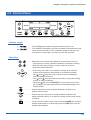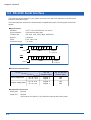
1
FC612-09 Series
CUTTING PRO
USER’S MANUAL
MANUAL NO. FC612-UM-152
PREFACE
Thank you for purchasing an FC612-09 Series Cutting Plotter. This plotter incorporates a digital servo
drive to perform cutting and plotting operations at high speed and high precision.
Besides being used to cut marking film and other media, this plotter can also be used as a pen plotter.
To ensure optimum use of its various functions, be sure to read this manual thoroughly before use.
Notes on the Use of This Manual
• All rights reserved. No part of this publication may be reproduced, stored in a retrieval system, or
transmitted, in any form or by any means, without the prior written permission of Graphtec
Corporation.
• The specifications and other information in this manual are subject to change without notice.
• While every effort has been made to supply complete and accurate information about this product,
please address any inquiries about unclear information, possible errors, or other comments to your
sales representative or nearest Graphtec vendor.
• Notwithstanding the preceding paragraph, Graphtec Corporation assumes no liability for damages
resulting from the use of the information contained herein or of the product.
Registered Trademarks and Copyrights
• The names of products and brands mentioned herein are the registered trademarks or trademarks
of their respective companies.
• All copyrights regarding this manual belong to Graphtec Corporation.
i
To ensure safe and correct use
TO ENSURE SAFE AND CORRECT USE
• To ensure safe and correct use of your plotter, read this Manual thoroughly before use.
• After having read this Manual, keep it in a handy location for quick reference as needed.
• Do not permit small children to touch the plotter.
• The following describes important points for safe operation. Please be sure to observe them strictly.
Conventions Used in This Manual
To promote safe and accurate use of the plotter as well as to prevent human injury and property
damage, safety precautions provided in this manual are ranked into the three categories described
below. Be sure you understand the difference between each of the categories.
DANGER
This category provides information that, if ignored, is highly likely to cause fatal or serious
injury to the operator.
WARNING
This category provides information that, if ignored, is likely to cause fatal or serious injury to
the operator.
CAUTION
This category provides information that, if ignored, could cause injury to the operator or
physical damage to the plotter.
Description of Safety Symbols
The
symbol indicates information that requires careful attention (which includes warnings).
The point requiring attention is described by an illustration or text within or next to the
symbol.
The
symbol indicates action that is prohibited. Such prohibited action is described by an
symbol.
illustration or text within or next to the
symbol indicates action that must be performed. Such imperative action is described
The
symbol.
by an illustration or text within or next to the
ii
To ensure safe and correct use
Safety Precautions
WARNING
During a plotting or cutting operation, do not
touch the writing panel, carriage, and other moving parts.
During a plotting or cutting operation, be sure to
keep your hands, hair, and so forth away from the
writing panel, carriage, and other moving parts.
• Such action may cause human injury.
• Such action may cause human injury.
No touching
No touching
Even when the plotter is stopped, it may suddenly
start operating if it receives data, so be sure to
keep your hands, hair, and so forth away from the
vicinity of the plotter's writing panel and moving
parts such as the pen carriage.
Be sure that the plotter is grounded.
• If the plotter is not grounded, the operator could suffer an electrical shock in case of current leakage.
• Such action may cause human injury.
Ground the Plotter
Keep away
Do not connect the plotter to a non-rated power
supply.
• Use of a different supply voltage
may result in electrical shock or a
fire hazard due to current leakage.
Do not disassemble, repair, or remodel the plotter.
• Such action may cause electrical shock or a fire
hazard due to current leakage.
• Contact with the high-voltage parts within the plotter
may cause electrical shock.
• If the plotter requires repair, contact your sales representative or nearest Graphtec vendor.
Use prohibited
If the plotter generates smoke, is too hot, emits a
strange odor, or otherwise functions abnormally,
do not continue using it. Turn off its power and
unplug its power cord from the electrical socket.
• Use of the plotter in such status may result in a fire
hazard or electrical shock.
• After confirming that smoke is no longer being generated, contact your sales representative or nearest
Graphtec vendor to request repair.
• Never try to perform repair yourself. Repair work by inexperienced personnel is extremely
dangerous.
Prohibited
No disassembly
Do not use the plotter in a location where it will
be exposed to water, rain or snow.
• Such location may cause electrical shock or a fire
hazard due to current leakage.
Avoid water
Beware of electrical shock
iii
To ensure safe and correct use
Safety Precautions (Continued)
WARNING
Do not allow dust or metallic matter to adhere to
the power plug.
• A dirty power plug may result in electrical shock or a
fire hazard due to current leakage.
Do not use the power cord if it is damaged.
• Use of a damaged cord may result in electrical
shock or a fire hazard due to current leakage.
• Replace the power cord with a new one.
Prohibited
Unplug the power
cord from the socket
Avoid direct contact with the cutter blade.
Beware of electrical shock
• Touching the blade with your bare hand may cause
injury.
• During a cutting operation, keep away from the cutter blade.
Avoid contact
CAUTION
Do not use or store the plotter in a location exposed to direct sunlight or the direct draft of an
air conditioner or heater.
• Such location may impair the performance of the
plotter.
Do not use or store the plotter in an excessively
dusty or humid location.
• Such location may impair the performance of the
plotter.
Prohibited
Prohibited
Do not place any receptacle containing water or
other fluid on top of the plotter.
• Fluid falling inside the plotter may cause electrical
shock or a fire hazard due to current leakage.
Do not install, use, or store the plotter in a location subject to excessive mechanical vibration or
electrical noise.
• Such location may impair the performance of the
plotter.
Avoid water
Prohibited
Beware of electrical shock
iv
To ensure safe and correct use
Safety Precautions (Continued)
CAUTION
When disconnecting the power cord or an interface cable, do not pull on the cord/cable.
• Such action will damage the cord/cable, resulting in
a fire hazard or electrical shock. Be sure to hold the
power cord’s plug or the interface cable’s connector.
If water or foreign matter enters inside the plotter,
do not continue using it. Turn off its power and
unplug its power cord from the electrical socket.
• Use of the plotter in such status may result in electrical shock or a fire hazard due to current leakage.
• Contact your sales representative or nearest Graphtec vendor to request repair.
Prohibited
Unplug the power
cord from the socket
Do not attempt to lubricate the plotter's mechanisms.
• Such action may cause it to break down.
Prohibited
When using the cutter, beware not to extend the
cutter's blade excessively.
Do not place diskettes, MO disks or similar on the
writing panel of models featuring magnetic media
hold-down.
• The magnetic force may destroy the data on the
diskettes or MO disks.
Prohibited
• An excessive blade length will damage the cutting
mat and impair the plotter’s cutting quality.
Move the pen carriage slowly when moving it
manually in order to load the medium or for other
reasons.
• Moving it quickly may damage the plotter.
Do not clean the plotter using a volatile solvent
(such as thinner or benzine).
• Such action may impair its performance.
Prohibited
v
To ensure safe and correct use
WARNING:
The United States Federal Communications Commission has specified that the following notice must be
brought to the attention of users of this product.
FEDERAL COMMUNICATIONS COMMISSION RADIO FREQUENCY INTERFERENCE
STATEMENT
NOTE : This equipment has been tested and found to comply with the limits for a Class A digital device,
pursuant to part 15 of the FCC Rules. These limits are designed to provide reasonable protection
against harmful interference when the equipment is operated in a commercial environment. This
equipment generates, uses, and can radiate radio frequency energy and, if not installed and used in
accordance with the instruction manual, may cause harmful interference to radio communications.
Operation of this equipment in a residential area is likely to cause harmful interference in which case
the user will be required to correct the interference at his own expense.
USE SHIELDED CABLES
To comply with FCC Class A requirements, all external data interface cables and connectors must be
properly shielded and grounded. Proper cables and connectors are available from GRAPHTEC’s
authorized dealers or manufacturers of computers or peripherals. GRAPHTEC is not responsible for
any interference caused by using cables and connectors other than those recommended or by
unauthorized changes or modifications to this equipment. Unauthorized changes or modifications could
void the user’s authority to operate the equipment.
vi
To ensure safe and correct use
Selecting a Power Cable
Be sure to refer to the following tables if you wish to use a cable other than the one supplied as an
accessory.
Table 1 100 V to 120 V Power Supply Voltage Range
Plug Configuration
Plug
Type
North
America
125 V
10 A
Supply
Voltage
Selector
Settings
Reference
Standards
100/120 V
ANSI C73.11
NEMA 5-15
UL498/817/62
CSA22.2
NO.42/21/49
Power Cable
UL Listed
Type SJT
No.18AWG × 3
300 V, 10 A
Table 2 200 V to 240 V Power Supply Voltage Range
Plug Configuration
Plug
Type
Supply
Voltage
Selector
Settings
Reference
Standards
Europe
250 V
10 A
200 V
CEE(7)VII
IEC320
CEE13
TYPE: H05VV-F
3 × 1.0 mm2
UK
250 V
5 A
200 V
BS1363
BS4491
BS6500
TYPE: H05VV-F
3 × 1.0 mm2
Australia
250 V
10 A
200 V
AS3112
AS3109
AS3191
TYPE: OD3CFC
3 × 1.0 mm2
North
America
250 V
15 A
200 V
ANSI C73.20
NEMA 6-15
UL 198.6
Switzerland
250 V
6 A
200 V
SEV1011
SEV1004
SEV1012
Power Cable
UL Listed
Type SJT
No.18AWG × 3
300 V, 10 A
TYPE: H05VV-F
3 × 0.75 mm2
vii
Introduction
Precautions on the Handling of Cutter Pens
This product uses a cutting blade. To prevent injuries (when replacing the cutter blade, installing the
cutter pen, etc.), take the following precautions when handling the cutter blade.
Cutter Blade
The blades are sharp. Be careful not to cut your fingers or prick yourself when
handling the cutter.
Blade tip
Return used blades to the accessory cutter blade case and throw them all out
together when the whole case has been filled.
Cutter Pen
The tip consists of a sharp blade. Do not extend it too far. When it is not in use,
cover it with the protective cap supplied.
Cutting blade
Protective cap
The methods for extending the blade and replacing it are described in Chapter 3
of this manual.
After Mounting the Cutter Pen
After the power has been turned on, and during operation, do not touch the pen
tip. It is dangerous.
viii
Introduction
Precautions After Turning On the Plotter
During operations, immediately after completion of operations, and when setting cutting plotter
functions, the pen carriage, Y bar, and other parts which are not fixed, may move suddenly. Do not let
your hands, hair, or clothing get too close to the moving parts or within their range of movement. Do
not place any foreign objects in or near these areas either. If your hands, hair, clothing, or the like get
caught in, or wrapped around moving parts, you may be injured and the machine may be damaged.
Daily Maintenance and Storage
During daily maintenance, pay particular attention to the following points.
1. Do not lubricate the plotter mechanisms.
2. To clean the plotter's casing, either wipe the soiled areas with a dry cloth or with a cloth that has
been dampened with a neutral detergent diluted with water.
CAUTION
Do not use paint thinner, benzine, alcohol, or similar solvents as they may damage the casing's
finish.
3. If the writing panel surface is soiled, wipe it with a dry cloth. If the surface is extremely dirty,
dampen the cloth with a diluted solution of neutral detergent or alcohol.
CAUTION
Do not use paint thinner, benzine, or similar solvents on the writing panel. They will damage the
surface.
When the plotter is not in use, follow the instructions listed below.
1. Remove the pen from the pen carriage and store it with the pen cap on.
2. Cover the plotter with the soft cover supplied or a cloth to keep dust off.
3. Store the plotter in a location which is not subject to either direct sunlight or high humidity.
ix
Contents
CONTENTS
PREFACE ....................................................................................................................................................... i
TO ENSURE SAFE AND CORRECT USE ................................................................................................... ii
Conventions Used in This Manual ............................................................................................. ii
Description of Safety Symbols ................................................................................................... ii
Safety Precautions ........................................................................................................................................ iii
Selecting a Power Cable .............................................................................................................................. vii
Precautions on the Handling of Cutter Pens ............................................................................................... viii
Cutter Blade ............................................................................................................................. viii
Cutter Pen ................................................................................................................................ viii
After Mounting the Cutter Pen ................................................................................................. viii
Precautions After Turning On the Plotter ...................................................................................................... ix
Daily Maintenance and Storage ................................................................................................................... ix
CHAPTER 1
PRODUCT SUMMARY
1.1
Model Names and Basic Specifications .................................................................................. 1-2
1.2
Standard Accessories ............................................................................................................. 1-2
1.3
Features .................................................................................................................................. 1-3
CHAPTER 2
DESCRIPTION OF PARTS AND FUNCTIONS
2.1
Plotter Nomenclature .............................................................................................................. 2-2
2.2
Control Panel .......................................................................................................................... 2-3
Indicator Lamps ...................................................................................................................... 2-3
Panel Keys .............................................................................................................................. 2-3
CHAPTER 3
CUTTER BLADES AND CUTTER PENS
3.1
Types of Cutter Blades and Their Features ............................................................................ 3-2
3.2
Cutter Pen Nomenclature ....................................................................................................... 3-3
3.3
Replacing the Cutter Blade ..................................................................................................... 3-4
Color of the blade length adjustment knob: Blue
(PPA31-CB09 cutter pen for 0.9 mm blades).......................................................................... 3-4
Color of the blade length adjustment knob: Red
(PPA31-CB15 cutter pen for 1.5 mm blades).......................................................................... 3-5
Color of the blade length adjustment knob: Green
(PPA31-CB15B cutter pen for 1.5 mm diameter blades fitted with a spring) .......................... 3-5
3.4
Adjusting the Blade Length ..................................................................................................... 3-6
Adjusting the Blade Length ..................................................................................................... 3-6
Obtaining the Correct Blade Length ....................................................................................... 3-6
3.5
Pen Types and Their Features ................................................................................................ 3-7
CHAPTER 4
4.1
PREPARATIONS FOR CUTTING/PLOTTING
Basic Operational Flow ........................................................................................................... 4-2
x
Contents
4.2
Mounting the Cutter Pen ......................................................................................................... 4-3
1-pen models .......................................................................................................................... 4-3
2-pen models .......................................................................................................................... 4-3
4.3
Adjusting the Pen Carriage Height ......................................................................................... 4-4
1-pen models .......................................................................................................................... 4-4
2-pen models .......................................................................................................................... 4-4
4.4
Turning On the Plotter and Initialization .................................................................................. 4-5
4.5
Loading the Medium ............................................................................................................... 4-6
Magnetic (models feature an ivory writing panel) ................................................................... 4-6
Vacuum suction (models feature a green writing panel) ......................................................... 4-6
Electrostatic adhesion (models feature a black writing panel) ................................................ 4-6
4.6
Setting the Cutting Conditions ................................................................................................ 4-7
4.7
Running a Cutting Test............................................................................................................ 4-9
4.8
Achieving Optimum Cutting Results ..................................................................................... 4-10
4.9
Setting the Cutting Origin ...................................................................................................... 4-12
4.10
Using the COPY Function ..................................................................................................... 4-13
CHAPTER 5
CUTTING/PLOTTING PROCEDURES AND FUNCTIONS (1)
5.1
PAUSE Menu Configuration .................................................................................................... 5-2
5.2
Setting the Pen Interval Adjustment Value (2-Pen Model) ...................................................... 5-3
5.3
Clearing the Buffer .................................................................................................................. 5-4
5.4
Raising/Lowering the Pen ....................................................................................................... 5-5
5.5
Moving the Pen Carriage to the Upper Right Position ............................................................ 5-6
5.6
Setting the Programmable Resolution (GP-GL mode only) .................................................... 5-7
5.7
RS-232C and Centronics Interface Settings ........................................................................... 5-8
5.8
Selecting the Command Mode ............................................................................................. 5-11
5.9
Setting the Origin in HP-GL™ Mode ..................................................................................... 5-12
5.10
Setting the Cutting Area ........................................................................................................ 5-13
5.11
Axis Alignment and Distance Adjustment ............................................................................. 5-15
5.12
Rotating the Coordinate Axes ............................................................................................... 5-18
5.13
Cutting Thick Sheets ............................................................................................................. 5-19
5.14
Cutting a Reversed Image .................................................................................................... 5-21
5.15
Scaling the Plotting Image .................................................................................................... 5-22
5.16
Assigning the Pen No. (2-Pen Model) .................................................................................. 5-23
CHAPTER 6
CUTTING/PLOTTING PROCEDURES AND FUNCTIONS (2)
6.1
Setting the Pen UP Speed ...................................................................................................... 6-2
6.2
Setting the Offset Cut Pressure (Offset Force) ....................................................................... 6-3
6.3
Adjusting the Blade Offset Angle ............................................................................................ 6-4
6.4
Setting the Step Pass ............................................................................................................. 6-5
6.5
Setting the Displayed Length Unit .......................................................................................... 6-6
6.6
Adjusting the Distance Correction .......................................................................................... 6-7
xi
Contents
6.7
Using the Special Functions ................................................................................................... 6-8
CHAPTER 7
7.1
TEST MODES AND TROUBLESHOOTING
Listing the Cutting Conditions ................................................................................................. 7-2
Sample printout by the CONDITION function ......................................................................... 7-3
7.2
Running the Self Test .............................................................................................................. 7-4
7.3
Using the Character Dump Mode ........................................................................................... 7-5
7.4
Troubleshooting ...................................................................................................................... 7-6
The Plotter is Turned On But Doesn't Operate ....................................................................... 7-6
The Cutting Results are Unsatisfactory .................................................................................. 7-7
7.5
Error Messages and Their Causes ......................................................................................... 7-9
Error messages in GP-GL command mode .......................................................................... 7-10
Error messages in HP-GL emulation mode .......................................................................... 7-11
CHAPTER 8
INTERFACES
8.1
Centronics-Compatible Parallel Interface ............................................................................... 8-2
8.2
RS-232C Serial Interface ........................................................................................................ 8-4
CHAPTER 9
VACUUM SUCTION
9.1
Selecting the Vacuum Pump ................................................................................................... 9-2
9.2
Installation Location ................................................................................................................ 9-3
9.3
Vacuum Pump Wiring ............................................................................................................. 9-4
CHAPTER 10 SPECIFICATIONS
10.1
Main Specifications ............................................................................................................... 10-2
10.2
External Dimensions ............................................................................................................. 10-3
INDEX ........................................................................................................................................................ i-1
xii
CHAPTER
1
PRODUCT SUMMARY
1.1
1.2
1.3
Model Names and Basic Specifications
Standard Accessories
Features
Chapter 1 Product summary
1.1 Model Names and Basic Specifications
The FC612-09 series comprises the following models.
Model
FC612-09M1
FC612-09M2
FC612-09V1
FC612-09V2
FC612-09E1
FC612-09E2
No. of pens
1
2
1
2
1
2
Media hold-down method
Cutting area
Magnetic
Vacuum suction
900 (X) × 1220 (Y) mm
Electrostatic adhesion
1.2 Standard Accessories
Item
Power cable
Cutter pen set
Water based fiber-tip pen
Paper
Cutter loupe
Soft vinyl cover
Sheet holder plates
Hexagon wrench
Height adjustment plates
Paper alignment seals
Durable flexible hose
Hose band
Vacuum pump
installation base
User’s manual
CD-ROM
Description
PPA31-CB15B, CB15U-2SP
KF550
PL525-A2-KP Measurement paper
For M models only
(2 large, 2 medium, 4 small)
For M4 bolts
10 mm, 4 mm height
For V models only; 1.5 m to 5 m
(can expand/contract)
Connection bore: 2-inch
For V models only;
for 2-inch diameter hose
For V models only
This manual
Driver, other software
Q'ty
1
1 set
1
1 pack
1
1
1 set
1
1 of each
1 pack
1
2
1
1
1
CAUTION
• The vacuum pump is an option. It is not provided with the V models.
• Make sure that the vacuum pump used with a V model is affixed with either a label
showing compliance with the relevant safety standard or with the CE marking.
1-2
Chapter 1 Product summary
1.3 Features
1. The Cutter Offset feature provides a sharply-defined cutting edge.
2. Cutting can be performed at a maximum speed of 400 mm per second, and the cutting pressure can
be freely selected within a 40-step range. A maximum acceleration of 0.6 G decreases overall
cutting time.
3. This unit can cut not only masking film, but also thick paper, rubber for sandblasting, and other
media. Therefore, point-of-purchase (POP) signs, signboards, and other artwork can easily be
produced.
4. Price cards and posters can be made using fiber-tip pens.
1-3
Chapter 1 Product summary
5. The standard 1-Mbyte buffer RAM unit greatly reduces load on the host computer.
6. The FC612-09 series uses a digital servo drive system for highly precise cutting results at high
speed.
7. Cutter blade replacement is straight-forward.
1-4
CHAPTER
2
DESCRIPTION OF PARTS AND
FUNCTIONS
2.1
2.2
Plotter Nomenclature
Control Panel
Chapter 2 Description of parts and functions
2.1 Plotter Nomenclature
The names of the plotter parts are as follows.
Writing panel
Y bar
Pen carriage
CHART HOLD key
Control panel
Rear view of
the main box
Interface connector
Stand
Power inlet
Power switch
2-2
Chapter 2 Description of parts and functions
2.2 Control Panel
Indicator Lamps
......... The POWER lamp remains lit (green) while the plotter is on.
....... The PROMPT lamp lights (red) when the plotter receives data that will
cause the pen carriage to move outside the effective cutting area or
receives the “Prompt Light” command (T) from the computer.
Panel Keys
......... Depending on the menu being displayed, these keys are used to:
• Load a group of cutting conditions retained in the plotter's memory;
• Shift the cursor when setting a numeric value for a function;
• Select the desired submenu.
......... • All four keys are used to move the pen carriage when setting a
function that requires the specification of a coordinate position.
• The [ ] and [ ] keys are used to raise or lower the displayed
numeric setting of a function.
• The [ ] and [ ] keys are used to select the pen type when setting
a group of cutting conditions.
• Press the [ ] key and the [ENTER] key concurrently to move the
pen carriage to the upper right position and facilitate loading of the
cutting medium.
............... Used to repeat the cutting operation defined by the data in the
plotter's receive buffer.
............... Used to set the four groups of cutting conditions retained in the
plotter's internal memory or to select one group as the current cutting
conditions.
............... To set a function at the control panel, press the [PAUSE] key to select
PAUSE mode and then consecutively press the [NEXT] key until the
desired menu appears.
2-3
Chapter 2 Description of parts and functions
............... Press the [PAUSE] key to select PAUSE mode (its green lamp lights)
and temporarily suspend a cutting or plotting operation. Press it again
to cancel PAUSE mode (the lamp goes off).
Select PAUSE mode to set functions at the control panel or to store
data from the computer in the plotter's receive buffer.
............... After setting a function at the display panel, press the [ENTER] key to
register your setting.
To reset the plotter, concurrently press the [ENTER] and [ORIGIN]
keys.
............... Runs a cutting test to check whether the currently selected cutting
conditions are compatible with the medium loaded.
............... Used to move the origin point.
To reset the plotter, concurrently press the [ENTER] and [ORIGIN]
keys.
2-4
CHAPTER
3
CUTTER BLADES AND CUTTER PENS
3.1
3.2
3.3
3.4
3.5
Types of Cutter Blades and Their Features
Cutter Pen Nomenclature
Replacing the Cutter Blade
Adjusting the Blade Length
Pen Types and Their Features
Chapter 3 Cutter blades and Cutter pens
3.1 Types of Cutter Blades and Their Features
CAUTION
Handle cutter blades with care!
Blade type
Blade features
Supersteel blades
CB15U(ø1.5)
CB15U-K30(ø1.5)
CB15U-SP(ø1.5)
CB15U-K30-SP(ø1.5)
CB09UA(ø0.9)
3-2
• Less expensive than other types of
blades
• The maximum cutting distance is
about 4000 m (depending on the
medium and cutting pressure used).
• The spring ensures that the blade is
lifted clear of the cutting medium
when the pen is raised.
Note:
The CB15U-K30 and CB15U-K30-SP
blades are designed for use with thick
media e.g. rubber for sandblasting.
Chapter 3 Cutter blades and Cutter pens
3.2 Cutter Pen Nomenclature
CAUTION
Handle cutter blades with care!
Structure of the PPA31-CB09 Cutter Pen
(for cutter blades of 0.9 mm diameter)
Protective cap
Plunger
Holder A
Spring
Cutter blade*
Holder B
Plunger cap
Blade length adjustment knob (blue)
* The CB09UA supersteel blade is shown in the figure above.
Structure of the PPA31-CB15 Cutter Pen
(for cutter blades of 1.5 mm diameter)
Protective cap
Plunger
Holder A
Cutter blade* Holder B
Plunger cap
Blade length adjustment knob (red)
* The CB15U supersteel blade is shown in the figure above.
Structure of the PPA31-CB15B Cutter Pen
(for cutter blades of 1.5 mm diameter)
Protective cap
Plunger
Holder A
Spring
Cutter blade*
Holder B
Plunger cap
Blade length adjustment knob (green)
* The CB15U-SP supersteel blade is shown in the figure above.
3-3
Chapter 3 Cutter blades and Cutter pens
3.3 Replacing the Cutter Blade
There are three types of cutter pen. Each type has different diameter blades. The blade diameter is
indicated by the color of the blade length adjustment knob as shown in the table below. When replacing
the cutter blade, check the table below to ensure that you are using the correct combination of cutter
pen and cutter blade.
CAUTION
Handle cutter blades with care!
Color of the
adjustment knob
Cutter pen
part no.
Blue
PPA31-CB09
Red
PPA31-CB15
Green
PPA31-CB15B
Compatible blade types
Diameter
Part no.
Material
0.9 mm
CB09UA
Supersteel
CB15U
Supersteel
1.5 mm
CB15U-K30
Supersteel
CB15U-SP
Supersteel
1.5 mm
CB15U-K30-SP Supersteel
Replacing the Blade
The procedure for blade replacement varies with the type of cutter pen used.
Color of the blade length adjustment knob: Blue
(PPA31-CB09 cutter pen for 0.9 mm blades)
Holder (B)
1. Remove holder (B) by turning the blade length adjustment knob in the
counterclockwise direction.
2. Remove the blade and spring from holder (A).
3. Attach the spring to the new blade. Next, with the tip of holder (A) facing
downward and at an angle as shown, insert the new blade with the spring into
the plunger.
Plunger
Holder (A)
(Inside plunger body)
4. Make sure the blade is inserted straight into the holder. If the blade is
positioned at an angle, gently tap the plunger to correct the orientation of the
blade.
5. With the tip of holder (A) facing downward, replace holder (B) and then turn the
blade length adjustment knob in the clockwise direction until the blade tip is
visible.
6. Using your finger, check that the cutter blade rotates smoothly inside the cutter
pen.
CAUTION
3-4
Be careful not to stab your finger at this time.
Chapter 3 Cutter blades and Cutter pens
Color of the blade length adjustment knob: Red
(PPA31-CB15 cutter pen for 1.5 mm blades)
Holder (B)
1. Remove holder (B) by turning the blade length adjustment knob in the
counterclockwise direction.
2. Remove the blade from holder (A).
3. With the tip of holder (A) facing downward as shown, insert the new blade.
4. Make sure the blade is inserted straight into the holder. If the blade is
positioned at an angle, gently tap the plunger to correct the orientation of the
blade.
Plunger
5. With the tip of holder (A) facing downward, attach the holder cap and then turn
the blade length adjustment knob in the clockwise direction until the blade tip is
visible.
6. Using your finger, check that the cutter blade rotates smoothly inside the cutter
pen (be careful not to stab your finger at this time).
Holder (A)
(Inside plunger body)
7. If the blade does not rotate smoothly or the blade falls off after attaching the
cutter pen to the pen carriage, the inside of the holder is insufficiently lubricated.
In this case, apply the grease provided to the three points indicated by arrows in
the figure.
CAUTION
Be careful not to stab your finger at this time.
Color of the blade length adjustment knob: Green
(PPA31-CB15B cutter pen for 1.5 mm diameter blades fitted with a spring)
1. Remove holder (B) by turning the blade adjustment knob in the
counterclockwise direction.
Holder (B)
2. Remove the blade and the spring from holder (A).
3. With the plunger held at an angle, and with the plunger cap pointing upward,
insert the blade with its spring attached into the plunger. Take care that the
spring does not fall off the blade.
Plunger
4. Make sure that the blade is inserted straight into the plunger. If the blade is
Holder (A)
inserted at an angle, gently tap the plunger to correct the orientation of the
(Inside plunger body)
blade.
5. With the plunger still in the upright position, insert the holder cap until you hear it
click into place. Turn the blade adjustment knob in the clockwise direction to
adjust the length of the blade.
CAUTION
Be careful not to stab your finger at this time.
3-5
Chapter 3 Cutter blades and Cutter pens
3.4 Adjusting the Blade Length
CAUTION
Be sure to correctly adjust the blade length. If the blade length is too long for the
thickness of the medium being used, you may damage the writing panel and the
blade.
Adjusting the Blade Length
1. Before adjusting the blade length, align the blade tip with the tip of the cutter pen
by turning the red, blue, or green blade adjustment knob in the B direction (see
the figure below)
2. Next, extend the blade tip to the length suitable for the medium to be used by
turning the blade adjustment length in the A direction.
Observe the scale on the plunger cap to determine how far to move the blade.
When the knob is turned the distance of one scale unit, the blade moves 0.1
mm. When it is given one full turn, the blade moves 0.5 mm.
a. To extend the blade, turn the knob in the A direction.
b. To retract the blade, turn it in the B direction.
B
A
Obtaining the Correct Blade Length
r” should be equal to
1. Assuming that the film thickness is “ t ”, the blade length “r
r” is never greater than the combined thickness of the film
“ t ”. Make sure that “r
and its backing sheet.
Film
R t
Backing sheet
If the film thickness cannot be accurately determined, adjust the blade length by
gradually increasing it until only traces of the blade appear on the backing sheet
when a cutting test is executed.
For more information about the cutting test, see Section 4.7, “Running a Cutting
Test.”
3-6
Chapter 3 Cutter blades and Cutter pens
3.5 Pen Types and Their Features
Pen types
Pen features
Water based fiber-tip pens (KF550 series)
Pen ID ring
• 8 colors are available
• Line width ranges from 0.3 to 0.7 mm
• Easier to handle than other pen types
• Maximum plotting distance: approx. 1000 m
Recommended media: coated paper,
measurement paper
Oil-based ballpoint pens (KB130 Series)
PHP33-BALL
Ballpoint pen plunger
main unit
KB130 Series
Ballpoint pen cartridge
PHP33-BALL
Ballpoint pen plunger
end fitting
Assembled ballpoint pen plunger
Recommended media: coated (glossy) paper
PHP32-BALL
Ballpoint pen plunger
main unit
KB130 Series
Ballpoint pen cartridge
PHP32-BALL
Ballpoint pen plunger
end fitting
Assembled ballpoint pen plunger
Recommended media: coated (glossy) paper
• Suitable for plotting detailed text and images.
• The tip will dry up if the pen is left unused for
a long period of time. Check that the ink is
flowing well before using the pen.
• The maximum pen speed is 64 cm/s (40 cm/s
when using an FC612-09 series cutting
plotter).
• A ballpoint pen plunger is required (PHP33BALL/PHP32-BALL)
• Consistent line width (0.2 to 0.3 mm)
Assembling the pen
1. Insert the KB130 series ballpoint pen
cartridge into the PHP33-BALL or PHP32BALL plunger main unit, and then screw on
the plunger end fitting.
2. If the pen is left unused for a long period of
time, the pen tip will dry out. Test the pen on
some scrap paper to check that the ink is
flowing well before using it in the plotter.
Usage precautions
The ballpoint pen’s inherent characteristics
may cause scratchy plotted lines.
Please follow the guidelines below.
1. Use coated (glossy) paper only. Scratching
occurs more easily on tracing paper or
polyester film.
2. If scratching does occur, reduce the plotting
speed to around 20 cm/s.
3. Avoid replotting over the same line. Paper
fibers may become caught in the pen tip and
cause scratchy plotting.
4. Use only KB130 series ballpoint pens.
5. Clean out the plunger regularly. Dust or dirt
will affect the up/down movement of the pen,
and adversely affect the plotted results.
3-7
Chapter 3 Cutter blades and Cutter pens
Pen type
Pen features
Disposable ink pen (SD500 series)
Plunger A
Plunger
Pen tip
Ink reservoir
Cap
Recommended media: tracing paper, polyester
film, measurement paper
3-8
• Line width can be selected (0.2, 0.3, 0.5, or
0.7 mm diameters).
• Suitable for detailed drafting
• Easier to handle than refillable ink pens
because the ink reservoir and pen tip are
disposable.
• Maximum plotting speed: 30 cm/s (20 cm/s
for 0.2 mm diameter pen tip)
• An ink pen plunger (PHP33-INK) is required.
Assembling the pen (7 steps)
1. Screw the pen tip into the ink reservoir, using
the cap as shown in the figure on the left.
2. To draw ink into the pen tip, hold the pen
with its tip downward and shake it gently up
and down.
3. Test the pen on some scrap paper. If the ink
does not flow well, repeat Step 2.
4. Screw the plunger into Plunger A as far as it
will go.
5. Finally, screw the pen firmly into the plunger.
6. Remove the pen from the plunger and put
the cap on after use.
7. If the ink does not flow smoothly after some
period of use, gently tap the bottom of the
pen a couple of times until the ink flows
down into the pen tip. (Be careful. Ink may
splatter from the pen tip.)
CHAPTER
4
PREPARATIONS FOR
CUTTING/PLOTTING
4.1
4.2
4.3
4.4
4.5
4.6
4.7
4.8
4.9
4.10
Basic Operational Flow
Mounting the Cutter Pen
Adjusting the Pen Carriage Height
Turning On the Plotter and Initialization
Loading the Medium
Setting the Cutting Conditions
Running a Cutting Test
Achieving Optimum Cutting Results
Setting the Cutting Origin
Using the COPY Function
Chapter 4 Preparations for cutting/plotting
4.1 Basic Operational Flow
For smooth operation, please follow the steps outlined below and make the appropriate settings
explained in the relevant sections.
1. Before turning on the power supply, make sure that the plotter is connected to
your computer.
2. Mount the cutter pen, and adjust the height of the pen carriage.
a 4.2 Mounting the Cutter Pen
a 4.3 Adjusting the Pen Carriage Height
CAUTION
The cutter blade tip is very sharp. Before handling a cutter
blade, be sure to read the sections ‘To Ensure Safe and
Correct Use’ and ‘Precautions on the Handling of Cutter Pens’
at the front of this manual.
3. Turn on the power supply to the plotter and your computer.
a 4.4 Turning on the Power and Initialization
CAUTION
The moment you turn the power on, the plotter’s Y bar and
pen carriage will start to move. Do not put your hands or
place any objects on the writing panel.
4. Load the medium.
a 4.5 Loading the Medium
5. Make the following settings at your computer and the plotter.
a 5.6 Setting the Programmable Resolution
a 5.7 RS-232C and Centronics Interface Settings
a 5.8 Setting the Command Mode
a 4.6 Setting the Cutting Conditions
a 4.7 Running a Cutting Test
a 4.8 Achieving Optimum Cutting Results
6. Send the cutting data from your computer to the plotter to start the cutting
operation.
CAUTION
4-2
The Y bar and pen carriage will start to move as soon as data
is sent from the computer, or shortly thereafter. Do not put
your hands or place any objects on the writing panel.
Chapter 4 Preparations for cutting/plotting
4.2 Mounting the Cutter Pen
CAUTION
Push the pen all the way to the pen stopper section.
Take care not to touch the blade tip during the mounting operation.
1-pen models
1. Loosen the pen holder screw and mount the pen.
2. After mounting the pen, tighten the screw.
2-pen models
• Mount each of the pens in the same way as that used for 1-pen models.
• When facing the pens, the left pen is designated as No. 1 and the right pen is
designated as No. 2.
CHECKPOINT
When mounting one cutter pen and one plotter pen, mount the
cutter pen as the No. 2 pen.
No. 2 pen
No. 1 pen
(Pen attaching example)
4-3
Chapter 4 Preparations for cutting/plotting
4.3 Adjusting the Pen Carriage Height
1-pen models
Initial adjustment of the pen carriage height
1. Use the hexagon wrench to loosen the height adjustment bolt.
2. When the pen carriage can be moved freely up and down, insert the height
adjustment plate (thick) under the pen carriage. Adjust the height of the pen
carriage so that the pen carriage rests on top of the plate.
3. Use the hexagon wrench to tighten the height adjustment bolt. Make sure that
the pen carriage is parallel to the writing panel.
4. When the adjustment is complete, remove the height adjustment plate (thick)
from under the pen carriage.
Height adjustment during cutter pen installation
1. Loosen the pen holder section screw and mount the pen.
2. Insert the height adjustment plate (thin) under the pen and adjust the height.
3. After mounting the pen, tighten the screw.
4. When the adjustment is complete, remove the adjustment plate (thin) from
under the pen.
2-pen models
The pen height is adjusted in the same manner as that used for 1-pen models.
CHECKPOINT
4-4
Always make sure that the writing panel is in a horizontal position
before making this adjustment. When cutting thick media, place
the medium on the writing panel before making this adjustment.
Chapter 4 Preparations for cutting/plotting
4.4 Turning On the Plotter and Initialization
CAUTION
Do not put your hands on the writing panel while turning on the plotter.
The moment you turn the power on, the plotter's Y bar and pen carriage will start to
move.
Operations:
1. Make sure that the “O” (OFF) side of the power switch is pressed down.
2. Securely plug the connector end of the power cord into the plotter's power inlet.
3. Securely plug the other end of the power cord connector into an electrical outlet
of the specified voltage.
4. Press the “I” (ON) side of the power switch.
5. The green power lamp on the control panel will light, and the Y bar and pen
carriage will start to move as shown in the figure below. These operations are
part of the initialization process.
The figure below shows what the plotter does when the power is turned on.
The pen carriage returns to the origin point for plotting, and then moves back
and forth twice at a 45° angle from the origin to determine the friction coefficient
of the plotter mechanisms.
1
2
6
3
7
5
4
8
9
6. When the initialization process is complete, the plotter is ready to begin plotting
or cutting.
4-5
Chapter 4 Preparations for cutting/plotting
4.5 Loading the Medium
CHECKPOINT
1. This plotter is available with a magnetic writing panel, a vacuum suction writing
panel, or an electrostatic writing panel. Note the medium is loaded differently
depending on the media hold-down method.
2. If air gets in between the writing panel and the medium during loading, force out
the air and ensure that the medium is securely attached to the writing panel before
cutting.
3. When loading a medium with no backing sheet, spread a vinyl backing sheet or
something similar on the panel before cutting.
4. When loading a medium that cannot be securely attached using the basic holddown method, reinforce adhesion by using tape on all four sides.
5. Common spray glue is often used for this purpose. However, since the spray glue
remover contains an anti-static agent, do not use it directly on the writing panel of
models which feature electrostatic media hold-down.
Magnetic (models feature an ivory writing panel)
1. Place the medium on the writing panel.
2. Secure the edges of the medium with the steel holder plates, which are supplied
with your plotter as standard accessories.
Vacuum suction (models feature a green writing panel)
1. Place the medium on the writing panel.
2. Turn on the vacuum pump's power supply.
CHECKPOINT
1. Be sure to select a vacuum pump which is affixed with either a
label showing compliance with the relevant safety standard or
with the CE marking.
2. Before connecting the vacuum pump to a power supply, be sure
to read CHAPTER 9 and follow the instructions accordingly.
3. Refer to CHAPTER 9 for pump connection instructions. Be sure
to connect the hose and hose bands securely.
Electrostatic adhesion (models feature a black writing panel)
1. Make sure the power is turned ON.
2. Place the medium on the writing panel.
3. Press the [CHART HOLD] key on the control panel.
4. The green [CHART HOLD] key lamp lights to indicate that the medium is being
held by electrostatic adhesion.
CHECKPOINT
1. Press the [CHART HOLD] key again to release the electrostatic
adhesion. The green lamp will no longer be lit.
2. After the medium has been held for a while by electrostatic
adhesion, it may become charged with static electricity and
therefore be harder to remove from the writing panel. There is
nothing abnormal about this phenomenon.
4-6
Chapter 4 Preparations for cutting/plotting
4.6 Setting the Cutting Conditions
This function lets you register four different groups of cutting conditions in the plotter's memory, which is
useful when using the plotter with multiple software applications. The desired group can be quickly
loaded by simply pressing the corresponding numeric key [1] through [4] at the control panel.
Cutting Conditions
Each group of cutting conditions consists of the following four parameters.
• FORCE
• SPEED
• OFFSET
• QUALITY
The description of each cutting condition is as follows.
• FORCE
Sets the pressure to be applied by the cutter blade or pen tip against the loaded medium during
cutting or plotting.
• SPEED
Sets the traveling speed of the lowered pen during cutting or plotting.
• OFFSET (in cutting mode only)
Sets the offset of the cutter blade's tip from the center of the cutter pen. Your plotter comes with a
preset offset adjustment value for each blade type. To set the blade offset adjustment, select the
type of cutter blade you will be using.
For fine adjustment of the cutter offset, set the blade type to OTHER. If the offset value is set to 0,
the plotter goes into plotting mode.
• QUALITY
Sets the acceleration rate of the pen during cutting or plotting.
The selected conditions greatly affect the finished quality of cutting operations.
Tip
• Raising the SPEED and QUALITY values results in lower precision but reduces the
overall cutting time. This is useful when making test runs.
• Lowering the SPEED and QUALITY values results in higher precision but increases
the overall cutting time.
Procedure
To change the settings of a group of cutting conditions, press the numeric key [1] through [4]
corresponding to the number of the group you wish to change.
1. Press the [CONDITIONS] key. The lower row of the display changes from “READY” to “SET
COND”.
2. A menu similar to the example below is displayed. In this example, the factory default setting
COND 2 has been selected. (Items displayed may differ for other COND numbers).
FORCE
Blinking cursor
1 4 CON D 2
2 0 S E T CON D
SPEED
OFFSET
0 9U 0
3
QUALITY
4-7
Chapter 4 Preparations for cutting/plotting
3. Move the blinking cursor next to the setting you wish to change.
4. The cursor will move each time you press one of the numeric keys [1] to [4].
5. Change the displayed setting next to the blinking cursor as follows.
To raise a numeric value, press the [ ] key.
To lower a numeric value, press the [ ] key.
6. Press the [3] key to select the blade type. Use the [ ] or [ ] key to move through the selection.
The table below describes the specifiable range for each condition.
Condition
FORCE
SPEED
OFFSET
QUALITY
Range
1 to 40
1 to 40
-5 to +5
1 to 6
Remarks
40 steps
40 steps in cm/s units.
Select 0 for automatic adjustment according to the blade type.
The lower the number, the higher the quality.
7. When all of the displayed settings are correct, press the [ENTER] key to register the group of
conditions in the plotter's internal memory. To change any of the settings, press the [NEXT] key.
Use the [TEST] key to perform test cutting. Adjust the OFFSET value to suit the type and
thickness of the medium being used, and fine-adjust the finish of the corner sections.
OFFSET is too low.
Increase the
OFFSET value.
(+1 to +5)
Correct
OFFSET
OFFSET is too high.
Decrease the
OFFSET value.
(-1 to -5)
• If [OTHER] has been specified as the blade type, the OFFSET value can be set in a range of 1 to
45.
• The OFFSET value is not displayed for plotting mode.
CHECKPOINT
• Your settings are retained even while the plotter is turned off.
• Before you actually begin cutting, be sure to check that your cutting conditions
are appropriately set as described in Section 4.2 “Running a Cutting Test”.
• The FORCE and SPEED values, in particular, should be initially set to low
values and gradually raised while running cutting tests.
Factory Presets
Setting condition No. Cutting force Speed
1
12
20
2
14
20
3
17
20
4
25
5
CHECKPOINT
4-8
Blade type Cutter offset
_
Pen
09U
0
15U
0
15U
0
Quality
3
3
3
1
Display mode
Plotter mode
Cutter mode
Cutter mode
Thick sheet mode
For a 2-pen block, Condition No.1 (plotter mode) is assigned to Pen 1, and
condition Nos. 2, 3, 4 (thick sheet mode) are assigned to Pen 2.
Chapter 4 Preparations for cutting/plotting
4.7 Running a Cutting Test
CAUTION
The cutter pen starts moving as soon as a cutting test is selected.
To avoid injury to yourself and damage to the plotter, load the medium before
pressing the [TEST] key and then keep your hands, face, and other obstacles out of
the vicinity of the pen carriage.
The TEST function allows you to check the suitability of your condition settings. If the test results are
not satisfactory, adjust the settings as described in Section 4.6, “Setting the Cutting Conditions.”
Procedure
1. Press the [TEST] key to put the plotter into TEST mode.
2. The following menu is displayed.
FORCE
OFFSET
TEST 1
C U T T I NG P RO
SPEED
TEST 1
TEST 2
QUALITY
: As soon as the [1] key (TEST1) is pressed, one triangle inside a square is cut
from the current pen position.
CUTTING PRO : When the [2] key (CUTTING PRO) is pressed, the display changes to the
CUTTING PRO prompt menu.
TEST2
: As soon as the [3] key (TEST2) is pressed, three triangles within squares are
consecutively cut from the current pen position. The first triangle is cut with the
specified force -1, the second triangle is cut with the specified force, and the
third triangle is cut with the specified force +1.
3. If the [2] key (CUTTING PRO) is pressed, the following menu is displayed.
FORCE
C U T T I NG P RO
YES
SPEED
OFFSET
OK ?
NO
QUALITY
4. Press the [2] key to begin cutting out the CUTTING PRO characters from the current pen
position.
Press the [4] key to return to the previous display.
5. Press the [ENTER] key or the [NEXT] key to return to the initial menu.
When setting conditions are changed
1. Press the [CONDITIONS] key and adjust your settings.
2. Press the [TEST] key to put the plotter into TEST mode. Run a cutting test.
Repeat this process until you achieve the desired results.
3. Press the [ENTER] key or [NEXT] key to return to the initial menu.
4-9
Chapter 4 Preparations for cutting/plotting
4.8 Achieving Optimum Cutting Results
The quality of cutting operations is determined by the settings of the five parameters below.
• Blade length
Adjust the blade length according to the thickness of the medium (see Section 3.4, “Adjusting the
Blade Length”).
• Cutting force • Cutting speed • Cutting quality
Set these conditions according to the combination of medium and cutter blade you are using (see
Section 4.6, “Setting the Cutting Conditions”).
• Cutter offset
Set this condition according to the type of cutter blade you are using (see Section 4.6, “Setting the
Cutting Conditions”).
To ensure optimum cutting results, be sure to set the above parameters in conformance with the
guidelines provided in the tables below.
Cutting Conditions for Cutter Pens
Cutting Conditions by Medium
Cutting medium
Adhesive film
indoor
outdoor
Fluorescent film
Masking film for block
copy production
Rubber for sandblasting
Thick paper
Thickness
(mm units)
0.1
0.05 to 0.1
0.2 to 0.25
Blade type
FORCE
SPEED
QUALITY
Supersteel
CB09UA
CB15U
CB15U-SP
14 to 17
10 to 14
16 to 20
30 or more
30 or more
30 or more
3
3
3
5 to 7
5 to 20
2
21 to 34
28 to 38
Up to 10
3 to 13
1
1
0.01 to 0.1
Up to 1
Up to 0.5
CB15U-K30
CB15U-K30-SP
Cutter Offset by Blade Type
Material & Blade Number
Supersteel
Other
CB09UA
CB15U
CB15U-SP
CB15U-K30
CB15U-K30-SP
Blade type
09U
15U
15U
15U-K30
15U-K30
OTHER
Panel display
OFFSET
Default
Setting range
0
±5
0
±5
0
±5
0
±5
0
±5
18
1 to 45
When using a blade type that is not listed in the table above or when a cutting operation using a thick or
otherwise difficult to cut medium produces unsatisfactory results, set the blade type to OTHER and then
alternately adjust the OFFSET value and run a cutting test until the desired results are achieved.
4-10
Chapter 4 Preparations for cutting/plotting
The table below lists sample OFFSET settings when the blade type is set to OTHER.
Actual blade type
CB09UA
CB15U
CB15U-SP
CB15U-K30
CB15U-K30-SP
OFFSET value
17
28
28
28
28
4-11
Chapter 4 Preparations for cutting/plotting
4.9 Setting the Cutting Origin
This function allows you to move the starting point of cutting to the desired position as shown in the
figure below.
Newly selected origin
Cutting from the new origin
Cutting from the original origin
Y
X
Original origin
Procedure
1. Use the POSITION (
,
,
,
) keys to move the cutter pen to the desired origin position.
2. Press the [ORIGIN] key. The beeper sounds to indicate that the new origin has become
effective.
When the ROTATE or MIRROR mode is selected or cancelled, the displacement of the new origin
is reset to its default position.
If you intend to use the ORIGIN function in combination with the ROTATE or MIRROR function, be
sure to set the ORIGIN function after setting the ROTATE or MIRROR function.
Tip
4-12
The coordinates being displayed on the LCD represent displacements along the X and
Y axes from the original origin.
Chapter 4 Preparations for cutting/plotting
4.10 Using the COPY Function
This function allows you to automatically cut duplicates of the data sent from the computer. Once the
data has been stored in the plotter's receive buffer, it can be repeatedly cut.
Procedure
1. Perform a cutting operation to enable the data to be stored in the plotter's buffer.
2. Use the POSITION ( , , ,
for cutting (the COPY origin).
) keys to move the cutter pen to the desired starting position
3. Press the [COPY] key to select COPY mode.
The submenu below appears.
FORCE
OFFSET
CO P Y MOD E
COU N T
1
SPEED
QUALITY
4. Use the [ ] or [ ] key to set the desired number of copies to be made.
Be sure to set the number of copies no higher than the maximum number of copies that can be
cut out of the currently loaded medium.
5. Press the [ENTER] key to start making copies.
6. If you wish to set the spacing between copies, press the [COPY] key again.
7. The submenu below appears to set the spacing between copies.
FORCE
OFFSET
CO P Y S P A C E
1 mm
SPEED
QUALITY
8. Use the [ ] or [ ] key to set the spacing between copies in a range of 1 to 10 mm.
Your COPY SPACE setting is registered in the plotter's internal memory and retained even while
the plotter is turned off.
9. Press the [ENTER] key to return to the display shown in Step 3.
10. Press the [ENTER] key.
11. The “COPY” message is displayed and the plotter begins cutting the specified number of
copies.
12. If you wish to continue cutting more copies, reload a cutting medium and start over again from
setting the number of copies.
13. If the data to be copied will not fit within the effective cutting area, the message below appears.
FORCE
OFFSET
C A N NO T CO P Y !
SPEED
QUALITY
14. In this case, use the POSITION keys to move the origin or replace the loaded medium with a
larger sheet.
4-13
Chapter 4 Preparations for cutting/plotting
The Copying Sequence
The following figures illustrate the sequence in which copies are cut, with the shaded areas
representing the parts of the medium that are not cut.
Copies are normally cut in the sequence shown below.
5th copy
4th copy
3rd copy
2nd copy
COPY
space
1st copy
Original cut
6th copy
COPY origin (the point at which copying starts)
Y
X Origin
When MIRROR mode is selected, copies are cut as follows.
Original cut
1st copy
6th copy
2nd copy
3rd copy
4th copy
5th copy
Y
X
When ROTATE mode is selected, copies are cut as follows.
Original cut
2nd copy
1st copy
3rd copy
Y
X
4-14
4th copy
5th copy
6th copy
Chapter 4 Preparations for cutting/plotting
CHECKPOINT
• Selection of the MIRROR or ROTATE mode remains valid even after the
cutting medium is reloaded.
• While a copy operation is in progress, do not send new data to the plotter.
• Be sure to specify the position of the original cut as close to the origin point
as possible. The distance between the original cut and the first copy is the
same as the distance between the original cut and the origin.
• If there is an interval of 10 seconds or greater when data is sent, the
previous data is cleared.
• Data which exceeds 1 Mbyte cannot be stored in the buffer, and therefore
cannot be copied.
• Make sure that cutting does not extend past the edges of the cutting medium
and onto the panel itself.
4-15
CHAPTER
5
CUTTING/PLOTTING PROCEDURES AND
FUNCTIONS (1)
5.1
5.2
5.3
5.4
5.5
5.6
5.7
5.8
5.9
5.10
5.11
5.12
5.13
5.14
5.15
5.16
PAUSE Menu Configuration
Setting the Pen Interval Adjustment Value (2-Pen Model)
Clearing the Buffer
Raising/Lowering the Pen
Moving the Pen Carriage to the Upper Right Position
Setting the Programmable Resolution (GP-GL mode only)
RS-232C and Centronics Interface Settings
Selecting the Command Mode
Setting the Origin in HP-GL™ Mode
Setting the Cutting Area
Axis Alignment and Distance Adjustment
Rotating the Coordinate Axes
Cutting Thick Sheets
Cutting a Reversed Image
Scaling the Plotting Image
Assigning the Pen No. (2-Pen Model)
Chapter 5 Cutting/plotting procedures and functions (1)
5.1 PAUSE Menu Configuration
When the plotter is in PAUSE mode, each of the functions listed below in the “Function selection”
column can be accessed by pressing the NEXT key until the desired menu appears and then pressing
the numeric key indicated by a box.
PAUSE
NEXT
NEXT
Function selection
Submenus
See Section
Page
1 PEN ADJ.
Setting the Pen Interval Adjustment Value 5-3
(2-Pen Model)
2 BUFFER CLR.
Clearing the Buffer
5-4
3 PEN U/D
Raising/Lowering the Pen
5-5
4 VIEW
Moving the Pen Carriage to the Upper
Right Position
5-6
1 STEP SIZE
Setting the Programmable Resolution
(GP-GL mode only)
5-7
2 RS-232C
Setting the Serial Interface
5-8
4 COMMAND
Selecting the Command Mode
5-11
1 ORIGIN POINT
Setting the Origin in HP-GLTM Mode
5-12
2 AREA
Setting the Cutting Area
5-13
3 AXIS
Axis Alignment and Distance Adjustment
5-15
1 ROTATE
Rotating the Coordinate Axes
5-18
Cutting Thick Sheets
5-19
3 MIRROR
Cutting a Reversed Image
5-21
4 SCALE
Scaling the Plotting Image
5-22
Assigning the Pen No. (2-Pen Model)
5-23
1 UP SPEED
Setting the Pen UP Speed
6-2
2 OFST PRS
Setting the Offset Cut Pressure
(Offset Force)
6-3
3 OFST ANG
Adjusting the Blade Offset Angle
6-4
4 STP PASS
Setting the Step Pass
6-5
2 L UNIT
Setting the Displayed Length Unit
6-6
3 DIST ADJ
Adjusting the Distance Correction
6-7
2 CONDITION
Listing the Cutting Conditions
7-2
3 SELF TEST
Running the Self Test
7-4
4 DUMP
Using the Character Dump Mode
7-5
1 I/F
2 FILM
3 FUNCTION
2 THICK
1 THICK No.
2 THICK MODE
3 OVER CUT
4 2PEN
NEXT
2 OPTION 1
4 OPTION 2
4 TEST
5-2
Chapter 5 Cutting/plotting procedures and functions (1)
5.2 Setting the Pen Interval Adjustment Value (2-Pen Model)
This function only works on 2-pen models. It enables adjustment of the distance between the origins for
Pen 1 and Pen 2.
Pens are used to draw lines for this adjustment. As described below, mount pens in
the Pen 1 and Pen 2 positions, then specify their conditions.
CHECKPOINT
Procedure
1. Press the [PAUSE] key to select PAUSE mode.
2. Press the [NEXT] key.
3. Press the [1] key (PEN ADJ.) to display the menu below.
FORCE
OFFSET
I NT ERVA L AD J US T
X=0
Y=0
SPEED
QUALITY
Mount pens in the Pen 1 and Pen 2 positions.
4. When the [TEST] key is pressed, the lines shown below are drawn.
Lines drawn by Pen 1
Y-axis deviation
Lines drawn by Pen 2
Y
X-axis deviation
X
5. Adjust the deviation of Pen 1 based on the lines drawn by Pen 2.
6. To adjust the X-axis deviation, press the [2] key and then use the [
numeric value.
] and [
] keys to adjust the
To adjust the Y-axis deviation, press the [4] key and then use the [
numeric value.
] and [
] keys to adjust the
The X= and Y= values can be specified in a range of –80 to +80 in 1-unit steps.
The numeric value of 1 corresponds to 0.05 mm (To correct a deviation of 0.3 mm, input 6). For
example, in the case of the above figure, input X=-∗∗, Y= -∗∗ .
7. Press the [ENTER] key to register your INTERVAL ADJUST setting.
8. Press the [PAUSE] key to cancel PAUSE mode.
CHECKPOINT
Your INTERVAL ADJUST setting is retained in the plotter's internal memory
even while the plotter is turned off.
5-3
Chapter 5 Cutting/plotting procedures and functions (1)
5.3 Clearing the Buffer
The BUFFER CLEAR function is used to clear from the plotter's receive buffer all data that has been
sent from the computer.
Procedure
1. Press the [PAUSE] key to select PAUSE mode.
2. Press the [NEXT] key.
3. Press the [2] key to select BUFFER CLR. The prompt message below appears.
FORCE
OFFSET
BU F F ER C L E AR OK ?
C L EAR
CANCE L
SPEED
QUALITY
4. To clear all the data in the plotter's buffer, press the [2] key (CLEAR).
To cancel PAUSE mode and resume cutting without clearing the buffer, press the [4] key
(CANCEL).
5. Press the [PAUSE] key to cancel PAUSE mode.
CAUTION
CHECKPOINT
5-4
• Do not execute the BUFFER CLEAR function until the computer has
completed data output. If you clear the buffer while the computer is still
sending data to the plotter, the data received up to the time that PAUSE mode
was selected is cleared but the computer resumes sending subsequent data
which remains in the buffer. At such time, the pen carriage may suddenly start
moving so be sure to keep your hands, face, and other obstacles out of the
vicinity of the pen carriage and Y bar.
If you select CANCEL, cutting resumes as soon as the [4] key is pressed.
Chapter 5 Cutting/plotting procedures and functions (1)
5.4 Raising/Lowering the Pen
The Pen UP/DOWN function allows you to raise or lower the pen from the control panel.
Procedure
1. Press the [PAUSE] key to select PAUSE mode.
2. Press the [NEXT] key. The menu below appears.
FORCE
OFFSET
PEN AD J .
PEN U / D
BUF F ER C L R .
V I EW
SPEED
QUALITY
3. Each time the [3] key (PEN U/D) key is pressed, the pen is alternately lowered or raised.
4. Press the [PAUSE] key to cancel PAUSE mode.
CAUTION
While using this function, keep your hands out of the vicinity of the pen holder
(especially the pen).
5-5
Chapter 5 Cutting/plotting procedures and functions (1)
5.5 Moving the Pen Carriage to the Upper Right Position
This function allows you to move the pen carriage to the upper right (VIEW) position.
Procedure
1. Press the [PAUSE] key to select PAUSE mode.
2. Press the [NEXT] key. The menu below appears.
FORCE
OFFSET
PEN AD J .
PEN U / D
BUF F ER C L R .
V I EW
SPEED
QUALITY
3. Press the [4] key (VIEW) to move the pen carriage to the upper right position.
4. Press the [ENTER] key to cancel the VIEW status and return the pen carriage to the former
position.
5. Press the [PAUSE] key to cancel PAUSE mode.
CAUTION
5-6
While using this function, keep your hands out of the vicinity of the pen carriage
and Y bar.
The Y bar and the pen carriage start moving immediately when the [4] key or
[ENTER] key is pressed. Keep your hands and other objects out of the vicinity
of any moving parts.
Chapter 5 Cutting/plotting procedures and functions (1)
5.6 Setting the Programmable Resolution (GP-GL mode only)
When GP-GL command mode is selected, this function lets you set the distance of pen movement
corresponding to the coordinate value of 1.
When HP-GL™ command mode is selected, this function is not displayed.
Procedure
1. Press the [PAUSE] key to select PAUSE mode.
2. Press the [NEXT] key twice.
3. Press the [1] key to select INTERFACE.
4. Press the [1] key to select STEP SIZE. The submenu below appears.
FORCE
OFFSET
STEP S I ZE
0 . 1 0 0 mm
SPEED
QUALITY
5. To select the programmable resolution, consecutively press the [
the available sizes in the sequence below.
0.010
0.025
0.050
] or [
] key to cycle through
0.100
6. Press the [ENTER] key to register your setting.
7. Press the [PAUSE] key to cancel PAUSE mode.
CHECKPOINT
• Your STEP SIZE setting is retained in the plotter's internal memory even while
the plotter is turned off.
• Be sure to set the programmable resolution to match the corresponding setting
of your software application. If they are not set identically, the cutting results
will not be the same size that you specified.
5-7
Chapter 5 Cutting/plotting procedures and functions (1)
5.7 RS-232C and Centronics Interface Settings
The FC612-09 switches automatically between the RS-232C and Centronics interface ports.
Setting the Parallel Interface
To use the Centronics-compatible parallel interface, connect the plotter's parallel connector to the
computer's parallel port by cable. Next, simply set the command mode plus the programmable
resolution (when GP-GL command is selected), or origin (when HP-GL command mode is
selected).
For instructions on setting the functions mentioned above, see Section 5.8, “Selecting the
Command Mode,” and Section 5.6, “Setting the Programmable Resolution.”
CAUTION
The interface cable should be no longer than two meters.
Setting the Serial Interface
To enable prompt compatibility with multiple software applications, you can register three different
groups of interface settings (RS-1, RS-2, and RS-3) in the plotter's non-volatile RAM. The desired
group of RS-232C interface settings can later be easily loaded from the control panel.
Incorrectly set interface conditions can cause the plotter to malfunction or not operate at all. Be
sure to set the plotter's interface conditions to match those of your computer and the target
software application.
Factory Preset Interface Settings
Your plotter comes with its three groups of interface conditions set to the factory presets listed in
the table below.
Group no.
Interface conditions
FORCE
RS-1
RS-2
RS-3
9600
8 BIT
RS - 1
N
H
SPEED
QUALITY
FORCE
OFFSET
9600
7 BIT
RS - 2
E
H
SPEED
QUALITY
FORCE
OFFSET
9600
8 BIT
SPEED
5-8
OFFSET
RS - 3
E
H
QUALITY
Chapter 5 Cutting/plotting procedures and functions (1)
Procedure
1. Press the [PAUSE] key to enter PAUSE mode.
2. Press the [NEXT] key twice.
3. Press the [1] key to select INTERFACE.
4. Press the [2] key to select RS-232C.The menu below appears, so select the group of RS-232C
interface conditions to be changed.
FORCE
OFFSET
R S - 2 3 2 C C ON D N o .
No . = 1
SPEED
QUALITY
5. Consecutively press the [
below.
] or [
] key to cycle through the available choices in the sequence
No.1
No.2
No.3
6. When the number of the desired group is displayed, press the [ENTER] key. A menu similar to
the example below appears.
FORCE
Blinking cursor
9600
8 BIT
OFFSET
RS - 1
N
H
SPEED
QUALITY
7. Press the numeric key next to the condition you wish to change. The selected condition blinks
to indicate that you can change its setting, so press the [ ] or [ ] key until the desired value
appears.
8. To set the rate of data transfer, press the [1] key. Next, consecutively press the [
to cycle through the available speeds in the sequence below.
300
600
1200
2400
4800
] key
9600
9. To set the number of bits per character, press the [2] key. Next, press the [
select 7 or 8 bits.
7
] or [
] or [
] key to
8
10. To set the parity mode, press the [3] key. Next, press the [
available choices.
N
E
(No parity check) (Even parity)
] or [
] key to cycle through the
O
(Odd parity)
5-9
Chapter 5 Cutting/plotting procedures and functions (1)
11. To set the handshaking mode, press the [4] key. Next, consecutively press the [
to cycle through the available handshaking modes.
H
(Hardwire)
X
(Xon/Xoff)
] or [
] key
E
(ENQ/ACK)
E (ENQ/ACK) only appears when HP-GL™ command mode has been selected.
12. When the displayed settings are all correct, press the [ENTER] key to register your settings.
13. Press the [PAUSE] key to cancel PAUSE mode.
CHECKPOINT
5-10
Your RS-232C settings are retained in the plotter's internal memory even while
the plotter is turned off.
Chapter 5 Cutting/plotting procedures and functions (1)
5.8 Selecting the Command Mode
This function selects the command mode for the plotter.
Procedure
1. Press the [PAUSE] key to select PAUSE mode.
2. Press the [NEXT] key twice.
3. Press the [1] key to select INTERFACE.
4. Press the [4] key to select COMMAND. The submenu below appears, so select the desired
command mode.
FORCE
OFFSET
CO MM A N D
GP - G L
SPEED
HP - GL
Blinking cursor
QUALITY
5. To select GP-GL command mode, press the [2] key to shift the blinking cursor to the left. To
select HP-GL command mode, press the [4] key to shift the blinking cursor to the right.
6. Press the [ENTER] key to register your setting.
CHECKPOINT
CAUTION
• Your COMMAND setting is retained in the plotter's internal memory even while
the plotter is turned off.
• Be sure to set the command mode to match the command mode setting of
your software application.
• This setting returns the plotting area, origin, rotate, and mirror mode settings to
their default values.
While using this function, keep your hands out of the vicinity of the pen carriage
and Y bar.
The Y bar and the pen carriage start moving immediately when the [ENTER]
key is pressed. Keep your hands and other objects out of the vicinity of any
moving parts.
5-11
Chapter 5 Cutting/plotting procedures and functions (1)
5.9 Setting the Origin in HP-GL™ Mode
When HP-GL™ command mode is selected, this function allows you to set the origin of the coordinate
system to either the lower left or center position. This function menu is not displayed when GP-GL
command mode is selected.
Procedure
1. Press the [PAUSE] key to select PAUSE mode.
2. Press the [NEXT] key twice.
3. Press the [2] key to select FILM.
4. Press the [1] key to select ORIGIN POINT. The submenu below appears.
FORCE
OFFSET
OR I G I N P O I N T
L OWE R L E F T C E N T E R
SPEED
Blinking cursor
QUALITY
5.To move the blinking cursor to set the origin to the lower left point, press the [2] key (LOWER
LEFT).
To move the blinking cursor to set the origin to the center position, press the [4] key (CENTER).
6. Press the [ENTER] key to register your ORIGIN setting.
7. Press the [PAUSE] key to cancel PAUSE mode.
CHECKPOINT
5-12
• Your ORIGIN setting is retained in the plotter's internal memory even while the
plotter is turned off.
• When the origin has been set to CENTER, the X- and Y-axis coordinate values
shown on the display panel represent the respective distances from the lower
left point of the effective cutting (plotting) range.
Chapter 5 Cutting/plotting procedures and functions (1)
5.10 Setting the Cutting Area
The U.R. (Upper Right) and L.L. (Lower Left) functions are used to specify the effective cutting area of
the plotter so that any data specifying coordinate positions outside of the effective cutting area is
disregarded. The origin moves together with the new cutting area.
Default U.R. Point
New effective cutting area’s U.R. Point
Newly specified effective cutting area
New effective cutting area’s origin
New effective cutting area’s L.L. Point
Original effective cutting area
Y
X
CAUTION
Original origin
Default L.L. Point
As soon as both the L.L. and U.R. points are set, the pen carriage moves to the new
origin. To avoid injury, keep your hands, face, and other obstacles out of the vicinity
of the pen carriage and Y bar.
Procedure
1. Press the [PAUSE] key to select PAUSE mode.
2. Press the [NEXT] key twice.
3. Press the [2] key to select FILM.
4. Press the [2] key again to select AREA. The submenu below appears for setting the coordinates
of the L.L. point (which becomes the new origin).
FORCE
SET
X=
SPEED
OFFSET
L.L.
DE F AU L T
0 Y=
0
QUALITY
5. To specify a new L.L. position, use the POSITION keys to move the pen carriage to the desired
point. At such time, the X= and Y= coordinate values respectively represent the current pen
position as X- and Y-axis displacements from the original origin.
6. Press the [ENTER] key to register the newly specified L.L. position.
7. To select the default L.L. position, press the [3] key (DEFAULT). The submenu below appears
for setting the coordinates of the U.R. point. You do not need to press the [ENTER] key if the
default L.L. position was selected.
FORCE
SET
X=
SPEED
OFFSET
U.R.
DE F AU L T
0 Y=
0
QUALITY
5-13
Chapter 5 Cutting/plotting procedures and functions (1)
8. To specify a new U.R. position, use the POSITION keys to move the pen carriage to the desired
point. At such time, the X= and Y= coordinate values respectively represent the current pen
position as X- and Y-axis displacements from the original origin.
9. Press the [ENTER] key to register the newly specified U.R. position.
10. To select the default U.R. position, press the [3] key (DEFAULT). You do not need to press the
ENTER key if the default U.R. position was selected.
11. Press the [PAUSE] key to cancel PAUSE mode, after which the pen carriage moves to the origin
of the new effective cutting area.
CHECKPOINT
• When the plotter is turned off, your L.L. and U.R. settings are erased. When
the plotter is turned back on, they are initialized to their default position (at the
lower left and upper right corners of the maximum effective cutting area).
• The L.L. and U.R. positions cannot be specified outside of the actual area of
the loaded medium.
• The effective cutting area can only be set by specifying the lower left and
upper right points. If the effective cutting area is incorrectly specified (by, for
example, specifying the upper left or lower right point or specifying the same
point for both the L.L. and U.R. positions), the message below appears for
several seconds. In this case, set the effective cutting area over again.
FORCE
OFFSET
I L L EGA L P L OT ARE A
SPEED
QUALITY
• When the ROTATE or MIRROR mode is selected or cancelled after specifying
new L.L. and U.R. positions, your L.L. and U.R. settings are initialized to their
default positions.
5-14
Chapter 5 Cutting/plotting procedures and functions (1)
5.11 Axis Alignment and Distance Adjustment
These functions enable you to align the coordinate axes with the axes of a pre-printed medium, or a
medium with printed registration marks; to compensate for any tilt in the medium, and to perform
distance adjustment.
Medium loaded
at an angle
Medium without
any markings
Tilted plotting area
Tilted plotting area
Axis Point 3
Plotting area
without any tilt
Axis Point 1
Origin Point
Origin Point
Y
Y
X
Origin
Axis Point 1
Axis Point 2
Axis Point 2 and 3
X
Medium without any markings
in the Y direction
: This is the center point of the X and Y axes, and the axes tilt with this point as the
center.
Press the [ORIGIN] key to move the Origin Point.
Axis Point 1 : This is one of the points which determine the tilt of the axis. Be sure to position this point
between Axis Point 2 and Axis Point 3.
Axis Point 2 : This point is used for axis alignment and distance adjustment,
Axis Point 3 : This point is used to determine the amount of tilt of the straight line formed by Axis Point
1 together with Axis Point 2 or Axis Point 3.
To align a medium which has no markings in the Y direction, specify points 2 & 3 as the same point.
This is single-axis alignment. Distance adjustment cannot be performed.
Procedure
1. Press the [PAUSE] key to select PAUSE mode.
2. Press the [NEXT] key three times.
3. Press the [2] key to select FILM.
4. Press the [3] key to select AXIS. The submenu below appears.
FORCE
OFFSET
A X I S PO I N T 1
X=∗∗∗∗∗∗ Y=∗∗∗∗∗∗
SPEED
5. Using the POSITION (
QUALITY
,
,
,
) keys, move the pen carriage to AXIS POINT 1.
6. Press the [ENTER] key to register your AXIS POINT 1 settings.
7. The submenu below appears.
FORCE
OFFSET
A X I S PO I N T 2
X=∗∗∗∗∗∗ Y=∗∗∗∗∗∗
SPEED
QUALITY
5-15
Chapter 5 Cutting/plotting procedures and functions (1)
8. Using the POSITION (
,
,
,
) keys, move the pen carriage to AXIS POINT 2.
9. Press the [ENTER] key to register your AXIS POINT 2 settings. If AXIS POINT 2 is not set within
the –45° to +45° range with respect to AXIS POINT 1, the following message will be displayed
and your axis alignment setting will be initialized. If this happens, you must make all the settings
again.
FORCE
OFFSET
A X I S S E T E R ROR !
S E T AGA I N P L E A S E
SPEED
QUALITY
10. If AXIS POINT 2 was set correctly, the following message will be displayed.
FORCE
OFFSET
A X I S PO I N T 3
X=∗∗∗∗∗∗ Y=∗∗∗∗∗∗
SPEED
QUALITY
11. Using the POSITION (
,
,
,
) keys, move the pen carriage to AXIS POINT 3.
12. Press the [ENTER] key to register your AXIS POINT 3 settings. If AXIS POINT 3 is not set within
the +45° to +135° range with respect to AXIS POINT 1, or at exactly the same point as AXIS
POINT 2, the following message will be displayed and your axis alignment setting will be
initialized. If this happens, you must make all the settings again.
FORCE
OFFSET
A X I S S E T E R ROR !
S E T AGA I N P L E A S E
SPEED
QUALITY
13. If AXIS POINT 2 and AXIS POINT 3 were set at the same point, this completes the AXIS
ALIGNMENT setting. If AXIS POINTs 2 and 3 were not set at the same point, the following
message is displayed.
FORCE
OFFSET
1 – 2M
S
∗ ∗ ∗ ∗ ∗ . ∗ mm
∗ ∗ ∗ ∗ ∗ . ∗ mm
SPEED
QUALITY
Perform X-axis distance adjustment
1. The upper row of the display shows the mechanical distance between points 1 and 2, and the
lower row shows the current distance adjustment. Measure the distance between points 1 and
2, and, if adjustment is required, follow the steps below.
2. Use the [
] and [
] keys to move the cursor, and the [
] and [
] keys to adjust the distance.
3. Press the [ENTER] key to register your setting. If you set the distance adjustment to a value
which is ±50% greater than the mechanical distance, the following message will be displayed. If
this happens, set an acceptable value for the distance adjustment.
FORCE
OFFSET
D I S T . A D J . E R ROR !
S E T AGA I N P L E A S E
SPEED
5-16
QUALITY
Chapter 5 Cutting/plotting procedures and functions (1)
When the setting has been correctly made, the sub-menu below appears.
FORCE
OFFSET
1 – 3M
S
∗ ∗ ∗ ∗ ∗ . ∗ mm
∗ ∗ ∗ ∗ ∗ . ∗ mm
SPEED
QUALITY
Perform Y-axis distance adjustment
1. The upper row of the display shows the mechanical distance between points 1 and 3, and the
lower row shows the current distance adjustment. Measure the distance between points 1 and
2, and, if adjustment is required, follow the steps below.
2. Use the [
] and [
] keys to move the cursor, and the [
] and [
] keys to adjust the distance.
3. Press the [ENTER] key to register your setting. If you set the distance adjustment to a value
which is ±50% greater than the mechanical distance, the following message will be displayed. If
this happens, set an acceptable value for the distance adjustment.
FORCE
OFFSET
D I S T . A D J . E R ROR !
S E T AGA I N P L E A S E
SPEED
QUALITY
When the setting has been correctly made, this completes the axis alignment and distance
adjustment settings.
4. Press the [PAUSE] key to cancel PAUSE mode. Move the Origin Point to your desired position,
and perform plotting.
CHECKPOINT
All settings will be returned to their default values when the power is turned off.
5-17
Chapter 5 Cutting/plotting procedures and functions (1)
5.12 Rotating the Coordinate Axes
This function is used to move the origin and rotate the coordinate axes by 90° as shown in the figure
below.
Y
New origin in ROTATE mode
X
Coordinates when ROTATE mode is selected
Original origin
Y Coordinates when ROTATE mode is off
Y
X
X
Procedure
1. Press the [PAUSE] key to select PAUSE mode.
2. Press the [NEXT] key twice.
3. Press the [3] key to select FUNCTION.
4. Press the [1] key to select ROTATE. The submenu below appears, with the blinking cursor
indicating the current ON/OFF status of ROTATE mode.
FORCE
OFFSET
RO T A T E
ON
SPEED
OF F
Blinking cursor
QUALITY
5. To select ROTATE mode, press the [2] key (ON).
To cancel ROTATE mode, press the [4] key (OFF).
6. Press the [ENTER] key to register your ROTATE setting.
7. Press the [PAUSE] key to cancel PAUSE mode.
CHECKPOINT
5-18
• Your ROTATE setting is retained in the plotter's internal memory even while
the plotter is turned off.
• When ROTATE mode is selected, cutting is started from the top left corner of
the medium as shown in the figure above instead of from the previous origin
point.
Chapter 5 Cutting/plotting procedures and functions (1)
5.13 Cutting Thick Sheets
This function enables the thick sheets mode and the overcut length to be specified. lt is used for cutting
thick media such as masking rubber for sandblasting, thick kraft paper for apparel design as well as for
thin but hard media such as acrylic film.
Procedure
1. Press the [PAUSE] key to select PAUSE mode.
2. Press the [NEXT] key twice.
3. Press the [3] key to select FUNCTION.
4. Press the [2] key to select THICK. The LCD panel displays the screen below.
FORCE
OFFSET
T H I CK N o . OV ER CU T
T H I C K MOD E
SPEED
QUALITY
Assignment of CONDITION Nos. to THICK MODE
1. Press the [1] key to select THICK No. to specify the CONDITION No. you want assigned to
THICK mode. Up to four numbers (from 1 through 4) can be assigned.
FORCE
OFFSET
1 T H I C K CON D . N o . 3
2
4
SPEED
QUALITY
2. When you press the key ([1], [2], [3], [4]) with the number you want assigned to THICK MODE,
a black dot appears next to your selected number on the display to indicate that it has been
assigned. To cancel your setting, press the same key again to remove the black dot from the
LCD.
3. Press the [ENTER] key to register your settings.
4. The screen will appear as follows.
FORCE
20
10
SPEED
OFFSET
CON D . 4
1 5U 0
1
Blinking cursor
QUALITY
THICK MODE Settings
1. Press the [2] key to select THICK MODE. Specify MODE 1 or MODE 2.
MODE 1 : Raises the cutter pen completely whenever the blade direction is changed. Use this
mode when cutting thick materials such as rubber in which the blade tends to catch.
MODE 2 : The cutter pen is only raised partway, and so the cutting operation is completed more
quickly when compared to MODE 1.
CHECKPOINT
Perform a cutting test on your material to determine which mode is more suitable.
5-19
Chapter 5 Cutting/plotting procedures and functions (1)
FORCE
OFFSET
T H I C K MOD E
MOD E 1
MOD E 2
SPEED
QUALITY
Blinking cursor
2. Press the [2] key to select MODE1.
Press the [4] key to select MODE2.
3. Press the [ENTER] key to register your setting.
Setting the OVERCUT function
1. Press the [3] key to select OVERCUT and specify the amount of overcutting at the start and end
points. Use this function when cutting soft, thick materials such as rubber to ensure that corners
are cut completely. If this function is not used, the start and end points may not be cut through
properly.
FORCE
OFFSET
OV ERCU T
S T R . = . 2 mm E N D . = . 2 mm
SPEED
QUALITY
Blinking cursor
The starting and end OVERCUT settings can be separately set in a range of 0.1 to 0.9 mm
increments.
The factory preset for both points is 0.2 mm.
2. To select the starting OVERCUT, press the [2] key (STR.=).
To select the end OVERCUT, press the [4] key (END.=).
To change the OVERCUT value, consecutively press the [
available settings in the sequence below.
.0
.1
.2
.7
.8
] or [
] key to cycle through the
.9
3. Press the [ENTER] key to register your OVERCUT settings.
CHECKPOINT
5-20
These settings are retained in the plotter’s memory even when the power has
been turned off.
Chapter 5 Cutting/plotting procedures and functions (1)
5.14 Cutting a Reversed Image
When MIRROR mode is selected using this function, the origin and coordinate axes are changed as
shown in the figure below to cut a mirror image of the programmed data.
X
New origin
Y
Original origin
MIRROR mode is selected
Y
Y
MIRROR mode is off
X
X
Procedure
1. Press the [PAUSE] key to select PAUSE mode.
2. Press the [NEXT] key twice.
3. Press the [3] key to select FUNCTION.
4. Press the [3] key again to select MIRROR. The submenu below appears, with the blinking
cursor indicating the current ON/OFF status of MIRROR mode.
FORCE
OFFSET
M I R R OR
ON
SPEED
OF F
Blinking cursor
QUALITY
5. To select MIRROR mode, press the [2] key (ON).
To cancel MIRROR mode, press the [4] key (OFF).
6. Press the [ENTER] key to register your MIRROR setting. The pen carriage moves to the new
ORIGIN POINT.
7. Press the [PAUSE] key to cancel PAUSE mode.
CHECKPOINT
• When the plotter is turned off, the MIRROR mode is cancelled.
• When MIRROR mode is selected, cutting is started from the new ORIGIN
POINT of the film as shown in the figure above instead of from the previous
origin point.
5-21
Chapter 5 Cutting/plotting procedures and functions (1)
5.15 Scaling the Plotting Image
This function is used to expand or reduce the plotting data using the program origin as the starting
point. The possible scaling settings are 1x through 8x, 1/8, 1/4, and 1/2.
Procedure
1. Press the [PAUSE] key to select PAUSE mode.
2. Press the [NEXT] key.
3. Press the [3] key to select FUNCTION.
4. Press the [4] key to specify Scale. The LCD panel displays the screen below.
FORCE
OFFSET
SCA L E
SCA L E = 1
SPEED
QUALITY
5. The value displayed at “Scale =” is increased by one increment by pressing the [
decreased by one increment in the sequence below by pressing the [ ] key.
1
2
3
7
8
1/8
1/4
] key, or is
1/2
6. Press the [ENTER] key to store the setting in the plotter's memory.
7. Press the [PAUSE] key to exit PAUSE mode.
CHECKPOINT
5-22
1. This setting returns to Scale =1 when the power goes off.
2. When this function is set for expansion, if the data values are too high, the
data beyond the plotting area is not cut and the red PROMPT lamp on the
control panel lights. In that case, either reduce the data values or lower the
scaling ratio.
Chapter 5 Cutting/plotting procedures and functions (1)
5.16 Assigning the Pen No. (2-Pen Model)
If you have a 2-pen model, this function enables you to assign a pen number to each CONDITION No.
Pen exchange commands (J for GP-GL and SP for HP-GL) are normally used with pen plotters to
specify the pen numbers. The FC612-09 series cutting plotters, however, use the J or SP pen exchange
commands to specify the setting conditions. You can therefore use this function to specify which pen to
use for which operation.
CHECKPOINT
• When using the SP and J pen exchange commands, please refer to the CONDITION
PRIORITY section in Section 6.7, “Using the Special Functions”.
• This function can only be used with 2-pen models.
Procedure
1. Press the [PAUSE] key to select PAUSE mode.
2. Press the [NEXT] key twice.
3. Press the [4] key to select 2 PEN.
FORCE
OFFSET
1 CON D - 1
2 CON D - 2
SPEED
CON D - 3 2
CON D - 4 2
QUALITY
4. Press the corresponding [1], [2], [3], [4] key to assign pen 1 or pen 2 to each CONDITION No.
Whenever you press the SELECT key, the pen number switches between 1 and 2. The default
settings are those given above.
5. Press the [ENTER] key to register your settings.
CHECKPOINT
These settings are retained in the plotter’s internal memory even while the
plotter is turned off.
5-23
CHAPTER
6
CUTTING/PLOTTING PROCEDURES AND
FUNCTIONS (2)
6.1
6.2
6.3
6.4
6.5
6.6
6.7
Setting the Pen UP Speed
Setting the Offset Cut Pressure (Offset Force)
Adjusting the Blade Offset Angle
Setting the Step Pass
Setting the Displayed Length Unit
Adjusting the Distance Correction
Using the Special Functions
Chapter 6 Cutting/plotting procedures and functions (2)
6.1 Setting the Pen UP Speed
To reduce the overall cutting time, this function lets you set the travelling speed of the pen in raised
status separately from the cutting SPEED setting.
Procedure
1. Press the [PAUSE] key to select PAUSE mode.
2. Press the [NEXT] key three times.
3. Press the [2] key to select OPTION1.
4. Press the [1] key to select UP SPEED. The submenu below appears.
FORCE
OFFSET
PEN UP SPEED
SPEED= AUTO
SPEED
QUALITY
5. To select the Pen UP Speed, consecutively press the [
choices in the sequence below.
] or [
] key through the available
The Pen UP Speed can be set to AUTO or to 10, 20, 30, or 40 cm/s. When AUTO is selected,
the Pen UP Speed is set to match the current cutting SPEED setting.
AUTO
10
20
30
40
6. Press the [ENTER] key to register your setting.
7. Press the [PAUSE] key to cancel PAUSE mode.
CHECKPOINT
6-2
Your Pen UP Speed setting is retained in the plotter's internal memory even
while the plotter is turned off.
Chapter 6 Cutting/plotting procedures and functions (2)
6.2 Setting the Offset Cut Pressure (Offset Force)
Since the direction in which the blade tip is facing cannot be determined during initialization of the
plotter, initial blade control is performed to adjust the offset angle of the blade (see Section 6.3,
“Adjusting the Blade Offset Angle”). The Offset Cut Pressure function is used to specify the force
applied during initial blade control. The Offset Cut Pressure setting is also used to offset the blade
angle for overcutting in THICK mode.
Procedure
1. Press the [PAUSE] key to select PAUSE mode.
2. Press the [NEXT] key three times.
3. Press the [2] key to select OPTION1.
4. Press the [2] key again to select OFST PRS. The submenu below appears.
FORCE
OFFSET
O F F S E T F OR C E
F OR C E = 4
SPEED
QUALITY
5. To set the OFST PRS value, consecutively press the [
available choices in the sequence below.
] or [
] key to cycle through the
The OFFSET PRESSURE can be set in a 40-step range from 1 to 40.
1
2
3
38
39
40
6. Press the [ENTER] key to register your OFFSET PRESSURE setting.
7. Press the [PAUSE] key to cancel PAUSE mode.
CHECKPOINT
• Your OFFSET PRESSURE setting is retained in the plotter's internal memory
even while the plotter is turned off.
• The OFFSET PRESSURE setting specifies the pressure being applied during
initial blade control and during overcutting in THICK mode. It is separate from
the cutting FORCE setting which specifies the travelling speed of the lowered
cutter pen during cutting.
6-3
Chapter 6 Cutting/plotting procedures and functions (2)
6.3 Adjusting the Blade Offset Angle
Your plotter rotates the blade tip according to the initial angle of rotation required by each line segment
defined in the data sent from the computer. This operation is called “initial blade control.”
This OFFSET ANGLE function specifies the reference blade offset angle for determining whether or not
to perform initial blade control. Setting a higher OFFSET ANGLE setting results in coarser initial blade
control but reduces the overall cutting time.
Procedure
1. Press the [PAUSE] key to select PAUSE mode.
2. Press the [NEXT] key three times.
3. Press the [2] key to select OPTION1.
4. Press the [3] key to select OFST ANG. The submenu below appears.
FORCE
OFFSET
O F F S E T A NG L E
A NG L E = 3 0
SPEED
QUALITY
5. To set the OFST ANG value, consecutively press the [
available choices in the sequence below.
] or [
] key to cycle through the
The OFFSET ANGLE can be set in a 61-step range from 0 to 60.
0
1
2
58
59
60
6. Press the [ENTER] key to register your OFFSET ANGLE setting.
7. Press the [PAUSE] key to cancel PAUSE mode.
CHECKPOINT
6-4
• Your OFFSET ANGLE setting is retained in the plotter's internal memory even
while the plotter is turned off.
• After setting the OFFSET ANGLE, be sure to run a cutting test. If it is set too
high, the cut shapes and characters may become deformed.
Chapter 6 Cutting/plotting procedures and functions (2)
6.4 Setting the Step Pass
Use this function when you intend to cut extremely detailed data. The cutting data sent from the
computer will be processed in blocks corresponding to the number of steps specified by the STEP
PASS function, thereby ensuring consistent blade control and higher cutting quality.
Procedure
1. Press the [PAUSE] key to select PAUSE mode.
2. Press the [NEXT] key three times.
3. Press the [2] key to select OPTION1.
4. Press the [4] key to select STP PASS. The submenu below appears.
FORCE
OFFSET
STEP PASS
STEP PASS= 0
SPEED
QUALITY
5. To set the STEP PASS, consecutively press the [
choices in the sequence below.
] or [
] key to cycle through the available
The STEP PASS can be set in a 21-step range from 0 to 20.
0
1
2
18
19
20
6. Press the [ENTER] key to register your STEP PASS setting.
7. Press the [PAUSE] key to cancel PAUSE mode.
CHECKPOINT
• Your STEP PASS setting is retained in the plotter's internal memory even while
the plotter is turned off.
• If the STEP PASS setting is set too high, the cut shapes and characters may
become deformed. Normally, therefore, it is best to set the STEP PASS
setting to zero.
6-5
Chapter 6 Cutting/plotting procedures and functions (2)
6.5 Setting the Displayed Length Unit
This function enables you to set the unit for coordinates appearing on the display panel to either
millimeters or inches.
Procedure
1. Press the [PAUSE] key to select PAUSE mode.
2. Press the [NEXT] key three times.
3. Press the [4] key to select OPTION2.
4. Press the [2] key to select L UNIT.
The submenu below appears, with the blinking cursor indicating the currently selected LENGTH
UNIT setting.
FORCE
OFFSET
L E NG T H U N I T
mm
SPEED
i nch
Blinking cursor
QUALITY
5. To set the LENGTH UNIT to millimeters, press the [2] key (mm).
To set the LENGTH UNIT to inches, press the [4] key (inch).
6. Press the [ENTER] key to register your LENGTH UNIT setting.
7. Press the [PAUSE] key to cancel PAUSE mode.
CHECKPOINT
6-6
• Your LENGTH UNIT setting is retained in the plotter's internal memory even
while the plotter is turned off.
• Since the plotter uses the metric system for internal processing of the cutting
data, calculation errors may occur if the LENGTH UNIT is set to inches.
Chapter 6 Cutting/plotting procedures and functions (2)
6.6 Adjusting the Distance Correction
The actual length of cut line segments may vary according to the thickness of the medium being used.
In this case, use the DISTANCE ADJUST function to correct the distance.
If, for example, the DISTANCE ADJUST setting is specified as 0.05 % for the X or Y axis, and the
distance of the cut is 50 cm (500 mm), the cut distance is increased by 500 × 0.05 % (=0.25 mm), which
means that the total cut distance is 500.25 mm.
Procedure
1. Press the [PAUSE] key to select PAUSE mode.
2. Press the [NEXT] key three times.
3. Press the [4] key to select OPTION2.
4. Press the [3] key to select DIST ADJ. The submenu below appears.
FORCE
OFFSET
D I S T ANCE AD J US T
X = 0 . 0 0% Y = 0 . 0 0%
SPEED
Blinking cursor
QUALITY
5. To correct the X-axis distance, press the [2] key (X=).
To correct the Y-axis distance, press the [4] key (Y=).
6. To set the DIST ADJ value, consecutively press the [
available choices in the sequence below.
] or [
] key to cycle through the
Each setting can be specified in 0.05 % increments in an 11-step range from –0.25 % to +0.25 %.
7. Press the [ENTER] key to register your DISTANCE ADJUST settings.
8. Press the [PAUSE] key to cancel PAUSE mode.
CHECKPOINT
Your DISTANCE ADJUST settings are retained in the plotter's internal memory
even while the plotter is turned off.
6-7
Chapter 6 Cutting/plotting procedures and functions (2)
6.7 Using the Special Functions
Your plotter is also equipped with the special functions described below.
“:”/“;” Command Control (“:”, “;” COMMAND) [GP-GL command mode]
When the GP-GL command mode is selected, set this function to enable or disable the recognition of “:”
and “;” commands sent from the computer. These commands may adversely affect the cutting results if
the leading section of data is missing. In such cases, set this function to DISABLED.
Pen UP/DOWN for the “W” Command (“W” COMMAND) [GP-GL command mode]
When a command specifying the plotting of an arc is sent from the computer, this function determines
whether to raise the pen or leave it in the same status (for example, the pen remains lowered if it was
lowered when the command was received) before moving it to the starting position for plotting.
When PEN DOWN is selected, the pen is moved to the starting position in the same status.
When PEN UP is selected, the pen is raised before moving to the starting position.
These settings are effective in the cutting mode only.
Model No. Response (MODEL EMULATED)
When HP-GL™ command mode is selected, this function selects the plotter's response to an “OI”
request sent from the computer.
When 7550 is selected, the plotter's response is 7550.
When 7595 is selected, the plotter's response is 7595.
CONDITION PRIORITY
This function determines the priority of programmed cutting conditions and manual settings of cutting
conditions at the plotter's control panel.
When MANUAL is selected, commands specifying cutting conditions from the computer are ignored and
the cutting conditions can only be set at the control panel. The registered conditions are retained in the
plotter's internal memory even while the plotter is turned off.
When PROGRAM is selected, the cutting conditions can be set either at the plotter's control panel or by
command input from the computer. When the plotter is turned off, however, the registered cutting
conditions are not retained.
Initial Blade Control Position (INIT. BLADE CONTROL)
This function specifies the position at which initial blade control is performed (for more information
about initial blade control, see Section 6.3, “Adjusting the Blade Offset Angle”).
When 2mm BELOW is selected, initial blade control is performed 2 mm below the starting point of
cutting.
When OUTSIDE is selected, initial blade control is performed outside of the effective cutting area.
Pen UP Movement Control (PEN UP MOVE)
When the plotter receives commands that specify consecutive pen movements in raised status, this
function determines whether to move the pen to each coordinate point or to move the pen directly to the
final coordinate point.
When ENABLED is selected, the pen moves to each coordinate point in sequence.
When DISABLED is selected, the pen moves directly to the final coordinate point.
6-8
Chapter 6 Cutting/plotting procedures and functions (2)
Procedure
While holding down the [
] key, turn on the plotter.
The special functions are displayed in the sequence shown below.
In GP-GL command mode
In HP-GLTM command mode
“ ; ” , “ : ” COMMA N D
ENAB L ED
D I SAB L ED
MOD E L EMU L A T E D
7550
7595
“ W ” COMMA N D
PEN UP
P E N DOWN
CON D I T I ON P R I OR I T Y
MA N U A L
P ROGR AM
CON D I T I ON P R I OR I T Y
MA N U A L
P ROGR AM
I N I T . B L A D E CON T RO L
2 mm B E L OW OU T S I D E
I N I T . B L A D E CON T RO L
2 mm B E L OW OU T S I D E
P E N U P MO V E
ENAB L ED
D I SAB L ED
P E N U P MO V E
ENAB L ED
D I SAB L ED
To change the setting of the displayed menu, press the [2] or [4] key.
To register the selected setting and proceed to the next menu, press the [ENTER] key.
To proceed to the next menu without changing the setting, press the [NEXT] key.
When you have finished setting all of the special functions, turn off the plotter.
CHECKPOINT
Your settings are registered in the plotter's internal memory and retained even
while the plotter is turned off.
6-9
CHAPTER
7
TEST MODES AND TROUBLESHOOTING
7.1
7.2
7.3
7.4
7.5
Listing the Cutting Conditions
Running the Self Test
Using the Character Dump Mode
Troubleshooting
Error Messages and Their Causes
Chapter 7 Test modes and troubleshooting
7.1 Listing the Cutting Conditions
The CONDITION function lets you print a list of the settings of the four groups of cutting conditions, so
you can check all of your current settings at a glance.
CAUTION
The pen starts moving as soon as the CONDITION function is selected by pressing
the [2] key.
To avoid injury to yourself and damage to the plotter, keep your hands, face, and
other obstacles out of the vicinity of the pen carriage and Y bar.
This function requires a plotting pen to be mounted in the pen holder.
Load a sheet of paper that is A4 in size or larger.
CHECKPOINT
Procedure
Replace the cutter pen at the pen carriage's pen holder with a plotting pen and load paper in the
plotter.
1. Press the [PAUSE] key to select PAUSE mode.
2. Press the [NEXT] key.
3. Press the [NEXT] key twice more.
4. Press the [4] key to select OPTION2.
5. Press the [4] key to select TEST. The submenu below appears, so select the CONDITION
function.
FORCE
CON D I T I O N
SPEED
OFFSET
SEL F TEST
D U MP
QUALITY
6. As soon as the [2] key (CONDITION) is pressed, the message below appears and the plotter
begins printing a list of the currently set cutting conditions.
FORCE
OFFSET
P R I N T CON D I T I ON S
SPEED
QUALITY
7. When all of the conditions have been printed, the READY message reappears.
7-2
Chapter 7 Test modes and troubleshooting
Sample printout by the CONDITION function
7-3
Chapter 7 Test modes and troubleshooting
7.2 Running the Self Test
Your plotter is provided with a self test function that enables it to check its own functions. Because a
correctly drawn self test pattern signifies that all of the functions of the plotter (excluding the interface
settings) have been tested and found normal, this function is useful for determining whether the source
of a problem lies in the plotter itself or in the connection between the plotter and computer.
CAUTION
The pen starts moving as soon as the SELF TEST mode is selected by pressing the
[2] key (YES).
To avoid injury to yourself and damage to the plotter, keep your hands, face, and
other obstacles out of the vicinity of the pen carriage and Y bar.
Procedure
Replace the cutter pen at the pen carriage's pen holder with a plotting pen and load paper in the
plotter.
1. Press the [PAUSE] key to select PAUSE mode.
2. Press the [NEXT] key.
3. Press the [NEXT] key twice more.
4. Press the [4] key to select OPTION2.
5. Press the [4] key to select TEST.
6. Press the [3] key to select SELF TEST. The prompt message below appears.
FORCE
OFFSET
SEL F TEST
YES
SPEED
?
NO
QUALITY
7. To select the SELF TEST mode, press the [2] key (YES) to initiate printing of the self test
pattern.
To return to the OPTION2 selection menu, press the [4] key.
8. When you have finished printing the self test pattern, turn off the plotter to cancel SELF TEST
mode.
CHECKPOINT
7-4
The self test pattern is repeatedly printed until the plotter is turned off. To
discontinue printing, even if a pattern is not completely printed, simply turn off
the plotter.
Chapter 7 Test modes and troubleshooting
7.3 Using the Character Dump Mode
This mode enables experienced users to detect the exact cause of communication problems between
the plotter and the computer. In character dump mode, an exact printout of the codes reaching the
plotter is produced.
If the cutting/plotting results are not what you expect, and the received data and the transmitted
program are different, check the interface conditions and the connection of the interface cable.
CAUTION
The pen starts moving as soon as the data is transmitted to the plotter from the
computer.
To avoid injury to yourself and damage to the plotter, keep your hands, face, and
other obstacles out of the vicinity of the pen carriage and Y bar.
Procedure
Replace the cutter pen at the pen carriage's pen holder with a plotting pen and load paper in the
plotter.
1. Press the [PAUSE] key to select PAUSE mode.
2. Press the [NEXT] key.
3. Press the [NEXT] key twice more.
4. Press the [4] key to select OPTION 2.
5. Press the [4] key to select TEST.
6. Press the [4] key to select DUMP. The prompt message below appears.
FORCE
OFFSET
D UMP
ON
SPEED
OF F
Blinking cursor
QUALITY
7. To select DUMP mode, press the [2] key to shift the blinking cursor next to ON.
If you decide not to select DUMP mode, press the [4] key to shift the blinking cursor to OFF.
8. Press the [ENTER] key. If DUMP mode has been selected, CHAR DUMP MODE appears on
the display to indicate that the plotter has entered DUMP mode.
9. Transmit the data from the computer. A Dump list is printed.
10. When all of the data has been printed, turn off the plotter to cancel DUMP mode.
CHECKPOINT
• The character data is printed as ASCII codes and the non-character (control)
data is plotted as two-digit hexadecimal values (e.g., Line Feed = 0A, Carriage
Return = 0D, ETX = 03).
• When the plotter receives READ commands that instruct it to output data, it
will output dummy data (except in the case of READ commands that request
the output of the plotter's status data). Note that printing in dump mode will be
based on that dummy data.
7-5
Chapter 7 Test modes and troubleshooting
7.4 Troubleshooting
The Plotter is Turned On But Doesn't Operate
Symptom
Cause
The control panel’s POWER lamp does
not light.
Nothing appears on the display panel.
The POWER lamp lights but the plotter
does not operate.
The plotter is not being
supplied with power.
The control panel’s POWER lamp lights
but the plotter does not operate.
The control panel’s PAUSE lamp
flickers.
Nothing appears on the display panel.
The control panel’s POWER lamp lights
but the plotter does not operate.
The message below appears.
The ROM or RAM is
defective.
FORCE
OFFSET
S u m - C k R OM R AM E R R ! !
SPEED
7-6
QUALITY
The plotter is defective.
The ROM or RAM is
defective.
Solution
Check that the power cord is
securely connected to the
plotter’s AC line inlet and the
electrical output.
Contact your sales
representative or nearest
Graphtec dealer.
Contact your sales
representative or nearest
Graphtec dealer.
Contact your sales
representative or nearest
Graphtec dealer.
Chapter 7 Test modes and troubleshooting
The Cutting Results are Unsatisfactory
Problem
Solution
See section
• Adjust the OFFSET value:
* If too low, corners become
rounded
* If too high, corners are too
pointed
• For CB15U holders (red blade
adjustment knob), grease the
blade and holder
• Remove any foreign matter
inside the pen holder
• Raise the Offset Cut Pressure
setting (the Offset Cut Pressure
is separate from the cutting
FORCE)
• Replace the blade with a new
one that has a spring
4.6
• Grease the blade and holder (B)
3.3
• Adjust the blade length
3.4
• The cutting SPEED is too high
• Lower the SPEED setting
4.6
• The software’s resolution
setting is too low
• The blade offset angle is too
low
• The blade is extended too far
• The OFFSET is incompatible
with the blade type being
used
• Adjust the software’s resolution
setting
• Raise the blade offset angle
6.3
Cause
• The cut corners are
rounded or too
pointed
• The OFFSET is incompatible
with the blade type being
used
• The cut line starts out
crooked
• The blade mounted in the
holder does not rotate
smoothly
• The Offset Cut Pressure is too
low
• The blade skips and
does not completely
cut lines that should
be solid
• Solid lines are not cut
at a constant depth
• Coarse resolution of
curved lines
• The cutting medium
curls up at the
corners
• The cutting medium
curls up when cutting
small characters
• The blade is cutting
into the backing
sheet
• The blade falls out of
the cutter plunger
• With the CB09UA cutter pen
(blue blade adjustment knob),
the spring has come loose
from the blade
• With the CB15U, CB15U-K30
cutter pen (red blade
adjustment knob), the blade
has fallen out
• The blade is extended too far
• The cutting SPEED is too high
• The blade is dull
• The QUALITY setting is too
high
• The blade is extended too far
• The cutting FORCE is too
high
• The blade is too small for the
holder.
• Insufficient grease
3.3
6.2
3.3
• Adjust the blade length
• Adjust the OFFSET value:
* If too low, corners become
rounded
* If too high, corners are too
pointed
• Lower the SPEED setting
• Replace the blade
• Lower the QUALITY setting
3.4
4.6
• Adjust the blade length
• Lower the FORCE setting
3.4
4.6
• Use a blade that fits securely in
the holder.
• For CB15U holders (red blade
adjustment knob), grease the
cutter blade and holder
3.1
3.2
3.3
4.6
3.3
4.6
7-7
Chapter 7 Test modes and troubleshooting
See section
Cause
• The medium can be
cut but is hard to
weed afterward
• The cut medium
cannot be picked up
using a retack sheet
• Abnormal noise
generated by the
cutter pen during
cutting
• The medium is
discolored where the
blade has passed
• The cutting results
differ from the
specified size
• The retack sheet is not sticky
enough
• The medium gets entangled
during cutting
• Weeding of the cut medium
was postponed too long
• The medium is stuck in the tip
of the cutter plunger
• Switch to a retack sheet that is
more sticky
• Reduce the blade length and/or
lower the cutting FORCE
• Promptly weed the cut medium
• Adjust the blade length and
cutting FORCE setting
3.4
4.6
• The programmable resolution
(STEP SIZE) has been set
differently at the plotter and
the software application
• Scaling has been specified at
the software application
• The programmable resolution
(STEP SIZE) has been set
differently at the plotter and
the software application
• The computer sent coordinate
data that exceeds the
specified effective cutting area
• The computer sent coordinate
data that exceeds the
maximum effective cutting
area
• The Condition Priority setting
is set to program mode
• The ENTER key was not
pressed after changing the
settings
• The plotter is in Cutting mode
• Set both the plotter and
software to the same resolution
• Check whether scaling has
been specified
5.7
• Set both the plotter and
software to the same resolution
5.7
• Set the effective cutting area to
a larger area
5.10
• When the plotter is
receiving data, the
PROMPT lamp lights
(an offscale error
occurs)
• Some parts of the
medium cannot be
cut
• The currently
selected cutting
conditions are
disregarded or
cannot be changed
• Characters or lines
are deformed during
pen plotting
• The length of cutting
results differ from the
program (slight
distance error)
• Cut characters are
deformed
• The starting and end
points of cutting do
not match
7-8
Solution
Problem
3.4
4.6
• Switch to a larger medium or
change the coordinate data
• Change the Condition Priority
setting to manual mode
• Make sure you are setting the
conditions correctly
6.7
4.6
• Set the blade type of the
OFFSET function to PEN (0)
4.6
• The distance correction
requires adjustment
• Adjust the distance correction
6.6
• The Step Pass is too high
• Lower the Step Pass setting
6.4
• Coordinate points are
incorrectly specified
• The Offset Cut Pressure is too
low
• The medium is too flimsy
• Blade rotation is not smooth
• Check the coordinate data by
plotting it with a pen
• Raise the Offset Cut Pressure
setting
• Switch to a stronger medium
• For CB15U holder (red blade
adjustment knob), grease the
cutter blade and holder
4.6
6.2
3.3
Chapter 7 Test modes and troubleshooting
7.5 Error Messages and Their Causes
Error message
FORCE
Cause
OFFSET
OV ER CURREN T
P OWE R O F F T H E N O N
SPEED
QUALITY
FORCE
OFFSET
P O S I T I ON A L A RM
P OWE R O F F T H E N O N
SPEED
QUALITY
• The beeper sounds
• The PROMPT lamp flickers
Excessive load is causing
the current to the motor to
exceed the rated value
• Cutting conditions do not
suit the cutting medium
Lower the cutting SPEED and/or
the cutting FORCE
• Movement of the pen
carriage is being
obstructed
Turn off the plotter, remove the
obstacle, then turn the plotter
back on
• The pen carriage was
subjected to external
pressure during cutting
Turn off the plotter, remove the
obstacle, then turn the plotter
back on
• Medium scraps stuck in
the plotter’s moving parts
are impeding operation
Turn off the plotter, remove the
medium scraps, then turn the
plotter back on
• Abnormal acceleration
rate table
FORCE
OFFSET
S P E E D A L A RM
P OWE R O F F T H E N O N
SPEED
• The beeper sounds
• The PROMPT lamp flickers
QUALITY
Solution
• Immediately after turning
on the plotter, excessive
force was used to
manually move the pen
carriage
• The internal speed control
is faulty
* If either error occurs frequently,
contact your sales representative
or nearest Graphtec dealer
Turn the plotter off then back on
again
Turn the plotter off then back on
again
* If the error occurs frequently,
contact your sales representative
or nearest Graphtec dealer
7-9
Chapter 7 Test modes and troubleshooting
Error messages in GP-GL command mode
Error message
FORCE
Cause
OFFSET
E R ROR 1
COMMA N D E R ROR
SPEED
FORCE
QUALITY
OFFSET
E R ROR 4
P A R AME T E R O V E R F L OW
SPEED
FORCE
QUALITY
OFFSET
E R ROR 5
I / O E R ROR
SPEED
7-10
QUALITY
Solution
The plotter received an
unrecognizable command
• Noise was input to the
plotter upon execution of
the software application
Press the ENTER key
• The software configuration
regarding the output
device has been changed
Configure the software to drive
your plotter
Ensure that the software’s
interface conditions are correctly
set
• The plotter’s interface conditions have been
changed
A command was received
containing a numeric
parameter that exceeds
that command’s permissible
range
Ensure that the plotter’s interface
conditions are set to match those
of the software
• The software configuration
regarding the output
device has been changed
Configure the software to drive
your plotter
Ensure that the software’s
interface conditions are correctly
set
• The plotter’s interface
conditions have been
changed
An error occurred during
data transfer
Ensure that the plotter’s interface
conditions are set to match those
of the software
• The software configuration
regarding the output
device has been changed
Configure the software to drive
your plotter
Ensure that the software’s
interface conditions are correctly
set
• The plotter’s interface
conditions have been
changed
Ensure that the plotter’s interface
conditions are set to match those
of the software
Chapter 7 Test modes and troubleshooting
Error messages in HP-GL emulation mode
If any of the following command errors occur, they are nearly always caused by one of the reasons
below:
(1) The software configuration regarding the output device has been changed; or
(2) The plotter's interface conditions have been changed
When a command error occurs in HP-GL™ emulation mode, therefore, first check the two
corresponding points below:
(1) Configure the software to drive your plotter, and ensure that the software's interface conditions are
correctly set; and
(2) Ensure that the plotter's interface conditions are set to match those of the software.
Error message
FORCE
Cause
OFFSET
Solution
An unrecognizable
instruction was executed
Execute a recognizable command
A command was executed
with the wrong number of
parameters
Execute the command with the
correct number of parameters
A command containing an
unusable parameter was
specified
Execute the command with its
parameters specified within their
permissible ranges
An unrecognizable
character set was specified
Specify a recognizable character set
A command was executed
with coordinate data that
exceeds the effective
cutting/plotting area
Execute the command with its
coordinate data specified within the
effective cutting/plotting area
The data being input
exceeded the capacity of
the plotter’s downloadable
character buffer, polygon
buffer, etc.
Increase the buffer size
E R ROR 1 I n s t r u c t i o n
no t r ecogn i zed
SPEED
QUALITY
FORCE
OFFSET
E R ROR 2 W r o n g n u m b e r
o f p a r ame t e r s
SPEED
QUALITY
FORCE
OFFSET
E R ROR 3 O u t o f
p a r ame t e r s
r ange
SPEED
QUALITY
FORCE
OFFSET
E R ROR 5 U n k n o w n
cha r ac t e r se t
SPEED
QUALITY
FORCE
OFFSET
E R ROR 6
Po s i t i o n o v e r f l ow
SPEED
QUALITY
FORCE
OFFSET
E R ROR 7
Bu f f e r o v e r f l ow
SPEED
QUALITY
7-11
Chapter 7 Test modes and troubleshooting
Error message
FORCE
Cause
OFFSET
E R ROR 1 0 I n v a l i d
I /O ou t pu t r eques t
SPEED
QUALITY
FORCE
OFFSET
Solution
During execution of an
output command, another
output command was
executed
Check the flow of your programmed
data
The ESC character was
followed by an invalid byte.
Check the ESC commands in your
program.
A device control command
containing an invalid byte
was received.
Check the device control commands
in your program.
A parameter outside of the
permissible numeric range
was specified.
Check the program.
Too many parameters were
received.
Check the number of command
parameters.
During data transfer, a
framing error, parity error,
or overrun error occurred.
Check the settings of the interface
conditions.
The I/O buffer received
data at a faster pace than it
could process, indicating
that handshaking is not
successful.
Check the settings of the
handshaking mode and other
interface conditions.
E R ROR 1 1 I n v a l i d
b y t e f o l l o w i n g ESC .
SPEED
QUALITY
FORCE
OFFSET
E R ROR 1 2 I n v a l i d
b y t e i n I / O Co n t r o l
SPEED
QUALITY
FORCE
OFFSET
E R ROR 1 3 O u t o f
r a n g e I / O p a r ame t e r
SPEED
QUALITY
FORCE
OFFSET
E R ROR 1 4 T o o m a n y
I / O p a r ame t e r s
SPEED
QUALITY
FORCE
OFFSET
E R ROR 1 5 E r r o r i n
I / O t r a n sm i s s i o n
SPEED
QUALITY
FORCE
OFFSET
E R ROR 1 6 I / O b u f f e r
o v e r f l ow
SPEED
7-12
QUALITY
CHAPTER
8
INTERFACES
8.1
8.2
Centronics-Compatible Parallel Interface
RS-232C Serial Interface
Chapter 8 Interfaces
8.1 Centronics-Compatible Parallel Interface
This eight-bit Centronics-compatible parallel interface is generally used for interfacing printers.
The input data signals are grouped into the eight bits of the DATA signals (DB0 to DB7), and each
group of eight DATA signals is followed by the input of an active-LOW STROBE signal. Upon receipt of
the STROBE signal, the plotter activates its BUSY signal, outputs an ACK signal, then reads the input
DATA signals to begin a cutting or plotting operation.
When the specified operation is completed, the plotter awaits the input of subsequent DATA signals.
The interface cable should be no longer than two meters.
Specifications
• While the parallel interface is used, data cannot be output from the plotter (that is, READ commands
cannot be used with the exception of the “BS” command).
• Synchronization method: Asynchronous transmission by handshaking based on STROBE and
BUSY signals.
Electrical characteristics
Based on TTL-level compatibility with the logic states below.
Positive logic
“1” +2.2 V or more
“0” +0.8 V or less
DATA, BUSY
Negative logic
“1” +0.8 V or less
“0” +2.2 V or more
ERROR, ACK, STROBE
Input/Output Circuitry
+5V
10kΩ
DATA
PLOTTER
CPU
+5V
1kΩ
PLOTTER
STROBE CPU
+5V
1kΩ
BUSY
ACK
ERROR
8-2
CPU
PLOTTER
Chapter 8 Interfaces
Input/Output Timing Chart
DB0-DB7
Valid
STROBE
BUSY
ACK
Compatible Connectors
Plotter end : FCN685J036-L/Y (FUJITSU)
Cable end : 57-30360
(DDK)
Pin Assignment of the Parallel Connector
The pin assignment of the Centronics-compatible parallel interface connector is described below.
Pin No.
Signal Name
Pin No.
Signal Name
1
STROBE
19
GND
2
DB 0
20
GND
3
DB 1
21
GND
4
DB 2
22
GND
5
DB 3
23
GND
6
DB 4
24
GND
7
DB 5
25
GND
8
DB 6
26
GND
9
DB 7
27
GND
10
ACK
28
GND
11
BUSY
29
GND
12
GND
30
GND
13
SLCT
31
Not used
14
Not used
32
ERROR
15
Not used
33
GND
16
GND
34
Not used
17
Not used
35
GND
18
+5 V
36
GND
8-3
Chapter 8 Interfaces
8.2 RS-232C Serial Interface
The RS-232C serial interface of your plotter conforms to the RS-232C Standard of the Electronic
Industries Association (EIA).
This serial interface performs the serial transfer of digital binary data, control signals, and SYNC
signals.
Specifications
Standard
Synchronization
Transfer rate
Stop bit
Parity
Character length
CCITT V.24, EIA RS-232C, JIS X5101
Asynchronous start-stop
300, 600, 1200, 2400, 4800, 9600 bits/s
2 stop bits
Even, odd, none
7 or 8 bits
7 bit
1
2
3
4
5
6
7
Stop bit
Parity bit
Data bit
Start bit
8 bit
1
2
3
4
5
6
7
8
Stop bit
Parity bit
Data bit
Start bit
Electrical Characteristics
RD, SD
(Negative logic)
RS, CS, DR, ER
(Positive logic)
Input voltage level
+5 V to +12 V
- 5 V to - 12 V
Logical 0
Logical 1
ON
OFF
Output voltage level
+5 V to +8 V
- 5 V to - 8 V
Logical 0
Logical 1
ON
OFF
Compatible Connectors
Plotter end : DB-25S
Cable end : DB-25P
(ISO 2.6mm nuts (M2.6 x 0.45) should be used as the locking nuts.)
8-4
Chapter 8 Interfaces
Pin Assignment of the Serial Connector
The pin assignment of the RS-232C serial interface connector is described below. In the “Signal
direction” column, “←P” indicates signal output from the plotter, and “→P” indicates signal input to the
plotter.
Pin no.
Signal
symbol
RS-232C
CCITT
V. 24
Signal
direction
1
FG
AA
101
—
Frame GND for grounding the
plotter’s chassis.
2
SD
BA (TDATA)
103
←P
Transmit data that is output by
the plotter.
3
RD
BB (RDATA)
104
→P
Receive data that is input to the
plotter.
4
RS
CA (RTS)
105
←P
The plotter activates the Request
to Send signal to confirm whether
the computer is ready to receive
data.
5
CS
(CTS)
106
→P
When the Clear to Send signal is
ON, the plotter can send data.
6
DR
(DSR)
107
7
SG
AB (SGND)
102
Not used
—
8 to 19
20
21 to 25
Function
Connected to the plotter’s signal
ground level.
Not used
ER
CD (DTR)
108.2
←P
When the Data Terminal Ready
signal is ON, the plotter is ready
to receive data.
Not used
8-5
CHAPTER
9
VACUUM SUCTION
9.1
9.2
9.3
Selecting the Vacuum Pump
Installation Location
Vacuum Pump Wiring
Chapter 9 Vacuum suction
9.1 Selecting the Vacuum Pump
Select the vacuum pump according to the guidelines listed in the table below.
Item
Ratings
FC612-09V1/V2
3
Airflow (m /min)
0.5
Static pressure (kPa)
6.4
Hose connection bore
CAUTION
50 mm
Make sure that the vacuum pump used with a V model is affixed with either a label
showing compliance with the relevant safety standard or with the CE marking.
The figure below shows the dimensions of the vacuum pump installation base provided.
496
95
314
225
205
174.5
4-¿12
4-¿10
150.5
9-2
83
Chapter 9 Vacuum suction
9.2 Installation Location
When connecting the vacuum pump to your cutting plotter, please refer to the following diagram.
CAUTION
The exhaust from the vacuum pump is hot, so do not place anything flammable near
the exhaust port. Failure to observe this precaution could cause a fire.
Cable
Hose
band
Durable flexible hose
Cable
Cable
Vacuum pump
Hose band
Connect to the power outlet
CHECKPOINT
A vacuum pump is not provided.
9-3
Chapter 9 Vacuum suction
9.3 Vacuum Pump Wiring
When connecting the vacuum pump to a power supply, be sure to follow the wiring instructions given in
the user's manual provided with your pump.
CAUTION
• Make sure that the cables and switches used for the wiring of your vacuum pump
conform to the pump's rated specifications and to the safety standards of the
country in which it is used.
• The pump uses a large amount of current. When connecting the pump to a power
supply, be sure to confirm that the power supply you plan to use has a capacity
which comfortably exceeds the amount of permissible current.
• Make sure that no foreign objects are sucked into the pump, as there is a danger
that the motor will lock up and that a large amount of current will flow, causing
damage to the pump and the possibility of fire.
When connecting the pump to a power supply, make sure that there is a safety
device such as a breaker or current leak alarm fitted. If required, use the safety
equipment such as an air filter or auto breaker stipulated in your user's manual.
Make sure that the pump is properly grounded.
• When the pump is first switched on, a large current flows which can cause
malfunctioning of any computer or plotter connected to the same power supply.
Whenever possible, avoid supplying the vacuum pump and other equipment from
the same power supply.
9-4
CHAPTER
10
SPECIFICATIONS
10.1 Main Specifications
10.2 External Dimensions
Chapter 10 Specifications
10.1 Main Specifications
FC612-09V1/FC612-09M1/FC612-09E1
FC612-09V2/FC612-09M2/FC612-09E2
1-pen type
2-pen type
Configuration
Flatbed
Effective cutting area (XY)
900 × 1220 mm
Maximum medium width
1260 mm (Y-axis direction)
Media hold-down method
V model: Vacuum suction, M model: Magnetic, E model: Electrostatic
Maximum cutting speed
400 mm/sec (40-step range)
Cutting force
4.9 N (500 g) max : 40-step range
Minimum character size
About 10 mm square
(varies with the character font and cutting media)
Mechanical resolution
Programmable resolution
0.0025 mm
GP-GL mode: 0.1/0.05/0.025/0.01 mm (selected by menu)
HP-GLTM emulation mode: 0.025 mm
Distance accuracy
Within ±0.1 % (plotter mode)
Perpendicularity
Within 0.7 mm/1220 mm (plotter mode)
Repeatability
Number of pens/cutters
Within 0.1 mm (plotter/cutting mode)
1
2
Cutter blades: Supersteel
Cutter and pen types
Pens: Fiber-tip pen (water based), ball-point pen (oil based),
ink pen (disposable)
Marking film (vinyl, fluorescent, reflective)
Stiff paper/card up to 0.5 mm thick
Media types
Sandblast rubber up to 1.0 mm thick
High-intensity reflective film
Polystyrene foam sheets
Interfaces
RS-232C serial, Centronics-compatible parallel
Buffer memory
1 Mbyte
Command sets
GP-GL and HP-GLTM emulation
LCD panel
Power supply
20 characters × 2 lines
100-120 VAC, 50/60 Hz, 1.2 A max
220-240 VAC, 50/60 Hz, 0.7 A max
Operating environment
Temperature: +10 °C to +35 °C
Humidity: 35 % to 75 %RH (non-condensing)
Guaranteed precision
Temperature: +16 °C to +32 °C
operating environment
Humidity: 35 % to 70 %RH (non-condensing)
External dimensions
Weight (including stand)
Options
1200 (W) × 1585 (D) × 835 (H) mm
V model: approx. 63 kg, M model: approx. 58 kg, E model: approx. 62 kg
Roll material supply rack*1 (separate unit)
*1. The RSK0009 roll material supply rack is not attached to the plotter.
10-2
Chapter 10 Specifications
10.2 External Dimensions
1585
Unit: mm
Dimensional accuracy: ±5mm
835
122
834
244
768
67
1200
273
1040
10-3
Index
INDEX
A
D
Achieving Optimum Cutting Results ..................... 4-10
Blade length ...................................................... 4-10
Cutter offset ...................................................... 4-10
Cutting force • Cutting speed • Cutting quality .. 4-10
Adjusting the Blade Length .................................... 3-6
Adjusting the Blade Offset Angle ............................ 6-4
Adjusting the Distance Correction .......................... 6-7
Adjusting the Pen Carriage Height ......................... 4-4
1-pen models ...................................................... 4-4
2-pen models ...................................................... 4-4
After Mounting the Cutter Pen ................................. viii
Assigning the Pen No. (2-Pen Model) .................. 5-23
Axis Alignment and Distance Adjustment ............. 5-15
Durable flexible hose .............................................. 1-2
B
H
Basic Operational Flow .......................................... 4-2
Height adjustment plates ........................................ 1-2
Hexagon wrench .................................................... 1-2
Hose band .............................................................. 1-2
C
CD-ROM ................................................................ 1-2
Centronics-Compatible Parallel Interface ............... 8-2
Clearing the Buffer ................................................. 5-4
Control Panel ......................................................... 2-3
Cutter Blade ............................................................ viii
Cutter Blades ......................................................... 3-2
CB09UA(ø0.9) .................................................... 3-2
CB15U(ø1.5) ...................................................... 3-2
CB15U-K30(ø1.5) ............................................... 3-2
CB15U-K30-SP(ø1.5) ......................................... 3-2
CB15U-SP(ø1.5) ................................................ 3-2
Cutter loupe ............................................................ 1-2
Cutter Pen ....................................................... viii, 3-3
Cutter Pen Nomenclature ....................................... 3-3
PPA31-CB09 Cutter Pen .................................... 3-3
PPA31-CB15 Cutter Pen .................................... 3-3
PPA31-CB15B Cutter Pen .................................. 3-3
Cutter pen set ......................................................... 1-2
Cutting a Reversed Image ................................... 5-21
Cutting Thick Sheets ............................................ 5-19
Assignment of CONDITION Nos. to THICK MODE ... 5-19
THICK MODE Settings ..................................... 5-19
E
Error Messages and Their Causes ........................ 7-9
Error messages in GP-GL command mode ..... 7-10
Error messages in HP-GL emulation mode ...... 7-11
External Dimensions ............................................ 10-3
F
FC612-09M1 .......................................................... 1-2
FC612-09M2 .......................................................... 1-2
FC612-09V1 ........................................................... 1-2
FC612-09V2 ........................................................... 1-2
I
Indicator Lamps ...................................................... 2-3
Installation Location ............................................... 9-3
Interface ......................................................... 8-2, 8-4
L
Listing the Cutting Conditions ................................ 7-2
Loading the Medium ............................................... 4-6
Electrostatic adhesion ........................................ 4-6
Magnetic ............................................................. 4-6
Vacuum suction .................................................. 4-6
M
Main Specifications .............................................. 10-2
Mounting the Cutter Pen ........................................ 4-3
1-pen models ...................................................... 4-3
2-pen models ...................................................... 4-3
Moving the Pen Carriage to the Upper Right Positio ...... 5-6
O
Obtaining the Correct Blade Length ....................... 3-6
i-1
Index
P
Panel Keys ............................................................. 2-3
Paper ...................................................................... 1-2
Paper alignment seals ............................................ 1-2
Parallel Interface .................................................... 8-2
PAUSE Menu Configuration ................................... 5-2
Pen Types and Their Features ............................... 3-7
Disposable ink pen (SD500 series) .................... 3-8
Oil-based ballpoint pens (KB130 Series) ............ 3-6
Water based fiber-tip pens (KF550 series) ......... 3-6
Plotter Nomenclature ............................................. 2-2
Power cable ........................................................... 1-2
POWER lamp ......................................................... 2-3
PROMPT lamp ....................................................... 2-3
R
Raising/Lowering the Pen ...................................... 5-5
Replacing the Cutter Blade .................................... 3-4
PPA31-CB09 cutter pen ..................................... 3-4
PPA31-CB15 cutter pen ..................................... 3-5
PPA31-CB15B cutter pen ................................... 3-5
Rotating the Coordinate Axes .............................. 5-18
RS-232C and Centronics Interface Settings .......... 5-8
Factory Preset Interface Settings ....................... 5-8
Setting the Parallel Interface .............................. 5-8
Setting the Serial Interface ................................. 5-8
RS-232C Serial Interface ....................................... 8-4
Running a Cutting Test ........................................... 4-9
Running the Self Test ............................................. 7-4
S
Sample printout by the CONDITION function ........ 7-3
Scaling the Plotting Image ................................... 5-22
Selecting the Command Mode ............................. 5-11
Selecting the Vacuum Pump .................................. 9-2
Serial Interface ....................................................... 8-4
Setting the Cutting Area ....................................... 5-13
Setting the Cutting Conditions ................................ 4-7
Factory Presets .................................................. 4-8
FORCE ............................................................... 4-7
OFFSET (in cutting mode only) .......................... 4-7
QUALITY ............................................................ 4-7
SPEED ............................................................... 4-7
Setting the Cutting Origin ..................................... 4-12
Setting the Displayed Length Unit .......................... 6-6
Setting the Offset Cut Pressure (Offset Force) ...... 6-3
i-2
Setting the Origin in HP-GL™ Mode .................... 5-12
Setting the Pen Interval Adjustment Value ............. 5-3
Setting the Pen UP Speed ..................................... 6-2
Setting the Programmable Resolution ................... 5-7
Setting the Step Pass ............................................. 6-5
Sheet holder plates ................................................ 1-2
Soft vinyl cover ....................................................... 1-2
T
Troubleshooting ..................................................... 7-6
The Cutting Results are Unsatisfactory .............. 7-7
Turning On the Plotter and Initialization ................. 4-5
Types of Cutter Blades and Their Features ........... 3-2
U
User’s manual ........................................................ 1-2
Using the Character Dump Mode ........................... 7-5
Using the COPY Function .................................... 4-13
The Copying Sequence .................................... 4-14
Using the Special Functions ................................... 6-8
CONDITION PRIORITY ..................................... 6-8
Initial Blade Control Position ............................... 6-8
Model No. Response .......................................... 6-8
Pen UP Movement Control ................................. 6-8
Pen UP/DOWN for the “W” Command ............... 6-8
“:”/“;” Command Control ...................................... 6-8
V
Vacuum pump installation base ............................. 1-2
Vacuum Pump Wiring ............................................. 9-4
W
Water based fiber-tip pen ....................................... 1-2
The specifications, etc., in this manual are
subject to change without notice.
FC612-UM-152
November 25, 2003
1st edition-01
GRAPHTEC CORPORATION
GRAPHTEC CORPORATION
503-10 Shinano-cho, Totsuka-ku,
Yokohama 244-8503, Japan
Tel : +81(045) 825-6250
Fax : +81(045) 825-6396
Email : info @ graphteccorp.com
Web : www.graphteccorp.com
Printed in Japan