1
Joomla!
User
Manual
The Artstract Co. Incorporated
www.theartstract.com
705.687.1510
Joomla! User Manual
Joomla! v 1.5.9
Manual Revision 2009.04.20
Brandon McGregor, pRGD
The Artstract Co. Incorporated
http://www.theartstract.com
Adapted From:
Joomla! User Manual
Joomla! v1.0.11
By Steve White - Websdezined.com
and Andy Wallace
TUTORonline
Joomla! User Guide
Module 1 - Introduction to Joomla!
See Appendix A for License Information
ii
The Artstract Co. - Joomla User Manual - Rev. 2009.04.20
Table of Contents
Chapter 1 - Welcome to Joomla . . . . . . . . . . . . . . . . . . . . . . . . . . . . . 1
Introduction. . . . . . . . . . . . . . . . . . . . . . . . . . . . . . . . . . . . . . . 1
What is a Content Management System. . . . . . . . . . . . . . . . . . . . . . . . . 1
Joomla! for End Users. . . . . . . . . . . . . . . . . . . . . . . . . . . . . . . . . . 1
Taking Joomla! to the Next Level. . . . . . . . . . . . . . . . . . . . . . . . . . . . . 1
Objectives of the Joomla User Manual. . . . . . . . . . . . . . . . . . . . . . . . . . 2
How to Use the Joomla! User Manual . . . . . . . . . . . . . . . . . . . . . . . . . . 2
Manual Styles & Conventions. . . . . . . . . . . . . . . . . . . . . . . . . . . . . . . 3
Chapter 2 - Overview of the Installed Elements of a Joomla Web Site. . . . . . . . 4
Introduction. . . . . . . . . . . . . . . . . . . . . . . . . . . . . . . . . . . . . . . 4
Templates. . . . . . . . . . . . . . . . . . . . . . . . . . . . . . . . . . . . . . . . . 4
Components. . . . . . . . . . . . . . . . . . . . . . . . . . . . . . . . . . . . . . . 4
Modules. . . . . . . . . . . . . . . . . . . . . . . . . . . . . . . . . . . . . . . . . 5
Plugins . . . . . . . . . . . . . . . . . . . . . . . . . . . . . . . . . . . . . . . . . . 5
Chapter 3 - Joomla! Users. . . . . . . . . . . . . . . . . . . . . . . . . . . . . . . . 6
Introduction. . . . . . . . . . . . . . . . . . . . . . . . . . . . . . . . . . . . . . . 6
Types of Users & Access Permissions. . . . . . . . . . . . . . . . . . . . . . . . . . . 6
Front-End Users . . . . . . . . . . . . . . . . . . . . . . . . . . . . . . . . . . . . . 6
Back-End Users. . . . . . . . . . . . . . . . . . . . . . . . . . . . . . . . . . . . . . 7
Recovering a Lost Password . . . . . . . . . . . . . . . . . . . . . . . . . . . . . . . 8
Logging In and Out. . . . . . . . . . . . . . . . . . . . . . . . . . . . . . . . . . . . 8
Chapter 4 - Adding Content to Your Website . . . . . . . . . . . . . . . . . . . . . 10
Creating an Article. . . . . . . . . . . . . . . . . . . . . . . . . . . . . . . . . . . 10
Adding an Image to an Article. . . . . . . . . . . . . . . . . . . . . . . . . . . . . . 13
Editing the Article Parameters . . . . . . . . . . . . . . . . . . . . . . . . . . . . . 14
Chapter 5 - Introduction to Accessing Functions from the Back-End. . . . . . . . 16
Introduction. . . . . . . . . . . . . . . . . . . . . . . . . . . . . . . . . . . . . . . 16
Logging in to the Back-End. . . . . . . . . . . . . . . . . . . . . . . . . . . . . . . 16
The Control Panel . . . . . . . . . . . . . . . . . . . . . . . . . . . . . . . . . . . 17
Administrator Modules. . . . . . . . . . . . . . . . . . . . . . . . . . . . . . . . . 19
The Artstract Co. - Joomla User Manual - Rev. 2009.04.20
iii
Chapter 6 - Accessing Functions from the Back-End: Manager . . . . . . . . . . .
Introduction. . . . . . . . . . . . . . . . . . . . . . . . . . . . . . . . . . . . . . .
Media Manager. . . . . . . . . . . . . . . . . . . . . . . . . . . . . . . . . . . . . Preview. . . . . . . . . . . . . . . . . . . . . . . . . . . . . . . . . . . . . . . . . Manage Menu Items . . . . . . . . . . . . . . . . . . . . . . . . . . . . . . . . . . .
Manage Content . . . . . . . . . . . . . . . . . . . . . . . . . . . . . . . . . . . . Manage Sections . . . . . . . . . . . . . . . . . . . . . . . . . . . . . . . . . . . . Manage Categories. . . . . . . . . . . . . . . . . . . . . . . . . . . . . . . . . . . Manage Articles. . . . . . . . . . . . . . . . . . . . . . . . . . . . . . . . . . . . . Frontpage Manager. . . . . . . . . . . . . . . . . . . . . . . . . . . . . . . . . . . 21
21
22
24
24
32
32
36
41
49
Chapter 7 - Accessing Functions from the Back-End: Administrator . . . . . . . . 51
Introduction. . . . . . . . . . . . . . . . . . . . . . . . . . . . . . . . . . . . . . . 51
Manage Users . . . . . . . . . . . . . . . . . . . . . . . . . . . . . . . . . . . . . . 51
Manage Menus . . . . . . . . . . . . . . . . . . . . . . . . . . . . . . . . . . . . . Manage Extensions. . . . . . . . . . . . . . . . . . . . . . . . . . . . . . . . . . . Manage Components. . . . . . . . . . . . . . . . . . . . . . . . . . . . . . . . . . Manage Modules . . . . . . . . . . . . . . . . . . . . . . . . . . . . . . . . . . . . Manage Plugins. . . . . . . . . . . . . . . . . . . . . . . . . . . . . . . . . . . . . 55
60
61
71
81
Chapter 8 - Accessing Functions from the Back-End: Super Administrator. . . . . 84
Introduction. . . . . . . . . . . . . . . . . . . . . . . . . . . . . . . . . . . . . . . 84
Global Configuration. . . . . . . . . . . . . . . . . . . . . . . . . . . . . . . . . . 84
Language Manager. . . . . . . . . . . . . . . . . . . . . . . . . . . . . . . . . . . . 91
Manage Templates . . . . . . . . . . . . . . . . . . . . . . . . . . . . . . . . . . . . 92
Messages. . . . . . . . . . . . . . . . . . . . . . . . . . . . . . . . . . . . . . . . 96
System Information. . . . . . . . . . . . . . . . . . . . . . . . . . . . . . . . . . . 98
Global Check-In. . . . . . . . . . . . . . . . . . . . . . . . . . . . . . . . . . . . . 99
Mass Mail. . . . . . . . . . . . . . . . . . . . . . . . . . . . . . . . . . . . . . . . 100
iv
The Artstract Co. - Joomla User Manual - Rev. 2009.04.20
Appendix A - Creative Commons License. . . . . . . . . . . . . . . . . . . . . . 102
Appendix B - Using JoomGallery. . . . . . . . . . . . . . . . . . . . . . . . . . . Introduction. . . . . . . . . . . . . . . . . . . . . . . . . . . . . . . . . . . . . .
Category Manager . . . . . . . . . . . . . . . . . . . . . . . . . . . . . . . . . . .
Picture Manager. . . . . . . . . . . . . . . . . . . . . . . . . . . . . . . . . . . .
Comments Manager . . . . . . . . . . . . . . . . . . . . . . . . . . . . . . . . . .
Votes Manager . . . . . . . . . . . . . . . . . . . . . . . . . . . . . . . . . . . . .
Uploading New Pictures . . . . . . . . . . . . . . . . . . . . . . . . . . . . . . . .
Configuration Manager. . . . . . . . . . . . . . . . . . . . . . . . . . . . . . . . .
103
103
103
105
109
109
109
114
Appendix C - Using JEvents . . . . . . . . . . . . . . . . . . . . . . . . . . . . . . 115
Front-End Functions . . . . . . . . . . . . . . . . . . . . . . . . . . . . . . . . . . 115
Back-End Functions. . . . . . . . . . . . . . . . . . . . . . . . . . . . . . . . . . . 118
Setting Up Global Parameters. . . . . . . . . . . . . . . . . . . . . . . . . . . . .
Manage Calendars. . . . . . . . . . . . . . . . . . . . . . . . . . . . . . . . . . .
Manage Categories. . . . . . . . . . . . . . . . . . . . . . . . . . . . . . . . . . .
Manage Events . . . . . . . . . . . . . . . . . . . . . . . . . . . . . . . . . . . . .
Manage Users . . . . . . . . . . . . . . . . . . . . . . . . . . . . . . . . . . . . .
Global Configuration. . . . . . . . . . . . . . . . . . . . . . . . . . . . . . . . . .
119
120
123
125
129
131
Appendix D - Using !JoomlaComment . . . . . . . . . . . . . . . . . . . . . . . . 140
Manage Comments. . . . . . . . . . . . . . . . . . . . . . . . . . . . . . . . . . . 140
!JoomlaComment Configuration. . . . . . . . . . . . . . . . . . . . . . . . . . . . 143
Appendix E - Special & Custom Extensions. . . . . . . . . . . . . . . . . . . . . 148
The Artstract Co. - Joomla User Manual - Rev. 2009.04.20
v
vi
The Artstract Co. - Joomla User Manual - Rev. 2009.04.20
Chapter 1: Welcome to Joomla!
Introduction
Thank you for choosing Joomla! Content Management System (CMS) software! You have made a great choice by selecting one
of the most powerful and versatile Open Source Content Management Systems available.
Joomla! is an award-winning CMS that will help you build web sites and other powerful online applications. Best of all,
Joomla! is an Open Source solution that is freely available to everybody.
What is a Content Management System (CMS)?
A CMS is a computer software system for organising and facilitating collaborative creation of documents and other content. A
CMS is frequently a web application used for managing web sites and web content.
Joomla! for End Users
Once Joomla! is installed and running, it is simple for even non-technical users to add or edit content, upload and add images,
and to manage the critical data that makes your company or organisation go. Anybody with basic word processing skills can
easily learn to manage a Joomla! web site.
You will easily be able to add new press releases or news items, manage staff pages, and create an unlimited amount of Sections,
Categories, and Articles on your web site via a simple, browser-based interface.
Taking Joomla! to the Next Level
Out of the box, Joomla! does a great job of managing the content needed to make your web site sing. However, for many
people, the true power of Joomla! lies in the application framework that makes it possible for thousands of developers around
the world to create powerful add-ons and extensions (Components, Modules, and Plugins). Here are just some examples of the
hundreds of available extensions:
• Dynamic form builders
• Business or organisational directories
• Document management
• Image and multimedia galleries
• E‐commerce and shopping cart engines
• Forums and chat software
• Calendars
• Blogging software
• E‐mail newsletters
• Data collection and reporting tools
• Banner advertising systems
• Subscription services...
in addition, many, many more.
You can find examples at the growing Joomla! Extensions or Components directory at http://extensions.joomla.org/. Prepare
to be amazed at the amount of exciting work produced by our active developer community!
The Artstract Co. - Joomla User Manual - Rev. 2009.04.20
1
Objectives of the Joomla! User Manual
The objectives of this User Manual are to:
• Provide a walk through of the many facets of the Joomla! core.
• Describe the various types of user together with their access permissions.
• Provide detailed instructions for both Front‐end and Back‐end inputting and site management within the Joomla! user
framework of Authors, Editors, Publishers, Managers, Administrators, and Super Administrators.
This is not a Technical Manual in that we do not go into major depth on modification, design, and development of the various
elements of Joomla! or any kind of programming. There are guides and web sites that provide this information. Nor do we go
into detail about PHP, MySQL or other essential software that you need to have some understanding.
How to Use the Joomla! User Manual
The Joomla! User Manual details the types of users Joomla! has and Front-End through to Back-End functionality. A summary
of the chapters and appendices follows.
Chapter 1
Introduces you to Joomla!, its benefits, versatility and strengths.
Chapter 2
An overview of the elements of a typical Joomla! installation.
Chapter 3
Provides information about the different types of Joomla! user and what functionality they can access.
Chapter 4
Covers adding content to the site
Chapter 5
Deals with logging on to the Back-End, the Control Panel, and Buttons.
Chapter 6
Deals with what a Manager can do.
Chapter 7
Deals with what an Administrator can do.
Chapter 8
Deals with what a Super Administrator can do.
Appendix A
This manual is released under The Creative Common License see details here.
Appendix B
Using the JoomGallery photo gallery
Appendix C
Using the JEvents event calendar
Appendix D
Using the !JoomlaComment
Appendix E
Custom plugin parameters
2
The Artstract Co. - Joomla User Manual - Rev. 2009.04.20
Manual Styles & Conventions
Throughout this manual, we will refer to specific items of information in the following ways:
Note: You will see this when an additional point needs to be made
Caution: You will see this when you should use care or ‘due diligence’ to avoid problems occurring either
immediately or potentially later on.
WARNING!: You will see this when there is a very high risk of damaging your installation in some way.
Exercise great care. Seek further advice if you are unclear as to what you are doing.
Code that you are either required to enter, reference, or alter in some way will be displayed as in the following example:
<meta name=”description” content=”Joomla!: the dynamic portal
engine and content management system, This article provides simple
information on using the Joomla! CMS.” />
<meta name=”keywords” content=”Joomla!, Joomla!, Joomla! CMS author
editor publisher” />
Buttons/Icons that should be clicked/selected in the course of a procedure are presented as follows:
Click Save button. Select Yes radio button. Select Show or Hide or Global Setting.
Toolbar Buttons: Delete, Save, Edit, Publish, Unpublish, and Save are available.
Internal addresses or addresses that you need to enter your own details into are shown as:
http://www.mydomainname.com/ or /usr/local/apache/htdocs
Web addresses of other resources are shown as: http://www.joomla.org.
If a point requires emphasis such as the name of a piece of software, or that a particular path, or element, is being referenced
then it will be highlighted either as: MySQL or Component xyz.
The Artstract Co. - Joomla User Manual - Rev. 2009.04.20
3
Chapter 2: Overview of the Installed Elements of a Joomla! Web Site
Introduction
Now that you have your Joomla! installation up and running, a word about the different elements that make up your web site.
Templates
The template and its associated files provide the visual ‘look and feel’ of your web site and are maintained separately from the
web site content. This is stored in a MySQL database.
A typical Joomla! installation comes with two templates pre-installed called madeyourweb and rhuk_solaflare_ii.
Template files are located in the templates folder, in the root directory, and each template typically consists of the following
files:
index.php
This file contains HTML, PHP and possibly JavaScript coding that provides the framework for your web site’s
design. In combination with the .css and image files, it builds all the design and content placement elements
of your web site.
templateDetails.xml
This file is the authority to use the template and contains references to all the files used, e.g. index.php, the css
file etc.
template_thumbnail.png
This file is used in the Template Manager to provide, if switched on, a small thumbnail representation of the
web site design. There must be a template_thumbnail.png file in the template’s root directory.
template_css.css
Located in the css folder, this Cascading Style Sheets (CSS) file contains the code to handle the visual elements
of the web site, e.g. font sizes, colours, etc. There can be as many CSS files as you wish provided the appropriate HTML reference is in the index.php file. For example,
<?php echo “<link rel=\”stylesheet\”
href=\”$GLOBALS[mosConfig_live_site]/
templates/$GLOBALS[cur_template] /css/template_css.css\”
type=\”text/css\”/>” ; ?>
Although this example has been wrapped over four lines, there are no spaces in this coding.
Image files
These files are located in the images folder and may be .gif, .jpg, or .png. They provide the graphical elements
of the web site design.
Further Information: This manual does not cover template design in detail.
Components
Components are core elements of Joomla!’s functionality and are displayed in the main body of the web site’s template. Depending on the design of the template in use, this is often in the centre of the web page.
A typical Joomla! installation comes with Banners, Contacts, News Feeds, Polls, and Web Links Components.
4
The Artstract Co. - Joomla User Manual - Rev. 2009.04.20
Members of the Joomla! community produce third party Joomla! Components on a continuous basis. Look at http://
extensions.joomla.org/ or http://developer.joomla.org for a listing of additional Component downloads.
Modules
Modules extend the capabilities of Joomla! giving the software new functionality. A Module is a small piece of content that can
be displayed anywhere that your template allows. Modules are very easy to install in the Administrator Section (Back-End).
Joomla! Modules may include: Main Menu, Top menu, Template Chooser, Polls, Newsflash, Hit Counter, etc.
Members of the Joomla! community produce Joomla! Modules on a continuous basis. They are freely available on http://
developer.joomla.org/ or http://extensions.joomla.org for download.
Plugins
A Plugin is a small, task-oriented function that intercepts and manipulates content, in some way, before displaying it. Joomla!
provides a number of Plugins in the core distribution.
The Artstract Co. - Joomla User Manual - Rev. 2009.04.20
5
Chapter 3: Joomla! Users
Introduction
This Chapter deals with:
• The different types of Joomla! Users
• User Registration
• Recovering a lost password
• Logging in to the Front‐end
• User’s Account Details
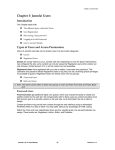
Types of Users and Access Permissions
Users of Joomla! web sites can be broken down into two broad categories:
• Guests
• Registered Users
Guests are simply visitors to your Joomla! web site. Depending on how the Super Administrator has configured the site, some
content can only be viewed by Registered users while visitors can only browse a limited amount of it, or all the content can be
accessible.
Registered Users have registered with your site to obtain a username and password. This username and password allows Registered Users to log into your site, receiving special privileges not available to guests. Registered Users are broken down into two
groups:
• Front‐end Users
• Back‐end Users.
Note: The admin panel refers to these two groups of users as Public Front-End and Public Backend.
Front-End Users
Front-End Users get additional rights over guests, which may include the ability to create and publish content on the web site.
We will generally refer to these users as content providers since their primary goal is to provide content on the web site, not to
administer the site or alter its design.
Content providers may provide new content through the web interface using an embedded WYSIWG (What You See Is What
You Get) editor without any knowledge of HTML coding.
Within the Front-End User classification there are four specific levels, the site administrator can assign. These levels are: Registered, Author, Editor, and Publisher.
Registered
A Registered User has no ability to create, edit, or publish content on a Joomla! web site. They may have access to restricted content that is not available to guests.
Author
Authors can create their own content, specify certain aspects of how the content will be displayed, and specify
the date when the material should be published.
Editor
Editors have the same abilities as an Author and they can edit their own content as well as that of any other
Author.
6
The Artstract Co. - Joomla User Manual - Rev. 2009.04.20
Publisher
Publishers can perform all the duties of Authors and Editors and have the ability to publish content.
The default user role is Registered User. For Front-End users to receive any other role requires an Administrator or Super Administrator to change their profile through the Back-End Administrator panel.
Back-End Users
Back-End users – Managers, Administrators, and Super Administrators – are typically thought of as the site administrators, but
they also have access to the Front-End interface. Just as with the Front-End Users, Back-End Users may have different privileges.
Manager
A Manager has the same permissions as a Publisher but with access to the Backend Administrator’s panel.
Managers have access to all the content associated controls in the administrator panel but are not able to
change templates, alter page layouts, or add or delete extensions to Joomla!
Managers also have no authority to add users or alter existing user profiles
Administrator
Administrators have a broader range of access than Managers do.
Administrators can add and delete extensions to the web site, change templates or alter page layouts and can
even alter user profiles equal to their own permission levels or below.
What they cannot do is edit the profiles of a Super Administrator or change certain global characteristics of
the web site.
Super Administrators do not show up in the User Manager screen when users are logged in as an Administrator.
Super Administrator
The Super Administrator has the same kind of power as root in a traditional Linux system and has unrestricted
abilities to perform all administrative functions inside of Joomla! Only Super Administrators have the ability to create new users with Super Administrator permissions or to assign Super Administrator permissions to
existing users.
The Artstract Co. - Joomla User Manual - Rev. 2009.04.20
7
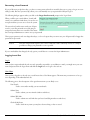
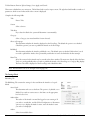
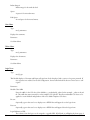
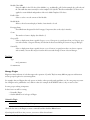
Recovering a Lost Password
If you are like most people these days, you have too many passwords and it is inevitable that you are going to forget one eventually. Joomla!, like most systems today, allows you to automatically reset your password should you forget it.
The following dialogue appears when you click on the Forgot Your Password? prompt in the Login Form:
When you fill in your e-mail address, Joomla! will
e-mail you a verification link where you can choose a
new password that you can use to access the system.
The reason that Joomla! cannot send your old password to you is that passwords are stored using an
encryption format that is not reversible. This means
that even Super Administrators cannot view your password!
This is proper practice in web site design these days, so do not be upset that you cannot use your old password, be happy that
passwords are protected!
Caution:
Since the new password request is sent out via e-mail and e-mail is inherently insecure it is always a
good idea to change your password as soon as possible.
If your e-mail address has changed, the only option you will have is to contact the Super Administrator.
Logging In and Out
Log In
Once you have registered with the web site and, optionally, responded to your validation e-mail, you simply enter your username and password in the Login Form and click the Login button to login to the web site.
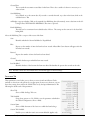
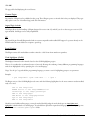
User Menu
Once you have logged in to the web site you will notice that a User Menu appears. This menu may contain more or less options depending on the individual web site.
The following gives a short description of the typical menu items you are likely to see:
Your Details
Used to view and/or modify your account details.
Submit News
Used to submit your new Articles (Author and Above).
Submit Web Link
Used to submit new web links that you have found (Registered users and above).
Check-In My Items
Used to check in any items you may have been working on but not saved.
8
The Artstract Co. - Joomla User Manual - Rev. 2009.04.20
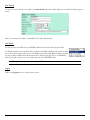
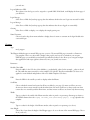
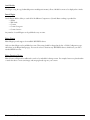
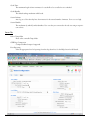
Your Details
To view your account details you can click on the Your Details menu link, which will present you with the following options
screen:
Here you can change Your Name, e-mail address, User Name and Password.
User Editor
You can also select the default User or WYSIWYG Editor from the User Editor drop down list.
In a default installation the only editor that is available is TinyMCE, which provides good basic abilities to edit content right from the web site. The Administrator may install additional editors, in which
case they would be available from the drop down list as well. You may also choose no WYSIWYG
editor if you wish to input your content without the use of the WYSIWYG editor.
Note: This option will require some knowledge of HTML.
Logout
Click on the Logout button to end the current session.
The Artstract Co. - Joomla User Manual - Rev. 2009.04.20
9
Chapter 4: Adding Content to Your Web Site
Joomla! organises content by Sections which can contain one or more Categories very much like a newspaper. An example of
a section could be sport with categories being golf, basketball and cricket in the sports section. You then add your articles to a
Section and Category
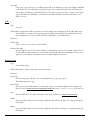
Creating an Article
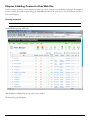
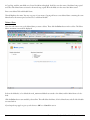
Access: Select Content > Article Manager
The Article Manager page will display
Click the New icon displayed at the top of the browser window
The Article New page will display
10
The Artstract Co. - Joomla User Manual - Rev. 2009.04.20
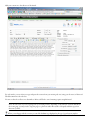
Before you begin adding your content you will need to give the Article a title (example: Welcome Front Page).
So that you will be able to view the content make sure that the Published radio button is selected to Yes.
The Alias field (which is the internal name of the
article) does not need to be completed as Joomla!
will complete this field for you.
If you wish your article to be displayed on your front page then check that the Front Page radio button is selected to Yes.
Select the Section and Category that your new article belongs to. Using sections and categories allow oher users to find your
article should they need to edit it later or insert it into the website navigation menu.
The Artstract Co. - Joomla User Manual - Rev. 2009.04.20
11
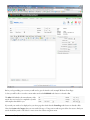
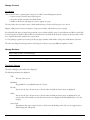
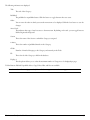
Add your content in to the edit area of the Article
For each article, you can often just copy and paste the content from your existing web site (using your browser) or Microsoft
Word document into the edit area.
You can see that the toolbar is not dissimilar to Microsoft Word so text formatting is quite straightforward
Note: In some cases, if you are copying from your existing website, depending on the amount of custom HTML in
the source page, you may need to copy the page to a plain text editor first (such as Notepad) and then copy from
there into Joomla!.
When you are happy with the content you can click the Save icon displayed at the top of your browser window
12
The Artstract Co. - Joomla User Manual - Rev. 2009.04.20
To create further articles, repeat the process described remembering that if you don’t want the content to be displayed on the
Front Page make sure that you select No using the Front Page radio button
Adding an Image to an Article
Access: Select Content > Article Manager
The Article Manager page will display
Select your article.
The Article Edit page will display.
At the bottom of the Edit screen there is an Image button.
Click the Image button
The Image Organiser pop up window will display
You can either select an image from the window or to upload your own image click the Browse button
The Artstract Co. - Joomla User Manual - Rev. 2009.04.20
13
The Choose File window will display where you can navigate to where you have your images stored
Select your image and click the Open button
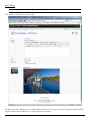
Your image will then be displayed in the Image Organiser pop up window.
Select your image and click the Insert button
Click the Save icon at the top of the Article Edit page.
Click the Preview hyperlink at the top of the browser window.
Your image will now display on the relevant article.
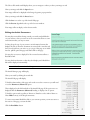
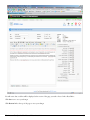
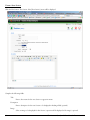
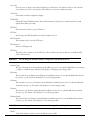
Editing the Article Parameters
You may have noticed that having created your article and published it
on your website so that you can now see the content that there are some
extra functions that you may not want.
Looking along the top of your content is an information banner that
displays the date of when the document was created, who created it and
three icons that allows your visitor to get a copy of this page as an Adobe
Acrobat .pdf file, print this page and email a link to this page.
You may also not want to display all of the content but instead have a
Read More link.
You can edit these functions so that they don’t display and a Read More
link will be displayed automatically.
Access: Select Content > Article Manager
The Article Manager page will display
Select your article by clicking the article title.
The Article Edit page will display.
To hide the functionality of the page such as who wrote the content etc you will need
to use the Parameters (Advanced) option.
This is displayed on the left hand side of the Article Edit page. If the options are not
displayed click the Parameters (Advanced) heading to display a list of options.
To hide the options such as pdf icon, Print icon, Email icon, title, Author Name etc
Select Hide from any of the drop down menus.
To create an automatic Read More link to your content position your mouse cursor at
the section of the page you want the link.
Click the Read More button
14
The Artstract Co. - Joomla User Manual - Rev. 2009.04.20
You will notice that a red line will be displayed at the section of the page you wish to have a link to Read More.
Click Save icon to save your changes
Click Preview link at the top of the page to view your changes
The Artstract Co. - Joomla User Manual - Rev. 2009.04.20
15
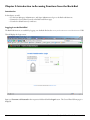
Chapter 5: Introduction to Accessing Functions from the Back-End
Introduction
In this chapter, we will:
• Look at how Managers, Administrators, and Super Administrators log in to the Back‐end functions.
• Examine the Control Panel, located on the Back‐end’s Home page.
• Describe the default buttons Joomla! uses.
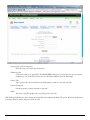
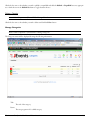
Logging in to the Back-End
The Back-End functions are available by logging onto the Back-End via the www.yourdomainname.com/administrator URL.
This will display the Login screen.
Input you Username and Password in their respective fields and click the Login button. The Control Panel (Home page) is
displayed.
16
The Artstract Co. - Joomla User Manual - Rev. 2009.04.20
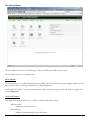
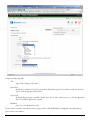
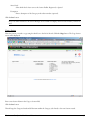
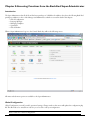
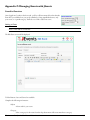
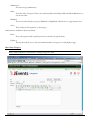
The Control Panel
The Control Panel, also known as the Home page, is always accessible from the Home menu option.
The Control Panel consists of four distinct areas:
Menu Options:
The menu provides access to all the Back-End functions available. The menu and sub-menu options displayed will vary according to your User status, i.e. Manager, Administrator, or Super Administrator.
On the right hand, side there are buttons representing the number of private messages you have, the number of logged on Users and a Logout link.
Quick Link Buttons:
These quick link buttons provide access to a number of common tasks with one click.
Add New Article
Displays the Article: New screen
Article Manager
Displays the Article Manager [Section: All] screen
The Artstract Co. - Joomla User Manual - Rev. 2009.04.20
17
Frontpage Manager
Displays the Frontpage Manager screen.
Section Manager
Displays the Section Manager screen.
Category Manager
Displays the Category Manager [Content: All] screen.
Media Manager
Displays the Media Manager screen.
Menu Manager
Displays the Menu Manager screen.
Language Manager
Displays the Language Manager [Site] screen.
User Manager
Displays the User Manager screen.
Global Configuration
This displays the Global Configuration screen.
Other Common Buttons
Save
Click Save to save the data on the screen you are using and return to the appropriate list screen, e.g. Article
Manager [Section: All].
Apply
Save the data on the screen, and remain on that screen.
Cancel, Logout
The correct way to leave an input screen, or to force a logout.
Help
Access the built in help system. The button is not referred to in the Toolbar Button: lists for processes described in this manual but it is available on all screens.
Publish, Default, Assign, and Send Mail
Used with Sections, Categories, and Articles etc. to control publication, assigning a template or sending a
Mass Mail.
Unpublish
Used with Sections, Categories, and Articles etc. to control publication.
Delete, Trash, Uninstall
Used to delete from the database, send to the Trash Manager, or uninstall a Component, Module, or Plugin.
Edit
Used to edit Sections, Categories etc.
New
Used to create new Articles etc.
18
The Artstract Co. - Joomla User Manual - Rev. 2009.04.20
Upload
Used to upload images to the Media Manager.
Edit HTML
Used to edit a template.
Edit CSS
Used to edit a template’s .css file.
Restore
Used to restore items that have been sent to the Trash Manager.
Copy
Used to copy Articles etc.
Move
Used to move Articles between Sections/Categories etc.
Archive
Used to archive Articles.
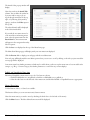
Administrator Modules
The modules display Logged In Users, Components installed, most Popular Articles viewed, Recently Added Articles published, and Menus with the number of links per menu.
The order, and whether the modules are displayed, or not, can be controlled from the menu option:
Access: Select Extensions > Module Manager > Administrator
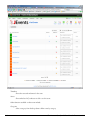
Logged In Users Tab:
This displays a list of users currently logged on together with their access level (both in the Backend and in the Front-End sections). Click a username to go to the User Edit page for that user.
Logout a user by clicking the red cross.
Popular Tab:
Click this Tab to access the screen that lists in order, the most popular Articles on your site. Included are the dates the Articles were created, and the
number of hits or views.
Click the Article name to edit that item.
The Artstract Co. - Joomla User Manual - Rev. 2009.04.20
19
Recent Added Articles Tab:
Click this Tab to access a screen that lists the most recently added Articles. This includes the creation date and the author. Click
the Article name to edit that item.
Menu Stats Tab:
Click this Tab to access the screen that lists all menus and the number of item links in each menu. The number of links is the
total created, not the total published. Click the name of a menu to access the screen that lists the items for that menu.
20
The Artstract Co. - Joomla User Manual - Rev. 2009.04.20
Chapter 6: Accessing Functions from the Back-End: Manager
Introduction
The Manager has all the Front-End access privileges of a Publisher. In addition, they have the following Back-End privileges,
which are covered in detail in this chapter:
• Media Manager
• Preview
• Menu Items
• Managing Content: Sections, Categories and Articles
• Frontpage Manager
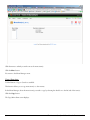
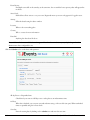
When a Manager logs in to the Control Panel, as described in the previous chapter, they will see the following screen.
You will notice that the menus are limited to Home, Site, Menu, Content, and Help. Within these, there is a sub-set of the full
menu options.
The Artstract Co. - Joomla User Manual - Rev. 2009.04.20
21
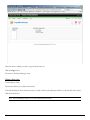
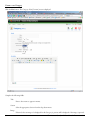
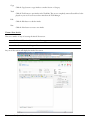
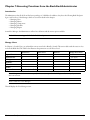
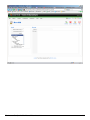
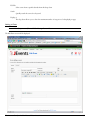
Media Manager
Access: Select Site > Media Manager.
The Media Manager screen will be displayed.
This screen displays the entire images folder, i.e. www.yourdomainname.com/images. This is useful to remember, as you need
to select the correct sub-folder to upload images, which will be available to your Articles.
Normally, you will see the following sub-folders:
M_images, banners, smilies, and stories (used to store images for Articles). In addition, you will see a number of images in the
images folder itself.
Some third party Components, e.g. Zoom Gallery, may create sub-folders in the images folder.
Access: Click on a folder button or use the Directory drop down box to access a sub-folder.
22
The Artstract Co. - Joomla User Manual - Rev. 2009.04.20
Use the Up directory button to move up in the folder, sub-folder hierarchy.
Note: Images for use in Articles are stored in the stories sub-folder. It is a good idea to organise your images in a
logical set of sub-folders. I remember one person putting hundreds of images directly in the stories sub-folder. Not
only did it take a long time to load but also they had a never-Ending quantity of images making it difficult to manage!
In this section we will look at:
• Creating a folder
• Uploading an image
• Deleting an image
• Using the Image/Url Code
Create a folder
Click on the stories sub-folder button.
Note: The change in the Directory drop down box to /stories.
Enter a name in the Create Directory field.
Note: Ideally use all lower case with no spaces or use an underscore and keep it short, e.g. newsitems or news_items.
Then, click the Create button. When the screen is refreshed, a new folder will have been added to the images/stories sub-folder.
Upload and Delete an Image
Ok, so now you have created a sub-folder, let us upload an image.
Use the Browse button to locate the image on your
local computer that you wish to upload.
From the Choose File dialogue, click on the selected
image and click on Open. The pathname to the
selected image is displayed in the File Upload box.
Now click the Upload button.
At the conclusion of the upload a confirmation,
Upload completed, will be displayed on the screen
and a thumbnail of the image will have been added
to the /stories sub-folder.
The Artstract Co. - Joomla User Manual - Rev. 2009.04.20
23
Notes on images:
1. I have found it best to keep the image file names as short as possible. Use lower case letters and/or numbers without spaces. I always use the underscore, _, to put gaps in a file name if I need it, e.g. camp_tent.gif.
2. Remember to keep files and image sizes small.
3. File Size – Someone asked why a web page with one small image and a lot of text took over 1 minute to load.
The answer was simple: The original image, which was large, was scaled down to a small image size in the browser
and was, therefore, still the same file size. When you resize your image on your web page, you have done nothing to
the file size. What you are actually doing is telling the browser to re scale the image on the fly. This creates a lot of
work for the browser.
4. When you use an image-editing program to resize the image, and save it as a .jpg or a .gif, you have actually created a smaller image and, therefore, a small file size.
5. If you want to optimise your images, the first thing you need to know about is the three image formats recognised by your web browser.
6. gif: These are gif (pronounced jif as in Jiffy), .jpg/jpeg (pronounced Jay-Peg) and .png (pronounced ping). .gif,
jpg and png files are compressed. That means that information has been organised inside the file in a special way to
minimise the file size.
7. The difference between gif, jpg, and png files is the way that they compress the data.
JPG: JPG compression is designed to optimise photographs or images with fine gradations of colour.
PNG: GIF compression is designed to optimise images with large continuous areas of colour, such as illustrations.
The PNG file format for image compression is expected to replace the Graphics Interchange Format. The PNG
format was developed by an Internet committee expressly to be patent-free. It provides a number of improvements
over the GIF format. Like a GIF, a PNG file is compressed in lossless fashion (meaning all image information is
restored when the file is decompressed during viewing). A PNG file is not intended to replace the JPEG format,
which is ’lossy’ but lets the creator make a trade-off between file size and image quality when the image is compressed.
9. Typically, an image in a PNG file can be 10 to 30% more compressed than in a GIF format. An image of around
19.5K in size will take approximately 3.5 seconds to download at 56Kbps. Although broadband access to the Internet is becoming increasingly common, do not forget to design your site for the lowest common denominator. Dial
up access still represents a significant number of Internet users.
10. Image Dimensions: Refer to the dimensions of your template to avoid adding a large image that will stretch the
width of your template, particularly if you are using a fixed width layout. For example, if I have a fixed width of 760
pixels and a block on the left hand side of 150 pixels for the menu, this leaves me 610 pixels to play with for the
main body of the site. If I insert a 500-pixel width image and want to wrap my text around it, this leaves me just
110 pixels width for text. This might be too narrow.
Preview
Preview is a function that allows you to view the web site(Front-End) from your Administrator (Back-End) Panel just by clicking the Preview button in the top right of your screen.
Manage Menu Items
Note: Creating and deleting menus is reserved for the Administrator or Super Administrator access levels only
In this section, we will be covering:
• How to add a new menu item
• Publish and Unpublish menu items
• Moving menu items
• Copying menu items
24
The Artstract Co. - Joomla User Manual - Rev. 2009.04.20
• Deleting menu items
• Using the Home Menu Option to control the Front Page Display
By default, there will be the mainmenu, othermenu, topmenu and usermenu listed.
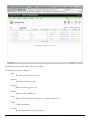
The Menu Manager
In this example, we will be adding a menu link to an article.
Access: Select Menu > mainmenu.
This will display the Menu Manager [mainmenu] screen. All existing menu item will be displayed.
Toolbar Buttons: Menus, Default, Publish, Unpublish, Move, Copy, Trash, Edit, and New are available.
The following information is displayed:
Menu Item
This is the name given to the menu item and is displayed on the menu on the Frontend
Default
Indicates the default page a visitor will see when accessing the site (the home page)
The Artstract Co. - Joomla User Manual - Rev. 2009.04.20
25
Published
This indicates whether the menu item is published, or not published. Clicking on the button will switch the
state of that menu item between Published and Unpublished.
Order
You can use the Up or Down arrows to alter the order in which the menu items are displayed. Or you can
enter the order in which you want the menu items displayed. Use the Save button to save the changes.
Access Level
This indicates what type of user has access to the menu item. By clicking on the title, you can toggle between,
Public, Registered, and Special.
Type
This indicates the type of link used for this menu item.
Itemid
This shows the ID (identification code) for this specific Menu Item used in the database.
Other functions available on this screen include
Max Levels
This drop down allows you to select the maximum levels of menu displayed. Useful if you have a long and
complex hierarchical menu.
State
Allows you to view only Published or Unpublished menu items.
Display #
This drop down allows you to select the maximum number of menu items displayed per page. Note the <<
Start < Previous [page number] Next > End >> navigation to move between pages.
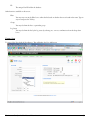
Create a New Menu Item
To create a new menu item, click on the New button.
This displays the New Menu Item screen.
26
The Artstract Co. - Joomla User Manual - Rev. 2009.04.20
Note: Some menu types appear in more than one grouping to aid selection, they are still the same menu type.
Click on the Article Layout link in the Article Item box. This will display the Add Menu Item: Article Layout screen.
Note: You can select the required options radio button and click the Next button or simply click the option name
you require. Either action will then display the Add Menu Item: Component screen.
The Artstract Co. - Joomla User Manual - Rev. 2009.04.20
27
Complete the following fields:
Title
Type a Title to display on the menu.
Parent Item
By default, it is added as a Top-level item under the Parent Item option. If you wish it to make it a sub-menu
option, select the appropriate Parent Item.
Access Level
By default, the menu item is available to Public access. If you wish to restrict access to it, select the appropriate
Access Level. Public, Registered, or Special.
Published
Select: No or Yes. By default, it is Yes.
You now need to select the article that the menu is going to link to Click the Select button displayed at the right hand top
corner of the browser window
28
The Artstract Co. - Joomla User Manual - Rev. 2009.04.20
The Article Select pop up window will
display
Select the article in the Article Title
column. You can filter the articles list
by section and/or category by using the drop down menus in the top
right, or by filtering by keywork by
typing a word into the Filter input in
the top left.
The selected Article will be displayed
in the Select Article field.
If you wish the new menu item to be
a sub-item below and existing menu
item, select the parent item from the
Parent Item list. A new menu item
will appear in the navigation hierarchy
below its parent.
Click the Save icon displayed at the top of the Menu Item page.
The Menu Item Manager page will display with your new menu item displayed
Click the Preview link to display your web page with the new Menu item.
Your web page will display with the new Menu option where you can test to see if by clicking on the title you just created the
correct page will be displayed.
Some menu items have further parameters, which may be visible when you first set up the menu item or become visible after
saving it, e.g. Blog – Content Category, has further parameters to control the way content displays.
Publish and Unpublish a Menu Item
Publish and Unpublish a menu item is easy to do. You have two choices:
• Click the Published icon to un‐publish or click the not Published icon to publish; or
• Select the radio button to the left side of the menu item, and click the Publish or Unpublish buttons as appropriate.
Move a Menu Item
Toolbar Buttons: Move, or Cancel, are available.
This function allows you to move menu item(s) between menus.
Select the menu item(s) you wish to move by checking the check box to the left side of the item(s).
Click the Move button. The Move Menu Items screen will be displayed.
The Artstract Co. - Joomla User Manual - Rev. 2009.04.20
29
Click the menu to which you wish to move the menu item(s).
Click the Move button.
You return to the Menu Manager screen.
Copy a Menu Item
Toolbar Buttons: Copy or Cancel are available.
This function allows you to copy menu item(s) to other menus.
In the Menu Manager, select the menu item(s) you wish to copy by selecting the check box to the left side of the item(s).
Click the Copy button.
The Copy Menu Items screen displays.
30
The Artstract Co. - Joomla User Manual - Rev. 2009.04.20
Select the menu to which you wish to copy the menu item(s) to.
Click the Copy button.
You return to the Menu Manager screen.
Delete a Menu Item
Toolbar Buttons: Trash
This function allows you to delete menu item(s).
In the Menu Manager, select the menu item(s) you wish to delete by checking the check box to the left side of the item(s).
Click the Trash button.
Note: The Trash Manager allows you to restore deleted menu item(s).
The Artstract Co. - Joomla User Manual - Rev. 2009.04.20
31
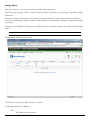
Manage Content
Introduction
There are three levels to organising the content of a Joomla! Content Management System:
• Sections are big containers; they hold Categories.
• Categories are little containers; they hold Articles.
• Articles are all the text and images you want to appear on a page.
The only catch is that you cannot create a Article without having a Section and Category for it to live in.
Imagine a filing system: Sections are drawers, Categories are folders, and Articles are pieces of paper.
If you had all of the pieces of paper lying around in your room that would be a mess. If you had them in folders, but the folders were lying all over the floor that would not be much better. If you had the all the pieces of paper in a drawer, with no folders to organise them, that would not be so great either.
So to keep things organised, you need to put all your papers (Articles) inside folders (Categories) inside drawers (Sections).
The other nice thing about having Sections and Categories is that you can assign different templates to them.
Manage Sections
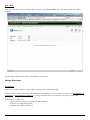
Access: Select Content > Section Manager.
Access: Click the Section Manager button from the Home page.
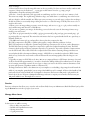
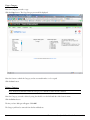
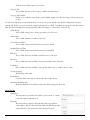
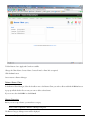
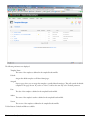
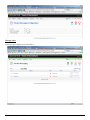
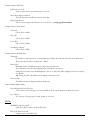
The Section Manager
The Section Manager screen will now be displayed.
The following information is displayed:
Title
The title of the section.
Published
The published or not published status of a Section.
Reorder
You can use the Up or Down arrows to alter the order in which the Section items are displayed.
Order
You can use the Up or Down arrows to alter the order in which the Section items are displayed. Or you
can enter the order in which you want the Section items to be displayed. Click the Save button to save the
changes.
Access Level
This indicates what type of user has access to the Section. By clicking on the title, you can toggle between,
Public, Registered, and Special.
32
The Artstract Co. - Joomla User Manual - Rev. 2009.04.20
# Categories
This is the number of Categories defined for the specific Section.
# Active
This is the number of published Articles in the Section.
#Trash
Number of Articles belonging to this section and currently in the Trash Manager.
ID
This is the ID for each Section as defined in the database.
Other functions available on this screen include:
State
Allows you to view only Published or Unpublished menu items.
Display #
This drop down allows you to select the maximum number of Sections to be displayed per page in the Section
Manager. Note the << Start < Previous [page number] Next > End >> navigation to move between pages.
Toolbar Buttons: Publish, Unpublish, Copy, Delete, Edit, and New are available.
The Artstract Co. - Joomla User Manual - Rev. 2009.04.20
33
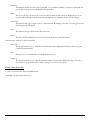
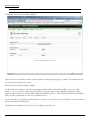
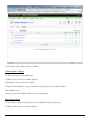
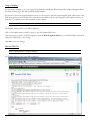
Create a New Section
Click the New button. The Section: New [New Section] screen will be displayed.
Complete the following fields:
Title
Enter a short name for the new Section to appear in menus
Description
Enter a description for the new Section to be displayed in headings fields (optional)
Image
Select an image to be displayed for this Section (a preview will be displayed of the image) (optional).
34
The Artstract Co. - Joomla User Manual - Rev. 2009.04.20
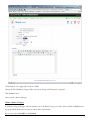
Access Level
Select which level of user can see the Section: Public, Registered, or Special
Description
Enter a description of the Category in the editor window (optional).
Click the Save button.
Note: You will be returned to the Section Manager screen, which now displays the new Section Name you have created.
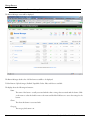
Copy a Section
Select the Section you wish to copy using the check box to the left of the title. Click the Copy button. The Copy Section
screen will be displayed.
Enter a new Section Name in the Copy to Section field.
Click the Save button.
This will copy the Categories listed and all the items within the Category (also listed) to the new Section created.
The Artstract Co. - Joomla User Manual - Rev. 2009.04.20
35
Delete a Section
Note: Ensure that all Articles and Categories within the Section to be deleted are either moved or deleted.
Select the Section you wish to delete by using the check box on the left hand side of the Section’s name. Click the Delete button. The Are you Sure? dialogue will appear. Click OK.
The Section will now be removed from the list and database.
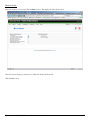
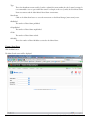
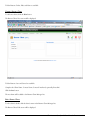
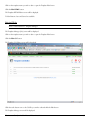
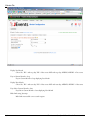
Manage Categories
The Category Manager
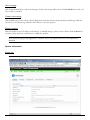
Access: Select Content > Category Manager
Access: Click the Category Manager button from the Home page
The Category Manager [Content All] screen will now be displayed.
36
The Artstract Co. - Joomla User Manual - Rev. 2009.04.20
The following information is displayed:
Title
The title of the Category.
Published
The published or unpublished status. Click the button to toggle between these two states.
Order
You can enter the order in which you want the menu items to be displayed. Click the Save button to save the
changes.
Access Level
This indicates what type of user has access to the menu item. By clicking on the title, you can toggle between,
Public, Registered and Special.
Section
This is the name of the Section to which the Category is assigned.
# Active
This is the number of published Articles in the Category.
#Trash
Number of Articles belonging to this Category and currently in the Trash.
ID
This is the id of the Category as held in the database.
Display #
This drop down allows you to select the maximum number of Categories to be displayed per page.
Toolbar Buttons: Publish, Unpublish, Move, Copy, Delete, Edit, and New are available.
Note the << Start < Previous [page number] Next > End >> navigation to move between pages.
The Artstract Co. - Joomla User Manual - Rev. 2009.04.20
37
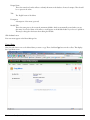
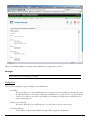
Create a new Category
Click the New button. The Category: New [Content] screen is displayed.
Complete the following fields:
Title
Enter a short name to appear in menus.
Section
Select the appropriate Section from the drop down menu.
Image
If desired, select an image to be displayed for this Category (a preview will be displayed of the image) (optional).
38
The Artstract Co. - Joomla User Manual - Rev. 2009.04.20
Image Position
Select whether the image appears to the Right or Left of the text.
Access Level
Select who can see the new Category. Public, Registered, or Special
Description
Enter a description of the Category in the editor window (optional).
Click the Save button.
Note: You return to the Category Manager screen, which now displays the new Category Name you have created.
Move a Category
Select the Category that you wish to move.
Click the Move button. The Move Category screen will be displayed.
Select the Section to which the Category and its associated Articles is to be moved.
Click the Save button.
The Artstract Co. - Joomla User Manual - Rev. 2009.04.20
39
Copy a Category
Select the Category you wish to copy.
Click the Copy button. The Copy Category screen will be displayed.
Select the Section to which the Category, and its associated Articles, is to be copied.
Click the Save button.
Delete a Category
Note: Ensure that all Articles within the Category to be deleted are either moved or deleted.
Select the Category you wish to delete by using the check box on the left hand side of the Section’s name.
Click the Delete button.
The Are you Sure? dialogue will appear. Click OK.
The Category will now be removed from the list and database.
40
The Artstract Co. - Joomla User Manual - Rev. 2009.04.20
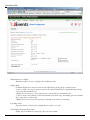
Manage Articles
Introduction
Managers, Administrators and Super Administrators may create, edit, and generally manage Articles from the Administrator’s
Back-End as well as the Front-End.
In this Section, we will be looking at how to:
• Create a new Article
• Move a Article
• Copy a Article
• Archive a Article
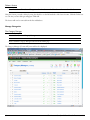
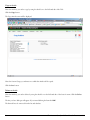
The Article Manager
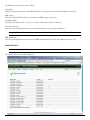
Access: Select Content > Article Manager.
Access: Click the Article Manager button from the Home page.
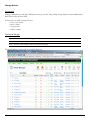
The Article Manager [Section: All] screen will be displayed.
The Artstract Co. - Joomla User Manual - Rev. 2009.04.20
41
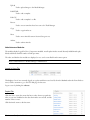
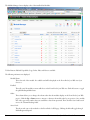
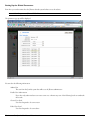
The Article Manager shows a list of the Articles on your site.
The following information is displayed:
Title
This is the title of the Articles and is listed within Section and Category. Click the title to edit content. A Padlock button, , next to it shows that it is checked-out. To check-in, click the title.
Published
This shows whether the item is Published, , or Not, . Hover over this button to see a summary of the publishing information. Click to change its state.
Frontpage
This indicates whether this item is Published or Not on the Front Page.
Order
Click the Up and Down arrow buttons to move the item up or down in the list. Or enter the list manually in
the field provided and click the Save button to save the new order.
Access Level
This is the user Access Level for the Article. Click on the Access level to switch it to Public, Registered, or
Special.
Section
This is the Section associated with the Article.
Category
This is the Category associated with the Article.
Author
This shows the name of the author of the Content. If the author’s name is displayed in red, click to edit the
author’s information.
Other functions available on this screen include:
You may enter text in the Filter box to refine the list based on whether the text is found in the title of any item. Type in any
text and press the Tab key.
You may also limit the list to a particular Author, Category, Section, or State by selecting one or more combinations from the
drop down boxes.
Toolbar Buttons: Archive, Publish, Unpublish, Move, Copy, Trash, Edit, and New are available.
A summary of their functions is listed below:
Archive
Check the Items to be archived, and click the Archive button to put Articles into an archived state. They are
still accessible to the Front-End of your site if in published mode.
Publish
Select the radio button of the Items to be published, and click the Publish button.
Unpublish
Select the radio button of the Items to be un-published and click the Unpublish button.
Move
42
Click the Move button to move Articles to another Content Section or Category.
The Artstract Co. - Joomla User Manual - Rev. 2009.04.20
Copy
Click the Copy button to copy Articles to another Section or Category.
Trash
Click the Trash button to put Articles in the Trash Bin. They are not completely removed but will not be displayed on your site. You can restore these Articles in the Trash Manager.
Edit
Click the Edit button to edit the Article.
New
Click the New button to create a new Article.
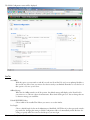
Create a New Article
There are a number of ways of accessing the Article: New screen.
Access: Click the Add New Article button on the Home page.
Access: Select Content > Article Manager > New.
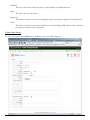
Any one of these actions will display the Article: New screen.
The Artstract Co. - Joomla User Manual - Rev. 2009.04.20
43
Toolbar Buttons: Preview, Upload (image), Save, Apply and Cancel.
This screen is divided into two main areas. The left hand side is used to input content. The right hand side handles a number of
parameters, which control what and how the content is displayed.
Complete the following fields:
Title
Enter a Title.
Section
Select a Section.
Title Alias
If you leave this blank, the system will determine it automatically.
Category
Select a Category (associated with the Section selected).
Show on Frontpage
This determines whether the Article is displayed on the Front Page. The default the option is not checked.
Check this option if you want to publish the Article on the Front Page.
Published
This determines whether the Article is published or not. The default option is checked. Uncheck it if you do
not wish to publish the Article, this is particularly useful when it cannot be finished at the first attempt.
Main Text
All of the content for this Article may be entered in the editor window. The main text, directly below the Intro
Text box is used specifically when you wish to publish the Article to the Front Page or a Category Blog display.
The Intro Text will be displayed on the Front Page with a Read More link.
Note: The Read More text can be changed in the language file.
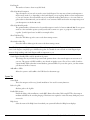
Tab Settings Block
Publishing Tab
The Publishing Tab contains the settings for how and when the Article is to be published:
Access Level
This determines who can see the Item. The option is, by default, set to
Public. If you wish to restrict access to this Item, set the appropriate
level of access for it.
Author Alias
The author of the Article is normal the logged on user creating it. If
you wish to override this, and the Global Configuration or Parameters
options is set to display the Author’s name, enter the Author’s name
you wish to be displayed.
Author
Select from available Users.
44
The Artstract Co. - Joomla User Manual - Rev. 2009.04.20
Created Date
This overrides the automatic created date for this Item. This is also a useful tool when it is necessary to reorder an Item
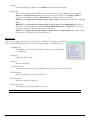
Start Publishing
Is, by default, set to the current date. If you wish to override this with, say, a date in the future, click on the
calendar button. This
will display a pop up calendar. Click on the required Start Publishing date. Alternatively, enter a date/time in the following format: YYYY-MM-DD HH:MM:SS (The time is optional).
Finish Publishing
This date can be overwritten from its default value of Never . The settings are the same as for the Start Publishing field.
Above the Publishing Tab is a report of the status of the Item:
State
Identifies whether the Item is Published or Unpublished.
Hits
Reports on the number of times the Item has been viewed. A Reset Hit Count button will appear after the
Item has been viewed)
Revised
Reports the number of times the Item has been edited.
Created
Identifies the date upon which the Item was created.
Last Modified
Identifies the date of the last time the Item was edited. It identifies the person who carried out the edit.
Note: The Hits counter does not include views of items that appear on the Front Page.
Parameters Tab
These parameters control what you see when you view a Article in full view. Check,
uncheck or select from a drop down box as appropriate. In most cases however, you can
leave these setting alone and use the Global Values set by the Super Administrator.The
following list details each of the parameters:
Show Title
Show or Hide the Page Title text.
Title Linkable
Drop down options are: Use Global to use the parameter as defined in
the Global Configuration, Show or Hide .
Section Name
Show or Hide the name of the Section to which the Item belongs.
Section Title Linkable
Enables you to make the item’s section name linkable. Applies only
The Artstract Co. - Joomla User Manual - Rev. 2009.04.20
45
when the Section Name option is set to Show.
Category Title
Show or Hide the name of the Category to which each item belongs.
Category Title Linkable
Enables you to make the item’s Category name linkable. Applies only when the Category Name option is set
to Show.
For each of the following seven items listed below, you can use the option selected in the Global Configuration settings by
selecting Use Global or you can override the setting by selecting Show or Hide . Overriding the settings for items here will not
affect the Global Configuration settings and will not affect the settings for other Articles on the web site.
Article Rating
Show or Hide ratings given to home page items by your site’s users.
Author Name
Show or Hide the names of authors of the item.
Created Date and Time
Show or Hide the date and time that those item were created.
Modified Date and Time
Show or Hide the date and time that item were last modified.
PDF Icon
Show or Hide the button and link to the PDF version of the item.
Print Icon
Show or Hide the button and link to the printer-friendly format of the item.
E-mail Icon
Show or Hide the button and link to the page that enables users to email the item to others.
Content Language
The language of the article.
Key Reference
A text key that the item may be referenced by, like a help reference.
Alternative Read More text
Alternative Read More text which overwrites the Global Settings for this article
Meta Info Tab
Description
This information is inserted in the headers of your content. i.e. <head>
tag Search engines commonly use it.
Keywords
These keywords are related to the header information provided for
search engines. They also drive the Related Items Module that provides
automatic links to other Articles that share the same keyword.
46
The Artstract Co. - Joomla User Manual - Rev. 2009.04.20
Move an Article
Select the Article(s) to be moved. Click the Move button. This displays the Move Items screen.
Select the Section/Category combination to which this Article will be moved.
Click the Save button.
The Artstract Co. - Joomla User Manual - Rev. 2009.04.20
47
Copy an Article
Select the Article(s) you wish to copy by using the check box to the left hand side of the Title.
Click the Copy button.
The Copy Articles screen will be displayed.
Select the Section/Category combination to which this Article will be copied.
Click the Save button.
Delete an Article
Select the Article(s) you wish to delete by using the check box on the left hand side of the Section’s name. Click the Delete
button.
The Are you Sure? dialogue will appear. If you intend deleting the Item click OK.
The Item will now be removed from the list and database.
48
The Artstract Co. - Joomla User Manual - Rev. 2009.04.20
Archive an Article
Select the Article(s) you wish to archive by using the check box on the left hand side of the Article’s name. Click the Archive
button.
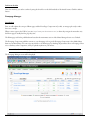
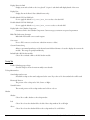
Frontpage Manager
Introduction
First, we will explain the concept of Home page and the Front Page Component in Joomla!, as many people easily confuse
these two concepts.
When a visitor types in the URL of your site, http://www.yourdomainname.com (or when they navigate from another site),
the Home page is usually the first page they visit.
The Home page itself is the published item located in the mainmenu section of the Menu Manager that is set as Default.
The Frontpage Component publishes content to your homepage (as long as the Frontpage Component is the default Menu
Item in your Main Menu). You can assign any Article to the Home page by checking the parameter Show on Frontpage. However, as with any other Component, it may be placed anywhere in your menus.
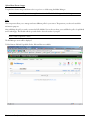
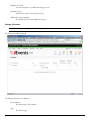
Access: Select Content > Frontpage Manager.
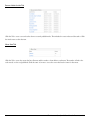
The Frontpage Manager screen will be displayed.
The Artstract Co. - Joomla User Manual - Rev. 2009.04.20
49
Toolbar Buttons: Archive, Publish, Unpublish, and Remove are available.
This page shows a list of the Articles assigned to the Front Page Component. You may filter the display by Section, Category,
Author, and/or State.
The following information is displayed:
Title
This is the title of the Articles displayed on the Front Page and is listed within Section and Category.
Published
This shows whether the item is published or not. Hover over this button to see a summary of the publishing
information. Click to change state.
Order
Click the arrow buttons to move the item up or down in the list. Or enter the list manually in the field provided and click the Save button to save the new order.
Access
This is the user access level for the Article. Click on the Access Level to switch it between Public, Registered,
or Special.
Section
This is the Section associated with the Article. Click the Section title to edit the Section page.
Category
This is the Category associated with the Article. Click the Category title to edit the Category page.
Author
This shows the name of the author of the Content. If the author’s name is displayed in red, click to edit the
author’s information.
Remove a Frontpage Item
To remove a Frontpage Item:
• Check the checkbox by the side of the Article you want to remove.
• Click the Remove button.
50
The Artstract Co. - Joomla User Manual - Rev. 2009.04.20
Chapter 7: Accessing Functions from the Back-End: Administrator
Introduction
The Administrator has all the Front-End access privileges of a Publisher. In addition, they have the following Back-End privileges as well as those of the Manager, which are covered in detail in this chapter:
• Managing Users
• Managing Menus
• Managing Components
• Managing Modules
• Managing Plugins
As with the Manager, the Administrator will not have all menu and sub-menu options available.
Further Information: Appendix B – Back-End Menu Options
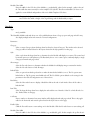
Manage Users
In Chapter 3: Joomla! Users, we outlined the various access levels offered by Joomla! This section deals with the creation of users from the Back-End. The Table below illustrates the permissions at each Access Level.
Super Administrator
Administrator
Manager
Publisher
Editor
Author
Registered
Create User
Delete Users
Edit User
Change Access Level
(See Note)
(See Note)
(self only if enabled)
Note: Managers and Administrators may only maintain users up to their level. Registered users may only maintain
their own account.
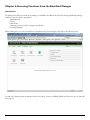
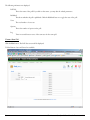
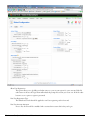
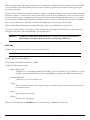
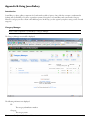
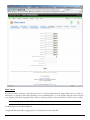
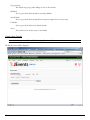
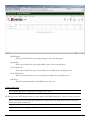
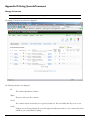
Access: Select Site > User Manager.
This will display the User Manager screen.
The Artstract Co. - Joomla User Manual - Rev. 2009.04.20
51
Toolbar Buttons: Logout, Delete, Edit, and New are available.
The following information is displayed:
Name
The name by which the User is known.
Username
The name the User uses to login.
Logged In
Indicates whether logged in or not.
Enabled
Indicates whether enabled or not.
Group
Indicates which Group the User belongs to, e.g. Author, Manager, etc.
E-Mail
A valid e-mail address.
Last Visit
The date and time the User was last logged on.
52
The Artstract Co. - Joomla User Manual - Rev. 2009.04.20
ID
The unique User ID held in the database.
Other functions available on this screen:
Filter
You may enter text in the Filter box to refine the list based on whether the text is found in the name. Type in
any text and press the Tab key.
Group
You may also limit the list to a particular group
Log Status
You may also limit the list by the log status by selecting one, or more, combinations from the drop down
boxes.
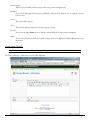
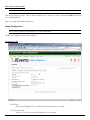
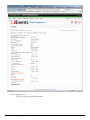
Create a User
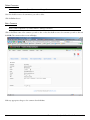
To create a New User, click the New Button. This will display the User: Add screen.
The Artstract Co. - Joomla User Manual - Rev. 2009.04.20
53
Name
The ‘real’ name of the user
Username
The name by which they will be identified when logged on to the site.
E-mail address
A valid e-mail address. Validation can be utilised by requiring a confirmatory e-mail to be sent and a special
activation link followed back to the site by the user.
New Password
A password – ideally a mixture of numbers, letters, and symbols.
Verify Password
The re-typing of the password to ensure accuracy.
Group
Select the Group to which the User is to be assigned from the stated options.
Block User
Options: Yes or No. Allows the administrator the chance to block this user and prevent logging in.
Receive System Emails
Determines if this user receives emails with website system status.
Back-End Language
The language used by the user in the back-end (administrator) area. Ignore to use Global Configuration.
Front-End Language
The language used by the user on the front-end of the website. Ignore to use Global Configuration.
User Editor
Determines what text editor the user will use. Ignore to use Global Configuration.
Help Site
The site the user will see when they click a help button.
Time Zone
The users time zone.
Click the Save button.
Delete a User
You can delete a User from the User Manager screen using the select box by the side of the Name and then clicking the Delete
button.
Logout a User
You can force a logout of a User by using selecting the radio button beside the Name and then clicking the Logout button.
54
The Artstract Co. - Joomla User Manual - Rev. 2009.04.20
Manage Menus
Navigation and access to content in your web site is made possible using menus.
Menus in Joomla! are groups of links to Sections, Categories, Articles, Components, or external pages. These links are called
Menu Items.
Each menu must have an identification name, which is only used internally by Joomla! A menu only becomes visible on a
site if it has a published mod_mainmenu Module, which references it. A menu may have multiple mod_mainmenu Modules
referencing it.
By default, you should find the following menus available, mainmenu, othermenu, topmenu, and usermenu under the Menu
option.
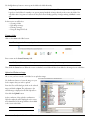
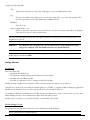
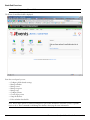
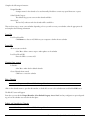
Access: Select Menus > Menu Manager.
This will display the Menu Manager screen.
Toolbar Buttons: Copy, Delete, Edit, and New are available.
The following information is displayed:
Title
The ‘English’ name of the menu
The Artstract Co. - Joomla User Manual - Rev. 2009.04.20
55
Type
This is the identification name used by Joomla! to identify this menu within the code. It must be unique. It
is recommended to use no space within this name. For example, in the core Joomla!, the User Menu’s Menu
Name is usermenu and the Main Menu’s Menu Name is mainmenu.
Menu Items
Click on the Menu Item button to access the menu items on the Menu Manager [menu name] screen.
#Published
The number of Menu Items published.
#Unpublished
The number of Menu Items unpublished.
#Trash
The number of Menu Items trashed.
#Modules
This is the number of Menu Modules associated to the Menu Name.
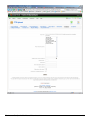
Create a New Menu
Click the New button.
The Menu Details screen will be displayed.
56
The Artstract Co. - Joomla User Manual - Rev. 2009.04.20
Unique Name
This is the name that Joomla! will use to identify this menu in the database. It must be unique. There should
be no spaces in the name.
Title
The ‘English’ name of the Menu
Description
A description of the menu (optional).
Module Title
This is the name given to the new mod_mainmenu Module, which is automatically created when you save
this menu. It is also the Name of the menu, as it will appear on the Module header if you choose to publish it.
This may be changed in the future when editing the Module.
Click the Save button.
Your new menu appears in the Menu Manager list.
Copy a Menu
Select the radio button next to the Menu Name you want to copy. Then, click the Copy button in the toolbar. This displays
the Copy Menu screen.
The Artstract Co. - Joomla User Manual - Rev. 2009.04.20
57
A Copy Page, with the same fields as in Create New Menu is displayed. It will also state the name of the Menu being copied
and a list of the Menu Items associated to the menu being copied. Fill in the fields as in the create New Menu screen.
Enter a new Menu Title and Module Name.
This will duplicate the menu. You may copy any of your menus. Copying will create a new Menu Name, containing the same
Menu Items as the menu copied, associated to a new Menu Module.
Delete a Menu
Select the radio button next to the Menu Name you want to delete. Then, click the Delete button in the toolbar. The Delete
Menu: menuname screen will be displayed.
It shows the Module(s) to be deleted (the mod_mainmenu Modules associated to this Menu) and the Menu Items to be deleted.
Click the Delete button surrounded by a dotted line. This will delete this Menu, all of its Menu Items, and all of the Modules
associated with it.
A JavaScript alert popup box gives you the choice to OK or to Cancel this action.
58
The Artstract Co. - Joomla User Manual - Rev. 2009.04.20
Edit a Menu
Select the radio button next to the Menu Name you want to edit. Click the Edit button. The Menu Details screen will be
displayed.
You can edit the Unique Name, Title, and Description on this screen.
Manage Extensions
Introduction
Extensions are add-on elements to the Joomla! core that provide specific functionality.
Members of the Joomla! community produce third party Joomla! Extensions on a continuous basis. Look at http://extensions.
joomla.org/ or http://developer.joomla.org for a listing of available Extension downloads or check the special forums.
In this section, we will look at:
• The core Extensions that come with the Joomla! installation.
• How they are configured and used.
• Installing and deleting an Extension.
The Artstract Co. - Joomla User Manual - Rev. 2009.04.20
59
Install an Extension
Access: Select Extensions > Install/Uninstall
The Install new Extension screen will be displayed.
This screen has six tabs. The first is used to install a comonent, module, plugin, language, or template. The remaining five tabs
are used to manage each type of extension.
There are three methods for installing a Module:
The first method of installing is to upload a zipped package file that will be automatically installed to your server. Click
Browse... to go to the location of the Component zip file on your local computer. Once identified select the file and click
Open. The name and location of the file will be displayed in the Package File: box. Then click the Upload File & Install button.
If all goes well you will transfer to a new screen confirming Success.
The second method is to upload an unpacked archive to your host’s server. Type the location of this file (it must be the absolute
location) then click the Install button.
The third method is similar to the second, but uses an address on another server.
60
The Artstract Co. - Joomla User Manual - Rev. 2009.04.20
Uninstall an Extension
Access: Select Extensions > Install/Uninstall
Click on the tab for the type of extension you wish to uninstall.
Tick the box next to the Extension you want to uninstall and then click the Delete button. A dialogue alert will show: Are you
sure, you want to delete selected items?
Click OK. The page will reload displaying the word Success.
Manage Components
Banners
This Component allows you to display banners in rotation on your site. It also allows some advanced features such as impressions management and custom code.
Banners can be displayed on your web site by simply publishing the banner once it has been created through the process below.
Their location is dependent upon the template being used for your site.
The Banner Component consists of three options, Manage Clients, Manage Categories and Manager Banners.
Manage Clients
Before you can set up a banner, you must have a client.
Access: Select Components > Banners > Manage Clients.
The Banner Client Manager screen will be displayed.
The Artstract Co. - Joomla User Manual - Rev. 2009.04.20
61
Toolbar Buttons: Delete, Edit, and New are available.
Create a Banner Client
To add a new client, click the New button.
The Banner Client: New screen will be displayed.
Toolbar Buttons: Save and Cancel are available.
Complete the Client Name, Contact Name, Contact E-mail and, optionally, Extra Info.
Click the Save button
The new client will be added to the Banner Client Manager list.
Edit a Banner Client
To edit a client’s details, click the client’s name in the Banner Client Manager list.
The Banner Client: Edit screen will be displayed.
62
The Artstract Co. - Joomla User Manual - Rev. 2009.04.20
Toolbar Buttons: Save, Apply and Cancel are available.
Change the Client Name, Contact Name, Contact E-mail, or Extra Info as required.
Click the Save button.
Screen returns to Banner Manager.
Delete a Banner Client
In the Banner Client Manager, Select the checkbox next to the Banner Client you wish to delete and click the Delete button.
A pop up will ask whether You are sure you want to delete selected items?
If you are sure, then click OK if not click Cancel.
Manage Categories
Before you can set up a banner, you must have a category.
Access: Select Components > Banners > Manage Categories.
The Banner Category Manager screen will be displayed.
The Artstract Co. - Joomla User Manual - Rev. 2009.04.20
63
Toolbar Buttons: Delete, Edit, and New are available.
Create a Banner Category
To add a new category, click the New button.
The Banner Category: New screen will be displayed.
Toolbar Buttons: Save and Cancel are available.
Complete the Title, Published, Category Order, Access Level, Image, and, optionally, Description.
Click the Save button
The new category will be added to the Banner Category Manager list.
Edit a Banner Client
To edit a category’s details, click the category’s name in the Banner Category Manager list.
The Banner Category: Edit screen will be displayed.
64
The Artstract Co. - Joomla User Manual - Rev. 2009.04.20
Toolbar Buttons: Save, Apply and Cancel are available.
Change the Title, Published, Category Order, Access Level, Image, and Description as required.
Click the Save button.
Screen returns to Banner Manager.
Delete a Banner Category
In the Banner Category Manager, Select the checkbox next to the Banner Category you wish to delete and click the Delete button.
A pop up will ask whether You are sure you want to delete selected items?
If you are sure, then click OK if not click Cancel.
The Artstract Co. - Joomla User Manual - Rev. 2009.04.20
65
Manage Banners
Access: Select Components > Banners > Manage Banners.
The Banner Manager screen will be displayed.
The Banner Manager details a list of all the banners available to be displayed.
Toolbar Buttons: Upload (images), Publish, Unpublish, Delete, Edit, and New are available.
The display shows the following information:
Name
The name of the banner – usually associated with the client or image that associated with the banner. Click
on the name or select the checkbox next to the name and click the Edit button to access the settings for the
banner.
Client
The client this banner is associated with.
Category
The category this banner is in.
66
The Artstract Co. - Joomla User Manual - Rev. 2009.04.20
Published
The status of the banner. Click on the image to either publish or un-publish the banner.
Order
The order of priority of the banners
Impressions
The number of times the banner has been displayed and the total number of impression aloted this banner.
Clicks
The number of times the banner has been clicked to access the underlying URL and the number of clicks as a
percentage of the impressions for that banner.
Create a New Banner
To create a new banner, click the New button. The Banner: New screen will be displayed.
The Artstract Co. - Joomla User Manual - Rev. 2009.04.20
67
Toolbar Buttons: Upload (images), Save and Cancel are available.
Complete the following fields:
Name
Enter the name of the Banner, as it will appear in the Banner Manager.
Show Banner
Choose whether to publish the banner or not. Select Yes or No
Client Name
Select the name of the assigned client from the drop down menu.
Category
Select the category from the drop down menu.
Impressions Purchased
Input the number of times to display this banner or check the box for unlimited.
Click URL
Enter the full URL of the page that should open when the banner is clicked on.
Clicks
Records the number of times the banner has been clicked. Click the Reset Clicks button to reset the number
to zero.
Custom banner code
You may enter here some code (See Developer’s Manual for more information).
Description / Notes
Optional additional information about the banner.
Banner Image Selector
Select the image to be displayed.
Banner Image
The image selected under Banner Image Selector is displayed here for your convenience and verification.
Click the Save button.
Delete a Banner
To delete a banner select the checkbox next to the banner that you intend to delete and click the Delete button. There will be a
pop up challenge as to whether you are sure this is what you intend click OK to confirm or Cancel to stop the deletion.
Edit a Banner
To edit a banner select the checkbox next to the banner that you wish to edit and click the Edit button.
Edit the Options/Details as necessary.
Click Save to accept changes or Cancel to reject changes. You will be returned to the Banner Manager.
68
The Artstract Co. - Joomla User Manual - Rev. 2009.04.20
Upload New Banner Images
To upload new banner images add them to the images/banners folder using the Media Manager.
Further Information: Chapter 6: Accessing Functions from the BBack-End: Manager > Media Manager
Polls
This Component allows you to manage and create different polls for your visitors. The questions you ask can be useful for
information purposes.
After publishing the poll, you need to activate the Polls Module. You can choose where you would like the poll to be published
and on which page. The Module will also provide a link to show the results of your poll.
Access: Select Components > Polls.
The Poll Manager screen will be displayed.
Toolbar Buttons: Publish, Unpublish, Delete, Edit and New are available.
The Artstract Co. - Joomla User Manual - Rev. 2009.04.20
69
The following information is displayed:
Poll Title
This is the name of the poll. If you click on this name, you may edit the related parameters.
Published
This shows whether the poll is published. Click the Published button to toggle the state of the poll.
Votes
The total number of votes cast
Options
This is the number of options in the poll.
Lag
Time in seconds between votes of the same user for the same poll.
Create a New Poll
Click the New button. The Poll: New screen will be displayed.
Toolbar Buttons: Save and Cancel are available.
70
The Artstract Co. - Joomla User Manual - Rev. 2009.04.20
Complete the following fields:
Title
Type here the title question of the poll as it will appear on your site (100 characters max).
Lag
Enter here the number of seconds users have to wait before being able to vote in the same poll again. This
interval is expressed in seconds. The default value is 86400 (24 hours).
Published
Select Yes or No.
Options: (input fields 1 to 12)
Fill in here the various options the user can select from to cast their vote. Empty items will not be displayed.
Users may select only one of the possible answers.
Note: You may add additional options after the poll has commenced. Deleting options will corrupt the data, so you
should create a new poll.
WARNING!
As of 03/02/05, this is bugged because you are allowed to save a poll without items, which
will generate a MySQL error. You should at least have two options filled out.
Note: You can control where on the site, and which poll appears, using the Poll module by going to Extensions >
Module Manager and selecting Polls.
Manage Modules
Introduction
This section deals with:
• Explaining what Modules are.
• Introducing the Module Manager and the functions associated with it.
• Installing and uninstalling a Module.
• Providing an explanation of how to configure installed Site Modules.
Modules are used to display various information and/or interactive features throughout your Joomla! site.
A Module can contain just about anything from simple plain text, to HTML, to complete standalone third party applications.
Modules can also display interactive content, such as polls, latest news, Newsfeeds and more.
Site Modules are different from Administrator Modules because they display their content on the Frontend of your site while
Admin Modules pertain to various Administrative (Back-End) tasks and/or features.
Modules can be created by you (custom/user Module), or downloaded, and installed.
Module Manager Screen
The management of the Modules is always done in the Administrator (Back-End)panel.
Access: Select Extensions > Module Manager.
The Artstract Co. - Joomla User Manual - Rev. 2009.04.20
71
The Module Manager Screen displays a list of the installed Site Modules.
Toolbar Buttons: Publish, Unpublish, Copy, Delete, Edit, and New are available.
The following information is displayed:
Module Name
This is the title of the module. It is editable and will be displayed on the Front-End of your Web site if you
choose so.
Enabled
This tells you if the module contents will show on the Front-End of your Web site. Click the button to toggle
the published/unpublished state.
Order
This column allows you to change the relevant order that the modules display on the Front-End of your Web
page(s). Click the Up or Down arrows to increase or decrease the module order by one position. Or to modify
this order, type in the number that you would like to have them presented. Then, click the Save Order button
next to the Column Heading Order.
Access Level
This shows who can see the modules on the Front-End of a Web page. Clicking the link will toggle through
Public/Registered/Special.
72
The Artstract Co. - Joomla User Manual - Rev. 2009.04.20
Position
This shows which template positions the module will be displayed. Some common Template positions are:
User1, Left, Righting, and Top.
NOTE: You can only assign the module position to one that is already coded into your template
Pages
This shows on which pages the module will be displayed. Options include All, Varies or None.
NOTE: This is not applicable to Administrator modules. Click on the Edit button in the Toolbar to edit this.
Type
This is the type of module. An example is mod_mainmenu, which is the ‘type’ of module used for the User
Menu and the Main Menu module instances.
ID
This is the ID number for the module item. This is allocated by the Joomla! site system when the module
instance is saved.
At the bottom of the list, you may see a pagination feature, which will allow you to navigate to the next set of modules in the
list. You can also set the number of modules displayed on a page by selecting the number in the drop down box at the bottom
of the screen.
Filtering functions are available at the top-right of the list. To filter the displayed modules by Position and module type, select
from the Select Position and/or Select Type drop down menu. You can refine your filter by typing in the keyword that you wish
to filter in the field box.
Uninstall a Module
Select the radio button next to the Module you want to uninstall and then click the Delete button.
A JavaScript alert will show: Are you sure, you want to delete selected items?
Click OK.
The page will reload displaying the word Success.
Site Module Screen
This option covers both amending existing modules and creating your own module.
Access: Click on the Module Name
Access: Check the box to the left of the Module Name and click the Edit button.
All Modules have the following Details and Page/Items options:
Title
This is the title of the Module as you wish it to appear in its header.
Show title
Select whether you wish the Module title to appear or not.
Enabled
Yes or No
The Artstract Co. - Joomla User Manual - Rev. 2009.04.20
73
Position
Select the Module position in which you wish it to appear.
Order
Select the order you wish the Module to appear.
Access Level
Select the Access Level: Public, Registered, or Special, which is able to view the Module.
ID
The ID for this Module.
Description
A description of the functionality of the Module.
Menu Item Link(s)
Select the Page(s) or Items that the Module should be displayed.
If you are creating a new module, additional fields are required and vary by the module type.
Administrator Modules
Access: Select Extensions > Module Manager > Administrator
The Module Manager [Administrator] screen will be displayed. This screen appears and behaves identically to the Module
Manager [Site] section detailed above.
Manage Specific Modules – Purposes and Parameters
The section below defines the purpose of each Module and details the additional Module specific parameters available to each.
Banners
Type
mod_banners
The banner Module allows you to show the active banners out of the Component within your site.
Parameters
Banner client
Insert the reference to the client id. A comma should separate multiple client ids.
Module Class Suffix
Enter the suffix for the CSS class of this Module, e.g. moduletable_online. In this example, _online is the suffix. This suffix class must currently be in the template CSS Style file. This allows individual CSS classes to be
applied to certain Modules independent of the site’s default Template CSS classes.
Further Information: Chapter 7: Managing Components – Banners
74
The Artstract Co. - Joomla User Manual - Rev. 2009.04.20
Main Menu
Type
mod_mainmenu
This Module displays a menu.
Parameters
Menu Class Suffix
An extension to the table.moduletable css class, which allows individual customisation of the Module.
Module Class Suffix
Enter the suffix for the CSS class of this Module, e.g. moduletable_online. In this example, _online is the suffix. This suffix class must currently be in the template CSS Style file. This allows individual CSS classes to be
applied to certain Modules independent of the site’s default Template CSS classes.
Menu Name
The name of the menu used, by default, this is mainmenu.
Menu Style
Select from Vertical, Horizontal or Flat List.
Enable Cache
Select whether to cache the content of this Module.
Show Menu Buttons
Show the menu buttons you have selected for your menu items.
Menu Button Alignment
Select Left or Right.
Expand Menu
Make the sub-menu items appear at all times.
Activate parent
Set’s the activation ID also for all parent menus in the tree
Indent Image
Choose which indent image to utilise.
Indent Image 1
Indent image for the first sub-level
Indent Image 2
Indent image for the second sub-level
Indent Image 3
Indent image for the third sub-level
Indent Image 4
Indent image for the fourth sub-level
Indent Image 5
Indent image for the fifth sub-level
The Artstract Co. - Joomla User Manual - Rev. 2009.04.20
75
Indent Image 6
Indent image for the sixth sub-level
Spacer
A spacer for horizontal menus.
End Spacer
An end spacer for horizontal menus.
User Menu
Type
mod_mainmenu
Displays the usermenu.
Parameters
See: Main Menu
Other Menu
Type
mod_mainmenu
Displays the othermenu.
Parameters
See: Main Menu
Login Form
Type
mod_login
This Module displays a Username and Password login form. It also displays a link to retrieve a forgotten password. If
user registration is enabled, See Global Configuration, then another link will be shown to invite users to selfregister.
Parameters
Module Class Suffix
Enter the suffix for the CSS class of this Module, e.g. moduletable_online. In this example, _online is the suffix. This suffix class must currently be in the template CSS Style file. This allows individual CSS classes to be
applied to certain Modules independent of the site’s default Template CSS classes.
Pre-text
Optionally, type in this text box to display text or HTML that will appear above the login form.
Post-text
Optionally, type in this text box to display text or HTML that will appear below the login form.
76
Login Redirection URL
The re-direct, from the login, can be assigned to a specific URL. If left blank, it will display the home page of
The Artstract Co. - Joomla User Manual - Rev. 2009.04.20
your web site.
Logout Redirection URL
The re-direct, from the logout, can be assigned to a specific URL. If left blank, it will display the home page of
your Web site.
Login Message
Select Show or Hide the JavaScript pop-up alert that indicates whether the user’s login was successful or failed.
Logout Message
Select Show or Hide the JavaScript pop-up alert that indicates that the user logged out successfully.
Greeting
Select Show or Hide to display, or not display, the simple greeting text.
Name/Username
Choose from the drop-down menu whether to display the user’s name or username in the login Module after
a successful login.
Wrapper
Type
mod_wrapper
The Wrapper Module wraps an external Web page into your site. The external Web page is inserted as a Frame into
your template. This is not only useful to display other people’s sites but also to include in your site pure
DHTML pages you would have created with a specialised web editor. It also allows you to integrate independent applications and scripts (galleries, directories) into your Joomla! site content.
Parameters
Module Class Suffix
Enter the suffix for the CSS class of this Module, e.g. moduletable_online. In this example, _online is the suffix. This suffix class must currently be in the template CSS Style file. This allows individual CSS classes to be
applied to certain Modules independent of the site’s default Template CSS classes.
URL
Enter the URL for the site/file you wish to display within the IFrame.
Scroll Bars
Choose whether horizontal and vertical scroll bars are added to your page. No means scroll bars are never
shown even when content extends beyond the inline frame, Yes means scroll bars are always used even when
content does not extend beyond the inline frame, and Auto means scrolls bars are shown only when necessary.
Width
Type in a value for the width of the IFrame window, either in pixels or in percentage. Percentage is relative to
the HTML element where the <?php include_once(“mainbody.php”); ?> tag is placed in the
template.
Height
Type in a value for the height of the IFrame window, either in pixels or in percentage (see above).
Auto Height
Choose Yes, if you desire the height of the Wrapper page to be set to the size of the external Web page. Choose
No if you do not.
The Artstract Co. - Joomla User Manual - Rev. 2009.04.20
77
Auto Add
Choose Yes, if you wish http:// to be added automatically to the URL that you type in the Wrapper Link field
in the Details Tab. If you already have typed in the http://, in the link field, then Joomla! will recognise this
and not put a second http:// in the link field. If set to No, then you must type http:// or https:// at the beginning of the URL in the URL field, or else the link in the URL field will be treated as a link relative to the
URL of your site.
Polls
Type
mod_poll
This Module compliments the Polls Component. It is used to display the configured poll. The Module differs from
other Modules in as much as the Component supports linking between Menu Items and Polls. This means
that the Module shows only those Polls, which are configured for a certain Menu Item.
Parameters
Enable Cache
Select to cache or not the content of this Module.
Module Class Suffix
Enter the suffix for the CSS class of this Module, e.g. moduletable_online. In this example, -online is the suffix. This suffix class must currently be in the template CSS Style file. This allows individual CSS classes to be
applied to certain Modules independent of the site’s default Template CSS classes.
Random Image
Type
mod_random_image
This Module display a random image from your chosen directory
Parameters
Image Type
Enter the image type of the files to be randomly displayed, e.g. .jpg, .png, .gif, etc.
The default image type is .jpg.
Image Folder
Enter the path of the folder/directory containing the images to be randomly displayed. For example, if the
files are located in http://www.joomla.org/images/random then enter “images/random” in the text box).
Link
Enter the URL that a user will be redirected to if the image is clicked (e.g. http://www.joomla.org).
Width
Enter the width in pixels you want the images displayed. This will force all images to be displayed using this
fixed width.
Height
Enter the height in pixels you want the images displayed. This will force all images to be displayed using this
fixed height.
78
The Artstract Co. - Joomla User Manual - Rev. 2009.04.20
Module Class Suffix
Enter the suffix for the CSS class of this Module, e.g. moduletable_online. In this example, -online is the suffix. This suffix class must currently be in the template CSS Style file. This allows individual CSS classes to be
applied to certain Modules independent of the site’s default Template CSS classes.
Caution
Changing the height and/or width settings may cause unwanted results if there is a sizeable difference between the width or height of the original image and the fixed width you input.
Newsflash
Type
mod_newsflash
The Newsflash Module randomly selects one of the published items from a Category upon each page refresh. It may
also display multiple items in horizontal or vertical configurations.
Parameters
Category
Select a content Category from this drop-down list (listed as Section/Category). The Articles in the selected
Category will be formatted based on the layout selected in the Style parameter on this page.
Style
Select a style from this drop-down list to determine how the Module will display its contents. The vertical and
horizontal options are self-explanatory. The Randomly choose one at a time option, randomly displays a single
Category item with each page reload.
Show images
Select the Yes radio button to determine whether the Module should display images contained in Articles.
Select the No radio button to hide all images.
Linked Titles
Select an option from this drop-down list to make the Article titles linkable (or not). The Yes option turns
linked titles on. The No option turns linked titles off. The Use Global options defaults to the setting for this
parameter in the Global Configuration area of the web site.
Read More
Select the Show radio button to display a Read More link at the end of each Article. Select the No radio to
hide this link.
Item Title
Select Yes from this drop-down list to display the title and the text of Articles. Select No to hide all titles. See
also: Linked Titles on this page
# of Items
Enter a number to determine how many Articles will be displayed with each page refresh. This is only applicable for the horizontal and vertical options listed in the Style section on this page.
Enable Cache
Click the Yes radio button to turn caching on for this Module. Click the No radio button to turn caching off.
Module Class Suffix
Enter the suffix for the CSS class of this Module. (e.g. moduletable_poll). In this example, the -poll is the sufThe Artstract Co. - Joomla User Manual - Rev. 2009.04.20
79
fix. This suffix class must currently be in the template CSS Style file. This allows individual CSS classes to be
applied to certain Modules independent of the site’s default Template CSS classes.
Note: It is important to allow sufficient space to display the generated content. This is especially important when
using the ‘vertical’ and ‘horizontal’ options.
Note: The Item Title option on this page must also be set to Yes before the titles may actually be displayed.
Search
Type
mod_search
This Module will display a search box
Parameters
Module Class Suffix
Enter the suffix for the CSS class of this Module. (e.g. moduletable-poll). In this example, the -poll is the suffix. This suffix class must currently be in the template CSS Style file. This allows individual CSS classes to be
applied to certain Modules independent of the site’s default Template CSS classes.
Enable Cache
Select Yes or No.
Set Itemid
Allow setting of the Itemid for the referencing search link
Box Width
Size of the search text box.
Text
The text that appears in the search text box.
Search Button
No or Yes
Button Position
Position of the button relative to the search box. Right, Left, Top, or Bottom.
Button Text
The text on the search button.
Popular
Type
mod_mostread
This Module shows a list of the currently published Items that have been seen the most: determined by the number of
times the page has been viewed.
Parameters
80
The Artstract Co. - Joomla User Manual - Rev. 2009.04.20
Module Class Suffix
Enter the suffix for the CSS class of this Module. (e.g. .moduletable_poll). In this example, the -poll is the suffix. This suffix class must currently be in the template CSS Style file. This allows individual CSS classes to be
applied to certain Modules independent of the site’s default Template CSS classes.
Enable Cache
Select to cache or not the content of this Module.
Module Mode
Allows a choice between display of Articles, Static Articles or both.
Frontpage Items
Show/Hide items designated for the Frontpage Component (this works only for Articles).
Count
The number of items to display (the default is 5)
Category ID
Select to display items from a specific Category or set of Categories (to specify more than one Category, separate with commas). Categories IDs may be found in the list accessed through Content >Category Manager.
Section ID
Select to display items from a specific Section or set of Sections (to specify more than one Section, separate
with commas). Sections IDs may be found in the list accessed through Content >Section Manager.
Top Menu
Type
mod_mainmenu
See mainmenu.
Manage Plugins
Plugins are functional units of code that support the operation of Joomla! They have many different purposes and functions
and are grouped together for easier management.
For example, there are Plugins that only operate on Articles, others provide search capabilities, etc. In some groups, any number of Plugins can be published at once, while in others (for example, the WYSIWYG editors) only one can be active.
In some groups ordering is important.
In this Section we will be covering:
• Uninstall a Plugin
• Outline definitions of each type of Plugin
Uninstall a Plugin
Access: Select Extensions > Plugin Manager
Check the box next to the Plugin you want to uninstall and then click the Delete button.
A JavaScript alert will show: Are you sure, you want to delete selected items?
The Artstract Co. - Joomla User Manual - Rev. 2009.04.20
81
Click OK.
The page will reload displaying the word Success.
Content Plugins
Any number of Plugins can be published in this group. These Plugins operate on Articles before they are displayed. They typically replace some sort of shorthand {tag} with other information.
Legacy Plugin Includer
This Plugin allows for the handling of Plugins designed for version 1.0 of Joomla! If you do not have any pre-version 1.5 Plugins installed, this Plugin can be safely unpublished.
SEF
The Search Engine Friendly Plugin makes links in content compatible with installed SEF support. It operates directly on the
HTML within the item and does not require a special tag.
E-mail Cloaking
This Plugin rewrites all e-mail addresses within a Article to ‘cloak’ them from unwelcome spambots.
Code Highlighter (GeSHi)
This displays formatted code in Articles based on the GeSHi highlighting engine.
This is to be considered as an enhanced version of moscode, allowing the rendering of many different programming languages
with colour-highlighted code by specifying the to-be-used language.
Usage: Use the “pre” tag and add the programming language you want to use for highlighting purposes as a parameter.
Example:
< pre lang=”xml” >your code here ... < /pre >
The Plugin version of the GeSHi highlight code comes with the following highlighters for the most common renders installed,
ready to be used:
CSS => use lang=”css”
HTML4 Strict => use lang=”HTML4strict”
JavaScript => use lang=”javascript”
PHP => use lang=”php”
PHP Brief => use lang="php-brief"
SQL => use lang="sql"
XML => use lang="xml"
Should you need additional languages, you may download the full package from the developer site: http://qbnz.com/
highlighter/, which includes over 30 languages. You should then upload the required newLanguage.php from the package into
your \Plugins\content\geshi\geshi folder.
82
The Artstract Co. - Joomla User Manual - Rev. 2009.04.20
Load Module
This Plugin, using the tag {loadmoduleposition modulepositionname}, allows a Module’s content to be displayed in a Article.
Search Plugins
Search Plugins add the ability to search all of the different Components of Joomla! Basic searching is provided for:
• Articles
• Web Links
• Contacts
• Content Categories
• Content Sections
Any number of search Plugins can be published at any one time.
Editor Plugins
Editor Plugins provide support for installable WYSIWYG editors.
Only one editor Plugin can be published at a time. This setting should be changed in the Site > Global Configuration page,
rather than on the Plugin Manager page. You can also select to deactivate any WYSIWYG editors, which leaves you with a
standard HTML text area.
Editor Extension Plugins
Editor Extension Plugins allow additional controls to be included for editing content. For example, buttons are placed within
or under the editor to insert {mosimage} and {mospagebreak} tags into your content
The Artstract Co. - Joomla User Manual - Rev. 2009.04.20
83
Chapter 8: Accessing Functions from the Back-End: Super Administrator
Introduction
The Super Administrator has all the Front-End access privileges of a Publisher. In addition, they have the following Back-End
privileges in addition to those of the Manager and Administrator, which are covered in detail in this chapter:
• Global Configuration
• Language Manager
• Managing Templates
• System Info
• Global Checkin
When a Super Administrator logs in to the Control Panel, they will see the following screen.
All menu and sub-menu options are available to the Super Administrator.
Global Configuration
Global Configuration controls Joomla!’s operational settings. Changes made on this screen will update the configuration.php
file. This file needs to be writeable in order for you to be able to edit your configuration.
Access: Select Site > Global Configuration.
84
The Artstract Co. - Joomla User Manual - Rev. 2009.04.20
The Global Configuration screen will be displayed.
Site Tab
Site Offline
With this option, you can switch on and off your web sites Front-End. Use it if you are updating Modules or
data, and do not wish to have your visitors view the site until you are finished. Remember to reset the Site offline option to No once you are done.
Offline Message
When the Site Offline switch is in the Yes position, this default message will display on the Front-End for
your visitors to see. This site is down for maintenance. Please check back again soon. You can change this text
to whatever message you would like.
Default WYSIWYG Editor
Choose which of the installed Text Editors you want to use to edit Articles.
List Length
Choose a default length for lists in the Administrator (Back-End). NOTE that if you have previously visited a
page with a list, changing this setting in Global Configuration will not be immediately visible. However, the
setting you specify will be honoured as a default upon your next login.
The Artstract Co. - Joomla User Manual - Rev. 2009.04.20
85
Feed Length
The number of items to show in any RSS feeds.
Global Site Meta Description
Type a description of your web site used to assist Search Engines. You may want to limit your description to
maybe twenty words or so, depending on the Search Engine you are targeting. Make it concise and pertinent
to your site’s contents. You can include some of your keywords and key phrases here too. As some search engines read more than 20 words, you can add one or two sentences. Make sure that the most important part of
your description is in the first 20 words.
Global Site Meta Keywords
The optimal number of characters for a keyword description is said to be between 300 and 500. Do not repeat
words too often and either separate your keywords with a comma or a space, or group two or three words
together. ‘Joomla! Open Source’ would be an example of this.
Show Title Meta Tag
Shows the Title Meta tag in the source code when viewing content.
Show Author Meta Tag
Shows the Authors Meta tag in the source code when viewing content.
Note: The Description and Keyword Meta tags will have a bearing on how Search Engines will index your site.
Some Search Engines completely ignore Metadata altogether. You should do some research on Search Engine Optimisation if high rankings and Search Engine traffic are important to you.
Search Engine Friendly URLs and Use Apache mod_rewrite
This changes the way site links are presented and optimises them so that search engines can access more of
your site. This option is ONLY available to sites hosted on Apache servers. Choose Yes to enable Joomla! to
output friendly URLs rather than normal database generated URLs. If you use this option, you must rename
your htaccess.txt file to .htaccess.
Add suffix to URLs
Allows the system to add a suffix to the URL based on document type
System Tab
Secret Word
This is the unique word for every Joomla! installation. It is used for security functions.
Path to Log File
Absolute path to the log files
Enable Web Services
Enable the ability of the installation to make RPC (Remote Procedure Calls) using HTTP as the transport
medium and XML as the encoding language. This function is required to ensure that many third-party extensions work.
Help Server
Select the name of the Help Server from which your system will collect the Help Screen displays.
86
The Artstract Co. - Joomla User Manual - Rev. 2009.04.20
Allow User Registration
This option allows you to globally set whether visitors to your site can register for a user account. If the Yes
radio button is chosen, the Login Form will include the prompt No account yet? Create one. If the No radio
button is set, no option to register is presented.
New User Registration Type
The default access level that will be applied to new Users registering via the front-end.
New User Account Activation
If set to Yes, the User will be e-mailed a link to activate their account before they can log in.
The Artstract Co. - Joomla User Manual - Rev. 2009.04.20
87
Front-end User Parameters
If set to Show, Users will be able to select their language, editor, and Help Site preferences on their Details
screen when logged into the front-end.
Legal Extensions (File Types)
Extensions (File Types) for the files you allow to be uploaded (comma separated).
Maximum Size (in bytes)
The maximum size for an upload (in bytes). Use zero for no limit.
Path to Media Folder
You can create a new folder to use with the Media Manager and enter the path to that folder here. Warning:
Do not delete or change the existing images folder. The images/banners, images/M_images, images/smilies,
and images/stories folders are used by the application.
Path to Image Folder
You can create a new folder to use with the Image Manager and enter the path to that folder here. If you
want to access this folder from the Media Manager, use the same folder name or make this a sub folder of the
Media Manager folder. Warning: Do not delete or change the existing images/stories folder since it is used by
the application.
Restrict Uploads
Restrict uploads for lower than manager users to just images if Fileinfo or MIME Magic isn’t installed.
Check MIME Types
Use MIME Magic or Fileinfo to attempt to verify files. Disable this if you get invalid mime type errors.
Legal Image Extensions (File Types)
Image Extensions (File Types) you are allowed to upload (comma separated). These are used to check for valid
image headers.
Ignored Extensions
Ignored file extensions for MIME type checking and restricted uploads
Legal MIME Types
A comma separated list of legal MIME types for upload
Illegal MIME Types
A comma separated list of illegal MIME types for upload (blacklist)
Enable Flash Uploader
Select whether the Flash Uploader should be used or not for uploading media in the Media Manager
Enable Debugging
If enabled, diagnostic information, language translation, and SQL errors (if present) will be displayed. The
information will be displayed at the foot of every page you view within the Joomla! back-end and front-end. It
is not advisable to leave the debug mode activated when running a live Web site.
Debug Language
Select whether the debugging indicators (<bold>•...•</bold>) or (<bold>?...?</bold>) for the
Joomla! Language files will be displayed. Debug Language will work without Debug System being activated,
but you will not get the aditional detailed references that will help you correct any errors.
Cache
Select whether the cache is enabled or not.
88
The Artstract Co. - Joomla User Manual - Rev. 2009.04.20
Cache Time
The maximum length of time in minutes for a cache file to be stored before it is refreshed.
Cache Handler
The default caching mechanism is file-based.
Session Lifetime
Auto log out a User after they have been inactive for the entered number of minutes. Do not set too high.
Session Handler
The mechanism by which Joomla! identifies a User once they are connected to the web site using non-persistent cookies.
Server Tab
Path to Temp-folder
Please select a writable Temp folder.
GZIP Page Compression
Compress buffered output if supported.
Error Reporting
Select the appropriate level of reporting from the drop down list. See the Help Screen for full details.
The Artstract Co. - Joomla User Manual - Rev. 2009.04.20
89
Force SSL
Force site access to always occur under SSL (https) for selected areas. You will not be able to access selected
areas under non-ssl. Note, you must have SSL enabled on your server to utilize this option.
Time Zone
Current date and time configured to display
Enable FTP
Enable the built in FTP (File Transfer Protocol) functionality of Joomla! to be used instead of the normal
upload functionality of Joomla!.
FTP Host
Enter the name of the host of your FTP server
FTP Port
Enter the port that FTP should be accessed by. Default is Port 21.
FTP Username
The username used to access the FTP server.
FTP Password
Enter your FTP password
FTP Root
The path to the root directory of the FTP server. The root directory is the base directory to which the FTP
server is allowed access.
WARNING!
Do not change the below five database settings unless you absolutely have to.
Database Type
The type of database in use entered during the installation process. Do not edit this field unless you are having
to migrate to a different type of database, perhaps due to changing your hosting provider.
Hostname
The hostname for your database entered during the installation process. Do not edit this field unless absolutely necessary (e.g. the transfer of the database to a new hosting provider).
Username
The username for access to your database entered during the installation process. Do not edit this field unless
absolutely necessary (e.g. the transfer of the database to a new hosting provider).
Database
The name for your database entered during the installation process. Do not edit this field unless absolutely
necessary (e.g. the transfer of the database to a new hosting provider).
Database Prefix
The prefix used for your database entered during the installation process. Do not edit field unless absolutely
necessary (e.g. the transfer of the database to a new hosting provider).
WARNING!
Do not change unless you have a database built using tables with the prefix you are setting.
Mailer
90
Select which mailer you wish to use for the delivery of site e-mails.
The Artstract Co. - Joomla User Manual - Rev. 2009.04.20
Mail from
The e-mail address that will be used to send site e-mails from.
From Name
By default, this field is populated with the site name entered during installation.
Sendmail Path
Enter the path to the sendmail program directory on the host server.
SMTP Authentication
Select Yes if your SMTP Host requires SMTP Authentication.
SMTP Username
Enter the username for access to the SMTP host
SMTP Password
Enter the password for access to the SMTP host
SMTP Host
Enter the name of the SMTP host.
Language Manager
The Language Manager allows you to maintain the installed language files for Joomla!
Access: Select Extensions > Language Manager.
The Language Manager [Site] screen will be displayed.
Installed Languages: This list shows all of the currently installed Joomla! Languages with a tick next to the currently active one.
The following information is displayed:
Name
Shows the name of the languages installed.
The Artstract Co. - Joomla User Manual - Rev. 2009.04.20
91
Default
Shows which is the default language.
Version
Shows the version of the language file.
Date
Shows the date of the language file.
Author
Shows the author of the language file.
Author E-mail
Shows the author's e-mail address, if available.
Other functions available on this screen include:
Manage Templates
Introduction
There are two types of templates, the Site Templates and Administrator Templates.
The Site Templates control the appearance of the Front-End of your Joomla! web site, whereas the Administrator Templates
control the Back-End Administration area of the Joomla! web site.
Note: All reference to Template Manager [Site] refers equally to Template Manager [Administration] as well
The Template Manager provides a workbench for manipulating templates. The initial view provides you with a list of the installed templates (Site or Administrator).
A yellow star will be shown adjacent to the name of the default template. Some supplied information about each template is
also shown.
Templates can be assigned to different parts of your site, much like Modules can. If you have several templates installed on your
Joomla! system, you can take advantage of all of them. You are able to assign a template to a specific page(s).
Template HTML and CSS files can be edited as well.
This section deals with:
• The Template Manager (Site and Administrator)
• Assigning a template (Site)
• Editing the template HTML (Site and Administrator)
• Editing the template CSS files. (Site and Administrator)
• Module Positions
The Template Manager
Access: Select Site > Template Manager > Site Templates.
The Template Manager [Site] screen will be displayed.
92
The Artstract Co. - Joomla User Manual - Rev. 2009.04.20
The following information is displayed:
Template Name
The name of the template as defined in the templateDetails.xml file.
Default
Assigns this default template to all Menu Items/pages.
Assigned
Opens a page where you can assign this template to specific Menu Items/pages. This will override the default
template for the pages chosen. If you choose 'None', it will act the same way as the 'Default' parameter.
Date
The date of the template as defined in the templateDetails.xml file.
Author
The name of the template’s author as defined in the templateDetails.xml file.
Version
The version of the template as defined in the templateDetails.xml file.
Toolbar Buttons: Default and Edit are available.
The Artstract Co. - Joomla User Manual - Rev. 2009.04.20
93
Assign a Template
You can assign a template to one or more pages from the list that is displayed. When assigned, the template will appear when a
user clicks on these pages. This will override the default template.
If you want to remove an assigned template from one (or some) page(s), select the assigned template again (radio button), and
click the Assign button in the Toolbar. Now either deselect the items you do not want assigned for this template anymore, or
click None to completely remove the assignment for this template.
Access: Select Extensions > Template Manager.
The Template Manager [Site] screen will be displayed.
Click on the template name you wish to assign to open the Template Edit Screen.
Select the page(s) you wish to assign the template to from the Menu Assignment Panel. You can Ctrl/Cmd click to select multiple items or Shift click to select a range.
Click Save to save your changes.
Edit the HTML File
Access: Select Extensions > Template Manager.
The Template Manager [Site] screen will be displayed.
94
The Artstract Co. - Joomla User Manual - Rev. 2009.04.20
Click on the template name you wish to edit to open the Template Edit Screen.
Click the Edit HTML button
The Template HTML Editor screen will be displayed.
Toolbar Buttons: Save and Cancel are available.
Edit the CSS file
Access: Select Extensions > Template Manager.
The Template Manager [Site] screen will be displayed.
Click on the template name you wish to edit to open the Template Edit Screen.
Click the Edit CSS button
The Template CSS Editor screen will be displayed.
Click the radio button next to the CSS file you wish to edit and click the Edit button.
The Template Manager screen will be displayed.
The Artstract Co. - Joomla User Manual - Rev. 2009.04.20
95
When you’ve finished making your changes, click the Save button to apply them to the site.
Messages
Access: Select Tools > Read Messages > Settings
Configuration
There are three configuration options available to your Administrator.
Lock Inbox
This option allows you to prevent Administrators or System processes from sending you messages. If you are
the only administrator, or work with a small group of administrators, you may choose not to use this feature
at all. It is a good idea to leave the box open while you are adding new Components as it will help you be
aware of system processes.
Mail me on new Message
This option will result in an e-mail being sent to you each time you receive a new message.
Auto Purge Messages
Set the number of days old after which the message will be purged from the database.
96
The Artstract Co. - Joomla User Manual - Rev. 2009.04.20
Message Inbox
This menu option displays your current Inbox.
The Artstract Co. - Joomla User Manual - Rev. 2009.04.20
97
View a message
Click the hyperlinked Subject of the desired message. Details of the message will be shown. Click the Back button in the toolbar to return to your Inbox.
Create a new message
Click the New button in the toolbar. Select the Recipient from the list and enter the desired subject and Message. Click the
Save button to send the message. Click the Cancel button to abort the operation.
Delete a message
Select the checkbox next to the Subject of the message, (or multiple messages), that you want to delete. Click the Delete button in the toolbar. An alert box will ask you to confirm the operation.
Note: Private messaging is only supported to, or between, users in a group that have access to the Administrator
Back-End.
System Information
System Info
Access: Select Help > System Info
98
The Artstract Co. - Joomla User Manual - Rev. 2009.04.20
The Information screen has five tabs as follows:
System Info
This tab provides information about the PHP build, web server, Joomla! version installed, and Browser being used.
PHP Settings
This tab provides detailed information about important PHP settings on the server.
Configuration File
This tab provides details of the configuration.php file located in the Joomla! root directory.
Directory Permissions
This tab provides detailed information about the folder permissions of your Joomla! installation.
Note: For all Joomla! functions and features to work all of the following directories should be writeable.
PHP Information
This tab provides detailed information about the PHP, Zend and MySQL versions and configurations being used.
Global Check-in
Access: Select Tools > Global Checkin
The Global Check-in screen will be displayed.
The Artstract Co. - Joomla User Manual - Rev. 2009.04.20
99
When a user edits a file, Joomla! changes the file’s status to Checked Out. The file is locked and only the user who has checked
it out can modify it. This security feature prevents two users from editing a document at the same time, thus preventing the
loss of data upon saving.
A Article remains Checked Out until the user clicks Save, Apply, or Cancel while editing it. Once saved, the Article is Checked
In. However, if there is a connection error, such as when the user presses the browser’s Back button, or the user chooses another
menu item without saving or cancelling the work in progress, the Article remains Checked Out. This means no one can edit it.
If users report this, verify the item’s availability by looking in the Section, Category, or Item file list. If the item has a Padlock
button, a Super Administrator will need to make the item available again by performing a Global Checkin.
Global Checkin will unlock all Articles currently Checked Out. Only a Super Administrator can perform it.
To perform a Global Checkin, select: System > Global Checkin. After performing the Global Checkin, Joomla! returns a list
showing how many items, and from which Tables, were checked back in.
WARNING!
Performing a Global Checkin while documents are open for editing may result in data loss.
All checked out items will be checked in and any unsaved changes will be lost.
Mass Mail
This page allows you to send a message to one or more groups of Users.
Access: Select Tools > Mass Mail.
The Mass Mail screen will be displayed.
Toolbar Buttons: Send Mail and Cancel are available
Complete the following information:
Mail to Child Groups
Check this box to automatically include all of the child groups of the selected group. For example, if you select
the Editor group and check this box, all users in the Publisher group will also be included in the mass mail.
Send in HTML mode
Check the box for Yes, leave blank for No.
Group
Make a selection from the list. Select All User Groups to mail the message to all users. Only one selection can
be made from this list.
Subject
Type a subject for the message.
Message
Type the body of the message
When you are finished, click the Send Mail button to mail the message or Cancel to abort the mail.
100
The Artstract Co. - Joomla User Manual - Rev. 2009.04.20
The Artstract Co. - Joomla User Manual - Rev. 2009.04.20
101
Appendix A: Creative Commons License
Attributation-NonCommercial-ShareAlike 2.5
You are free:
• to copy, distribute, display, and perform the work
• to make derivative works
Under the following conditions:
Attributation: You must attribute the work in the manner specified by the author or licensor.
Noncommercial: You may not use this work for commercial purposes.
Share Alike: If you alter, transform, or build upon this work, you may distribute the resulting work only
under a license identical to this one.
For any reuse or distributiuon, you must make clear to other the license terms of this work.
Any of these conditions can be waived if you get permission from the copyright holder.
Your fair use and other rights are in no way affected by the above.
102
The Artstract Co. - Joomla User Manual - Rev. 2009.04.20
Appendix B: Using JoomGallery
Introduction
JoomGallery is a photo gallery component for Joomla with a wealth of options. One of the key concepts to understand in
working with JoomGallery is it’s photo organization systems. Every photo in JoomGallery must exist inside a Category.
However, a category can also contain other child categories. In this way, you can organize your photos using a series of nested
categories.
Category Manager
Access: Select Components > JoomGallery > Category Manager
The Category Manager screen will be displayed.
The following information is displayed:
ID
The category identification number
Category
The category name
The Artstract Co. - Joomla User Manual - Rev. 2009.04.20
103
Parent Category
If the category is a child of another category, that category name will appear here
Published
A green check will appear if the category is published, a red cross if not. Click the icon to toggle the category
between states
Owner
The creator of the category
Access
The level of Joomla user required to view the category’s content
Reorder
You can use the Up or Down arrows to alter the order in which the Category items are displayed
Order
You can enter the order in which you want the Category items to be displayed. Click the Save button to save
the changes.
Create a New Category
Access: Select Components > JoomGallery > Category Manager > New
The Category Manager :: Add Category screen will be displayed
104
The Artstract Co. - Joomla User Manual - Rev. 2009.04.20
Complete the following fields:
Title
The name of the category
Parent Category
If this is to be a child category, select it’s parent from the drop down menu
Description
A description of the category (optional)
Access
The level of Joomla user required to view the category
Published
Select Yes to have the category appear online
Click the Save button to create the category
Edit a Category
Access: Select Components > JoomGallery > Category Manager
Click the name of the category you wish to edit
The Category Manager :: Edit Category screen will be displayed. Edit the fields as required and then click the Save button to
update the category .
Delete a Category
Access: Select Components > JoomGallery > Category Manager
Select the checkbox next to the category(categories) you wish to delete.
Click the Remove button to delete the category(categories).
Picture Manager
Access: Select Components > JoomGallery > Picture Manager
The Picture Manager screen will be displayed with the following information:
Title
The name of the picture
Category
The name of the category the picture belongs to
Hits
The number of times the picture has been viewed by site visitors
The Artstract Co. - Joomla User Manual - Rev. 2009.04.20
105
Ordering
You can use the Up or Down arrows to alter the order in which the pictures appear or enter the order you
wish them to appear and click the Save button
Published
A green check will appear if the picture is published, a red cross if not. Click the icon to toggle the picture
between states
Approved
A green check will appear if the picture has been approved for display on the site, a red cross if not. Click the
icon to toggle the picture between states
Owner
The name of the user who uploaded the picture
Author
The name of the photographer as entered by the Owner
Date
The date and time the picture was uploaded.
106
The Artstract Co. - Joomla User Manual - Rev. 2009.04.20
Edit a Picture
Access: Select Components > JoomGallery > Picture Manager
Click the name of the picture you wish to edit
The Picture Manager :: Edit Picture screen will be displayed with a preview image of the picture being edited. Edit the fields as
required and then click the Save button to update the picture information.
The Artstract Co. - Joomla User Manual - Rev. 2009.04.20
107
Move a Picture
Access: Select Components > JoomGallery > Picture Manager
Select the checkbox next to the picture(s) you wish to move.
Click the Move button.
The Picture Manger :: Move pictures to a different category screen will be displayed
Select the category you wish to move the pictures to from the Target category to move pictures to drop down and click the
Save button to move the pictures.
Remove a Picture
Access: Select Components > JoomGallery > Picture Manager
Select the checkbox next to the picture(s) you wish to delete.
Click the Remove button to delete the picture(s).
108
The Artstract Co. - Joomla User Manual - Rev. 2009.04.20
Comments Manager
If comments are enabled, the Comment Manager will help you mange them. Here you can see all the comments made and approve or remove them, and publish or unpublish any comment with a few clicks.
Votes Manager
If voting is enabled, the Votes Manager will help you mange voting. Here you can Reset Votes for all images if you wish.
Uploading New Pictures
JoomGallery offers a number of ways of adding new photos to the gallery depending on which method best suits your needs
and knowledge. Here we’ll highlight the most common types of upload.
Note: In order to give the site visitor the best experience (fast downloads) and keep from using too many resources
on the server (images are very resource intensive) any image should be optimized before uploading, this is particularly important in the photo gallery. Ideally, the image should be no more than 1000 pixels in any dimension and
with an optimized file compression scheme before being uploaded to the server. Once there, the server will automatically create the thumbnail images necessary. Optimizing images for the web is beyond the scope of this document, but many excellent books and online tutorials are available.
Picture Upload
Access: Select Components > JoomGallery > Picture Upload
The Picture Upload screen will be displayed (shown next page).
Here you can upload up to 10 images by clicking the Browse button next to each of the 10 Select Image inputs. You do not
have to complete all 10 spots. You can then complete the following fields to apply properties to all the pictures being uploaded:
Category photos will be assigned to
Select the category from the drop down menu
Generic Title
Type a generic title, the system will automatically append a number to the end of the title.
Generic Description
Give these pictures a generic description (optional)
Author
The name of the photographer who created the picture (optional)
Transparent or animated picture files
This option allows the upload of special picture files. Only choose this option if your upload exclusively consists of animated or transparent .png or .gif files. Keep in mind that the files do not get resized and therefore
are displayed full size in detail view!
Click the Upload button when you have completed the form
The Artstract Co. - Joomla User Manual - Rev. 2009.04.20
109
Batch Upload
If you have a number of images to upload you may want to use the batch upload feature. Images still need to be correctly optimized prior to upload, but rather than uploading a series of individual photos, you can upload a single zip archive created on
your computer. Consult the manual that came with your archiving software for more information on how to zip a set of files.
Access: Select Components > JoomGallery > Batch Upload
The Batch Upload screen will be displayed.
Complete the following fields to apply properties to all the pictures in the archive file:
110
The Artstract Co. - Joomla User Manual - Rev. 2009.04.20
Category photos will be assigned to
Select the category from the drop down menu
Numbering Start
Consecutive numbers are appended to the Generic Title and assigned to the pictures. In case you want the
numbering to start with a chosen value enter it in this field. Otherwise leave the field empty
Generic Title
Type a generic title, the system will automatically append a number to the end of the title.
Generic Description
Give these pictures a generic description (optional)
Author
The name of the photographer who created the picture (optional)
Click the Begin Upload button after selecting the archive file and completing the fields. The system will automatically extract
your images from the archive and process them as usual.
The Artstract Co. - Joomla User Manual - Rev. 2009.04.20
111
FTP Upload
If you have a number of images to upload and have access to FTP software and the server login information, you may want to
use the FTP upload feature. Images still need to be correctly optimized prior to upload, but rather than uploading through the
relatively slow HyperText Transfer Protocol (HTTP) you can use the much faster File Transfer Protocol (FTP). There is a wide
variety of FTP clients available each with differing methods of operation, so you’ll have to consult the manual for your FTP
software for instructions on how to login to your server.
Once connected to the FTP server, browse to JoomGallery’s FTP Upload folder. This can be changed by the administrator but
by default will be /components/com_joomgallery/ftp_upload/ To verify the correct address, browse to the FTP upload screen
in the administrator panel where the full path will be displayed.
Once the images are uploaded into the folder, access the FTP Upload screen.
Access: Select Components > JoomGallery > FTP Upload
The FTP Upload screen will be displayed.
The filenames of the pictures you just uploaded will be displayed in the Please select the pictures list. Select the files to add to
the gallery here by clicking on them. You may Ctrl/Cmd click to select multiple files, or Shift click to select a range of files.
You must also complete the following fields to apply properties to all the pictures selected:
Category photos will be assigned to
Select the category from the drop down menu
Numbering Start
Consecutive numbers are appended to the Generic Title and assigned to the pictures. In case you want the
numbering to start with a chosen value enter it in this field. Otherwise leave the field empty
Generic Title
Type a generic title, the system will automatically append a number to the end of the title.
Generic Description
Give these pictures a generic description (optional)
Author
The name of the photographer who created the picture (optional)
Delete pictures after upload
Ensure this box is checked to remove the pictures from the FTP upload folder after they have been processed
and added to the gallery category you selected. If this is not checked, you will have to remove the files manually using your FTP client.
Transparent or animated picture files?
This option allows the upload of special picture files. Only choose this option if your upload exclusively consists of animated or transparent .png or .gif files. Keep in mind that the files do not get resized and therefore
are displayed full size in detail view!
Click the Upload button after selecting the files and completing the fields. The system will automatically process the selected
images as usual and remove them from the FTP Upload folder if so selected.
112
The Artstract Co. - Joomla User Manual - Rev. 2009.04.20
The Artstract Co. - Joomla User Manual - Rev. 2009.04.20
113
Configuration Manager
Access: Select Components > JoomGallery > Configuration Manager
The Configuration Manager screen will be displayed.
From here, nearly every possible configuration setting for JoomGallery can be updated. Due to the sheer number of settings
available we won’t detail them here, but rest assured that each setting has an extremely helpful note explaining the setting and
what it affects. These settings should only be changed by the Super-Administrator with care, but regardless of what type of
update is required, there is sure to be a setting for it here.
Above is a preview of the tabs available in the Configuration Manager, each of the main top tabs has its own set of sub-tabs
available.
114
The Artstract Co. - Joomla User Manual - Rev. 2009.04.20
Appendix C: Managing Events with jEvents
Front-End Functions
Once logged into Joomla in the front end, you’ll see a JEvents menu below the calendar.
From here you can filter how you see the calendar by seeing unpublished events, only
your events, or a specific category. You’ll also see a link to add a new event.
Adding an Event
Access: Select Add an event(ICAL)
The Edit Event screen will be displayed.
Toolbar Buttons: Save and Cancel are available.
Complete the following information:
Subject
A short title for your event
Category
Select a category for the event from the drop down menu. All events must have a category.
The Artstract Co. - Joomla User Manual - Rev. 2009.04.20
115
Event Priority
If multiple events fall on the same day at the same time, the one with the lowest priority value will appear first
in the list.
Access Level
Public allows all site visitors to see your event, Registered means your event only appear for logged in users.
Activity
Fill in the details using the editor window
Location
Where is the event taking place
Contact
Who to contact for more information
Extra Info
Anything else that doesn’t fit above
Note: Additional information fields (those that appear below the editor window) may vary depednding on how the
administrators have configured the site.
Click the Calendar tab to set the dates and repetition.
All day Event or Unspecified time
Check this if your event is a full day event or takes place at an indeterminate time.
12 Hour
When this is checked, you can enter start and end times using a 12 hour clock (am, pm). When unchecked
times are specified using the 24 hour clock.
Start date
Enter the starting date by clicking on the calendar icon and enter the start time
116
The Artstract Co. - Joomla User Manual - Rev. 2009.04.20
End date
Enter the ending date by clicking on the calendar icon and entering the end time
Repeat type
If your event is recurring, select the radio button next to the recurrence type. Further options will appear
Daily: Enter the Repeat Interval (number of days between repeats), and choose either Repeat Count (to
repeat the event x number of times) or Repeat Until (to select the last date from a calendar)
Weekly: Enter the Repeat Interval, Repeat Count or Repeat Until, and the week day(s) the event occurs (By
Day)
Monthly: Enter the Repeat Interval, Repeat Count or Repeat Until, and the By Month Day (the x day of
the month, or x from last day when checking Count back from month end) or the By Day(to select the day
of the week, and week of the month that the event takes place)
Yearly: Enter the Repeat Interval, Repeat Count or Repeat Until, and the By Year Day (the number of days
from the start or end of the year the event takes place on
Edit an Event
When a user is logged in and views an event detail page, a small edit icon will appear to the right
of the event title, clicking that will open a menu listing ways in which you can edit the event.
Unpublish event
Unpublish the event so that it is not visible to site visitors, but is still available
to be edited later
Edit repeat
Change the repeat settings
Edit event
Edit the event details
Copy and edit event
Copy this events details and open the editing panel to create a new event based on this one
Delete this repeat
Delete only this repetiton occurance of this event
Delete all repeats
Deletes all occurances of this event
Delete future repeats
Delete all repeats of this event that have yet to occur
Note: Editing the repetition settings of an event will overwrite the existing event and may cause unforeseen results
The Artstract Co. - Joomla User Manual - Rev. 2009.04.20
117
Back-End Functions
Access: Select Components > JEvents MVC
The JEvents Control Panel will be displayed.
From the control panel you can:
• Configure global calendar settings
• Manage calendars
• Manage events
• Manage categories
• Manage users
• Configure JEvents
• Convert legacy events
• Setup the database
• Delete calendar related tables
Note: The last three options are advanced configuration options that shouldn’t be used unless you have a specific
reason to do so. These commands could damage the database, destroying the events information.
118
The Artstract Co. - Joomla User Manual - Rev. 2009.04.20
Setting Up the Global Parameters
From here you can determine how the JEvents calendar system behave across the website.
Access: Select Components > JEvents MVC > Parameters
The parameters pop up will be displayed.
You can alter the following information:
Admin User
The user from the Joomla! system that will act as the JEvents administrator
Enable User Authorisation
If yes then only authorised users can create events etc. otherwise any user of the following levels can undertake
these tasks.
Creator User Level
User Level required to be event creator
Editor User Level
User Level required to be event editor
The Artstract Co. - Joomla User Manual - Rev. 2009.04.20
119
Publisher User Level
User Level required to be publish and mangage events
Specified category
Shows events only from the selected category
Additional category (multiple)
Also include events from this additional category
Manage Calendars
Access: Select Components > JEvents MVC > Manage Calendars
The ICals screen will be displayed
The following information is displayed:
Event Summary
The unique name of the calendar
Type
The calendar type
120
The Artstract Co. - Joomla User Manual - Rev. 2009.04.20
Category Name
The default category type when adding an event to this calendar
Published
Shows a green check if the calendar is currently published
Anon Refresh?
Shows a green check if the calendar allows anonymous updates from a remote script
Is Default?
Shows a green check if this is the default calendar
Access
Shows what level of user has access to the calendar
Create a New Calendar
Access: Select Components > JEvents MVC > Manage Calendars > New
The Edit ICS screen will be displayed
The Artstract Co. - Joomla User Manual - Rev. 2009.04.20
121
Complete the following information:
Unique Identifier
A unique name for the calendar to be used internally. Should not contain any special characters or spaces
Select Default Category
The default category new events in this calendar will take
Access Level
The level of Joomla user who the calendar will be available to
There are three ways to create a new calendar, depending on how you wish to create your calendar, select the appropriate tab
and complete the following information
From File
Load Local from File
Click Browse to select an iCal file from your computer to define the new calendar
From URL
Allow anonymous refresh
Select Yes to allow a remote script to make updates to the calendar
Load Local From URL
Enter the URL to a remote iCal
Creating from scratch
Is Default?
Select Yes to make this the default calendar
Create Calendar from scratch
Click here to create the calendar
Edit a Calendar
Access: Select Components > JEvents MVC > Manage Calendars
Click on the calendar name to open the edit window, or check the box next to the calendar name and click the Edit button
The Edit ICS screen will appear
From here you can edit the Unique Identifier, Select Default Category, Access Level, and any configuration options depending on how the calendar was created in the first place.
Publish and Unpublish a Calendar
Access: Select Components > JEvents MVC > Manage Calendars
122
The Artstract Co. - Joomla User Manual - Rev. 2009.04.20
Check the box next to the calendar you wish to publish or unpublish and click the Publish or Unpublish button as appropriate or click the icon in the Published column to toggle between the two.
Delete a Calendar
Access: Select Components > JEvents MVC > Manage Calendars
Check the box next to the calendar you wish to delete and click the Delete button
Manage Categories
Access: Select Components > JEvents MVC > Manage Categories
The Categories screen will be displayed showing the following information:
Title
The title of the category
Parent
The category parent if it’s a child category
The Artstract Co. - Joomla User Manual - Rev. 2009.04.20
123
Administrator
Shows the category administrator
Order
Shows the order of categories. Enter a new order manually in the field provided and click the Save button to
save the new order.
Published
Shows an icon denoting the category as Published or Unpublished. Click the icon to toggle between states.
Access
The Joomla user level required to see the category
Other functions available on this screen include:
Parent
Show only categories with a specific parent, chosen from the drop down menu
Display #
The drop down allows you to select the maximum number of categories to be displayed per page
Add A New Category
Access: Select Components > JEvents MVC > Manage Categories > New
124
The Artstract Co. - Joomla User Manual - Rev. 2009.04.20
The Categories screen will display
Complete the following fields:
Title
The title of the category
Parent
The category parent if this is to be a child category, otherwise select No Parent
Administrator
Select the category administrator from the drop down list
Access Level
Select the level of Joomla user that is able to see events in this
category
Event Colour
Click Choose Colour to select a category colour
Description
A category description (optional)
Edit a Category
Access: Select Components > JEvents MVC > Manage Categories
Click the title of the category you wish to edit or the check box next to the category title and click Edit
The Categories screen will display where you can edit all the fields above
Delete a Category
Access: Select Components > JEvents MVC > Manage Categories
Click the check box next to the category title and click Delete
Manage Events
Access: Select Components > JEvents MVC > Manage Events
The ICal Events screen will be displayed showing the following information:
Event Summary
The title of the event
Repeats
Shows an icon if the event has a repetition scheduled
Published
Shows an icon noting whether the event is Published or Unpublished as well as if a published event is in the
future, current, or past. Click on the icon to toggle the event between states
The Artstract Co. - Joomla User Manual - Rev. 2009.04.20
125
Timesheet
Shows the start and end times for the event
Access
Shows what level of Joomla user is able to see this event
Other functions available on this screen include:
Categories
Select a category from the drop down to filter events by category
126
The Artstract Co. - Joomla User Manual - Rev. 2009.04.20
ICS File
Select events from a specific calendar from this drop down
Search
Quickly search the events for a keyword
Display #
The drop down allows you to select the maximum number of categories to be displayed per page
Adding an Event
Access: Select Components > JEvents MVC > Manage Events > New
The Edit Event screen will be displayed.
The Artstract Co. - Joomla User Manual - Rev. 2009.04.20
127
Toolbar Buttons: Save and Cancel are available.
Complete the following information:
Subject
A short title for your event
Category
Select a category for the event from the drop down menu. All events must have a category.
Event Priority
If multiple events fall on the same day at the same time, the one with the lowest priority value will appear first
in the list.
Access Level
Public allows all site visitors to see your event, Registered means your event only appear for logged in users.
Activity
Fill in the details using the editor window
Location
Where is the event taking place
Contact
Who to contact for more information
Extra Info
Anything else that doesn’t fit above
Note: Additional information fields (those that appear below the editor window) may vary depending on how the
administrators have configured the site.
Click the Calendar tab to set the dates and repetition.
All day Event or Unspecified time
Check this if your event is a full day event or takes place at an indeterminate time.
12 Hour
When this is checked, you can enter start and end times using a 12 hour clock (am, pm). When unchecked
times are specified using the 24 hour clock.
Start date
Enter the starting date by clicking on the calendar icon and enter the start time
End date
Enter the ending date by clicking on the calendar icon and entering the end time
Repeat type
If your event is recurring, select the radio button next to the recurrence type. Further options will appear
Daily: Enter the Repeat Interval (number of days between repeats), and choose either Repeat Count (to
repeat the event x number of times) or Repeat Until (to select the last date from a calendar)
Weekly: Enter the Repeat Interval, Repeat Count or Repeat Until, and the week day(s) the event occurs (By
Day)
Monthly: Enter the Repeat Interval, Repeat Count or Repeat Until, and the By Month Day (the x day of
the month, or x from last day when checking Count back from month end) or the By Day(to select the day
128
The Artstract Co. - Joomla User Manual - Rev. 2009.04.20
of the week, and week of the month that the event takes place)
Yearly: Enter the Repeat Interval, Repeat Count or Repeat Until, and the By Year Day (the number of days
from the start or end of the year the event takes place on
Edit an Event
Access: Select Components > JEvents MVC > Manage Events
Click the title of the event you wish to edit, or select the checkbox next to the event title and click Edit to open the Edit Event
screen. Here you can edit all the fields detailed above.
Delete an event
Access: Select Components > JEvents MVC > Manage Events
Select the checkbox next to the event title and click Delete.
Manage Users
Access: Select Components > JEvents MVC > Manage Users
The Users screen will now be displayed with the following information:
Name
The users real name
Username
The users user name
Enabled?
Shows a green check if the user is enabled
Create?
Shows a green check if the user has the ability to create a new event
Max Events?
Shows the maximum number of events the user can create
Publish Own?
Shows a green check if the user can publish their own events
Delete Own?
Shows a green check if the user can delete their own events
Edit All?
Shows a green check if the user can edit all events
Publish All?
Shows a green check if the user can publish all events
Delete All?
Shows a green check if the user can delete all events
The Artstract Co. - Joomla User Manual - Rev. 2009.04.20
129
Upload Images?
Shows a green check if the user can upload images to their event description
Upload Files?
Shows a green check if the user can upload files as part of their event description
Create Own Extras?
Shows a green check if the user can create their own extra fields in the event display screen
Create Global Extras?
Shows a green check if the user can create global extra fields in the event display screen
Max Extras?
Shows the maximum number of extra fields the user can create
Create a New User
Access: Select Components > JEvents MVC > Manage Users > New
The Edit User screen will be displayed where you can complete all the fields detailed above. Click Save when you’re done
Note: Joomla users are automatically given permission to add and edit events using JEvents based on the global
parameters set by the administrator.
Further Information: Setting up the Global Parameters
130
The Artstract Co. - Joomla User Manual - Rev. 2009.04.20
Edit a JEvents Users Details
Access: Select Components > JEvents MVC > Manage Users
Click the users name you wish to edit or select the checkbox next to the user you wish to edit and click Edit. The Edit User
screen will be displayed.
Here you can edit all the fields detailed above.
Global Configuration
Access: Select Components > JEvents MVC > Global Configuration
The JEvents Configuration panel will be displayed.
Component 1 Tab
Date Format
Choose French-English, US, or Continental-German date formats to be used.
Use 12hr time Format
Select Yes to use the 12 hour clock by default, No to use 24 hour
The Artstract Co. - Joomla User Manual - Rev. 2009.04.20
131
Use Simple
Use Simple (IE. No Repeat types) Event entry Form for user front end
Default Event Color
Choose Random, None, or Category based colouring for your events
Set meta-tag to stop robots crawling
Select Yes to hide events from search engine spiders
Event color rule
Event specific colors allowed - Frontend and backend editors can use event specific colours
Event colors in backend edit only - Only backend editors can specify event specific colours
Always use category colors - Editors cannot use event specific colours and any events specific colours defined
before the use of this setting will be ignored and the category colour displayed instead
Use Joomla Cache
Select Yes to allow Joomla to cache event information. Not compatible with session based filtering
Component 2 Tab
Choose layout view
Choose alternative, default, ext, geraint default layout
Show Headline
Displays a headline of the component view.
Use new Icon Navigation bar
Choose Yes or No
Navigation Bar Color
Green, Orange, Blue, Red, Gray, Yellow
First Year to Display in Calendar
Type the first year to include a calendar for
Last Year to Display in Calendar
Choose the last year to include a calendar for
Start Page
Choose whether the first page displayed in the events calendar system is Day, Week, Month (Calendar),
Month (List), Year, Categories, or Search view
First Day
Choose Sunday first or Monday first
Show Print Icon
Generates a print view for the current calendar page
Hide “See By Categories” (appropriate if events legend module is visible)
Choose Yes to hide the “See By Categories” selection
Hide Links using Javascript
Make links inaccessible to most search engines
132
The Artstract Co. - Joomla User Manual - Rev. 2009.04.20
Show Copyright Footer
Select Yes to hide the copyright information
The Artstract Co. - Joomla User Manual - Rev. 2009.04.20
133
Settings related to Edit Event
Edit Events in one tab
Only one tab is used to enter all attributes of an event
Show editors button extensions
Show all the buttons installed as extension of the edito
Hide specific buttons
Enter a comma separated list of buttons not to be shown, e.g. image,pagebreak,readmore
Settings related to Event Detail
View mail
Choose Show or Hide
View “By”
Choose Show or Hide
View “Hits”
Choose Show or Hide
View Repeat and time
Choose Show or Hide
Settings related to Monthly View
Titlelength
If a title has too many characters, an unwanted design could be the result. Enter here how many characters to
allow before the title will be trimmed and ... added
Max. Events
Maximum number of displayed events as text per day in month view
If you have many events per day, displaying them could destroy your layout.
Define here how many events should displayed as text, if too many they will be displayed as an icon (tooltip is
not affected)
Tip: Setting the value to 0 [null] forces the display of all events as icon
Show starttime
Should the starttime be displayed when in month view
Other Calendar display settings
Show All Repeat Events in Year List
Choose Show to show all repeats of an event or Hide to show only the initial event when in year view
No. of Events
No. of Events to List per page for week, month, or year views
RSS Tab
Should RSS results be cached?
Select Yes to allow Joomla to cache the RSS feed.
RSS Cache Time in Seconds
Length of time to cache RSS feed
134
The Artstract Co. - Joomla User Manual - Rev. 2009.04.20
Number of Events to show
The number of event to include in the RSS feed
Live Bookmarks
Choose Yes to create a Live Bookmark. With Live Bookmarks you can see the item titles of an RSS web feed
in your bookmarks.
Get RSS feed data from module
Get data for the live bookmark RSS feed from the Latest Events tab of the component or the selected Latest
Events module.
RSS Title
The public title of the RSS feed
RSS Description
The public description of the RSS feed
Limit Text Length
Choose yes to limit the title length in the RSS feed
Text Limit
The maximum number of characters allowed in the title of RSS feed items before trimming
The Artstract Co. - Joomla User Manual - Rev. 2009.04.20
135
Calendar Tab
Display Last Month
Choose No, YES - with stop day, YES - if has events AND with stop day, ALWAYS, ALWAYS - if has events
Day in Current Month to Stop
Day in Current Month to Stop displaying Last Month
Display Next Month
Choose No, YES - with start day, YES - if has events AND with start day, ALWAYS, ALWAYS - if has events
Days left in Current Month to Start
Days left in Current Month to Start displaying Next Month
Hide Links using Javascript
Make links inaccessible to most search engines
136
The Artstract Co. - Joomla User Manual - Rev. 2009.04.20
Latest Events Tab
Maximum Events to Display
Maximum number of events to display in the module(max 150)
Display Mode
0 (default) display closest events for current week and following week only up to maximal events
1 same as [ mode = 0 ] except some past events for the current week will also be displayed if num of future
events is less than maximal events
2 display closest events for [ + days ] range relative to current day up to maximum events
3 same as mode 2 except if there are less than maximal events in the range, then display past events within [ days ] range relative to current day
4 display closest events for current month up to maximal events relative to current day
Days Before-After
Day range relative to Current Day to display Events (modes 2 or 3 only)
Only Display a Repeating Event Once
Display any event which has a repeat type only once in the module
The Artstract Co. - Joomla User Manual - Rev. 2009.04.20
137
Display Events As Link
Display event titles as links to the “view_detail” ‘.$option.’ task which will display details of the event
Display Year
Display Year in the Event’s Date (default format only)
Disable default CSS Date Field Style
Do not apply the default mod_events_latest_date css class to the date field
Disable default CSS Title Field Style
Do not apply the default mod_events_latest_content css class to the title field
Display link to the Calendar Component
Generates a link to the Calendar Component. Current category restrictions are passed as parameters
Hide Title Links using Javascript
Make links inaccessible to most search engines
Sort reverse
If set to YES, events are sorted reverse order(from newest to oldest)
Custom Format String
Allows a customized specification of the desired event fields and format to be used to display the event in the
module. The string can specify html directly.
Include link to RSS feed in module
Choose Yes to include a link to the RSS feed in module
Tooltip Tab
Enable Calendar popup tooltips
Should tooltips be shown for main monthly event calendar
Tooltip Mainwindow
Same background as event
Should the tooltip use the same background as the event. If you choose No the standard color will be used
Horizontal Position
The positon of the tooltip can be Left, Center, or Right
Vertical Position
The vertical position of the tooltip window can be below or above
Shadow
Shadow
Choose Yes to add a shadow to the tooltip window
Left
Choose Yes to have the shadow fall to the left of the tooltip window, No to fall right
Above
Choose Yes to have the shadow fall above the tooltip window, No to fall below
138
The Artstract Co. - Joomla User Manual - Rev. 2009.04.20
The Artstract Co. - Joomla User Manual - Rev. 2009.04.20
139
Appendix D: Using !JoomlaComment
Manage Comments
Access: Select Components > !JoomlaComment > Manage Comments
The Manage Comments tab will now be displayed
The following information is displayed:
Id
The comment identification number
Writer
The person who wrote the comment
Userid
The comment writers userid if they are a registered Joomla user. The userid will be 0 if they are not a user.
Notify
Displays an icon showing whether the writer has requested notification if there is a new comment after theirs,
and allows you to email them by clicking
140
The Artstract Co. - Joomla User Manual - Rev. 2009.04.20
Url
The writers supplied URL
Date
The date and time the comment was made
Comment
The comment text
ContentItem
The article the comment was made on
Published (notify writer)
Displays an icon showing if the comment has been published and let’s you click to toggle the published state.
Delete (notify writer)
Click the icon to delete the comment
IP
The commenters IP address
Voting Yes
Indicates the number of visitors who have voted for the comment (requires configuration to use)
Voting No
Indicates the number of visitors who have voted against the comment
Parent Id
Indicated the comment id of the comment this is in response to. E.g. If comment 2 is in response to comment
1, the parent id of comment 2 will be 1, and the partent id of comment 1 will be -1 (no parent)
Imported From
Indicates where the comment was imported from (if appropriate)
Other functions available on this screen include:
Search
Keyword search of the comments
Display #
This drop down allows you to select the maximum number of comments to be displayed per page.
Publish & Unpublish Comments
Access: Select Components > !JoomlaComment > Manage Comments
Select the checkbox next to the comment(s) you wish to publish or unpublish.
Click the Publish or Unpublish button as appropriate.
The Artstract Co. - Joomla User Manual - Rev. 2009.04.20
141
Delete Comments
Access: Select Components > !JoomlaComment > Manage Comments
Select the checkbox next to the comment(s) you wish to delete.
Click the Delete button.
Edit a Comment
Access: Select Components > !JoomlaComment > Manage Comments
Click on the Writer name of the comment you wish to edit or select the checkbox next to the comment you wish to edit and
click Edit. The comment editor screen will display.
Make any appropriate changes to the comment then click Save.
142
The Artstract Co. - Joomla User Manual - Rev. 2009.04.20
!JoomlaComment Configuration
Access: Select Components > !JoomlaComment > Content Settings
The configuration screen will be displayed.
General Tab
Uninstall complete mode:
Delete both the component and the data on uninstall. Do not use if you plan to reinstall later.
Mambot content function
For expert only ! You can change here the joscomment mambot function, if you have hacked the content
html.
Frontend language
Select autodetect to use the Global Parameters
Backend language
Select autodetect to use the Global Parameters
Local charset
Input the charset of your joomla installation if it is different from utf-8.
Exclude/Include
If INCLUDE, this will allow comments for items which are: IN selected Ids OR IN selected sections OR IN
selected categories.
If EXCLUDE, this will not allow comments for items which are: IN selected Ids OR IN selected sections OR IN
selected categories.
Exclude/Include items Ids
You can use this field to exclude/include items Ids. Format: list of Ids separated by , with no space.
Exclude/Include sections
Click to Exclude/Include sections. Use Ctrl or Shift key to select unselect lines.
Exclude/Include categories
Click to Exclude/Include sections. Use Ctrl or Shift key to select unselect lines.
Excluded content item list
This is a depreciated setting from previous versions, DO NOT USE.
Username concerned by debug
Debug alerts will be dislplayed only for this username account.
xmlErrorAlert
Choose Yes or No to receive debug alerts for XML errors
ajaxdebug
Choose Yes or No to receive debug alerts for AJAX errors.
The Artstract Co. - Joomla User Manual - Rev. 2009.04.20
143
Security Tab
Only registered
Selecting Yes means only registered users can write comments.
Autopublish comments
If you set this to No then comments will be added to the database and will wait for you to review and publish
them before showing. If set to Yes the comments will be published automatically and can be moderated later.
Banlist
Specify IPs to ban, separated by commas
Notify admin
This is a depreciated setting from previous versions, DO NOT USE.
Admin’s email
The administrators email address
Notify moderators
Click Yes to notify moderators when a new comment is made
Moderator groups
Designates which Joomla user groups are considered !JoomlaComment moderators. Moderators can modify
and delete comments.
Enable users notification
Email and notification field will be available and if notified is set, users will receive information of new post.
Enable comment feed (RSS
Choose Yes to enable the comment RSS feed
Post max length
Maximum allowed characters in posts (-1 for no max.)
Line max length
Maximum allowed characters in one line (-1 for no max.)
Word max length
Maximum allowed characters in words (-1 for no max.)
Captcha Enabled (recommended)
If set to Yes, this will force the user to input a random string displayed in a specially crafted image. This will
disallow automated submissions to your site.
Captcha Usertypes
Only the selected usertypes will have to complete the Captcha, other users will not see it.
Website URL only for registered
If set to Yes, the writers website URL will only display when the user is registered
Enable
Choose Yes to activate the word censor. The censor will use the rules written in the censored words list to hide
or change those words
Case sensitive
Choose Yes to make the censor case insensitive
144
The Artstract Co. - Joomla User Manual - Rev. 2009.04.20
Censored words
List of words to censor in the format word = censored version, word 2 = censored version. Whenever a censored word appears in a comment, the censored version supplied here will replace it.
Usertypes
The word censor will be applied only to the selected usertypes
Posting Tab
Ajax support (recommended)
Choose Yes to enable Asynchronous JavaScript + XML
Allow nested comments
This will allow users to insert make a comment in response to any other comment of the content item (not
only the last), with an indent display.
Only moderators
Only moderators will be allowed
Indent (pixels)
This is used to indent messages in threaded view.
Comments sorting (if NOT nested comments)
Ordering of comments : used only if nested is NOT active.
If New entries first, the form will be on the top, else it will be on the bottom
Number of comments by page
Number of comments to be display per page
Input website field
Allow the users to input their website link.
UBB code support
Allow the use of UBB Codes ?
Picture support
Allow the use of pictures in comments ?
Picture maximum width
Maximum width in pixel
Enable voting
If set AND ajax mode is set : will display reactive image to allow to vote + or - for any comments.
Use names
Use names rather than usernames (it concerns only registered users)
Enable profiles
Allow the use of Community Builder - Profiles in comments ?
Enable avatars
Allow the use of Community Builder - Avatars in comments ? (only if profiles is enabled)
Date format
Input the date format you wish to use. The syntax used here is identical to the PHP date() function.
The Artstract Co. - Joomla User Manual - Rev. 2009.04.20
145
Deactivate search button
Deactivate the search button.
Visible
If set, will display the IP address of the unregistered writers OR the “usertype” of the registered users.
Usertypes
At least one usertype must be selected.
“IP visible” is set to Yes : will show only for comments of selected usertypes (select all is recommended).
“IP visible” is set to No : will show only for selected connected usertypes
Partial
If set, will not display the last digit of the unregistered users IP address
Caption
Description before display the IP value
Layout Tab
Show “Read On”
In case of intro display mode of content items (frontpage, blogs...), will display a write comment link with the
count of existing comments for this content item
Only if “Read On” set in Menu
Show only if “Read On” parameter of the calling menu link (in joomla admin Menu->...) is set. YES is recommended.
Do not show if detail link exists
Do not show when content item has link to detail (Readon or Title) and the page is “intro only”
Preview visible
Display preview of last comments (if “Show Read On” is enable)
Preview Length
The length of the preview in characters Preview Number of lines
The height of the preview in lines Standard template
Templates are the different looks of your comments.
If you have enabled emoticons, adapt the numbers of emoticons by line (see below) according to your template choice.
Copy current standard template to customized template directory
If set, when saving setting, the selected standard template will be copied in custom directory as a new
“my[standard template]” which you could then modify (see parameters below). It will be copied only if it does
not already exist.
Your customized template
Use the copy parameter to copy standard template. Then you will be allowed to modify HTML or CSS (it will
not be overwritten during next upgrades). If none is selected, standard template will be used.
146
The Artstract Co. - Joomla User Manual - Rev. 2009.04.20
Modify current customized template
Set YES if you would like to modify HTML and CSS style of your current customized template. 2 new tabs
will appear after saving the selection.
Set to NO will simplify the save of the setting (faster).
Include javascript library
Include javascript library when using templates with effects (JQuery, Mootools...)
Set to NO if library is already included. Else, you will have javascript errors and problems.
Columns number of the input area
You can use this parameter to increase or decrease width of input text area according to your website design.
Emoticon (smilies) support
Allow the use of Emoticons in comments ?
Emoticon pack
Select the emoticon pack to use Number of emoticon by line
Number of emoticon to display on each line. Value 0 means no limit.
Proposition: use 12 in case of emotop templates (emoticon are on top) and 2 or 3 if possible for others (left
emoticon templates). Try and see what is the best for your website !
The Artstract Co. - Joomla User Manual - Rev. 2009.04.20
147
Appendix E: Special & Custom Extensions
Introduction
A number of special use and custom built extensions have been configured on this site. Here you’ll find information on their
parameters.
Customized Footer
Access: Select Extensions > Module Manager > Customized Footer
This module creates a customized footer for the site.
Parameters
Show Site Map Link
Choose Show to include a link to the HTML site map
Site Map Link
Enter the URL to the HTML site map
Explore Gravenhurst
Access: Select Extensions > Module Manager > Explore Gravenhurst
This is a standard Joomla! Random Image module set to pull an image at random from the JoomGallery thumbnails and link
to the JoomGallery page. These locations can be changed here.
Events Legend
Access: Select Extensions > Module Manager > Events Legend
This module is an extension to the JEvents component that displays the events category legend in the left hand panel
Sidebar - Maps
Access: Select Extensions > Module Manager > Sidebar - Maps
This is a standard Joomla Custom HTML module that is used to input the text used in the Maps sidebar item.
148
The Artstract Co. - Joomla User Manual - Rev. 2009.04.20
Sidebar - Artstract News Flash
Access: Select Extensions > Module Manager > Sidebar - Artstract News Flash
This is a heavily modified version of the default Joomla Newsflash module with a number of new features and parameters as
outlined below The purpose of the module is to select one or more of the published items from a Category (News/Newsflash)
upon each page refresh.
Parameters
Category
Select a content Category from this drop-down list (listed as Section/Category). The Articles in the selected
Category will be formatted based on the layout selected in the Style parameter on this page.
Layout
Select a layout from this drop-down list to determine how the Module will display its contents. The vertical
and horizontal options are self-explanatory. The Randomly choose one at a time option, randomly displays a
single Category item with each page reload.
Show images
Select the Yes radio button to determine whether the Module should display images contained in Articles.
Select the No radio button to hide all images.
Linked Titles
Select an option from this drop-down list to make the Article titles linkable (or not). The Yes option turns
linked titles on. The No option turns linked titles off. The Use Global options defaults to the setting for this
parameter in the Global Configuration area of the web site.
Show last separator
Choose Yes if you want to show the separator between items following the last item in the list, or No to hide
this separator
Read More
Select the Show radio button to display a Read More link at the end of each Article. Select the No radio to
hide this link.
Read More Link Text
Enter the text to use as a link to the article when the module automatically trims the content
Auto Trim
Choose Yes to enable auto trimming of content that exceeds the Auto Trim Length, or No to show full articles, regardless of length
Auto Trim Length
Enter the maximum number of characters to show from an article before the content is trimmed.
Article Title
Select Yes from this drop-down list to display the title and the text of Articles. Select No to hide all titles. See
also: Linked Titles above
No. of Items
Enter a number to determine how many Articles will be displayed with each page refresh. This is only applicable for the horizontal and vertical options listed in the Style section above.
The Artstract Co. - Joomla User Manual - Rev. 2009.04.20
149
Module Class Suffix
Enter the suffix for the CSS class of this Module. (e.g. moduletable_poll). In this example, the -poll is the suffix. This suffix class must currently be in the template CSS Style file. This allows individual CSS classes to be
applied to certain Modules independent of the site’s default Template CSS classes.
Note: It is important to allow sufficient space to display the generated content. This is especially important when
using the ‘vertical’ and ‘horizontal’ options.
Sidebar - Community Associations
Access: Select Extension > Module Manager > Sidebar - Community Associations
This is a standard Joomla Custom HTML module that is used to input the text used in the Community Links sidebar item.
CssJsCompress
Access: Select Extensions > Plugin Manager > System - CssJsCompress
CssJsCompress can automatically optimize external resources like CSS and JavaScript, which can reduce both the size and
number of requests made to your website. GZip generated CSS and JavaScript files to about 1/4 of the original size. These
optimizations may reduce server load, bandwidth requirements, and page loading times.
This compression may introduce problems with the code being served however and should be thoroughly tested. On launch,
CSS Optimization was turned off due to issues, Javascript Oprtimization was turned off due to problems, and GZip Javascript
and CSS compression was Enabled.
Joomap
Access: Select Components > Joomap
Joomap is a component to change a menu into an HTML site map which makes the site more accessible to site visitors and
can improve search engine rankings. A number of settings for this component can be configured but most require an advanced
knowledge of CSS.
150
The Artstract Co. - Joomla User Manual - Rev. 2009.04.20