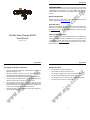
1
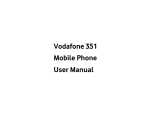
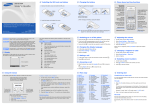
aigo S2902
Important Notice
Congratulations on purchasing your aigo Portable Solar Charger
S2902. Please read this user manual carefully before using your aigo
product.
Warranty Registration
Register your aigo product online to enjoy warranty, member's perks
and more, please visit www.aigo.com.sg
Need Help Fast?
Read your User Manual first for quick tips. After you have read the
instructions and still need assistance, you may access our online help
at www.aigo.com.sg or call +65 6333 6388 with your product’s model
and serial number.
Portable Solar Charger S2902
User Manual
(Version 1.0)
Obtaining Warranty Service
Please review the User’s Manual troubleshooting resources and online
help resources before seeking warranty service. If the product is still
not functioning properly after making use of these resources, access
the online website: www.aigo.com.sg for instructions on how to obtain
warranty service.
|1|
aigo S2902
aigo S2902
Copyrights/ Trademarks Information
Safety Instructions
•
aigo logo is registered trademark of Beijing Huaqi Information &
Digital Technology Co., Ltd.
•
Do not expose to extreme temperatures.
•
Do not allow any liquid form into the device.
•
Microsoft, MS-DOS, Windows and the Windows logo are
registered trademarks of Microsoft Corporation.
•
Do not apply or subject the product to excessive pressure.
•
•
Do not try to disassemble and repair the device yourself.
Intel and Pentium are registered trademarks of Intel Corporation.
•
•
Do not expose device to chemicals such as benzene or thinner.
All other products are trademarks or registered trademarks of their
respective owners and are hereby recognized as such.
•
Do not store device in dusty or damp area.
•
The information on this manual is prepared with the current
product specifications. aigo reserves the right to make design and
specification changes for product improvement without prior notice.
Actual contents may differ slightly from those pictured.
•
Copyright © 2006 by Huaqi Information Technology (Singapore)
Pte Ltd. All rights reserved.
|2|
|3|
aigo S2902
Contents
Important Notice................................................................................ 1
Before Using the Player .................................................................... 5
Package Contents ......................................................................... 6
Technical Specifications ................................................................. 7
Product Features ........................................................................... 8
Product Overviews......................................................................... 9
The 3-Color LED Indicator ........................................................... 10
Using aigo Portable Solar Charger S2902 ....................................11
aigo S2902
Before Using the Player
Product Introduction
aigo Portable Solar Charger S2902 (S2902) is a portable battery power
kit based on intellectual voltage regulation proprietary technology. The
solar charger can distinguish output voltage and current on different
requirements automatically.
S2902 can charge most of mobile phones and *USB interface digital
products with operating voltage between 4.5V - 9V directly. The device
is portable, environmental-friendly, lightweight, durable and versatile
for traveling use.
Note: *USB interface digital products refer to digital products that are
equipped with built-in rechargeable battery and can be recharged via USB
interface.
|4|
|5|
aigo S2902
aigo S2902
Package Contents
- aigo Portable Solar Charger S2902
- 100V - 240V Power Adapter (optional)
- Extension USB Cable
- User Manual
- 7 Sets of Charging Connectors (optional)
Technical Specifications
Voltage is adjustable between 5V-9V
High storage capacity 2500mAh
USB output, connect the USB cable to charge external device
Wide range of charging connections to charge a variety of devices
Polycrystalline Silicon Solar Panel:
- Peak power supplied by photocell: 1.54W
- Operating voltage: 5.5V (max)
- Charging current: 280mA (max) / 3.8V
Solar Charger:
- Battery capacity: 2500mAh / 3.8V
- Output voltage: 4.5V-9V (adjustable)
- Output current: 1A (max)
- Output power: 4W (max) Dimensions: 137 x 79 x 24 (mm)
- Weight: 240 (g)
|6|
|7|
aigo S2902
Product Features
aigo S2902
Product Overviews
1. High transforming rate when converting light energy into electrical
energy.
2. Professional built-in circuit to prevent over-discharge, over-charge,
over-current and heat reduction when charging the built-in battery by
power adapter or sunlight.
3. Double short-circuit protection.
4. 3-Color LED Indicator.
Product Material: Fireproof plastic (ABS)
1——USB Interface (Output Interface)
2——LED Light (Torchlight function)
3——Control Switch (ON / OFF / LED)
4——3-Color LED Indicator (Intelligent LED Indicator)
5——DC Interface (Input Interface)
6——Output Voltage Switch (adjustable 4.5V / 5V / 6.3V / 9V)
7——Polycrystalline Silicon Solar Panel
|8|
|9|
aigo S2902
aigo S2902
The 3-Color LED Indicator
Using aigo Portable Solar Charger S2902
A: When charging the built-in battery:
Red light: Low voltage < 3.8V.
Orange light: Mid voltage between 3.8V - 4.1V.
Green light: High voltage, fully charged.
IMPORTANT:
To stabilize the built-in battery on the solar charger, we would
recommend the following:
1. Use up the remaining power on the new solar charger until the
built-in battery is totally flat (Example: Connect it to a mobile phone and
starts charging).
2. When the built-in battery has finally gone flat, starts charging the
new solar charger for at least 12 hours using the power adapter (repeat
this process for the very first 3 times when using the new solar
charger).
Remarks: It is normal to see LED indicator flashing in Red, Orange and
Green color during the charging process.
B: When discharging the built-in battery:
Red light: Low voltage < 3.5V.
Orange light: Mid voltage between 3.5V - 4.1V.
Green light: High voltage between 4.1V - 4.2V.
Remarks:
1. When Control Switch is turned ON and is NOT charging any external
device, the LED indicator turns RED indicates that the power is low and it
requires charging immediately (using direct sunlight or power adapter).
2. When Control Switch is turned ON and while charging an external device,
LED indicator will flash in Red, Orange and Green color.
3. When Control Switch is turned ON and there is no LED indicator, it
indicates that the power is low and it requires charging immediately (using
direct sunlight or power adapter).
Under direct sunlight, the product transforms light energy absorbed by
solar panel into electric energy and through the control circuit to store
electric energy in the built-in battery, or directly charge cell phone or
other digital products with the electric energy (It depends upon the
sunlight intensity. If the electronic mobile equipments need high current,
may cause no charging to external electronic products). During the
absence of sunlight, the product can be charged with the bundled
power adapter, and it also can charge other devices at the same time.
| 10 |
| 11 |
aigo S2902
1). Charging under direct sunlight
a. Open the cover on the solar charger and keep solar panels upright
facing direct sunlight.
b. Turn Control Switch to OFF position.
Note: When the 3-Color Indicator turns Red color, it indicates that the
built-in lithium battery is being charged and voltage is under 3.8V;
if the light turns Orange color, the storage capacity is larger and the
voltage is between 3.8V - 4.1V;
if the light becomes Green color, it means the built-in battery is full.
When the cover on the solar charger is closed, the 3-Color Indicator is
OFF and the solar panel stops working.
2). Charging using power adapter
a. Connect the cable of the power adapter to the DC interface on the
solar charge.
b. The 3-Color Indicator will turn Red color. The 3-Color Indicator will
flash in Red, Orange and Green color.
c. When the 3-Color Indicator turns Green color, it indicates that the
internal built-in battery is fully charged.
| 12 |
aigo S2902
3). Charge an external portable digital device
a. Set the Output Voltage to the most suitable voltage level according
to your electronic equipments charging voltage.
b. Select the correct charging connector which is suitable for the
electronic equipments and connect the electronic equipment to the
charging connector and solar charger (through the USB cable).
c. Switch the Control Switch to ON and 3-Color Indicator turns Red (the
LED indicator will flash in Red and Green color) to indicate charging is
in progress.
d. When the battery indicator on the external electronic mobile
equipment indicates fully charged, please switch Control Switch on the
solar charger to OFF and disconnect the power adapter (Please
change setting to 6.3V for Nokia mobile phones if it is not charging).
Note:
1. Before using the solar charger, please charge it for more than 12 hours
using power adapter for the first three times (see page 11).
2. When LED indicator flashes in Red and Green color, it means that the
sunlight intensity is low. However, we may also charge using the power
adapter.
| 13 |