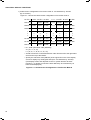
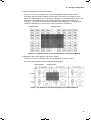
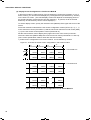
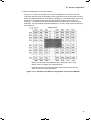
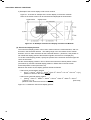
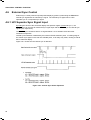
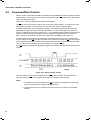
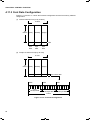
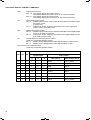
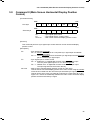
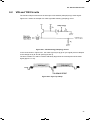
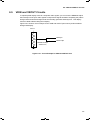
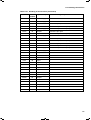
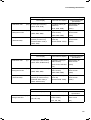
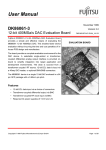
1
FUJITSU SEMICONDUCTOR
ASSP MANUAL
AM32-10827-1E
ON-SCREEN DISPLAY
CONTROLLER
ASSP FOR SCREEN DISPLAY CONTROLLER
MB90092
USER'S MANUAL
CONTENTS
CHAPTER 1
1.1
1.2
1.3
1.4
Features ..................................................................................................................................................2
Block Diagram .........................................................................................................................................5
Internal Circuit Blocks ..............................................................................................................................6
Example of Application Circuit .................................................................................................................7
CHAPTER 2
2.1
2.2
INPUT AND OUTPUT PINS ............................................................................9
Pin Assignment......................................................................................................................................10
Pin Descrptions......................................................................................................................................11
CHAPTER 3
3.1
3.1.1
3.1.2
3.2
3.2.1
3.2.2
3.2.3
3.3
3.3.1
3.3.2
3.3.3
3.3.4
3.3.5
3.4
DESCRIPTION ................................................................................................1
DISPLAY FUNCTIONS .................................................................................15
Screen Configuration .............................................................................................................................16
Main Screen Configuration ...............................................................................................................16
Sub-screen Configuration.................................................................................................................21
Character Configuration.........................................................................................................................30
Normal and Graphic Characters.......................................................................................................30
Character Sizes ................................................................................................................................31
Zoom-in Display Function.................................................................................................................32
Character Display Functions..................................................................................................................34
Pattern Background Display .............................................................................................................34
Solid-fill Background Display ............................................................................................................37
Shaded Background Display ............................................................................................................38
Blinking Display ................................................................................................................................40
Kanji Font Display.............................................................................................................................41
Graphic Character Display Functions ....................................................................................................44
CHAPTER 4
CONTROL FUNCTION .................................................................................45
4.1 Dot Clock Generator ..............................................................................................................................46
4.2 Color Burst Clock Generator..................................................................................................................48
4.3 Power-on Reset .....................................................................................................................................49
4.3.1
Power-on Reset................................................................................................................................49
4.3.2
Device Initialization...........................................................................................................................49
4.4 Analog Switch Circuit.............................................................................................................................50
4.5 Sync Control ..........................................................................................................................................51
4.6 External Sync Control ............................................................................................................................52
4.6.1
H/V Separate Sync Signal Input .......................................................................................................52
4.6.2
Composite Sync Signal Input ...........................................................................................................53
4.7 Display Signal Output Timing ................................................................................................................54
4.8 Command Write Sequence....................................................................................................................55
4.9 Command/Data Transfer .......................................................................................................................56
4.10 Command Transfer Sequence and Timing............................................................................................57
4.11 Font Memory..........................................................................................................................................58
4.11.1 Font Memory Configuration ..............................................................................................................58
4.11.2 Kanji Font Area Control ....................................................................................................................59
4.11.3 Font Data Configuration ...................................................................................................................60
iii
CHAPTER 5
5.1
5.2
5.3
5.3.1
5.3.2
5.3.3
5.4
5.5
5.6
5.7
5.8
5.9
5.10
5.11
5.12
5.13
5.14
Display Control Commands .................................................................................................................. 64
Command 0 (VRAM Address Setting) .................................................................................................. 65
Commands 1 and 2 (VRAM Data Settings 1 and 2) ............................................................................. 67
Main Screen Sharacter Control Data Write (If VSL = 0 in Command 0) .......................................... 67
Writing Sub-screen Line Control Data (When Command 0: VSL = 1, CA0 = 0) .............................. 71
Main Screen Line Control Data Write (If VSL = 1 and CA0 = 1 in Command 0).............................. 73
Command 3 (VRAM Write Control)....................................................................................................... 76
Command 4 (Screen Control 1) ............................................................................................................ 77
Command 5 (Screen Control 2) ............................................................................................................ 79
Command 6 (Main Screen Line Control) .............................................................................................. 81
Command 7 (Main Screen Vertical Display Position Control)............................................................... 82
Command 8 (Main Screen Horizontal Display Position Control) .......................................................... 84
Command 9 (Kanji Font Display Control) ............................................................................................. 86
Command 10 (Color Control)................................................................................................................ 89
Command 11 (Sub-Screen Control) ..................................................................................................... 91
Command 12 (Sub-Screen Vertical Position Control)........................................................................... 93
Command 13 (Sub-Screen Horizontal Position Control) ...................................................................... 94
CHAPTER 6
6.1
6.2
6.3
6.4
6.5
6.6
6.7
6.8
iv
DISPLAY CONTROL COMMANDS..............................................................63
APPLICATIONS............................................................................................95
Power Supply........................................................................................................................................ 96
VIN and YIN Circuits ............................................................................................................................. 97
VOUT and YOUT Circuits ..................................................................................................................... 98
CIN and COUT Circuit ........................................................................................................................ 100
VKIN and VKOUT Circuits .................................................................................................................. 101
Interfacing with Microcontroller ........................................................................................................... 102
Refreshing Display Data ..................................................................................................................... 103
Handling Unused Pins ........................................................................................................................ 104
FIGURES
Figure 1.2-1
Block Diagram .............................................................................................................................. 5
Figure 1.4-1
Example of Application Circuit...................................................................................................... 7
Figure 2.1-1
MB90092 Pin Assignment .......................................................................................................... 10
Figure 3.1-1
Example of Main Screen and Sub-Screen Merged .................................................................... 16
Figure 3.1-2
Display Configuration on Screen ................................................................................................ 17
Figure 3.1-3
Display Screen Configuration When Enlarged Characters Are Used......................................... 18
Figure 3.1-4
Display Screen Configuration When Line Spacing is Set........................................................... 19
Figure 3.1-5
Main Screen Display Position..................................................................................................... 21
Figure 3.1-6
Screen Configuration in the Normal Screen Mode ..................................................................... 22
Figure 3.1-7
Virtual Screen Configuration in Full Screen Mode A .................................................................. 24
Figure 3.1-8
Example of the Screen Configuration in Full Screen Mode A .................................................... 25
Figure 3.1-9
Example of the Screen Display in Full Screen Mode A .............................................................. 25
Figure 3.1-10
Virtual Screen Configuration in Full Screen Mode B .................................................................. 26
Figure 3.1-11
Example of the Screen Configuration in Full Screen Mode B .................................................... 27
Figure 3.1-12
Example of the Screen Display in Full Screen Mode B .............................................................. 28
Figure 3.1-13
Sub-screen Display Position....................................................................................................... 29
Figure 3.2-1
Character Configuration Examples............................................................................................. 30
Figure 3.2-2
Zoom-in Display Function........................................................................................................... 31
Figure 3.2-3
Example of Zoom-in Display (One Character)............................................................................ 32
Figure 3.2-4
Example of Zoom-in Display (Multiple Characters) .................................................................... 33
Figure 3.3-1
Example of Pattern Background Configuration .......................................................................... 34
Figure 3.3-2
Example of Pattern Background Display .................................................................................... 35
Figure 3.3-3
Example of Solid-fill Background Display ................................................................................... 37
Figure 3.3-4
Example of Shaded Background Display ................................................................................... 39
Figure 3.3-5
16-dot Font Display Configuration .............................................................................................. 41
Figure 3.3-6
Examples of Horizontal Framing Display.................................................................................... 42
Figure 3.3-7
Example of Boldface Character Display (Displaying Twelve Dots
in the Horizontal Direction) ......................................................................................................... 42
Figure 3.3-8
Display Position Control Modes.................................................................................................. 43
Figure 4.1-1
Dot Clock Oscillation Waveform ................................................................................................. 46
Figure 4.1-2
LC-Tuned Dot Clock Oscillator ................................................................................................... 46
Figure 4.1-3
Equivalent Circuit of Dot Clock Generator.................................................................................. 47
Figure 4.2-1
Crystal Oscillator Circuit ............................................................................................................. 48
Figure 4.3-1
Clearing Power-on Reset ........................................................................................................... 49
Figure 4.4-1
Analog Switch Circuit.................................................................................................................. 50
v
Figure 4.5-1
External Sync and Internal Sync Display................................................................................... 51
Figure 4.6-1
Vertical Sync Detect Operation.................................................................................................. 52
Figure 4.6-2
Internal Timing of Sync Separate Operation.............................................................................. 53
Figure 4.7-1
Display Signal Output Timing .................................................................................................... 54
Figure 4.8-1
Command Write Sequence (for Command 2-1) ........................................................................ 55
Figure 4.9-1
Serial Transfer Timing ............................................................................................................... 56
Figure 4.11-1
Font Memory Configuration ....................................................................................................... 58
Figure 4.11-2
Example of Kanji Font Area Specification.................................................................................. 59
Figure 4.11-3
Font Data Configuration............................................................................................................. 60
Figure 4.11-4
Font Memory Address Configuration ......................................................................................... 61
Figure 5.2-1
VRAM Configuration .................................................................................................................. 66
Figure 5.5-1
Pattern Background Display Examples ..................................................................................... 78
Figure 5.8-1
Main Screen Vertical Display Position ....................................................................................... 83
Figure 5.9-1
Main Screen Horizontal Display Position................................................................................... 85
Figure 5.10-1
Examples of Horizontal Framing Display................................................................................... 86
Figure 5.10-2
16-dot Font Display Format ....................................................................................................... 87
Figure 5.10-3
Example of Boldface Character Display
(Fisplaying Twelve Fots in the Horizontal Direction)................................................................... 87
Figure 5.10-4
Kanji Font Display Position Format............................................................................................ 88
Figure 5.12-1
Sub-screen configuration........................................................................................................... 92
Figure 6.2-1
DC-Restoring (Clsmping) Circuit ............................................................................................... 97
Figure 6.2-2
Sync Tip Clamp ......................................................................................................................... 97
Figure 6.3-1
Emitter Follower Buffer Circuit ................................................................................................... 98
Figure 6.3-2
Video Output Circuit Examples.................................................................................................. 98
Figure 6.4-1
Circuit Example for CIN Pin ..................................................................................................... 100
Figure 6.4-2
Circuit Example for COUT Pin ................................................................................................. 100
Figure 6.5-1
Circuit Example for VKIN and VKOUT Pins............................................................................. 101
Figure 6.6-1
Interface with Microcontroller................................................................................................... 102
vi
TABLES
Table 2.2-1
Pin Descriptions...........................................................................................................................11
Table 3.3-1
Pattern Background Mode...........................................................................................................34
Table 5.1-1
List of Display Control Commands ..............................................................................................64
Table 6.8-1
Handling of Unused Pins ...........................................................................................................104
vii
viii
CHAPTER 1
DESCRIPTION
Chapter 1 describes the features and internal circuit blocks of the MB90092.
The MB90092 is the display controller for displaying text and graphics on the TV
screen.
The MB90092 incorporates display memory (VRAM), a font memory interface, and a
video signal generator, allowing text and graphics to be displayed in conjunction with
a small number of external components.
1.1
Features
1.2
Block Diagram
1.3
Internal Circuit Blocks
1.4
Example of Application Circuit
1
CHAPTER 1 DESCRIPTION
1.1
Features
Main Screen Display
• Screen display capacity: 24 characters × 12 lines (up to 288 characters)
• Character sizes:
Standard, double width, double height, double width × double
height, quadruple width × double height (Setting possible for each
line)
• Display position control: Horizontal display start position: Set in 1/3-character units
Vertical display start position:
Set in raster units
Line spacing control:
Set in raster units (0 to 15 rasters)
• Display priority control: Capable of controlling display priority over the sub-screen
(for each line)
• Normal mode display
• Normal character exclusive display mode:
Screen capacity:
• Character display:
24 characters × 12 lines
(up to 288 characters)
Character types:
8192 different characters
(8 M addresses)
Character dot configuration: 24 × 32 dots (per character)
Character color:
8 colors (for each character) × 4
phases (for each line)
Character background color: 8 colors (for each character)
Display mode:
Selectable from among the pattern
background/solid-fill backgroundor/
no background modes
• Extended graphics mode display
• Mode for displaying individually selected, normal and graphic characters mixed:
Screen capacity:
24 characters × 12 lines
(up to 288 characters)
192 horizontal dots × 384 vertical
dots (entire screen)
Character types:
16384 different characters
(16 M addresses)
• Normal character display: Character dot configuration: 24 horizontal dots × 32 vertical dots
Character color:
8 colors (for each character) × 4
phases (for each line)
Line background color:
8 colors (for each line)
Display mode:
Selectable from among the pattern
background/solid-fill background/
no background modes Shaded
background display available
(set for each character)
• Graphic character display:Character dot configuration: 8 horizontal dots × 32 vertical dots
Character color:
8 colors (for each dot) × 4 phases
(for each character)
Sub-Screen Display
Screen display position: Settable horizontally and vertically in 2-dot units
2
1.1 Features
• Normal screen mode
32 characters × 12 lines
(up to 384 characters)
256 horizontal dots × 384 vertical
dots (graphics characters only) (The
actual display screen depends on
the television system and dot clock
frequency. Normal character/
graphic character display selectable
for each line (Header display
character code is specified for each
line.)
Character string length:
Selectable from among 1, 2, 4, 8, 16,
24, and 32 digits
• Normal character display: Character dot configuration: 24 horizontal dots × 32 vertical dots
Character color:
8 colors (for each line)
Pattern background color: 8 colors (entire screen)
• Graphic character display:Character dot configuration: 8 horizontal dots × 32 vertical dots
Character color:
8 colors (for each dot) × 4 phases
(for each line)
Screen capacity:
• Full-screen mode
32 characters × 16 lines
(up to 512 characters)
256 horizontal dots × 512 vertical
dots
(The actual display screen depends
on the television system and dot
clock frequency.)
Virtual screen capacity:
Mode A: 32 characters × 16 lines
(× 32 screens)
256 horizontal dots × 512
vertical dots
Mode B: 512 characters × 32 lines
4096 horizontal dots ×
1024 vertical dots
• Normal character display: Character dot configuration: 24 horizontal dots × 32 vertical dots
Character color:
8 colors (set for the entire screen)
Pattern background color: 8 colors (set for the entire screen)
• Graphic character display:Character dot configuration: 8 horizontal dots × 32 vertical dots
Character color:
8 colors (for each dot) × 4 phases
(set for the entire screen)
Screen capacity:
Screen Background Display
Screen background color: 8 colors (set for the entire screen)
Analog Inputs
• Composite video signal input
• Y/C-separated inputs
Analog Outputs
• Composite video signal output
• Y/C-separated outputs
3
CHAPTER 1 DESCRIPTION
Digital Outputs
• G (Green), R (Red), and B (Blue) output
• VOC (character) output, VOB (character + background) output
• Characters, character background, line background, and screen background each capable
of being displayed in eight colors
Internal Synchronization Control (Video Signal Generator)
• Internal video signal generator supporting the NTSC and PAL systems
• Interlaced/noninterlaced display selectable
External Synchronization Control
• Separated sync signal input/composite sync signal input selectable
External Interface
• 8-bit serial inputs (3 signal input pins)
Chip select: CS
Serial clock: SCLK
Serial data: SIN
Package
• QFP-80
Miscellaneous
• Internal power-on reset circuit
4
1.2 Block Diagram
1.2
Block Diagram
Figure 1.2-1 is a block diagram of the MB90092.
SIN
SCLK
CS
TEST
Serial input control
Each control and data
VIN
YIN
Analog SW
CIN
VKIN
EXHSYN
EXVSYN
IC
HSYNC
VSYNC
VBLNK
VOUT
YOUT
COUT
VKOUT
H/V separation
circuit
Video signal
generator
NTSC/PAL signal
generator
Display memory
control
Output
control
CG memory
control
ADR0 to ADR20
READ
DA0 to DA7
TSC
Phase comparator
(color burst)
CBCK
PDS
FSCO
VRAM
XS
EXS
4FSC clock oscillator
Each block
XD
EXD
Dot clock oscillator
Each block
B
R
G
VOB
VOC
Figure 1.2-1 Block Diagram
5
CHAPTER 1 DESCRIPTION
1.3
Internal Circuit Blocks
(1) Serial input control block
This block receives the commands and data input to the MB90092 via 8-bit serial transfer.
The command decoder decodes the received command and directs data to each register.
(2) H/V separator block
This block separates the input composite sync signal into a horizontal sync and a vertical
sync signal by the comparator.
(3) NTSC/PAL signal generator block
This block generates an NTSC system or PAL system timing signal.
(4) Display memory control block
This block generates timing for display operation to control the operation of each block.
(5) Display memory (VRAM) block
Display memory (VRAM) is used to store character code, character color, character
background color, attribute, and line control information.
(6) Font memory control block
This block controls the external font memory. It outputs a font memory address and the
READ signal and reads the font data.
(7) Output control block
This block processes the character data from CGROM for character border, background,
etc. to generate a character signal.
(8) Video signal generator block
This block generates a video signal and a character luminance signal when operating under
internal sync control.
(9) Analog switch block
This block synthesizes an externally input video signal or an internally generated video
signal with the internally generated character signal.
(10) 4FSC clock oscillator block
This block generates a 4FSC clock that serves as the basic block of the MB90092's sync
signal system.
(11) Dot clock oscillator block
This block generates a dot clock that serves as the basic block of the MB90092's memory
timing system.
(12) Phase comparison circuit (color burst) block
This block compares the phases between internally generated color burst signals and
external input color burst signals.
6
1.4 Example of Application Circuit
1.4
Example of Application Circuit
Figure 1.4-1 shows an example of an application circuit using the MB90092. This is a quite
basic and simple circuit example not considering the character display quality but considering
the numbers of external components.
Note that the precise circuit configuration may vary depending on the system or components
used.
Figure 1.4-1 Example of Application Circuit
7
CHAPTER 1 DESCRIPTION
8
CHAPTER 2
INPUT AND OUTPUT PINS
Chapter 2 describes the functions and uses of the MB90092 input and output pins.
The MB90092 is packaged in a QFP-80 containing 80 pins.
2.1
Pin Assignment
2.2
Pin Descrptions
9
CHAPTER 2 INPUT AND OUTPUT PINS
2.1
Pin Assignment
80
79
78
77
76
75
74
73
72
71
70
69
68
67
66
65
XD
EXD
TEST
TSC
VCC
ADR20
ADR19
ADR18
ADR17
ADR16
ADR15
ADR14
ADR13
ADR12
ADR11
VSS
Figure 2.1-1 shows the pin assignment of the MB90092.
1
2
3
4
5
6
7
8
9
10
11
12
13
14
15
16
17
18
19
20
21
22
23
24
MB90092
[NC]
[NC]
[NC]
[NC]
AVSS
AVSS
YOUT
YIN
AVCC2
COUT
CIN
AVSS
VOUT
VKIN
VKOUT
VIN
25
26
27
28
29
30
31
32
33
34
35
36
37
38
39
40
IC
VOC
VOB
VSS
B
R
G
CS
SCLK
SIN
VCC
EXHSYN
EXVSYN
HSYNC
VSYNC
VBLNK
EXS
XS
[NC]
FSCO
CBCK
PDS
VSS
AVSS
Figure 2.1-1 MB90092 Pin Assignment
10
64
63
62
61
60
59
58
57
56
55
54
53
52
51
50
49
48
47
46
45
44
43
42
41
ADR10
ADR9
VCC
ADR8
ADR7
ADR6
ADR5
ADR4
ADR3
ADR2
ADR1
ADR0
VSS
DA7
DA6
DA5
DA4
DA3
DA2
DA1
DA0
READ
VCC
AVCC1
2.2 Pin Descrptions
2.2
Pin Descrptions
Table 2.2-1 Pin Descriptions
Pin name
Pin no.
I/O
Function
IC
1
I
Internal color generation mode setting pin
This pin outputs the internally generated color burst signal to the video
signal output in response to Low-level input during external
synchronization control operation.
The pin can also be used as a reset signal input pin by Low-level input to
the TEST pin. In this case, Low-level input to this pin resets the
MB90092.
The pin is a hysteresis input with an internal pull-up resistor.
VOC
2
O
Character interval signal output pin
The output signal represents the character dot output interval.
VOB
3
O
Character/background internal signal output pin
During internal synchronization control operation, the output signal
represents the character, character background, line background, or
screen background output interval.
B
R
G
5
6
7
O
O
O
Color signal output pins
These pins output the character, character background, line
background, and screen background color signals.
CS
8
I
Chip select pin
For serial transfer, set this pin to the Low level.
This pin is also used to release a power-on reset.
The pin is a hysteresis input with an internal pull-up resistor.
SCLK
9
I
Shift clock input pin for serial transfer
This pin is a hysteresis input with an internal pull-up resistor.
SIN
10
I
Serial data input pin
The pin is a hysteresis input with an internal pull-up resistor.
EXHSYN
12
I
External horizontal sync signal input pin
This pin can also serve as a composite sync signal input pin depending
on the internal register setting.
The pin is a hysteresis input with an internal pull-up resistor.
EXVSYN
13
I
External vertical sync signal input pin
Input to this pin is disabled when composite sync signal input has been
selected by setting the internal register.
HSYNC
14
O
Horizontal sync signal output pin
This pin can also output composite sync signals depending on the
internal register setting.
The pin outputs the signal (FSC) resulting from dividing the 4FSC clock
frequency by setting the TEST pin to the Low level.
VSYNC
15
O
Vertical sync signal output pin
This pin is fixed at the High level when composite sync signal output has
been selected by setting the internal register.
The pin outputs the dot clock oscillator signal when the TEST pin goes
Low.
11
CHAPTER 2 INPUT AND OUTPUT PINS
Table2.2-1
Pin name
Pin Descriptions (Continued)
Pin no.
I/O
VBLNK
16
O
Vertical blanking interval signal output pin
This pin outputs the Low-level signal in the vertical blanking interval.
EXS
XS
17
18
I
O
External circuit pins for color burst clock generator
Connect an external crystal oscillator (14.31818 MHz for NTSC or
17.734475 MHz for PAL) and load capacitance (C) to these pins to form
a crystal oscillator circuit.
FSCO
20
O
Internal color burst clock output pin
This pin controls internal color burst clock output depending on the FO
bit of command 7.
CBCK
21
I
External color burst clock input pin
PDS
22
O
Pin for output of the result of color burst clock phase comparison
YOUT
31
O
Luminance signal output pin
This pin outputs a signal of 2 VP-P (pedestal level 1.57 V, sink chip level
1 V).
YIN
32
I
Luminance signal input pin for superimpose display
This pin inputs a DC-reproduced (DC-clamped) signal of 2 V P-P
(pedestal level 1.57 V, sink chip level 1 V).
COUT
34
O
Saturation signal output pin
This pin outputs a signal at 1.57 VDC and a color burst signal amplitude
of 0.57 VP-P.
CIN
35
I
Saturation signal input pin for superimpose display
This pin inputs a signal at 1.57 VDC and a color burst signal amplitude
of 0.57 VP-P.
VOUT
37
O
Composite video signal output pin
This pin outputs a signal of 2 VP-P (pedestal level 1.57 V, sink chip level
1 V).
VKIN
38
I
Background level control input pin for halftone background display of
external input composite video signals (input to the VIN pin and output
from the VOUT pin)
Halftone background display is controlled by setting the KID bit of
command 5 to “1”.
VKOUT
39
O
Background level control output pin for halftone background display of
external input composite video signals (input to the VIN pin and output
from the VOUT pin)
Halftone background display is controlled by setting the KID bit of
command 5 to “1”.
VIN
40
I
Composite video signal input pin for superimpose display
This pin inputs a DC-reproduced (DC-clamped) signal of 2 VP-P
(pedestal level 1.57 V, sink chip level 1 V).
12
Function
2.2 Pin Descrptions
Table2.2-1
Pin name
Pin Descriptions (Continued)
Pin no.
I/O
Function
READ
43
O
External font memory read control pin
This pin outputs the Low-level signal in the font memory read period.
The pin enters the high impedance state when the TSC pin inputs a
Low-level signal.
DA0
DA1
DA2
DA3
DA4
DA5
DA6
DA7
44
45
46
47
48
49
50
51
I
I
I
I
I
I
I
I
External font memory data input pins
These pins are TTL level inputs with an internal pull-up resistor.
ADR0
ADR1
ADR2
ADR3
ADR4
ADR5
ADR6
ADR7
ADR8
ADR9
ADR10
ADR11
ADR12
ADR13
ADR14
ADR15
ADR16
ADR17
ADR18
ADR19
ADR20
53
54
55
56
57
58
59
60
61
63
64
66
67
68
69
70
71
72
73
74
75
O
External font memory address output pins
These pins enter the high impedance state when the TSC pin inputs a
Low-level signal.
ADR0
ADR1
ADR2
Raster address
ADR3
ADR4
ADR5
M0, SM0
ADR6
M1, SM1
ADR7
M2, SM2
ADR8
M3, SM3
Character code (Lower bits)
ADR9
M4, SM4
ADR10
M5, SM5
ADR11
M6, SM6
ADR12
Data distinction bits
ADR13
(12,13 = 00: Left, 10: Center, 01: Right)
ADR14
M7, SM7
ADR15
M8, SM8
ADR16
M9, SM9
ADR17
MA, SMA
Character code (Higher bits)
ADR18
MB, SMB
ADR19
MC, SMC
ADR20
MD, SMD
TSC
77
I
Tristate control input pin for external font memory control bus
When this pin inputs a Low-level signal, the ADR0 to ADR20 pins and
the READ pin enter the high impedance state.
The pin is a hysteresis input with an internal pull-up resistor.
TEST
78
I
Test signal input pin
This pin usually inputs a High-level (fixed) signal.
EXD
XD
79
80
I
O
External circuit pins for display dot clock generator
Connect these pins to external “L” and “C” to form an LC oscillator
circuit.
13
CHAPTER 2 INPUT AND OUTPUT PINS
Table2.2-1
Pin name
Pin Descriptions (Continued)
Pin no.
I/O
[N.C]
19
25
26
27
28
—
—
—
—
—
Leave these pins unconnected.
VCC
11
42
62
76
—
—
—
—
Power-supply pins (+5 V)
VSS
4
23
52
65
—
—
—
—
Ground pins
AVCC1
41
—
Analog power pin for composite video signals (VIN-VOUT)
AVCC2
33
—
Analog power pin for luminance (YIN-YOUT) and chroma (CIN-COUT)
signals
AVSS
24
29
30
36
—
—
—
—
Analog circuit ground pins
Set these pins to the same level as the V SS pin.
14
Function
CHAPTER 3
DISPLAY FUNCTIONS
Chapter 3 describes the display functions of the MB90092.
The MB90092 provides two screens, called the main screen and the sub-screen, and is
capable of controlling the display priority for each line. It can also display the screen
background color that will be used as the background color of the main screen and
sub-screen.
3.1
Screen Configuration
3.2
Character Configuration
3.3
Character Display Functions
3.4
Graphic Character Display Functions
15
CHAPTER 3 DISPLAY FUNCTIONS
3.1
Screen Configuration
The MB90092 provides two screens: the main screen on which data can be set for each
character and the sub-screen on which data can be set for each line (or for the entire screen).
The overall background can be represented using the screen background color.
Figure 3.1-1 shows an example of main screen and sub-screen merged.
Main screen
Sub-screen
Screen background color display
Figure 3.1-1 Example of Main Screen and Sub-Screen Merged
The MB90092 can provide two screens, called the main screen and the sub-screen, either
independently or overlayed one on top of the other.
The main screen consists of 24 characters by 12 lines and allows data to be set for each
character. The sub-screen consists of 24 characters by 12 lines or up to 32 characters by 16
lines. Data can be set either for each line in the former configuration or collectively for the entire
screen in the latter configuration.
The characters supported by the MB90092 are the normal characters made up of 24 by 32 dots
and the 8 × 32-dot graphic characters that can be displayed in any of eight different colors in
character units.
If filled with only graphic characters, the main screen is 192 (horizontal) × 384 (vertical) dots. In
the same case, the sub-screen is 192 (horizontal) × 384 (vertical) dots, or 256 (horizontal) × 512
(vertical) dots. (The actual display screen depends on the dot clock frequency in the horizontal
direction and on the number of rasters of the television system in the vertical direction.) The
MB90092 uses RAM as font memory, enabling free graphics display.
The MB90092 can use up to 16384 types of characters including normal and graphic characters
in total. It can control up to 16M bits of external font memory.
For output of video signals, the MB90092 has the composite video signal, Y/C-separated video
signal, and RGB digital output pins. The MB90092 also has video signal input pins, allowing
superimpose display over either composite video signals and Y/C-separated video signals.
3.1.1 Main Screen Configuration
The main screen displays up to 24 characters by 12 lines. It offers a choice of two display
modes: the normal mode for displaying only normal characters and the extended graphics
mode in which both normal and graphic characters can be displayed, selectable character by
character.
■ Main Screen Features
• Normal mode and extended graphics mode
• Screen configuration: 24 characters × 12 lines (data settable for each character)
• Character sizes: Five different types (selectable for each line)
16
3.1 Screen Configuration
• Line spacing: 0 to 15 rasters
• Display position control (Vertical: In raster units, Horizontal: In 1/3-character units)
• Setting display priority over the sub-screen (for each line)
• Output control (for each line)
(1) Display Screen Configuration in Standard Character Size
The MB90092 can display up to 24 characters x 12 lines (= 288 characters) in standard
character size. The number of characters that can be displayed on a screen may be fewer
than that if displayed in an enlarged size or depending on the vertical or horizontal display
start positions.
Figure 3.1-2 shows a display screen configuration in standard character size.
1) Display configuration in VRAM
2) Display configuration on screen
Figure 3.1-2 Display Configuration on Screen
(2) Display Screen Configuration When Enlarged Characters are Used
Five character sizes (standard, double width, double height, double width x double height,
and quadruple width x double height) can be set for each line.
Set the character size in the G2 to G0 bits of the main screen line control (Command 6) and
main screen line control 2 (Command 2-3).
When vertically enlarged characters are displayed, there are two different ways of displaying
them. The selection is made with the GYZ bit (enlarged line display control) of screen
control 2 (Command 5).
17
CHAPTER 3 DISPLAY FUNCTIONS
• If GYZ = 0 in Command 5:
When characters are vertically enlarged, any lines following the enlarged line are moved
down in sequence.
• If GYZ = 1 in Command 5:
When characters are vertically enlarged, the line immediately following the enlarged line
is not displayed, and any subsequent lines are displayed where they originally were (in
the same positions as if no enlarged line existed).
For example, if the second line is made double height (or double width x double height, or
quadruple width x double height), the third line is no longer visible (not displayed) and the
fourth and later lines remain where they originally were.
Additionally, the vertical enlargement specification made for a higher line overrides any such
specification for subsequent lines.
For example, if the third line is made double height and then the second line is made double
height, the third line is hidden by the vertically enlarged display of the second line.
Additionally, the fourth line, previously hidden by the third line, becomes visible.
Figure 3.1-3 shows the display screen configuration when enlarged characters are used.
1) If GYZ = 0 in Command 5:
2) If GYZ = 1 in Command 5:
Figure 3.1-3 Display Screen Configuration When Enlarged Characters Are Used
18
3.1 Screen Configuration
(3) Display Screen Configuration When Line Spacing is Set
The line spacing can be set to a value from 0 to 15 rasters (in steps of one raster).
Set screen control 2 (Command 5) to one of W3 through W0 to simultaneously control all the
line spacings on screen.
If enlarged characters are used, the line spacing, depending on the GYZ bit of screen control
2 (Command 5), is as follows:
• If GYZ = 0:
All the line spacings are as indicated by the set value.
• If GYZ = 1:
Only the line spacing of the line following the vertically enlarged line is twice the amount
indicated by the set value.
Figure 3.1-4 shows the display screen configuration when line spacing is set.
1) If no vertically enlarged line exists:
2) A vertically enlarged line exists and GXY = 0 in Command 5:
Figure 3.1-4 Display Screen Configuration When Line Spacing is Set
19
CHAPTER 3 DISPLAY FUNCTIONS
3) A vertically enlarged line exists and GXY = 1 in Command 5:
Figure 3.1-4 Display Screen Configuration When Line Spacing is Set (Continued)
(4) Screen Display Position
The main screen display position can be set in raster units in the vertical direction, and in 1/3
character units in the horizontal direction. The setting range is 0 to 63 rasters for the vertical
direction, and 0 to 21 characters for the horizontal direction.
To set the screen display position, specify the position of the character dot at the upper left
corner of the screen.
Set the vertical display position in Y5 to Y0 in the main screen vertical position control
(Command 7), and the horizontal display position in X5 to X0 in the main screen horizontal
position control (Command 8).
Based on the values set, the display position shall be as follows:
•
•
Main screen vertical display position
= Y5×25+Y4×24+Y3×23+Y2×22+Y1×21+Y0×20+1
(Number of H's from the rise of VSYNC)
Main screen horizontal display position
= (X5×25+X4×24+X3×23+X2×22+X1×21+X0×20)×8+88[Dot clock]
(Number of dot clocks from the rise of HSYNC)
Figure 3.1-5 shows the main screen display position.
20
[H]
3.1 Screen Configuration
Figure 3.1-5 Main Screen Display Position
3.1.2 Sub-screen Configuration
The sub-screen offers a choice of two screen modes: the normal screen mode on which data
can be set for each line and the full-screen moe A or B for full-screen display.
In the normal screen mode, the sub-screen displays up to 32 characters by 12 lines. The
number of horizontal characters can range from 1 to 32 (1, 2, 4, 8, 16, 24, or 32 characters)
depends on the SG2-SG0 setting of command 11 (sub-screen control).
Setting the code for the character to be displayed at the left end of each line allows a string of
continuous characters of the same character code (address) to be displayed as many as the
specified number of horizontal characters.
The full-screen mode enables display using the entire screen (screen display area: 32
characters × 16 lines). Setting the code for the character to be displayed at the upper left corner
of the screen allows a string of continuous characters of the same character code to be
displayed on the entire screen. Full-screen mode A or B is selected depending on the display
area setting.
■ Sub-screen Features
• Normal screen mode/full-screen mode A/full-screen mode B
• Display position control (Vertical: In raster units, Horizontal: In 2-dot units)
• Setting display priority over the main screen (for each line on the main screen)
• Output control (for each line)
21
CHAPTER 3 DISPLAY FUNCTIONS
(1) Display Screen Configuration in Normal Screen Mode
The sub-screen configuration is determined according to the settings in the sub-screen
configuration control (SG2 to 0) of the sub-screen control (Command 11).
SG2
SG1
SG0
Sub-screen configuration
0
0
0
1 character x 12 lines
0
0
1
2 characters x 12 lines
0
1
0
4 characters x 12 lines
0
1
1
8 characters x 12 lines
1
0
0
16 characters x 12 lines
1
0
1
24 characters x 12 lines
1
1
0
32 characters x 12 lines
1
1
1
Full screen display mode (32 characters x 16 lines)
Set the character code to be displayed at the beginning (left end) of each line to display as
many characters of the repeated character code (address) as there are number of
characters in the horizontal direction.
Set the start character code of display lines (upper left corner of the screen) in the subscreen line start code (SMD to SM0) of the sub-screen line control (Commands 1-2 and 2-2).
Figure 3.1-6 shows the screen configuration in the normal screen mode.
1) Screen configuration in the normal screen mode
N characters
12
lines
1)
1)+1
1)+2
1)+3
••••
1)+N-2
1)+N-1
2)
2)+1
2)+2
2)+3
••••
2)+N-2
2)+N-1
•
•
•
•
•
•
••••
11)
11)+1
11)+2
11)+3
••••
11)+N-2 11)+N-1
12)
12)+1
12)+2
12)+3
••••
12)+N-2 12)+N-1
• 1) through 12) are any character codes (addresses).
• N is the number of characters in the horizontal direction in the sub-screen
configuration according to the settings in SG2 to 0.
Figure 3.1-6 Screen Configuration in the Normal Screen Mode
22
3.1 Screen Configuration
2) Sub-screen configuration example 1: If SG 2 to 0 = (1, 0, 1)
3) Sub-screen configuration example 2: If SG 2 to 0 = (0, 1, 1)
Figure 3.1-6 Screen Configuration in the Normal Screen Mode (Continued)
(2) Display Screen Configuration in Full Screen Mode A
In full screen mode A, 32 virtual screens of 32 characters by 16 lines are provided. For any
of these screens, you can extract and display any rectangular area (32 characters by 16
lines) in the entire screen. To set the display screen, specify the character code (address) of
the upper left corner of the screen.
Full screen mode A is selected if the sub-screen configuration control (SG 2 to 0) = (1, 1, 1)
in the sub-screen control (Command 11) and the sub-screen full screen mode control (SGA)
= (0) in the sub-screen vertical position control (Command 12).
Set the start character code of display lines (upper left corner of the screen) in the subscreen line start code (SMD to SM0) of the sub-screen line control (Commands 1-2 and 2-2).
23
CHAPTER 3 DISPLAY FUNCTIONS
1) Virtual screen configuration in full screen mode A: 32 characters by 16 lines
(by 32 screens)
Figure 3.1-7 shows the virtual screen configuration in full screen mode A.
N+1FFH N+1E0H N+1E1H N+1E2H
• • • • N+1FEH N+1FFH N+1E0H
N+01FH N
• • • • N+01EH N+01FH N
N+001H N+002H
N+03FH N+020H N+021H N+022H
• • • • N+03EH N+03FH N+020H
N+05FH N+040H N+041H N+042H
• • • • N+05EH N+05FH N+040H
•
•
•
•
•
•
•
•
•
•
•
•
•
•
•
•
•
•
•
•
•
•
•
•
N+1DFH N+1C0H N+1C1H N+1C2H
• • • • N+1DEH N+1DFH N+1C0H
N+1FFH N+1E0H N+1E1H N+1E2H
• • • • N+1FEH N+1FFH N+1E0H
N+01FH N
• • • • N+01EH N+01FH N
N+001H N+002H
• N = Xn00H [Character code (address)]
X = (0H, 1H, 2H, 3H)
n = (0H, 2H, 4H, 6H, 8H, AH, CH, EH)
• Virtual screens are connected with each other from the left to the right sides
and from the top to the bottom.
• Specify the character code (address) of the upper left corner of the display
screen to display any rectangular area (max. 32 characters by 16 lines).
(The display screen size depends on the TV system and the dot clock
frequency. In general, not all of the area defined by 32 characters by 16
lines can be displayed.)
Figure 3.1-7 Virtual Screen Configuration in Full Screen Mode A
24
3.1 Screen Configuration
2) Screen configuration in full screen mode A
Figure 3.1-8 shows an example of the screen configuration in full screen mode A.
If the start character code of display screen (upper left corner of the screen) is set to
0042H, the shaded part shown in this figure is displayed. (The actual display screen size
depends on the display period of the specific television system and the dot clock
frequency. In general, not all of the 32 characters can be displayed. The figure below
shows 27 characters by 12 lines, which varies according to conditions.)
Figure 3.1-8 Example of the Screen Configuration in Full Screen Mode A
3) Example of the screen display in full screen mode A
Figure 3.1-9 shows an example of the screen display in full screen mode A.
Part of the virtual screens can be extracted and displayed.
Figure 3.1-9 Example of the Screen Display in Full Screen Mode A
25
CHAPTER 3 DISPLAY FUNCTIONS
(3) Display Screen Configuration in Full Screen Mode B
In full screen mode B, virtual screens of 512 characters by 32 lines are provided. In any of
these screens, you can extract and display any rectangular area (32 characters by 16 lines)
on the entire TV screen. (The actual display screen size depends on the display period of
the specific television system and the dot clock frequency. In general, not all of the area
defined by 32 characters by 16 lines can be displayed.)
To set the display screen, specify the character code (address) of the upper left corner of the
screen.
Full screen mode B is selected if the sub-screen configuration control (SG 2 to 0) = (1, 1, 1)
in the sub-screen control (Command 11) and the sub-screen full screen mode control (SGA)
= (1) in the sub-screen vertical position control (Command 12).
Set the start character code of display lines (upper left corner of the screen) in the subscreen line start code (SMD to SM0) of the sub-screen line control (Commands 1-1 and 2-2).
(A line control specification made for lines after the first is invalid.)
1) Virtual screen configuration in full screen mode B: 512 characters by 32 lines
Figure 3.1-10 shows the virtual screen configuration in full screen mode B.
32
characters
0000H to
16 lines
16 lines
01FFH
0200H to
03FFH
*A
1000H to
11FFH
1200H to
13FFH
*B
2000H to
21FFH
2200H to
23FFH
32
characters
0400H to
05FFH
0600H to
07FFH
1400H to
15FFH
1600H to
17FFH
2400H to
32
characters
0800H to
09FFH
0A00H to
0BFFH
1800H to
19FFH
1A00H to
1BFFH
••••
25FFH
2600H to
27FFH
32
characters
0C00H to
* Connected to A
0DFFH
0E00H to
0FFFH
1C00H to
* Connected to B
1DFFH
1E00H to
1FFFH
3C00H to
3DFFH
••••
3E00H to
3FFFH
Figure 3.1-10 Virtual Screen Configuration in Full Screen Mode B
26
3.1 Screen Configuration
2) Screen configuration in full screen mode B
Figure 3.1-11 shows an example of the screen configuration in full screen mode B.
If the start character code of the display screen (upper left corner of the screen) is set to
0062H, the shaded part shown in this figure is displayed. (The actual display screen size
depends on the display period of the specific television system and the dot clock
frequency. In general, not all of the area defined by 32 characters by 16 lines can be
displayed. The figure below shows 28 characters by 12 lines, which varies according to
the conditions.)
• Specify the character code (address) of the upper left corner of the
display screen to display any rectangular area.
• Virtual screens are connected with each other from the left to the righ
sides, and from the top to the bottom.
Figure 3.1-11 Example of the Screen Configuration in Full Screen Mode B
27
CHAPTER 3 DISPLAY FUNCTIONS
3) Example of the screen display in full screen mode B
Figure 3.1-12 shows an example of the screen display in full screen mode B.
Some of the virtual screens can be extracted and displayed as shown below.
Figure 3.1-12 Example of the Screen Display in Full Screen Mode B
(4) Sub-screen Display Position
The sub-screen display position can be set in raster units in the vertical direction, and in 2dot units in the horizontal direction. The setting range is 0 to 510 rasters for the vertical
direction, and 0 to 1022 characters for the horizontal direction. (However, if the position is
set outside the display period of the television signals, the screen is not displayed.)
To set the screen display position, specify the position of the character dot at the upper left
corner of the screen.
Set the vertical display position in SY7 to SY0 in the sub-screen vertical position control
(Command 12), and the horizontal display position in SX8 to SX0 in the sub-screen
horizontal position control (Command 13).
Based on the values set, the display position shall be as follows:
• Sub-screen vertical display position
=
SY7×27 + SY6×26 + SY5×25 + SY4×24 + SY3×23 + SY2×22 + SY1×21 + SY0×20 + 1 [H]
(Number of H's from the rise of VSYNC)
• Sub-screen horizontal display position
=
(SX8×28 + SX7×27 + SX6×26 + SX5×25 + SX4×24 + SX3×23 + SX2×22 + SX1×21
[Dot clock]
+ SX0×20)×2 + 72
(Number of dot clocks from the rise of HSYNC)
Figure 3.1-13 shows the sub-screen display position.
28
3.1 Screen Configuration
Figure 3.1-13 Sub-screen Display Position
29
CHAPTER 3 DISPLAY FUNCTIONS
3.2
Character Configuration
3.2.1 Normal and Graphic Characters
The MB90092 can display two types of characters: normal characters and graphic characters.
Normal characters each consist of 24 horizontal dots × 32 vertical dots. Graphic characters
each consists of 8 horizontal dots × 32 vertical dots. The normal and graphic characters are the
same in size (3 horizontal dots for normal characters equal to one horizontal dot for graphic
characters). The display color can be set for each dot of only graphic characters.
Figure 3.2-1 shows character configuration examples.
(1) Normal character configuration example:
32 dots
24 dots
: Character dot
: Pattern background dot
: Blank dot
(2) Graphic character configuration example:
32 dots
8 dots
: Graphic dot color 0
: Graphic dot color 1
: Graphic dot color 2
: Graphic dot color 3
: Graphic dot color 4
: Graphic dot color 5
: Graphic dot color 6
: Graphic dot color 7
Figure 3.2-1 Character Configuration Examples
30
3.2 Character Configuration
3.2.2 Character Sizes
Five different character sizes are available: standard, double width, double height, double width
× double height, and double height × quadruple width. The character size can be specified for
only the main screen. The sub-screen can display only the standard size of characters.
Figure 3.2-2 shows character configuration examples of each character size.
24 dots
48 dots
32 dots
1) Standard character size
32 dots
2) Double width character size
24 dots
48 dots
64 dots
3) Double height character size
64 dots
4) Double width × double height character size
96 dots
64 dots
5) Double height × quadruple width character
Figure 3.2-2 Zoom-in Display Function
Note: The number of horizontal dots is based on the normal
character dot as a unit dot.
One dot for graphic characters is equivalent to three
horizontal dots for normal characters.
31
CHAPTER 3 DISPLAY FUNCTIONS
3.2.3 Zoom-in Display Function
The zoom-in display function displays each character on the main screen using 48 vertical dots
by vertically doubling only the upper 24 dots of font data which is 32 dots in height.
Set 1 in the ZM bit of screen control 1 (Command 4) to enable the zoom-in function. However,
the zoom-in function is not enabled in kanji font mode (RM0 = 1 or RM0 = 1 in Command 9).
Characters enlarged by the zoom-in function can be further enlarged by separately specifying
the desired character size.
Figure 3.2-3 shows an example of the zoom-in display of one character.
Figure 3.2-3 Example of Zoom-in Display (One Character)
32
3.2 Character Configuration
If characters in an ordinary kanji font of 24 by 24 dots (e.g., a kanji ROM font) are displayed, an
8-dot blank area appears below the characters as shown in (1) of Figure 3.2-4. If the zoom-in
display is used, the spacing between characters (between lines) can be reduced, as shown in
(2) of Figure 3.2-4. (The line spacing may be separately set to any value.)
Note: Since characters are elongated vertically to twice their height, lines below may disappear
from the display screen. Normally, up to about eight lines can be displayed.
Figure 3.2-4 Example of Zoom-in Display (Multiple Characters)
33
CHAPTER 3 DISPLAY FUNCTIONS
3.3
Character Display Functions
The character display functions available in the normal character display mode of the MB90092
include: “pattern background display” for displaying arbitrarily shaped patterns around character
dots, “solid-fill background display” for filling the entire character cell made up of 24 × 32 dots
with a background color, “shaded background display” for adding 3D shading to the perimeter of
the solid-fill background, and “blink display” for blinking.
The MB90092 also provides “kanji font display” functions for framing and boldfacing of kanji
fonts (such as the kanji ROM font) for easier viewing.
3.3.1 Pattern Background Display
A pattern background can be displayed for normal characters (except for a specified kanji font)
on the main screen and the sub-screen.
The pattern background shall be set at the time the font is created. In addition to the character
dots, a font of any shape can be displayed. Alternatively, the pattern background can be set as
framing dots around the character dots. If the MB90092 font editor is used to create a font, the
font's pattern background is automatically created.
There are four types of pattern backgrounds: pattern background 0, pattern background 1,
pattern background 2, and pattern background 3. The pattern background is selected according
to the settings in the P2 and P0 bits of screen control 1 (Command 4). The settings are
common to the main screen and the sub-screen.
Table 3.3-1 shows the pattern background mode.
Figure 3.3-1 shows an example of pattern background configuration
Table 3.3-1 Pattern Background Mode
P2
P0
Pattern background mode
0
0
Pattern background 1
0
1
Pattern background 0
1
0
Pattern background 2
1
1
Pattern background 3
Font data
:
0 0 1 0 0 0 1 1 0 0 0 0 (12 bits in the horizontal
direction are extracted.)
Pattern background 0
Pattern background 1
Pattern background 2
Pattern background 3
: Blank dot
: Character dot
: Pattern background dot
Figure 3.3-1 Example of Pattern Background Configuration
Note: This example applies for SF1 = 0 in Command 9.
34
3.3 Character Display Functions
The pattern background color indicates the character background color that is set for each
character in normal mode. In extended graphic mode, it indicates the line background color that
is set for each line.
A pattern background on the main screen is displayed unless the solid-fill background is
specified. The pattern background of the sprite screen is always displayed.
In normal mode, the pattern background color (character background color) is set in the BG,
BR, and BB bits of Command 1-1 (main screen character control 1). In extended graphic mode,
the pattern background color (line background color) is set in the KG, KR, and KB bits of
Command 2-3 (main screen line control 2). In normal mode, the specification of color or
monochrome for the pattern background color is set in the BC bit (specification for the entire
screen) of Command 10 (color control). In extended graphic mode, it is set in the KC bit
(specification for each line) of Command 2-3 (main screen line control 2).
The pattern background is displayed if AT = 0 or AT = 1 in Command 1-1 (main screen
character control 1) and BK = 0 in Command 10 (color control). The AT bit can be set for each
character.
Figure 3.3-2 shows an example of pattern background display.
Note: If a character dot is set as the rightmost dot (24th dot) or the dot before the rightmost one
(23rd dot) in the horizontal 24-dot character area, the pattern background dot may leave
the character area and be displayed in the adjacent character area on the right.
However, the pattern background never extends beyond the right edge of the character
display screen area (24th dot of the 24th character).
(1) Pattern background 0 display (Font data display)
Command 1-1
:
AT = 0
Command 4
:
P0 = 1
:
P2 = 0
Figure 3.3-2 Example of Pattern Background Display
35
CHAPTER 3 DISPLAY FUNCTIONS
(2) Pattern background 1 display
Command 1-1
:
AT = 0
Command 4
:
P0 = 0
:
P2 = 0
(3) Pattern background 2 display
Command 1-1
:
AT = 0
Command 4
:
P0 = 0
:
P2 = 1
(4) Pattern background 3 display (Same display mode as horizontal framing 1 of the kanji font
pattern background)
Command 1-1
:
AT = 0
Command 4
:
P0 = 1
:
P2 = 1
Figure 3.3-2 Example of Pattern Background Display (Continued)
36
3.3 Character Display Functions
Note: The font data differs for (1),(2),(3), and (4).
The font data for (1) is designed so that the font is displayed without any
change to the dots.
The font data for (2) and (3)is designed taking into consideration the
pattern background display.
The font data for (4) is the same as the (1)data except that the font image
is shifted to the left by one dot.
The pattern background is influenced by (and influences) the adjacent
character patterns on the left and right. Be careful of using the area one
or two dots from a character on the left or right .
3.3.2 Solid-fill Background Display
The solid-fill background can be displayed for normal characters on the main screen. Portions
other than the character dots in a character area of 24 by 32 dots are displayed in the line
background color or the character background color. Specifying the solid-fill background
disables the pattern background. Character dot generation, however, depends on the pattern
background mode. Whether the solid-fill background should be displayed or not can be
specified for each character.
In normal mode, the solid-fill background is displayed in the character background color that is
set for each character. In extended graphic mode, it is displayed in the line background color
that is set for each line.
The solid-fill background is displayed if 1 is set in the AT bit of Command 1-1 (main screen
character control 1) as well as the RB bit of Command 10 (color control). The AT bit can be set
for each character. (Here, Command 1-1: BS must be set to 0.)
In normal mode, set the solid-fill background color (character background color) in the BG, BR,
and BB bits of Command 1-1 (main screen character control 1). In extended graphic mode, set
the solid-fill background color (line background color) in the KG, KR, and KB bits of Command
2-3 (main screen line control 2).
Figure 3.3-3 shows an example of solid-fill background display.
(1) Normal mode:
Command 9
:
GRM = 0
Command 1-1
:
AT = 1, BS = 0
Command 10
:
RB = 1
Figure 3.3-3 Example of Solid-fill Background Display
37
CHAPTER 3 DISPLAY FUNCTIONS
(2) Extended graphic mode:
Command 9
:
GRM = 1
Command 1-1
:
AT = 1, GR = 0, BS = 0
Command 10
:
RB = 1
Figure 3.3-3 Example of Solid-fill Background Display (Continued)
3.3.3 Shaded Background Display
The shaded background display adds white or black rectangular framing around the solid-fill
background display to produce a three-dimensional effect. The shaded background display can
be enabled for normal characters in extended graphic mode on the main screen.
For each character, you can specify whether a shaded background should be displayed,
whether convex or concave display should be used, what the solid-fill background colors (8) for
each line should be, whether the pattern background should be displayed, and what the pattern
background colors (8) should be.
If you continuously specify shaded background in the horizontal direction, multiple characters
are treated as one block for which shaded background is displayed.
(Multiple characters in the vertical direction cannot be treated as one block.)
A shaded background is displayed if 1 is set in the BS bit of Command 1-1 (main screen
character control 1). The solid-fill background color is set in the KG, KR, and KB bits of
Command 2-3 (main screen line control 2).
At the same time, a pattern background can be displayed. If the RB bit of Command 10 (color
control) is set to 0, a pattern background is used. If the RB bit is set to 1, a pattern background
is not used. The pattern background color is set in the PG, PR, and PB bits of Command 1-3
(main screen line control 1).
Shaded background can be selected in either of two ways: convex display, in which an element
appears raised from the screen background, and concave display, in which an appears sunken
in relation to the screen background. Convex display is selected if the AT bit of Command 1-1
(main screen character control 1) is set to 0. Concave display is selected if the AT bit is set to
1.
Figure 3.3-4 shows an example of shaded background display.
38
3.3 Character Display Functions
• Shaded background display specification
Command 1-1
:
BS = 1 (Shaded background display specification)
Command 1-1
:
GR = 0 (Normal character display specification)
Command 9
:
GRM = 1 (Extended graphic mode specification)
(1) Example of shaded background display (Convex display with a pattern background)
Command 1-1
:
AT = 0 (Specifying convex display)
Command 10
:
RB = 0 (Specifying that there is a pattern background)
(2) Example of shaded background display (Concave display with a pattern background)
Command 1-1
:
AT = 1 (Specifying concave display)
Command 10
:
RB = 0 (Specifying that there is a pattern background)
Figure 3.3-4 Example of Shaded Background Display
39
CHAPTER 3 DISPLAY FUNCTIONS
(3) Example of shaded background display (Convex display without a pattern background)
Command 1-1
:
AT = 0 (Specifying convex display)
Command 10
:
RB = 1 (Specifying that there is no pattern background)
(4) Example of shaded background display (Concave display without a pattern background)
Command 1-1
:
AT = 1 (Specifying concave display)
Command 10
:
RB = 1 (Specifying that there is no pattern background)
Figure 3.3-4 Example of Shaded Background Display (Continued)
3.3.4 Blinking Display
Blinking display is a display mode in which display and no display alternate every 32 Vs (vertical
cycles). Whether blinking display should be used can be specified for each character.
If 1 is set in the BK bit of Command 10 (color control), blinking display is specified for the
character for which 1 is set in the AK bit of Command 1-1 (main screen character control 1).
(However, if BS bit = 1 in Command 1-1, blinking display is not used.)
For blinking display of a pattern background character, the character dots and the pattern
background dot blinks. For blinking display of a solid-fill background character, the character
dots and the solid-fill background dots blinks.
40
3.3 Character Display Functions
3.3.5 Kanji Font Display
The MB90092 provides kanji font display control functions that optimize the display of a kanji
font of 24 by 24 dots or 16 by 16 dots (such as a kanji ROM font).
The kanji font display control functions include the kanji font area control, 16/24-dot font control,
kanji font pattern background control, kanji font boldface character control, and kanji font display
position control.
(1) Kanji Font Area Control
This function specifies the area in which kanji font control is performed. Control of the RM1
and RM0 bits of the kanji font display control (Command 9) selects an option from among no
kanji font area, 4 megabits (character codes: 0000H to 0FFFH), and 8 megabits (character
codes: 0000H to 1FFFH). Specify an optimal area size appropriate for the kanji font size
used.
Note that if normal or graphic characters other than a kanji font is set in the kanji font area,
these characters will not be displayed correctly.
(2) Kanji Font 16/24-dot Font Control
This function specifies the dot format of the kanji font to be used. A font of 16 by 16 dots or
24 by 24 dots can be selected.
Figure 3.3-5 shows the 16-dot font display configuration (example of displaying one
character).
4 dots
4 dots
16 dots
32
dots
16-dot
font
24 dots
Figure 3.3-5 16-dot Font Display Configuration
If a font of 24 by 24 dots is selected (kanji font display control (Command 9: S16 = 0), see
(5), “Kanji font display position control.”
41
CHAPTER 3 DISPLAY FUNCTIONS
(3) Kanji Font Pattern Background Control
This function specifies the pattern background mode in which a character in the kanji font
area is displayed. The following table shows the relationship of the RP1 and RP0 bits of the
kanji font display control (Command 9) and the pattern background mode.
RP1
RP0
Pattern background mode
0
0
Depends on the settings in P2 and P0 in Command 4.
0
1
Horizontal framing 1 (Same as pattern background 3)
(One-dot framing on the right and left sides of a character dot)
1
0
Horizontal framing 2
(Two-dot framing on the right and left sides of a character dot)
1
1
(Do not use this setting.)
Figure 3.3-6 shows examples of horizontal framing display.
Figure 3.3-6 Examples of Horizontal Framing Display
Notes:
1.
2.
-
With horizontal framing 1, the character dot is shifted one dot to the right.
-
With horizontal framing 2, the character dot is shifted two dots to the right.
-
If horizontal framing and a character in another display mode are adjacent,
the display may not be correct.
If a character dot is set as the rightmost dot (24th dot) or the dot before the
rightmost one (23rd dot) in the horizontal 24-dot character area, the pattern
background dot may leave the character area and be displayed in the adjacent
character area on the right. However, the pattern background never extends
beyond the right edge of the character display screen area (24th dot of the 24th
character).
(4) Kanji font boldface character control
The kanji font boldface character control enlarges the character dots horizontally by one dot.
The character size is not changed.
Figure 3.3-7 shows an example of boldface character display.
Figure 3.3-7 Example of Boldface Character Display (Displaying Twelve Dots
in the Horizontal Direction)
42
3.3 Character Display Functions
Notes:
1.
This specification replaces a non-character dot with a character dot, causing
continuous character dots to be displayed.
Do not use this specification for a font created in relation to pattern backgrounds
1 and 2.
2.
If a character dot is set as the rightmost dot (24th dot) in the horizontal 24-dot
character area, the character dot added for boldfacing leaves the character area
and is displayed in the adjacent character area on the right. However, the
character dot never extends beyond the right edge of the character display
screen area (24th dot of the 24th character). The same applies to a pattern
background dot in the pattern background display.
(5) Kanji Font Display Position Control
This function selects the display mode (vertical display position) used when a character of
24 by 24 dots in the kanji font area is displayed. The DW4 bit of the kanji font display control
(Command 9) is used for control.
Figure 3.3-8 shows the display position control modes.
Figure 3.3-8 Display Position Control Modes
43
CHAPTER 3 DISPLAY FUNCTIONS
3.4
Graphic Character Display Functions
The MB90092 can display graphic characters as well as normal characters. Graphic characters
consist of 8 × 32 dots each of which can be displayed in the color selected from among eight
different colors. Color display information is included in font data. The character size is the
same as that of normal characters. (One dot for graphic characters is equivalent to three dots
for normal characters.)
Graphic character display has the following features:
• Dot configuration
: 8 × 32 dots (horizontal × vertical)
• Main screen display
– Display control
: Normal and graphic characters selected for each character can
be displayed at the same time.
(Mixed display enabled only in extended graphics mode)
– Display character color : 8 colors (for each dot) × 4 phases (for each character)
or 8 gradient colors (color or monochrome specified
for the entire screen)
• Sub-screen display
– Display control
: Normal and graphic characters selected for each line can be
displayed at the same time.
(Mixed display enabled only in extended graphics mode)
– Display character color : 8 colors (for each dot) × 4 phases (for each line)
or 8 gradient colors (color or monochrome specified
for the entire screen)
Note: Do not specify graphic display for those characters in the kanji font area. Otherwise, they
cannot be displayed correctly.
44
CHAPTER 4
CONTROL FUNCTION
This chapter describes the display control functions of the MB90092.
The MB90092 has two modes of operation: internal sync controlled and external sync
controlled operation.
In internal sync controlled operation, the device generates horizontal/vertical sync
signals and a character signal, as well as a video signal for color display.
In external sync controlled operation, it generates a character signal for superimposed
display.
4.1
Dot Clock Generator
4.2
Color Burst Clock Generator
4.3
Power-on Reset
4.4
Analog Switch Circuit
4.5
Sync Control
4.6
External Sync Control
4.7
Display Signal Output Timing
4.8
Command Write Sequence
4.9
Command/Data Transfer
4.10
Command Transfer Sequence and Timing
4.11
Font Memory
45
CHAPTER 4 CONTROL FUNCTION
4.1
Dot Clock Generator
The dot clock serves as the fundamental clock for character display. Since the dot clock must
be phase-synchronized with the video signal, the dot clock uses an LC-tuned oscillator with its
oscillation stopped and restarted by the horizontal sync signal for phase synchronization.
Figure 4-1-1 shows the dot clock oscillation waveform.
Figure 4.1-1 Dot Clock Oscillation Waveform
The LC-tuned oscillator circuit for the dot clock is shown in Figure 4-1-2. Since this circuit must
be oscillated synchronously with the rising edge of the HSYNC signal, it cannot be built with a
crystal or ceramic oscillator.
Since the character display positions on the screen are proportional to the dot clock period
(1/frequency), it is necessary to adjust the clock period by using a trimmer or other variable
capacitor on the EXD side if fluctuations in display positions present a problem for your
application. (The capacitor on the XD side can be a fixed one.)
Set the adjustment range with some allowance by considering variations in L and C.
When adjusting the frequency, use the oscillator output for the dot clock from the VSYNC pin for
reference. This output is obtained by driving the TEST pin low. When adjusted to
approximately 14 MHz, you can display characters normally over the entire screen.
Figure 4-1-2 shows an internal equivalent circuit of the dot clock generator.
Figure 4.1-2 LC-Tuned Dot Clock Oscillator
46
4.1 Dot Clock Generator
Figure 4.1-3 Equivalent Circuit of Dot Clock Generator
47
CHAPTER 4 CONTROL FUNCTION
4.2
Color Burst Clock Generator
The color burst clock functions as the basic clock for the sync and the color burst signals during
internal sync control (internal video signal). Note that the internal sync control system is
operating even during external sync control to control the horizontal and vertical blanking.
Concerning the crystal oscillator circuit for the color burst clock, make sure that the capacitors
fitted to both ends of the crystal resonator meet the capacitance requirements stipulated for the
crystal resonator used.
Since the color burst clock is the source for the internally generated video signal color burst and
chroma carrier, it is generally required of extremely high frequency accuracy. Therefore, it is
recommended that the capacitance on either side of the EXS or the XS pins be made adjustable
by using, for example, a trimmer capacitor. In most applications, this trimmer capacitor may be
fitted on the EXS pin side where it is easier to adjust capacitance without adversely affecting its
balance. This is because if load capacitance in a crystal oscillator circuit is excessively
unbalanced, the temperature and other oscillation characteristics tend to deteriorate.
For the fixed capacitor on the XS pin side, use a ceramic or other appropriate capacitor that has
the smallest temperature coefficient possible.
When adjusting the frequency, use the oscillator output for the color burst clock from the
HSYNC pin (divided by 4) for reference. This output is obtained by driving the TEST pin low.
Figure 4-2-1 shows a crystal oscillator circuit of the color burst clock.
Figure 4.2-1 Crystal Oscillator Circuit
48
4.3 Power-on Reset
4.3
Power-on Reset
4.3.1 Power-on Reset
A power-on reset means that the device generates an internal reset signal to initialize its
operation upon detection of power-on.
Input the CS signal four times to clear a power-on reset.
Figure 4-3-1 shows a timing of how a power-on reset is cleared.
Figure 4.3-1 Clearing Power-on Reset
4.3.2 Device Initialization
When reset at power-on, the MB90092's screen control 1(command4) has its IE (internal/
external sync control) bit and DC (display control) bit cleared to 0, and screen display is turned
off under internal sync control.
After power-on, clear a power-on reset first. Then, set the screen control 1(command4) DC bit
to 1 to turn display on after setting all register data and all VRAM contents to be displayed.
49
CHAPTER 4 CONTROL FUNCTION
4.4
Analog Switch Circuit
The MB90092 contains an analog switch circuit which allows you to synthesize character
information on a video signal input from the VIN, YIN, or CIN pins or an internally generated
video signal and output the result via the VOUT, YOUT, and COUT pins.
Figure 4-4-1 shows a block diagram of the analog switch circuit.
Figure 4.4-1 Analog Switch Circuit
50
4.5 Sync Control
4.5
Sync Control
The MB90092 has two modes of operation: external sync controlled and internal sync controlled
operation. The external sync mode is used for superimposed display by synthesizing an
externally input video signal (sync signal) with characters. The internal sync mode is used to
display characters after synthesizing them with an internally generated video signal (sync
signal), that is, a signal generated by the MB90092's internal video signal (sync signal)
generator.
Video output during internal sync controlled operation can be displayed in color.
Figure 4.5-1 External Sync and Internal Sync Display
51
CHAPTER 4 CONTROL FUNCTION
4.6
External Sync Control
External sync control produces superimposed display by phase-synchronizing the MB90092's
internal sync signal with an external sync signal. The external sync signal can be a H/V
separate sync or a composite sync signal.
4.6.1 H/V Separate Sync Signal Input
By setting the SC bit of the horizontal display start position register (command 8) to 1, the
EXHSYN pin can be used for horizontal sync signal input and the EXVSYN pin for vertical sync
signal input, respectively.
The EXHSYN pin contains a filter to cut signals below 3 µs to eliminate noise and other
unwanted components.
Vertical synchronization is detected by the internal VSYNC detection pulse. If a falling edge of
the vertical sync signal occurs near this VSYNC pulse, a 1H delay may result, causing a vertical
drift in character display.
Figure 4-6-1 shows how the vertical sync is detected.
Figure 4.6-1 Vertical Sync Detect Operation
52
4.6 External Sync Control
4.6.2 Composite Sync Signal Input
By setting the SC bit of the horizontal display start position register (command 8) to 0, the
EXHSYN pin can be used for composite sync signal input.
Vertical synchronization is detected by measuring the pulse width of the signal input to the
EXHSYN pin. When the pulse width of the signal input to the EXHSYN pin is equal to or greater
than 13 µs, the signal is assumed to be the vertical sync pulse; when equal to or greater than 4
µs, it is assumed to be the horizontal sync pulse. Signals 3 µs or less in pulse width are ignored
as noise.
Figure 4-6-2 shows the internal timing of sync separate operation.
Figure 4.6-2 Internal Timing of Sync Separate Operation
53
CHAPTER 4 CONTROL FUNCTION
4.7
Display Signal Output Timing
The MB90092 pins output the display periods and display colors using digital signals.
The B, R, and G pins output signals indicating the display color. A valid color is output during
the output period for display color, pattern background color, solid-fill background color, graphic
character color, and screen background color.
The VOC pin designates the output period for characters (only character dots) and graphic
characters.
The VOB pin designates the output period for characters, pattern backgrounds, solid-fill
backgrounds, and screen backgrounds.
Figure 4.7-1 shows an example of display signal output timing for the following settings:
Character color settings
(CG, CR, CB) = (1, 0, 0)
Solid-fill background color settings
(BG, BR, BB) = (0, 0, 1)
Screen background color settings
(UG, UR, UB) = (0, 1, 1)
Figure 4.7-1 Display Signal Output Timing
54
4.8 Command Write Sequence
4.8
Command Write Sequence
The MB90092's each command consists of two bytes, with the first byte containing “command
ID code + high-order bits of data” and the second byte containing “data.”
In serial transfer, each command is transferred in order of the first and the second bytes. Since
the first byte is internally retained into a latch, it is possible to transfer two or more second bytes
in succession after transferring the first byte.
Figure 4-8-1 shows a command write sequence.
Figure 4.8-1 Command Write Sequence (for Command 2-1)
55
CHAPTER 4 CONTROL FUNCTION
4.9
Command/Data Transfer
Display control commands and data are transferred to the MB90092's internal registers via 8-bit
serial transfer. This serial transfer is done by using three signals: CS (chip select), SCLK (shift
clock), and SIN (serial input).
Figure 4-9-1 shows the signal timing during serial transfer.
The CS pin is for the chip select signal, and is set low for serial transfer. The SIN pin is for the
serial data input signal. The SCLK pin is for the shift clock signal for data reception.
The data is 8 bits long, and is sequentially shifted in to the SIN pin beginning with the least
significant bit (LSB). The data is latched and shifted in on each rising edge of the shift clock
input to the SCLK pin as shown in Figure 4-9-1. The transferred data is loaded into the internal
register on the rising edge of the shift clock at the eighth bit and processed as command or
data. Therefore, commands and data can be written into the MB90075 at any timing.
In serial transfer, the number of received bits is counted by shift clock counts. Serial transfer
may be reset by forcing CS pin high; this reset can be cleared by forcing the CS pin from high to
low so that the subsequent eight bits of data (eight shift clock counts) are handled as byte data.
Thus, it is possible to maintain byte synchronization by using the CS pin.
If the CS signal is released back high before eight bits of data are transferred, the data becomes
invalid.
Figure 4.9-1 Serial Transfer Timing
Data A is written into the internal register since the CS pin is held low. However, data B is
ignored because the CS pin is released back high in the middle of data transfer.
Notes:
1: To maintain byte synchronization, the CS pin should be temporarily returned high
and then set low before starting serial data transfer.
2: Just after the power-on, please force the SCLK pin to “H” before the serial data
transfer.
56
4.10 Command Transfer Sequence and Timing
4.10 Command Transfer Sequence and Timing
No restrictions are imposed on the sequence of command and data transfer, so the registers
can be set in any order. (However, register settings in command 0 and command 1 are made
effective by issuing command 2.)
The MB90092's register and VRAM contents are rewritten simultaneously when a command
and data are accepted and reflected in display operation. Consequently, if the contents of any
register are altered while characters are displayed on the screen, the display of that frame may
be disturbed. (When the same contents are written, display is generated normally without
disturbance.) Display disturbance occurs in only one frame, and display is produced normally
from the next frame onward.
Generally, the following rules may be observed when transferring commands and data.
• When powered on, do not turn display on (command 4; screen control 1 DC bit = 1) until
after data is set in all registers and VRAM.
• When setting commands that change the screen display such as the VRAM data set etc, we
recommend that commands are performed in the display-OFF state.
• If possible, make sure that issue of commands are done during the vertical blanking interval
synchronously with the vertical sync signal.
For writing display data to VRAM, you need not be concerned about the write timing if the
device is used under normal conditions (write frequency equivalent to refreshing display
memory at a period of several 10ms to a few seconds).
However, for applications where the MB90092 outputs are recorded on video tape and
reproduced after being decomposed frame by frame, changes in the settings of commands
must be made synchronously with the vertical sync signal during the vertical blanking interval
before the display position is reached.
57
CHAPTER 4 CONTROL FUNCTION
4.11 Font Memory
4.11.1 Font Memory Configuration
One character requires 128 bytes of font memory (and 96 bytes for character data). Up to 16
megabits of memory can be provided externally, and up to 16,384 character types can be used.
Normal and graphic characters can be mixed and set for any character code (address).
Figure 4.11-1 shows the font memory configuration.
Figure 4.11-1 Font Memory Configuration
58
4.11 Font Memory
4.11.2 Kanji Font Area Control
A kanji ROM font of 16 by 16 dots or 24 by 24 dots must be set in the kanji font area so that
kanji font area control can be performed on it. The kanji font area is set to character codes
(addresses) 0000H to 0FFFH (4 megabits) or 0000H to 1FFFH (8 megabits) depending on the
specification in RM1 and RM0 of the kanji font display control (Command 9). A kanji ROM font
for which no kanji font display control is performed can be set to any character codes
(addresses) that are not the highest-order codes. Be careful that a non-kanji font character
(including a graphic character), if set in the kanji font area, will be displayed correctly. If no kanji
font display control need be performed in any of the areas, specify that no kanji font is used.
Figure 4.11-2 shows an example of kanji font area specification.
(1) Using no kanji font is specified
(2) 4-megabit kanji font is specified
(Character code)
[RM 1=0]
[RM 0=0]
(Character code)
0000H
(Normal character area)
0000H
0FFFH
[RM 1=0]
[RM 0=1]
Kanji font specification
area
0FFFH
1000H
(Normal character area)
1FFFH
1000H
(Normal character area)
1FFFH
(Normal character area)
2000H
2FFFH
2000H
(Normal character area)
2FFFH
(Normal character area)
3000H
3FFFH
3000H
(Normal character area)
3FFFH
Font memory
Font memory
(3) 8-megabit kanji font is specified
(Character code)
0000H
[RM 1=1]
[RM 0=0]
Kanji font specification
area
0FFFH
1000H
Kanji font specification
area
1FFFH
2000H
(Normal character area)
2FFFH
3000H
(Normal character area)
3FFFH
Font memory
Figure 4.11-2 Example of Kanji Font Area Specification
59
CHAPTER 4 CONTROL FUNCTION
4.11.3 Font Data Configuration
Figures 4.11-3 and 4.11-4 show the font data configuration and the font memory address
configuration.
(1) Normal character font (24 by 32 dots)
24 dots
32
rasters
(Left)
(Middle)
(Right)
MSB
8 bits
8 bits
8 bits
Left
byte
data
Middle
byte
data
Right
byte
data
LSB
(2) Graphic character font (8 by 32 dots)
8 dots
32
rasters
(Left)
(Middle)
(Right)
One-raster data
MSB
MSB
MSB
B R GB R GB R GB R GB R GB R GB R GB R G
8 bits
Left byte data
8 bits
Left byte data
8 bits
Left byte data
8 dots
Figure 4.11-3 Font Data Configuration
60
4.11 Font Memory
Figure 4.11-4 Font Memory Address Configuration
61
CHAPTER 4 CONTROL FUNCTION
62
CHAPTER 5
DISPLAY CONTROL COMMANDS
Chapter 5 describes the display control commands of the MB90092.
The MB90092 is provided with the following:
VRAM address setting (Command 0),
Main screen character control 1 (Command 1-1),
Main screen character control 2 (Command 2-1),
Sub-screen line control 1 (Command 1-2),
Sub-screen line control 2 (Command 2-2),
Main screen line control 1 (Command 1-3),
Main screen line control 2 (Command 2-3),
VRAM write control (Command 3),
Screen control 1 (Command 4),
Screen control 2 (Command 5),
Main screen line control 3 (Command 6),
Main screen vertical position control (Command 7),
Main screen horizontal position control (Command 8),
Kanji font display control (Command 9),
Color control (Command 10),
Sub-screen control (Command 11),
Sub-screen vertical position control (Command 12)
Sub-screen horizontal position control (Command 13)
5.1
Display Control Commands
5.2
Command 0 (VRAM Address Setting)
5.3
Commands 1 and 2 (VRAM Data Settings 1 and 2)
5.4
Command 3 (VRAM Write Control)
5.5
Command 4 (Screen Control 1)
5.6
Command 5 (Screen Control 2)
5.7
Command 6 (Main Screen Line Control)
5.8
Command 7 (Main Screen Vertical Display Position Control)
5.9
Command 8 (Main Screen Horizontal Display Position Control)
5.10
Command 9 (Kanji Font Display Control)
5.11
Command 10 (Color Control)
5.12
Command 11 (Sub-Screen Control)
5.13
Command 12 (Sub-Screen Vertical Position Control)
5.14
Command 13 (Sub-Screen Horizontal Position Control)
63
CHAPTER 5 DISPLAY CONTROL COMMANDS
5.1
Display Control Commands
Table 5.1-1 lists the MB90092 display control commands.
Table 5.1-1 List of Display Control Commands
Command
no.
First byte
Second byte
Command code/data
Data
76543
64
2
1
6
5
4
Function
0
7
3
2
1
0
RA7
0
RA6 RA5 CA4 CA3 CA2 CA1 CA0
VRAM address
setting
0
10000
VSL RA8
1-1
10001
MA
MB
AT
0
CG
CR
CB
MC
2-1
10010
M9
M8
M7
0
M6
M5
M4
M3
1-2
10001
SMA SMB
0
0
SCG SCR SCB SMC SGR SDC SMD
Sub-screen line
control 1
2-2
10010
SM9 SM8 SM7
0
SM6 SM5 SM4 SM3 SM2 SM1 SM0
Sub-screen line
control 2
1-3
10001
OF1 OF0
0
0
0
0
0
PC
PG
PR
PB
Main screen line
control 1
2-3
10010
G2
G1
G0
0
SOC
VD
DG
KC
KG
KR
KB
Main screen line
control 2
3
10011
FIL
0
0
0
0
0
0
0
0
0
0
4
10100
IE
IN
EB
0
EO
CM
ZM
NP
P2
P0
DC Screen control 1
5
10101
KID APC GYZ
0
BH2 BH1 BH0
W3
W2
W1
W0 Screen control 2
6
10110
G2
G1
G0
0
SOC
VD
DG
N3
N2
N1
N0
Main screen line
control 3
7
10111
EC
LP
FO
0
0
Y5
Y4
Y3
Y2
Y1
Y0
Main screen
vertical position
control
8
11000
SC
0
FC
0
0
X5
X4
X3
X2
X1
X0
Main screen
horizontal position
control
9
11001
0
0
GRM
0
0
0
0
0
0
0
0
Kanji font display
control
10
11010
0
0
RB
0
BK
CC
BC
UC
UG
UR
UB
11
11011
SG2 SG1 SG0
0
0
12
11100
SGA
0
SY7
0
Sub-screen
SY6 SY5 SY4 SY3 SY2 SY1 SY0 vertical position
control
13
11101
0
SX8
SX7
0
Sub-screen
SX6 SX5 SX4 SX3 SX2 SX1 SX0 horizontal position
control
14
11110
—
—
—
0
—
Main screen
BG BR BB
character control
(GR) (BS) (MD)
1*
M2
M1
M0
SCC SBC SGC SBG SBR SBB
—
—
—
—
—
—
Main screen
character control
2
VRAM write
control
Color control
Sub-screen
control
(Reserved)
5.1 Display Control Commands
Table 5.1-1 List of Display Control Commands
15
11111
—
—
—
0
—
—
—
—
—
—
—
(Reserved)
*: Parenthesized bit names are used for extended graphics mode.
65
CHAPTER 5 DISPLAY CONTROL COMMANDS
5.2
Command 0 (VRAM Address Setting)
[Command format]
MSB
First byte
LSB
1
0
0
0
0
VSL
RA8
RA7
LSB
MSB
Second byte
0
RA6
RA5
CA4
CA3
CA2
CA1
CA0
VSL
: VRAM write control
RA8 to RA5 : VRAM row address setting (00 to BH)
CA4 to CA0 : VRAM column address setting (00 to 17H)
[Function]
This command sets the VRAM address. The write address must be specified using this
command before data can be written by command 1 and command 2.
[Description]
This command sets the character control RAM address and line control RAM address of the
main screen, and the line control RAM address of the sub-screen. The operation is selected
according to the settings in the VSL and CA0 bits.
The VRAM address is automatically incremented by writing character code data (by
command 2). VRAM address is specified by A8 to A0 bits.
VSL
: VRAM write control
RA8 to RA5 : VRAM row address setting (0 to BH)
CA4 to CA0 : VRAM column address setting (00 to 17H)
VSL
0
RA8
RA7
RA6
RA5
Row address (0 to BH)
CA4
CA3
CA2
CA1
CA0
Operation
Set the main screen
character control RAM address.
Column address (0 to 17H)
Row address (0 to BH)
—
—
—
—
0
Set the sub screen
row control RAM address.
Row address (0 to BH)
—
—
—
—
1
Set the main screen
row control RAM address.
1
RA8-RA5 specify the row address; CA4-CA0 specify the column address.
Valid column addresses are 00H to 17H.
Valid row addresses are 0H to BH.
Do not specify any other column or row addresses.
66
5.2 Command 0 (VRAM Address Setting)
Figure 5.2-1 shows the VRAM configuration.
VRAM column addresses
10
0 1 2 3 4 5 6 7 8 9
12
11
14
13
16
15
18
17
20
19
22
21
23
0
VRAM row addresses
1
2
3
4
5
6
7
8
9
10
11
Main screen character control RAM
Main screen Sub-screen
line control
line control
RAM
RAM
Figure 5.2-1 VRAM Configuration
67
CHAPTER 5 DISPLAY CONTROL COMMANDS
5.3
Commands 1 and 2 (VRAM Data Settings 1 and 2)
The contents of Commands 1 and 2 are set to main screen character control data write, main
screen line control data write, or sub-screen line control data write according to the settings of
the VSL and CA0 bits of Command 0.
Before these commands are issued, the VRAM write address must be specified using
Command 0. Issuing Command 2 saves the contents of Command 1 in VRAM and updates the
screen.
5.3.1 Main Screen Sharacter Control Data Write (If VSL = 0 in
Command 0)
The main screen is placed in normal mode or graphic mode under control of the GRM bit of
Command 9. Using a different operation mode partially changes the contents of commands.
[Command format]
Command 1-1 (Main screen character control data setting 1)
MSB
First byte
LSB
1
0
0
0
1
MA
MB
AT
LSB
MSB
Second byte
0
CG
CR
CB
MC
BG
(GR)
BR
(BS)
BB
(MD)
*
*: Parenthesized bit names are used for extended graphics mode.
Command 2-1 (Main screen character control data setting 2)
MSB
LSB
1
First byte
0
0
1
0
M9
M8
M7
LSB
MSB
Second byte
0
M6
(MD), MC to M0
AT
CG, CR, CB
BG, BR, BB
(GR)
(BS)
M5
M4
M3
M2
M1
M0
: Character code
: Specify character attribute display.
: Character colors
: Character background colors
: Specify normal character/graphic character display.
: Specify shaded background display.
[Function]
In normal mode, this command sets character codes, character colors, character
background colors, and character attributes.
In extended graphic mode, this command sets character codes, character colors, normal or
graphic character specification, character background display specification, transparency
control, and color phase control.
68
5.3 Commands 1 and 2 (VRAM Data Settings 1 and 2)
[Description]
(1) In normal mode (Command 9: GRM = 0)
MC to M0
: Set a character code.
The character code can be specified between 0000H to 1FFFH.
Up to 8192 different characters can be used.
AT
: Specify character attribute display.
AT = 0 : Specify normal display.
AT = 1 : Specify attribute display.
Solid-fill background (when command 10: RB = 1)
Blinking (when command 10: BK = 1)
Shaded background (when command 1: BS = 1)
Note: If shaded background display and solid-fill background display
or blinking display are specified, the shaded background display
setting takes priority over the other setting.
CG, CR, CB : Character colors
BG, BR, BB : Character background colors
Character color signal output/Character background color signal output
CG/BG
CR/BR
CB/BB
Digital output
Video output
G
R
B
Color
Monochrome
0
0
0
L
L
L
Black
Gray 0 (Black)
0
0
1
L
L
H
Blue
Gray 1
0
1
0
L
H
L
Red
Gray 2
0
1
1
L
H
H
Magenta
Gray 3
1
0
0
H
L
L
Green
Gray 4
1
0
1
H
L
H
Cyan
Gray 5
1
1
0
H
H
L
Yellow
Gray 6
1
1
1
H
H
H
White
Gray 7 (White)
Note: The video output color of the character color signal is the one used when the color phase
control of the main screen line control data is 0 degrees (Command 1-3: 0F1 = OF0 = 0).
Control the OF1 and OF0 bits to display colors with the +90, +180, and +270 degree color
phases.
Color/monochrome control of video output is performed with the CC and BC bits of
Command 10.
69
CHAPTER 5 DISPLAY CONTROL COMMANDS
(2) In extended graphics mode (Command 9: GRM = 1)
MD to M0
: Set a character code.
The character code can be specified between 0000H to 3FFFH.
Up to 16384 different characters can be used.
AT
: Specify character attribute display.
AT = 0 : Specify normal display.
AT = 1 : Turn attribute display ON.
Solid-fill background (when command 10: RB = 1)
Blinking (when command 10: BK = 1)
Shaded background (when command 1: BS = 1)
Note: If shaded background display and solid-fill background display
or blinking display are specified, the shaded background display
setting takes priority over the other setting.
GR
: Specify normal character/graphic character display.
GR = 0 : Specify normal character display.
Characters made up of 24 horizontal dots × 32 vertical dots
GR = 1 : Specify graphic character display
Characters made up of 8 horizontal dots × 32 vertical dots (color
settable for each dot)
Note: Do not set BS = 1.
BS
: Specify shaded background display.
BS = 0 : Specify normal display.
BS = 1 : Specify shaded background display.
Characters for which AT = 0 has been set are shaded on the
background.
Characters for which AT = 1 has been set are shaded on the
background in reverse video.
1) In normal character display mode (GR = 0)
CG, CR, CB: Character colors
Character color signal output
CG
CR
CB
Digital output
Video output
G
R
B
Color (CC=1)
Monochrome (CC=0)
0
0
0
L
L
L
Black
Gray 0 (black)
0
0
1
L
L
H
Blue
Gray 1
0
1
0
L
H
L
Red
Gray 2
0
1
1
L
H
H
Magenta
Gray 3
1
0
0
H
L
L
Green
Gray 4
1
0
1
H
L
H
Cyan
Gray 5
1
1
0
H
H
L
Yellow
Gray 6
1
1
1
H
H
H
White
Gray 7 (white)
Note: The video output color is the one used when the color phase control of the main screen
line control data is 0 degrees (Command 1-3: 0F1 = OF0 = 0). Control the OF1 and OF0
bits to display colors with the +90, +180, and +270 degree color phases.
Color/monochrome control of video output is performed with the CC bit of Command 10.
70
5.3 Commands 1 and 2 (VRAM Data Settings 1 and 2)
2) In graphic character display mode (GR = 1)
CG
CR, CB
: Graphic color transparency control
CG = 0 : Normal display
CG = 1 : Transparent display
This setting replaces the “black” graphic color display with transparent
display.
: Graphic color phase control
These bits control the color phase of video signal outputs (VOUT pin and COUT
pin outputs).
CR
CB
Graphic color phase
0
0
+0 degree
0
1
+90 degrees
1
0
+180 degrees
1
1
+270 degrees
71
CHAPTER 5 DISPLAY CONTROL COMMANDS
5.3.2 Writing Sub-screen Line Control Data (When Command 0:
VSL = 1, CA0 = 0)
Set sub-screen line control data.
[Command format]
Command 1-2 (Sub-screen line control data setting 1)
MSB
LSB
1
First byte
0
0
0
1
SMA
SMB
LSB
MSB
Second byte
0
0
SCG
SCR
SCB
SMC
SGR
SDC
SMD
Command 2-2 (Sub-screen line control data setting 2)
MSB
LSB
1
First byte
0
0
1
0
SM9
SM8
LSB
MSB
Second byte
SM7
0
SM6
SMD to SM0
SDC
SGR
SCG to SCB
SCG
SCR, SCB
SM5
SM4
SM3
SM2
SM1
SM0
: Sub-screen line first character code
: Sub-screen line output control
: Sub-screen line character display control
: Sub-screen line character colors (when SGR = 0)
: Sub-screen line graphic color transparency control (when SGR = 1)
: Sub-screen line graphic color phase control (when SGR = 1)
[Function]
This command sets up the sub-screen for each line. The command sets the first character
code of the sub-screen line, sub-screen line output, sub-screen line character display
control, and sub-screen line character color.
[Description]
SMD to SM0:Sub-screen line first character code
Set the first character code of a sub-screen line. On this line, only characters with the
continuous character codes can be displayed.
A value from 0000H to 3FFFH can be specified.
SDC: Sub-screen line output control
SDC = 0 : Disable sub-screen line display output.
SDC = 1 : Enable sub-screen line display output.
SGR: Sub-screen line character display control
SGR = 0 : Display normal characters.
SGR = 1 : Display graphic characters.
72
5.3 Commands 1 and 2 (VRAM Data Settings 1 and 2)
1) In sub-screen line normal character display mode (SGR = 0)
SCG to SCB: Sub-screen line character colors
Sub-screen line character color signal output
SCG SCR SCB
Digital output
Video output
G
R
B
Color (SCC=1)
Monochrome (SCC=0)
0
0
0
L
L
L
Black
Gray 0 (black)
0
0
1
L
L
H
Blue
Gray 1
0
1
0
L
H
L
Red
Gray 2
0
1
1
L
H
H
Magenta
Gray 3
1
0
0
H
L
L
Green
Gray 4
1
0
1
H
L
H
Cyan
Gray 5
1
1
0
H
H
L
Yellow
Gray 6
1
1
1
H
H
H
White
Gray 7 (white)
Note: Color/monochrome control of video output is performed with the SCC bit of Command 11.
2) In sub-screen line graphic character display mode (SGR = 1)
SCG
: Sub-screen line graphic color transparency control
SCG = 0: Normal display
SCG = 1: Transparent display
This setting replaces “black” graphic color display with transparent
display.
SCR, SCB
: Sub-screen line graphic color phase control
These bits control the color phase of graphic character video signal outputs
(VOUT pin and COUT pin outputs).
SCR
SCB
Sub-screen line graphic color phase
0
0
+0 degree
0
1
+90 degrees
1
0
+180 degrees
1
1
+270 degrees
73
CHAPTER 5 DISPLAY CONTROL COMMANDS
5.3.3 Main Screen Line Control Data Write (If VSL = 1 and CA0 = 1
in Command 0)
This command sets the line control data of the main screen.
[Command format]
Command 1-3 (Main screen line control data setting 1)
MSB
First byte
LSB
1
0
0
0
1
OF1
OF0
0
LSB
MSB
Second byte
0
0
0
0
PC
PG
PR
PB
Command 2-3 (Main screen line control data setting 2)
MSB
LSB
1
First byte
0
0
1
0
G2
G1
G0
LSB
MSB
Second byte
0
SOC
OF1, OF0
PC
PG, PR, PB
G2, G1, G0
SOC
VD
DG
KC
KG, KR, KB
VD
DG
KC
KG
KR
KB
: Character color phase control
: Shaded pattern background color/monochrome control
: Shaded pattern background color
: Character size control
: Output priority control
: Video signal output control
: Digital signal output control
: Line background color/monochrome control
: Line background color
[Function]
This command sets the line control data of the main screen. For normal character display
mode, the command sets the color phase control. For shaded background display mode,
the command sets the pattern background color and its color/monochrome control, character
size, display priority control between the main screen and the sub-screen, video output
control, digital output control, and line background color and its color/monochrome control.
74
5.3 Commands 1 and 2 (VRAM Data Settings 1 and 2)
[Description]
OF1 and OF0: Character color phase control
In normal character display mode in normal mode or extended graphic mode,
these bits control for each line the character color phase of the video signal
output (VOUT pin and COUT pin output).
PC
OF1
OF0
Character color phase
0
0
+0 degree
0
1
+90 degrees
1
0
+180 degrees
1
1
+270 degrees
: Shaded pattern background color/monochrome control (Valid only in extended
graphics mode)
PC = 0 : Display the shaded pattern background of video signal outputs in
monochrome.
PC = 1 : Display the shaded pattern background of video signal outputs in color.
PG, PR, PB: Shaded pattern background color (Valid only in extended graphics mode)
Shaded pattern background color signal output
PG
PR
PB
Digital output
Video output
G
R
B
Color (PC=1)
Monochrome (PC=0)
0
0
0
L
L
L
Black
Gray 0 (black)
0
0
1
L
L
H
Blue
Gray 1
0
1
0
L
H
L
Red
Gray 2
0
1
1
L
H
H
Magenta
Gray 3
1
0
0
H
L
L
Green
Gray 4
1
0
1
H
L
H
Cyan
Gray 5
1
1
0
H
H
L
Yellow
Gray 6
1
1
1
H
H
H
White
Gray 7 (white)
G2 to G0
: Character size
G2
G1
G0
Character size
0
0
0
Standard
0
0
1
Double width
0
1
0
Double width × double height
0
1
1
Quadruple width × double height
1
0
0
Standard
1
0
1
Double width
1
1
0
Double width × double height
1
1
1
Double height
75
CHAPTER 5 DISPLAY CONTROL COMMANDS
SOC
: Output priority control
SOC = 0 : Give display priority to the main screen.
This setting displays the main screen on top of the sub-screen.
SOC = 1 : Give display priority to the sub-screen.
This setting displays the sub-screen on top of the main screen.
VD
: Video signal output control
VD = 0 : Disable output of main screen character information to the video output
pin (VOUT, YOUT,
or COUT pin).
VD = 1 : Output main screen character information to the video output pins
(VOUT, YOUT, and COUT pins).
DG
: Digital signal output control
DG = 0 : Disable output of main screen character information to the digital output
pin (G, R, B, VOB, or VOC pin).
DG = 1 : Output main screen character information to the digital output pins (G,
R, B, VOB, and VOC pins).
KC
: Line background color/monochrome control
(Valid only in extended graphics mode)
KC = 0 : Display the line background of video signal outputs in monochrome.
KC = 1 : Display the line background of video signal outputs in color.
KG, KR, KB: Line background color
(Valid only in extended graphics mode)
Line background color signal output
KG
76
KR
KB
Digital output
Video output
G
R
B
Color (KC=1)
Monochrome (KC=0)
0
0
0
L
L
L
Black
Gray 0 (black)
0
0
1
L
L
H
Blue
Gray 1
0
1
0
L
H
L
Red
Gray 2
0
1
1
L
H
H
Magenta
Gray 3
1
0
0
H
L
L
Green
Gray 4
1
0
1
H
L
H
Cyan
Gray 5
1
1
0
H
H
L
Yellow
Gray 6
1
1
1
H
H
H
White
Gray 7 (white)
5.4 Command 3 (VRAM Write Control)
5.4
Command 3 (VRAM Write Control)
[Command format]
MSB
First byte
LSB
0
1
0
1
1
FIL
0
0
LSB
MSB
Second byte
0
0
0
0
0
0
0
0
FIL: VRAM fill control
[Function]
This command performs VRAM fill control.
[Description]
Before Command 1 or 2 writes data to VRAM, use this command to specify the VRAM fill so
that the specified data is saved in the VRAM area from the current address to the end
address.
FIL
: VRAM fill control
FIL = 0: Do not fill VRAM.
FIL = 1: Fill VRAM.
Depending on the settings of the VSL and CA0 bits of Command 0, the main
screen character control RAM, the main screen line control RAM, or the
sub-screen line control RAM is selected.
VSL
CA0
Area to be filled
0
—
Main screen character control RAM
1
0
Sub-screen line control RAM
1
1
Main screen line control RAM
While VRAM fill is being executed, do not issue another command.
Note: VRAM fill is executed in about 1 ms if all the characters are set
in the main screen character control RAM. The time it takes to
set all the lines in the main screen line control RAM or subscreen line control RAM is about 50 µs.
During external sync control, correct sync signals must be input.
77
CHAPTER 5 DISPLAY CONTROL COMMANDS
5.5
Command 4 (Screen Control 1)
[Command format]
MSB
First byte
LSB
1
0
1
0
0
IE
IN
LSB
MSB
Second byte
EB
0
IE
IN
EB
EO
CM
ZM
NP
P2, P0
DC
EO
CM
ZM
NP
P2
P0
DC
: Internal/external synchronization control
: Interlaced/noninterlaced display control
: Screen background display control
: Field control
: Color/monochrome display control
: Zoom-in control
: NTSC/PAL control
: Pattern background control
: Display control
[Function]
This command controls sync signals and the screen.
[Description]
IE
: Internal/external synchronization control
IE = 0 : Specify internal synchronization control operation.
IE = 1 : Specify external synchronization control operation.
IN
: Interlaced/noninterlaced display control
IN = 0 : Specify interlaced scan display.
IN = 1 : Specify noninterlaced scan display.
Note: These settings are valid only during internal synchronization
control operation. In external synchronization control operation,
input sync signal scanning mode is used.
EB
: Screen background display control
EB = 0 : Specify normal display.
The screen background is displayed only during internal synchronization
control operation.It is not displayed in external synchronization control
operation.
EB = 1 : Display the screen background.
The screen background is always displayed regardless of internal or
external synchronization control.
EO
78
: Field control
EO = 0: Specify normal display.
EO = 1: Replace display output data to the even-numbered and odd-numbered
fields with each other.
Display output data to each field is replaced with that to the other when
the horizontal/vertical separated sync signal input involves phase shift
during external synchronization control operation.
5.5 Command 4 (Screen Control 1)
CM
: Color/monochrome display control
CM = 0: Monochrome display
The video signal output is in monochrome. The color burst signal is not
output.
CM = 1: Color display
The video signal output is in color. Color synchronization with the external
input video signal is required to enable a superimposed display in external
synchronization control operation.
ZM
: Zoom-in control
ZM = 0: Normal display
ZM = 1: Zoom into the main screen.
Only the upper 24 dots out of the 32 dots of the vertical character
configuration are enlarged to double height.
Zoom-in display is not enabled in kanji font mode (RM0 = 1 or RM1 = 1
in Command 9).
NP
: NTSC/PAL control
NP = 0: Output display signals using the NTSC system.
NP = 1: Output display signals using the PAL system.
Note: Also make the correct settings in external synchronization
control operation.
P2, P0
: Pattern background control
Specify the pattern background mode for normal character display.
P2
P0
Pattern background mode
0
0
Pattern background 1
0
1
Pattern background 0
1
0
Pattern background 2
1
1
Pattern background 3
Figure 3 shows examples of pattern background display.
Font data
: 001000110000 (12 abstracted bits)
Pattern background 0
Pattern background 1
Pattern background 2
Pattern background 3
: Blank dot
: Character dot
: Pattern background dot
Figure 5.5-1 Pattern Background Display Examples
DC
: Display control
DC = 0: Display neither the main screen nor the sub-screen.
Only the screen background can be displayed.
DC = 1: Enable display output operation.
79
CHAPTER 5 DISPLAY CONTROL COMMANDS
5.6
Command 5 (Screen Control 2)
[Command format]
MSB
First byte
LSB
1
0
1
0
1
KID
APC
GYZ
LSB
MSB
Second byte
0
BH2
KID
APC
GYZ
BH2 to BH0
W3 to W0
BH1
BH0
W3
W2
W1
W0
: Halftone control
: APC control
: Main screen line enlargement control
: Color phase control
: Main screen line spacing control
[Function]
This command performs halftone control, APC control, color phase control, and line
enlargement control and line spacing control of the main screen.
[Description]
KID
: Halftone control
KID = 0 : Perform normal display, disabling halftone display.
KID = 1 : Enable halftone display.
In superimposed display mode of external synchronization control
operation (IE = 1 and EB = 0 in Command 4), the composite video
signal (VIN-VOUT pin signal) displays the pattern and solid-fill
backgrounds in halftones. It also displays the pattern and solid-fill
backgrounds of the C signal (CIN-COUT pin signal) in gray scale.
The level of the halftone background is determined by the resistor
connected to the VKIN-VKOUT pins.
Note: In shaded background display, the solid-fill background and
shading (black and white framing) are displayed in halftones,
and not in the pattern background.
80
APC
: APC control
APC = 0 : Turn the APC function OFF.
APC = 1 : Turn the APC function ON.
In superimposed display mode of external synchronization control operation (IE
= 1 and EB = 0 in Command 4), the characters superimposed on the composite
video signal (VIN-VOUT pin signal) and the C signal (CIN-COUT pin signal) can
be displayed in color.
GYZ
: Main screen line enlargement control
GYZ = 0 : Shift the display positions of the lines downward that follow a line on
the main screen when that line is being displayed enlarged, to bring
all the lines into view.
GYZ = 1 : Undisplay (conceal) the line that follows a line on the main screen when
that line is being displayed enlarged, and display the remaining lines
without changing their original positions.
5.6 Command 5 (Screen Control 2)
BH2 to BH0 : Color phase control
With APC turned on, these bits are used for color phase control if there is a
difference between the external input color phase and internal color phase for
some reason such as a circuit delay.
W3 to W0
BH2
BH1
BH0
Color phase offset
0
0
0
0 degree
0
0
1
45 degrees
0
1
0
90 degrees
0
1
1
135 degrees
1
0
0
180 degrees
1
0
1
225 degrees
1
1
0
270 degrees
1
1
1
315 degrees
: Main screen line spacing control
Set the line spacing on the main screen.
The line spacing can be specified between 0 and 15 rasters in increments of one
raster.
81
CHAPTER 5 DISPLAY CONTROL COMMANDS
5.7
Command 6 (Main Screen Line Control)
[Command format]
MSB
First byte
LSB
0
1
1
1
0
G2
G1
G0
LSB
MSB
Second byte
0
SOC
G2 to G0
SOC
VD
DG
N3 to N0
VD
DG
N3
N2
N1
N0
: Character size control
: Output priority control
: Video signal output control
: Digital signal output control
: Line specification
[Function]
This command performs character size control and output control for each line on the main
screen.
[Description]
G2 to G0
82
: Character size control
G2
G1
G0
Character size
0
0
0
Standard
0
0
1
Double width
0
1
0
Double width × double height
0
1
1
Quadruple width × double height
1
0
0
Standard
1
0
1
Double width
1
1
0
Double width × double height
1
1
1
Double height
SOC
: Output priority control
SOC = 0 : Give display priority to the main screen.
This setting displays the main screen on top of the sub-screen.
SOC = 1 : Give display priority to the sub-screen.
This setting displays the sub-screen on top of the main screen.
VD
: Video signal output control
VD = 0 : Disable output of main screen character information to the video output
pin (VOUT, YOUT, or COUT pin).
VD = 1 : Output main screen character information to the video output pins
(VOUT, YOUT, and COUT pins).
DG
: Digital signal output control
DG = 0 : Disable output of main screen character information to the digital
output pin (G, R, B, VOB, or VOC pin).
DG = 1 : Output main screen character information to the digital output pins
(G, R, B, VOB, and VOC pins).
N3 to N0
: Line specification
Specify the line on the main screen, for which control data is to be set.
The N3 to N0 bits correspond to the RA8 to RA5 bits for VRAM addresses.
5.8 Command 7 (Main Screen Vertical Display Position Control)
5.8
Command 7 (Main Screen Vertical Display Position Control)
[Command format]
MSB
First byte
LSB
1
0
1
1
1
EC
LP
FO
LSB
MSB
Second byte
0
EC
LP
FO
Y5 to Y0
0
Y5
Y4
Y3
Y2
Y1
Y0
: Sync signal output control
: Simple NTSC/PAL control
: Color phase signal output control
: Main screen vertical display position control
[Function]
This command performs sync signal control and main screen vertical display position control.
[Description]
EC
: Sync signal output control
EC = 0 : Set the HSYNC pin as a composite sync signal output and the VSYNC
pin as a fixed High-level output.
EC = 1 : Set the HSYNC pin as a horizontal sync signal output and the VSYNC
pin as a vertical sync signal output.
LP
: Simple NTSC/PAL control
LP = 0 : Normal operation
LP = 1 : Simple NTSC/PAL operation
In NTSC mode operation (NP = 0 in Command 4 and 4FSC clock =
14.31818 MHz), This bit enables PAL display operation
(1V = 312.5H/312H).
In PAL mode operation (NP = 1 in Command 4 and 4FSC clock =
17.734475 MHz), this bit enables NTSC display operation
(1V = 262.5H/263H).
Set CM = 0.
FO
: Color phase signal output control
FO = 0 : Set the FSCO pin as a fixed Low-level output
FO = 1 : Set the FSCO pin to output the signal representing an internal color
burst phase.
Y5 to Y0
: Main screen vertical display position control (in dot units)
This bit sets the vertical display position of the main screen using the number of
H cycles (horizontal cycles) counted from the rise of the input vertical sync signal
EXHSYN.
83
CHAPTER 5 DISPLAY CONTROL COMMANDS
Figure 5.8-1 Main Screen Vertical Display Position
84
5.9 Command 8 (Main Screen Horizontal Display Position Control)
5.9
Command 8 (Main Screen Horizontal Display Position
Control)
[Command format]
MSB
LSB
1
First byte
1
0
0
0
SC
0
FC
LSB
MSB
Second byte
0
SC
FC
X5 to X0
0
X5
X4
X3
X2
X1
X0
: Sync signal input control
: Sync signal input 3 µs filter control
: Main screen horizontal display position control
[Function]
This command performs sync signal input control and main screen horizontal display
position control.
[Description]
SC
: Sync signal input control bit
SC = 0 : Set the EXHSYN pin as a composite sync signal input and disable
EXVSYN pin input.
SC = 1 : Set the EXHSYN pin as a horizontal sync signal input and the EXVSYN
pin as a vertical sync signal input.
FC
: Sync signal input 3 µs filter control
FC = 0 : Enable the 3 µs digital filter function of the EXHSYN pin input.
The Low pulse signal inputs of 3 µs or less are ignored.
FC = 1 : Disable the 3 µs digital filter function of the EXHSYN pin input.
The input signal drives the function directly.
X5 to X0
: Main screen horizontal display position control (in 8-dot units)
This bit sets the horizontal display position of the main screen using the number
of dot clocks counted from the rise of the input horizontal sync signal (EXHSYN).
This bit can be set in 8-dot (1/3 character) units and to a value from 00H to 3FH.
Figure 5.9-1 shows the relationship between the main screen horizontal display
position and the horizontal sync signal.
85
CHAPTER 5 DISPLAY CONTROL COMMANDS
Figure 5.9-1 Main Screen Horizontal Display Position
86
5.10 Command 9 (Kanji Font Display Control)
5.10 Command 9 (Kanji Font Display Control)
[Command format]
MSB
First byte
LSB
1
1
0
0
1
0
0
GRM
LSB
MSB
Second byte
0
GRM
0
0
0
0
0
0
0
: Main screen display mode control
[Function]
This command controls the main screen display mode and kanji font display.
[Description]
GRM
: Main screen display mode control
GRM = 0 : Display the main screen in normal mode.
The main screen can display only normal characters.
The character background color can be set for each character.
GRM = 1 : Display the main screen in extended graphic mode.
The main screen can display both normal and graphic characters
at the same time.
: Kanji font pattern background control
This bit specifies the pattern background mode for a character in the kanji font
area.
RP1 and 0
PR1
PR0
Pattern background mode
0
0
Depends on the settings in P2 and P0 of Command 4.
0
1
Horizontal framing 1
(One-dot framing on the right and left sides of a character dot)
1
0
Horizontal framing 2
(Two-dot framing on the right and left sides of a character dot)
1
1
(Do not use this setting.)
Figure 5.10-1 shows examples of horizontal framing display.
Figure 5.10-1 Examples of Horizontal Framing Display
87
CHAPTER 5 DISPLAY CONTROL COMMANDS
Note:
S16:
In horizontal framing 1, the character dot is shifted one dot to the right.
In horizontal framing 2, the character dot is shifted two dots to the
right.
If horizontal framing and a character in another display mode are
adjacent, the display may not be correct.
Kanji font 16/24-dot font control
S16 = 0: Select a 24-dot font.
A font of 24 by 24 dots is selected for a font in the kanji font area.
For the display format of a 24-dot font, see DW4 (kanji font vertical
display position control).
S16 = 1: Select a 16-dot font.
A font of 16 by 16 dots is selected for a font in the kanji font area.
A 16-dot font is enlarged to double height and shifted 4 dots to the right.
Figure 5.10-2 shows a 16-dot font display format (example of one
character).
4 dots
4 dots
16 dots
32
dots
16-dot
font
24 dots
Figure 5.10-2 16-dot Font Display Format
Note: The DW4 specification is disabled.
SF1:
Kanji font boldface character control
SF1 = 0: Perform normal display.
SF1 = 1: Bold a character in the kanji font area by enlarging the character dots
horizontally by one dot. The character size is not changed.
Figure 5.10-3 shows an example of boldface character display.
Figure 5.10-3 Example of Boldface Character Display
(Fisplaying Twelve Fots in the Horizontal Direction)
Note: This specification replaces a non-character dot with a character dot,
causing continuous display of the character dots.
Do not use this specification for a font created in relation to pattern
backgrounds 1 and 2.
88
5.10 Command 9 (Kanji Font Display Control)
DW4:
Kanji font display position control
DW4 = 0: Perform normal display.
The kanji font is displayed in the upper 24 dots of the 32 dots in the
vertical direction.
DW4 = 1
: Shift a character in the kanji font area four dots down.
Note: This setting is valid only if S16 = 0 (using a 24-dot font).
Do not use this setting if S16 = 1.
Figure 5.10-4 shows a display format (example of one character).
Figure 5.10-4 Kanji Font Display Position Format
RM1 and 0: Kanji font area control
This bit specifies the kanji font area.
RM1
RM0
Kanji font area control
0
0
No kanji font area
(Using only normal characters)
0
1
Using 4M kanji font
(Character codes: 0000H to 0FFFH)
1
0
Using 8M kanji font
(Character codes: 0000H to 1FFFH)
1
1
(Do not use this setting.)
89
CHAPTER 5 DISPLAY CONTROL COMMANDS
5.11 Command 10 (Color Control)
[Command format]
MSB
First byte
LSB
1
1
0
1
0
0
0
RB
LSB
MSB
Second byte
0
BK
CC
BC
UC
UG
UR
UB
RB
BK
CC
BC
: Main screen solid-fill background display control
: Main screen blink display control
: Main screen character color/monochrome control
: Main screen character background color/monochrome control
(Main screen graphic color/monochrome control)
UC
: Screen background color/monochrome control
UG, UR, UB : Screen background color
[Function]
This command performs, for the main screen, solid-fill background display control, blinking
display control, character color and character background color/monochrome control, and
screen background color setting, and screen background color/monochrome control.
[Description]
RB
: Main screen solid-fill background display control
RB = 0 : Normal display
RB = 1 : The main screen is displayed with a solid-fill background.
This command displays a solid-fill background for a main screen
character for which AT = 1 in Command 1-1.
Note: This specification displays a solid-fill background only for a
normal character. A graphic character is displayed the normal
way.
Shaded background display overrides this specification for a
character for which BS = 1 in Command 1-1 (shaded
background display character).
For a kanji ROM display character, the specification in RP1 and
RP0 of Command 9 is used for priority control.
BK
: Main screen blink display control
BK = 0 : Normal display
BK = 1 : Display characters blinking on the main screen.
This bit causes a main screen character for which AT = 1 in Command
1-1 to blink. The blinking cycle is about one second (on for 0.5 s and off
for 0.5 s).
Both normal and graphic characters can blink.
The pattern background and the solid-fill background blink as well as the
character.
Note: This specification is invalid for a character for which BS = 1 in
Command 1-1 (shaded background display character).
CC
90
: Main screen character color/monochrome control
CC = 0 : Display video signal output characters on the main screen in
monochrome.
CC = 1 : Display video signal output characters on the main screen in color.
5.11 Command 10 (Color Control)
BC
:(1) Main screen character background color/monochrome control (in normal mode
with GRM = 0)
BC = 0 : Display the background of video signal output characters on the main
screen in monochrome.
BC = 1 : Display the background of video signal output characters on the main
screen in color.
(2) Main screen character background color/monochrome control (in extended
graphics mode with GRM = 1)
BC = 0 : Display video signal output graphics on the main screen in monochrome.
BC = 1 : Display video signal output graphics on the main screen in color.
UC
: Screen background color/monochrome control
UC = 0 : Display the video signal output screen background in monochrome.
UC = 1 : Display the video signal output screen background in color.
UG, UR, UB : Screen background color
Screen background color signal output
UG
UR
UB
Digital output
Video output
G
R
B
Color (UC=1)
Monochrome (UC=0)
0
0
0
L
L
L
Black
Gray 0 (black)
0
0
1
L
L
H
Blue
Gray 1
0
1
0
L
H
L
Red
Gray 2
0
1
1
L
H
H
Magenta
Gray 3
1
0
0
H
L
L
Green
Gray 4
1
0
1
H
L
H
Cyan
Gray 5
1
1
0
H
H
L
Yellow
Gray 6
1
1
1
H
H
H
White
Gray 7 (white)
91
CHAPTER 5 DISPLAY CONTROL COMMANDS
5.12 Command 11 (Sub-Screen Control)
[Command format]
MSB
LSB
1
First byte
1
0
1
1
SG2
SG1
SG0
LSB
MSB
Second byte
0
0
SCC
SG2 to SG0
SCC
SBC
SGC
SBG, SBR, SBB
SGC
SBC
SBG
SBR
SBB
: Sub-screen configuration control
: Sub-screen character color/monochrome control
: Sub-screen character background color/monochrome control
: Sub-screen graphic color/monochrome control
: Sub-screen pattern background color
[Function]
This command performs sub-screen display control.
[Description]
SG2 to SG0
: Sub-screen configuration control
Specify the display configuration of the sub-screen.
SG2
SG1
SG0
Sub-screen configuration
0
0
0
1 character × 12 lines
0
0
1
2 characters × 12 lines
0
1
0
4 characters × 12 lines
0
1
1
8 characters × 12 lines
1
0
0
16 characters × 12 lines
1
0
1
24 characters × 12 lines
1
1
0
32 characters × 12 lines
1
1
1
Full-screen display mode
(32 characters × 16 lines)
If SG2 to 0 = 000 to 110 (normal screen mode), the first character can be
specified for each line, and then as many characters with continuous character
codes (addresses) as there are on-screen characters are displayed.
If SG2 to 0 = 111 (full screen mode), the full screen of 32 characters by 16 lines
is displayed and controlled by SGA of Command 12.
92
5.12 Command 11 (Sub-Screen Control)
Figure 5.12-1 shows the sub-screen configuration (in normal screen mode).
N characters
1)
1)+1
1)+2
1)+3
1)+N-2
1)+N-1
2)
2)+1
2)+2
2)+3
2)+N-2
2)+N-1
11)
11)+1
11)+2
11)+3
11)+N-2 11)+N-1
12)
12)+1
12)+2
12)+3
12)+N-2 12)+N-1
12
lines
•
1) through 12) are any character codes (addresses).
•
N is the number of characters in the horizontal direction in the sub-screen
configuration according to the settings of SG2 to 0.
Figure 5.12-1 Sub-screen configuration
SCC
: Sub-screen character color/monochrome control
SCC = 0 : Display video signal output characters on the sub-screen in
monochrome.
SCC = 1 : Display video signal output characters on the sub-screen in color.
SBC
: Sub-screen character background color/monochrome control
SBC = 0 : Display the background of video signal output characters on the
sub-screen in monochrome.
SBC = 1 : Display the background of video signal output characters on the
sub-screen in color.
SGC
: Sub-screen graphic character color/monochrome control
SGC = 0 : Display video signal output graphic characters on the sub-screen
in monochrome.
SGC = 1 : Display video signal output graphic characters on the sub-screen
in color.
SBG, SBR, SBB : Sub-screen pattern background color
These bits specify the sub-screen pattern background colors.
Sub-screen pattern background color
SBG SBR SBB
Digital output
Video output
G
R
B
Color
Monochrome
0
0
0
L
L
L
Black
Gray 0 (black)
0
0
1
L
L
H
Blue
Gray 1
0
1
0
L
H
L
Red
Gray 2
0
1
1
L
H
H
Magenta
Gray 3
1
0
0
H
L
L
Green
Gray 4
1
0
1
H
L
H
Cyan
Gray 5
1
1
0
H
H
L
Yellow
Gray 6
1
1
1
H
H
H
White
Gray 7 (white)
93
CHAPTER 5 DISPLAY CONTROL COMMANDS
5.13 Command 12 (Sub-Screen Vertical Position Control)
[Command format]
MSB
First byte
LSB
1
1
1
0
0
SGA
0
LSB
MSB
Second byte
SY7
0
SY6
SY5
SY4
SY3
SY2
SY1
SY0
SGA
: Sub-screen full-screen mode control
SY7 to SY0 : Sub-screen vertical display position
[Function]
This command sets full screen mode control and the vertical display position of the subscreen.
[Description]
SGA
: Sub-screen full-screen mode control
Select a full-screen display mode for the sub-screen.
SGA = 0 : Full-screen mode A
Virtual screen : 32 characters × 16 lines × 32 screens
(Display screen capacity : 32 characters × 16 lines)
SGA = 1 : Full-screen mode B
Virtual screen : 512 characters × 32 lines
(Display screen capacity : 32 characters × 16 lines)
SY7 to SY0 : Sub-screen vertical display position (in 2-dot units)
These bits set the vertical display position of the sub-screen.
The vertical display position counted from the vertical sync pulse is set.
The vertical display position can be set to a value from 0 to 510 rasters in 2-raster
units.
94
5.14 Command 13 (Sub-Screen Horizontal Position Control)
5.14 Command 13 (Sub-Screen Horizontal Position Control)
[Command format]
MSB
First byte
LSB
1
1
1
0
1
0
SX8
SX7
LSB
MSB
Second byte
0
SX6
SX5
SX4
SX3
SX2
SX1
SX0
SX8 to SX0 : Sub-screen horizontal display position
[Function]
This command sets the horizontal display position of the sub-screen.
[Description]
SX8 to SX0 : Sub-screen horizontal display position (in 2-dot units)
These bits set the horizontal display position of the sub-screen.
The horizontal display position counted from the horizontal sync pulse is set.
The horizontal display position can be set to a value from 0 to 1022 dots in 2-dot
units.
95
CHAPTER 5 DISPLAY CONTROL COMMANDS
96
CHAPTER 6
APPLICATIONS
This chapter shows application examples which may serve as a guide when designing
your system using the MB90092.
The circuits shown here are just examples and must, therefore, be carefully evaluated
before actually using them in your application system.
The contents described here are not guaranteed in terms of performance when applied
to products available on the market, and do not assure that they meet any specific
purposes of use.
6.1
Power Supply
6.2
VIN and YIN Circuits
6.3
VOUT and YOUT Circuits
6.4
CIN and COUT Circuit
6.5
VKIN and VKOUT Circuits
6.6
Interfacing with Microcontroller
6.7
Refreshing Display Data
6.8
Handling Unused Pins
95
CHAPTER 6 APPLICATIONS
6.1
Power Supply
The MB90092 has two systems of power supply and grounding pins for digital circuits (Vcc and
Vss) and analog circuits (AVcc1, AVcc2, and AVss). Inside the chip, the power pins Vcc,
AVcc1, and AVcc2 are independent and the grounding pins Vss and AVss are common.
Special considerations different from the digital circuit power supply are required for the analog
circuit power supply, which also supplies power to the analog switch with which character
information is superimposed on video signals.
In general, pay attention to the following points:
• Design so that the ground and the power supply will have a low impedance. We recommend
that the grounding line including the circumferential analog circuits be connected directly to a
wide ground plane.
• Provide separate power sources for the digital circuit (Vcc and Vss) and analog circuit
(AVcc1, AVcc2, and AVss). Do not cause a difference in potential between Vcc-AVcc1AVcc2 and Vss-AVss.
If the same power source is used to supply power to the analog and digital circuits, use
independent cables from the power source. Also, use a choke coil, etc., to prevent an inflow
of digital noise via the power source.
• In each of the digital and analog circuits, install a relatively high-capacity (about a few tens to
100 µF) electrolytic capacitor as a bypass capacitor between the power supply and ground.
■ Not Using any of the Analog Circuit Functions
If none of the analog circuit functions (*1) are to be used, we recommend the AVcc1, AVcc2,
and AVss terminals be connected to the Vss level. This will reduce the current consumption of
the analog circuit.
*1 Analog circuit functions include the functions of the VIN, VOUT, YIN, YOUT, CIN, COUT,
VKIN, and VKOUT pins.
■ Using only the Composite Sync Signal Input and Output Function of the Analog Circuit Functions.
If from among the analog circuit functions only the VIN, VOUT, VKIN, and VKOUT pin functions
and none of the YIN, YOUT, CIN, and COUT pin functions are to be used, we recommend that
AVcc1 be connected to the power supply and AVcc2 be connected to the AVss (Vss) level.
This will prevent unnecessary consumption of analog power.
96
6.2 VIN and YIN Circuits
6.2
VIN and YIN Circuits
The VIN and YIN pins must have as their input a DC-restored (clamped) 2Vp-p video signal.
Figure 6-2-1 shows an example of a video signal DC-restoring (clamping) circuit.
Figure 6.2-1 DC-Restoring (Clsmping) Circuit
In the circuit shown in Figure 6-2-1, the video signal sync tip (tip of sync signal) level is clamped
to the voltage set by R1 and R2 (see Figure 6-2-2).
The time constant of C and R3 must be sufficiently larger than the vertical period of the video
signal (approx. 17 ms).
Figure 6.2-2 Sync Tip Clamp
97
CHAPTER 6 APPLICATIONS
6.3
VOUT and YOUT Circuits
The VOUT and YOUT pins have the MB90092's internal analog switches directly connected to
them, so that the signals from these pins must be received with high impedance. Generally, the
signals are output via an emitter follower buffer circuit shown in Figure 6-3-1.
Figure 6.3-1 Emitter Follower Buffer Circuit
When driving a video output line of 75-ohm impedance, circuit (a) in Figure 6-3-2 may be used
for most practical purposes. When the effects of the analog switches on the video signal are
considered, however, it is desirable to receive the output from the VOUT/YOUT pins with as
much high impedance as possible, so circuit (b) in Figure 6-3-2 is recommended.
Figure 6.3-2 Video Output Circuit Examples
98
6.3 VOUT and YOUT Circuits
Figure 6.3-2 Video Output Circuit Examples (Continued)
99
CHAPTER 6 APPLICATIONS
6.4
CIN and COUT Circuit
Figure 6-4-1 shows a circuit example for the CIN pin; Figure 6- 4-2 shows a circuit example for
the COUT pin.
Figure 6.4-1 Circuit Example for CIN Pin
Figure 6.4-2 Circuit Example for COUT Pin
100
6.5 VKIN and VKOUT Circuits
6.5
VKIN and VKOUT Circuits
In superimposed display mode for composite video signals, you can have the MB90092 adjust
the intensity level of input video signals to output these signals instead of outputting the pattern
background and solid-fill background at the internally generated intensity level. This display
format is called halftone background display.
Figure 6.5-1 shows a circuit example for the VKIN and VKOUT pins used to perform halftone
background display.
AVcc1
VKIN pin
VKOUT pin
Variable resistor
: about 5 KΩ
AVss
Figure 6.5-1 Circuit Example for VKIN and VKOUT Pins
101
CHAPTER 6 APPLICATIONS
6.6
Interfacing with Microcontroller
The MB90092 operation is controlled by a microcontroller. The MB90092 is interfaced with the
microcontroller via 8-bit serial transfer. The three signal lines shown in Figure 6-6-1 are used
for this interface.
Figure 6.6-1 Interface with Microcontroller
Although any type of microcontroller may be used, those with an 8-bit serial interface (8-bit
serial port) can be directly connected to the MB90092 so commands and data can be
transferred by hardware at high speed. (Microcontrollers with 4-bit serial ports may also be
used, in which case data is transferred in two operations.)
Note: Some microcontrollers cannot be directly connected to the MB90092 serial ports.
Fujitsu's 4/8-bit microcontrollers may be used without any problem.
102
6.7 Refreshing Display Data
6.7
Refreshing Display Data
The register data set via serial transfer and the VRAM data are retained as long as the
MB90092 remains powered on. However, it is recommended that the display data be
periodically refreshed to prevent the data from being disturbed by external noise during serial
transfer or erroneous display due to some other reason.
For refreshing display data, write the data (all data including the blank character code) to VRAM
and settings by all commands repeatedly at a period of several ten milliseconds to several
seconds.
When writing data to VRAM, it is effective to execute write address preset by command 0 in
units of rows.
103
CHAPTER 6 APPLICATIONS
6.8
Handling Unused Pins
Handle unused MB90092 pins as shown in Table 6.8-1.
Table 6.8-1 Handling of Unused Pins
104
Pin name
Pin
number
Input or output
Handling of a pin that is not used
TC
1
Input
Connect the pin to Vcc.
VOC
2
Output
Leave the pin open.
VOB
3
Output
Leave the pin open.
Vss
4
Power supply
-
B
5
Output
Leave the pin open.
R
6
Output
Leave the pin open.
G
7
Output
Leave the pin open.
CS
8
Input
-
SCLK
9
Input
-
SIN
10
Input
-
Vcc
11
Power supply
-
EXHSYN
12
Input
Connect the pin to Vcc or leave it open.
EXVSYN
13
Input
Connect the pin to Vcc or leave it open.
HSYNC
14
Output
Leave the pin open.
VSYNC
15
Output
Leave the pin open.
VBLNK
16
Output
Leave the pin open.
EXS
17
Input
-
XS
18
Output
-
[N.C]
19
FSCO
20
Output
Leave the pin open.
CBCK
21
Input
Connect the pin to Vcc or Vss or leave it open.
PDS
22
Output
Leave the pin open.
Vss
23
Power supply
-
AVss
24
Power supply
-
[N.C]
25
Leave the pin open.
[N.C]
26
Leave the pin open.
[N.C]
27
Leave the pin open.
[N.C]
28
Leave the pin open.
Leave the pin open.
6.8 Handling Unused Pins
Table 6.8-1 Handling of Unused Pins (Continued)
Pin name
Pin
number
Input or output
Handling of a pin that is not used
AVss
29
Power supply
-
AVss
30
Power supply
-
YOUT
31
Output
Leave the pin open.
YIN
32
Input
Connect the pin to AVss (Vss).
AVcc2
33
Power supply
Connect the pin to AVss (Vss).
COUT
34
Output
Leave the pin open.
CIN
35
Input
Connect the pin to AVss (Vss).
AVss
36
Power supply
-
VOUT
37
Output
Leave the pin open.
VIN
38
Input
Connect the pin to AVss (Vss).
VKOUT
39
Output
Leave the pin open.
VKIN
40
Input
Connect the pin to AVss (Vss).
AVcc1
41
Power supply
Connect the pin to AVss (Vss).
Vcc
42
Power supply
-
READ
43
Output
-
DA0
44
Input
-
DA1
45
Input
-
DA2
46
Input
-
DA3
47
Input
-
DA4
48
Inputt
-
DA5
49
Input
-
DA6
50
Input
-
DA7
51
Input
-
Vss
52
Power supply
-
ADR0
53
Output
-
ADR1
54
Output
-
ADR2
55
Output
-
ADR3
56
Output
-
ADR4
57
Output
-
ADR5
58
Output
-
105
CHAPTER 6 APPLICATIONS
Table 6.8-1 Handling of Unused Pins (Continued)
106
Pin name
Pin
number
Input or output
Handling of a pin that is not used
ADR6
59
Output
-
ADR7
60
Output
-
ADR8
61
Output
-
Vcc
62
Power supply
-
ADR9
63
Output
-
ADR10
64
Output
-
Vss
65
Power supply
-
ADR11
66
Output
-
ADR12
67
Output
-
ADR13
68
Output
-
ADR14
69
Output
Leave the pin open.
ADR15
70
Output
Leave the pin open.
ADR16
71
Output
Leave the pin open.
ADR17
72
Output
Leave the pin open.
ADR18
73
Output
Leave the pin open.
ADR19
74
Output
Leave the pin open.
ADR20
75
Output
Leave the pin open.
Vcc
76
Power supply
TSC
77
Input
Connect the pin to Vcc.
TEST
78
Input
Connect the pin to Vcc.
EXD
79
Input
-
XD
80
Output
-
6.8 Handling Unused Pins
FPT-80P-M06
EIAJ code: *QFP080-P-1420-4
80-pin plastic QFP
Lead pitch
0.80 mm
Package width and length
14 x 20 mm
Lead form
Gull-wing
Packaging
Plastic mold
Pin flat portion length
0.80 mm
(FPT-80P-M06)
80-pin Plastic QFP
(FPT-80P-M06)
23.90±0.40(.941±.016)
64
20.00±0.20(.787±.008)
3.35(.132)MAX
0.05(.002)MIN
(STAND OFF)
41
65
40
14.00±0.20
(.551±.008)
17.90±0.40
(.705±.016)
12.00(.472)
REF
16.30±0.40
(.642±.016)
INDEX
80
25
"A"
LEAD No.
1
24
0.80(.0315)TYP
0.35±0.10
(.014±.004)
0.16(.006)
0.15±0.05(.006±.002)
M
Details of "A" part
Details of "B" part
0.25(.010)
"B"
0.10(.004)
18.40(.724)REF
22.30±0.40(.878±.016)
C
0.30(.012)
0.18(.007)MAX
0.58(.023)MAX
0 10°
0.80±0.20
(.031±.008)
1994 FUJITSU LIMITED F80010S-3C-2
107
CHAPTER 6 APPLICATIONS
■ Display color configuration chart
Main screen (GRM = 0: normal mode)
Color display
Character color
(C)
Monochrome display
8 colors
8 gradient colors
(for each character) x 4
phases (for each line)
(for each character)
(CG, CR, CB)
Color/monochrome
specification
Specification for
entire screen
(CC)
(CG, CR, CB) x (OF1, OF0)
Pattern
background color
(B)
Solid-fill
background color
8 colors
8 gradient colors
(for each character)
(for each character)
(BG, BR, BB)
(BG, BR, BB)
Specification for
entire screen
(BC)
Main screen (GRM = 1: extended graphic mode)
Color display
Character color
(C)
Monochrome display
8 colors
8 gradient colors
(for each character) x 4
phases (for each line)
(for each character)
(CG, CR, CB)
Color/monochrome
specification
Specification for
entire screen
(CC)
(CG, CR, CB) x (OF1, OF0)
Line pattern
background color
(K)
Line solid-fill
background colorr
Shaded pattern
background color
Graphic color
(External data)
108
(P)
Specification for
each line
8 colors
8 gradient colors
(for each line)
(for each line)
(KG, KR, KB)
(KG, KR, KB)
8 colors (for each line)
8 gradient colors (for
each line)
Specification for
each line
(PG, PR, PB)
(PC)
8 colors (for each dot) x 4
phases (for each character)
8 gradient colors (for
each dot)
Specification for
entire screen
(External data: 3 bits) x
(CR, CB)
(External data: 3 bits)
(BC)
(PG, PR, PB)
(KC)
6.8 Handling Unused Pins
Sub-screen (SG2 to 0 = value other than 111: normal screen mode)
Color display
Character color
(SC)
(SB)
Specification for
entire screen
SCG, SCR, SCB)
(SCC)
8 gradient colors (for
entire screen)
Specification for
entire screen
(SBG, SBR, SBB)
(SBC)
8 colors (for each dot) x 4
phases (for each line)
8 gradient colors (for
each dot)
Specification for
entire screen
(External data: 3 bits) x
(SCR, SCB)
(External data: 3 bits)
(SGC)
8 colors (for entire screen)
(SBG, SBR, SBB)
Graphic color
(External data)
Color/monochrome
specification
8 gradient colors (for
each line)
8 colors (for each line)
(SCG, SCR, SCB)
Pattern
background color
Monochrome display
Sub-screen (SG2 to 0 = 111: full screen mode)
Color display
Character color
(C)
(SB)
Specification for
entire screen
(SCG, SCR, SCB first
line)
(SCC)
8 gradient colors (for
entire screen)
Specification for
entire screen
(SBG, SBR, SBB)
(SBC)
8 colors (for each dot) x 4
phases (for entire screen)
8 gradient colors (for
each dot)
Specification for
entire screen
(External data: 3 bits) x
(SCR, SCB first line)
(External data: 3 bits)
(SGC)
8 colors (for entire screen)
(SBG, SBR, SBB)
Graphic color
(External data)
Color/monochrome
specification
8 gradient colors (for
entire screen)
8 colors (for entire screen)
(SCG, SCR, SCB first line)
Pattern
background color
Monochrome display
Screen background
Color display
Screen
background color
(U)
8 colors (for entire screen)
(UG, UR, UB)
Monochrome display
Color/monochrome
specification
8 gradient colors (for
entire screen)
Specification for
entire screen
(UG, UR, UB)
(UC)
109
CHAPTER 6 APPLICATIONS
■ Main Screen Nnormal Character Display Format Chart
Screen
No.
Command 9
(Setting for
entire screen)
GRM
Command 10
(Setting for
entire screen)
RB
(1)
BK
Command 1
(Setting for
each character)
BS
0
0
(2)
1
0
(Normal
mode)
-
(3)
0
1
(4)
1
0
0
(5)
1
0
0
(6)
1
0
(7)
0
1
1
0
(8)
Pattern
background
color
Solid-fill
background
color
0
Pattern background display
B
-
1
Pattern background display
B
-
0
Pattern background display
B
-
1
Pattern background and
blinking display
B
-
0
Pattern background display
B
-
1
Solid-fill background display
-
B
0
Pattern background display
B
-
1
Solid-fill background and
blinking display
-
B
0
Pattern background display
K
-
1
Pattern background display
K
-
0
Shaded pattern background
display
P
K
1
Reverse shaded pattern
background display
P
K
0
Pattern background display
K
-
1
Pattern background and
blinking display
K
-
0
Shaded pattern background
display
P
K
1
Reverse shaded pattern
background display
P
K
0
Pattern background display
K
-
1
Solid-fill background display
-
K
0
Shaded solid-fill background
display
-
K
1
Reverse shaded solid-fill
background display
-
K
0
Pattern background display
K
-
1
Solid-fill background and
blinking display
-
K
0
Shaded solid-fill background
display
-
K
1
Reverse shaded solid-fill
background display
-
K
1
1
110
AT
1
1
(Extended
graphic
mode)
Display format
6.8 Handling Unused Pins
• The pattern background depends on the specifications of the P0 and P2 bits of Command 4
and the RP0 and RP1 bits of Command 9.
• In blinking display, a character as well as its pattern background and solid-fill background
blink.
• In pattern background and solid-fill background columns, B, K, and P mean the following:
B: Character background color (BG, BR, and BB)
K: Line background color (KG, KR, and KB)
P: Shaded pattern background (PG, PR, and PB)
• A display screen for each screen number can be configured.
111
CHAPTER 6 APPLICATIONS
112
AM32-10827-1E
FUJITSU SEMICONDUCTOR • ASSP MANUAL
ON-SCREEN DISPLAY CONTROLLER
ASSP FOR SCREEN DISPLAY CONTROLLER
MB90092
USER’S MANUAL
June 1998 the first edition
Published
FUJITSU LIMITED
Edited
Technical Communication Dept.
Electronic Devices
FUJITSU LIMITED
For further information please contact:
Japan
FUJITSU LIMITED
Corporate Global Business Support Division
Electronic Devices
KAWASAKI PLANT, 4-1-1, Kamikodanaka
Nakahara-ku, Kawasaki-shi
Kanagawa 211-88, Japan
Tel:(044)754-3763
Fax:(044)754-3329
http://www.fujitsu.co.jp/
North and South America
FUJITSU MICROELECTRONICS, INC.
Semiconductor Division
3545 North First Street
San Jose, CA 95134-1804, U.S.A
Tel:(408)922-9000
Fax:(408)922-9179
Customer Response Center
Mon.-Fri.:7am-5pm(PST)
Tel: (800)866-8608
Fax: (408)922-9179
http://www.fujitsumicro.com/
Europe
FUJITSU MIKROELEKTRONIK GmbH
Am Siebenstein 6-10
D-63303 Dreieich-Buchschlag
Germany
Tel:(06103)690-0
Fax:(06103)690-122
http://www.fujitsu-ede.com/
Asia Pacific
FUJITSU MICROELECTONICS ASIA PTE LTD
#05-08,151 Lorong Chuan
New Tech Park
Singapore 556741
Tel:(65)281 0770
Fax:(65)281 0220
http://www.fmap.com.sg/