1
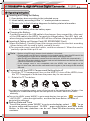
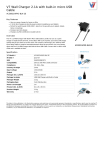
HDDV
Digital Camcorde r
User manual
Please carefully read the User manual before using this product.
Please correctly use this product based on full understanding of
The User manual.
No further notice will be informed if technical specifications or
appearance of this product changed.
E
Table of Contents
English
Brief Introduction
Introduction to High-definition Digital Camcorder ...................2
Accessories Contained
............................................... 2
Features
............................................... 2
Operating Insturction
............................................... 3
Inserting and Taking out Battery . ...............................................3
Inserting and Taking out storage card..........................................3
Turning on Camera....... .................................................3
Setting Date and Time .. . .................................................3
Video Mode . .............. .................................................4
Camera Mode ........... . .................................................4
Review Mode ............. .................................................5
Setting Mode ............. .................................................5
Key Functions
.................................................6
Option Functions
.................................................8
Specifications
.................................................9
Storing Information and Reviewing Videos
..........................10
Troubleshooting
Security Cautions. .... ...............................................
1
11
Introduction to High-definition Digital Camcorder
English
Accessories Contained
HDDV
HDDV Pouch
User manual
Neck Strap
Lithium-ion
Rechargeable battery
Charger
HDMI cable
Notice: Please kindly check the accessories according to the above
diagram so as to avoid any unnecessary loss.
Optional Accessories
USB Cable
TV Cable
Driver and Editing Software
Features
Function key
Focus Switch
[up Button(Flash Speed Dial)\Down Button
( Speed and switch Video/Camera )\Left
Button(Zoom out )\Right(Zoom in)\OK
Button]
Lens
Speaker
Shutter Button
LED Light
Microphone
Mode Button
Self-time LED
indicator
Menu Button
Playback key
HDMI Port
Power key
TV Port
Power LED
indicator
TFT Compages
USB Port
Strap mount
SD Card Slot
(Open the Battery cover)
Tripod fixing interface
2
Battery Door
Introduction to High-definition Digital Camcorder
English
Operating Instruction
Inserting and Taking out Battery
1) Open battery door accordin g to the in dic ated arrow.
2)Insert battery accordin g to the “+ -” marks prin ted on camera;
3)Ple ase refer to the foll owin g dia grams for battery status in formatio n.
Full percentage
Low percentage
Critical percentage
4) To take out battery, sli de the battery open.
Chargin g the Battery
Connect one end of the USB cable to the charger then connect the other end
of the USB cable to the HDDV .for ready to charge battery The LED light red
when charging is started and the LED will turn off when charging is completed.
Inserting & Taking out Storage Card (SD SPEED/MMC Card)
1)Open the Battery .Carefull y in sert the storage card in to the card slo t accordin g
shown belo w until the card is tig htly rooted in the slo t.
2)To remove th e card, push th e card in , and th en rele ase it. When th e card is
partia lly reje cte d th en pull it out.
Note:
Before using SD card, please check whether it is locked;
Please make sure SD card is oriented in the right direction. Inserting SD card in the
wrong direction might cause damage to the HDDV and the SD card;
After the SD card has been inserted into the card slot, HDDV will automatically
Take this SD card as default storage card and all the data stored before the insert
cannot be read until it is taken out.
If the storage card is not compatible with the HDDV, the card might not be
read. In this case, take out the card and insert it again or just change it with another
SD card.
Turning on/off the HDDV Camera and Setting Auto off
1) . Open the TFT Compages will turn on the HDDV,To turn off the HDDV,close
the TFT Compages or hold down the power key for one second.
2).Rotate the TFT as below:
145
90
180
270
3)In order to save battery power, auto off can be set in the “setting menu” display. If no
operation is conducted during the set time period, the HDDV will turn off auto
matically.
Turn on the HDDV, press “MODE” to go to mode display, then go into “
”and select
“ AUTO OFF ” , press the right button, and then the down button, the Auto off
period will be changed.
Setting Date and Time
Turn on the power, press “MODE” to go to mode display, select “
”to go
to menu setup and then select “ CLOCK ” , press right button and then down
Button, in this way ,date/time can be set . Press OK after choosing correct
numbers.
3
Introduction to High-definition Digital Camcorder
English
Operating Instruction
Video Mode
1.HDDV automatically goes to video mode after it is turned on. At this Time,
“
HD” appears the upper left corner of the screen.
HD
XX:XX:XX
2.Press “REC” to start recording. To stop recording, press and release “REC” again.
During recording, timer and “ HD ”shown on the screen turn to blinking red
Circle“
” to time the recording. As soon as the recording stops, the blinking
red circle“
.
” turns back to the“ HD”
3.Selection of the LED Light
Pressing Speed Flash Switch button (Up button) at the HDDV can start
or stop using Auto Flash “
” (which can automatically compensate light
according to lighting condition) or Fill“ ” (every time you take a picture,
flash is used regardless of lighting conditions).
Remark:LED light function will automatic turn off when the battery at critical
percentage.
Camera Mode
1.Turnin g on HDDV
Press “ POWER ” to turn on the HDDV and it goes into video mode automatically.
Press “MODE” to go to mode display.and then go to“ ”the left corner of
The screen which shows“
8M”and the bottom shows the maximum photo
capacity
5m
XXX
2.Alignment the HD DV to the subject which to be taken, using left and right
buttons to adjust focus.
3.Press “REC” to shoot a picture
While pressing “REC”, camera makes a sound, and the sound signifies that
the shooting is finished.
Infinity and Macro function
Under Infinity mode to shoot subfects 1.5m or more.
Under Macro mode to shoot close-ups of small items, the effective is 0.5m.
Notice: At video or camera mode, Flash(LED) light,speedily
Switching from video to camera botton are still can
work at the same time.
4
Introduction to High-definition Digital Camcorder
English
Operating Instruction
Review Mode
Revie w
1)Turn on the HDDV to go to Video mode. Press “ MODE ” and use direction buttons
to highlight.
2)Press “OK” to enter into single-picture review mode. Press left or right button
to review pictures or videos taken.
3)Press down button to go to index review mode. user can press up, Down, left
and right keys to review taken picture or video.
If the displayed picture is tagged with“ ”, then it is a video. Pressing
OK will play the video. Pressing OK again it will come to pause. While
playing video , you can use left or right button to forward or backward
Playingto exist playing mode. You have to press OK to pause the playing
video first, and then press left button or right button to go to the next file.
Truncatio n chart functio n
When you see the“current pic ture”whil e revie vin g vid eo,then press“ok”
to pause the vid eo and press“REC”, until the sounds comin g out,This
“current pic ture”will recorded to be a photo in your storage,Then press
“OK ”for contin ue revie w vid eo.
Dele te
While reviewing (reviewing pictures/video), press “ MENU ”, delete menu
will appear on the screen, press “OK” to go to deleting display. Press the
right button and then up or down button to choose deleting “ YES ” the
press“OK”.
DELETE
no
SLIDE SHOW
YES
OK
:E NT ER
:SE T
Setting Mode
1)Regardless of taking pictures, recording or reviewing, pressing “MENU”
will enable user to go to menu setting display.
2)At any menu mode, pressing right button will enable user to go to menu
setting options and then use Up or Down buttons to choose desired
setting.
For detail ed settin g in formatio n ple ase refer to Settin g Table (Page 8)
5
Introduction to High-definition Digital Camcorder
English
Key Functions
Video/Camera Mode
Power Button
Turning on or off HDDV
Shutter Button
Take Videos/Pause take videos/Take picture
Direction Button (Up)
Switching LED light: Auto/Fill/Off
Direction Button (Down)
Speedy switch between video mode and camera mode
Direction Button (Left)
1/2 /3/4 Digital zoom
Direction Button (Right)
4/3 /2/1 Digital zoom
Menu Button
Menu Selection
Mode Button
Mode Selection
Playback Button
Speedy to play back the last taken file
Review Mode
Reviewing pictures/videos
Power Button
Turning off video camera
Shutter Button
Going to video mode
Direction Button (Down)
Index pictures
Direction Button (Left)
Last picture/video
Direction Button (Right)
Next picture/video
OK Button
Playing video
Menu Button
Menu Selection
Mode Button
Mode Selection
Playback Button
Speedy to play back the last taken file
Preview (Index pictures)
Power Button
Turning off video camera
Direction Button (Up)
Last line/Last page
Direction Button (Down)
Next line/Next page
Direction Button (Left)
Last picture/video
Direction Button (Right)
Next picture/video
OK Button
Going into single file play mode
Menu Button
Menu selection
Mode Button
Mode selection
Playback Button
Speedy to play back the last taken file
6
Introduction to High-definition Digital Camera
English
Functions of Keys
Reviewing (Video/Audio)
Power Button
Turning off video camera
Direction Button (Up)
Volume+(0-8)
Direction Button (Down)
Volume - (8-0)
Direction Button (Left)
Backward 2,4,8times
Direction Button (Right)
Forward 2,4,8times
OK Button
Play/Pause(Regardless of backward or forward)
Menu Button
Going to review menu
Mode Button
Stop playing and go into mode selection
Playback Button
Speedy to play back the last taken file
Reviewing (Pictures)
Power Button
Turning off video camera
Direction Button (Down)
Zoom out (index pictures)
Direction Button (Left)
Last picture
Direction Button (Right)
Next picture
OK Button
Going into Single picture play mode
Menu Button
Going to review menu
Mode Button
Stop playing and go into mode selection
Playback Button
Speedy to play back the last taken file
While using this product, you will find a lot of symbols and icons. In order to
you can better use this product, please refer to the following table.
Taking videos
Auto Flash
Cloudy
Taking pictures
Fill Flash
Tungsten
Play
Flash off
System Setting
Picture size is 5M
HD
Storage card
Picture size is 8M
WVGA
Battery percentage
Sunny
7
Fluorescent
High Definition
WVGA
Introduction to High-definition Digital Camcorder
English
Option Functions
Mode & Menu Settin g
Mode
Menu
Size
White B
Taking
Videos
Taking
pictures
Review
System
setting
Setting
HD/WVGA
Auto/Sunny/Cloudy/Tungsten
/Fluorescent
Effect
Off/Art/sepir
Duration
No/3min/5min/10min
Size
8M/5M
Quality
Fine/good/normrl
White B
Auto/Sunny/Cloudy/ TUNGSTEN/
Fluorescent
Contrast
Standard/Hard/Soft
Sharpness
Standard/Hard/Soft
Effect
Off/Art/Sepir/Negrtive/
Monochrome/Vivid
Selftimer
No/Yes
Burst
No/3pics/5pics/10pics
Delete
No/Yes
Slide Show
No/1Second/3Second/5Second
TV Ou t
PAL/NTSC
Language
English/ Chinese
Clock
Year Month Date Hour Minute
(0000:00:00 00:00)
Format
Cancel/Yes
Sys.reset
No/Yes
Volume
0/1/2/3.......8
Auto off
Off/1minute/3minute/5minute
Light freq
50HZ/Auto/60HZ
Version
V.0000 00 0000
8
Note
Introduction to High-definition Digital Camcorder English
Specifications
Sensor
5M CMOS sensor
Resolution: 2592x1944
Lens
4 Elements fix focus lens
Zoom
4X Digital Zoom
L Display
2.5” TFT LCD
Video Output
HDMI:CTS1.3 Compliant,Support 720P/1080P output mode,
Composite:NTSC/PAL
Picture
Picture Format: JPEG
3264 X 2448;2592 X 1944
Video
Format: MPEG-4
HD 1280 X 720P ( 30 Fps 6 Mbps ) ( A)
1920 X 1080P ( 30 Fps 12 Mbps )( B)
WGVA:848 X 480P (60 Fps 5 Mbps )
Audio
Mic and Speaker(Mono)Equipped
Storage
Internal: 32M
External : SD/MMC card(up to 32G SD card)
(SD card storage should be no more than 32G)
Shutter Button Electronic shutter
Shutter Speed
1 / 2 -1/1000
White Balance
Auto/Sunny/Cloudy/Tungsten/Fluorescent
Flash Light
Electronic Auto Flash Light (LED),Optional flash on for illumination
Port USB 2.0/HDMI/TV
second
Battery
3.7V 900mAh lithium-ion rechargeable
Size/Weight
Length97.4 Width54.9
Height22.7
111g
Working Humility/
Temperature
Video Storage Capacity (for reference)
Storage
Card(G)
A
1280 X 720P(HD)
B
1920 X1080P(HD)
848 X 480P(WVGA)
2592 X 1944(5M)
3264 X 2448(8M)
8G
160 min
80 min
200 min
4720 pcs
3193 pcs
4G
80 min
40 min
100 min
2360 pcs
1565 pcs
2G
40 min
20 min
50 min
1180 pcs
753 pcs
1G
20 min
10 min
25 min
590 pcs
390 pcs
File size and storage capacity might differ from one camera to camera due to the Differences
existing in shooting subjects, brand of storage card and other settings.
A, B refers to two different type of video camera.
9
Introduction to High-definition Digital Camcorder
English
Transferring Data to Computer
USB Storage Mode
Open “My computer” located on desktopfrom your computer, two removable
disks can be found (one is internal storage , the other is external storage card);
find the stored videos and pictures under “Removable hard disk/ DCIM/100MEDIA”.
If SD card has not been inserted into video camera yet, removable disk is internal
Came ra storage ; if SD card ha s be en inserted into video came ra, the remo vable di sk
is SD card. Under storage card mode, data can be saved or transferred through
Wi ndows system an d files in vi deo ca me ra ca n be cut, copied an d de leted through
Windows system.
Connecting HDDV to TV
1)Connecting HDDV to HDTV with an HDMI cable to take and review
pictures and videos.
2)Connecting HDDV to television with the TV cable to take and review
pictures and videos.
Tip: no drive is needed to be installed. U disc can only be used when the
video camera is on.
10
Troubleshooting & Security Cautions
English
Troubleshooting
Cannot take pictures, videos and record voice?
Change resolution, image quality, frame frequency; change for a storage
card with enough space; check whether the storage card is locked or not;
delete part of files stored in the card.
Pictures or videos cannot be deleted?
Pictures and videos cannot be deleted if they are under protection mode.
Images cannot be transferred to HDTV screen?
Please ma ke sure that HDMI cable is completely plugged into TV’S HD MI
port. Please use the HDMI cable comes along with the HDDV.
Pictures and videos taken are not clear?
Please check whether lens is covered with any dirty. If so, clean the lens
before using it. Or check whether the focus zone is correct.
The flash LED can not light on?
Under video or camera mode,if the battery is low,the flash LED can not
work.
Security Caution
Do not try to modify or disassemble this HDDV video camera in any way in
Case of any damage or electronic shock.
Remove battery when the product is stored for an extended period of time
So as to avoid electricity power loss or damage to camera.
Please do not place or store this product at any place of high temperature
to avoid damage to HDDV camcorder.
For safety reason, please keep the HDDV and the accessories out of the
reach of children and animals.
In the unlikely event that any liquid or unknow material unexpectedly falls
into HDDV , please stop using the HDDV, turn it off, cut power supply and
ask the local sales agent for help.
Please do not open flash light if the distance between camera and person
or animal to be taken is less than 1 m. Strong light of flash might damage
the person or animal's eyesight if it is too close to them.
After operating for a period of time, temperature of HDDV video camera will
go up and this is normal.
During operation, please do not touch the lens.
Tips for operating
HDDV video camera is similar to computer. If HDDV video camera is not
working, please operate as follows:
1. Take out battery 2. Re-insert the battery. 3. Restart the video camera.
11