1
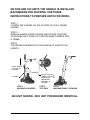
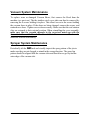
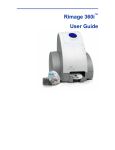
360i Rotary Extractor Owner’s Manual 360i/09/19/2014 1 IMPORTANT! BEFORE USING YOU`R 360i, PLEASE Read Your Owner’s Manual Watch Your Training Video Call For Important Instructions TOLL FREE – U.S. and CANADA 1-888-768-6822 OUTSIDE NORTH AMERICA 1-425-883-6746 Hours: 8:00 am to 5:00 pm Pacific Time CALL BEFORE USING FOR THE FIRST TIME Before using the 360i for the first time, read the owners manual, watch the training video, write down any questions that you may have and then call Rotovac toll-free for valuable tips and pointers. 1-888-768-6822. (8:00 am to 5:00 pm Monday - Friday PST) Training video is available online at: www.rotovac.com 2 * W AR NI NG * * Al l ow i ng your equi pme nt to free ze w il l voi d yo ur w a rrant y * Thoroughly remove as much moisture from all lines and tanks in the equipment system before storing in cold climates. Equipment should never be stored where it can freeze. Excess water can freeze during storage and crack the internal components of powered equipment and accessories, damaging them and voiding the warranty. An unheated vehicle will not protect your equipment. ¡ AD V E R TE NCI A ! * P e rmi ti r que el equi po s e c onge l e a nul ará la gara ntí a . * Retire totalmente tanta humedad del interior de todas las líneas y de los tanques en el sistema del equipo antes de almacenar en climas fríos. El equipo nunca debe almacenarse dónde se puede congelar. Cualquier agua restante puede congelar durante el almacenamiento y puede agrietar los componentes internos del equipo y de los accesorios, dañándolos y anulando la garantía. Un vehículo sin la calefacción no protegerá su equipamiento. * AV E RTI S S E ME NT * * P e rme ttre à votre équi pe me nt de c onge l e r a nnule ra votre ga ra nti e . * Enlevez complètement autant humidité de l'intérieur de tous les lignes et réservoirs dans le système de l'équipement avant d'être stocké dans des climats froids. L'équipement ne devrait jamais d’être stocké où il peut congeler. Toute eau restante peut congeler pendant le stockage et peut éclater les composants internes de l'équipement actionné et des accessoires, endommageant eux et annulant la garantie. Un véhicule sans le chauffage ne protégera pas son équipement. 3 ON DHX AND 360 UNITS THE HANDLE IS INSTALLED BACKWARDS FOR SHIPPING. USE THESE INSTRUCTIONS TO PREPARE UNITS FOR WORK. STEP 1 LOOSEN THE 2 KNOBS ON THE OUTSIDE OF THE H FRAME HANDLE. STEP 2 REMOVE HANDLE FROM H FRAME AND ROTATE COUNTERCLOCKWISE HALF TURN (180°) AND RE-INSERT HANDLE INTO H FRAME. STEP3 TIGHTEN BOTH KNOBS WITH THE HANDLE AT ALMOST FULL LENGTH. RAISE HANDLE UP & OUT OF H FRAME LOOSEN H FRAME STEP 1 MACHINE AS SHIPPED ROTATE CCW WITH HANDLE OUT FROM POSITION AS SHOWN AND REINSERT IN H FRAME. STEP 2 TOP VIEW STEP 3 MACHINE READY FOR WORK 360 UNIT SHOWN - DHX UNIT PROCEDURE IDENTICAL. 4 Congratulations on owning the new Rotovac 360i Extraction System. The patented rotary extraction cleaning head of the 360i produces unparalleled cleaning results for carpet and hard surface flooring while greatly reducing operator fatigue. Operator’s responsibility As with all equipment, proper operation and maintenance plays a vital role in the performance of the 360i. It is therefore extremely important that this operations manual is read and understood completely before operating the 360i. CALL BEFORE USING FOR THE FIRST TIME ! If you are using the 360i for the first time read the owners manual, watch the training DVD (also available on line at Rotovac,com) and then call Rotovac toll-free before using for valuable tips and pointers at 1-888-768-6822. (Office hours: 8:00 a.m. to 5:00 p.m. Monday through Friday P.S.T.) Online Service Instructions Service instructions are available online @ www.ROTOVAC.com, under Rotovac Manuals in the left hand column. OVERVIEW 5 The Rotovac 360i maneuvers in the same manner as a rotary floor buffer with a “heal and toe” left to right cleaning motion. If you have never operated a rotary floor type machine, this will take a little practice to learn how to control properly. Once mastered, operating the 360i is a nearly effortless self propelled side to side motion. It may take a few jobs to learn how to operate the 360i efficiently. Be patient and try it on some really dirty carpets and you will soon discover that the Rotovac 360i cleans better, leaves it drier and is much more impressive to your customers than a traditional wand cleaning. When presented and used properly, the 360i will impress your customers and lead to a major increase of referral and repeat business. CONTROL: When operating the 360i for the first time, you can run it dry (not hooked up to an extractor) in an open carpeted area to get used to the handling characteristics. Extend the telescoping handle out to near its fully extended length. Adjust the handle angle to a low enough position so that your arms are extending almost straight down during operation. Before turning on, make sure the cleaning head is flat and level on the carpet and the speed control dial is turned all the way up to 10. Learn how to “hover” the 360i in one spot without fighting it. Once you have found the center of balance and proper technique, you will find the 360i is very easy to control. The 360i maneuvers left and right like a rotary floor scrubber (heel and toe). Lifting up slightly on the handle causes the 360i to move to the right. Letting down on the handle causes the 360i to move to the left. Slightly twisting the handles clockwise moves forward, counterclockwise rearward. Combined handle movements allow motion in any direction. The on/off trigger is located under the left handle grip. The head speed control dial is located at the front of the control box. This allows adjustment of the head speed rpm. The solution valve trigger is located under the right handle grip. A red lever solution flow control valve allows for the adjustment of flow rate. CLEANING: With the solution trigger activated, make cleaning passes in a slow left and right motion allowing the 360i to do the work. Overlap cleaning passes approximately 50% to assure thorough cleaning. The more soiled the carpet, the slower you should make the cleaning passes. Clean an area of approximately 4’ X 4’ with solution on and then let off the solution valve trigger and go back over the carpet with a vacuum only "dry pass" to provide maximum extraction for faster drying. For normal carpet cleaning spray pressure we recommend operating between 50 and 300 PSI. 6 SPEED CONTROL DIAL SLOW DOWN HEAD SPEED WHEN CLEANING NEAR OBJECTS THAT HEADS COULD HIT. The head rotation speed is adjustable from 0 to 250 RPM. This allows the operator to adjust the head speed for different types of carpets. When cleaning berber or commercial glue down, a slower speed will sometimes give better cleaning and/or drying results. Experiment for best performance. Examples of when you may want to use slower speed: 1) Not handling properly, chattering or jumping on hard glue down carpet 2) Cleaning close to an obstacle you don’t want heads to impact such as, where the tile floor meets the carpet, floor heat registers, metal thresholds, furniture legs or anything else you don’t want the rotary heads to impact. 3) Dry pass on carpet that is difficult to dry such as Berber, 4) Hard surface cleaning. HARD SURFACE BRUSH HEAD 7 OPERATION: Recommended cleaning procedure: Pre-spray a section of the floor with the proper cleaning solution and then clean with the rotary brush head. When cleaning a tile floor with deep recessed grout lines you may want to use the broom stick grout brush to pre-scrub the grout lines and edges before cleaning and rinsing with the 360i brush head. You can pre-scrub with or without the vacuum turned on, and then clean, rinse and extract by activating the solution valve. A vacuum only dry pass can then be made for faster drying if needed. The brush head works well at 100 psi and it works even better at 800 psi when cleaning deep recessed grout lines. The brush head is equipped with 1.0 spray jets as standard; however you can customize with larger or smaller spray jets to suit your needs. When the nylon brush bristles become worn out, a new brush head block can be purchased and be refitted with all the other components. PRECAUTIONS Be careful not allow the rotating vacuum heads to strike any stationary objects such as metal thresholds, floor vent registers, furniture legs etc. Be extra careful when cleaning up next to where the carpet meets the hard floor as the rotating vacuum shoes could scratch and damage the hard floor. Reduce the head speed to avoid hard impact when cleaning close to any object that the rotary could impact. SLOW DOWN HEAD SPEED WHEN CLEANING NEAR OBJECTS THAT HEADS COULD HIT. Transporting Be careful that the 360i cleaning head does not come loose, unscrew and fall off while you are carrying or rolling it around. Before carrying or rolling the 360i check that the head is screwed on tight. Warnings8 * Never allow unit to freeze. Damage due to freezing water expansion will NOT be covered under warranty. * Keep motor and handle dry to avoid shorting out electrical components. * Do not use 360i in standing water, such as on a flooded carpet. * Always use a grounded electrical outlet. Keep the control box on the handle dry. If the control box becomes wet, do not operate, call Rotovac for instructions. * Always wear rubber-soled shoes when operating the 360i * Only trained personnel who have read this manual and understand completely the information herein should operate the 360i . * Regularly inspect the cleaning heads for any nicks or burrs. Grind or sandpaper away any sharp edges, nicks or burrs before use. * Maintain tightness of all screws at all times . Routine Maintenance While facing the cleaning head, use the heel of your shoe to stomp down on the right side of a vacuum head so that the head unscrews clockwise from the motor. If the head is stuck try a rubber mallet and a block of wood. Head Stuck on 360i Removal Technique: 9 If you do not regularly remove the cleaning head, it may be more difficult to remove. Should initial procedure prove unsuccessful more force may be necessary. Place a 7/8” wrench onto reducer bushing and rest it against the motor housing tube while repeating step 2 with more force. Replacing the Cleaning Head Note: Always check that the vacuum is turned off and the felt seal remains seated in position on the studs when replacing the cleaning head. When screwing the head back on you should feel the felt seal engage (sandwich) 1/4 turn before the head bottoms out. This ensures a good vacuum seal. Felt Vacuum Seals Check the felt vacuum seals on the vacuum head for damage or wear. A good felt seal is important for maximum vacuum extraction performance. An excessively worn or torn felt seal will result in poor extraction. The felt seal will perform better and last longer if treated with a non-oily silicone spray. We prefer Dupont Silicone/Teflon spray, available at Home Depot. Carpet and hard floor head Felt Vacuum Seal 10 Vacuum System Maintenance To replace worn or damaged Vacuum Shoes, first remove the Head from the machine (see previous). The the stainless steel cover plate can then be removed by removing the 6 screws holding it in place. This allows access to the screws holding the vacuum shoes in place. If the shoes are being changed, remove the screws, and reattach new shoes. Tighten screws down securely. Make sure that the seal retainer clips are returned to their original position. When reinstalling the cover assembly, make sure that the vacuum channels in the cover/seal match up with the channels in the molded head. The Round Glide Discs are accessible from the underside without disassembly. Sprayer System Maintenance Periodically tilt the 360i back and visually inspect the spray pattern of the jets to make sure they are not clogged or aimed in the wrong direction. The spray fan pattern should be aligned with the vacuum slots and should never go beyond the outer edge of the vacuum slot. 11 ` 12 13 14 Carpet Cleaning Head (RA -105A complete) ITEM # 1 2 3 4 5 6 7 8 9 10 11 13 14 15 16 17 18 QUANTITY 1 1 1 3 3 1 1 1 1 3 12 6 3 3 1 6 1 ROTOVAC P/N RP-203A RA-106A S-027 RP-360 RP-367 RA-196 A-2329AL RV-412 S-023 S-026 RV-630 RV-609 RP-224 RV-439 RP-269 RV-497 RP-344 DESCRIPTION VACUUM DISC COVER/SEAL ASSEMBLY FELT SEAL CAST VACUUM SHOE GLIDE SHOE SPRAYER ASSEMBLY MALE SHAFT (LH) SMALL O-RING O-RING SPRAY JET 1.5 ROUND HEAD SCREW FLAT HEAD SCREW GASKET RETAINER GLIDE SHOE SCREW VENT CHECK (FROM S/N 1803) FLAT HEAD SCREW SPINDLE SPACER 360i TROUBLE SHOOTING GUIDE 1. Motor bogging down or stopping 15 *The 360i has a built in torque governor that will cause the motor to bog down or stop if overloaded or used improperly. This feature ensures long motor and gear box life because it forces the operator to use the 360i correctly and not “fight” or abuse the machine during operation. When operated correctly, the torque governor will put out plenty of power to do the job while also protecting the motor gear box from premature wear. *NOTE: If you feel the 360i is bogging down due to too much vacuum power, we recommend using our vacuum relief attachment P/N RV-449. Motor running Hot. *The 360i drive motor is made to safely run at temperatures up to 160° F. Note that metal surfaces at 120° F can be comfortably handled for only several seconds. 2. Overspray from cleaning head, slinging water. *Make sure spray jets are pointing slightly inward and your psi is not turned up too high. Recommend 100 to 300 psi *Turn down the motor speed rpm. 3. Leaving carpet too wet. *Make sure felt vacuum seal is not worn or torn. *Turn down psi. *Make slower vacuum only dry pass. *Turn down motor speed during dry pass. *Check to make sure your vacuum system is working properly and the filters in your extractor are not clogged with carpet lint. * Make sure top plate of cleaning head black foam gasket is aligned properly with vacuum slots, *Check vacuum on your extractor for full power. 16 ` WARRANTY Rotovac Corporation products are warranted to be free of defects in material for 1 year as noted below: During this warranty period, we will repair or replace, at our sole option, free of charge, any parts shown to be defective in either material or workmanship. Said parts must be returned with postage or freight pre-paid. Specific parts, such as switches, vacuum motors, pumps, fittings, etc., are also warranted for a period of 1 year from date of original purchase. This warranty is for replacement of defective parts or workmanship only. IT DOES NOT PROVIDE FOR REPLACEMENT OF COMPLETE UNITS DUE TO DEFECTIVE PARTS. It does NOT cover normal wear items such as hoses, power cords, bumpers, carbon brushes, gaskets, etc., which require replacement as a result of ordinary usage. Also, failures caused by abuse, neglect, alterations or operation contrary to manufacturer's recommendations are not warranted. Replacement parts are warranted only for the remainder of the original warranty period. This warranty does not cover labor or other charges in connection with replacement parts. NO LOCAL SERVICE OR REPAIR CHARGES ARE ALLOWED UNLESS PRIOR AUTHORIZATION IS OBTAINED. There are no other warranties, expressed or implied, made with respect to this equipment. The manufacturer assumes no responsibility for damages resulting from the use or misuse of this equipment. NOTE: This warranty is not transferable. Rotovac Corporation 14615 NE 19st ST BLDG C REDMOND, WASHINGTON 98052 Ph. (425) 883-6746 Fax (425) 883-8953 http://www.Rotovac.com 17