1
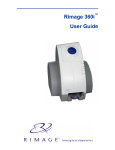
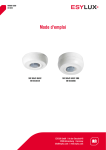
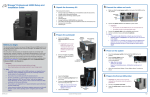
1 Install the Rimage software. The Rimage software for Macintosh includes an application called Discribe®. Discribe allows you to select data and labels for your discs. After installation, Discribe is located at Applications > Discribe. Important! You must have administrative privileges to install the Rimage 360i software on your computer. Setup and Installation for Macintosh® a. Power on your computer. b. At your computer, insert the Rimage Software for Macintosh CD in the disc drive. 2 Connect the Rimage 360i cables. a. Connect the USB 2.0 cable from the Rimage 360i to your computer USB 2.0 port. Note: The computer must have a USB 2.0 port. For more information, refer to the computer specifications listed in the ‘Learn More’ section of your Rimage 360i User Guide. b. Connect the power cord from the Rimage 360i to a power outlet. c. From your computer desktop, select the Rimage Software CD icon. The Rimage Software CD contents display. d. From the software CD, select Rimage Installer. The installation window opens. e. Follow the onscreen prompts to complete the installation. f. When the installation is complete, select Quit. Note: If you are prompted to restart your computer, select Restart. The software installation completes and the computer restarts. Power Cord USB 2.0 Cable If you are unfamiliar with the procedures in this document, ask your computer technician for help or refer to your computer documentation. Before you begin: c. To power on the Rimage 360i, press the power switch. Power Switch • You must have administrative privileges to install the Rimage 360i software on your computer. • Do not plug in any cables until you are instructed to do so. • Obtain a Macintosh computer that meets the computer specifications listed in the ‘Learn more’ section of the Rimage 360i User Guide. 1 110858_A 3 Add the Rimage 360i to your printer list. Using OS X v 10.4 a. At your computer, navigate: System Preferences > Print & Fax. The Print & Fax window opens. b. From the Print & Fax window, select Browser window opens. 4 5 Install the ink cartridges. Activate your software. You have 30 days to activate your software. Until your software is activated, you will be prompted to activate your software each time you use it. a. Open the ink cartridge access door. . The Printer c. From the Printer Name list, select 360i. d. Select Add. The printer is added to your printer list and the Printer Browser window closes. b. When the ink cartridge carriages are still, lift both cartridge latches. Ink Cartridge Access Door e. Close the Print & Fax window. Using OS X v 10.3 a. At your computer, navigate: System Preferences > Print & Fax. The Print & Fax window opens. b. From the Print & Fax window, select Setup Printers. The Printer List window opens. c. From the printer list popup menu, select USB. In the printer list, 360i displays. Learn more. For more information about operating and maintaining your Rimage 360i, refer to your Rimage 360i User Guide. c. Slide the matching ink cartridges into the matching carriages as shown. d. Close the ink cartridge latches. 6 For information about the Discribe software, refer to the Discribe User Manual. After you install the Rimage Software for Macintosh, the Discribe User Manual is located on your computer at Applications > Discribe Robot. Ink Cartridge Latch For additional support and product information, go to www.rimage.com/support.html. d. From the printer list, select 360i. e. Select Add. The printer is added to your printer list and the Printer List window closes. e. Close the ink cartridge access door. The printer initializes. f. Close the Print & Fax window. f. Align the ink cartridges. For specific instructions, refer to the Rimage 360i User Guide. 2 110858_A