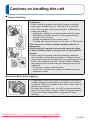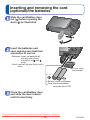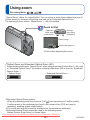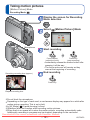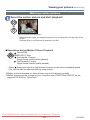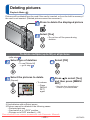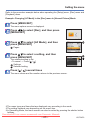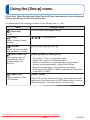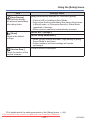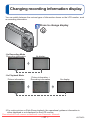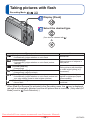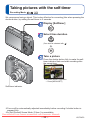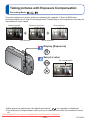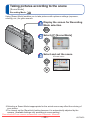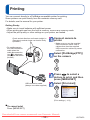
1
Owner’s Manual
for advanced features
Digital Camera
Model No.
DMC-LS5
Before connecting, operating or adjusting this product,
please read the instructions completely.
Downloaded From camera-usermanual.com Panasonic Manuals
VQT3W70
Contents
Before use
Basics
Cautions on handling this unit ............. 4
Standard Accessories ........................... 6
Names of parts....................................... 7
Cursor button ................................................7
Preparations
Taking pictures with automatic settings
[Intelligent Auto] Mode ........................ 16
Using zoom .......................................... 18
Taking motion pictures
[Motion Picture] Mode ......................... 19
Viewing your pictures
[Normal Play] ....................................... 20
About the batteries ................................ 8
Watching motion pictures ............................21
Guidelines for the number of recordable
pictures and operating time ...........................8
Viewing as list (Multi Playback) ......... 22
Deleting pictures ................................. 23
Inserting and removing the card
(optional)/the batteries ........................ 10
To delete multiple (up to 50)
or all pictures ...............................................23
Remaining battery and memory capacity ....12
Picture save destination
(cards and built-in memory) ........................12
Recording capacity guidelines
(pictures/recording time) .............................13
Setting the menu ................................. 24
Using the [Setup] menu ...................... 26
Setting the clock .................................. 14
[Clock Set] ...................................................26
[Beep] ..........................................................26
[Volume] ......................................................26
[Auto Power Off] ..........................................26
[Light Freq.] .................................................26
[Auto Review] ..............................................27
[Reset] .........................................................27
[Version Disp.] .............................................27
[Format] .......................................................28
[Language] ..................................................28
Downloaded From camera-usermanual.com Panasonic Manuals
-2-
VQT3W70
Contents
Recording
Playback/Editing
Taking pictures with your own settings
[Normal Picture] Mode ........................ 29
Different playback methods
(Playback Mode) .................................. 48
Recording Mode list ....................................29
[Slide Show] ................................................49
[Category Selection] ....................................50
Aligning the focus ............................... 30
Changing recording information
display .................................................. 31
Taking pictures with flash................... 32
Taking pictures with the self-timer .... 34
Taking pictures with Exposure
Compensation...................................... 35
Taking pictures according to the scene
[Scene Mode] ....................................... 36
[Portrait].......................................................37
[Self Portrait] ...............................................37
[Scenery] .....................................................37
[Panorama Assist] .......................................38
[Sports] ........................................................38
[Night Portrait] .............................................39
[Night Scenery]............................................39
[Food] ..........................................................39
[Party] ..........................................................39
[Baby] ..........................................................40
[Sunset] .......................................................40
[High Sens.].................................................40
[Fireworks]...................................................41
[Beach] ........................................................41
[Snow] .........................................................41
Using the [Playback] menu................. 51
[Resize] .......................................................51
[Protect] .......................................................53
[Copy] ..........................................................54
Connecting with other devices
Using with your PC.............................. 55
Using “PHOTOfunSTUDIO” to copy pictures
to your computer .........................................57
Printing ................................................. 58
Printing multiple pictures .............................59
Print with date .............................................60
Making print settings on the camera ...........61
Others
List of LCD monitor displays.............. 62
Message displays ................................ 64
Q&A Troubleshooting ........................ 66
Usage cautions and notes .................. 72
Specifications ...................................... 76
Using the [Rec] menu.......................... 42
[Picture Size] ...............................................42
[Rec Quality] ...............................................43
[Sensitivity] ..................................................43
[White Balance] ...........................................44
[AF Mode]....................................................45
[Digital Zoom] ..............................................46
[Burst] ..........................................................46
[Red-Eye Removal] .....................................47
[Stabilizer] ...................................................47
[Clock Set] ...................................................47
Downloaded From camera-usermanual.com Panasonic Manuals
-3-
VQT3W70
Cautions on handling this unit
■Camera handling
Keep the camera away from excessive vibration, force,
or pressure.
●Avoid using the camera under the following conditions,
which may damage the lens, LCD monitor, or camera
body. This may also cause the camera to malfunction or
prevent recording.
• Dropping or hitting the camera against a hard surface
• Sitting down with the camera in your pants pocket or
forcing it into a full bag
• Adding accessories to the camera strap
• Pushing with excessive force on the lens or LCD monitor
The camera is not dust resistant, splash resistant, or
waterproof.
Avoid using the camera in places with excessive dust
or sand, or where water can come into contact with the
camera.
●Avoid using the camera under the following conditions,
which present a risk that sand, water, or foreign material
may enter the camera through the lens or openings around
buttons. Be especially careful, because these conditions
may damage the camera and such damage may not be
repairable.
• In extremely dusty or sandy places
• In the rain or by the shore, where the camera may be
exposed to water
■Condensation (lens fogging)
●Condensation may occur when the camera is exposed to
sudden changes of temperature or humidity. Avoid these
conditions, which may make the lens dirty, cause mold, or
damage the camera.
●If condensation does occur, turn off the camera and wait
about two hours before using it. Once the camera adjusts
to the surrounding temperature, fogginess will clear
naturally.
Downloaded From camera-usermanual.com Panasonic Manuals
-4-
VQT3W70
Cautions on handling this unit
■Always take a test shot first
Before important events when you will use the camera (at weddings, for example), always
take a test shot to make sure that pictures and sound record correctly.
■No compensation for missed shots
We cannot compensate for missed shots if technical problems with the camera or card
prevent recording.
■Carefully observe copyright laws
Unauthorized use of recordings which contain works with copyright for purposes other
than personal use is prohibited under copyright law. Recording of certain material may be
restricted even for the purpose of personal use.
■Also refer to “Usage cautions and notes” (→72)
Downloaded From camera-usermanual.com Panasonic Manuals
-5-
VQT3W70
Standard Accessories
Check that all the accessories are supplied before using the camera.
For details on the accessories, refer to Basic Owner’s Manual.
●The accessories and their shape will differ depending on the country or area where the
camera was purchased.
●LR6/AA alkaline batteries or HR6/AA rechargeable Ni-MH (nickel metal hydride)
batteries is indicated as battery (or batteries) in the text.
●Please dispose of all packaging appropriately.
●Keep small parts in a safe place out of the reach of children.
■ Optional accessories
• Memory cards are optional. You can record or play back pictures on the built-in
memory when you are not using a card.
• If any accessories are lost, customers in the USA and Puerto Rico should contact
Panasonic’s parts department at 1-800-833-9626 and customers in Canada should
contact 1-800-99-LUMIX (1-800-995-8649) for further information about obtaining
replacement parts.
Downloaded From camera-usermanual.com Panasonic Manuals
-6-
VQT3W70
Names of parts
Tripod receptacle
• Ensure that the tripod is
stable.
Shutter button (→16)
Power button (→14)
Self-timer indicator (→34)
Speaker
Microphone (→19)
Lens barrel
Card/Battery door
(→10)
Lens (→4)
Flash (→32)
Zoom button (→18)
Hand strap eyelet
We recommend using
the supplied hand strap
to avoid dropping the
camera.
LCD monitor (→62)
[MODE] button (→29, 48)
Cursor button
Playback button (→20)
[ / ] (Delete/Return)
button (→23)
[DIGITAL] socket (→55, 58)
Cursor button
[MENU/SET]
Up cursor button ( )
(menu display/set) (→24)
• Exposure Compensation (→35)
Left cursor button ( )
Right cursor button ( )
• Self-timer (→34)
• Flash (→32)
Down cursor button ( )
• Changing information display (→31)
●In this manual, the button that is used is shaded or indicated by
.
●The illustrations and screens in this manual may differ from the actual product.
●Some methods of holding the camera may block the speaker, making it difficult to hear
the beep, etc.
Downloaded From camera-usermanual.com Panasonic Manuals
-7-
VQT3W70
About the batteries
■About batteries that you can use with this unit
LR6/AA alkaline batteries or optional HR6/AA rechargeable Ni-MH (nickel metal
hydride) batteries can be used with this unit.
●EVOLTA (EVOIA) batteries (Panasonic battery) can also be used.
●The following batteries cannot be used.
Manganese batteries, lithium batteries, nickel batteries, Ni-Cd batteries, Oxyride
batteries
If these batteries are used, the following problems may occur: battery leakage,
incorrect display of remaining battery power, failure to turn on camera, damage to
data written to built-in memory or card, and other troubles.
●Never use batteries such as those indicated below.
Batteries with all or part of their covering peeled off, or batteries with flat
poles.
Guidelines for the number of recordable pictures and operating time
The number of recordable pictures or available operating time may vary according to
surrounding environment and usage conditions. Figures may be reduced if flash, zoom,
or other functions are used frequently, or in colder climates.
Fully-charged Panasonic Ni-MH
Supplied batteries or
batteries (optional, when the
optional Panasonic alkaline
battery capacity is 1950 mAh)
batteries
Number of recordable pictures
Approx. 160 pictures
Recording time
Approx. 80 min.
Approx. 320 pictures
Approx. 160 min.
Playback time
Approx. 480 min.
Approx. 640 min.
●Recording conditions by CIPA standard
• CIPA is an abbreviation of [Camera & Imaging Products Association].
• [Normal Picture] Mode.
• Temperature: 23 °C (73.4 °F)/Humidity: 50%RH when LCD monitor is on.
• Using a Panasonic SD Memory Card (32 MB).
• Using the supplied batteries
• Starting recording 30 seconds after the camera is turned on. (When the Optical
Image Stabilizer function is set to [ON].)
• Recording once every 30 seconds with full flash every second recording.
• Perform a zoom operation every recording (W end → T end, or T end → W end)
• Turning the camera off every 10 recordings and leaving it until the temperature of the
batteries decreases.
Number reduced if intervals are longer – e.g. to approx. one quarter for 2-minute
intervals under the above conditions.
Downloaded From camera-usermanual.com Panasonic Manuals
-8-
VQT3W70
About the batteries
Please note that the performance of alkaline batteries significantly decreases in low
temperature conditions.
(When the temperature is 0 °C (32 °F))
Fully-charged Panasonic Ni-MH
Supplied batteries or
batteries (optional, when the
optional Panasonic alkaline
battery capacity is 1950 mAh)
batteries
Number of recordable pictures
Approx. 50 pictures
Approx. 290 pictures
Recording time
Approx. 25 min.
Approx. 145 min.
Playback time
Approx. 240 min.
Approx. 620 min.
●The number of recordable pictures, recording time, and playback time vary, depending
on the storage and operating conditions of the batteries and the brand and type of
batteries.
●We recommend turning off the camera frequently between recording sessions to make
the batteries last longer. If you will be using the camera for long periods of time, the use
of rechargeable Ni-MH batteries is recommended.
●If the available battery power is significantly reduced even when fully charged Ni-MH
batteries are used, the batteries have reached the end of their life. Please purchase
new batteries.
●Do not use a damaged or dented battery (especially connectors), e.g. by dropping (can
cause faults).
Downloaded From camera-usermanual.com Panasonic Manuals
-9-
VQT3W70
Inserting and removing the card
(optional)/the batteries
Slide the card/battery door
out ( ) before opening the
door ( ) as illustrated
Insert the batteries and
card, making sure that their
orientation is correct
• Batteries: Insert the batteries all
the way with correct
orientation of
and
poles.
• Card: Insert all the way firmly until it
clicks.
Do not touch
the terminal
Battery (check orientation)
Card (check orientation:
terminals face LCD)
Close the card/battery door
and slide the door inward
until it locks firmly
Downloaded From camera-usermanual.com Panasonic Manuals
- 10 -
VQT3W70
Inserting and removing the card (optional)/the batteries
■To remove
Before removing the card or batteries, turn off the camera and wait until the indication
on the LCD monitor turns off completely.
(Otherwise, this unit may no longer operate normally, the card itself may become
damaged or recorded pictures may be lost.)
• To remove batteries:
Tilt the camera and catch the batteries
in your hand. Be careful not to drop
them.
• To remove card:
Press the center of the card and pull the
card straight toward you. Be sure not to
drop the batteries.
●Be sure to remove the batteries if you are not using the camera for a long period of
time. Batteries may be hot immediately after use. Turn off the camera and wait until the
battery temperature lowers before removing them.
●The clock settings may reset if batteries are removed from the camera for 24 hours or
more.
●Always use two new batteries of the same type and brand when replacing batteries.
●Keep the Memory Card out of reach of children to prevent swallowing.
●The unusable battery should be discarded in accordance with battery recycling laws.
Call the RBRC hotline at 1-800-822-8837 for information.
Downloaded From camera-usermanual.com Panasonic Manuals
- 11 -
VQT3W70
Inserting and removing the card (optional)/the batteries
Remaining battery and memory capacity
Remaining battery
(flashes red)
If the battery mark flashes red, replace the batteries with new ones.
Estimated remaining pictures or recording time capacity (press
display on/off)
Displayed when no card is inserted (pictures will be saved to built-in memory)
to
When in operation
(Card) or
(Built-in memory) are illuminated red.
While the light remains lit, an operation is taking place, such as picture writing, reading,
deletion or formatting. While the light is lit, do not turn off the power or remove battery,
card, as this can cause data loss or damage.
Keep the camera away from vibrations, impact, or static electricity. Should any of these
cause camera operation to be terminated, attempt to perform the operation again.
Picture save destination (cards and built-in memory)
Pictures will be saved to a card if one is inserted, or to the built-in memory
if not.
■ Built-in memory (Approx. 10 MB)
●Pictures may be copied between cards and the built-in memory (→54).
●The access time for the built-in memory may be longer than the access time for a card.
●[QVGA] in [Rec Quality] can only be available to record motion pictures in the built-in
memory.
■ Compatible memory cards (optional)
The following SD standard-based cards (Panasonic brand recommended)
Type of Card
Capacity
SD Memory Cards
8 MB – 2 GB
SDHC Memory Cards
4 GB – 32 GB
SDXC Memory Cards
48 GB, 64 GB
Notes
• Can be used with devices compatible with the
respective formats.
• Before using SDXC Memory Cards, check that
your computer and other devices support this type
of card.
http://panasonic.net/avc/sdcard/information/SDXC.html
• Only the cards listed on the left with the given
capacities are supported.
• Using a card of SD Speed “Class 6”∗ or above is
recommended for recording motion pictures.
∗ SD speed class refers to a specification for sustained write speeds. Confirm the SD speed by
checking the card label or other card related materials.
(Example)
Downloaded From camera-usermanual.com Panasonic Manuals
- 12 -
VQT3W70
Inserting and removing the card (optional)/the batteries
●Please reformat the card with this camera if it has already been
formatted with a computer or another device. (→28)
●If the write-protect switch is set to “LOCK”, the card cannot be used to
record or delete pictures, and it cannot be formatted.
●It is recommended that you copy important pictures to your computer
(as electromagnetic waves, static electricity, or faults may cause data to
be damaged).
●Latest information:
http://panasonic.jp/support/global/cs/dsc/ (This Site is English only.)
Switch (LOCK)
Recording capacity guidelines (pictures/recording time)
The number of pictures you can take and the recording time varies in proportion to card
capacity (and depending on recording conditions and type of card).
■ Recording picture capacity (still pictures)
[Picture Size]
2 GB
32 GB
14M
1
270
4470
8800
5M
3
730
11940
23010
37
7920
141620
263250
0.3M
Built-in memory
64 GB
• When the number of recordable pictures exceeds 99,999, “+99999” is displayed.
■ Recording time capacity (motion pictures)
[Rec Quality]
Built-in memory
2 GB
[HD]
—
10 min 50 s
[VGA]
—
[QVGA]
19 s
32 GB
64 GB
2 h 56 min
5 h 51 min
23 min 50 s
6 h 24 min
12 h 47 min
1 h 2 min
16 h 46 min
23 h 59 min
• Motion pictures can be recorded continuously up to 2 GB. To record more than 2 GB, press the
shutter button again. Remaining time for continuous recording is displayed on the screen.
Downloaded From camera-usermanual.com Panasonic Manuals
- 13 -
VQT3W70
Setting the clock
The clock is not set when the camera is shipped.
Press the Power button
The power is turned on.
If the language select screen is not displayed,
proceed to step .
Power button
Press [MENU/SET] while the
message is displayed
Press
to select the language,
and press [MENU/SET]
[MENU/SET]
Press [MENU/SET]
Press
to select the items (year, month, day, hour, minute,
display order or time display format), and press
to set
Select the
setting
item
Change
the values
and
settings
Select either [24hrs] or [AM/PM]
for the time display format.
Select the display order for the day, month, and year
([M/D/Y], [D/M/Y], or [Y/M/D]).
• To cancel → Press [
/
].
Press [MENU/SET]
Confirm the setting and press [MENU/SET]
• To return to the previous screen, press [ / ].
• Turn on power again and check time display.
(Time and date can be displayed by pressing several times.)
Downloaded From camera-usermanual.com Panasonic Manuals
- 14 -
VQT3W70
Setting the clock
To change time setting
Select [Clock Set] from [Setup] or [Rec] menu, perform
and .
• If approximately 5 hours have elapsed after installing the batteries in the camera,
the clock settings will be retained for about 24 hours even if the batteries are
removed.
●Failure to set the date and time will cause the date/time to be improperly printed when
printing pictures at a digital photo center.
●After the time has been set, the date can be printed correctly even if the date is not
displayed on the camera screen.
Downloaded From camera-usermanual.com Panasonic Manuals
- 15 -
VQT3W70
Taking pictures with automatic settings
[Intelligent Auto] Mode
Recording Mode:
Optimum settings are made automatically from information such as “face,” “brightness,”
and “distance” just by pointing the camera at the subject, meaning that clear pictures can
be taken without the need to make settings manually.
Shutter button
Display the screen for Recording
Mode selection
Select
[Intelligent Auto] Mode
Focus display
(When focus is aligned: illuminated
When focus is not aligned: flashing)
Take pictures
Press halfway
(press lightly to
focus)
The type of scene detected is indicated
by a blue icon for two seconds
Press fully
(press the button all
the way to record)
■Holding the camera
Microphone
Speaker
Flash
• To avoid camera shake, hold it with both hands keeping
your arms close to your body and standing with your feet
slightly apart.
• Do not touch the lens.
• Do not block the flash.
Do not look at it from close range.
• Try to hold the camera steady when you press the
shutter button.
• Be careful not to block the microphone or the
speaker.
• We recommend the use of the hand strap to avoid
dropping the camera.
■To set flash
Select either
or
.
• When
is selected, the type of flash automatically changes
according to the subject and brightness. (→32)
•
and
indicate that the Red-Eye Reduction function is
activated.
• The shutter speed is slower in
and
.
Downloaded From camera-usermanual.com Panasonic Manuals
- 16 -
VQT3W70
Taking pictures with automatic settings [Intelligent Auto] Mode
■Automatic Scene Detection
Camera identifies the scene when pointed at the subject, and makes optimum settings
automatically.
People are detected
Scenery is detected
A close-up shot is detected
People and night scenery are detected (Only when
is selected)
Night scenery is detected
When the scene does not correspond to any of the conditions above
When
or
is detected, Face Detection is activated, and the focus and exposure
are adjusted for the recognized faces.
●Depending on recording conditions, different scene types may be determined for the
same subject.
●If undesired scene type is selected, we recommend manually selecting the
appropriate Recording Mode.
●We recommend using a tripod and the self-timer with and .
●The following menu items may be set in [Intelligent Auto] Mode:
• [Rec] menu: [Picture Size]∗1, [Burst]
• [Setup] menu∗2: [Clock Set], [Beep], [Light Freq.], [Language]
∗1 Items that may be set differ from other Recording Modes.
∗2 Other items in the [Setup] menu will reflect settings made in other Recording Modes.
●The settings for the following functions are fixed:
• [Auto Power Off]: [5 MIN.] • [Auto Review]: [ON] • [Sensitivity]: [AUTO]
• [White Balance]: [AWB]
• [AF Mode]:
(Face Detection)∗3
• [Red-Eye Removal]: [ON] • [Stabilizer]: [ON]
∗3
(9-area-focusing) when face cannot be recognized
●The following functions cannot be used:
[Exposure], [Digital Zoom]
Downloaded From camera-usermanual.com Panasonic Manuals
- 17 -
VQT3W70
Using zoom
Recording Mode:
“Optical Zoom” offers 5 x magnification. You can zoom in even closer without the loss of
picture quality by lowering the picture size and using “Extended Optical Zoom.”
For zooming in even closer, “Digital Zoom” (→46) is available.
Zoom In/Out
Capture a
wider area
(wide-angle)
Enlarge
the subject
(telephoto)
Focus range
Zoom ratio (approx.)
Zoom bar
●Focus after adjusting the zoom.
Optical Zoom and Extended Optical Zoom (EZ)
Automatically switches to “Optical Zoom” when using maximum Picture Size (→42), and
to “Extended Optical Zoom” (for further zooming) otherwise. (EZ is short for “Extended
Optical Zoom.”)
• Optical Zoom
• Extended Optical Zoom
●Extended Optical Zoom system
When the recording pixel level is set to [3 M ] (corresponding to 3 million pixels),
3 million pixels of the available pixel level in the center of the CCD are used in
recording, enabling higher magnification.
●The zoom ratio and the zoom bar displayed on the screen are estimates.
●Extended Optical Zoom cannot be used in the following cases:
Motion Picture, [High Sens.] in Scene Mode
Downloaded From camera-usermanual.com Panasonic Manuals
- 18 -
VQT3W70
Taking motion pictures
[Motion Picture] Mode
Recording Mode:
Display the screen for Recording
Mode selection
Select
Microphone
[Motion Picture] Mode
Start recording
Press halfway
(adjust the focus)
Press fully
(start recording)
• Immediately release the shutter button after
pressing it all the way.
• The focus and zoom will remain as they
were at the beginning of recording.
Remaining recording time (approx.)
End recording
Press fully
Elapsed recording time
●Do not block the microphone.
●Depending on the type of card used, a card-access display may appear for a while after
motion picture recording. This is not a fault.
●In [AF Mode], (9-area-focusing) is fixed.
●[Stabilizer] does not function while recording motion pictures.
●When there is no space left to store the motion picture, recording automatically ends.
Additionally, recording in progress may be stopped, depending on the card used.
Downloaded From camera-usermanual.com Panasonic Manuals
- 19 -
VQT3W70
Viewing your pictures [Normal Play]
Playback Mode:
When a card is in the camera, pictures are played back from the card, and without a card,
pictures are played back from the built-in memory.
Speaker
Press the Playback button
• Press again to enter the
Recording Mode.
Zoom button
Scroll through pictures
Picture number/Total pictures
Previous Next
File number
• Press the shutter button to switch to
Recording Mode.
■To enlarge (Playback Zoom)
Press the
T side of the
zoom button
Current zoom position (displayed for 1 sec.)
• Each time the T side of the zoom button is pressed, the magnification increases. It
moves through four levels after 1x: 2x, 4x, 8x, and 16x. (The picture quality displayed
becomes successively lower.)
• To reduce zoom → Press the W side of the zoom button
• Move zoom position →
●Some pictures edited on a computer may not be viewed on this camera.
●This camera is compliant with the unified DCF (Design rule for Camera File system)
standard formulated by the Japan Electronics and Information Technology Industries
Association (JEITA), and with Exif (Exchangeable image file format). Only files that are
DCF-compliant can be played back.
Downloaded From camera-usermanual.com Panasonic Manuals
- 20 -
VQT3W70
Viewing your pictures [Normal Play]
Watching motion pictures
Select the motion picture and start playback
Motion picture recording time∗
∗ When playback starts, the elapsed playback time is displayed in the top right of the
screen.
Example: After 3 minutes and 30 seconds: [3m30s]
■Operations during Motion Picture Playback
: Pause/Play
[MENU/SET]: Stop
: Fast rewind (2 steps)
Single-frame rewind (while paused)
: Fast forward (2 steps)
Single-frame forward (while paused)
• Press during fast rewind or fast forward to return to the normal playback speed.
• The volume can be adjusted with the zoom button.
●Motion pictures recorded on other devices may not be played correctly.
●Motion pictures can be viewed on your computer using “PHOTOfunSTUDIO” on the
supplied CD-ROM or “QuickTime.”
Downloaded From camera-usermanual.com Panasonic Manuals
- 21 -
VQT3W70
Viewing as list (Multi Playback)
Playback Mode:
You can view 12 (or 30) pictures at once (Multi Playback).
Press the Playback button
Set to multiple screen display
Date recorded Picture no.
Total no.
■To restore
The display
changes
each time
the W side
is pressed
Scroll bar
(12 screens)
Press the T side of the
zoom button
■To change from
12/30-screen
display to singlescreen display
(30 screens)
Select picture with
and press
[MENU/SET]
●Pictures taken without clock settings are displayed with the date January 1st, 2011.
●Pictures displayed with [!] cannot be played back.
Downloaded From camera-usermanual.com Panasonic Manuals
- 22 -
VQT3W70
Deleting pictures
Playback Mode:
Pictures will be deleted from the card if the card is inserted, or from the built-in memory if
the card is not inserted. (Deleted pictures cannot be recovered.)
Press to delete the displayed picture
Select [Yes]
• Do not turn off the power during
deletion.
To delete multiple (up to 50) or all pictures
(after step
)
Select type of deletion
Select [OK]
• To use [Delete All]
→ go to step
Select the pictures to delete
(Repeat)
• To release
→ Press
[MENU/
SET]
again
Press to select [Yes],
and then press [MENU/
SET]
• May take time depending on
number of pictures deleted.
Picture selected
●Use batteries with sufficient power.
●Pictures cannot be deleted in the following cases:
• Protected pictures
• Card switch is in “LOCK” position.
• Pictures not of DCF standard (→20)
Downloaded From camera-usermanual.com Panasonic Manuals
- 23 -
VQT3W70
Setting the menu
■About the menu screen
■Menu operation flow
Displaying the menu screen
Selecting the menu type
Select the item
Changing the settings
Buttons used in menu operations
: [MENU/SET]
: Cursor button
: [ / ] (Delete/Return) button
Exiting the menu screen
Menu screen configuration
: Menu description
: Menu items
: Operation guide
■Menu type
[Setup] menu
Making the camera more convenient to use
• Enables you to specify clock settings, sound volume, and so on to make the camera
easier to use.
[Rec] menu (Recording Mode only)
Changing picture preferences
• Enables you to specify color, sensitivity, pixel level, and other settings.
[Playback] menu (Playback Mode only)
Using your pictures
• Enables you to specify picture protection, resizing, and other settings for pictures you
have taken.
Downloaded From camera-usermanual.com Panasonic Manuals
- 24 -
VQT3W70
Setting the menu
Refer to the procedure example below when operating the [Setup] menu, [Rec] menu and
[Playback] menu.
Example: Changing [AF Mode] in the [Rec] menu in [Normal Picture] Mode
Press [MENU/SET]
The menu options screen is displayed.
Press
to select [Rec], and then press
[MENU/SET]
Press
to select [AF Mode], and then
press [MENU/SET]
: Pages
Press
to select a setting, and then
press [MENU/SET]
The selected setting is set.
• To cancel → Press [ / ]
: Settings
: Selected setting
Press [
/
] several times
The menu closes and the monitor returns to the previous screen.
●The menu types and items that are displayed vary according to the mode.
●The setting methods vary depending on the menu item.
●In Recording Mode, the menu screen can also be exited by pressing the shutter button
halfway.
Downloaded From camera-usermanual.com Panasonic Manuals
- 25 -
VQT3W70
Using the [Setup] menu
[Clock Set], [Auto Review] and [Auto Power Off] are important for clock setting and
battery life. Please check these before use.
For details about the setting procedure in the [Setup] menu. (→24)
Item
[Clock Set]
Settings, Notes
Set time, date, and display format.
(→14)
[Beep]
Adjust volume of beep
sounds.
/
/
: Low/High/Mute
[Volume]
Adjust volume of sound
from speakers (7 levels).
[0] / [1] / [2] / [3] / [4] / [5] / [6]
[Auto Power Off]
The camera turns off
automatically after a
specified period of
inactivity.
[2 MIN.]/[5 MIN.]/[10 MIN.]/[OFF]
[Light Freq.]
Correct flickers on the
LCD monitor.
[50Hz] / [60Hz]
• To restore → Turn on the power again.
• Cannot be used in the following cases:
When connected to computer/printer, during motion
picture recording/playback, during Slide Shows
• Specific periods apply in the following situations.
[Intelligent Auto] Mode: [5 MIN.], and when a Slide Show
is paused: [10 MIN.]
If the LCD monitor flickers when you record pictures under
lighting such as fluorescent or LED lighting fixture, set the
utility frequency of the area where you are using.
Downloaded From camera-usermanual.com Panasonic Manuals
- 26 -
VQT3W70
Using the [Setup] menu
Item
[Auto Review]
Automatically display
still pictures immediately
after taking them.
[Reset]
Settings, Notes
[ON] (Automatically displays for 2 seconds.)/[OFF]
• Fixed to [ON] in [Intelligent Auto] Mode.
• Auto review occurs immediately after taking still pictures
in [Burst] mode, or [Panorama Assist] in Scene Mode,
regardless of settings.
• Motion pictures cannot be automatically reviewed.
[Reset Rec. settings?]
Reset to the default
settings.
[Reset setup parameters?]
[Version Disp.]
Check the version of the
camera firmware.
Current version is displayed.
• When [Setup] settings are reset, [Age] setting in [Baby]
Scene Mode is also reset.
• Folder numbers and clock settings will remain
unchanged.
●For details about the setting procedure in the [Setup] menu. (→24)
Downloaded From camera-usermanual.com Panasonic Manuals
- 27 -
VQT3W70
Using the [Setup] menu
Item
[Format]
Use when [Built-In
Memory Error] or
[Memory Card Error]
appears, or when
formatting the built-in
memory or card.
When a card/built-in
memory is formatted,
the data cannot be
restored. Check the
content of the card/
built-in memory
carefully before
formatting.
Settings, Notes
• Confirm that the batteries have sufficient remaining
power. When formatting the built-in memory, remove the
cards.
(Only inserted card will be formatted if present; built-in
memory will be formatted if no card is inserted.)
• Always format cards with this camera.
• All protected pictures and other picture data will be
deleted.
• Do not turn off power or perform other operations during
formatting.
• Formatting the built-in memory may take several
minutes.
• Consult the dealer or your nearest Service Center if
format cannot be successfully completed.
• If the card cannot be formatted, please try another card
before contacting your nearest Service Center.
For USA and Puerto Rico assistance, please call:
1-800-211-PANA(7262) or, contact us via the web at:
http:www.panasonic.com/contactinfo
[Language]
Set the language displayed on the screen.
Change display
language.
●For details about the setting procedure in the [Setup] menu. (→24)
Downloaded From camera-usermanual.com Panasonic Manuals
- 28 -
VQT3W70
Taking pictures with your own settings
[Normal Picture] Mode
Recording Mode:
Using the [Rec] menu to change settings and set up your own recording environment.
Shutter button
Display the screen for Recording
Mode selection
Select
[Normal Picture] Mode
Take a picture
Press halfway
(press lightly to
focus)
Press fully
(press the button all
the way to record)
●If a warning is displayed about jitter, use [Stabilizer], a
tripod, or [Selftimer].
●If aperture value or shutter speed is displayed in red,
correct exposure has not been achieved. Use flash or
change [Sensitivity] settings.
Jitter alert
display
Aperture value Shutter speed
Recording Mode list
[Intelligent Auto] Mode
Take pictures with automatic settings.
(→16)
[Normal Picture] Mode
Take pictures with your own settings.
−
[Scene Mode]
Take pictures according to scene.
(→36)
[Motion Picture] Mode
Take motion pictures.
(→19)
Downloaded From camera-usermanual.com Panasonic Manuals
- 29 -
VQT3W70
Aligning the focus
Useful when subject is not in the center of picture.
First adjust focus according to subject
Align the AF area
with the subject
Focus display
(When focus is aligned: illuminated
When focus is not aligned: flashing)
AF area
(When focus is aligned: green
When focus is not aligned: red)
Hold down
halfway
Return to desired composition
●Subjects/environments which may
make focusing difficult:
• Fast-moving or extremely bright
objects, or objects with no color
contrast.
• Taking pictures through glass or
near objects emitting light. In the
dark, or with significant jitter.
• When too close to object or when
taking pictures of both distant and
close objects together in the same
picture.
Press fully
AF area
■ Focus range
Distance between the lens
and the subject
15 cm
(0.49 feet)
60 cm
(1.97 feet)
Zoom ratio
1 x (Max. W)
Gradually changes
5 x (Max. T)
●The focus display flashes and beep sounds when focus is not
aligned.
Use the focus range displayed in red as a reference.
Even if the focus display is lit, the camera may be unable to bring
the subject into focus if it is out of range.
●AF area is displayed larger in dark conditions or when using Digital
Zoom.
Focus range
Downloaded From camera-usermanual.com Panasonic Manuals
- 30 -
VQT3W70
Changing recording information display
You can switch between the various types of information shown on the LCD monitor, such
as recording information.
Press to change display
●In Recording Mode
Recording information
●In Playback Mode
Picture information
No display
Picture information +
Recording information
No display
●For motion picture or Slide Show playback, the operational guidance information is
either displayed or not displayed on the LCD monitor.
Downloaded From camera-usermanual.com Panasonic Manuals
- 31 -
VQT3W70
Taking pictures with flash
Recording Mode:
Display [Flash]
Select the desired type
(Can also be selected with
Type, operations
[Auto]
• Automatically judges whether or not to flash
[Auto/Red-Eye]∗
• Automatically judges whether or not to flash (reduce
red-eye)
[Forced Flash On]
• Always flash
.)
Uses
Normal use
Taking pictures of subjects in
dark places
Taking pictures with backlight
or under bright lighting (e.g.
fluorescent)
[Forced On/Red-Eye]∗
• Always flash (reduce red-eye)
[Slow Sync./Red-Eye]∗
• Automatically judges whether or not to flash (reduce redeye; slow shutter speed to take brighter pictures)
Taking pictures of subjects
against a nightscape (tripod
recommended)
[Forced Flash Off]
• Never flash
Places where flash use is
prohibited
∗ When [Red-Eye Removal] is activated in the Recording menu, the
icon is displayed,
red-eye is automatically detected, and the still picture data is corrected. (Only when [AF
Mode] is set to
(Face Detection).)
Downloaded From camera-usermanual.com Panasonic Manuals
- 32 -
VQT3W70
Taking pictures with flash
■Available types in each mode
(○: Available, –: Not available, ○ : Default setting)
[Scene Mode]
○
○
○
–
–
○
○∗1
–
–
–
–
○
○
○
○
–
–
○
○
○
○
–
–
○
○
–
○
–
–
○
–
–
–
–
○
○
○
–
○
–
–
○
–
–
–
○
○
○
○
○
○
–
–
○
○
–
○
–
–
○
–
–
○
–
–
○
○
–
○
–
–
○
∗1 Set to
,
,
or
according to the subject and brightness.
• The flash cannot be used in Motion Picture Mode and in these Scene Modes:
,
,
,
,
.
• Scene Mode flash settings are restored to default when Scene Mode is changed.
■The available flash range when [Sensitivity] setting is AUTO
W side (Max.)
Approx. 0.6 m (1.97 feet) - 4.6 m (15.09 feet)
T side (Max.)
Approx. 0.6 m (1.97 feet) - 2.0 m (6.56 feet)
●The flash is activated twice. Be sure to keep still until all flashing is complete.
●Shutter speeds are as follows:
•
•
,
,
,
: 1/60 - 1/2000th
,
: 1/8∗2 - 1/2000th
∗2 Varies according to [Intelligent Auto] Mode, [Scene Mode] scene, etc.
●The effect of Red-Eye Reduction varies depending on the subject and is affected by
factors such as distance to the subject, whether the subject is looking at the camera
during preliminary flash, and so on. In some cases, the effect of Red-Eye Reduction
may be negligible.
●Do not touch or look at the flash (→7) from close distances (i.e. a few cm).
Do not use the flash at close distances to other subjects (heat/light may damage
subject).
●Flash settings may be changed when changing Recording Mode.
●Scene Mode flash settings are restored to default when Scene Mode is changed.
●When [AUTO] is set in [Sensitivity], the ISO Sensitivity is automatically set in a range up
to 800.
) are flashing (flash is charging).
●No pictures may be taken if these marks (e.g.
●Insufficient light may prevent appropriate exposure or white balance.
●Flash effect may not be fully achieved with high shutter speeds.
●Flash charging may take time if battery is low, or if using flash repeatedly.
Downloaded From camera-usermanual.com Panasonic Manuals
- 33 -
VQT3W70
Taking pictures with the self-timer
Recording Mode:
We recommend using a tripod. This is also effective for correcting jitter when pressing the
shutter button, by setting the self-timer to 2 seconds.
Display [Selftimer]
Select time duration
(Can also be selected with
.)
Take a picture
Press the shutter button fully to make the selftimer indicator flash and start recording after
the preset time.
• To cancel while in operation
→ Press [MENU/SET]
Self-timer indicator
●Focus will be automatically adjusted immediately before recording if shutter button is
pressed fully.
●In [Self Portrait] Scene Mode, [10sec.] is unavailable.
Downloaded From camera-usermanual.com Panasonic Manuals
- 34 -
VQT3W70
Taking pictures with Exposure Compensation
Recording Mode:
Corrects exposure to obtain optimum exposure (for example, if there is difference
between brightness of object and background). Depending on the brightness, this may be
impossible in some cases.
Under-exposed
Optimum exposure
Plus direction
Over-exposed
Minus direction
Display [Exposure]
Select a value
No compensation
for example) is displayed.
●After exposure adjustment, the adjustment value (
●The Exposure Compensation value you set is retained even after the camera is turned
off.
Downloaded From camera-usermanual.com Panasonic Manuals
- 35 -
VQT3W70
Taking pictures according to the scene
[Scene Mode]
Recording Mode:
Using [Scene Mode] enables you to take pictures with optimum settings (exposure,
coloring, etc.) for given scenes.
Display the screen for Recording
Mode selection
Select
[Scene Mode]
Select and set the scene
● Scene menu
●Selecting a Scene Mode inappropriate for the actual scene may affect the coloring of
your picture.
●You cannot set the [Sensitivity] setting because it is automatically adjusted by the
camera. (Available settings vary according to scene setting.)
Downloaded From camera-usermanual.com Panasonic Manuals
- 36 -
VQT3W70
Taking pictures according to the scene [Scene Mode]
Improves the skin tone of subjects for a healthier appearance in bright
daylight conditions.
[Portrait]
Tips
• The closer the zoom is positioned to the T (telephoto) edge and the closer the
camera is brought to the subject, the greater the effect will be.
Take pictures of yourself.
[Self Portrait]
Tips
• Use of the 2-second self-timer is recommended when the shutter speed is
slow or jitter occurs easily.
Takes clear pictures of wide, distant subjects.
[Scenery]
●How to select a scene. (→36)
●Using flash in Scene Modes. (→33)
Downloaded From camera-usermanual.com Panasonic Manuals
- 37 -
VQT3W70
Taking pictures according to the scene [Scene Mode]
Use the supplied software to join multiple pictures into a single panorama
picture.
Use
to select the recording direction, and press [MENU/SET] to set.
Take the picture.
Select [Next], and press [MENU/SET] to set.
• Alternatively, press the shutter button halfway.
• You can take pictures again by selecting [Retake].
Change the composition and take the picture so that a part of the picture
overlaps with the previous picture.
• To take more pictures, select [Next] and repeat steps
and .
[Panorama
Assist]
Section of picture that was taken last time
After you finish taking pictures, select [Exit], and press [MENU/SET] to set.
Tips
• Use a tripod.
• When it is dark, use the self-timer to record pictures.
Notes
• The focus, zoom, Exposure Compensation, White Balance, shutter speed,
and ISO Sensitivity are all fixed at the setting for the first picture.
• Panorama picture stitching cannot be performed by this camera. Use the
software on the supplied CD-ROM “PHOTOfunSTUDIO” to make the pictures
you record into a panorama still picture with your computer.
Takes pictures of scenes with fast movement, e.g. sports.
[Sports]
Tips
• Stand at least 5 m (16.4 feet) away.
●How to select a scene. (→36)
●Using flash in Scene Modes. (→33)
Downloaded From camera-usermanual.com Panasonic Manuals
- 38 -
VQT3W70
Taking pictures according to the scene [Scene Mode]
Takes pictures of people and nightscapes with close to actual brightness.
Tips
flash.
[Night Portrait] •• Use
Subject should not move.
• Tripod, self-timer recommended.
Takes clear pictures of night scenes.
Tips
• Tripod, self-timer recommended.
[Night
Scenery]
Notes
• Shutter speed may slow down up to 8 seconds.
• After recording, the shutter may stay closed (up to 8 seconds) to process the
signal. This is not a malfunction.
Takes natural-looking pictures of food.
[Food]
Brighten subjects and background in pictures of indoor events, such as
weddings.
[Party]
Tips
• Stand approx. 1.5 m (4.92 feet) away.
• Zoom: Wide (W side)
• Use flash.
• Tripod, self-timer recommended.
●How to select a scene. (→36)
●Using flash in Scene Modes. (→33)
Downloaded From camera-usermanual.com Panasonic Manuals
- 39 -
VQT3W70
Taking pictures according to the scene [Scene Mode]
Uses weak flash to bring out skin colors.
• To record age
Select [Age], and press [MENU/SET].
Select [SET] with
, and press [MENU/SET].
Set birthday with
, and press [MENU/SET].
Select [Exit] with , and press [MENU/SET].
[Baby]
Tips
• Make sure [Age] is [ON] before taking a picture.
Notes
• You can perform print settings on your computer using the software
“PHOTOfunSTUDIO” on the supplied CD-ROM when you print [Age] on a still
picture.
Takes clear pictures of scenes such as sunsets.
[Sunset]
Prevents blurring of subject in dark, indoor conditions.
[High Sens.]
Select the aspect ratio and the picture size with
and press [MENU/SET].
●How to select a scene. (→36)
●Using flash in Scene Modes. (→33)
Downloaded From camera-usermanual.com Panasonic Manuals
- 40 -
VQT3W70
Taking pictures according to the scene [Scene Mode]
Takes clear pictures of fireworks in the night sky.
Tips
• Stand at least 10 m (32.8 feet) away.
• Tripod recommended.
[Fireworks]
Notes
• Shutter speed is fixed to 1/4. (Setting of shutter speed changes if exposure
compensation is operated)
Brings out the clear blues of the sky and the sea without darkening
subject.
[Beach]
Notes
• Do not touch camera with wet hands.
• Beware of sand and sea water.
• Problems caused by sand, seawater and fresh water are not covered by the
product warranty.
Brings out the natural color of snow in ski slope and mountain scenes.
[Snow]
●How to select a scene. (→36)
●Using flash in Scene Modes. (→33)
Downloaded From camera-usermanual.com Panasonic Manuals
- 41 -
VQT3W70
Using the [Rec] menu
For details about the setting procedure in the [Rec] menu (→24)
[Picture Size]
Set the size (number of pixels) of still pictures. This setting determines how many pictures
you can record.
■ Mode:
■ Settings:
Recording pixel level type
14 M
4320×3240
∗
10 M
3M
3648×2736
2560×1920
5M
∗
0.3 M
12.5 M
10.5 M
2048×1536
640×480
4320×2880
4320×2432
∗ This setting is not available in
([Intelligent Auto] Mode).
represent the aspect ratios of the still pictures.
●
●Extended Optical Zoom can be used for picture sizes indicated with
●Extended Optical Zoom is not available in the following cases.
.
- [Motion Picture] Mode
- [High Sens.] in Scene Mode
●Mosaic effect may appear depending on subject and recording conditions.
Setting guide
Larger Picture Size
Smaller Picture Size
Sharper picture
Coarser picture
Lower recording
capacity
Higher recording
capacity
Downloaded From camera-usermanual.com Panasonic Manuals
- 42 -
VQT3W70
Using the [Rec] menu
For details about the setting procedure in the [Rec] menu (→24)
[Rec Quality]
Set the picture size of motion pictures.
■ Mode:
■ Settings:
Picture Quality
Picture Size
[HD]
1280 × 720 pixels
[VGA]
640 × 480 pixels
[QVGA]∗
320 × 240 pixels
No. of Frames
Picture Aspect Ratio
16:9
30 fps
4:3
∗ [QVGA] is fixed when recording to the built-in memory.
●Depending on the motion picture recording environment, static electricity or
electromagnetic waves may cause the screen to go black momentarily or noise to be
recorded.
●When recording motion pictures, it is recommended to use batteries with sufficient
power.
●If you attempt to play motion pictures recorded with the camera on other devices,
playback may not be possible, or the picture or sound quality may be poor.
Additionally, incorrect recording information may be indicated.
[Sensitivity]
Set ISO Sensitivity (sensitivity to lighting) manually.
We recommend higher settings to take clear pictures in darker locations.
■ Mode:
■ Settings: [AUTO] / [100] / [200] / [400] / [800] / [1600]
Setting guide
[Sensitivity]
Location
(recommended)
Shutter speed
Interference
Jitter of the subject
[100]
Bright
(outdoors)
Slow
Low
Increased
[1600]
Dark
Fast
High
Less
●[AUTO] is automatically set in a range up to 800 based on brightness.
●Scope of flash recording (→33)
Downloaded From camera-usermanual.com Panasonic Manuals
- 43 -
VQT3W70
Using the [Rec] menu
For details about the setting procedure in the [Rec] menu (→24)
[White Balance]
Adjust coloring to suit light source if colors otherwise appear unnatural.
■ Mode:
■ Settings: [AWB] (automatic) /
(outdoor, shade) /
(uses value set in
(outdoor, clear sky) /
(outdoor, cloudy sky) /
(incandescent lighting) /
)/
(set manually)
[AWB] operational range:
10000K
9000K
Blue sky
8000K
7000K
Cloudy sky (rain)
Shade
6000K
5000K
4000K
Sunlight
White fluorescent lighting
3000K
2000K
Incandescent lighting
Sunset/sunrise
Candlelight
K=Kelvin color Temperature
●Picture may appear red or blue if out of
range. This function may also not work
correctly even within the range if there are
many light sources present.
●Under fluorescent lighting, LED lighting
fixture etc., the appropriate White Balance
will vary depending on the lighting type, so
use [AWB] or [
].
●White Balance setting is fixed to [AWB] in the
following Scene Modes:
[Scenery], [Night Portrait], [Night Scenery],
[Food], [Party], [Sunset], [Fireworks],
[Beach], [Snow]
●If the Scene Mode is changed, the white
balance setting returns automatically to
[AWB].
■ Setting White Balance manually (
)
Select
and press [MENU/SET].
Point the camera towards a white object (e.g. paper)
and press [MENU/SET].
Press [MENU/SET].
• White Balance is set to
.
• The White Balance you set is retained even after
the power is turned off.
• White Balance setting may not be possible if the
subject is too bright or too dark. In such cases,
adjust the subject to an appropriate brightness, and
then set the White Balance again.
Only takes picture of white
objects within frame (step )
Downloaded From camera-usermanual.com Panasonic Manuals
- 44 -
VQT3W70
Using the [Rec] menu
For details about the setting procedure in the [Rec] menu (→24)
[AF Mode]
Method of aligning focus can be changed according to position and number of subjects.
■ Mode:
■ Settings:
/
/
Taking front-on pictures of
people
(Face Detection)
Subject not centered in
picture (AF area displayed
only when focused)
Detected faces (up to 11 people) and adjusts exposure and focus
accordingly.
AF area
Yellow: When the shutter button is
pressed halfway, the frame
turns green when the camera is
focused.
White: Displayed when more than one
face is detected. Other faces
that are the same distance away
as faces within the yellow AF
area are also focused.
Automatically focuses on any of 9 points.
(9-area-focusing)
Determined position for
focus
Focuses on AF area in center of picture. (Recommended when
focus is difficult to align)
(1-area-focusing)
●AF area becomes larger in dark locations or when using Digital Zoom, etc.
●Cannot set to “Face Detection” in the following cases:
[Panorama Assist], [Night Scenery], [Food] Scene Modes
●If the camera misinterprets a non-human subject as a face in the “Face Detection”
setting, switch to another setting.
●If faces cannot be detected such as when subjects are looking at places other than the
camera or when the subject is moving rapidly, the AF mode setting switches to
.
Downloaded From camera-usermanual.com Panasonic Manuals
- 45 -
VQT3W70
Using the [Rec] menu
For details about the setting procedure in the [Rec] menu (→24)
[Digital Zoom]
Multiplies effect of Optical Zoom or Extended Optical Zoom by up to 4 times.
(Note that, with Digital Zoom, enlarging will decrease picture quality.)
■ Mode:
■ Settings: [ON]/[OFF]
Digital Zoom area is displayed within zoom bar on screen.
Digital Zoom area
• Zoom motion stops momentarily when entering
Digital Zoom range.
• Within Digital Zoom range, AF area is displayed
larger when the shutter button is pressed halfway.
• We recommend using a tripod and [Selftimer].
●The setting is fixed to [OFF] in [High Sens.] Scene Mode.
●Cannot change the setting in [Motion Picture] Mode. The setting in other Recording
Mode is applied.
[Burst]
Enables a rapid succession of still pictures to be taken. Succession of still pictures taken
while shutter button is held down.
■ Mode:
■ Settings:
/[OFF]
Speed
Approx. 0.8 pictures/sec
No. of pictures
Until card/built-in memory is full
●Burst speed may be reduced if ISO Sensitivity is set to high, or if shutter speed is
reduced in darker locations.
●When burst is selected, the flash is disabled.
●When you record subjects in motion where there is a significant difference between
light and dark areas, it may not be possible to achieve the optimal exposure.
●The setting is fixed to [OFF] in [Panorama Assist] and [Fireworks] Scene Modes.
●When [Selftimer] is set, 3 pictures are taken.
Downloaded From camera-usermanual.com Panasonic Manuals
- 46 -
VQT3W70
Using the [Rec] menu
For details about the setting procedure in the [Rec] menu (→24)
[Red-Eye Removal]
Automatically detects red-eye and corrects still picture data when recording with flash
).
Red-Eye Reduction (
■ Mode:
■ Settings: [ON]/[OFF]
●Available only when [AF Mode] is set to (Face Detection).
●The red-eye effect may not be corrected under certain conditions.
●When [ON] is selected, is displayed in the flash icon.
[Stabilizer]
Automatically detects and prevents jitter.
■ Mode:
■ Settings: [ON]/[OFF]
●The setting is fixed to [ON] in [Self Portrait] Scene Mode.
●Cases where Optical Image Stabilizer may be ineffective:
Heavy jitter, high zoom ratio (also in the Digital Zoom range), fast-moving objects,
indoors or in dark locations (due to low shutter speed)
[Clock Set]
Set the clock (→14). Same function as that in [Setup] menu.
Downloaded From camera-usermanual.com Panasonic Manuals
- 47 -
VQT3W70
Different playback methods (Playback Mode)
Playback Mode:
Recorded pictures can be played back in a variety of ways.
Press the Playback button
Display the screen for Playback
Mode selection
Select the method of playback
■[Normal Play]
(→20)
■[Slide Show]
(→49)
■[Category Selection]
(→50)
●When no card is inserted, pictures are played back from the built-in memory.
●After you switch from Recording Mode to Playback Mode, the Playback Mode
automatically becomes [Normal Play].
Downloaded From camera-usermanual.com Panasonic Manuals
- 48 -
VQT3W70
Different playback methods (Playback Mode)
For details about the switching Playback Mode procedure (→48)
[Slide Show]
Automatically plays back still pictures in order.
Select playback method
[All]
Playback of all still pictures
[Category
Selection]
Select a category and play back. (Select category with
and press [MENU/SET].) (→50)
Make sure [Start] is selected and press [MENU/SET]
■Operations during Slide Show
Pause/Play
(While paused)
Next
(While paused)
Previous
Stop
■Changing settings such as playback duration
Select [Setup] in step
above and press [MENU/SET]
Select an item to change its setting
[Setup]
[Duration]
[1 SEC.] / [2 SEC.] / [3 SEC.] / [5 SEC.]
[Repeat]
[ON]/[OFF]
●Motion pictures cannot be played back in a Slide Show. When the [Motion Picture]
category is selected, the initial screens of motion pictures are played back as still
pictures in the Slide Show.
Downloaded From camera-usermanual.com Panasonic Manuals
- 49 -
VQT3W70
Different playback methods (Playback Mode)
For details about the switching Playback Mode procedure (→48)
[Category Selection]
You can narrow down the pictures displayed to view only a selected category.
Select a category and press [MENU/SET]
[Category]
Recording information such as Scene Modes
[Portrait]/
[Scenery]/
/[Self Portrait]/[Night Portrait]/
/[Baby]
/[Sunset]
[Night Portrait]/
/[Night Scenery]/
[Sports]/[Party]/[Fireworks]/[Beach]/[Snow]
[Baby]
[Food]
[Motion Picture]
Downloaded From camera-usermanual.com Panasonic Manuals
- 50 -
VQT3W70
Using the [Playback] menu
Playback Mode:
For details about the setting procedure in the [Playback] menu (→24)
[Resize]
Picture size can be reduced to facilitate e-mail attachment and use in webpages, etc.
(Still pictures recorded at the smallest recording pixel level cannot be further reduced.)
Set-up: Press [MENU/SET] → [Playback] menu → Select [Resize]
■ [SINGLE]
Select [SINGLE]
Select still picture
Select size
Current size
Size after change
Select [Yes]
• After confirmation, press [
/
] to return to the menu screen.
Downloaded From camera-usermanual.com Panasonic Manuals
- 51 -
VQT3W70
Using the [Playback] menu
■ [MULTI]
Select [MULTI] in step
on the previous page
Select size
Select still picture (up to 50 pictures)
Resize setting
• To cancel → Press [MENU/SET] again.
Select [OK]
Select [Yes]
●Picture quality is reduced after resizing.
●May not be compatible with still pictures taken on other devices.
Downloaded From camera-usermanual.com Panasonic Manuals
- 52 -
VQT3W70
Using the [Playback] menu
For details about the setting procedure in the [Playback] menu (→24)
[Protect]
Set protection to disable picture deletion. Prevents deletion of important pictures.
Set-up: Press [MENU/SET] → [Playback] menu → Select [Protect]
Select [SINGLE] or [MULTI]
Select picture and make setting
●[SINGLE]
●[MULTI]
Picture protected
• To cancel → Press
[MENU/SET] again.
• After confirmation,
press [ / ] to
return to the menu
screen.
Picture protected
■ To clear all
Select [CANCEL] in step
and select [Yes].
■ To cancel while releasing all
Press [MENU/SET].
●May not be effective when using other devices.
●Formatting will cause even protected files to be deleted.
●If the write-protect switch is set to “LOCK,” pictures on the card cannot be deleted even
if they are not protected with the camera setting.
Downloaded From camera-usermanual.com Panasonic Manuals
- 53 -
VQT3W70
Using the [Playback] menu
For details about the setting procedure in the [Playback] menu (→24)
[Copy]
You can copy pictures between built-in memory and memory card.
Set-up: Press [MENU/SET] → [Playback] menu → Select [Copy]
Select the copy method (direction)
: Copy all pictures from built-in memory to card (go to step
: Copy 1 picture at a time from card to built-in memory.
When selecting
, press
press [MENU/SET]
).
to select a picture, and then
Select [Yes]
• To cancel → Press [MENU/SET].
• After confirmation, press [ / ] to return to the menu screen.
●Copying pictures may take several minutes. Do not turn off power or perform other
operations during copying.
●If identical names (folder/file numbers) are present in the copy destination, a new
folder for copying will be created when copying from built-in memory to card (
Identically-named files will not be copied from card to built-in memory (
).
●The [Protect] setting will not be copied. Set it again after copying.
●Only pictures from Panasonic digital cameras (LUMIX) may be copied.
).
Downloaded From camera-usermanual.com Panasonic Manuals
- 54 -
VQT3W70
Using with your PC
Pictures and motion pictures can be imported from the camera to your computer by
connecting the two together.
• If your computer does not support SDXC Memory Cards, a message will be displayed
requesting you to format the card. (Do not format the card. This will erase recorded
pictures.) If the card is not recognized, refer to the following support website:
http://panasonic.net/avc/sdcard/information/SDXC.html
Getting Ready:
• Make sure to insert batteries with sufficient power.
• When importing pictures from the built-in memory, remove any memory cards.
Connect camera to
computer
Check socket direction and insert straight in.
(Damage to socket shape can lead to faulty
operation.)
• Please make sure you use the
supplied USB connection cable.
Use of cables other than the
supplied USB connection cable
may cause malfunction.
[Access]
(sending data)
• Do not disconnect
the USB
connection cable
while [Access] is
displayed.
Select [PC] on the camera
Operate with your computer
USB connection
cable
(always use cable
supplied)
■To cancel connection
Click “Safely Remove Hardware” in the Windows System Tray → disconnect USB
connection cable → turn off camera power
Downloaded From camera-usermanual.com Panasonic Manuals
- 55 -
VQT3W70
Using with your PC
You can save pictures to use on your computer by dragging and dropping folders and
files into separate folders on your computer.
■Folder and file names on computer
● Windows
Drives are displayed
in “My Computer” or
“Computer” folder.
● Mac
DCIM (Still pictures/motion pictures)
100_PANA (Up to 999 pictures/folder)
P1000001.JPG
:
JPG:
P1000999.JPG
Still pictures
101_PANA
MOV:
∗
:
Motion pictures
999_PANA
MISC
Drives are displayed
on the desktop.
(Displayed as
“LUMIX”, “NO_NAME”,
or “Untitled.”)
∗ New folders are created in the following cases:
• When pictures are added to folders containing files numbered 999.
• When using cards already containing the same folder number (for example, pictures
taken with other cameras, etc.)
■When using Windows XP, Windows Vista, Windows 7, or Mac OS X
The camera can be connected to your computer even if you select [PictBridge(PTP)] in
the step
on the previous page.
• Only picture output can be performed from the camera. (Picture deletion can also be
performed with Windows Vista and Windows 7.)
• It may not be possible to import if there are 1000 or more pictures on the card.
●Do not use any other USB connection cables except the one supplied.
●Turn off power before inserting or removing memory cards.
●If the batteries run out while transmitting, a warning beep sounds. Cancel transmission
using your computer immediately. Use batteries with sufficient power.
●Some computers can read directly from the camera’s memory card.
For details, see the manual for your computer.
●For more details, consult your computer operating manual.
Downloaded From camera-usermanual.com Panasonic Manuals
- 56 -
VQT3W70
Using with your PC
Using “PHOTOfunSTUDIO” to copy pictures to your computer
With the “PHOTOfunSTUDIO” software on the supplied CD-ROM, a computer can be
used to manage the recorded pictures.
●Main “PHOTOfunSTUDIO” functions
• Copying recorded still pictures or motion pictures to a computer
• Backing up still pictures or motion pictures that have been copied to a computer to
media such as a DVD
• Editing still pictures on a computer
• Stitching still pictures recorded in Scene Mode [Panorama Assist] into a panorama
• Attaching recorded pictures to e-mail
• Uploading recorded pictures to YouTube or Facebook
●After importing pictures to your computer, you can print or e-mail them.
Downloaded From camera-usermanual.com Panasonic Manuals
- 57 -
VQT3W70
Printing
You can connect directly to a PictBridge-compatible printer for printing.
Some printers can print directly from the camera’s memory card.
For details, see the manual for your printer.
Getting Ready:
• Make sure to insert batteries with sufficient power.
• When printing pictures from the built-in memory, remove any memory cards.
• Adjust the print quality or other settings on your printer, as needed.
Check socket direction and insert straight in.
(Damage to socket shape can lead to faulty
operation.)
• Do not disconnect
the USB connection
cable when the
cable disconnection
icon
is displayed
(displayed with some
printers.).
Connect camera to
printer
• Make sure you use the supplied
USB connection cable. Use of
cables other than the supplied
USB connection cable may cause
malfunction.
Select [PictBridge(PTP)]
on the camera
Press
to select a
picture to print, and then
press [MENU/SET]
USB connection cable
(always use cable supplied)
Select [Print start]
(Print settings (→61))
■To cancel print
Press [MENU/SET].
Downloaded From camera-usermanual.com Panasonic Manuals
- 58 -
VQT3W70
Printing
Printing multiple pictures
Select [Multi Print] in step
on the previous page
Select item
• [Multi Select]:
• [Select All]:
Print (Previous page
Scroll between pictures with
, select pictures
with [MENU/SET] to print. (Press [MENU/SET] again to
release selection.)
Press to select [OK], and press [MENU/SET].
Print all pictures.
)
●Select [Yes] if print confirmation screen is displayed.
●An orange ● displayed during printing indicates an error message.
●Print may be divided into several times if printing a large amount of pictures.
(Remaining sheets display may differ from set number.)
●Do not use any other USB connection cables except the one supplied.
●Disconnect USB connection cable after printing.
●Turn off power before inserting or removing memory cards.
●When the batteries run out during communication, a warning beep sounds. Cancel
printing and disconnect the USB connection cable. Use batteries with sufficient power.
Downloaded From camera-usermanual.com Panasonic Manuals
- 59 -
VQT3W70
Printing
Print with date
●Printing in store: Only recording date can be printed. Request date printing in store.
• When printing still pictures of 16:9 Aspect Ratio, check in advance that the store can
accept this size.
●Using computer: Print settings for recording date and text information can be made
using the supplied CD-ROM “PHOTOfunSTUDIO.”
●Using printer: Recording date can be printed by setting [Print with Date] (→61) to [ON]
when connecting to a printer compatible with date printing.
Downloaded From camera-usermanual.com Panasonic Manuals
- 60 -
VQT3W70
Printing
Making print settings on the camera
(Make settings before selecting [Print start])
Select item
Select setting
Item
Settings
[Print with
Date]
[ON]/[OFF]
[Num.of prints]
Set number of pictures (up to 999 pictures)
[Paper Size]
(printer takes priority)
[L/3.5”×5”] (89×127 mm)
[2L/5”×7”]
(127×178 mm)
[POSTCARD] (100×148 mm)
[16:9]
(101.6×180.6 mm)
[A4]
(210×297 mm)
[Page Layout]
(printer takes priority) /
(1 picture, with border) /
[A3]
[10×15 cm]
[4”×6”]
[8”×10”]
[LETTER]
[CARD SIZE]
(297×420 mm)
(100×150 mm)
(101.6×152.4 mm)
(203.2×254 mm)
(216×279.4 mm)
(54×85.6 mm)
(1 picture, no border) /
(2 pictures) /
(4 pictures)
●Items only compatible with the printer may be displayed.
●To arrange “2 pictures” or “4 pictures” in the same still pictures, set the
number of prints for the still pictures to 2 or 4.
●To print to paper sizes/layouts not supported by this camera, set to
and make
settings on the printer. (Consult your printer’s operating manual.)
●When setting [Print with Date] to [ON], check the date printing settings on the
printer (printer settings may be prioritized).
Downloaded From camera-usermanual.com Panasonic Manuals
- 61 -
VQT3W70
List of LCD monitor displays
Press
to change display (→31).
■In recording
1
2
3
4
5
15
14
6
7
13
12
11
8
9
10
1 Recording Mode (→16, 19, 29, 36)
2 Picture Size (→42)
3
4
5
6
7
8
Recording quality (→43)
Flash Mode (→32)
Optical Image Stabilizer (→47)
Jitter alert (→29)
White Balance (→44)
Battery capacity (→12)
Burst Mode (→46)
Focus (→16)
AF area (→30)
Self-timer Mode (→34)
9 ISO Sensitivity (→43)
Aperture value/Shutter speed (→29)
Exposure Compensation (→35)
Current date/time
Age in years/months (→40)
Elapsed recording time (→19)
Save destination (→12)
Recording state
15 Number of recordable pictures (→13)
Remaining recording time (→19)
RXXhXXmXXs∗
10
11
12
13
14
Focus range
Zoom (→18, 46)
∗ [h], [m] and [s] indicate “hour”, “minute” and “second.”
• Screens shown here are only examples. The actual display may vary.
Downloaded From camera-usermanual.com Panasonic Manuals
- 62 -
VQT3W70
List of LCD monitor displays
■In playback
1 2
3
4
10
9
8
5
7
6
1
2
3
4
5
Playback Mode (→48)
Protected picture (→53)
Picture Size (→42)
Battery capacity (→12)
Picture number/Total pictures (→20)
Elapsed playback time (→21)
6 Recorded date and time
Age in years/months (→40)
ISO Sensitivity (→43)
Aperture value/Shutter speed (→29)
7 Recording Mode (→16, 19, 29, 36)
Flash Mode (→32)
White Balance (→44)
Exposure Compensation (→35)
8 Motion picture recording time (→21)
XXhXXmXXs∗
9 Folder/File number (→20, 56)
Save destination (→12)
10 Motion pictures (→21)
Cable disconnection warning icon
(→58)
∗ [h], [m] and [s] indicate “hour”, “minute” and “second.”
• Screens shown here are only examples. The actual display may vary.
Downloaded From camera-usermanual.com Panasonic Manuals
- 63 -
VQT3W70
Message displays
Meanings and required responses to major messages displayed on LCD monitor.
[Some pictures cannot be deleted]
[This picture cannot be deleted]
●Non-DCF pictures (→20) cannot be deleted.
→ Save needed data on a computer or other device, and then use [Format] on the
camera. (→28)
[No additional selections can be made]
●The number of pictures that can be deleted at once has exceeded.
●The number of pictures allowing [Resize] (multiple settings) at once has exceeded.
[Please turn camera off and then on again]
●The lens is not working correctly.
[System Error]
→ Turn on power again.
(Consult the dealer or your nearest Service Center if display still remains)
[Some pictures cannot be copied]
[Copy could not be completed]
●Pictures cannot be copied in the following cases:
→ Picture of same name already exists in built-in memory when copying from card.
→ File is not of DCF standard.
→ Picture taken or edited on a different device.
[Not enough space on built-in memory]
[Not enough memory on the card]
●There is no space left on the built-in memory or the card. When you copy pictures from
the built-in memory to the card (batch copy), the pictures are copied until the capacity of
the card becomes full.
[Built-In Memory Error]
[Format built-in memory?]
●Displayed when formatting built-in memory via computer, etc.
→ Reformat directly using camera. Data will be deleted.
[Memory card error. This card cannot be used in this camera. Format this card?]
●The card format cannot be used with this camera.
→ Save needed data on a computer or other device, and then use [Format] on the
camera. (→28)
[Insert SD card again]
[Try another card]
●Access to card has failed.
→ Insert card again.
●Try with a different card.
Downloaded From camera-usermanual.com Panasonic Manuals
- 64 -
VQT3W70
Message displays
[Memory Card Error]
[Memory card parameter error]
●Card is not of SD standard.
●When cards in capacities of 4 GB or more are used, only SDHC or SDXC Memory
Cards are supported.
[Read Error]/[Write Error]
●Data read has failed.
[Please check the card]
→ Check whether card has been inserted correctly (→10).
●Data write has failed.
→ Turn off power and remove card, before re-inserting and turning on power again.
●Card may possibly be damaged.
●Try with a different card.
[Motion recording was cancelled due to the limitation of the writing speed of the
card]
●When recording motion picture, use a card rated with an SD speed class∗ of “Class 6”
or higher.
∗ SD speed class refers to a specification for sustained write speeds.
●If recording stops even when using a card with speed of “Class 6” or faster, the data
writing speed is low. We recommend backing up the data on the memory card and
reformatting it. (→28)
●Motion picture recording may be automatically terminated with certain cards.
[A folder cannot be created]
●Folder numbers in use have reached 999.
→ Save needed data on a computer or other device, and then use [Format] on the
camera. (→28)
Downloaded From camera-usermanual.com Panasonic Manuals
- 65 -
VQT3W70
Q&A
Troubleshooting
Try checking these items (→66 - 71) first.
If the problem persists, performing [Reset] in the [Setup] menu may resolve the issue.
(Note that except for some items such as [Clock Set], all settings are returned to their
values from the time of purchase.)
Battery, power
The camera turns off immediately even with full battery power.
The remaining battery power is low even if new batteries are inserted.
●The batteries are expended.
●Depending on the battery brand and the operating temperature, the remaining battery
power may not be displayed accurately.
Camera does not work even if power is turned on.
●Batteries are not inserted correctly (→10), or need recharging.
The power cuts off during use.
●The batteries are expended.
●Camera is set to [Auto Power Off]. (→26)
→ Turn on the power again.
Recording
Cannot record pictures.
●Built-in memory/card is full. → Free space by deleting unwanted pictures (→23).
Recorded pictures look white.
●Lens is dirty (fingerprints, etc.).
→ Clean lens surface with a soft, dry cloth.
●Lens is foggy (→4).
Recorded pictures are too bright/too dark.
●Adjust the exposure (→35).
2-3 pictures are taken when I press the shutter button just once.
●Camera is set to use [Burst] (→46).
Focus not aligned correctly.
●Not set to mode appropriate for distance to subject. (Focus range varies according to
Recording Mode.)
●Subject outside of focus range.
●Caused by jitter or subject movement (→47).
Recorded pictures are blurred. Optical Image Stabilizer ineffective.
●Shutter speed is slower in dark locations and Optical Image Stabilizer is less effective.
→ Hold camera firmly with both hands, keeping arms close to body.
→ Set [Digital Zoom] to [OFF] and [Sensitivity] to [AUTO]. (→43, 46)
Downloaded From camera-usermanual.com Panasonic Manuals
- 66 -
VQT3W70
Q&A
Troubleshooting
Recording (Continued)
Recorded pictures appear coarse, or there is interference.
●ISO Sensitivity is high, or shutter speed is low.
(Default [Sensitivity] setting is [AUTO] – interference may appear with indoor pictures.)
→ Lower [Sensitivity] (→43).
→ Take pictures in brighter locations.
●Camera is set to [High Sens.].
(Picture becomes slightly coarser in response to high sensitivity.)
Brightness or coloring of recorded picture different from real life.
●When recording under fluorescent or LED lighting fixture etc., increasing the shutter
speed may introduce slight changes to brightness and color. These are a result of the
characteristics of the light source and do not indicate a malfunction.
Red banding may appear on the LCD monitor or part or the entire
screen may have a reddish tint, when recording or pressing the
shutter button halfway.
●This is a characteristic of CCD and may appear if subject contains
brighter areas. Some blurring may occur around these areas, but this
is not a fault. This will be recorded in motion pictures, but not in still
pictures.
●We recommend keeping the screen away from strong light sources
such as sunlight when taking pictures.
Motion picture recording stops midway.
●With some cards, access display may appear briefly after recording, and recording may
end midway.
●When recording motion picture, use a card rated with an SD speed class∗ of “Class 6”
or higher.
∗ SD speed class refers to a specification for sustained write speeds.
●If recording stops even when using a card with speed of “Class 6” or faster, the data
writing speed is low. We recommend backing up the data on the memory card and
reformatting it. (→28)
The beep volume is low.
●The speaker is blocked.
Downloaded From camera-usermanual.com Panasonic Manuals
- 67 -
VQT3W70
Q&A
Troubleshooting
LCD monitor
Monitor sometimes shuts off even though power is on.
●After recording, monitor shuts off until next picture can be recorded.
Brightness is unstable.
●Aperture value is set while shutter button is pressed halfway.
(Does not affect recorded picture.)
Monitor flickers indoors.
●If the LCD monitor flickers when you record pictures under lighting such as fluorescent
or LED lighting fixture, use [Light Freq.] in the [Setup] menu to set the utility frequency
of the area where you are using. (→26)
Black/blue/red/green dots or interference appears. Monitor looks distorted when
touched.
●This is not a fault, and will not be recorded on the actual pictures, so there is no need to
worry.
Date/age is not displayed.
●The current date and [Age] are displayed for about 5 seconds in instances such as
when the camera is turned on, when you switch from Playback Mode to Recording
Mode, when you switch to [Baby] Scene Mode.
Flash
No flash emitted.
●Flash set to [Forced Flash Off] (→32).
●Flash is disabled when using [Burst] or when using the following Scene Modes.
[Scenery], [Panorama Assist], [Night Scenery], [Sunset], [Fireworks]
Playback
Cannot view pictures.
●Press the Playback button.
●No pictures in built-in memory or card (pictures are played from card if inserted, from
built-in memory if card is not inserted).
●Camera set to [Category Selection].
→ Set Playback Mode to [Normal Play] (→48).
Folder/file number displayed as [-]. Picture is black.
●Picture edited on computer or taken with a different device.
●Batteries removed immediately after picture taken, or picture taken with low battery.
→ Use [Format] to delete (→28).
Downloaded From camera-usermanual.com Panasonic Manuals
- 68 -
VQT3W70
Q&A
Troubleshooting
Playback (Continued)
The Playback volume and beep volume are low.
●The speaker is blocked.
White round spots like soap bubbles appear on the recorded picture.
●If you take a picture with the flash in a dark place or indoors, white round
spots may appear on the picture caused by the flash reflecting particles of
dust in the air. This is not a fault. A characteristic of this is that the number
of round spots and their position differ in every picture.
[Thumbnail is displayed] is shown on the screen.
●The still pictures may have been recorded with another device. If so, they may be
displayed with poor picture quality.
Blackened red areas in recorded pictures.
●When digital red-eye correction ( , , ) is operating, if a subject is recorded that
has skin-colored areas with red areas inside, the digital red-eye correction function may
blacken the red areas.
→ We recommend setting the Flash Mode to
,
or , or [Red-Eye Removal] to
[OFF] before recording.
The sound of the recorded motion pictures sometimes breaks up.
●This unit automatically adjusts the aperture during motion picture recording. At such
times, the sound may break up. This is not a malfunction.
Motion pictures recorded on this camera cannot be played on other devices.
●Motion pictures (Motion JPEG) recorded with this camera may not be played on
digital cameras of other manufacturers. Additionally, motion pictures recorded with this
camera cannot be played on Panasonic LUMIX digital cameras sold before July 2008.
(However, motion pictures recorded with LUMIX digital cameras sold before this date
can be played on this camera.)
Downloaded From camera-usermanual.com Panasonic Manuals
- 69 -
VQT3W70
Q&A
Troubleshooting
Computer, printer
Cannot send pictures to computer.
●Not connected correctly (→55).
●Check whether computer has recognized camera.
●Select [PC] when connecting the camera to your computer. (→55)
Computer does not recognize card (only reads built-in memory).
●Disconnect USB connection cable and reconnect with card in place.
The card is not recognized by the computer.
(You are using an SDXC Memory Card.)
●Make sure your computer supports SDXC memory cards.
http://panasonic.net/avc/sdcard/information/SDXC.html
●When you insert a card, a message will be displayed requesting you to format the card,
but do not format it.
●If [Access] remains displayed on the LCD monitor, turn off the camera and then
disconnect the USB cable.
Cannot print when connecting to printer.
●Printer is not compatible with PictBridge.
●Set [USB Mode] to [PictBridge (PTP)]. (→58)
Cannot print the date.
●Make date printing settings before printing.
→ With supplied software: Select “with dates” within print settings.
Edges cut off pictures when printing.
●Release any trimming or edgeless printing settings on printer before printing.
(Consult printer operating manual.)
aspect ratio.
●The pictures were recorded in
→ If printing in shop, check if 16:9 sizes can be printed.
Downloaded From camera-usermanual.com Panasonic Manuals
- 70 -
VQT3W70
Q&A
Troubleshooting
Others
Menu not displayed in desired language.
●Change [Language] setting (→28).
Camera is hot.
●Camera may become a little warm during use, but this does not affect performance or
quality.
Lens makes a clicking noise.
●When brightness changes, the lens may make a clicking noise and the monitor
brightness may also change, but this is due to aperture settings being made.
(Does not affect recording.)
Clock is incorrect.
●Camera has been left for a long period.
→ Reset the clock (→14).
When using zoom, picture becomes slightly warped and the edges of the subject
become colored.
●Pictures may be slightly warped or colored around the edges, depending on the zoom
ratio, but this is not a fault.
File numbers are not recorded in sequence.
●File numbers are reset when new folders are created (→56).
File numbers have jumped backwards.
●Batteries were removed/inserted with power on.
(Numbers may jump backwards if folder/file numbers are not correctly recorded.)
Downloaded From camera-usermanual.com Panasonic Manuals
- 71 -
VQT3W70
Usage cautions and notes
When in use
●Camera may become warm if used for long periods of time, but this is not a fault.
●Keep this unit as far away as possible from electromagnetic equipment (such as
microwave ovens, TVs, video games etc.).
• If you use this unit on top of or near a TV, the pictures and/or sound on this unit may
be disrupted by electromagnetic wave radiation.
• Do not use this unit near cell phones because doing so may result in noise adversely
affecting the pictures and/or sound.
• Recorded data may be damaged, or pictures may be distorted, by strong magnetic
fields created by speakers or large motors.
• Electromagnetic wave radiation generated by microprocessors may adversely affect
this unit, disturbing the pictures and/or sound.
• If this unit is adversely affected by electromagnetic equipment and stops functioning
properly, turn this unit off and remove the battery. Then reinsert the battery and turn
this unit on.
Do not use this unit near radio transmitters or high-voltage lines.
• If you record near radio transmitters or high-voltage lines, the recorded pictures and/
or sound may be adversely affected.
●Do not extend the supplied cord or cable.
●Do not allow camera to come into contact with pesticides or volatile substances (can
cause surface damage or coating to peel).
●Never leave the camera and the batteries in a car or on a car hood in the summer.
It may cause leakage of the battery electrolyte, generation of heat, and may cause a
fire and the batteries to burst due to the high temperature.
Caring for your camera
To clean your camera, remove the batteries and wipe with a soft, dry cloth.
●Use a damp cloth to remove stubborn stains, before wiping again with a dry cloth.
●Do not use benzene, thinners, alcohol, or kitchen detergent, as these may damage the
outer casing and finish of the camera.
●If using a chemically-treated cloth, read the supplied instructions carefully.
When not using for a while
●Turn off camera power before removing batteries and card.
●Do not leave in contact with rubber or plastic bags.
●Store together with a drying agent (silica gel) if leaving in a drawer, etc.
Downloaded From camera-usermanual.com Panasonic Manuals
- 72 -
VQT3W70
Usage cautions and notes
Memory cards
●To prevent damage to cards and data
• Avoid high temperatures, direct sunlight, electromagnetic waves, and static electricity.
• Do not bend, drop, or expose to strong impacts.
• Do not touch connectors on reverse of card or allow them to become dirty or wet.
●When disposing of/transferring memory cards
• If using the “format” or “delete” functions on your camera or computer, this only
changes the file management information, and does not completely delete the data
from within the memory card. When disposing of or transferring your memory cards,
we recommend physically destroying the memory card itself, or using commercially
available computer data erasing software to completely delete the data from the card.
Data within memory cards should be managed responsibly.
LCD Monitor
●Do not press hard on the LCD monitor. This may cause uneven display and damage
the monitor.
●Do not rub the LCD monitor forcefully or push on it.
●In cold climates or other situations when the camera becomes cold, the LCD monitor
may be slightly less responsive than normal immediately after startup. Normal
brightness will return once the internal components have warmed up.
Batteries
●Be sure to remove the batteries from the camera if you are not using it for a long period
of time.
• If the batteries are left in the camera, a small electrical current continues to flow even
when the camera is turned off and the batteries will be gradually drained.
• If the temperature is too high or low or the humidity is high, the terminals may rust
causing a malfunction.
• Be sure to store the batteries in cool (15 °C to 25 °C (59 °F to 77 °F)) location with
low humidity (40%RH to 60%RH), where the temperature does not change sharply.
• Keep batteries away from toddlers and children.
●Do not drop, throw, or subject batteries to other strong impact.
• If you drop the batteries accidentally, make sure that the terminals have not been
damaged.
• Do not use batteries that show signs of leakage, deformation, discoloration, etc.
If battery leakage occurs, remove the batteries, thoroughly wipe dry the battery
compartment, and then insert new batteries or fully charged Ni-MH batteries.
●Always use the batteries in dry and clean conditions.
• Do not immerse the batteries in water or seawater or wet the terminals.
• If there is any foreign substance such as grease or dirt on the battery poles, the
recording/playback time may become extremely short. Before inserting the batteries,
carefully clean the poles with a soft dry cloth.
Downloaded From camera-usermanual.com Panasonic Manuals
- 73 -
VQT3W70
Usage cautions and notes
●Do not peel off or scratch the battery covering.
• Do not use commercially available batteries that are entirely or partly uncovered. Do
not use batteries with flat
poles. Using such batteries may cause leakage, heat
generation or explosion.
●Take spare batteries when going out.
• Be aware that the recording time is reduced in low temperature conditions such as at
a ski slope. Battery performance deteriorates when the ambient temperature is low
(10 °C (50 °F) or less) and the recording/playback time may become extremely short.
In particular, when using alkaline batteries, warm them in your pocket etc. before
using them. Make sure that pocket heaters or metal objects such as lighters do not
come into contact with the batteries when warming them in your pocket etc. The
battery performance will recover when the temperature returns to normal.
• Battery performance may vary greatly depending on the brand used, the storage life
from the date of manufacture, and the storage conditions of the batteries.
• Depending on the temperature and the conditions of use, the camera may not
operate properly or the batteries may run out (the remaining battery power may not
be accurately displayed). This is not a malfunction.
• Expended batteries may temporarily recover some performance if they are left for
a period of time. However, they cannot be used for an extended period. Be sure to
replace them with new batteries.
Rechargeable Ni-MH batteries
●You can use Ni-MH batteries after charging them with a dedicated battery charger.
However, improper handling of the batteries may cause leakage, heat generation, fire
or an explosion. Observe the following.
• If there is dirt on the battery poles, you may not be able to charge the batteries
normally. Carefully clean the battery poles and battery charger terminals with a soft
dry cloth.
• Do not peel off or scratch the covering on Ni-MH batteries.
• When the batteries are used for the first time, or after having not been used for a long
period of time, they may not fully charge. This is a characteristic of Ni-MH batteries
and is not a malfunction. Battery performance will return to normal after a few
charges and discharges.
• We recommend charging the batteries after they are fully discharged. If you repeat
charging before they are fully discharged, battery performance may be reduced. (This
is called “memory effect.”)
If a “memory effect” occurs, continue using the batteries until the camera can no
longer perform recording or playback and then charge them fully. Battery performance
will be restored after a few charges and discharges.
• Once the Ni-MH batteries have reached full charge, do not continue to charge them.
• Over time, Ni-MH batteries naturally discharge and their performance lowers even if
they are not used. If the batteries are left in the camera in this condition, they will be
drained excessively and may become unusable even if they are charged again.
• When storing the batteries for a long period of time, we recommend charging them
once a year. Remove the batteries from the camera and store them again after they
have been completely expended.
Downloaded From camera-usermanual.com Panasonic Manuals
- 74 -
VQT3W70
Usage cautions and notes
• Ni-MH batteries have a limited life. Battery performance gradually decreases over
time as you keep using them and time goes by. If the length of time you can use
the camera is extremely short even after fully charging the batteries, they may have
exceeded their life span. Purchase new batteries.
• Read the operating instructions for the battery charger.
Disposing of used rechargeable batteries
●Insulate the terminals using adhesive tape etc.
●Do not disassemble the batteries.
Personal Information
If you set [Age] in [Baby] Mode, keep in mind that the camera and recorded pictures will
contain personal information.
●Disclaimer
• Data containing personal information can be altered or lost due to malfunction, static
electricity, accidents, breakdowns, repairs, or other operations.
Panasonic will not be liable for any damage that occurs, direct or indirect, as a result
of the alteration or loss of data containing personal information.
●When ordering repairs or transferring/disposing of the camera
• To protect your personal information, please reset the settings. (→27)
• If any pictures are contained in the built-in memory, copy (→54) them to a memory card
if necessary, and then format (→28) the built-in memory.
• Remove the memory card from the camera.
• When ordering repairs, the built-in memory and other settings may be returned to the
initial purchase state.
• If the above operations cannot be performed because of a camera malfunction,
consult with the dealer or nearest Service Center.
When transferring or disposing of your memory card, see “When disposing of/
transferring memory cards” in the previous section.
Downloaded From camera-usermanual.com Panasonic Manuals
- 75 -
VQT3W70
Specifications
Power Source
DC 3 V LR6/AA Alkaline batteries (2) (supplied)
DC 2.4 V HR6/AA Rechargeable Ni-MH (nickel metal hydride)
batteries (2)
Power
Consumption
When recording:
1.4 W
When playing back: 0.8 W
Camera effective
pixels
14,100,000 pixels
Image sensor
1/2.33” CCD, total pixel number 14,500,000 pixels
Primary color filter
Lens
Optical 5 x zoom
f=4.7 mm to 23.5 mm
(35 mm film camera equivalent: 26 mm to 130 mm)/
F2.8 (Max. W) to F6.5 (Max. T)
Image Stabilizer
Optical method
Digital Zoom
Max. 4 x
Extended Optical
Zoom
Max. 10.5 x
(When the picture size is set to 3 million pixels [3M] or less.)
Focus
Face Detection/9-area-focusing/1-area-focusing
Focus range
Normal
15 cm (0.49 feet) (Wide)/0.6 m (1.97 feet) (Tele) to
Scene Mode
There may be difference in above settings.
Shutter system
Electronic shutter + Mechanical shutter
ISO Sensitivity
AUTO/100/200/400/800/1600
[High Sens.] mode: 1600 - 6400
Shutter speed
8 to 1/2000 th
White Balance
Auto [AWB]/Daylight/Cloudy/Shade/Incandescent/White set
Exposure (AE)
AUTO (Program AE)
Exposure Compensation (1/3 EV Step, -2 EV to +2 EV)
Metering Mode
Multiple
LCD monitor
2.7” TFT LCD (4:3) (Approx. 230,400 dots)
(field of view ratio about 100%)
Flash
Flash range:
(ISO AUTO) Approx. 0.6 m (1.97 feet) to 4.6 m (15.09 feet)
(Wide)
Microphone
Monaural
Speaker
Monaural
Downloaded From camera-usermanual.com Panasonic Manuals
- 76 -
VQT3W70
Specifications
Recording media
Built-in Memory (Approx. 10 MB)/SD Memory Card/
SDHC Memory Card/SDXC Memory Card
Picture size
Still picture
Motion pictures
When the aspect ratio setting is [4:3]
4320×3240 pixels / 3648×2736 pixels / 2560×1920 pixels /
2048×1536 pixels / 640×480 pixels
When the aspect ratio setting is [3:2]
4320×2880 pixels
When the aspect ratio setting is [16:9]
4320×2432 pixels
1280×720 pixels∗ / 640×480 pixels∗ / 320×240 pixels
30 fps
(∗ Only when using an SD Memory Card)
Recording file
format
Still picture
JPEG (based on Design rule for Camera File system, based on
Exif 2.3 standard)
Motion pictures
QuickTime Motion JPEG (motion pictures with audio)
Interface
Digital
USB 2.0 (High Speed)
Terminal
DIGITAL: Dedicated jack (8 pin)
Dimensions
Approx. 96.5 mm (W) x 62.0 mm (H) x 27.2 mm (D)
[3.8” (W) x 2.45” (H) x 1.07” (D)]
(excluding the projection part)
Mass (weight)
With card and battery: Approx. 173 (0.38 lb)
Excluding card and battery: Approx. 126 (0.28 lb)
Operating
temperature
Between 0 °C and 40 °C (Between 32 °F and 104 °F)
Operating humidity Between 10%RH and 80%RH
Downloaded From camera-usermanual.com Panasonic Manuals
- 77 -
VQT3W70
• SDXC Logo is a trademark of SD-3C, LLC.
• QuickTime and the QuickTime logo are trademarks or registered
trademarks of Apple Inc., used under license therefrom.
• Other names, company names, and product names printed in these
instructions are trademarks or registered trademarks of the companies
concerned.
Downloaded From camera-usermanual.com Panasonic Manuals