1
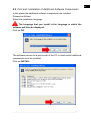
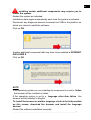
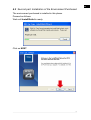
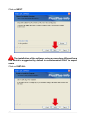
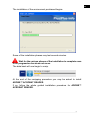
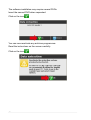
en
ENGLISH...............................................................5
2
en
SUMMARY
1 INTRODUCTION..........................................................................5
2 SYSTEM REQUIREMENTS.........................................................6
3 BLUETOOTH RESOURCES........................................................7
4 SOFTWARE INSTALLATION......................................................8
4.1 Preliminary Operations....................................................................9
4.2 First part: Installation of Additional Software Components...........11
4.3 Second part: Installation of the Environment Purchased..............15
5 INFORMATION REGARDING INSTALLATION ON WINDOWS™
VISTA AND WINDOWS™ 7 OPERATING SYSTEMS...................21
6 SOFTWARE ACTIVATION........................................................22
6.1 Manual Activation..........................................................................25
6.2 Automatic Activation......................................................................25
6.3 Release Notes...............................................................................26
7 AUTOMATIC CONFIGURATION...............................................27
8 USER MANUAL.........................................................................30
3
4
en
TEXA IDC4 SOFTWARE INSTALLATION
1 INTRODUCTION
This manual describes the installation procedure for TEXA IDC4 software.
The procedure described is valid for all versions and for all software
environments.
If you are installing the software on a Windows™ Vista or
Windows™ Seven operating system, consult the chapter,
INFORMATION REGARDING INSTALLATION ON WINDOWS™ VISTA
AND WINDOWS™ 7 OPERATING SYSTEMS.
If you have any difficulties in carrying out this procedure correctly
and completely, contact your local retailer.
5
2 SYSTEM REQUIREMENTS
Below you will find a list of system requirements for installing the software
on a PC.
Requirement
Idle
Advised
Service Pack
Service Pack 2
Service Pack 2
RAM
512 MB
1 GB
4 GB
8 GB
Space
DISK
on
HARD
Screen Resolution
1024x600 pixels 1024x600 pixels
Browser
Internet Explorer Internet Explorer 8
DVD player
Yes
Yes
USB Port
Yes
Yes
Wi-Fi
No
Yes
Bluetooth
No
Yes
Service Pack
Service Pack 2
32/64 bit
RAM
1 GB
2 GB
4 GB
8 GB
Space
DISK
on
HARD
Screen Resolution
1024x600 pixels 1024x600 pixels
Browser
Internet Explorer Internet Explorer 8
DVD player
Yes
Yes
USB Port
Yes
Yes
Wi-Fi
No
Yes
Bluetooth
No
Yes
To optimise use and reduce the risk of eventual compatibility problems, we
advise that this software be installed on a PC dedicated exclusively to use
in the workshop.
6
en
3 BLUETOOTH RESOURCES
The software provides special automatic configuration functions for TEXA
products equipped with Bluetooth technology.
To use these functions you must install the software on a PC equipped with
Bluetooth peripherals.
The software supports the following drivers:
•
•
•
MICROSOFT™
WIDCOMM™ 1.4.2 Build 10 or higher
TOSHIBA™ 4 or higher
If the drivers being used are not supported by the software, you
will not be able to use the automatic configuration procedures.
Alternatively, use the Bluetooth manual configuration functions provided
by your operating system.
We DO NOT recommend installing external Bluetooth
peripherals (such as a USB key) on PCs equipped with built-in
Bluetooth.
We recommend you check the Bluetooth system configuration and, if
necessary, consult qualified personnel for further information.
7
4 SOFTWARE INSTALLATION
The software installation is composed of two parts:
FIRST PART: INSTALLATION OF ADDITIONAL SOFTWARE
COMPONENTS
In order for the software to work properly certain additional components
must be installed on the PC.
The software carries out a quick scan of the PC to check which additional
components must be installed.
The list of additional components that need to be installed varies depending
on the operating system, the service pack, other previously installed
environments/versions (if any), etc.
The time required and steps involved in the installation depend on the
number and type of additional components.
Installing certain additional components may require you to
reboot the system.
Installation starts again automatically each time the system is restarted.
If your PC's operating system is very recent, you may not have to install
any additional components at all.
SECOND PART: INSTALLATION OF THE ENVIRONMENT
PURCHASED
The installation of the environment purchased begins when all the
additional components are installed.
At this point you may be required to install ADOBE™ ACROBAT
READER.
NOTES
A message will appear on your screen should any problems arise during
installation.
Contact Technical Assistance if the installation cannot be completed
successfully.
8
en
4.1 Preliminary Operations
Close all active applications.
Disconnect any USB/parallel hardware keys if installing the
software on a PC.
Deactivate any antivirus programs within the system.
Disconnect any diagnosis devices connected via USB to the
platform on which you intend to install the software.
Do not switch off your PC for any reason during the update
unless it is required by the software itself.
You must have system administrator rights in order to carry out
the installation of the software correctly.
In order to use the software correctly we recommend disabling
the standby mode in your PC. To do so go to the Control Panel and
select Power Options.
9
Insert the installation DVD in the player.
If the setup procedure doesn't start automatically, access the procedure on
the DVD through the system functions and launch the file setup.exe.
manually.
10
en
4.2 First part: Installation of Additional Software Components
In this phase the additional software components are installed.
Proceed as follows:
Select the installation language.
The language that you install is the language in which the
software will later be displayed.
Click on OK.
The software carries out a quick scan of the PC to check which additional
components must be installed.
Click on INSTALL.
11
A screen appears containing important information concerning
the installation.
Follow the instructions on this screen in order to carry out the installation
correctly.
Click YES.
The installation of additional components begins.
12
en
Installing certain additional components may require you to
reboot the system.
Restart the system as indicated.
Installation starts again automatically each time the system is restarted.
Disconnect any diagnosis devices connected via USB to the platform on
which you intend to install the software.
Click on OK.
Another additional component that may have to be installed is INTERNET
EXPLORER 8.
Click on OK.
NOTE
If the operating system you are installing the component in is set to Italian
, the browser will be installed in Italian.
If the operating system is set to a language other than Italian , the
browser will be installed in English.
To install the browser in another language, click on the link provided
on this screen, download the browser and install the language
desired.
Restart the software installation manually.
13
Among the additional components, the HASP key drivers are also
installed.
Insert the HASP key into a USB port when requested.
Wait for the red LED on the HASP key to turn on.
Click on OK.
14
en
4.3 Second part: Installation of the Environment Purchased
The environment purchased is installed in this phase.
Proceed as follows:
Wait until InstallShield is ready.
Click on NEXT.
15
Click on NEXT.
The installation of the software using a procedure different from
that which is suggested by default is recommended ONLY to expert
users
Click on INSTALL.
16
en
The installation of the environment purchased begins.
Some of the installation phases may last several minutes.
Wait for the various phases of the installation to complete even
if the progression bar does not move.
The data bank will now begin to unzip.
At the end of the unzipping procedure you may be asked to install
ADOBE™ ACROBAT READER.
If so, follow the whole guided installation procedure for ADOBE™
ACROBAT READER.
17
The software installation may require several DVDs.
Insert the second DVD when requested.
Click on the icon
.
You can now reactivate any antivirus programmes.
Read the instructions on the screen carefully.
Click on the icon
18
.
en
Read the instructions on the screen carefully.
Click on the icon
Click on
.
.
The installation is complete.
19
Two icons appear on the desktop:
Icon
Name
Description
Reference Chapter
IDC4
This allows you to start
-the software.
Allows you to access
the service functions
Exchange Manager
-reserved to certain
environments.
20
en
5 INFORMATION REGARDING INSTALLATION ON
WINDOWS™ VISTA AND WINDOWS™ 7 OPERATING
SYSTEMS
The installation of the software on Windows™ Vista and Windows™ 7
differs from others as a result of the functions implemented by the operating
systems, in particular the UAC security settings.
The UAC (User Account Control) is a protection module introduced by
Microsoft™ that manages the licenses of individual PC users in order to
prevent dangerous software from being run on the computer and to
safeguard the system data or components from damage.
The UAC intervenes both during the installation and when the software is
opened, momentarily blocking its operation.
You can deactivate the UAC by modifying the module's settings in the
Control Panel.
We recommend that the security settings be modified by
qualified personnel only.
For further information regarding the User Account Control see the
following Microsoft™ websites:
Windows™ Vista: http://support.microsoft.com/kb/975787 (Windows
Vista)
Windows™
7:
http://technet.microsoft.com/en-us/library/
cc709691%28WS.10%29.aspx
21
6 SOFTWARE ACTIVATION
Before you can use the software you need to accept the conditions
described in theLICENCE AGREEMENT and activate the software with
the COUNTERCODE.
Activation can be carried out in two ways:
•
•
MANUAL ACTIVATION: the countercode is entered manually.
AUTOMATIC ACTIVATION: the countercode is entered via Internet.
The following procedure describes the operations required to activate the
software.
Proceed as follows:
Click on the icon
.
Click on the icon of the environment installed.
22
en
Read the software LICENCE AGREEMENT carefully using the scroll bar
to view all the text.
The
icon becomes active only once you have reached the end of the
text in the LICENSE AGREEMENT.
Click on the icon
.
23
The SOFTWARE ACTIVATION screen appears.
This screen allows you to activate the environment installed.
Icon Name
Reference
Chapter
Description
Copy
Allows you to copy
ACTIVATION CODE.
the
Paste
Allows you to paste the
-ACTIVATION COUNTERCODE.
Manual
Activation
Allows you to carry out the
-activation manually.
Automatic
Activation* **
Allows you to carry out the
-activation automatically.
Cancel
Allows you to close the screen.
--
--
(*) You must have an active Internet connection.
(**) Not available when installing the software for the first time.
24
en
6.1 Manual Activation
This function allows you to carry out the activation manually.
You can attempt the activation a maximum of 20 times.
Proceed as follows:
1.
2.
3.
Click on
to copy the activation code.
Send the activation code to your retailer. The activation code can be pasted
in an email using the system functions.
Select and copy the countercode provided by your retailer using the system
functions.
4.
5.
6.
7.
to paste the countercode.
Click on
The countercode is pasted in the designated field.
.
Click on the icon
The environment is activated.
6.2 Automatic Activation
This function allows you to carry out the activation automatically.
The software downloads the countercode via Internet and fills in the
corresponding field automatically.
This function is available only when carrying out an update, not
when carrying out a first installation.
You must have an active Internet connection.
Proceed as follows:
1.
2.
3.
4.
Click on the icon
.
Wait for the viewing unit to connect to the server.
The countercode is downloaded.
The environment is activated.
25
6.3 Release Notes
The RELEASE NOTES is a document that describes the new features of
the version installed.
The RELEASE NOTES are displayed automatically.
NOTE
Before you can view the RELEASE NOTES you may have to accept the
ADOBE™ ACROBAT READER license agreement.
Icon Name Description
Ok
Allows you to close the screen.
Reference
Chapter
--
Allows you to view the Adobe™ Acrobat
Update Reader licence in case that it has not yet -been accepted.
26
en
7 AUTOMATIC CONFIGURATION
This function allows you to access the automatic configuration of the
devices/tools for the environment installed.
The function automatically starts when the RELEASE NOTES are closed.
The function only starts if you are carrying out a first installation.
The function will not start if you are updating the software, that is, if you
are switching from one version to another; this allows information on tools
which have already been configured to be kept.
Proceed with the automatic configuration of the devices/tools for the
environment installed.
27
It is possible to halt the configuration and continue at a later point.
Proceed as follows:
Select the environment installed.
Click on the icon
.
Enter the password 1236.
Click on the icon
28
.
en
Click on the icon
.
For further information regarding configuration see the user manual
available in the software.
29
8 USER MANUAL
This function allows you to view the software manual.
Connecting to the Internet allows the function to check if an updated version
of the manual is available.
You need an active Internet connection
Proceed as follows:
Click on the icon
30
.
en
Click on the icon
.
Click on the icon
.
If an updated version of the manual is available, it is downloaded and
displayed.
If no updated versions of the manual are available, the manual that is
integrated in the software is displayed.
31