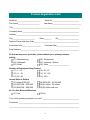
1
BioTouch
User Manual
Important Claim
Thank you for purchasing the Acroprint BioTouch Time Clock. Before installing your
clock, please read this manual carefully to understand its proper use and to avoid
damaging it.
You may not distribute or change any content of this manual in part or in full without
written consent from Acroprint Time Recorder Company.
FCC Warning:
Note: This equipment has been tested and found to comply with the limits for a Class A
digital device, pursuant to Part 15 of the FCC rules. These limits are designed to
provide reasonable protection against harmful interference when the equipment is
operated in a commercial environment. This equipment generates, uses, and can
radiate radio frequency energy and, if not installed and used in accordance with the
instruction manual, may cause harmful interference to radio communications. Operation
of this equipment in a residential area is likely to cause harmful interference in which
case the user will be required to correct the interference at his or her own expense.
Caution: Changes or modifications not expressly approved by the party responsible for
compliance could void the user’s authority to operate the equipment.
Lithium Battery Caution:
The circuit board on this time clock is populated with a lithium battery to protect data or
programs stored in the Random Access Memory (RAM). Do not, under any
circumstances, attempt to replace the lithium battery in the time clock. Failure to comply
may invalidate your warranty. Battery replacement should be done by qualified
personnel wearing the proper eye protection.
CAUTION: Danger of explosion if the battery is incorrectly replaced. Replace only with
the same or equivalent type recommended by the manufacturer. Discard used batteries
according to the manufacturer’s instruction.
This product utilizes a battery that contains Perchlorate Material.
Perchlorate Material – special handling may apply,
See www.dtsc.ca.gov/hazardouswaste/perchlorate
Table of Contents
Before You Start! ........................................................................................................... 1
What’s In the Box? ....................................................................................................... 1
Setting up the clock’s rules........................................................................................... 2
Shifts and Punch Setup............................................................................................. 2
Adding or modifying employee information .................................................................. 4
Enroll an employee’s finger template at the clock ..................................................... 5
Setting up Managers .................................................................................................... 6
Manager access to the menu.................................................................................... 6
Setting the time and date ............................................................................................. 7
Employee punching...................................................................................................... 7
Reporting ..................................................................................................................... 8
Clock Data.................................................................................................................... 9
Adding a Missed Transaction .................................................................................... 9
Downloading Raw Transactions................................................................................ 9
Deleting All Transactions......................................................................................... 10
Deleting All Enrolled Employees ............................................................................. 10
Initializing to Factory Defaults ................................................................................. 10
Cutoff Time................................................................................................................. 10
Editing Data at the clock............................................................................................. 11
Appendix...................................................................................................................... 12
Cleaning the clock...................................................................................................... 12
Wall Mounting Instructions ......................................................................................... 12
Acroprint® Limited Warranty ..................................................................................... 13
Product Registration Card.......................................................................................... 14
Before You Start!
What’s In the Box?
• Acroprint BioTouch Time Clock
• 5 Volts DC, 1A output Power Supply
• User Manual
• (1) Sample Proximity Badge
• Wall Mount Bracket w/screw
• Ziplok Bag: (3) Mounting Screws & (3) Plastic Wall Anchors
• (1) Table Stand Bracket
• (1) USB Flash Drive
1) Unpack time clock. Inspect for any damage that may have occurred during
shipment. Check box contents for any missing items.
2) If any damage is found or any parts are missing, please contact Acroprint
Customer Service at (800) 334-7190.
3) Connect the BioTouch power supply and plug it into a 120V/240V A/C power
source to turn the clock on.
Do not attempt to service the BioTouch Time Clock yourself.
Disassembling the clock will void the warranty. Always follow the
instructions in the User Guide.
• Do not place the clock in direct sunlight. Bright light may significantly affect
finger readings or cause finger verification to fail.
• The clock is designed for indoor use in a temperature range of 32-104º F (040º C). The clock is not waterproof or shockproof. Keep the clock away from
heat sources such as radiators. Avoid dusty environments or exposure to
chemicals.
• The clock may be placed upright on a solid surface or mounted to a wall with
the included wall bracket & mounting screws. Avoid locations where the
device will be susceptible to vibrations and shock, such as a slamming door.
• The clock warranty does not cover defects or damages arising from improper
installation, improper storage, abuse, or unauthorized service.
1
Setting up the clock’s rules
Setting the clock rules involves setting up your shifts, punch parameters, and
holidays.
Shifts and Punch Setup
Shifts are used to determine the time of day that employees are due to start
work, leave and return from lunch, and leave for the day. These times are used
along with the Punch Early/Late Setup settings to mark unusual punches in red
on the timecard. An example would be when an employee punches in earlier
than their Shift Start time and the Early Shift Start setting, the punch will be in red
on the time card. This allows the supervisor to quickly isolate punches that are
outside of the company policies and procedures.
The steps involved in setting up or modifying the shifts and punch setup are to
download the current shift and punch settings to the USB stick, open them in
Excel, enter your company’s data, and then upload them back to the clock.
Step 1: If this is your initial setup, Acroprint has already loaded the shift file onto
the USB stick, so you can skip to step two. Otherwise, download the ‘Shifts’ file
to the USB stick.
a. Plug the USB stick into the side of the clock.
b. Press the ‘Menu’ button, then select Shift and press ‘OK’, then select
Download Shift and ‘OK’.
c. When completed, select Download Setup and ‘OK’.
d. When completed, press ‘ESC’ repeatedly to exit the menus or simply allow
the menus to time out.
e. Remove the USB stick from the clock.
Step 2: Open the files in Excel
a. Plug the USB stick into your computer.
b. If a directory does not automatically open, use Windows Explorer to
navigate to the USB directory.
c. Double click on the ‘Shift_Setup’ file. Excel should launch and open the
file. If not, run Excel and open the shift file from the USB stick’s directory.
d. Now double click to open the ‘Global_Setup’ file also.
2
Step 3: Enter your company’s rules
a. Read the information at the top of the ‘Shifts_Setup’ spread sheet and
then, starting with Shift one, enter the employees’ Start time, Lunch start,
Lunch end, and End time. Enter this information for each day worked.
Leave the scheduled days off blank.
b. Leave the ‘Cutoff’ time at midnight unless your employees work across
midnight. If so, see ‘Cutoff’ Time’ in the back of the manual.
c. When finished, Save the file back to the USB stick.
d. Now open the ‘Global_Setup’ file in Excel. There are two tabs: Holidays
and Punch. Click on Punch.
e. Read the information at the top of the Punch Early/Late Setup spread
sheet and then set the six settings according to your company’s policies.
f. Next, click on the Holidays Setup tab.
g. Enter your company’s holiday’s names and dates.
h. Save the file back to the USB stick.
i. Eject and remove the USB stick from your computer.
Step 4: Upload the files back to the clock
a. Plug the USB stick into the side of the clock
b. Press the ‘Menu’ button, then select Shift and press ‘OK’, then select
Upload Shift and ‘OK’.
c. When complete, select Upload Setup and ‘OK’.
d. When complete, press ‘ESC’ repeatedly to exit the menus or simply allow
the menus to time out.
e. Eject and remove the USB stick from the clock.
3
Adding or modifying employee information
Employees are added to the clock along with one or more of the following: a
password, a proximity card/badge number, a finger template.
The steps involved in adding or modifying employees are to download the current
clock user file to the USB stick, open the user file in Excel, make your additions
or changes, upload the user file back to the clock, and then enroll the employee’s
finger templates on the clock.
Step 1: If this is your initial setup, Acroprint has already loaded the user file onto
the USB stick, so you can skip to step 2. Otherwise download the user file to a
USB stick:
a. Plug the USB stick into the side of the clock.
b. Press the ‘Menu’ button, select User Mgt and ‘OK’, then Download User
and ‘OK’.
c. When complete, press ‘ESC’ repeatedly to exit the menus or simply allow
the menus to time out.
d. Remove the USB stick from the clock.
Step 2: Open the user file in Excel
a. Plug the USB stick into your computer.
b. If a directory does not automatically open, use Windows Explorer to
navigate to the USB directory.
c. Double click on the ‘User_Setup’ file.
d. Excel should launch and open the file. If not, run Excel and open the
‘User_Setup’ file from the USB directory.
Step 3: Enter your employee data
a. Follow the instructions at the top of the spread sheet and add your
employee(s) or modify existing data as necessary.
Note: An employee’s password and badge number can be entered via the
Excel spreadsheet and USB stick, but a finger template can only be
entered at the clock.
Note: Before setting an employee to Manager, see “Setting Up Managers”
b. Save the file back to the USB stick.
c. Remove the USB stick from your computer.
4
Step 4: Upload the ‘User_Setup’ file back to the clock
a. Plug the USB stick into the side of the clock.
b. Press the ‘Menu’ button, select User Mgt and ‘OK’, then ‘Upload User’ and
‘OK’.
c. When finished, press ‘ESC’ repeatedly to exit the menus or simply allow
the menus to time out.
d. Remove the USB stick from the clock.
Step 5: Enroll an employee’s finger template at the clock
a. Press the ‘Menu’ button, select User Mgt and ‘OK’, select UserView and
‘OK’, select the specific employee and ‘OK’ , select Edit and ‘OK’, and
then select Finger and ‘OK’.
b. The clock will request the user to press a finger (press and release quickly
for best results) at least twice to insure a good read. When completed, the
clock will return to the previous screen.
c. If you wish to record more than one finger for an employee, simply select
Finger and ‘OK’ again and repeat 2 above.
d. When finished, press ‘ESC’ once, then press ‘OK’ to save the finger
template(s).
e. Now press ‘ESC’ repeatedly to exit the menus or you can simply allow the
menus to time out.
Note: Employee card/badge numbers and passwords can be entered at the clock
by following Step 5 above; just select Card or Password instead of Finger on the
menu.
However, these types of entry are more easily done on the PC through the Excel
spread sheet.
5
Setting up Managers
The clock data can be protected by designating one or more users as Managers.
Special care must be taken to insure that a Manager has a finger template, a
badge number, or a password registered on the clock. If there is a least one
Manager on the clock, the menus can only be accessed by a Manager who
enters their ID and password, or their finger image, or swipes their badge.
IMPORTANT: Do not change a User to a Manager unless they have a finger
template registered or a password or badge assigned.
To change a User to an Administrator at the clock:
1. Press the ‘Menu’ button, select User Mgt and ‘OK’, select UserView
and ‘OK’, select the specific employee and ‘OK’, select Edit and ‘OK’,
and then select Privilege and ‘OK’.
2. Select Manager and ‘OK’, and then press ’ESC’ once only.
3. The clock will prompt you to “Save?” Select ‘OK’.
4. When complete, press ’ESC’ repeatedly to exit the menus or simply
allow the menus to time out.
To change a User to a Manager via the Excel spreadsheet:
Follow the instructions for “Adding and Modifying Employee Information”.
When editing the data on the spread sheet, locate the employee you want
to change to a Manager, change the ‘0’ to ‘1’ in the Admin column.
Manager access to the menu
IMPORTANT: Only employees with a Manager status can access the clock
menu when one or more Managers are enrolled. Any one of the following three
processes allow a Manager to access the menu:
1.
2.
Press the ‘Menu’ button (clock responds with ‘Manager?’)
Now do one of the following:
a. Touch finger on the sensor
or
b. Swipe Proximity Card/Badge
or
c. Enter the Manager’s ID number and ‘OK’, then enter the Manager’s
Password and ‘OK’
6
Setting the time and date
To set the time and date at the clock:
1. Press the ‘Menu’ button, select Setup and ‘OK’, select System and
‘OK’, select Time and ‘OK’.
2. Use the arrow keys or key pad to change a setting. Press ‘OK’ to move
to the next setting.
3. When finished, press ‘ESC’ once only.
4. The clock will prompt you to “Save?” Select ‘OK’
5. When finished, press ’ESC’ repeatedly to exit the menus or simply
allow the menus to time out.
Employee punching
Finger:
1. Touch an enrolled finger on the sensor.
2. Alternately, the employee can enter their employee ID first, press ‘OK’,
and then press their finger.
Badge:
1. Hold the proximity badge close to the clock immediately below the
finger reader.
ID and Password:
1. The employee will enter their User ID and press ‘OK’.
2. The clock will prompt the user to enter their password
3. The employee will enter their password and press ‘OK’
Clock Response
The clock will respond by displaying the employee’s name and ID number and
saying “Thank You!”
7
Reporting
Two transaction reports can be generated: Punch Report and Time cards. To
generate either or both reports:
Step 1: Create the report
1. Plug the USB stick into the side of the clock.
2. Press the ‘Menu’ button, Report, and then select the specific report.
3. Set the Starting and Ending dates for the report data. Use the arrows and
the key pad to change the values. Press ‘OK’ to move to the next setting.
When done press ‘ESC’ once only.
4. The clock will prompt you to “Start report”. Select ‘OK’
5. Once complete, follow the same process to create the other report if
desired.
6. When finished, press ’ESC’ repeatedly to exit the menus or simply allow
the menus to time out
7. Remove the USB stick from the clock.
Step 2: View the report in Excel
1. Plug the USB stick into your computer.
2. If a directory does not automatically open, use Windows Explorer to
navigate to the USB directory
3. Double click the report file you want.
4. Excel should launch and open the file. If not, run Excel and open the
report file from the USB directory.
You can now edit the report to install missed punches and totals based on your
company’s time and attendance policies.
8
Clock Data
Adding a Missed Transaction
An employee’s missed punch can be added at the clock
1. Select ‘Menu’, User Mgt, User View, Select the specific employee, and
then select Retroactive.
2. Set the date and time for the missed transaction. Use the arrows and the
key pad to change the values. Press ‘OK’ to move to the next setting.
When done press ’ESC’ once only.
3. The clock will prompt you to “Save”. Select ‘OK’ to save the transaction
or ’ESC’ to discard.
4. When finished, press ’ESC’ repeatedly to exit the menus or simply allow
the menus to time out.
Downloading Raw Transactions
The GLog is similar to reports except that the file that is created will contain just
the raw transactions. This can be ideal for importing your data into an application.
The data download has two options: 1) collect new transactions since the last
download, and 2) collect all transactions on the clock.
To get the raw transaction file:
1. Plug the USB stick into the side of the clock
2. Select ‘Menu’ and then Data Man
3. Select Down GLog to download only transactions since the last download,
or Down All GLog to download all the transactions on the clock.
4. When finished, press ‘ESC’ repeatedly to exit the menus or simply allow
the menus to time out.
5. Remove the USB stick from the clock.
You can now insert the USB stick into your PC to upload your clock data file(s)
for further processing as desired.
9
Deleting All Transactions
This function is rarely if ever used. Use with caution as you will lose all
transaction data on the clock. To remove all transaction from the clock:
1. Select ‘Menu’, Data Man, ‘Delete all Glog’ then press ‘OK’ when clock
shows ‘Delete?’ or press ‘ESC’ to go back.
2. When finished, press ‘ESC’ repeatedly to exit the menus or simply allow
the menus to time out.
Deleting All Enrolled Employees
This function is rarely if ever used. Use with caution as you will lose all
employees on the clock. To remove all enrolled employees:
1. Select Menu, Data Man, ‘Clear all Enroll’ then press ‘OK’ when clock
shows ‘Continue?’ or press ‘ESC’ to go back.
2. When finished, press ‘ESC’ repeatedly to exit the menus or simply allow
the menus to time out.
Initializing to Factory Defaults
This function is only used when you want to clear all information from the clock
and return all settings to their factory defaults. Use with caution as you will lose
all employees and transactions on the clock. To reinitialize the clock:
1. Select ‘Menu’, Setup, InitSys, and then press ‘OK’.
2. When finished, press ‘ESC’ repeatedly to exit the menus or simply allow
the menus to time out.
Cutoff Time
A normal day by default begins at exactly 12:00 AM. Some companies, however,
may have employees who work shifts that end at 12AM or even into the next day.
Also, there may be shifts that begin at 12AM or earlier and end the next day.
The Cutoff time is used to 'move' such employees workday change time
backward or forward from 12AM so their hours are credited to the proper workday.
10
Editing Data at the clock
In general, we recommend editing most data at the PC. The resources on a PC
and in the Excel program provide a robust, familiar environment for adding and
editing information. This is the approach used throughout this manual.
However, there are times when you may wish to perform these task at the clock.
The example we’ll review is entering an employee name:
1.
2.
Select ‘Menu’, User Mgt, Add User, User Name
Press the key containing the first letter of the employee name and then
press ‘OK’.
3. Press the number that is over the letter you wish to enter.
4. Press the key containing the next letter of the employee’s name and
then press ‘OK’
5. Again, press the number that is over the letter you wish to enter.
6. Repeat steps 4 and 5 above until complete
7. Press ‘ESC’ to get back to the Add User Menu.
8. Press ‘ESC’ to exit the Add User Menu
9. Press ‘OK’ to save the data.
10. Press ‘ESC’ repeatedly to exit or simply allow the menus to time out.
11
Appendix
Cleaning the clock
Do not use cleaning products that contain alcohol or other strong chemicals as
they could discolor or crack the clock housing. Use a soft damp cloth to remove
dirt. Wipe dry.
Wall Mounting Instructions
The BioTouch clock can be placed on a table or desk and it can also be mounted
to a wall using the included wall bracket.
Use the bracket to mark (3) screw holes on the wall. Use the included screws
and wall anchors (if necessary) to securely attach the bracket to the wall.
Attach the clock to the bracket using the included machine screw.
• Do not place the clock in direct sunlight. Bright light may significantly affect
finger readings or cause finger verification to fail.
• The clock is designed for indoor use in a temperature range of 32-104º F (040º C). The clock is not waterproof or shockproof. Keep the clock away from
heat sources such as radiators. Avoid dusty environments or exposure to
chemicals.
• Avoid locations where the device will be susceptible to vibrations and shock,
such as a slamming door.
• The clock warranty does not cover defects or damages arising from improper
installation.
12
Acroprint® Limited Warranty
Should you have any questions concerning your warranty information or
supplies, please contact the dealer or store where you purchased the equipment.
This product is guaranteed to the original purchaser for a period of one (1) year
from original purchase date against defective materials and workmanship when
used under normal operating conditions. The repair or replacement of any
defective component or part and any necessary adjustments will be made free of
charge provided that the machine is shipped prepaid to the factory service center
shown below, securely packaged and shipped in the original shipping container.
This warranty applies to Acroprint products purchased and retained in the U.S.A.
The guarantee is not applicable if the device has been subject to misuse, abuse,
negligence, accidents, power surges and lightning. The guarantee is not
applicable if the serial number has been altered, defaced or removed or if the
device has been tampered with or taken apart by other than authorized service
personnel.
Please return the warranty card on the following page to Acroprint to
register your product. Or, if you would like to register online, go to
www.acroprint.com. For your future reference, please fill out the information
below and keep it in a safe place.
Model Number __________________________________________________
Serial Number __________________________________________________
Date Purchased _________________________________________________
Purchased From _________________________________________________
Location _______________________________________________________
Telephone Number _______________________________________________
Acroprint Time Recorder
5640 Departure Drive
Raleigh, NC 27616-1841
13
Product Registration Card
Model No._______________________
Serial No.___________________________
First Name______________________
Last Name_____________________________
Title____________________________________________________________________
Company Name ___________________________________________________________
Address__________________________________________________________________
City_______________________
State________
Zip_______________________
Daytime Phone with Area Code_______________________________________________
Purchased From___________________
Purchase Date_________________________
Email Address ____________________________________________________________
So that we may serve you better, please indicate your primary business
activity.
(01) Manufacturing
(04) Government
(02) Wholesale
(05) University / School
(03) Retail
(06) Other _____________________
Number of Employees Using Product
(11) 1 – 10
(14) 50 - 75
(12) 11 - 25
(15) 76 - 100
(13) 26 - 49
(16) 100+
Annual Sales in Dollars
(21) Under $100,000
(22) $100,000 - $250,000
(23) $250,000 - $500,000
(24) $500,000 - $1,000,000
(25) $1 million - $5 million
(26) $5 million and over
Do You Use Microsoft Windows
(31) Yes
(32) No
If not, what operating system do you use? _____________________________________
Comments: ______________________________________________________________
________________________________________________________________________
14
06-0415-000 Rev. A