1
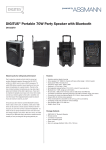
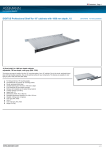
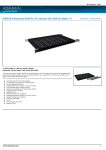
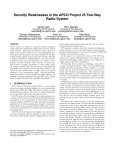
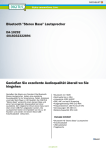
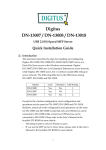
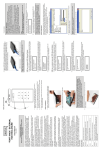
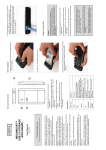
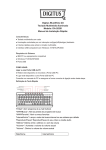
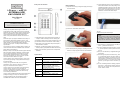
Each part and function
HDD Installation
(1) Open the back cover by pushing down slightly according to
the arrow direction.
LOCKUP™ USB 3.0
EXTERNAL HDD
ENCLOSURE 2.5''
(4) Connect DIGITUS LockUp™ and your Desktop or Laptop
with the official USB3.0 cable in the package. It’s also
compatible with USB2.0, but in that case, the data transfer
speed is dramatically slowed down and it may not supply
enough power. The insufficient power supply can cause
malfunction to DIGITUS DIGITUS LockUp™.
User Manual
DA-74002
Precautions before use
Please read the following instructions carefully before using.
(2) Install a 2.5” SATA HDD as below picture.
LockUp™ (is compatible with SATA Type 2.5” HDD. The
product doesn’t include a HDD. Users have to purchase and
install their own 2.5” HDD (SATA for Laptop). DIGITUS cannot
take any responsibility to any HDD failures and malfunction.
Users would need to contact the HDD manufacturers in
relation to any HDD malfunction and after sales services of
HDD.
Please don’t place any magnetic material around LockUp™. It
may damage the data of HDD installed in LockUp™. Also,
don’t drop or cause any hard impact to LockUp™. The data of
HDD in LockUp™ can be damaged easily by magnetic
material or strong impact. It is always advisable to back up
important data.
The encryption of LockUp™ is hardware based. LockUp™ can
connect and work with all OS, Embedded devices and media
players which support USB host.
Basically LockUp™ uses AES (Advanced Encryption Standard)
256 bit encryption algorithms. Additionally, it supports higher
level encryption management via Password input. If a user
loses or forgets password of LockUp™, nobody including
(DIGITUS – manufacturer) can rescue or recover any data.
User need to format the HDD to use it again.
LockUp™ doesn’t use any S/W for encryption. Users can set
up the security by inputting 1~8 digits password according to
the front LED status.
LockUp™ encrypts the entire HDD, once encrypted it is
impossible to read or decode any data on the HDD even
though it’s connected with other PC systems.
LockUp™ supports ‘un-mount’ feature. When disconnecting
LockUp™ from PC, please use ‘un-mount’ feature on
LockUp™ or ‘Safely Remove Hardware’ of Windows. If you
disconnect USB cable during data transfer, data loss may
occur. Please pay attention to it.
LockUp™ supports USB3.0 Super-Speed. Data transfer speed
(reading and writing) of LockUp™ can be affected by the
performance (RPM) of HDD. The data transfer speed of
7,200RPM HDD is rather faster than 5,200RPM HDD.
The first Password Setting and Password Input
Caution:
DIGITUS LockUp™ works only as security mode. In case
of installing a used HDD which got previous data, the
HDD installed in LockUp™ should be initialized. So,
certainly make the data back-up in the HDD before using.
(1) LED indicator light: shows password input and status of
LockUp™. Read the message next to the blinking LED.
(2) Input button: buttons for the numeric password input. (0~9)
(3) Lock button: Mount/Un-mount function or Menu setting
(4) Enter button: press ‘Enter’ button after password input or
Menu selection to confirm it.
(5) USB Port: 5 pin Mini-B type USB3.0 port connecting to
desktop or laptop. (Compatible with USB2.0 devices also)
(6) Back cover: Screw-less type back cover for simple HDD
installation.
Specification
Model Name
DIGITUS LockUp™
Power
USB Power
HDD
Interface
OS
Size/Weight
Package
contents
2.5 inch SATA I, II, III HDD/SSD (Max
9.5mm thickness HDD)
USB 3.0 Super Speed (Max 5Gbps),
USB2.0 compatible. (USB3.0 Max
speed is available when it’s connected
with USB3.0 host device.)
All Operation Systems recognizing USB
storage device
(W) 78mm x (H) 135mm x (D) 16mm /
75g(w/o HDD)
DIGITUS LockUp™, USB3.0 cable,
Pouch, User Manual.
(1) When LockUp™ is connected with PC via USB port, LED
next to “1_USB connected” turns on.
(3) Close the back panel by pushing up according to the arrow
direction. LockUp™ supports screw-less HDD installation.
(2) In case of installing new HDD in LockUp™, LED next to
“2_Input new password, and then press ‘Enter’ button”
turns on.
(3) Enter your own Password (1~8 digit PIN setting) and press
‘Enter’ button.
(4) After entering new password in the above (3), LED next to
“3_input password and then press ‘Enter’ button” turns on.
It’s the process to identify your password. Just enter the
same password you entered in the previous step and press
‘Enter’ button to apply it. (If you enter wrong or different
password, you can’t go to the next. You have to go back to
(2).
(5) In case of installing HDD which already got password input,
LED next to “3_input password and then press ‘Enter’
button” turns on. Just enter the correct password and press
<Enter> button to confirm.
Menu Navigation
HDD Initialization
Password Change
HDD in LockUp™ should be initialized, partitioned and
formatted first for common usage (Reading and writing)
via your OS. Below instructions are for Windows 7.
(Windows XP and Vista are also similar – Refer to below
instruction!)
Press <Lock> button → <0> button → <Enter> button
in order.
User can change the current password. The procedure to
change the password is the same with new password input.
HDD Initialization
(6) Now, you can begin the partitioning and formatting process
on the Hard Disk. Right-click on the driver’s space details
(below picture) and select “New Simple Volume…” or “New
Partition...”.
(1) Select [Control Panel] -> [Administrative Tools], then open
up [Computer Management], then go to [Disk Management]
(2) Your PC can’t recognize the HDD installed in LockUp™
because it’s initialized only by Software.
Press <Lock> button → <9> button → <Enter> button
in order.
Caution:
If HDD is initialized, it’s impossible to recover the data in
the HDD.
HDD Connection / Disconnection (Smart Mount/Un-mount
function)
Press <Lock> button over 2 seconds.
Abruptly removing storage devices or external hardware from
your PC can damage to the device and result in loss of data.
So, it’s recommended to get in the habit of safely removing
your external hardware via “Safely Remove Hardware”. But,
it’s rather annoying job.
► AES (Advanced Encryption Standard) is s symmetrickey encryption standard adopted by the U.S.
Government. The AES ciphers have been analyzed
extensively and are now used as a world top level
security standard. AES 256 is the most advanced
algorithm among AES standards (AES 128, 192, 256).
(4) I forgot my Password. Can I recover the data on HDD?
(7) “New Simple Volume Wizard” comes up giving you some
selections about the new partition. In the first tab select the
partition type. The usual is primary. Click ‘Next’ and set the
partition size. Set the max size if you want all the space to
be allocated to a single partition or smaller size if you want
to create more partitions.
HDD initialization means that the HDD installed in LockUp™ is
initialized. After HDD initialization, users need to set up
partition and format process again.
(3) What’s AES 256 Encryption?
► No, it’s impossible. Without the correct password,
nobody can connect and read the data on HDD of
LockUp™.
(5) In case DIGITUS LockUp™ itself gets damaged, how can I
recover the data or use the installed HDD without data loss?
Can I buy new DIGITUS LockUp™ and use it without any
problem with the HDD?
► In case of physical damage of LockUp™, please visit
our official A/S centers in the world with 1) the damaged
LockUp™, 2) its HDD (installed) and 3) new LockUp™.
We can recover and make the HDD compatible with the
new LockUp™ after checking the combination of
product serial number and correct password. But, if
users forgot the password of LockUp™ (HDD), there’s
no way to recover the data.
(3) Right-click on the external hard drive and select [Initialize
Disk] to begin the partitioning and formatting process.
Caution:
Please be careful not to initialize the used or existing HDD
which includes any valuable DATA on it.
(6) If I take off HDD from LockUp™ and connect it to PC, PC
can read and recover any data on the HDD?
► No! PC can’t read anything because it’s fully encrypted.
It just recognizes it as an unformatted HDD.
(4) Select “MBR” in the menu of [Initialize Disk] and press “OK”
(7) My TV supports Media Play (Audio and Video). Can I
connect LockUp™ to my TV and play the media files even
under Safety Mode?
Q&A
(1) Is there any limitation on 2.5” HDD Capacity which
LockUp™ can use?
► There’s no limit on 2.5” HDD capacity, but there’s a limit
on the depth of 2.5” HDD. LOCKDOWN can install
standard 9.5mm depth (thick) 2.5” HDD only. In case of
12.5mm thick HDD, it can’t be installed and used.
LockUp™ supports smart MOUNT and UN-MOUNT feature to
make simple, convenient and safe hardware removal. Press
“MENU” button over 2 seconds, then HDD is automatically
disconnected. It works like [Safely Remove Hardware]. * To
run this function, there should be no data transfer between PC
and DIGITUS at that time.
Again, press “MENU” button over 2 seconds, then HDD is
automatically connected. Users have to enter the correct
password again to run it.
Caution:
In case over 2TB capacity HDD, please select ‘GPT’ to use
all capacity.
(5) [Initialize Disk] is completed, then the Hard Disk displays
“Online”.
(2) Is there any slow down or speed delay in data transfer due
to using Security Mode?
► Regardless of Security Mode, LockUp™ supports the
same USB3.0 Super Speed. It’s a Hardware type
Encrypt solution.
► Yes, it’s the greatest advantage of LockUp™. You can
connect LockUp™ to any device which supports USB
Host. After entering Password, it works just like USB
3.0 super speed storage. (Blu-ray Player, Mobile phone,
Media Player, TV, PC, MAC ..)