1
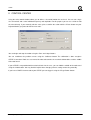
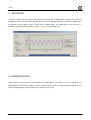
STEVE
Software User Manual
CONTENT
Control Center
Handshake Generator
Custom Handshake
Recorder
Administration
mage Engineering GmbH & Co. KG . Augustinusstraße 9d . 50226 Frechen . Germany
T +49 2234 995595 0 . F +49 2234 995595 10 . www.image-engineering.de
STEVE
I INTRODUCTION
STEVE is designed for qualitative analysis of image stabilizing systems under reproducible, realistic
conditions. The device is delivered with camera mount and a controller box with a USB interface to the
computer. DIGITUS – an addition device allowing to press the camera shutter release button automatically is
optionally available. To run the software provided with STEVE a Windows computer with a USB interface is
required. STEVE's "Control Center" is a software to control the motion of the two axes – pitch and yaw.
www.image-engineering.de
2
STEVE
II CONTROL CENTER
Using the main control window allows you to define a sinusoidal motion for each axis. You can turn single
axes on and off, and set the individual frequency and amplitude. For this purpose you can use a slider or edit
the value directly. If you manually edit the value, please confirm the action with the "Enter" button on your
keyboard before you proceed with the next value.
You can begin and stop the motion using the "Run" and "Stop" buttons.
You can recalibrate the position sensors using the "Calibrate" button. The calibration is done everytime
STEVE is turned on. Both axes are moved in order to determine the mechanical boundaries and the middle
of the total travel.
If your STEVE is not provided with mechanical locks for the axes, you can hold the middle of the total travel
using the "Hold" button. You may find this helpful when changing camera settings or focusing manually.
If you have a DIGITUS connected to your STEVE you can trigger it using the "Finger Down" button.
www.image-engineering.de
3
STEVE
III HANDSHAKE GENERATOR
You can create your own motion curves using the Handshake Generator (Menu Tools -> Handshake
Generator...). Two sine waves are superimposed in order to achieve this. You can define amplitude,
frequency and phase for each of the two curves which are displayed as the red and green lines. The
resulting curve is blue.
The amplitude is given in "counts" which is the metric of the positioning sensors. One count corresponds to
one micrometer. Please note that the amplitude here denotes the displcement between the sensor and
magnetic tape, the corresponding total travel of the voice coil will be different and has to be calculated.
You can extend the duration of the custom curve by selecting a multiplier greater than one. Since the size of
the data block for the curves is limited, this is done at the expence of the sampling precision, i.e. extending
the duration leads to decreasing the sampling rate. The effect of the multiplier is shown on the images
above.
You can save your custom curve in order to use it for the motion. In order use it please select Tools ->
Custom Handshake... in the menu.
www.image-engineering.de
4
STEVE
IV CUSTOM HANDSHAKE
Using the Custom Handshake module you can load and apply the curve data to the yaw and pitch
controllers. Before loading the data, its sampling multiplier has to be specified. It may take a few seconds
until the data is loaded, a progress bar represents the process. Please don't take any further action while
loading the curve data.
You can select either the motion should be only performed once or in a loop. If using a DIGITUS in order to
press the shutter release button, after loading the data you can double-click on a curve to define a pressing
point. The field "Finger release" displays details about this trigger. Please note that only one trigger can be
set for both, yaw and pitch axes. Setting the trigger for a specific axis will remove the trigger for the other
one, if it was available. The pressing duration value defines the time DIGITUS will keep pressing the shutter
release button.
Furthermore, you can define the shutter lag, if known, in order to take the picture exactly at the defined
trigger position. DIGITUS will then start pressing the button before the trigger point taking the shutter lag into
consideration.
The motion according to the custom data can be started and stopped using the buttons on the bottom right.
www.image-engineering.de
5
STEVE
V RECORDER
Using the recorder you can capture and visualize the motion curves logged by the control units using the
positioning sensors. You can select, which data you want to record and trigger the recorder immediately after
pressing the "Start" button or make it wait until the motion begins. The motion data can be saved as a
tabulator separated text file for further analysis, e.g. in a custom spread sheet.
VI ADMINISTRATION
Some features concerning the administration and debugging of the device, such as uploading and
downloading the control units software and the communication console are protected by password. Please
contact [email protected] if you experience any issues.
www.image-engineering.de
6