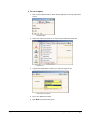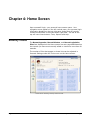
1
Legistar 5 User Manual Generic Edition With ATS Daystar Computer Systems, Inc. Copyright 2010 Chapter 1: Welcome to Legistar 5 1 What is Legistar? ................................................................... 1 Reports ................................................................................ 1 InSite................................................................................... 1 Chapter 2: Getting Started 2 How To: Log in to Legistar 5 .................................................... 2 Login Fields ........................................................................... 4 Personal Settings ................................................................... 5 How To: Change Your Personal Settings .................................... 6 Personal Settings – General..................................................... 7 Personal Settings – Legislative Files .......................................... 8 Personal Settings – Agendas.................................................... 9 Personal Settings – Minutes................................................... 10 Personal Settings – File Locations ........................................... 11 Personal Settings – Color Settings .......................................... 12 How To: Change Your Password ............................................. 13 How To: Lock and Unlock Records .......................................... 14 Chapter 3: Working with Legistar Overview 15 Screen Layout Overview ....................................................... 15 Main Navigation Bar ............................................................. 15 Common Screen Layout ........................................................ 16 Common Fields and Buttons .................................................. 17 Date Fields and Calendar Buttons ........................................... 17 Data Range Searching .......................................................... 18 Drop-Down List Boxes .......................................................... 19 List-to-List Boxes ................................................................. 19 Record Set Navigation .......................................................... 21 Disabled Buttons.................................................................. 22 Legistar Shortcut Keys .......................................................... 22 Spell Check ......................................................................... 23 How To: Use Standard Paragraphs ......................................... 25 How To: Run a Report .......................................................... 26 Chapter 4: Home Screen 28 Recently Visited ................................................................... 28 General Reports from the Home Screen .................................. 29 Chapter 5: Legislative Files 40 Field Definitions ................................................................... 40 Tools Menu ......................................................................... 42 File Text Tab ....................................................................... 44 File Text Editor .................................................................... 45 Using Word as your Editor ..................................................... 46 The History Tab ................................................................... 46 The Attachments Tab ........................................................... 48 The Associations Tab ............................................................ 49 The Details Tab ................................................................... 51 The Info 1 and Info 2 Tabs .................................................... 52 The Approvals Tab ............................................................... 53 How To: Create a Legislative File............................................ 55 Legistar 5.0 User Manual: Generic Edition How To: Create Legislative File Text ....................................... 60 How To: Add Attachments ..................................................... 61 How To: Change Versions ..................................................... 62 How To: Add History Lines .................................................... 64 How To: Change a File’s Status .............................................. 65 How To: Spell Check a Legislative File ..................................... 66 How To: Search for Legislative Files ........................................ 67 How To: Browse Legislative Files ............................................ 69 How To: Create a Saved Search ............................................. 72 How To: Run all Master Reports for a Meeting .......................... 73 How To: Approve Files .......................................................... 74 Legislative File Reports ......................................................... 75 Chapter 8: Text Search 145 How To: Text Search with Advanced Search .......................... 145 How To: Text Search in Simple Search .................................. 147 Legistar 5.0 User Manual: Generic Edition User Manual Index Legistar 5.0 User Manual: Generic Edition 148 Chapter 1: Welcome to Legistar 5 What is Legistar? Legistar is a proprietary software system developed and provided for you by Daystar Computer Systems, Inc. The system organizes and tracks legislative files, maintains all supporting documents; generates agendas; manages meetings; controls and supports workflow; indexes meeting video; and publishes all data, reports, files, and media to the web. In short, it does everything needed to manage the information, documents, workflow, and Internet accessibility for the city. This is all done in three screens: Legislative Files, Agendas, and Minutes. As you create Legislative Files and send them through your internal workflow process, Legistar maintains the file integrity as it captures specific file information, attributes, and events used by the system to create agendas, minutes, reports, certified copies, attendance and voting records, calendars, and many other standard reports and Internet displays. Reports Legistar allows users to define and generate various reports in several formats. There are options available from each Legistar screen that allow users to generate reports specific to that area. InSite InSite is the public access module of the program that makes Legistar data available on the Internet. Any legislative item is available, in its entirety, on the web page as soon as the Status is changed from Draft, unless it is specifically flagged to be held off the Web on the Legislative Files Details tab. Minutes or Agenda reports must be published to be available via InSite. Legistar 5.0 User Manual: Generic Edition Chapter 1: Welcome to Legistar 5 1 Chapter 2: Getting Started How To: Log in to Legistar 5 In order to log in, you must have a user account already created by your system administrator. If you do not know your User Name or Password, contact your system administrator, who will provide you with your user name and reset your password. This tutorial assumes the application is already installed on your PC. NOTE If a Legistar icon isn’t present on your desktop, look in your Start menu and under All Programs. To log in to Legistar 5: 1. Double click on the Legistar icon on your desktop. - Desktop Legistar Icon The Legistar login screen appears. 2. Enter your User Name. - NOTE Your password is case sensitive and must contain a minimum of six characters. User Name Field This information is already filled in if you were the last one to use Legistar on this computer. 3. Enter your Password. Legistar 5.0 User Manual: Generic Edition Chapter 2: Getting Started 2 - Password Field 4. Choose the database you wish to access. 5. Ensure the ‘Local’ connection type is selected if you run Legistar off your own server, ‘Remote’ if you use a Hosted system. - Connection Type Selection This option allows a user to connect to Legistar either over your local network (Local) or through the Internet (Remote). 6. Click on the Login button or press Enter. Legistar 5.0 User Manual: Generic Edition Chapter 2: Getting Started 3 Login Fields Item Description User Name The User Name is assigned by a system administrator when a user account is created through Legistar Administration. Password The Password is a masked text entry box to establish user credentials with Legistar. Passwords are initially established by a system administrator when creating an account through Legistar Administration. Database The user connects to a Database in Legistar. Typically the user can connect to two or more databases. These generally include the production database, in which all real work is done, and one or more training or staging databases. Training and production databases should be distinguishable by their names. If they are not, contact a system administrator. Connect The Connect option determines how the Legistar user application connects to the Legistar server. When working on a local network, select Local. When working from outside the office, select Remote. Legistar 5.0 User Manual: Generic Edition Chapter 2: Getting Started 4 Personal Settings The local settings and password settings are for each individual user. This allows individuals to have more control in determining how the program is set up so they can use it more efficiently. - Personal Settings Screen Before establishing a comfortable work pattern with Legistar, Daystar recommends that you personalize the application to fit your needs. Several personal settings are available to tailor the user experience to your personal taste and work process. Settings such as Auto-Save and Grid Double-Click control how you interact with the application, while others such as Default File Type or Default File Status streamline the work process to make it as efficient as possible. Legistar 5.0 User Manual: Generic Edition Chapter 2: Getting Started 5 How To: Change Your Personal Settings The greatest benefit of Personal Settings is the ability to set default values for new files that you create. You can also set a location from which the program looks for attachments and imports text files. To change your personal settings: 1. From the Home screen Tools menu, choose Personal Settings. - Personal Settings Screen 2. Click on the sections you want and set the options under each heading. 3. Click on the Save button. Users responsible for creating new legislative files should visit their Personal Settings to make sure the files they create are prepopulated with the desired default values in File Type, File Status, Controlling Body, Contact, and Text Editor Font. Legistar 5.0 User Manual: Generic Edition Chapter 2: Getting Started 6 Personal Settings – General - Personal Settings General Screen Setting Description Auto Save If Auto Save is set to YES, all changes made to a record are automatically saved each time the user exits a record. Calendar Display If Calendar Display is set to YES, the Calendar tab on the Agenda and Minutes forms automatically retrieves and displays the meetings within the date ranges determined by the user’s date range settings (accessed under Personal Settings – Agendas and Personal Settings – Minutes). If Calendar Display is set to NO, records are not automatically retrieved. NOTE Setting the Search Results Threshold value to 999 makes it unlimited. A large number may affect your retrieval speed and display a useless number of files. The recommended setting is 100. Recent Files Limit Recent Files Limit determines how many files (between 1 and 25) appear under the Recently Visited records lists on the Home screen. Search Results Threshold Search Results Threshold is the maximum number of records retrieved in a user search. Search results that exceed the threshold results in a message to the user asking if all records should be retrieved. A large number of records retrieved can affect system performance. EXAMPLE: If the Threshold is set to 50 and 45 Legistar 5.0 User Manual: Generic Edition Chapter 2: Getting Started 7 Setting Description files match the desired criteria then they will show on the screen without a message. If 55 records match the search criteria than the program will notify the user that the search threshold has been crossed and ask if he still wishes to see the results. Work Style Work Style determines how the individual lines on the Agenda and Minutes grids are displayed. If Work Style is set to YES, the display uses a rich text format to imitate the look and feel of a printed Agenda If Work Style is set to NO, the display uses a simple plain text format. Personal Settings – Legislative Files - Personal Settings Legislative Files Screen Setting Description Default File Controlling Body Default File Controlling Body determines the default value of the Controlling Body when a new file is created. Default File Status Default File Status determines the default value of the Status when a new file is created. Legistar 5.0 User Manual: Generic Edition Chapter 2: Getting Started 8 Setting Description Default File Type Default File Type determines the default Type when a new file is created. Text Editor – Default Font Text Editor – Default Font determines the default font used in the legislative file text editor. Assign File ID as Assign File ID determines how the system, by default, assigns a file ID for newly created files. Personal Settings – Agendas - Personal Settings Agendas Screen Setting Description Beginning Date Range For Calendar Beginning Date Range For Calendar determines how many days back from today’s date the calendar will display. For example, the value 90 shows all agendas in Legistar from the past 90 days. Default Meeting Body Default Meeting Body determines the default Meeting Body to be automatically inserted when a new Agenda record is created. The Meeting Body can be changed after creation. Ending Date Range For Legistar 5.0 User Manual: Generic Edition Ending Date Range For Calendar determines how many days forward the calendar will display. For Chapter 2: Getting Started 9 Setting Description Calendar example, the value 90 shows all agendas in Legistar for the next 90 days. Personal Settings – Minutes - Personal Settings Minutes Screen Setting Description Beginning Date Range For Minutes Calendar View Beginning Date Range For Minutes Calendar View determines how many days back the calendar will display. For example, the value 90 shows all meeting minutes in Legistar from the past 90 days. Ending Date Range For Minutes Calendar View Ending Date Range For Minutes Calendar View determines how many days forward the calendar will display. For example, the value 90 shows all meeting minutes in Legistar for the next 90 days. Legistar 5.0 User Manual: Generic Edition Chapter 2: Getting Started 10 Personal Settings – File Locations - Personal Settings File Locations Screen Setting Description Export Directory Export Directory is the default location that opens when selecting the location to export a file. An alternate location can be selected at that time. Import Directory Import Directory is the default location that opens when importing a file. This is most frequently used when importing Attachments. An alternate location can be selected at that time. Legistar 5.0 User Manual: Generic Edition Chapter 2: Getting Started 11 Personal Settings – Color Settings - Personal Settings Color Settings Screen Setting Description Date Text Color (Future) Date Text Color (Future) is the color for any dates beyond today’s date. Date Text Color (Past) Date Text Color (Past) is the color for any dates older than today’s date. Date Text Color (Today) Date Text Color (Today) is the color for today’s date. Field Focus Color Field Focus Color is the color of the field on which your cursor is positioned. Frozen Locked Fields Frozen Locked Fields color is the color of any fields that are locked from entry. Grid Row Selection Color Grid Row Selection Color is the color of the selected line(s) on any grid. AVS Activated Agenda AVS (Active Voting System) Activated Agenda color is the color of the active agenda item. The AVS is an additional module that may not be activated on your system. Legistar 5.0 User Manual: Generic Edition Chapter 2: Getting Started 12 How To: Change Your Password Not all Legistar users have permission to change their own passwords. If you don’t have permission, you need to contact your system administrator to change your password for you. NOTE Your new password will be case sensitive and can contain special characters. If you have any questions about which passwords are acceptable, you should contact your system administrator or IT staff. - Change Password Screen To change your password: 1. On the Home screen Tools menu, click the Password tab. 2. Enter your Old Password. 3. Enter your New Password and Confirm it. 4. Click on the Save button. Legistar 5.0 User Manual: Generic Edition Chapter 2: Getting Started 13 How To: Lock and Unlock Records Locking a file disallows any changes until it is unlocked. This can also be done by clicking on the pink pad lock icon on the legislative file screen form or the Lock/Unlock toggle command on the Tools Menu. If the file is already locked, this option reads Unlock. There may also be certain actions recorded in the history tab or at a meeting, which, according to the rules set by your system administrator, automatically lock a file. To lock and unlock records: 1. On the Tools menu, click Lock to lock the file from editing. 2. If the file is locked and you wish the edit it, click Unlock. Legistar 5.0 User Manual: Generic Edition Chapter 2: Getting Started 14 Chapter 3: Working with Legistar Overview Screen Layout Overview The Legistar window consists of two components: the main navigation bar and the program-area screen. Main Navigation Bar Regardless of which screen you are on in Legistar, the Main Navigation Bar on the LEFT side of the screen always remains the same. Item Description Home The Home section provides easy access to items recently worked on or viewed, as well as system reports and Legistar Administration. Legislative Files The Legislative Files form allows users to create, edit, research, and generally manage Legislative Files (sometimes called “matters” or “items”) independently of any meeting. In Legistar, the process of requesting, drafting, approving, and attaching supporting documents starts here, long before the file is ever included in any meeting agenda. Agendas The Agendas form allows users to create and edit meeting agendas for each of the meeting bodies. Based on set-up information referred to as agenda definitions, Legistar automatically generates meeting agendas for selected meeting bodies. There is also the option to manually create a meeting agenda, if desired. Minutes The Minutes form allows users to record and publish actions taken on the agenda items, either during or after the meeting. When an agenda is generated, Legistar automatically creates the template for the meeting minutes. Users record the meeting attendance, votes and other actions to create a formal, legal record of a meeting. Text Search Text Search allows users to search within the legislative matter text file for a specific word or phrase. Using either simple or advanced search techniques, Legistar quickly locates the Legistar 5.0 User Manual: Generic Edition Chapter 3: Working with Legistar Overview 15 Legislative Files containing text that matches the search criteria. Exit Exit closes Legistar. Note that if the standard Windows application close (Red box with a white X in the upper right corner) is used, the system prompts the user to confirm the command to exit the program. Common Screen Layout The three major functional areas of Legistar (Legislative Files, Agendas, and Minutes) all have consistent screen layouts. They are divided into two major areas each: Workspace The workspace, found at the top of the record display, is the primary information area for each record. It holds the data that summarizes the record and makes it easily identifiable to the viewer. The workspace for Minutes or Agendas holds general information about the selected meeting, such as the name of the meeting body, the location, and date of the meeting. The workspace for a Legislative File displays information such as the File ID, the Title of the file, its Status, and Controlling Body. Tabs Tabs contain all the detailed information of a record. For Minutes and Agendas, you have a Calendar tab and other tabs that allow you to build and edit agendas and minutes records. The Legislative File tabs contain the text file; the complete history; and various associations, such as sponsors and code sections, attachments, and various other data related to that file. Legistar 5.0 User Manual: Generic Edition Chapter 3: Working with Legistar Overview 16 Common Fields and Buttons Throughout Legistar, many of the same buttons can be found on almost every screen. These buttons allow you to perform the same functions wherever they are found. - Menu Buttons These buttons are found consistently throughout Legistar: Button Description Save Save allows the user to save any changes made since entering that screen. Search Search allows the user to search the Legistar database (available only in Search Mode). You can enter data or select the appropriate values and click Search. This prompts Legistar to retrieve all the matching corresponding data. New New allows the user to create a new file in the Legistar database. Clear Clear displays information and returns to Search Mode. Edit Edit allows the user to edit text fields with tools such as cut, copy, and paste. Tools Tools gives the user access to a variety of different options and functions, depending on the screen. Browse Browse allows the user to look through the screen records or the records most recently accessed. Reports Reports allows the user to select a report to run based on the displayed Legistar data. Help Help launches the Legistar Help file, which contains information on specific fields as well as many of the process steps found in this manual. Each screen has a Help button that opens the Help file to the page, which covers the relevant screen. Date Fields and Calendar Buttons Date fields store and display dates in the American standard mm/dd/yyyy format by default. A calendar button is located next to each date field for easy date selection. The selected date appears in various colors to symbolize the past, present, and future. The default settings for date colors are: Legistar 5.0 User Manual: Generic Edition Chapter 3: Working with Legistar Overview 17 Black = Past dates Red = Today’s date Green = Future dates These colors can be changed in Personal Settings. When the calendar date selection tool is opened, the date within the red circle is the current date. The left and right directional buttons scroll the months. Alternatively, you may click on the name of the month and receive a list of months from which to select. Clicking on the year provides an editable text box with up and down scroll buttons for year entry or selection. Data Entry Shortcuts Each data field has keystroke shortcut functionality built into it. Entry Description Today To enter today’s date into the field, enter: t (for “today”) Add Days, Weeks, Months, Years To add days, weeks, months, years, enter: +[desired number][d, w, m, or y] Examples: +10d (to enter the date ten days from today) +2w (to enter the date two weeks from today) Subtract Days, Weeks, Months Years To subtract days, weeks, months, years, enter: (minus sign)[desired number][ d, w, m, or y] Examples: -6m (to enter the date six months ago) -2y (to enter the date two years ago) After you enter one of these shortcut values into a date field and move to another field, the date field automatically updates with the computed date. Data Range Searching Data ranges can be entered as search criteria. The range operators (>, <, and to) can be used in conjunction with all of the Data Entry Shortcuts described above. Legistar 5.0 User Manual: Generic Edition Chapter 3: Working with Legistar Overview 18 Entry Description Greater Than and Less Than To add greater than or less than criteria, enter: > or < (greater or less than symbol) and [data or data entry shortcut] Examples: >1/1/2008 (to find all records with a date greater than 1/1/2008) <t (to find all records with a date prior to today's date) Specified Date Range To specify date range, enter: [start date] to [end date] Examples: 1/1/2008 to 12/31/2008 (to find all records with a date within the year 2008) 1/1/2005 to t (to find all records with a date from January 1, 2005 up to today) Drop-Down List Boxes A drop-down list box is used to make a selection from established available choices. Such fields identified by the down arrow only accept predefined entries. The choices displayed reflect specific data entered in administration tables. Click the down arrow to view a list of available choices. Click desired list item. Adding More Choices Some drop-down list boxes can be edited on-screen. Security restrictions determine which users may edit these fields. If a field name appears white when the cursor moves over it, you can add choices to the list. Double-click on the field name to add new values in the screen that appears. List-to-List Boxes List-to-list boxes allow one or more choices from a list to be added as part of a Legislative File. The left side of the box lists available options, which are controlled in the Administration tables by your system administrator. The right side lists your selections. Legistar 5.0 User Manual: Generic Edition Chapter 3: Working with Legistar Overview 19 - List-to-List Box You move the choices by selecting an item and then clicking the arrow key to move it to the other side. Multiple items may be selected and moved by pressing and holding down the Ctrl key while selecting each one and then using the right arrow, or by double clicking on each item. The double arrow moves all the items in the box. The up and down arrows arrange the listing of the selected choices only. This is used to designate the relative importance of various Sponsors. When searching in a list-to-list box, you can only search on items that have been previously used. Zoom Boxes Some Legistar fields are expandable to make it easier to enter and read extended text. These are called Zoom Boxes. You can type into the text field right on the form, or you can open the Zoom Box by clicking on the button. - Plain Text Zoom Box Legistar 5.0 User Manual: Generic Edition Chapter 3: Working with Legistar Overview 20 There are two types of Zoom Boxes in Legistar 5. RTF (Rich Text Format) Zoom Boxes and Plain Text Zoom Boxes. The RTF Zoom Boxes have buttons that allow you to bold and underline text, while the Plain Text Zoom Boxes do not allow text formatting. You can tell the difference before opening the Zoom Boxes by looking at the Zoom Box button. If it has an A on it, like this , then it supports RTF; if it has a + on it, then it is a Plain Text Zoom Box. - RTF Zoom Box The OK button closes the box and saves any changes. The save button saves changes and leaves the box open. Record Set Navigation A set of files returned in a search (a record set) can be navigated using the arrows at the bottom right corner of the screen. Button Description Navigates to the first file. Navigates to the previous file. Navigates to the next file. Navigates to the last file. Clicking the Go To button brings up a list of all records matching the search criteria. You can filter the results by right clicking on the results and selecting which columns you want to have displayed and the order in which the records appear. Legistar 5.0 User Manual: Generic Edition Chapter 3: Working with Legistar Overview 21 Disabled Buttons Buttons that appear dim or gray are disabled and cannot be used. Buttons can be disabled for various reasons. Record locking, screen mode, and user permissions are the most common reasons you may see a disabled button. If you notice that many fields are disabled, make sure you are not in Read Only Mode. - Read Only Mode Legistar Shortcut Keys There are several keys board keys that are used for various functions in Legistar 5 Entry Description F8 This will open the Standard Paragraph screen Ctrl + E This will switch from Read Only Mode to Edit Mode Ctrl + C Copies selected text to the clip board Ctrl + X Cuts selected text and places it in the clip board Ctrl + V Pastes text on the clip board to the current cursor location Ctrl + Z This is the Undo key, it will remove the last text typed or entry selected. A user entering text can press the key multiple times to Undo multiple changes NOTE Ctrl + B, I and U will not Bold, Italicize or Underline selected text. Legistar 5.0 User Manual: Generic Edition Chapter 3: Working with Legistar Overview 22 Spell Check Legistar’s Spell Check tool is a standard design that should be familiar to anyone with familiar with a word processer. The Spell Check form is common to all screens. Item Description Not in Dictionary This is the possible misspelling that has been found. This field will also contain the new value that the word shall be changed to after clicking the Change button. Suggestions These are possible corrections to the misspelled word. Uncheck the box to hide the suggestions. Click on a suggestion in the list to change the possible misspelling to the selected word. Add Words To Specifies the dictionary to which new words will be added. Defaults to the Legistar custom dictionary on the Legistar server. Ignore Disregards this instance of the possible misspelling. Ignore All Disregards all instances of the possible misspelling. NOTE If you add a word than it will not be picked up by spell check for ANY Legistar user. Please make sure the word is correct before adding it. Legistar 5.0 User Manual: Generic Edition Chapter 3: Working with Legistar Overview 23 Add Adds this spelling as a valid word to the custom dictionary. Change Changes this instance of the possible misspelling to the newly selected or altered spelling. This button becomes enabled when the possible misspelling in the Not in Dictionary field has changed. Change All Changes all instances of the possible misspelling to the newly selected or altered spelling. This button becomes enabled when the possible misspelling in the Not in Dictionary field has changed. Cancel Cancels the current spell check process. To use Spell Check: 1. Open the Spell Check utility to begin spell checking. There are How To’s in the Legislative Files, Agendas and Minutes sections of this manual. 2. Ignore or Add the possible misspelling if there is nothing to correct, otherwise, manually correct the spelling or choose a spelling suggestion and click Change. Legistar 5.0 User Manual: Generic Edition Chapter 3: Working with Legistar Overview 24 How To: Use Standard Paragraphs Standard paragraph allows you to store commonly used sentences and paragraphs in one location. Then you can copy the text to the clipboard and paste it into an area of Legistar. To use standard paragraphs: 1. Click Tools and Standard Paragraphs or press F8 to access the Standard Paragraphs dialog box. - File Text 2. Select the stored standard paragraph name from the list or search for a specific standard paragraph using the search box. 3. Click Copy To Legistar Clipboard to copy the text to the clipboard. 4. File Text Click Edit and Paste to paste the text. Legistar 5.0 User Manual: Generic Edition Chapter 3: Working with Legistar Overview 25 How To: Run a Report Reports in Legistar are used to retrieve and format almost any sort of information from the system. You can run reports for specific files, meeting minutes, agendas, or general reports on information that meets your criteria. Common Report Settings Many reports have common settings. All reports have a destination setting and the option to save the report. Item Description Destination This can be a report format such as a PDF or Word document. You can also choose to send the report as an attachment to your email, send it straight to the printer, or publish it to directly to the Web if you are running an Agenda or Minutes. Include Attachments Many reports provide the option to print attachments associated with any legislative files in the report. This option will only print the attachments that have been marked to be printed with reports. Save the Report Reports with a file format destination, such as PDF, enable the option to save the report for future use. When the report is run, a save dialog box is opened providing the user with the opportunity to save the report to a familiar location on the user’s workstation. Printing Records In Legislative Files, you can choose to run the report on either the current file you have open, or on all files returned in your search by selecting “This Legislative File – [File Number]” or “All Legislative Files – [Search Results Count]” respectively. In Agendas and Minutes, you can choose to run the report on the entire meeting contents or on selected lines. Select multiple lines for the report on the Agenda or Minutes tab using Windows’ standard CTRL+Click or SHIFT+Click functionality. Legistar 5.0 User Manual: Generic Edition Chapter 3: Working with Legistar Overview 26 To run a report: 1. Click on the Reports button, which always appears in the top right-hand corner. 2. Select the report you wish to run from the provided drop-down list. 3. Reports Button Reports List Choose the Destination to which you want the report to go. - Destination Drop Down 4. Fill in any additional criteria. 5. Click Run to generate the report. Legistar 5.0 User Manual: Generic Edition Chapter 3: Working with Legistar Overview 27 Chapter 4: Home Screen Upon successful login, your personal home screen opens. Your navigation menu appears in the left vertical pane, your personal login information displays on the top right pane, and groups of recently visited records show in the main center right pane. The bar at the top will have three buttons: Tools, Reports and Help. Recently Visited The Recent Agendas, Recent Minutes, and Recent Legislative Files lists displayed on the Home screen are auto-populated based on the records you have most recently edited or visited for more than 20 seconds. The number of files that appear on these lists can be adjusted in Personal Settings under the Tools menu on the Home screen. - Legistar 5.0 User Manual: Generic Edition Home Screen showing recently visited records. Chapter 4: Home Screen 28 Item Description Tools The tools button allows access to Legistar Administration and Personal Settings. Any changes made to Administration may require the use of the Refresh Administration Data tool for the changes to be immediately available in Legistar. Reports This will take the user to the system reports. These reports are not tied to a particular section of Legistar, because they do not require a set of search results or a particular record. Some reports found here are: Voting Record, General Certification, and Meeting Calendar. Help Help launches the Legistar Help file, which contains information on specific fields as well as many of the process steps found in this manual. Each screen has a Help button that opens the Help file to the page, which covers the relevant screen. General Reports from the Home Screen The following reports are available from the Reports button on the Home screen: Matter Summary The Matter Summary report is a summary for a file or group of files. The same Summary report is available here and in the Legislative Files screen. Legistar 5.0 User Manual: Generic Edition Chapter 4: Home Screen 29 Item Description File Introduced Date Users can enter an exact date or a date ranged so that the report will only contain files introduced in that range. Final Action Date Users can enter an exact date or start and end date so that the report will only contain Files that had a final action taken on them in that range. File Status This allows users to limit the report to files that are currently assigned a specific status. File Type This allows users to limit the report to files that are of a desired file type. Legistar 5.0 User Manual: Generic Edition Chapter 4: Home Screen 30 Matters Introduced The Matters Introduced report is a list of files that were introduced in user-defined date ranges. Item Description Selected Sponsors Moving sponsors from the Available Sponsors to the Selected Sponsors field will limit the report to Files where those Board Members are assigned as Sponsors. Selected Indexes This allows users to have only files that have the selected index terms appear on the report. Begin/End Date This will limit the files on the report to show files that were Introduced only during the specified date range. File Type This allows users to limit the report to files that are of a desired file type. Legistar 5.0 User Manual: Generic Edition Chapter 4: Home Screen 31 Chapter 5: Legislative Files The Legislative Files screen is where new files are created and edited, and it provides file-searching capabilities. This chapter contains guides for creating a file, drafting file text, adding supporting documentation, changing a file’s version, and file searching. Field Definitions The following fields are found in the workspace area of the Legislative Files screen. - Legislative Screen Item Description File ID The File ID is a unique number assigned to the file. Automatic assignment of the number can be selected with the button next to the field. Typically, users start with a permanent number in the format of the year followed by a four-digit number (YYNNNN). For example: 094321. File Type The File Type field identifies what kind of legislative file this is, such as an ordinance or a resolution. It is used to help place the file in the appropriate location on the agenda. In addition, File Type is used in agenda grouping, searching, and reporting. Specific File Types can be set to not appear on Insite. Legistar 5.0 User Manual: Generic Edition Chapter 5: Legislative Files 40 Item Description Status The Status field is used to identify where the file is in the legislative process. When clicking on NEW, the default status is Draft. The default status for new files is based on the user’s personal settings. The Status is also used to group items on the agenda, and for searching and reporting. In Control The In Control field will determine which legislative body is currently scheduled to meet and act on the file. This field also determines agenda item order and works with security restrictions. Date Introduced The Date Introduced field is the date on which the file was created. The default date can be set to the next meeting date of the PLB. This date can also be manually changed. Agenda Date The Agenda Date directs a legislative file to appear on a specific agenda. The agenda date can be left blank and the legislative file goes to the controlling body it is assigned. Final Action The Final Action field displays the date of final action taken on this item. During file creation, data is not entered in this field. If the final action date is present, the file will not go to an agenda, because Legistar assumes the file is completed. The Final Action date is automatically entered by the system based on settings controlled by your system administrator. Title The Title field is the title of the legislative file's text. It is automatically populated with the text that you input in the ..Title section of the text file. Legistar 5.0 User Manual: Generic Edition Chapter 5: Legislative Files 41 Tools Menu - Tools Menu Item Description Attachment Utility The Attachment Utility tool allows the user to manage the attachments that have expired according to the expiration date for each attachment. To preview all the attachments that have met the expiration date, enter the desired expiry date (it is most effective to use the greater-than sign, e.g. “>8/12/04”), and click on Search. The files will be listed in order in the top portion of the screen. After retrieving the desired attachments, they can be saved to a different directory for archiving to CD and/or batch printing. Attachments that are expired can then be deleted or left for later if they are still needed. To print the attachments in a batch, move them to the print job section by selecting them and clicking on the down arrow or the add-all button. Security Log The Security Log tool allows the user to view a list of all changes made to the file, as well as the date and time on which they were made. Spell The Spell tool allows the user to spell-check the text fields of the file. Error Log The error log is strictly for support purposes and will only be used under the guidance of a Legistar technical support representative. Lock The Lock tool allows the user to lock a file, which disallows any changes until it is unlocked. This Legistar 5.0 User Manual: Generic Edition Chapter 5: Legislative Files 42 can also be done by clicking on the pink padlock. If the file is already locked, this option reads Unlock. Create Resolution From This tool will create a legislative file from a line added in an agenda. Refresh The Refresh tool allows the user to update the screen with any changes that may have been made by another user while it was open. Standard Paragraph The Standard Paragraph tool allows the user to open the Standard Paragraph screen, which stores commonly used sentences and paragraphs in one location. This enables the user to copy text to the clipboard and paste into any area of Legistar. The screen can also be reached by pressing F8. Assign File IDs This feature allows for the automatic assignment of File IDs to items that have not yet been assigned File IDs Refresh Administration The Refresh Administration tool allows the user to update the local session with any basic changes that may have been made by the system administrator. This happens automatically each time the user logs in. Save Search Option to save the search criteria entered for frequently used searches. Delete Saved Searches Option to delete existing saved searches. Legistar 5.0 User Manual: Generic Edition Chapter 5: Legislative Files 43 File Text Tab The File Text tab contains a text preview box and controls for editing the text. No editing can be done directly in this preview box. - File Text Tab Item Description Edit Current Edit Current opens up the text editor or Microsoft Word and allows the user to make changes to the current version. Draft New Draft New allows the user to create a new version of the file. The system asks the user if he wishes to keep the current file text on which to base the new version, and if he wishes to keep the same sponsors. The majority of the time, the answer to both questions will be Yes. Delete Current Delete Current allows the user to delete the current version of the file text and revert to the old version. Viewing Past Versions List The versions drop-down listViewing Past Versions allows the user to select and view or edit past versions. The version number followed by (Current) is listed in a drop box. Set as Current Set as Current allows the user to view an old version and set that as the current version. This also allows the user to edit the selected version or runprint reports using it.that version. NOTE In order to edit a previous version, use the drop-down list to select the version you wish to edit and click the Set as Current button. Then click the Edit Current button. Legistar 5.0 User Manual: Generic Edition Chapter 5: Legislative Files 44 File Text Editor NOTE Some clients are set up to use word as their editor. If this is the case please proceed to the next section. This is the screen used to edit or add new file text. In addition to standard Legistar and Editing buttons, you have the ability to add section and templates. - File Text Tab Item Description New New allows the user to fill a default template into the Text file. . Import By clicking on the down arrow next to the new button, the user has the option to Import a file. The Import option allows a user to browse for a file and import the text from it. NOTE: Copy and Paste from a Word document may introduce extraneous hidden characters, which cause the text to be displayed erratically in reports. If this happens, copy and paste into a simple text editor like Windows Notepad, and then copy and paste into the Legislative Text editor. Templates By clicking on the down arrow next to the New button, the user can choose a Template set up by the system administrator. . File Selections A user can type in the desired section or choose it from this manual. Undo Undo allows the user to Undo the last edit to the file. Press Ctrl+Z to undo. Legistar 5.0 User Manual: Generic Edition Chapter 5: Legislative Files 45 Using Word as your Editor NOTE Not all clients use Word as their text editor. In those cases use the proceeding section which describes the functionality of the Legistar Text Editor. If you are using word to edit your file text then clicking on the Edit Current button will open Microsoft Word. Word will look the same, with the same buttons and options that you are used to seeing but with an additional tool bar added identified by Legistar icons. These buttons have options that will be very similar to those used by the Legistar text editor. Using Word allows for users to work in a familiar environment, import word documents, and have access to Word features like spacing and line numbering. Item Description New New allows the user to fill a default template into the Text file. Import By clicking on the down arrow next to the new button, the user has the option to Import a file. The Import option allows a user to browse for a file and import the text from it. Templates By clicking on the down arrow next to the New button, the user can choose a Template set up by the system administrator. File Selections A user can type in the desired “dot dot” section or choose it from this drop down list Save This Legistar Save button IS NOT the same as clicking on the Microsoft Word Save button. It must be used to load any changes into the system. Once the user clicks on Save, Word will close and the updated/new file text will populate into the Text tab of the Legislative File screen. NOTE If users are required to add line numbers to your Resolutions and Ordinances they can do so using the standard Word controls. The location of this control may vary with the version of Word used. It will typically be located under the Lay Out section under Page Setup. Please see your Word Help for specifics. The History Tab The history of a file shows all actions that have been taken on the file. These actions are usually taken during a meeting but can also be added from this screen. Actions that were taken from a meeting cannot be edited here, but rather must be changed in the minutes. Legistar 5.0 User Manual: Generic Edition Chapter 5: Legislative Files 46 - History Tab Item Description Save Save allows the user to save any changes made to a History line. New New allows the user to add a new history line and the President’s actions for new files. Delete Delete allows the user to delete selected lines. Agenda Agenda allows the user to display the agenda associated with the selected line. Minutes Minutes allows the user to display the minutes record for the selected line. Votes Votes allows the user to view the votes taken on the selected line. History Criteria History Criteria allows the user to change the criteria for the lines that are displayed. Options include: Past Actions: Shows only history records on which actions have been recorded. Scheduled Meetings: Shows only history records on which no action has been recorded. This can include 30-Day Rule items, items introduced at Roll Call and items on agendas that have not had minutes recorded. Show All: Shows all history records. Version Version allows the user to view the version of the file associated with that line. Action Date Action Date is the date the action occurred. Time Time is the time the action was taken. Acting Body Acting Body is the body that took the action. Legistar 5.0 User Manual: Generic Edition Chapter 5: Legislative Files 47 Item Description Action Taken Action Taken is the motion that was made. Sent To Sent To is the body the file was referred to. Due Date Due Date is the date by which a response to a referral is required. Return Return is the date the file was returned to the referring body. Action Note Action Note is any text on the discussion of the file. Action Text Action Text is the motion string of the action generated by Legistar. Result Result is the result of the vote taken on the motion. The Attachments Tab The attachments tab allows the management of all supporting documents for a legislative file. Supporting documents can be of any file type and any file size. They can be added, deleted, annotated, and ordered on this tab. If there are multiple attachments on a file, they can be reordered by clicking on the document you wish to move and selecting the up and down arrows to the right of the list. - Attachments Tab Item Description Import Import allows a user to browse for a file to add as a supporting document. By clicking on the down arrow, users are also able to import a hyperlink or scan a document directly into Legistar. Legistar 5.0 User Manual: Generic Edition Chapter 5: Legislative Files 48 Item Description Launch Launch allows a user to open the attachment in its native windows application. Remove Remove allows the user to delete the supporting document from the file. Update Attachment Details Update Attachment Details allows the user to make changes to a supporting document. Name Name is the name of the file that appears on the InSite page. By default, the file name will be added. Description Description allows the user to enter information about what is contained in any of the attachments. Expiration Date Expiration Date is the date the attachment will become obsolete; this will not cause automatic deletion. Expired attachments will not be available on reports or through InSite. Print This Attachment With Reports Print This Attachment With Reports allows the user to print the attachment when creating an agenda packet. Show This Attachment On Internet Reports Show This Attachment On Internet Reports allows the user to access the attachment through InSite. View only fields are also present, including the Attached On date and Time, File Type, Size, and the Original Path of the File. The Associations Tab This tab provides users with an easy way to index and reference their files by selecting options from a list of predetermined choices. These fields allow you to categorize or group the files together. There are four ways to associate and categorize files: code sections, sponsors, indexes, and related files. Each of these can have unlimited selections, which are added through a list-to-list box. Legistar 5.0 User Manual: Generic Edition Chapter 5: Legislative Files 49 NOTE The Primary Sponsor is listed first, and the sponsor list order can be changed using the up and down arrows. The user designates a sponsor as Primary or Secondary by highlighting one of the selected sponsors and using either the Mark as Primary or Mark as Secondary commands from the Tools menu. Different versions of a file may have different sponsors. The user can view the sponsors for past versions with the drop down box in the bottom left corner. - Associations Tab Item Description Code Section The Code Section allows the user to attach related code sections to a file. Indexes An Index is used to reference a Legislative File to a certain topic Sponsors Sponsors are the Councilors who are backing the file. Legistar also allows a user to designate one or more Primary Sponsors and one or more Secondary Sponsors. Related Files Related Files allows the user to link related Legislative Files together. Legistar 5.0 User Manual: Generic Edition Chapter 5: Legislative Files 50 The Details Tab The Details tab is a collection of additional information fields about each file. - Details Tab Item Description File Name The File Name field is a text box intended to hold a short summary description of the legislative file. This is used to help easily identify items on minutes and agenda forms. It can optionally be used in some reports. Requester The Requester field is a drop-down selection box that contains a list of all legislative bodies from which a request for a legislative item can originate. Contact The Contact field allows the user to assign a particular primary contact person for this item and enter his or her information. Comment The Comment text box is for any sort of notes or comments that need to be entered. Not Viewable Via Web The Not Viewable Via Web checkbox determines if the legislative item is not viewable through Legistar InSite. A check here overrides any status that typically allows the file to be found through InSite. Reference The Reference text field allows a free-text storage of a file reference, such as a department or committee number. Drafter The Drafter field allows the user to list the name or initials of the individual who drafted the file. Cost The Cost field allows the user to list any cost associated with this legislation. Legistar 5.0 User Manual: Generic Edition Chapter 5: Legislative Files 51 Item Description Must Be Heard By The Must Be Heard By date shows the next date on which this legislative file is to be heard in a meeting. The file will not be automatically added to a board agenda until this date or after this date. The user should use this field if an item is continued until a specific date. Agenda Number The Agenda Number field shows any particular agenda number that should be used on the next agenda generated with the file. Enactment Number The Enactment Number field shows an automatically generated ID assigned based on the order that the legislation was enacted. Enactment Date The Enactment Date field stores the date the file was enacted. Next Meeting Body The Next Meeting Body field shows the next body that is scheduled to have the item on its agenda. Effective Date The Effective Date field is the date the legislation becomes effective as law. Last Edit The Last Edit field identifies the last person to edit the file, what was done, and when the change occurred. Clicking on the Last Edit button allows you to see a log of all changes made. The Info 1 and Info 2 Tabs The Info 1 and Info 2 tabs are two tabs that can be optionally hidden and contain five free text fields and five date fields, each for any additional custom metadata. The labels can be changed to more informative captions through administration, so the labels on these tabs may be different. If and how these fields will be used has not yet been officially decided. - Legistar 5.0 User Manual: Generic Edition Info 1 Tab Chapter 5: Legislative Files 52 The Approvals Tab Some agenda items require a sequence of review and approvals prior to being on an agenda. We will refer to these as “pre-agenda approvals” entered in Legistar as Approval Sequences. Each sequence defines the individuals that must review and approve prior to an item being on an agenda. - Approvals Tab Item Description Add Sequence The Add Sequence button displays a list of available approvals sequences. After you select a sequence the names will populate the Legistar form. # The approval sequence is in sequential order and Legistar automatically moves the item on to the next approver. The sequence zero (0) indicates a individual who is an FYI. Approver Name The approver name field displays the names of the individual who can approve or disapprove a file on the line where their name appears. Due Days The number of days an approver has to review and approve the legislative file. If it is not completed by that time the file will be escalated to their alternate approver. Legistar 5.0 User Manual: Generic Edition Chapter 5: Legislative Files 53 NOTE Once the Initiate button has been selected, the status of the file will change to “ATS Review” and the file will not be editable by any users other than the approval requester and the approvers until the process has been completed. An Email will be sent to notify approvers of pending items. Item Description Sequence Type This can be set to Approval Review Request or FYI Requester This field displays the name of the Legistar user who started the approvals process by clicking on the initiate button. Initiate After the sequence has been added, the “initiate” button should be clicked to start the process. Legistar 5.0 User Manual: Generic Edition Chapter 5: Legislative Files 54 How To: Create a Legislative File To create a file: 1. Under Legislative Files in the main navigation bar, click on New to start the process. NOTE To delete a legislative file, contact the system administrator. NOTE If you are drafting a file that is a copy of an existing file, go to that file and choose the Copy File option under the Tools menu. 2. New File Select a File Type from the drop down list. NOTE To edit legislative files switch to Edit Record Mode (Ctrl+E), make any required changes to one or more fields and click Save. Unless you are granted edit privileges by the system administrator, you may not be able to edit files. 3. File Type Selection Add File Text by choosing Edit Current. - Legistar 5.0 User Manual: Generic Edition Edit Current Text Chapter 5: Legislative Files 55 You can Import a file if the text already exists or choose a template to start from scratch. 4. Once file text is added, click Save and Go Back. 5. Edit Current Text Go to the Associations tab to add Sponsors. - Edit Sponsors If necessary, you will also need to add the companion files. 6. Add any sponsors. You can select a sponsor by clicking on the name in the Available Sponsors list and use the arrows to move and rearrange the sponsor into the Selected Sponsors list. Identify primary and secondary sponsors by using Tools > Mark as Primary and Tools > Mark as Secondary. When finished, click Save and Close. Legistar 5.0 User Manual: Generic Edition Chapter 5: Legislative Files 56 NOTE From the Attachment tab, you can import any type of file. Make sure to follow naming conventions set by your system administrator. 7. Add related files as needed. Type the beginning part of the file ID in the search box at the bottom and click the Go button. Move the related files from the left list to the right. 8. Sponsors List Related Files Tab Add any supporting documentation on the Attachments tab. Click Import to import a file, hyperlink, or scan. Legistar 5.0 User Manual: Generic Edition Chapter 5: Legislative Files 57 9. Sponsors List Go to the Details tab and fill in a File Name and Requester. - Detail Tab For some files, you may also need to add information into the Note field. 10. On the History tab, add the Acting Body and Action Taken. - Legistar 5.0 User Manual: Generic Edition History Tab Chapter 5: Legislative Files 58 11. On the Approval tab, select the appropriate approval sequence, add any additional members (often your department head) to the sequence. 12. When finished, click Initiate. Legistar 5.0 User Manual: Generic Edition Chapter 5: Legislative Files 59 How To: Create Legislative File Text You can create text files using Legistar’s text editor, but you also have the ability to use templates or individual sections. NOTE In order to edit a previous version, use the drop-down list to select the version you wish to edit and click the Set as Current button. Then click the Edit Current button. To create a legislative file text: 1. Press the Edit Current button on the right-hand side of the File Text tab. 2. Click New and add the Title and body section by either typing it in or copy and pasting the text. 3. Edit Current File File Text When finished, click Save and click Go Back in the top right corner. Legistar 5.0 User Manual: Generic Edition Chapter 5: Legislative Files 60 How To: Add Attachments Attachments, often called supporting documents, can be any type and of any size. Many sites have standards for what kind of files attachments need to be. To add attachments: 1. On the Attachments tab, click on the Import button on the bottom left corner. NOTE The default file name will be the original name of the file you imported. Your organization may have standard naming conventions that you should follow. 2. Browse to find the file you wish to attach and double click on it. 3. Add a description or expiration date if you wish. Expiration dates might apply depending on the Attachment. Legistar’s Attachment archiving tool on the Tools menu can be used to manage attachments that have expired dates. There is no automatic deletion or archiving of files based on this date. Importing a File - Attachment Description and Expiration Date 4. If you add a file by mistake and wish to remove it, highlight the file and click the Remove button. 5. Click Save when finished. Legistar 5.0 User Manual: Generic Edition Chapter 5: Legislative Files 61 How To: Change Versions Legistar keeps track of different versions of the text files. The designated current version will be used when the file is added to an agenda. To change versions: 1. Open the file for which you wish to add a new version. - Draft New Button 2. Click the Draft New button to create a new version. 3. You are then asked if you wish to base your new version’s text on the old file. You will also be asked if you want to copy sponsors from the previous version to the new one. In most cases, unless you are completely rewriting the title, you will choose, Yes. 4. Make changes to the Title. 5. Amendment Section Click Save and press the Go Back button on the top right corner. Legistar 5.0 User Manual: Generic Edition Chapter 5: Legislative Files 62 You are then asked if you wish to replace the old title with the new title. Click Yes. 6. Go to the Attachment tab and update the file text with a new file. You are automatically prompted to change the version any time you change the file’s Type. Legistar 5.0 User Manual: Generic Edition Chapter 5: Legislative Files 63 How To: Add History Lines History Lines are automatically added when a file is acted on in a meeting, but at certain points, you will have to add a line manually. Usually this happens when you want to record an action taken outside of a meeting, such as the Received and Assigned action or any action taken by the Clerk or the Executive. To add history lines: 1. On the History tab, click New at the bottom of the screen. 2. New History Button Fill in the required information on the right-hand side of the screen. This includes the Action Date, Acting Body, Action, Due Date, and Target Body. 3. New History Click Save when finished. Legistar 5.0 User Manual: Generic Edition Chapter 5: Legislative Files 64 How To: Change a File’s Status To change a file’s status: 1. While in Edit Record Mode, click on the Status drop down menu. 2. New History Click Save to save the new status. The next time an agenda is created the item will appear automatically in the section for the selected status. Legistar 5.0 User Manual: Generic Edition Chapter 5: Legislative Files 65 How To: Spell Check a Legislative File Using the Tools > Spell from the Legislative Files toolbar will spell check all text fields in the work space and the current tab that is selected. NOTE For more information on how to use the Spell Check please see the section in Chapter 3 on Page 23. The following fields can be spell checked: Workspace: Title History Tab: Action Note, Action Text Attachments Tab: Name, Description Details Tab: File Name, Contact, Comment, Reference, Drafter Info 1 Tab: Generic Text 1 – 5 Info 2 Tab: Generic Text 1 – 5 NOTE Every zoom box that opens has spell check built in for immediate spell checking on just that field. To spell check the Text File use the spell check in the Text File form. To Fully Spell Check a Legislative File: 1. On the desired file, ensure that you are in Edit mode and that the file is unlocked. 2. Open the text file (Edit Current button) and click on the Spell button. Make corrections as needed. Save and Close the text file editor. 3. Run Spell Check from the Legislative Files screen to check the fields in the History, Attachments, Details and Extra Info Tabs. Make corrections as needed. Legistar 5.0 User Manual: Generic Edition Chapter 5: Legislative Files 66 How To: Search for Legislative Files You can use any number of criteria, in any of the fields in the Legislative File form. NOTE Make sure you are in Search Mode. The top of the screen should read Search Mode. If it doesn’t, press the Clear button to get to Search Mode. To search for legislative files: 1. Enter any criteria in one or more data fields. If you are searching for a particular word or phrase and are not sure what field it might be in, enter it into the EZ Text Search, which searches through all text fields for legislative files (this does not include drop-down or date fields). The EZ Text Search will only pull up files that contain the exact phrase searched for, not any file that contains each word. For this example we will use Resolution as the File Type and Mayor’s Office for Status. NOTE Some inactive controlling bodies, file types and statuses will be available to select while in search mode. - Search Criteria 2. Press the Search button. 3. If your set of search criteria does not narrow down the results, you will receive a message asking you if you want to see all the results. Choose Yes to see them or No if you want to add more criteria to narrow down the results. NOTE If you need to edit a file and the menu bar says (Read Only Mode), you need to click on the Edit menu and then select Edit Record. Once in Edit Record Mode you will be able to edit records until you switch back to Read Only mode. - Records Found Message If your search returns multiple files, scroll through them using the arrows on the bottom right-hand corner or the Go To button. 4. To print the results, run the File Summary report with the All Legislative Files option selected. 5. If you want to run another report, click Clear and the menu at the top will once again revert to Search Mode. Tip: Asterisks ( * ) can be used as wildcards to better define your search. For example searching on the file ID 1003* will return all files that have an ID Legistar 5.0 User Manual: Generic Edition Chapter 5: Legislative Files 67 starting with 1003 regardless of the next 2 numbers. While a search for 1003, without a wildcard will return all files that contain 1003 in their number which would include files like 091003. Question marks can also be used in a similar way. The difference being, that when question marks will only require matching search results to have a character where the question mark is located. So to use our sample from before, searching on file IDs with 1003? would return all files starting with 1003 as well as 010030 – 010039 but would not return 091003 because there is no character where the question mark is. Legistar 5.0 User Manual: Generic Edition Chapter 5: Legislative Files 68 How To: Browse Legislative Files You can browse all of the recent legislative files by clicking on the Browse button. NOTE Clicking on the arrow next to the Browse button brings down a list of recently accessed legislative files. To browse for legislative files: 1. Click the Browse button. 2. Click on the calendar button and select the Matter Introduced Date range you wish to browse. - Matter Introduced Date 3. Click Go to browse. 4. If your set of search criteria does not narrow down the results, you will receive a message asking you if you want to see all the results. Choose Yes to see them or No if you want to add more criteria to narrow down the results. - Legistar 5.0 User Manual: Generic Edition Records Found Message Chapter 5: Legislative Files 69 5. The list of files appears, displaying the Total Records Found and the number of records displaying. 6. By right clicking on the results you can select which criteria to view your results by and how much detail you want to show. You can save your layout for future use, or restore the default layout. 7. Records Found Record Sorting By Type Clicking on the File ID, File Type, File Status, File Name headings organizes the results in either numerical or alphabetical order. Legistar 5.0 User Manual: Generic Edition Chapter 5: Legislative Files 70 - Legistar 5.0 User Manual: Generic Edition Record Sorting By Name Chapter 5: Legislative Files 71 How To: Create a Saved Search In cases where you run the same search on a regular basis, you may find it easier to save your search criteria so that you can use it when needed. NOTE Make sure you are in Search Mode. The top of the screen should read Search Mode. If it doesn’t, then press the Clear button to get to Search Mode. To search for legislative files: 1. Enter the criteria for your search as you normally would. 2. Instead of clicking Search, choose the Save Search option located under the Tools menu. 3. Enter a name for the search to be saved under and click OK. 4. Save Search Search Name To run your search, click on the down arrow next to the Search button and you can choose from any of your saved searches. Each search you save only shows up on your account and won’t be available for other users. Legistar 5.0 User Manual: Generic Edition Chapter 5: Legislative Files 72 How To: Run all Master Reports for a Meeting If a user needs to they can run a batch of Master report for all files in a meeting. To Run a batch Master report for a Meeting: 1. Go to the Legislative File screen. 2. Go to the History tab. 3. Enter the meeting date into the Action Date field. 4. Enter the meeting body into the Acting Body. 5. Click Search. 6. Click on Reports and select the Master report. 7. Click on the option for All Legislative Files. 8. Click on Run. Legistar 5.0 User Manual: Generic Edition Chapter 5: Legislative Files 73 How To: Approve Files With Legistar’s main menu displayed, select a file from the “Approval Requests” section on your home screen by clicking on the ID number (Bottom Right Hand Corner). How to Approve a File: 1. Click on the File you wish to approve from the Home Sceen. 2. Review the Text in the File Text tab. 3. Review the Attachments under the Attachments tab, make sure they are named correctly. 4. Review the Sponsors and Related Files under the Detail tab. 5. Return to the Approvals tab and enter the appropriate action under the Approve sub-tab. 6. Click Save on the bottom of the screen. Legistar 5.0 User Manual: Generic Edition Chapter 5: Legislative Files 74 Legislative File Reports From the Legislative File Reports screen, you’ll be able to create Certified Copy, Master, Tails, Text File and Matter Summary reports. Certified Copy The Certified Copy provides file text and file information for distribution to the public. Item Description Available Variables This is a listing of different variables that can be added to the Signature Block (by clicking the right arrow button) that will contain information about the File that the report is being printed for. Signature Block This is pre-loaded with text that prints at the bottom of the report before the signature line. Preview This is a display only field that allows users to view what the Signature Block will look like when it is printed on the report. Use When checked, this signature line will be included at the end of the report. Signature Text[n] This is the text that will appear next to the name of the person who is going to be signing the Legistar 5.0 User Manual: Generic Edition Chapter 5: Legislative Files 75 report. This should be the desired title for the signer. Signer[n] Users can select the signatory name that will appear for this signature line of the report. If left blank, the report will select the first name from the drop-down list as the signer. Digital Signature Will print the signature image that is loaded in Administration for the selected signer. Legistar 5.0 User Manual: Generic Edition Chapter 5: Legislative Files 76 Master The Master report contains all the information on the file. Item Description With Page Break Selecting this will print a copy of the report with the text printed on a second page after the Legislative File information. Without Page Break Selecting this will print a copy of the report with the text immediately following the History of the file. Do Not Show This option will print a copy of the report without the text of the file. Sections This allows users to pick specific sections of the file text they want to show on the report. Show All Text This will override the sections specified in the Sections portion of the criteria and print the entire text of the file. Legistar 5.0 User Manual: Generic Edition Chapter 5: Legislative Files 77 Tails The Tails report provides a place for the required signatures and is preceded by the title and body of the ordinance or resolution. Note: there must be a final action date for the legislative matter in order to print a Tails report. Item Description Available Variables This is a listing of different variables that can be added to the Signature Block (by clicking the right arrow button) that will contain information about the file that the report is being printed for. Signature Block This is pre-loaded with text that prints at the bottom of the report before the signature line. Preview This is a display only field that allows users to view what the Signature Block will look like when it is printed on the report. Use Toggles the use of this signature. Un-checking this box will remove the title and name from the signature line. Signature Text[n] This is the text that will appear next to the name of the person who is going to be signing the report. This should be the desired title for the signer. Legistar 5.0 User Manual: Generic Edition Chapter 5: Legislative Files 78 Signer[n] Users can select the signatory name that will appear for this signature line of the report. If left blank, the report will select the first name from the drop-down list as the signer. Digital Signature Will print the signature that is loaded in Administration for the selected signer. Legistar 5.0 User Manual: Generic Edition Chapter 5: Legislative Files 79 Text File The Text File report prints the text of an item with very little other information. The user can select the specific sections they would like displayed on the criteria screen. Item Description With Page Break Selecting this will print a copy of the report with the text printed on a second page after the Legislative File information. Without Page Break Selecting this will print a copy of the report with the text immediately following the History of the file. Sections This allows users to pick specific sections of the file text they want to show on the report. Show All Text This will override the sections specified in the Sections portion of the criteria and print the entire text of the file. Legistar 5.0 User Manual: Generic Edition Chapter 5: Legislative Files 80 Matter Summary The Matter Summary only contains the basic data about a file, which is useful if the user wants a report on all the files a search returns. Users can do this by clicking All Files under Print on the top-right corner of the criteria screen. Legistar 5.0 User Manual: Generic Edition Chapter 5: Legislative Files 81