1
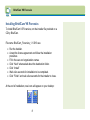
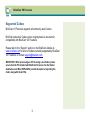
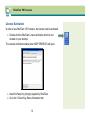
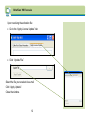
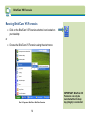
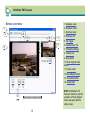
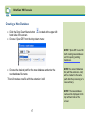
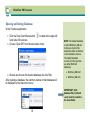
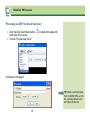
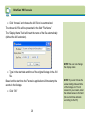
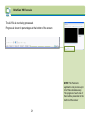
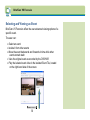
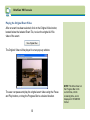
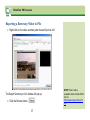
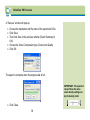
BriefCam VS Forensics
User Manual
Version 1.0
© BriefCam Ltd. | G.G. Communication Center, Suite 302 | 90850 | Neve Ilan | Israel
Tel: +972-2-5337228 | Fax: +972-2-5337448 | www.briefcam.com
BriefCam VS Forensics
Contents
About This Manual ......................................................................................................................4
Target Audience for This Manual ................................................................................................6
Introduction .................................................................................................................................7
What is BriefCam VS Forensics? ...............................................................................................7
How does BriefCam VS Forensics work? ...................................................................................7
Installing BriefCam VS Forensics ...............................................................................................8
Supported Codecs ......................................................................................................................9
License Activation ..................................................................................................................... 10
License Reactivation ................................................................................................................ 13
Running BriefCam VS Forensics .............................................................................................. 14
Screen overview ....................................................................................................................... 15
Managing Databases ................................................................................................................ 16
Creating a New Database......................................................................................................... 17
Opening an Existing Database ................................................................................................. 18
Processing an AVI File Into A Summary ................................................................................... 19
Opening an Existing Summary ................................................................................................. 22
The Timeline Bar ...................................................................................................................... 23
Setting/Changing the Timeframe .............................................................................................. 24
To Set/Change The Timeframe: ............................................................................................... 24
Playing the Summary Video ..................................................................................................... 25
2
BriefCam VS Forensics
The Progress Bar ..................................................................................................................... 25
For Frame-By-Frame Playback: ............................................................................................... 26
Adjusting the Summary Settings............................................................................................... 27
Density Slider: .......................................................................................................................... 27
Speed Slider: ............................................................................................................................ 27
Event Marker Button ................................................................................................................. 28
Timestamp Button .................................................................................................................... 29
Selecting and Viewing an Event ............................................................................................... 30
Selecting and Isolating an Event .............................................................................................. 31
Moving an Event Forward or Backward In Time (Event Scrolling) ............................................ 33
Playing an Isolated Event Video ............................................................................................... 34
Tile Toggle ................................................................................................................................ 34
Playing the Original Event Video .............................................................................................. 35
Moving Between Selected Events ............................................................................................ 36
Exporting a Summary Video to File .......................................................................................... 37
Copyright & Trademarks ........................................................................................................... 39
For More Information ................................................................................................................ 39
3
BriefCam VS Forensics
About This Manual
This manual is an electronic publication designed in PDF format for
easy viewing in Adobe Reader, which also gives the reader
exceptional control over accessing content.
The publication opens with a navigation window to the left, containing
“Thumbnail” screen shots. This window may be expanded to view
Thumbnails, or collapsed. The options may also be selected under
"Window" on the menu bar, or by clicking on the Bookmarks or
Thumbnails tabs at the top of the navigation window.
The pages will open in "Fit Page" viewing size.
The viewing size may be controlled by selecting the page buttons on
the command bar. Options include magnification, fit the page in
window, and fit the visible width of the page in window. Alternatively
use the viewing section under "View" in the menu bar. The magnifying
glass on the command bar can be used to zoom in and out of any
area on the page.
Use the arrows on the command bar to view the next page or the
previous page. You may also click the arrow or the page up/page
down keys on your keyboard, or use the scroll bar on the right-hand
side of the screen.
4
BriefCam VS Forensics
The menu bar can also be used for navigation.
To find information, enter the desired text in the dialog box in the
command bar or click “Find” on the Menu Bar.
To find more occurrences of the text, select “Find Again” or click the
arrows next to the dialog box.
Live hyperlinks are included in the text.
This manual was designed for viewing on your computer screen but
can also be printed out.
Printing properties: “Horizontal” on A4 paper.
5
BriefCam VS Forensics
Target Audience for This Manual
This manual is aimed at users of BriefCam VS Forensics. It provides
a full description of the installation process and operation instructions.
6
BriefCam VS Forensics
Introduction
What is BriefCam VS Forensics?
BriefCam Video Synopsis (VS) Forensics enables the rapid review of
captured video footage -- with an index to the original source video
file. Using Video Synopsis, a day of surveillance camera footage can
be summarized into a video clip as short as a minute. This means a
significant reduction in both the effort and the expense required to
review stored video. The result: users receive a "brief" that enables
the rapid review of events and evidence, and make use of the
operators’ experience and instincts to increase effectiveness and
efficiency.
How does BriefCam VS Forensics work?
BriefCam VS Forensics takes an AVI file containing the original video
and processes it, producing a database consisting of objects and
backgrounds that can be called on to create a video summary
presentation, on demand. This easy-to-use application enables the
user to create, view and export a video summary.
7
BriefCam VS Forensics
Installing BriefCam VS Forensics
To install BriefCam VS Forensics, run the installer file provided on a
CD by BriefCam.
File name: BriefCam_Forensics_1.1.0019.exe
• Run the installer.
• Accept the license agreement and follow the installation
procedure.
• Fill in the user and organization names.
• Click “Next” when asked about the destination folder.
• Click “Install”
• Wait a few seconds for installation to be completed.
• Click “Finish” and wait a few seconds for the installer to close.
At the end of installation, new icons will appear on your desktop:
8
BriefCam VS Forensics
Supported Codecs
BriefCam VS Forensics supports all commonly used Codecs.
BriefCam tests other Codecs on an ongoing basis to ensure their
compatibility with BriefCam VS Forensics.
Please refer to the “Support” section on the BriefCam website at
www.briefcam.com for a list of Codecs currently supported by BriefCam
VS Forensics, or contact [email protected]
IMPORTANT: When processing an AVI file using a new Codec, please
ensure that the PC installed with BriefCam Forensics has that Codec
installed as well. Most DVRs/NVRs provide the option of exporting the
Codec along with the AVI file.
9
BriefCam VS Forensics
License Activation
In order to use BriefCam VS Forensics, the license must be activated.
• Double-click the BriefCam License Activation shortcut icon
located on your desktop.
The License Activation window (also HASP SRM RUS) will open:
• Insert the Hasp Key (dongle) supplied by BriefCam.
• Go to the “Collect Key Status Information tab:
10
BriefCam VS Forensics
• Click “Collect Information”.
This generates and saves a signature file: filename.c2v (c2v means
Client to Vendor). This will be a unique signature file for your PC.
Send this file by e-mail to [email protected]
You will receive an e-mail from the BriefCam support department
containing an activation file.
The file will be: filename.v2c (Vendor to Client).
11
BriefCam VS Forensics
Upon receiving the activation file:
• Go to the “Apply License Update” tab
• Click “Update File”.
Select the file you received via e-mail
Click “Apply Update".
Close the window.
12
BriefCam VS Forensics
License Reactivation
Follow the same procedure as activating the license (see above).
13
BriefCam VS Forensics
Running BriefCam VS Forensics
• Click on the BriefCam VS Forensics shortcut icon located on
your desktop:
or
• Choose the BriefCam VS Forensics using the start menu:
Start > Programs > BriefCam > BriefCam Forensics
14
IMPORTANT: BriefCam VS
Forensics can only be
launched while the hasp
key (dongle) is connected.
BriefCam VS Forensics
Screen overview
1. Database name
2. Dropdown menu
1
3. Summary name
3
2
7
8
9
4. Summary Tile
5. Tile Toggle
6
4
5
6. Isolated Event Tile
7. Timeframe Settings
8. Timeline bar
9. Apply button
10
10. Show Original Video
button
11. Density slider
12. Event Marker button
13. Timestamp button
11
13
12
14
14. Speed slider
The BriefCam VS Forensics screen
15
NOTE: All BriefCam VS
Forensics functions, with the
exception of Show Original
Video, take place within a
single screen.
BriefCam VS Forensics
Managing Databases
After an AVI file is processed into a summary, that summary is saved
into a database. One database can consist of several summaries.
The user can choose which database to use for processing new AVI
clips and for opening an existing summary.
Database name and Summary name are presented at all times on the
upper left hand side of the screen:
The BriefCam database consists of two files:
• CAM file (“filename”.cam) – contains the actual events (objects)
and backgrounds.
• BRIEF file (“filename”.brief) - contains the data needed to
retrieve the events and backgrounds from the CAM file.
16
BriefCam VS Forensics
Creating a New Database
• Click the Drop Down Menu button
located at the upper left
hand side of the screen.
• Choose “Open DB” from the drop down menu:
NOTE: “Open DB” is used for
both creating new databases
and for opening existing
databases.
• Choose the desired path for the new database and enter the
new database file name.
This will create a new file with the extension .brief
NOTE: the second database
file (with the extension .cam)
will be created in the same
path after the processing of a
new summary.
NOTE: The new database
name will be displayed at the
top left-hand side of the
screen.
17
BriefCam VS Forensics
Opening an Existing Database
In the Forensics application
• Click the Drop Down Menu button
located at the upper left
hand side of the screen.
• Choose “Open DB” from the drop down menu:
• Browse and choose the desired database (the .brief file).
NOTE: The default database
is called BriefCam_DB and
its files are found at the
destination folder as defined
in the installation process.
The default database
consists of 2 files (just like
any other BriefCam
database):
• BriefCam_DB.brief
• BriefCam_DB.cam
After opening a database, the summary names in that database will
be displayed in the drop down menu:
IMPORTANT: both
database file (.brief and
.cam) must be located in
the same folder.
18
BriefCam VS Forensics
Processing an AVI File Into A Summary
• Click the Drop Down Menu button
hand side of the screen.
• Choose “Process new movie”
located at the upper left
A dialog box will appear:
TIP: When exporting footage
from the NVR/DVR to an AVI
file, exporting without audio
will reduce the file size.
19
BriefCam VS Forensics
• Click “browse” and choose the AVI file to be summarized.
The chosen AVI file will be presented in the field “File Name”
The “Display Name” field will insert the name of the file automatically
(without the AVI extension).
NOTE: the user can change
the display name
• Type in the start date and time of the original footage in the AVI
file.
Based on this start time the Forensics application will timestamp the
events in the footage.
• Click “OK”
20
NOTE: If you don’t know the
actual starting date and time
of the footage or if it’s not
relevant to your needs, retain
the default values in this field
(the current time and date
according to the PC).
BriefCam VS Forensics
The AVI file is now being processed.
Progress is shown in percentages at the bottom of the screen:
NOTE: The Forensics
application can process up to
4 AVI files simultaneously.
The progress of each one of
them will be presented on the
bottom of the screen:
21
BriefCam VS Forensics
Opening an Existing Summary
• Open the relevant database as described on page 18
• Click the drop down menu button
on the upper left hand
side of the screen.
• Choose the desired summary from the drop down menu:
• Click the apply button
the screen:
at the upper right hand side of
NOTE: Only the Summaries
stored in the specific
database you are using will
be presented on the list.
22
BriefCam VS Forensics
The Timeline Bar
The Timeline Bar presents event density over time. It is located on
the upper right side of the screen:
Event density is presented on the Timeline Bar using grayscale colors
(light grey = fewer events, dark grey = more events).
NOTE: the Timeline Bar
shows the event density only
after a new AVI file is
processed or an existing
summary is opened.
23
BriefCam VS Forensics
Setting/Changing the Timeframe
After a new AVI file is processed or an existing summary is opened
the user can set the timeframe of the summary. The timeframe is the
duration that is presented in the summary. For every summary the
user can set the start and end time and date.
To Set/Change The Timeframe:
• Type in or use the arrows to change the timeframe in the boxes
• Click the Apply button.
or
• Drag the Timeline Bar markers to the desired timeframe
NOTE: This function is useful
for zooming in on timeframes
when event density is high.
24
BriefCam VS Forensics
Playing the Summary Video
The Summary Video plays within the Summary Tile.
The user can pause or play the Summary Video by clicking the
“Pause” or “Play” icons
or by clicking on the background within
the video image.
Video play speed slows down automatically when the mouse cursor is
placed over the video.
The Progress Bar
The Progress Bar shows the video’s progress and remaining runtime.
By dragging the marker, users can choose which part of the Summary
Video they would like to play.
Progress Bar
25
NOTE: Video Synopsis (VS)
technology differentiates
between moving objects
(events) and motionless
backgrounds. The video
background is the nonmoving area within the
frame. (Clicking on an object
or event will be discussed on
page 30).
BriefCam VS Forensics
For Frame-By-Frame Playback:
• Pause the video.
• Scroll the mouse wheel forwards or backwards while the cursor
is over the video.
Sliding forward will run the video forward in time and backwards will
run it in reverse.
26
BriefCam VS Forensics
Adjusting the Summary Settings
Settings controls are located on the lower left-hand side of the screen.
Density Slider:
.
Moving the Density Slider to the left reduces event density, meaning
the number of events shown at once. Moving it to the right increases
the density.
Speed Slider:
The Speed Slider is located in the lower left-hand side of the screen.
Moving the Speed Slider to the left slows down the playing speed,
moving to the right increases the speed.
27
NOTE: Changing the event
density will change the actual
runtime of the Summary
Video. Increasing the event
density will make the
Summary Video shorter;
decreasing it will make the
video longer. The new
runtime will be presented in
the Progress Bar.
NOTE: Changing the video
speed will change the actual
runtime of the Summary
Video. This change will not
be presented on the
Progress Bar.
BriefCam VS Forensics
Event Marker Button
The Event Marker button is a blue circle
center of the screen.
located in the bottom
Click this button to add a marker on the events shown in the
Summary Video. Clicking this button again makes the markers
disappear.
This feature enables the user to keep track of all the events shown in
the summary and to make sure that no event is overlooked.
28
BriefCam VS Forensics
Timestamp Button
The Timestamp button looks like a clock-face
the right of the Event Marker button.
and is located to
Click this button to add a timestamp on each event shown in the
Summary Video.
The timestamp shows the hour and minute when the event first
appeared in the original video, based on user-determined start-time.
29
BriefCam VS Forensics
Selecting and Viewing an Event
BriefCam VS Forensics offers the user advanced viewing options of a
specific event.
The user can:
• Select an event
• Isolate it from other events
• Move the event backwards and forwards in time while other
events remain static
• View the original event as recorded by the DVR/NVR
• Play the isolated event video in the Isolated Event Tile, located
on the right-hand side of the screen.
Isolated Event Tile
30
BriefCam VS Forensics
Selecting and Isolating an Event
When the mouse cursor is placed over an event in the Summary
Video, that specific event is marked.
• Click on the event to select it.
31
BriefCam VS Forensics
The video playback stops and the timestamp of that event is shown.
In addition, the selected event is shown on the Isolated Event Tile.
32
BriefCam VS Forensics
Moving an Event Forward or Backward In Time (Event Scrolling)
After an event is selected, the user can use the mouse scroller to
move a specific event forward or backward in time. All other events
are paused and remain static.
Event in blue square is scrolled forward
All other events remain static
NOTE: This function is useful
for separating events and
makes choosing a specific
event easier.
33
BriefCam VS Forensics
Playing an Isolated Event Video
Double-clicking the event in the Summary Video Tile plays the
Isolated Event Video in the Isolated Event Tile on the right side of the
screen. This is a synthetic video that shows only the selected event.
IMPORTANT: This video is not the original AVI file video. Other events that
occurred at the same time as the selected event are not shown
Tile Toggle
The Tile Toggle
is located between the Summary Video Tile and
the Isolated Event Tile.
By clicking on the toggle users can change the size ratio between of
the Summary Video Tile and the Isolated Event Tile.
34
BriefCam VS Forensics
Playing the Original Event Video
After an event has been selected, click on the Original Video button,
located below the Isolated Event Tile, to view the original AVI file
video of the event.
The Original Video will be played in a new pop-up window:
The user can pause and play the original event video using the Pause
and Play buttons, or drag the Progress Bar to a desired location.
35
NOTE: The time shown on
the Progress Bar is the
current time, not the
remaining time, and is
displayed in HH:MM:SS
format.
BriefCam VS Forensics
Moving Between Selected Events
When no event is selected, use the space bar to go to the first event
not yet visible on screen.
When there is a selected event, use the space bar to go to the next
event in the timeline.
The video will go to the first frame where the event is visible.
Use Ctrl+Space to go to the previous event.
36
BriefCam VS Forensics
Exporting a Summary Video to File
• Right-click on the video summary and choose Export to AVI.
The Export Summary to AVI window will pop up.
• Click the Browse button.
37
NOTE: The exported
Summary Video is an AVI
(Audio Video Interleave) file.
NOTE: Free Codecs
available online include XVID
(Go to:
http://www.koepi.info/xvid.ht
ml).
BriefCam VS Forensics
A “Save as” window will pop-up.
• Choose the destination and file name of the exported AVI file.
• Click Save.
• Then click Save in the previous window (Export Summary to
AVI).
• Choose the Video Compression type (Codec) and Quality
• Click OK:
The export is complete when the progress bar is full:
IMPORTANT: The exported
clip will have the same
event density settings set
by the density slider:
• Click Close.
38
BriefCam VS Forensics
Copyright & Trademarks
Copyright © 2009 BriefCam, Ltd. All rights reserved. All text, graphics,
audio, design, software and other works are the copyrighted works of
BriefCam. Any unauthorized use of the materials herein is strictly
prohibited. BriefCam's name, logo, and other marks used in
connection with BriefCam's products and services are registered or
unregistered trademarks of BriefCam. You may not use any of
BriefCam's trademarks without the express written consent of
BriefCam. All other company and product names may be trademarks
of their respective owners.
For More Information
BriefCam Ltd. - www.briefcam.com
[email protected]
G.G. Communication Center
Suite 302
Neve Ilan, D.N. Harei Yehuda
90850, ISRAEL
Tel: +972-2-5337228 Fax: +972-2-5337448
39