1
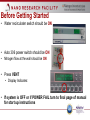
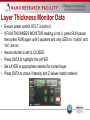
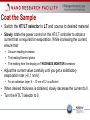
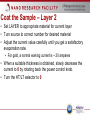
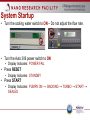
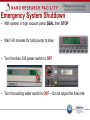
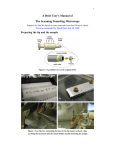
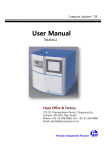
Thermal Evaporator
(Edwards Auto 306)
Basic User Manual
3rd Edition Aug 2012 NR
Before Getting Started
• Water recirculater switch should be ON
• Auto 306 power switch should be ON
• Nitrogen flow at the wall should be ON
• Press VENT
• Display Indicates:
• If system is OFF or if POWER FAIL turn to final page of manual
for start up instructions
Load the Chamber
• Open chamber door.
• Affix sample to holder.
• Place filament heaters into source 1, 2, and/or 3.
• Filament heater 1 is ALWAYS reserved for Al.
• Filament heater 3 is ALWAYS reserved for Au, Pt, or Ag
• Assure clear line of sight from source to sample and xtal
Load the Chamber
• Press CYCLE
• Wait for the display to read: FINE PUMPING
• When the pressure reading is <2 x 10⁻⁵ torr you may begin
coating (this may take ~ 30 min).
Layer Thickness Monitor Data
• Ensure power control HT/LT is set to 0.
• If FILM THICKNESS MONITOR reading is not 0, press RUN pause
then press RUN again until 0 appears and only LEDs to “crystal” and
“nm” are on.
• Assure shutter is set to CLOSED.
• Press DATA to highlight the LAYER.
• Set LAYER to appropriate material for current layer
• Press DATA to check if density and Z values match material
Coat the Sample
• Switch the HT/LT selector to LT and source to desired material
• Slowly rotate the power control on the HT/LT controller to obtain a
current that is required for evaporation. While increasing the current,
ensure that:
• Vacuum reading increases
• The heating filament glows
• The reading from the display on THICKNESS MONITOR increases
• Adjust the current value carefully until you get a satisfactory
evaporation rate (~0.1 nm/s).
• For an adhesion layer, 5 – 10 nm of Cr is sufficient
• When desired thickness is obtained, slowly decrease the current to 0.
• Turn the HT/LT selector to 0.
Coat the Sample – Layer 2
• Assure shutter is set to CLOSED(click run to change)
• Press DATA until the LAYER reading displays then change to 2 with
the up or down arrows.
• Continue pressing DATA until only the LEDs corresponding to
“crystal” and “nm” are on.
• Turn the HT/LT selector to LT for the second metal layer.
• Note the thickness reading
Coat the Sample – Layer 2
• Set LAYER to appropriate material for current layer
• Turn source to correct number for desired material
• Adjust the current value carefully until you get a satisfactory
evaporation rate.
• For gold, a normal working current is ~ 20 amperes
• When a suitable thickness is obtained, slowly decrease the
current to 0 by rotating back the power control knob.
• Turn the HT/LT selector to 0
Unload the Chamber
• Allow chamber to cool for 15-30 minutes before proceeding
• Press VENT
• Display reads: CHAMBER VENT
•
•
•
•
Carefully open chamber (do not force open)
Take out the coated samples (chamber may be HOT)
Carefully close chamber.
Press CYCLE
• Display reads: FINE PUMPING
• Leave chamber in fine pumping mode
System Startup
• Turn the cooling water switch to ON – Do not adjust the flow rate.
• Turn the Auto 306 power switch to ON
• Display Indicates: POWER FAIL
• Press RESET
• Display Indicates: STANDBY
• Press START
• Display Indicates: PUMPS ON → BACKING → TURBO → START →
SEALED
Emergency System Shutdown
• With system in high vacuum press SEAL then STOP
• Wait >30 minutes for turbo pump to slow
• Turn the Auto 306 power switch to OFF
• Turn the cooling water switch to OFF – Do not adjust the flow rate.