1
Sophos Enterprise Console
Help
Product version: 5.1
Document date: June 2012
Contents
1 About Enterprise Console ........................................................................................................................3
2 Guide to the Enterprise Console interface...............................................................................................4
3 Getting started with Sophos Enterprise Console..................................................................................14
4 Setting up Enterprise Console................................................................................................................17
5 Protecting computers..............................................................................................................................48
6 Updating computers...............................................................................................................................66
7 Configuring policies................................................................................................................................90
8 Setting up alerts and messages.............................................................................................................192
9 Viewing events.......................................................................................................................................202
10 Generating reports..............................................................................................................................212
11 Recovering access to encrypted computers.......................................................................................222
12 Copying or printing data from Enterprise Console..........................................................................224
13 Troubleshooting..................................................................................................................................226
14 Glossary...............................................................................................................................................233
15 Technical support................................................................................................................................239
16 Legal notices........................................................................................................................................240
2
Help
1 About Enterprise Console
Sophos Enterprise Console, version 5.1, is a single, automated console that manages and updates
Sophos security software on computers running Windows, Mac OS X, Linux and UNIX operating
systems. Enterprise Console enables you to:
■
Protect your network against viruses, Trojans, worms, spyware, malicious websites, and
unknown threats, as well as adware and other potentially unwanted applications.
■
Control which websites users can browse to, further protecting the network against malware,
and preventing users from browsing to inappropriate websites.
■
Control which applications can run on the network.
■
Manage client firewall protection on endpoint computers.
■
Assess computers' compliance with the conditions you set before they are allowed to log onto
the network and enforce compliance.
■
Assess computers for missing patches.
■
Reduce accidental data loss, such as unintentional transfer of sensitive data, from endpoint
computers.
■
Prevent users from using unauthorized external storage devices and wireless connection
technologies on endpoint computers.
■
Prevent users from re-configuring, disabling, or uninstalling Sophos security software.
■
Protect data on endpoint computers against unauthorized access with full disk encryption.
Note: Some of the features are not included with all licenses. If you want to use them, you
might need to change your license. For more information, see
http://www.sophos.com/en-us/products/complete/comparison.aspx.
3
Sophos Enterprise Console
2 Guide to the Enterprise Console interface
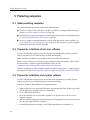
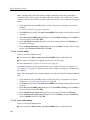
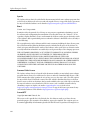
2.1 User interface layout
The Enterprise Console user interface consists of the following areas:
Toolbar
The toolbar contains shortcuts to the most common commands for using and configuring your
Sophos security software.
For more information, see Toolbar buttons (page 5).
Dashboard
The Dashboard provides an at-a-glance view of your network's security status.
For more information, see Dashboard panels (page 7).
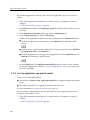
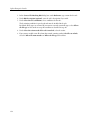
Computer list
The computer list is displayed at the bottom right. It has two views:
■
Endpoints view displays the computers in the group that is selected in the Groups pane at the
bottom left. For more information, see Navigating the Endpoints view (page 9).
■
Update managers view displays the computers where Sophos Update Manager is installed. For
more information, see Navigating the Update managers view (page 13).
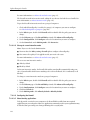
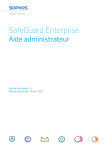
The screenshot below shows the computer list in the Endpoints view.
4
Help
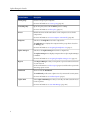
2.2 Toolbar buttons
The following table describes the toolbar buttons. Some toolbar buttons are available only in
specific circumstances. For example, the Protect button to install anti-virus and firewall software
is only available if a group of computers is selected in the Groups pane in the Endpoints view.
Toolbar Button
Description
Discover computers
Searches for computers on the network and adds them to the console.
For more information, see Choose how to discover computers (page 37) and
the other topics in the Setting up Enterprise Console > Finding computers on
the network section.
5
Sophos Enterprise Console
Toolbar Button
Description
Create group
Creates a new group for computers.
For more information, see Create a group (page 28).
View/Edit policy
Opens the policy selected in the Policies pane for editing.
For more information, see Edit a policy (page 35).
Protect
Installs anti-virus and firewall software on the computers selected in the
computer list.
For more information, see Protect computers automatically (page 50).
Endpoints
Switches to the Endpoints view in the computer list.
The Endpoints view displays the computers in the group that is selected in
the Groups pane.
For more information, see Navigating the Endpoints view (page 9).
Update managers
Switches to the Update managers view in the computer list.
The Update managers view displays computers where Sophos Update Manager
is installed.
For more information, see Navigating the Update managers view (page 13).
Reports
Starts Report Manager so that you can generate reports about alerts and events
on your network.
For more information, see About reports (page 212) and the other topics in the
Generating reports section.
Dashboard
Shows or hides the Dashboard.
The Dashboard provides an at-a-glance view of your network's security status.
For more information, see Dashboard panels (page 7).
Sophos NAC
Starts Sophos NAC Manager so that you can edit your NAC (Network Access
Control) policies.
For more information, see Start NAC Manager (page 143).
6
Help
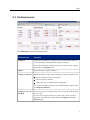
2.3 Dashboard panels
The Dashboard contains the following panels:
Dashboard Panel
Description
Computers
Displays the total number of computers on the network and the number of
connected, managed, unmanaged and encrypted computers.
To view a list of managed, unmanaged, connected, encrypted, or all computers,
click a link in the Computers area.
Updates
Displays the status of update managers.
Computers with alerts
Displays the number and percentage of managed computers with alerts about:
■ Known and unknown viruses and spyware
■ Suspicious behavior and files
■ Adware and other potentially unwanted applications
To view a list of managed computers with outstanding alerts, click the panel
title Computers with alerts.
Computers over event
threshold
Displays the number of computers with events over the threshold within the
last seven days.
To view a list of computers with device control, data control, controlled
application, or firewall events, click a link in the Computers over event
threshold panel.
7
Sophos Enterprise Console
Dashboard Panel
Description
Policies
Displays the number and percentage of managed computers with group policy
violations or policy comparison errors. It also includes computers that haven't
yet responded to the changed policy sent to them from the console.
To view a list of managed computers that differ from policy, click the panel
title Policies.
Protection
Displays the number and percentage of managed and connected computers
on which Sophos Endpoint Security and Control or Sophos Anti-Virus is out
of date or uses unknown detection data.
To view a list of managed connected out-of-date computers, click the panel
title Protection.
Errors
Displays the number and percentage of managed computers with outstanding
scanning, updating, or firewall errors.
To view a list of managed computers with outstanding Sophos product errors,
click the panel title Errors.
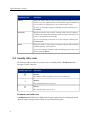
2.4 Security status icons
The following table describes the security status icons displayed in the Dashboard and the
Enterprise Console status bar.
Security status icon
Description
Normal
The number of affected computers is below the warning level.
Warning
The warning level has been exceeded.
Critical
The critical level has been exceeded.
Dashboard panel health icons
A Dashboard panel health icon is displayed in the upper-right corner of a Dashboard panel. It
shows the status of the particular security area represented by the panel.
8
Help
A Dashboard panel health icon shows the status of a panel icon with the most severe status, that
is:
■
A panel health icon changes from Normal to Warning when a warning level is exceeded for
at least one icon in the panel.
■
A panel health icon changes from Warning to Critical when a critical level is exceeded for at
least one icon in the panel.
The network health icon
The network health icon is displayed on the right side of the Enterprise Console status bar. It
shows the overall security status of your network.
The network health icon shows the status of the Dashboard panel with the most severe status,
that is:
■
The network's overall health icon changes from Normal to Warning when a warning level is
exceeded for at least one icon in the Dashboard.
■
The network's overall health icon changes from Warning to Critical when a critical level is
exceeded for at least one icon in the Dashboard.
When you first install or upgrade Enterprise Console, the Dashboard uses the default warning
and critical levels. To configure your own warning and critical levels, see Configure the Dashboard
(page 54).
You can also set up email alerts to be sent to your chosen recipients when a warning or critical
level has been exceeded for a Dashboard panel. For instructions, see Set up network status email
alerts (page 198).
2.5 Navigating the Endpoints view
9
Sophos Enterprise Console
Computer list
In the Endpoints view, the computer list displays the endpoint computers in the group that is
selected in the Groups pane.
This view contains of a number of tabs. The Status tab shows whether the computers are protected
by on-access scanning, whether they are compliant with their group policies, which features are
enabled, and whether the software is up to date. This tab also shows if there are any alerts. The
other tabs give more detailed information on each of these subjects.
You can filter the computer list using the View filter. In the View drop-down list, select which
computers you want to see. For example, select Computers with potential problems to display
computers with problems.
You can search for computers by computer name, computer description or IP address. For more
information, see Find a computer in Enterprise Console (page 12).
For an explanation of the icons displayed in the computer list, see Computer list icons (page 11).
You can copy or print data displayed in the computer list. For more information, see Copy data
from the computer list (page 224) and the other topics in the section Copying or printing data from
Enterprise Console.
Groups pane
In the Groups pane, you create groups and put networked computers in them. You can create
groups yourself or you can import Active Directory containers, with or without computers, and
use them as Enterprise Console computer groups.
For more information, see What are groups for? (page 27) and the other topics in the Setting up
Enterprise Console > Creating and using groups section.
The Unassigned group
is for computers that are not yet in a group that you created.
Policies pane
In the Policies pane, you create and configure the policies applied to groups of computers. For
more information, see the following:
10
■
About policies (page 30) and the other topics in the Setting up Enterprise Console > Creating
and using policies section
■
The Configuring policies section
Help
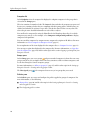
2.6 Computer list icons
Alerts
Icon
Explanation
A red warning sign displayed in the Alerts and errors column on the Status tab
means that a virus, worm, Trojan, spyware, or suspicious behavior has been detected.
A yellow warning sign displayed in the Alerts and errors column on the Status tab
indicates one of the following problems:
■ A suspicious file has been detected.
■ An adware or other potentially unwanted application has been detected.
■ An error has occurred.
A yellow warning sign displayed in the Policy compliance column indicates that
the computer is not using the same policy or policies as other computers in its
group.
If there are multiple alerts or errors on a computer, the icon of an alert that has the highest priority
will be displayed in the Alerts and errors column. Alert types are listed below in descending order
of priority.
1.
2.
3.
4.
5.
Virus and spyware alerts
Suspicious behavior alerts
Suspicious file alerts
Adware and PUA alerts
Software application errors (for example, installation errors)
Protection disabled or out of date
A gray feature icon in the feature status column on the Status tab means that the feature is disabled.
For example, a gray shield
A clock icon
in the On-access column means that on-access scanning is inactive.
in the Up to date column means that the security software is out of date.
Computer status
Icon
Explanation
A computer sign with a green connector means that the computer is managed by
Enterprise Console.
11
Sophos Enterprise Console
Icon
Explanation
A computer sign with a yellow hourglass means that installation of security software
is pending.
A computer sign with a yellow down arrow means that installation of security
software is in progress.
A gray computer sign means that the computer is not managed by Enterprise
Console.
A computer sign with a red cross means that the computer that is usually managed
by Enterprise Console is disconnected from the network. (Unmanaged disconnected
computers are not shown.)
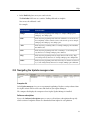
2.7 Find a computer in Enterprise Console
You can search for a computer or computers in Enterprise Console by:
■
Computer name
■
Computer description
■
IP address
1. To find a computer, do either of the following:
■
Press CTRL+F.
On the Edit menu, click Find a Computer.
■ Click anywhere in the computer list, right-click, and then click Find a Computer.
■
12
Help
2. In the Find dialog box, enter your search criteria.
The Find what field is not case sensitive. Trailing wildcards are implicit.
You can use the wildcards * and ?
For example:
Search criteria
Search results
UKlapt
Finds any string beginning with “uklapt”, for example, UKlaptop-011,
UKlaptop-155, uklaptop132.
Ukla*
Finds any string beginning with “ukla”. The wildcard is not needed as it is
there implicitly; search returns the same results as in the previous example,
UKlaptop-011, UKlaptop-155, uklaptop132.
*ukla
Finds any string containing “ukla”, for example, UKlaptop-011, 055uklax,
056-Dukla-sales.
Ukl*t
Finds any string beginning with “ukl”, containing a “t”, and ending with
any character, for example, UKlaptop-011, ukLite55.
?klap
Finds any string beginning with any single character followed by “klap”
and ending with any character, for example, UKlaptop-011, uklapland33.
UKl??t
Finds any string beginning with “ukl”, followed by two characters, followed
by “t”, and ending with any character, for example, UKlaptop-011, uklist101.
2.8 Navigating the Update managers view
Computer list
In the Update managers view, you set up automatic updating of Sophos security software from
the Sophos website and view the status and details of your update managers.
The computer list displays the computers where Sophos Update Manager is installed.
Software subscriptions
You use the Software Subscriptions pane to create or edit software subscriptions that specify
which versions of endpoint software are downloaded from Sophos for each platform.
13
Sophos Enterprise Console
3 Getting started with Sophos Enterprise Console
This is an overview of the tasks you need to perform to protect your network after you have
installed Enterprise Console and completed the Download Security Software Wizard. For more
information about using Enterprise Console, refer to the other materials and sections mentioned.
We recommend that you refer to the Sophos Enterprise Console policy setup guide for advice on
best practices for using and managing Sophos security software. Sophos documentation is published
at http://www.sophos.com/support/docs/.
If you haven't completed the Download Security Software Wizard, see Run the Download Security
Software Wizard (page 79).
To protect your network, follow these steps:
1. Create groups.
You can create groups yourself, one by one, or you can import Active Directory containers,
with or without computers, and use them as Enterprise Console computer groups.
If you want to import Active Directory containers, see Import containers and computers from
Active Directory (page 37). We recommend that you first import containers from Active
Directory without computers, then assign group policies to the groups, and then add computers
to the groups, for example, by synchronizing the groups with Active Directory.
For information about creating groups manually, see What are groups for? (page 27) and other
topics in the subsection Creating and using groups under the Setting up Enterprise Console
section.
2. Set up policies.
Enterprise Console has a set of default policies that are essential to keep your network protected.
You can use default Updating and Anti-virus and HIPS policies out of the box. To configure
the firewall policy, run the Firewall policy wizard. See Set up a basic firewall policy (page 111).
3. Discover computers on the network and add them to the console.
If you have imported containers and computers from Active Directory in step 1, you do not
need to do anything. Otherwise, see Choose how to discover computers (page 37) and other
topics in the subsection Discovering computers on the network under the Setting up Enterprise
Console section.
14
Help
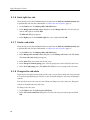
4. Protect computers.
You can choose between two approaches to protecting your networked computers, depending
on which suits you best.
■
Using the Protect Computers Wizard
When you drag a computer from the Unassigned group and drop it onto another group,
a wizard is launched to help you protect the computers. See Protect computers automatically
(page 50) and other topics in the section Protecting computers.
■
Protecting computers automatically during synchronization with Active Directory
If you chose to synchronize with Active Directory, you can also choose to protect your
Windows 2000 or later computers automatically. You can do so in the Synchronize with
Active Directory Wizard or Synchronization properties dialog box. For instructions, see
Use synchronization to protect computers automatically (page 44).
5. Check that computers are protected.
When installation is complete, look at the list of computers in the new group again. In the
On-access column, you should see the word Active: this shows that the computer is protected
by on-access scanning, and that it is now managed by Enterprise Console. For more information,
see How do I check that my network is protected? (page 54)
6. Clean up computers.
If a virus, unwanted application, or other issue has been detected on your network, clean up
affected computers as described in Clean up computers now (page 62).
Additional protection options
By default, Sophos Endpoint Security and Control detects viruses, Trojans, worms and spyware
and analyzes behavior of the programs running on the system. You can add further protection,
for example, protection against adware, potentially unwanted applications (PUAs), suspicious or
unwanted behavior, or accidental data loss from workstations. For more detail, see the following
sections:
■
Scan for suspicious files during on-access scanning (page 97)
■
Scan for adware and PUAs (page 92)
■
About application control (page 144)
■
About NAC (page 142)
■
About patch assessment (page 181)
■
About data control (page 147)
■
About device control (page 163)
■
About tamper protection (page 179)
Encryption options
15
Sophos Enterprise Console
If your license includes encryption, you can protect your computers against unauthorized access.
Drives can be encrypted transparently and Power-on Authentication provides an additional
authentication mechanism before the operating system starts.
Adminstrative options
You can set up different roles in Enterprise Console, add rights to the roles, and then assign
Windows users and groups to the roles. The System Administrator role that includes the Sophos
Full Administrators Windows group has full rights and does not require setting up. For more
information, see About roles and sub-estates (page 17).
You can split your IT estate into sub-estates and assign Enterprise Console groups of computers
to the sub-estates. You can then control access to the sub-estates by assigning Windows users and
groups to them. The Default sub-estate contains all Enterprise Console groups, including the
Unassigned group. For more information about sub-estates, see About roles and sub-estates (page
17).
16
Help
4 Setting up Enterprise Console
4.1 Managing roles and sub-estates
4.1.1 About roles and sub-estates
Important: If you already use role-based administration, you must have the Role-based
administration right to set up roles and sub-estates. The System Administrator role that includes
the Sophos Full Administrators Windows group has full rights and does not require setting up.
For more information, see What are the preconfigured roles? (page 18) and What tasks do the rights
authorize? (page 22).
You can set up role-based access to the console by setting up roles, adding rights to the roles, and
then assigning Windows users and groups to the roles. For example, a Help Desk engineer can
update or clean up computers, but cannot configure policies, which is the responsibility of an
Administrator.
To open Enterprise Console, a user must be a member of the Sophos Console Administrators
group and be assigned to at least one Enterprise Console role and one sub-estate. Members of the
Sophos Full Administrators group have full access to Enterprise Console.
Note: If you want to allow a user to use a remote or additional Enterprise Console, see How can
another user use Enterprise Console? (page 27)
You can create your own roles or use preconfigured roles.
You can assign a user as many roles as you like, by adding to the roles either the individual user
or a Windows group the user belongs to.
If a user does not have rights to perform a certain task within the console, they can still view
configuration settings pertaining to that task. A user who is not assigned any role cannot open
Enterprise Console.
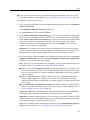
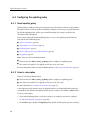
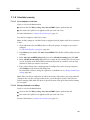
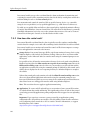
You can also restrict the computers and groups that users can perform operations on. You can
split your IT estate into sub-estates and assign Enterprise Console groups of computers to the
sub-estates. You can then control access to the sub-estates by assigning Windows users and groups
to them. The Default sub-estate contains all Enterprise Console groups, including the Unassigned
group.
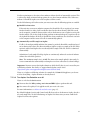
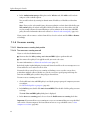
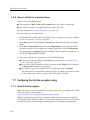
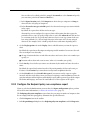
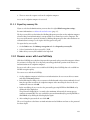
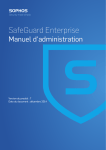
A user can only see the sub-estate that they are assigned to. If a user has been assigned to more
than one sub-estate, they can choose which sub-estate to view, one sub-estate at a time. The
sub-estate that is open in Enterprise Console is the active sub-estate. A user cannot edit a policy
that is applied outside their active sub-estate.
17
Sophos Enterprise Console
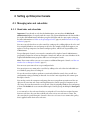
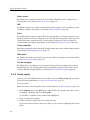
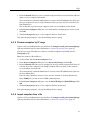
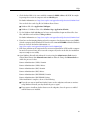
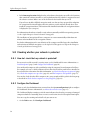
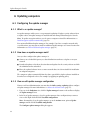
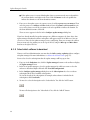
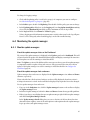
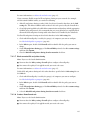
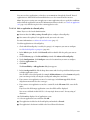
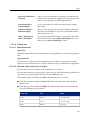
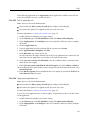
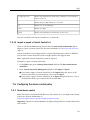
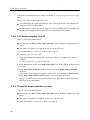
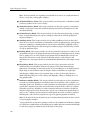
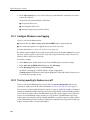
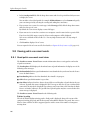
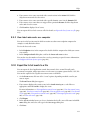
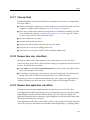
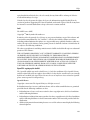
Figure 1: Roles and sub-estates
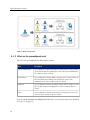
4.1.2 What are the preconfigured roles?
There are four preconfigured roles in Enterprise Console:
Role
Description
System Administrator
A preconfigured role that has full rights to manage Sophos security software
on the network and roles in Enterprise Console. The System Administrator
role cannot be edited or deleted.
Administrator
A preconfigured role that has rights to manage Sophos security software on
the network, but cannot manage roles in Enterprise Console. The
Administrator role can be renamed, edited, or deleted.
Helpdesk
A preconfigured role that has remediation rights only, for example, to clean
up or update computers. The Helpdesk role can be renamed, edited, or
deleted.
Guest
A preconfigured role that has read-only access to Enterprise Console. The
Guest role can be renamed, edited, or deleted.
You can edit the Administrator, Helpdesk and Guest roles, or create your own roles as described
in Create a role (page 19).
18
Help
4.1.3 Create a role
If you already use role-based administration, you must have the Role-based administration right
to perform this task. For more information, see About roles and sub-estates (page 17).
1. On the Tools menu, click Manage Roles and Sub-Estates.
2. In the Manage roles and sub-estates dialog box, on the Manage roles tab, click Create.
The Create role dialog box appears.
3.
4.
5.
6.
In the Name field, enter a name for the role.
In the Rights pane, select the right or rights you want to assign to the role and click Add.
In the Users and groups pane, click Add.
In the Select User or Group dialog box, enter the name of a Windows user or group you want
to assign to the role. Click OK.
If necessary, assign more users or groups to the role, as described in steps 5 and 6.
4.1.4 Delete a role
If you already use role-based administration, you must have the Role-based administration right
to perform this task. For more information, see About roles and sub-estates (page 17).
1. On the Tools menu, click Manage Roles and Sub-Estates.
2. In the Manage roles and sub-estates dialog box, on the Manage roles tab, select the role you
want to delete and click Delete.
Note: The preconfigured System Administrator role cannot be deleted.
4.1.5 Edit a role
If you already use role-based administration, you must have the Role-based administration right
to perform this task. For more information, see About roles and sub-estates (page 17).
1. On the Tools menu, click Manage Roles and Sub-Estates.
2. In the Manage roles and sub-estates dialog box, on the Manage roles tab, select the role you
want to edit and click Edit.
The Edit role dialog box appears.
3. In the Rights pane, assign rights to the role or remove existing rights as appropriate.
4. In the Users and groups pane, add Windows users or groups to the role or remove existing
users or groups as appropriate.
19
Sophos Enterprise Console
4.1.6 Grant rights to a role
If you already use role-based administration, you must have the Role-based administration right
to perform this task. For more information, see About roles and sub-estates (page 17).
1. On the Tools menu, click Manage Roles and Sub-Estates.
2. In the Manage roles and sub-estates dialog box, on the Manage roles tab, select the role you
want to add a right to and click Edit.
The Edit role dialog box appears.
3. In the Rights pane, in the Available rights list, select a right and click Add.
4.1.7 Create a sub-estate
If you already use role-based administration, you must have the Role-based administration right
to perform this task. For more information, see About roles and sub-estates (page 17).
1. On the Tools menu, click Manage Roles and Sub-Estates.
2. In the Manage roles and sub-estates dialog box, on the Manage sub-estates tab, click Create.
The Create sub-estate dialog box appears.
3. In the Name field, enter a name for the sub-estate.
4. In the Enterprise Console groups pane, select the groups you want to add to the sub-estate.
5. In the Users and groups pane, click Add to add Windows users or groups to the sub-estate.
4.1.8 Change active sub-estate
If you have been assigned to more than one sub-estate, you can choose which sub-estate you want
to view when opening Enterprise Console, or you can switch among the sub-estates in Enterprise
Console.
You can only view one sub-estate at a time. When you change your active sub-estate, Enterprise
Console is reloaded with a new sub-estate.
To change active sub-estate:
1. On the Tools menu, click Select Active Sub-Estate.
2. In the Select Active Sub-Estate dialog box, select the sub-estate you want to open and click
OK.
20
Help
4.1.9 Edit a sub-estate
If you already use role-based administration, you must have the Role-based administration right
to perform this task. For more information, see About roles and sub-estates (page 17).
1. On the Tools menu, click Manage Roles and Sub-Estates.
2. In the Manage roles and sub-estates dialog box, on the Manage sub-estates tab, select the
sub-estate you want to edit and click Edit.
3. In the Edit sub-estate dialog box, change the name of the sub-estate, change which Enterprise
Console groups are included in the sub-estate, or change which Windows users and groups
have access to the sub-estate, as appropriate. Click OK.
4.1.10 Copy a sub-estate
If you already use role-based administration, you must have the Role-based administration right
to perform this task. For more information, see About roles and sub-estates (page 17).
1. On the Tools menu, click Manage Roles and Sub-Estates.
2. In the Manage roles and sub-estates dialog box, on the Manage sub-estates tab, select the
sub-estate you want to copy and click Copy.
A copy of the sub-estate appears in the list of sub-estates.
3. Select the newly created sub-estate and click Edit. Rename the sub-estate. Change the groups
that are included in the sub-estate and/or Windows users and groups that have access to it, if
you want to.
4.1.11 Delete a sub-estate
If you already use role-based administration, you must have the Role-based administration right
to perform this task. For more information, see About roles and sub-estates (page 17).
1. On the Tools menu, click Manage Roles and Sub-Estates.
2. In the Manage roles and sub-estates dialog box, on the Manage sub-estates tab, select the
sub-estate you want to delete and click Delete.
You cannot delete the Default sub-estate.
4.1.12 View user or group roles and sub-estates
To view the roles and sub-estates a Windows user or group has been assigned to:
1. On the Tools menu, click Manage roles and sub-estates.
2. In the Manage roles and sub-estates dialog box, go to the User and Group View tab and click
the Select user or group button.
21
Sophos Enterprise Console
3. In the Select User or Group dialog box, select a user or group whose roles and sub-estates you
want to view and click OK.
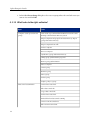
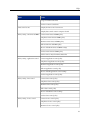
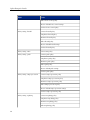
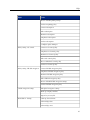
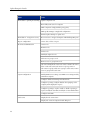
4.1.13 What tasks do the rights authorize?
Right
Tasks
Computer search, protection and
groups
Start search, stop search and find domains for Network search,
IP range search and Active Directory search
Import computers and groups from Active Directory; import
groups from Active Directory
Import computers from a file
Delete a computer
Protect a computer
Synchronize a group with Active Directory
Change group synchronization properties
Remove group synchronization
Move a computer
Create a group
Rename a group
Move a group
Delete a group
Assign a policy to a group
Data control customization
Create a data control rule
Edit a data control rule
Copy a data control rule
Delete a data control rule
Exclude files from data control scanning
Create a Content Control List
Edit a Content Control List
22
Help
Right
Tasks
Copy a Content Control List
Delete a Content Control List
Data control events
Display the data control event viewer
Display data control events in computer details
Policy setting - anti-virus and HIPS
Create an anti-virus and HIPS policy
Duplicate an anti-virus and HIPS policy
Rename an anti-virus and HIPS policy
Edit an anti-virus and HIPS policy
Restore default anti-virus and HIPS settings
Delete an anti-virus and HIPS policy
Add or remove entry from threat master list
Policy setting - application control
Create an application control policy
Duplicate an application control policy
Rename an application control policy
Edit an application control policy
Restore default application control settings
Delete an application control policy
Policy setting - data control
Create a data control policy
Duplicate a data control policy
Rename a data control policy
Edit a data control policy
Restore default data control settings
Delete a data control policy
Policy setting - device control
Create a device control policy
Duplicate a device control policy
Rename a device control policy
23
Sophos Enterprise Console
Right
Tasks
Edit a device control policy
Restore default device control settings
Delete a device control policy
Policy setting - firewall
Create a firewall policy
Duplicate a firewall policy
Rename a firewall policy
Edit a firewall policy
Restore default firewall settings
Delete a firewall policy
Policy setting - NAC
View a NAC policy
Policy setting - patch
Create a patch policy
Duplicate a patch policy
Rename a patch policy
Edit a patch policy
Restore default patch settings
Delete a patch policy
Policy setting - tamper protection
Create a tamper protection policy
Duplicate a tamper protection policy
Rename a tamper protection policy
Edit a tamper protection policy
Restore default tamper protection settings
Delete a tamper protection policy
Policy setting - updating
Create an updating policy
Duplicate an updating policy
Rename an updating policy
Edit an updating policy
24
Help
Right
Tasks
Restore default updating settings
Delete an updating policy
Create a subscription
Edit a subscription
Rename a subscription
Duplicate a subscription
Delete a subscription
Configure update managers
Policy setting - web control
Create a web control policy
Duplicate a web control policy
Rename a web control policy
Edit a web control policy
Reset a default web control policy
Delete a web control policy
Policy setting - full disk encryption
Create a full disk encryption policy
Duplicate a full disk encryption policy
Rename a full disk encryption policy
Edit a full disk encryption policy
Restore default full disk encryption settings
Delete a full disk encryption policy
Global encryption settings
Edit global encryption settings
Back up company certificate
Export key recovery file
Remediation - cleanup
Clean up detected items
Acknowledge alerts
Acknowledge errors
25
Sophos Enterprise Console
Right
Tasks
Remediation - updating and scanning
Update computers now
Run a full system scan of a computer
Make computers comply with the group policy
Make update manager comply with configuration
Instruct update manager to update now
Remediation - encryption recovery
Recover access to encrypted computers with Challenge/Response
Report configuration
Create, edit, or delete a report
Role-based administration
Create a role
Rename a role
Delete a role
Modify the rights of a role
Add a user or group to a role
Remove a user or group from a role
Sub-estate management: create a sub-estate; rename a sub-estate;
delete a sub-estate; add a sub-estate root group; remove a
sub-estate root group; add a user or group to a sub-estate; remove
a user or group from a sub-estate
System configuration
Modify SMTP server settings; test SMTP server settings; modify
email alert recipients
Configure dashboard warning and critical levels
Configure reporting: configure database alert purging; set the
company name displayed in reports
Configure reporting to Sophos: enable or disable reporting to
Sophos; modify the username; modify the contact email address
Configure NAC URL
Web events
Display the web event viewer
Display web events in computer details dialog box
26
Help
4.1.14 How can another user use Enterprise Console?
Members of the Sophos Full Administrators group have full access to Enterprise Console.
You can allow other users to use Enterprise Console. To open Enterprise Console, a user must be:
■
a member of the Sophos Console Administrators group,
■
assigned to at least one Enterprise Console role,
■
assigned to at least one Enterprise Console sub-estate.
If you want to assign a user to the Sophos Console Administrators group, use Windows tools to
add that user to the group.
To assign a user to an Enterprise Console role or sub-estate, on the Tools menu, click Manage
Roles and Sub-Estates. For more information about roles and sub-estates, see About roles and
sub-estates (page 17).
To use a remote or additional Enterprise Console, a user must:
■
Be a member of the Sophos Console Administrators group on the server where the Enterprise
Console management server is installed.
■
Be a member of the Distributed COM Users group on the server where the Enterprise Console
management server is installed. (The Distributed COM Users group is located in the Builtin
container of the Active Directory Users and Computers tool.)
■
Be assigned to at least one Enterprise Console role.
■
Be assigned to at least one Enterprise Console sub-estate.
4.2 Creating and using groups
4.2.1 What are groups for?
You must create groups and place computers in them before you can protect and manage those
computers.
Groups are useful because you can:
■
Have computers in different groups updated from different sources or on different schedules.
■
Use different anti-virus and HIPS, application control, firewall, and other policies for different
groups.
■
Manage computers more easily.
Tip: You can create groups within groups and apply a specific set of policies to each group and
subgroup.
27
Sophos Enterprise Console
4.2.2 What is a group?
A group
is a folder that holds a number of computers.
You can create groups yourself or you can import Active Directory containers, with or without
computers, and use them as computer groups in Enterprise Console. You can also set up
synchronization with Active Directory so that new computers and containers as well as other
changes in Active Directory are copied into Enterprise Console automatically.
Each group has settings for updating, anti-virus and HIPS protection, firewall protection, and so
on. All the computers in a group should usually use these settings, which are called a “policy.”
A group can contain subgroups.
4.2.3 What is the Unassigned group?
The Unassigned group is a group where Enterprise Console holds computers before you put them
into groups.
You cannot:
■
Apply policies to the Unassigned group.
■
Create subgroups in the Unassigned group.
■
Move or delete the Unassigned group.
4.2.4 Create a group
If you use role-based administration, you must have the Computer search, protection and groups
right to perform this task. For more information, see About roles and sub-estates (page 17).
To create a new group for computers:
1. In the Endpoints view, in the Groups pane (on the left-hand side of the console), select where
you want to create the group.
Click the computer name at the top if you want to create a new top-level group. Click an existing
group if you want to create a subgroup.
2. On the toolbar, click the Create group icon.
A “New Group” is added to the list, with its name highlighted.
3. Type a name for the group.
Updating, anti-virus and HIPS, application control, firewall, NAC (network access control), patch,
data control, device control, tamper protection, and web control policies are applied to the new
group automatically. You can edit these policies, or apply different policies. See Edit a policy (page
35) or Assign a policy to a group (page 35).
28
Help
Note: If the new group is a subgroup, it initially uses the same settings as the group it is within.
4.2.5 Add computers to a group
If you use role-based administration, you must have the Computer search, protection and groups
right to perform this task. For more information, see About roles and sub-estates (page 17).
1. Select the computers that you want to add to a group. For example, click the Unassigned group
and select computers there.
2. Drag and drop the computers onto the new group.
If you move unprotected computers from the Unassigned group to a group that has automatic
updating set up, a wizard is launched to help you protect them.
If you move computers from one group to another, they will use the same policies as the
computers already in the group they are moved to.
4.2.6 Delete computers from a group
If you use role-based administration, you must have the Computer search, protection and groups
right to perform this task. For more information, see About roles and sub-estates (page 17).
You can delete computers from a group, for example, if you want to remove entries for computers
that are no longer on the network.
Important: If you delete computers that are still on the network, they will no longer be listed or
managed by the console.
To delete computers:
1. Select the computers that you want to delete.
2. Right-click and select Delete.
If you want to see the computers again, click the Discover computers icon on the toolbar. These
computers will not be shown as managed until they are restarted.
4.2.7 Cut and paste a group
If you use role-based administration, you must have the Computer search, protection and groups
right to perform this task. For more information, see About roles and sub-estates (page 17).
1. Select the group you want to cut and paste. On the Edit menu, click Cut.
2. Select the group where you want to place the group. On the Edit menu, click Paste.
29
Sophos Enterprise Console
4.2.8 Delete a group
If you use role-based administration, you must have the Computer search, protection and groups
right to perform this task. For more information, see About roles and sub-estates (page 17).
Any computers that were in the deleted group will be placed in the Unassigned group.
1. Select the group you want to delete.
2. Right-click and select Delete. When prompted, confirm that you want to delete the group and,
if the group has any subgroups, its subgroups.
4.2.9 Rename a group
If you use role-based administration, you must have the Computer search, protection and groups
right to perform this task. For more information, see About roles and sub-estates (page 17).
1. Select the group you want to rename.
2. Right-click and select Rename.
4.2.10 Check which policies a group uses
To see which policies have been assigned to a group:
■
In the Groups pane, right-click the group. Select View/Edit Group Policy Details.
In the group details dialog box, you can see the policies currently used.
4.3 Creating and using policies
4.3.1 About policies
A policy is a collection of settings applied to all the computers in a group.
30
■
The Updating policy specifies how computers are updated with new security software.
■
The Anti-virus and HIPS policy specifies how the security software scans computers for viruses,
Trojans, worms, spyware, adware, potentially unwanted applications, suspicious behavior and
suspicious files, and how it cleans them up.
■
The Application control policy specifies which applications are blocked and which are allowed
on your computers.
■
The Firewall policy specifies how the firewall protects computers.
■
The Data control policy specifies rules for monitoring or restricting the transfer of files, based
on file content, filename, or file type.
Help
■
The Device control policy specifies which storage and networking devices are not authorized
for use on workstations.
■
The NAC policy specifies the conditions that computers must comply with before they can
access the network.
■
The Patch policy specifies whether patch assessment is enabled and how often computers are
assessed for missing patches.
■
The Full disk encryption policy specifies how full disk encryption protects computers against
unauthorized access.
■
The Tamper protection policy specifies the password that allows authorized endpoint users
to re-configure, disable or uninstall Sophos security software.
■
The Web control policy specifies which websites can be browsed to by users. A notification is
displayed to users for sites that are configured as "block" or "warn."
You can create more than one policy of each type.
You can apply the same policy to more than one group.
4.3.2 What is a policy?
A policy is a collection of settings applied to all the computers in a group.
When you install Enterprise Console, default policies that offer a basic level of security are created
for you. These policies are applied to any groups you create. You can edit the default policies or
create new policies.
To learn more about different types of policy, see About policies (page 30)
4.3.3 What are the default policies?
When you install Enterprise Console, default policies are created for you.
Updating policy
The default updating policy provides:
■
Automatic updating of computers every 10 minutes from the default location. The default
location is a UNC share \\<ComputerName>\SophosUpdate, where ComputerName is the
name of the computer where the update manager is installed.
Anti-virus and HIPS policy
The default anti-virus and HIPS policy provides:
■
On-access scanning for viruses and spyware (but not suspicious files and adware and other
potentially unwanted applications).
31
Sophos Enterprise Console
■
Analysis of the execution of programs running on the system (Sophos Anti-Virus and Sophos
Endpoint Security and Control for Windows 2000 and later).
■
Security alerts displayed on the desktop of the affected computer and added to the event log.
Application control policy
By default, all applications and application types are allowed. On-access scanning for applications
you may want to control on your network is disabled.
Firewall policy
By default, the Sophos Client Firewall is enabled and blocks all non-essential traffic. Before you
use it throughout your network, you should configure it to allow the applications you want to
use. See Set up a basic firewall policy (page 111).
For a full list of the default firewall settings, see Sophos support knowledgebase article 57757
(http://www.sophos.com/support/knowledgebase/article/57757.html).
Data control policy
By default, data control is turned off and no rules are specified to monitor or restrict the transfer
of files to the internet or storage devices.
Device control policy
By default, device control is turned off and all devices are allowed.
NAC policy
By default, computers are allowed to access the network (unless you have modified the default
policy or changed the “policy mode” in NAC server).
Patch policy
By default, patch assessment is turned off. For new patch policies, assessment is turned on. Once
patch assessment is turned on, computers are assessed daily for missing patches (unless you have
changed the patch assessment interval).
Tamper protection policy
By default, tamper protection is turned off and no password is specified to allow authorized
endpoint users to re-configure, disable or uninstall Sophos security software.
Web control policy
By default, web control is turned off, and users can visit any site that is not restricted as part of
Enterprise Console's web protection. See About web protection (page 94).
Full disk encryption policy
By default, drives on computers are not encrypted. If you select volumes to encrypt in the default
policy, the selected volumes on computer drives are encrypted with fast initial encryption.
32
Help
Note: The fast initial encryption mode may lead to a less secure state if a disk has been in use
before encryption is applied. Unused sectors may still contain data.
For logon, the Power-on Authentication is enabled. For recovery, the recovery method
Challenge/Response is enabled and configured.
4.3.4 Do I need to create my own policies?
When you install Enterprise Console,“default” policies are created for you. These policies are
applied to any groups you create.
The default policies offer a basic level of security, but to use features like network access control
or application control you need to create new policies or change the default policies.
Note: When you change the default policy, the change applies to all new policies you create.
Note: If you use role-based administration, you must have a respective Policy setting right to
create or edit a policy. For example, you must have the Policy setting - anti-virus and HIPS right
to create or edit an anti-virus and HIPS policy. For more information, see About roles and sub-estates
(page 17).
Updating policy
The default updating policy sets endpoints to check for updates to the recommended subscription
every 10 minutes from the default software distribution UNC share. To change subscriptions,
update locations and other settings, configure update policies as described in About updating policy
(page 80).
Anti-virus and HIPS
The default anti-virus and HIPS policy protects computers against viruses and other malware.
However, to enable detection of other unwanted/suspicious applications or behavior, you may
want to create new policies, or change the default policy. See About the anti-virus and HIPS policy
(page 90).
Application control
To define and block unauthorized applications, configure application control policies as described
in About application control (page 144).
Firewall policy
To allow bona-fide applications access to a network, configure firewall policies as described in Set
up a basic firewall policy (page 111).
Data control
By default, data control is turned off. To restrict data leakage, configure data control policies as
described in About data control (page 147).
33
Sophos Enterprise Console
Device control
By default, device control is turned off. To restrict allowed hardware devices, configure device
control policies as described in About device control (page 163).
NAC
By default, network access control is turned off. To restrict computer access according to certain
conditions, configure NAC policies as described in Edit a NAC policy (page 144).
Patch
By default, patch assessment is turned off. For new patch policies, assessment is turned on. Once
patch assessment is turned on, computers are assessed daily for missing patches (unless you have
changed the patch assessment interval). To turn patch assessment on or off or to change the
assessment interval, configure patch policies as described in About patch assessment (page 181).
Tamper protection
By default, tamper protection is turned off. To enable tamper protection, configure tamper policies
as described in About tamper protection (page 179).
Web control
By default, web control is turned off. To turn on web control, and configure web control policies,
see About the web control policy (page 183).
Full disk encryption
By default, drives on computers are not encrypted. To protect data on computer drives against
unauthorized access by encrypting them and to specify further settings for logon and recovery,
configure full disk encryption policies as described in About full disk encryption (page 170).
4.3.5 Create a policy
If you use role-based administration, you must have a respective Policy setting right to perform
this task. For more information, see About roles and sub-estates (page 17).
To create a policy:
Note: You cannot create NAC policies. You can only edit them. See Edit a NAC policy (page 144).
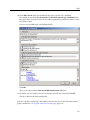
1. In the Endpoints view, in the Policies pane, right-click the type of policy you want to create,
for example, “Updating,” and select Create policy.
A “New Policy” is added to the list, with its name highlighted.
2. Type a new name for the policy.
3. Double-click the new policy. Enter the settings you want.
For the instructions on how to choose the settings, see the section on configuring the relevant
policy.
34
Help
You have created a policy that can now be applied to groups.
4.3.6 Assign a policy to a group
If you use role-based administration, you must have the Computer search, protection and groups
right to perform this task. For more information, see About roles and sub-estates (page 17).
1. In the Policies pane, highlight the policy.
2. Click the policy and drag it onto the group to which you want to apply the policy. When
prompted, confirm that you want to continue.
Note: Alternatively, you can right-click a group and select View/Edit Group Policy Details. You
can then select policies for that group from drop-down menus.
4.3.7 Edit a policy
If you use role-based administration:
■
You must have a respective Policy setting right to perform this task.
■
You cannot edit a policy if it is applied outside your active sub-estate.
For more information, see About roles and sub-estates (page 17).
To edit a policy for a group or groups of computers:
1. In the Policies pane, double-click the policy you want to edit.
2. Edit the settings.
For instructions on how to configure different policies, see the respective sections.
4.3.8 Rename a policy
If you use role-based administration:
■
You must have a respective Policy setting right to perform this task.
■
You cannot rename a policy if it is applied outside your active sub-estate.
For more information, see About roles and sub-estates (page 17).
Note: You cannot rename a “Default” policy.
To rename a policy:
1. In the Policies pane, select the policy you want to rename.
2. Right-click and select Rename policy.
35
Sophos Enterprise Console
4.3.9 Delete a policy
If you use role-based administration:
■
You must have a respective Policy setting right to perform this task.
■
You cannot delete a policy if it is applied outside your active sub-estate.
For more information, see About roles and sub-estates (page 17).
Note: You cannot delete a “Default” policy.
To delete a policy:
1. In the Policies pane, right-click the policy you want to delete and select Delete Policy.
2. Any groups that use the deleted policy will revert to using the default policy.
4.3.10 See which groups use a policy
To see which groups a particular policy has been applied to:
■
In the Policies pane, right-click the policy and select View Groups Using Policy.
A list of the groups that use the policy is displayed.
4.3.11 Check whether computers use the group policy
You can check whether all the computers in a group comply with the policies for that group.
1. Select the group which you want to check.
2. In the computer list, Endpoints view, on the Status tab, look in the Policy compliance column.
■
If you see the words “Same as policy”, the computer complies with the policies for its group.
■ If you see a yellow warning sign and the words “Differs from policy”, the computer is not
using the same policy or policies as other computers in its group.
For more detailed information about the status of the security features on the computer and
policies applied to the computer, see the respective tab in the Endpoints view, for example,
the Anti-Virus Details tab.
If you want your computers to comply with their group policies, see Make computers use the group
policy (page 36).
4.3.12 Make computers use the group policy
If you use role-based administration, you must have the Remediation - updating and scanning
right to perform this task. For more information, see About roles and sub-estates (page 17).
36
Help
If you find computers that do not comply with the policies for their group, you can apply the
group policies to that computer.
1. Select the computer(s) that do not comply with the group policy.
2. Right-click and select Comply with. Then select the appropriate policy type, for example,
Group anti-virus and HIPS policy.
4.4 Discovering computers on the network
4.4.1 Choose how to discover computers
To manage computers in Enterprise Console, you first have to add them to Enterprise Console.
You can use the “Discover computers” function and choose among several options that allow you
to search for networked computers and add them to Enterprise Console. There are the following
options:
■
Import containers and computers from Active Directory (page 37)
■
Discover computers with Active Directory (page 38)
■
Discover computers by browsing the network (page 38)
■
Discover computers by IP range (page 39)
■
Import computers from a file (page 39)
If you use role-based administration, you must have the Computer search, protection and groups
right to add computers to the console. For more information, see About roles and sub-estates (page
17).
4.4.2 Import containers and computers from Active Directory
If you use role-based administration, you must have the Computer search, protection and groups
right to perform this task. For more information, see About roles and sub-estates (page 17).
Importing groups from Active Directory retrieves the Active Directory container structure and
copies it into Enterprise Console as a computer group structure. You can import the group structure
only or groups and computers. If you choose the latter, computers found in Active Directory are
placed in their respective group, and not in the Unassigned group.
You can have both “normal” groups that you create and manage yourself and groups imported
from Active Directory. You can also synchronize the imported groups with Active Directory.
To import groups from Active Directory:
1. On the toolbar, click the Discover computers icon.
37
Sophos Enterprise Console
2. In the Discover Computers dialog box, in the Import from Active Directory pane, select
Import and click OK.
Alternatively, select a group you want to import your Active Directory container(s) into,
right-click and select Import from Active Directory.
The Import from Active Directory Wizard starts.
3. Follow the instructions in the wizard. When asked to choose what to import, select Computers
and groups or Groups only, depending on what you want to import.
After you have imported containers from Active Directory, apply policies to the groups. See About
policies (page 30).
After you have applied group policies to the groups, you can synchronize the groups with Active
Directory, if you want to. For instructions, see Synchronize with Active Directory (page 42).
4.4.3 Discover computers with Active Directory
If you use role-based administration, you must have the Computer search, protection and groups
right to perform this task. For more information, see About roles and sub-estates (page 17).
You can use Active Directory to discover networked computers and add them to the Unassigned
group.
1. On the toolbar, click the Discover computers icon.
2. In the Discover Computers dialog box, select Discover with Active Directory and click OK.
3. You are prompted to enter a username and password. You need to do this if you have computers
(for example, Windows XP Service Pack 2) that cannot be accessed without account details.
The account must be a domain administrator’s account, or have full administrative rights over
the target XP computers.
If you are using a domain account, you must enter the username in the form domain\user.
4. In the Discover Computers dialog box, select the domains you want to search. Click OK.
5. Click the Unassigned group to see the computers that have been found.
To begin managing computers, select them and drag them to a group.
4.4.4 Discover computers by browsing the network
If you use role-based administration, you must have the Computer search, protection and groups
right to perform this task. For more information, see About roles and sub-estates (page 17).
To add a list of computers found in Windows domains and workgroups to the Unassigned group:
1. On the toolbar, click the Discover computers icon.
2. In the Discover Computers dialog box, select Discover on the network and click OK.
38
Help
3. In the Credentials dialog box, enter a username and password of an account that has sufficient
rights to retrieve computer information.
The account must be a domain administrator’s account or have full administrative rights over
the target computers. If you are using a domain account, you must enter the username in the
form domain\user.
You can skip this step if your target computers can be accessed without account details.
4. In the Discover Computers dialog box, select the domains or workgroups you want to search.
Click OK.
5. Click the Unassigned group to see the computers that have been found.
To begin managing computers, select them and drag them to a group.
4.4.5 Discover computers by IP range
If you use role-based administration, you must have the Computer search, protection and groups
right to perform this task. For more information, see About roles and sub-estates (page 17).
You can use a range of IP addresses to discover networked computers and add them to the
Unassigned group.
Note: You cannot use IPv6 addresses.
1. On the toolbar, click the Discover computers icon.
2. In the Discover Computers dialog box, select Discover by IP range and click OK.
3. In the Credentials dialog box, you are prompted to enter a username and password. You need
to do this if you have computers (for example, Windows XP Service Pack 2) that cannot be
accessed without account details.
The account must be a domain administrator’s account, or have full administrative rights over
the target XP machines.
If you are using a domain account, you must enter the username in the form domain\user.
In the SNMP pane, you can enter the SNMP community name.
4. In the Discover Computers dialog box, enter the Start of IP Range and End of IP Range. Click
OK.
5. Click the Unassigned group to see the computers that have been found.
To begin managing computers, select them and drag them to a group.
4.4.6 Import computers from a file
If you use role-based administration, you must have the Computer search, protection and groups
right to perform this task. For more information, see About roles and sub-estates (page 17).
39
Sophos Enterprise Console
To enable Enterprise Console to list your computers, you can import the computer names from
a file. You can create the file using entries like this:
[GroupName1]
Domain1|Windows7|ComputerName1
Domain1|Windows2008ServerR2|ComputerName2
Note: You do not have to specify which group the computers will be put in. If you enter [] (with
no space between the brackets) for the group name, computers will be put in the Unassigned
group.
Note: Valid operating system names are: Windows2000, Windows2000Server, WindowsXP,
Windows2003, WindowsVista, Windows7, WindowsServer2008, Windows2008ServerR2,
Windows8, WindowsServer2012, MACOSX, Linux, and Unix.
The domain name and the operating system are both optional. So an entry can look like this:
[GroupName1]
ComputerName1
You import computer names as follows:
1.
2.
3.
4.
On the File menu, click Import Computers from File.
In the browser window, select the file.
Click the Unassigned group to see the computers that have been found.
To begin managing computers, select them and drag them to a group.
4.5 Synchronizing with Active Directory
4.5.1 About synchronization with Active Directory
This section gives an overview of Active Directory synchronization.
What does Active Directory synchronization do for me?
With Active Directory synchronization, you can synchronize Enterprise Console groups with
Active Directory containers. New computers and containers discovered in Active Directory are
copied into Enterprise Console automatically. You can also choose to protect discovered Windows
2000 or later workstations automatically. This allows you to minimize the time in which computers
can become infected and reduce the amount of work you need to do to organize and protect
computers.
Note: Computers running Windows server operating systems, Mac OS, Linux, or UNIX are not
protected automatically. You must protect such computers manually.
40
Help
After you have set up synchronization, you can set up email alerts to be sent to your chosen
recipients about new computers and containers discovered during future synchronizations. If you
choose to protect computers in synchronized Enterprise Console groups automatically, you can
also set up alerts about automatic protection failures.
How does Active Directory synchronization work?
In Enterprise Console, you can have both “normal,” unsynchronized groups that you manage
yourself and groups synchronized with Active Directory.
When setting up synchronization, you select or create a synchronization point: an Enterprise
Console group to be synchronized with an Active Directory container. All computers and subgroups
contained in the Active Directory are copied into Enterprise Console and kept synchronized with
Active Directory.
Note: To learn more about synchronization points, see What is a synchronization point? (page
42) To learn more about synchronized groups, see What is a synchronized group? (page 42)
After you set up synchronization with Active Directory, the synchronized part of Enterprise Console
group structure matches exactly the Active Directory container it is synchronized with. This means
the following:
■
If a new computer is added to the Active Directory container, then it also appears in Enterprise
Console.
■
If a computer is removed from Active Directory or is moved into an unsynchronized container,
then the computer is moved to the Unassigned group in Enterprise Console.
Note: When a computer is moved to the Unassigned group, it stops receiving new policies.
■
If a computer is moved from one synchronized container to another, then the computer is
moved from one Enterprise Console group to the other.
■
If a computer already exists in an Enterprise Console group when it is first synchronized, then
it is moved from that group to the synchronized group that matches its location in Active
Directory.
■
When a computer is moved into a new group with different policies, then new policies are sent
to the computer.
By default, synchronization occurs every 60 minutes. You may change the synchronization interval
if required.
How do I approach synchronization?
It is your decision what groups to synchronize with Active Directory and how many synchronization
points to set up. Consider whether the size of groups that will be created will be manageable. You
should be able to deploy software, scan and clean up computers easily. This is especially important
for the initial deployment.
The recommended approach is as follows:
41
Sophos Enterprise Console
1. Import the group structure (without computers), using the Import from Active Directory
function. For instructions, see Import containers and computers from Active Directory (page
37).
2. Review the imported group structure and choose your synchronization points.
3. Set up group policies and apply them to the groups and subgroups. For instructions, see Create
a policy (page 34) and Assign a policy to a group (page 35).
4. Synchronize your chosen synchronization points, one at a time, with Active Directory. For
instructions, see Synchronize with Active Directory (page 42).
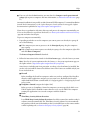
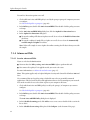
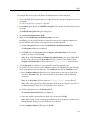
4.5.2 What is a synchronization point?
A synchronization point is an Enterprise Console group that points to a container (or subtree) in
Active Directory. A synchronization point can contain synchronized groups imported from Active
Directory.
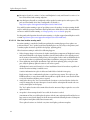
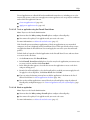
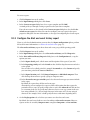
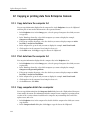
In the Groups pane, a synchronization point appears as follows:
You can move, rename, or delete a synchronization point. You can also change policies and
synchronization settings, including automatic protection settings, for a synchronization point.
You cannot create or delete subgroups in a synchronization point, or move other groups into it.
You cannot move computers into or from the synchronization point.
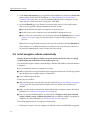
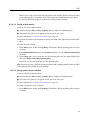
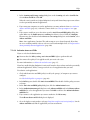
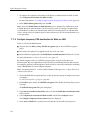
4.5.3 What is a synchronized group?
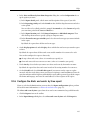
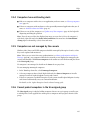
A synchronized group is a subgroup of a synchronization point, imported from Active Directory.
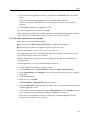
In the Groups pane, a synchronized group appears as follows:
You can change policies assigned to a synchronized group.
You cannot change any synchronized group settings other than group policies. You cannot rename,
move, or delete a synchronized group. You cannot move computers or groups into or from the
group. You cannot create or delete subgroups in the group. You cannot change synchronization
settings for the group.
4.5.4 Synchronize with Active Directory
Before you perform this task:
■
42
If you use role-based administration, you must have the Computer search, protection and
groups right. For more information, see About roles and sub-estates (page 17).
Help
■
If you want to protect computers in synchronized groups automatically, make sure you have
prepared the computers as described in Prepare for installation of anti-virus software (page 48).
To synchronize with Active Directory:
1. Select a group that will become your synchronization point, right-click and select Synchronize
with Active Directory.
The Synchronize with Active Directory wizard starts.
2. On the Overview page of the wizard, click Next.
3. On the Choose an Enterprise Console group page, select or create an Enterprise Console group
that you want keep synchronized with Active Directory (synchronization point). Click Next.
4. On the Choose an Active Directory container page, select an Active Directory container which
you want to synchronize the group with. Enter the name of the container (for example,
LDAP://CN=Computers,DC=domain_name,DC=local) or click Browse to browse to the
container in Active Directory. Click Next.
Important: If a computer exists in more than one synchronized Active Directory container,
it causes a problem, with messages being exchanged continually between the computer and
Enterprise Console. Each computer should be listed only once in Enterprise Console.
5. If you want to protect Windows 2000 or later workstations automatically, on the page Protect
Computers Automatically, select the check box Install Sophos security software automatically,
and then select the software you want to install.
Note: For a list of system requirements for the software, see the system requirements page on
the Sophos website (http://www.sophos.com/products/all-sysreqs.html).
■
Before you can install Compliance Control (an agent for Sophos NAC) on computers, you
must click the link to specify the NAC server URL. If Sophos NAC is installed on more than
one server, use the URL of the computer running the Application Server, not the computer
with the databases.
■ Before installing Firewall on computers, make sure you have configured the firewall to
allow the traffic, applications, and processes you want to use. By default, the firewall is
enabled and blocks all non-essential traffic. See Configuring policies > Configuring the firewall
policy section.
■ Leave Third-Party Security Software Detection selected if you want to have another vendor's
software removed automatically. If you need to remove another vendor's updating tool, see
Remove third-party security software (page 50).
All Windows 2000 or later workstations discovered during this and future synchronizations
will be protected automatically, in compliance with their respective group policies.
Important: Computers running Windows server operating systems, Mac OS, Linux, or UNIX
will not be protected automatically. You must protect such computers manually, as described
in the Sophos Enterprise Console advanced startup guide.
Note: You can enable or disable automatic protection later, in the Synchronization properties
dialog box. For instructions, see View and edit synchronization properties (page 45).
43
Sophos Enterprise Console
Click Next.
6. If you chose to protect computers automatically, on the Enter Active Directory Credentials
page, enter the details of an administrator account that will be used to install software on the
computers. Click Next.
7. On the Choose the Synchronization Interval page, choose how often you want to synchronize
the Enterprise Console group with the Active Directory container. The default is 60 minutes.
Note: You can change the synchronization interval later, in the Synchronization properties
dialog box. For instructions, see View and edit synchronization properties (page 45).
8. On the Confirm Your Choices page, check the details, and then click Next to proceed.
9. On the last page of wizard, you can view the details of the groups and computers that have
been synchronized.
You can also set up email alerts to be sent to your chosen recipients about new computers and
groups discovered during future synchronizations. If you chose to protect computers in
synchronized groups automatically, you can also set up alerts about automatic protection
failures. To open the Configure Email Alerts dialog box after you click Finish, select the check
box on the last page of the wizard. For instructions, see Set up Active Directory synchronization
email alerts (page 199).
To close the wizard, click Finish.
4.5.5 Use synchronization to protect computers automatically
Before you perform this task:
■
If you use role-based administration, you must have the Computer search, protection and
groups right. For more information, see About roles and sub-estates (page 17).
■
Make sure you have prepared computers for automatic installation of the security software as
described in Prepare for installation of anti-virus software (page 48).
Workstations running Windows 2000 or later can be protected automatically when discovered
during synchronization with Active Directory.
Important: Computers running Windows server operating systems, Mac OS, Linux, or UNIX
will not be protected automatically. You must protect such computers manually as described in
the Sophos Enterprise Console advanced startup guide.
You can protect computers in synchronized groups automatically either when setting up
synchronization (see Synchronize with Active Directory (page 42)), or by editing the synchronization
properties later.
The instructions below tell you how to protect computers by editing the synchronization properties.
1. In the Groups pane, select the group (synchronization point) for which you want to enable
automatic protection. Right-click the group and select Synchronization Properties.
44
Help
2. In the Synchronization Properties dialog box, select the Install Sophos security software
automatically check box, and then select the software you want to install.
■
Before you can install Compliance Control (an agent for Sophos NAC) on computers, you
must click the link to specify the NAC server URL. If Sophos NAC is installed on more than
one server, use the URL of the computer running the Application Server, not the computer
with the databases.
■ Before installing Firewall on computers, make sure you have configured the firewall to
allow the traffic, applications, and processes you want to use. By default, the firewall is
enabled and blocks all non-essential traffic. See Configuring policies > Configuring the firewall
policy section.
■ Leave Third-Party Security Software Detection selected if you want to have another vendor's
software removed automatically. If you need to remove another vendor's updating tool, see
Remove third-party security software (page 50).
3. Enter the username and password of an administrator account that will be used to install
software on the computers. Click OK.
Should you want to disable automatic protection later, in the Synchronization Properties dialog
box, clear the Install Sophos security software automatically check box.
4.5.6 View and edit synchronization properties
Before you perform this task:
■
If you use role-based administration, you must have the Computer search, protection and
groups right. For more information, see About roles and sub-estates (page 17).
■
If you want to protect computers in synchronized groups automatically, make sure you have
prepared the computers as described in Prepare for installation of anti-virus software (page 48).
To view and edit synchronization properties:
1. In the Groups pane, select the group (synchronization point) for which you want to edit
synchronization properties. Right-click the group and select Synchronization Properties.
The Synchronization Properties dialog box appears.
2. In the Active Directory container field, you can see the container which the group is
synchronized with. If you want to synchronize the group with a different container, remove
synchronization and run the Synchronize with Active Directory wizard again. See Turn
synchronization on or off (page 46) and Synchronize with Active Directory (page 42).
3. In the Synchronization interval field, set the frequency of synchronization. The default is 60
minutes. The minimum is 5 minutes.
45
Sophos Enterprise Console
4. Select the Install Sophos security software automatically check box if you want to protect all
newly discovered Windows 2000 or later workstations automatically, in compliance with their
respective group policies. Under Features, the anti-virus protection is selected by default. If
you want to have other Sophos security software installed, select the relevant check boxes. Enter
the username and password of an administrator account that will be used to install software
on the computers.
Note: Before you can install Sophos NAC on computers, you must click the link to specify the
NAC server URL.
Note: Only Windows 2000 or later workstations can be protected automatically. Computers
running Windows server operating systems, Mac OS, Linux, or UNIX cannot be protected
automatically. You must protect such computers manually, as described in the Sophos Enterprise
Console advanced startup guide.
4.5.7 Synchronize with Active Directory now
Before you perform this task:
■
If you use role-based administration, you must have the Computer search, protection and
groups right. For more information, see About roles and sub-estates (page 17).
■
If you want to protect computers in synchronized groups automatically, make sure you have
prepared the computers as described in Prepare for installation of anti-virus software (page 48).
You can synchronize Enterprise Console groups (synchronization points) with Active Directory
containers immediately, without waiting for the next scheduled synchronization.
To synchronize with Active Directory immediately:
1. In the Groups pane, select the group (synchronization point) which you want to synchronize
with Active Directory. Right-click the group and select Synchronization Properties.
2. In the Synchronization Properties dialog box, make changes as appropriate and click OK.
4.5.8 Turn synchronization on or off
Before you perform this task:
■
If you use role-based administration, you must have the Computer search, protection and
groups right. For more information, see About roles and sub-estates (page 17).
■
If you want to protect computers in synchronized groups automatically, make sure you have
prepared the computers as described in Prepare for installation of anti-virus software (page 48).
To turn synchronization with Active Directory on or off:
■
46
To turn the synchronization on, run the Synchronize with Active Directory wizard as described
in Synchronize with Active Directory (page 42).
Help
■
To turn the synchronization off, select the group (synchronization point) which you do not
want to synchronize with Active Directory anymore, right-click and select Remove
Synchronization. Click Yes to confirm.
47
Sophos Enterprise Console
5 Protecting computers
5.1 About protecting computers
You can install Sophos protection software in the following ways:
■
To protect computers automatically, use the protect computer wizard provided in Enterprise
Console, see Protect computers automatically (page 50).
■
Alternatively, you can protect computers automatically using Active Directory synchronization,
see About synchronization with Active Directory (page 40).
■
To protect computers manually, Enterprise Console helps to locate the required software, see
Locate installers for protecting computers manually (page 53). Then go to the respective computer
and install the protection software manually.
5.2 Prepare for installation of anti-virus software
As well as ensuring that computers meet the general system requirements, you must perform
further steps before you can install software on them automatically.
Note: Automatic installation is not possible on Mac, Linux and UNIX computers.
If you use Active Directory, you can prepare your computers using a Group Policy Object (GPO).
For instructions, see Sophos support knowledgebase article 116754
(http://www.sophos.com/support/knowledgebase/article/116754.html).
If you use workgroups, you must configure computers locally. For instructions, see Sophos support
knowledgebase article 116755 (http://www.sophos.com/support/knowledgebase/article/116755.html).
5.3 Prepare for installation of encryption software
As well as ensuring that computers meet the general system requirements, you must perform
further steps before you can install software on them automatically.
To prepare computers for installation of encryption software:
1. Make sure that drives encrypted with third-party encryption software have been decrypted and
that the third-party encryption software is uninstalled.
2. Create a full backup of the data.
3. Check if a Windows user account with credentials is set up and active for the user on the
endpoint computer.
4. Make sure that the computer has already been protected with Sophos anti-virus software version
10 before you deploy full disk encryption.
5. Uninstall third-party boot managers, such as PROnetworks Boot Pro and Boot-US.
48
Help
6. Check the hard disk(s) for errors with this command: chkdsk %drive% /F /V /X. You might
be prompted to restart the computer and run chkdsk again.
For further information, see: http://www.sophos.com/support/knowledgebase/article/107081.html.
You can check the results (log file) in Windows Event Viewer:
■
Windows XP: Select Application, Winlogon.
■
Windows 7, Windows Vista: Select Windows Logs, Application, Wininit.
7. Use the Windows built-in defrag tool to locate and consolidate fragmented boot files, data
files, and folders on local drives: defrag %drive% .
For further information, see: http://www.sophos.com/support/knowledgebase/article/109226.html.
8. If you have used an imaging/cloning tool on the computer, clean the master boot record (MBR).
Start the computer from a Windows DVD and use the command FIXMBR within the Windows
Recovery Console. For further information, see:
http://www.sophos.com/support/knowledgebase/article/108088.html.
9. If the boot partition on the computer has been converted from FAT to NTFS, and the computer
has not been restarted since then, restart the computer. If you do not do this, the installation
may not complete successfully.
10. Open Windows Firewall with Advanced Security, using the Administrative Tools item in
Control Panel. Ensure that Inbound connections are allowed. Change the Inbound rules to
enable the processes below:
Remote Administration (NP-In) Domain
Remote Administration (NP-In) Private
Remote Administration (RPC) Domain
Remote Administration (RPC) Private
Remote Administration (RPC-EPMAP) Domain
Remote Administration (RPC-EPMAP) Private
When installation is complete, do one of the following:
■
If you do not want to install any further features on the endpoints and want to continue
using Windows Firewall, you may disable the process again.
■
If you want to install any further features on the endpoints, leave the processes enabled
until all features are installed.
49
Sophos Enterprise Console
5.4 Remove third-party security software
If you want to remove any previously installed security software, do the following BEFORE selecting
the Third-Party Security Software Detection in the Protect Computers Wizard and installing
it:
■
If computers are running another vendor's anti-virus software, ensure that its user interface is
closed.
■
If computers are running another vendor's firewall or HIPS product, ensure that it is turned
off or configured to allow the Sophos installer to run.
■
If you want to remove not just the other vendor's software but also the other vendor's update
tool (to prevent it from reinstalling the software automatically), follow the steps below. If
computers have no update tool installed, you can disregard the steps below.
Note: You have to locally restart any computers from which you remove third-party anti-virus
software.
If computers have another vendor's update tool installed and you wish to remove the update tool,
you will need to modify the configuration file before selecting the Third-Party Security Software
Detection option in the Protect Computers Wizard.
Note: If computers are running another vendor's firewall or HIPS product, you may need to leave
that vendor's update tool intact. See that vendor's documentation for clarification.
To modify the configuration file:
1. From the Central Installation Directory, find the data.zip file.
2. Extract the crt.cfg configuration file from data.zip.
3. Edit the crt.cfg file to change the line reading "RemoveUpdateTools=0" to
"RemoveUpdateTools=1".
4. Save your changes and save crt.cfg to the same directory that contains data.zip. Do not put
crt.cfg back into data.zip or it will be overwritten the next time the data.zip file is updated.
When you run the Protect Computers Wizard and select Third-Party Security Software Detection,
the modified configuration file will now remove any third-party security update tools as well as
third-party security software.
5.5 Protect computers automatically
Before you protect computers from the console:
50
■
You must apply an updating policy to the group before you can protect computers in that
group.
■
Make sure you have prepared computers for automatic installation of the security software as
described in Prepare for installation of anti-virus software (page 48).
Help
■
If you use role-based administration, you must have the Computer search, protection and
groups right to protect computers. For more information, see About roles and sub-estates (page
17).
Automatic installation is not possible on Mac, Linux and UNIX computers. Use manual installation
instead. For the instructions, see the Sophos Enterprise Console advanced startup guide. Sophos
documentation is published at http://www.sophos.com/support/docs/.
If you chose to synchronize with Active Directory and protect the computers automatically, you
do not need to follow the steps below. For details, see About synchronization with Active Directory
(page 40) and other related topics.
To protect computers automatically:
1. Depending on whether or not the computers you want to protect are already in a group, do
one of the following:
■
If the computers you want to protect are in the Unassigned group, drag the computers
onto a group.
■ If the computers you want to protect are already in a group, select the computers, right-click
and click Protect Computers.
The Protect Computers Wizard is launched.
2. Follow the instructions in the wizard. On the Select features page, select the features you want.
Note: For a list of system requirements for the features, see the system requirements page on
the Sophos website (http://www.sophos.com/products/all-sysreqs.html).
Some features, including anti-virus protection, are always selected and must be installed. You
can also select to install the features listed below. Some of the features are available only if your
license includes them.
■
Firewall
Before installing the firewall on computers, make sure you have configured the firewall to
allow the traffic, applications, and processes you want to use. By default, the firewall is
enabled and blocks all non-essential traffic. See Configuring policies > Configuring the firewall
policy section.
■ Compliance Control (an agent for Sophos NAC)
Before you can use Compliance Control on computers, you must specify the NAC server
URL. If Sophos NAC is installed on more than one server, use the URL of the computer
running the Application Server, not the computer with the databases.
■ Patch
■ Third-Party Security Software Detection
Leave Third-Party Security Software Detection selected if you want to have another vendor's
software removed automatically. The Third-Party Security Software Detection uninstalls
only products with the same functionality as those you install. If you need to remove another
vendor's updating tool, see Remove third-party security software (page 50).
51
Sophos Enterprise Console
3. On the Protection summary page, any problems with installation are shown in the Protection
issues column. Troubleshoot the installation (see Sophos Endpoint Security and Control
installation failed (page 228)), or carry out manual installation on these computers (see the
Sophos Enterprise Console advanced startup guide). Click Next.
4. On the Credentials page, enter details of an account which can be used to install software.
This account is typically a domain administrator account. It must:
■
Have local administrator rights on computers you want to protect.
■
Be able to log on to the computer where you installed the management server.
■
Have read access to the Primary server location specified in the Updating policy. See About
update server locations (page 81) and other topics in section Configuring update server
locations.
Note: If you are using a domain account, you must enter the username in the form domain\user.
If the computers are on different domains covered by the same Active Directory schema, use
the Enterprise Administrator account in Active Directory instead.
5.6 Install encryption software automatically
Warning: If you are installing the Sophos encryption software for the first time, we strongly
recommend that you enable and test each setting step-by-step.
You can install encryption software automatically on Windows XP, Windows Vista and Windows
7 computers.
Before you install the software on computers, you must:
■
Make sure that drives encrypted with third-party encryption software have been decrypted and
that the third-party encryption software is uninstalled.
■
Create a full backup of the data.
Further prepare as follows:
■
Make sure that you have carried out the steps as described in Prepare for installation of encryption
software (page 48), in particular that the Sophos anti-virus software version 10 has been
installed.
■
Make sure that you have subscribed to and downloaded the encryption software. For further
information, see Subscribe to encryption software (page 79).
■
If you use role-based administration, you must have the Computer search, protection and
groups and Policy setting - full disk encryption right to install and configure encryption on
computers. For more information, see About roles and sub-estates (page 17).
To install encryption software on computers automatically:
1. In Enterprise Console, select the computers on which you want to install full disk encryption.
52
Help
2. Right-click the computers, and then click Protect Computers. The Protect Computers Wizard
is launched.
3. On the Welcome page, click Next.
4. On the Installation Type page, select Encryption software.
5. If there is more than one encryption subscription and installer location (bootstrap location)
available, the Encryption location page is displayed. Select the Encryption subscription and
Address to install from.
6. On the Encryption summary page, any problems with installation are shown in the Encryption
issues column. Troubleshoot the installation (see Sophos Endpoint Security and Control
installation failed (page 228)) or carry out manual installation on these computers (see the
Sophos Enterprise Console advanced startup guide).
7. On the Credentials page, enter details of an account which can be used to install software.
This account is typically a domain administrator account. It must:
■
Have local administrator rights on computers you want to protect.
■
Be able to log on to the computer where you installed the management server.
■
Have read access to the Primary server location specified in the Updating policy. See About
update server locations (page 81) and other topics in section Configuring update server
locations.
Note: If you are using a domain account, you must enter the username in the form domain\user.
If the computers are on different domains covered by the same Active Directory schema, use
the Enterprise Administrator account in Active Directory instead.
Installation is staggered, so the process may not be complete on all the computers for some time.
The installation of encryption will cause computers to restart automatically within about 30
minutes after installation of the encryption software.
By default, full disk encryption is not enabled after installation. To enable it, configure the full
disk encryption policy to your needs and assign it to the computers. For further information, see
Configure full disk encryption (page 171).
For further information on the start behavior of the computer and first logon after installation
and activation of full disk encryption, see the Sophos Disk Encryption 5.61 help or the Enterprise
Console quick/advanced startup guides.
5.7 Locate installers for protecting computers manually
If Enterprise Console is unable to install anti-virus, firewall, NAC, or patch features on certain
computers automatically, you can perform the installation manually.
To locate the installers:
1. On the View menu, click Bootstrap Locations.
53
Sophos Enterprise Console
2. In the Bootstrap Locations dialog box, for each software subscription, you will see the locations
that contain the software installers, as well as platforms that the software is supported on and
the software versions. Make a note of the location for the installer that you need.
If your license includes full disk encryption, make sure that you have prepared the endpoints
for encryption. First install Sophos anti-virus software version 10 if not already done. Next
install the encryption software. The location of the installer that includes the encryption software
is displayed to you (setup.exe).
For information about how to install security software manually on different operating systems,
see the Sophos Enterprise Console advanced startup guide.
The installation of encryption will cause computers to restart automatically within about 30
minutes after installation of the encryption software.
For further information on the start behavior of the computer and first logon after installation
and activation of full disk encryption, see the Sophos Disk Encryption user help or the Enterprise
Console quick/advanced startup guides.
5.8 Checking whether your network is protected
5.8.1 How do I check that my network is protected?
For an overview of the network's security status, use the Dashboard. For more information, see
Dashboard panels (page 7) and Configure the Dashboard (page 54).
You can identify computers with a problem by using the computer list and computer list filters.
For example, you can see which computers do not have the firewall or patch features installed, or
have alerts that need attention. For more information, see Check that computers are protected (page
55), Check that computers are up to date (page 56), and Find computers with problems (page 57).
You can also check whether all the computers in a group comply with the policies for that group,
as described in Check whether computers use the group policy (page 36).
5.8.2 Configure the Dashboard
If you use role-based administration, you must have the System configuration right to configure
the Dashboard. For more information, see About roles and sub-estates (page 17).
The Dashboard displays warning or critical status indicators based on the percentage of managed
computers that have outstanding alerts or errors, or on the time since the last update from Sophos.
You can set up the warning and critical levels you want to use.
1. On the Tools menu, click Configure Dashboard.
54
Help
2. In the Configure Dashboard dialog box, change the threshold values in the Warning level
and Critical level text boxes as described below.
a) Under Computers with outstanding alerts, Computers with Sophos product errors, and
Policy and protection, enter a percentage of managed computers affected by a particular
problem, that will trigger the change of the respective indicator to “warning” or “critical.”
b) Under Computers with events, enter the number of events occurred within a seven-day
period that will trigger an alert displayed on the Dashboard.
c) Under Latest protection from Sophos, enter the time since last successful update from
Sophos in hours, that will trigger the change of the “Updates” indicator to “warning” or
“critical.” Click OK.
If you set a level to zero, warnings are triggered as soon as the first alert is received.
You can also set up email alerts to be sent to your chosen recipients when a warning or critical
threshold has been exceeded. For instructions, see Set up network status email alerts (page 198).
5.8.3 Check that computers are protected
Computers are protected if they are running on-access scanning and the firewall (if you have
installed it). For full protection, the software must also be up to date.
Note: You may have chosen not to use on-access scanning on certain types of computer, for
example, file servers. In this case, ensure that the computers use scheduled scans and that they are
up to date.
To check that computers are protected:
1. Select the group of computers you want to check.
2. If you want to check computers in subgroups of the group, select At this level and below in
the drop-down list.
3. In the list of computers, on the Status tab, look in the On-access column.
If you see “Active,” the computer is running on-access scanning. If you see a gray shield, it is
not.
4. If you installed the firewall, look in the Firewall enabled column.
If you see “Yes,” the firewall is enabled. If you see a gray firewall sign and the word “No,” the
firewall is disabled.
5. If you use other features, such as application control, data control, or patch, check the status
in the respective column.
For information about how to check that computers are up to date, see Check that computers are
up to date (page 56).
55
Sophos Enterprise Console
For information about how to find computers with problems using the computer list filters, see
Find computers with problems (page 57).
5.8.4 Check that computers are up to date
If you set up Enterprise Console as recommended, computers should receive updates automatically.
To check that computers are up to date:
1. Select the group of computers you want to check.
2. If you want to check computers in any subgroups, select At this level and below in the
drop-down list.
3. On the Status tab, look in the Up to date column, or go to the Update details tab.
■
If you see “Yes” in the Up to date column, the computer is up to date.
■
If you see a clock icon, the computer is out of date. The text indicates how long the computer
has been out of date.
For information about updating such out-of-date computers, see Update out-of-date computers
(page 88).
5.8.5 Check that computers are encrypted
If you set up a Full disk encryption policy to protect endpoint computers from unauthorized
access, drives on these computers should be encrypted.
To check that computers are encrypted:
1. Select the group of computers you want to check.
2. If you want to check computers in any subgroups, select At this level and below in the
drop-down list.
3. On the Status tab, look in the Full disk encryption column.
The column shows the encryption status of the computers. The column can be empty for the
following reasons:
■
The encryption software has not been installed on the computer.
■
The encryption software has been installed on the computer but the computer has not been
restarted yet. The computers will be restarted within 30 minutes after the installation of the
encryption software.
■
An encryption error occurred.
■
The computer is not managed by the Sophos Enterprise Console.
Check the Encryption Event Viewer to find out if an encryption error occurred. The relevant error
is displayed there.
56
Help
5.8.6 Find computers with problems
To display a list of computers that are not properly protected or have other protection-related
problems:
1. Select the group of computers you want to check.
2. In the View drop-down list, select which computers you want to find, for example, Computers
with potential problems.
You can also select a subentry of an entry, to display computers affected by a specific problem
(for example, computers that differ from group policy, computers with outstanding alerts, or
computers where an installation error has occurred).
3. If the group contains subgroups, select also whether you want to find computers At this level
only or At this level and below.
Any computers that have protection problems will be listed.
For information about dealing with protection problems, see Computers are not running on-access
scanning (page 226) and other topics in the Troubleshooting section.
57
Sophos Enterprise Console
5.9 Dealing with alerts and errors
5.9.1 What do the alert icons mean?
If a virus or spyware, a suspicious item, an adware or other potentially unwanted application is
detected, alert icons are displayed on the Status tab in the Endpoints view.
Below is a key to the alert icons. The other topics in this section give advice on dealing with alerts.
Note: Warnings are also displayed in the console if software is disabled or out of date. For
information on this, see How do I check that my network is protected? (page 54).
Alert icons
Icon
Explanation
A red warning sign displayed in the Alerts and errors column means that a virus,
worm, Trojan, spyware, or suspicious behavior has been detected.
A yellow warning sign displayed in the Alerts and errors column indicates one
of the following problems:
■ A suspicious file has been detected.
■ An adware or other potentially unwanted application has been detected.
■ An error has occurred.
A yellow warning sign displayed in the Policy compliance column indicates that
the computer is not using the same policy or policies as other computers in its
group.
If there are multiple alerts or errors on a computer, the icon of an alert that has the highest priority
will be displayed in the Alerts and errors column. Alert types are listed below in descending order
of priority.
1.
2.
3.
4.
5.
Virus and spyware alerts
Suspicious behavior alerts
Suspicious file alerts
Adware and PUA alerts
Software application errors (for example, installation errors)
For more details about an alert, for example, the name of the detected item, click the Alert and
Error Details tab.
For information about update manager alerts, see Monitor update managers (page 87).
58
Help
5.9.2 Deal with alerts about detected items
If you use role-based administration, you must have the Remediation - cleanup right to clean up
detected items or clear alerts from the console. For more information, see About roles and sub-estates
(page 17).
To take action against alerts displayed in the console:
1. In the Endpoints view, select the computer(s) for which you want to see alerts. Right-click and
select Resolve Alerts and Errors.
The Resolve alerts and errors dialog box is displayed.
2. The action you can take against an alert depends on the cleanup status of the alert. Look in the
Cleanup status column and decide what action you want to take.
Tip: You can sort alerts by clicking on a column heading. For example, to sort alerts by cleanup
status, click the Cleanup status column heading.
Cleanup status
Description and actions to take
Cleanable
You can remove the item. To do this, select the alert or alerts and click Cleanup.
Threat type not
cleanable
This type of detected item, for example, suspicious file or suspicious behavior,
cannot be cleaned up from the console. You have to decide whether you want to
allow or block the item. If you do not trust the item, you can send it to Sophos
for analysis. For more information, see Find information about detected items (page
60).
Not cleanable
This item cannot be cleaned up from the console. For more information about
the item and actions you can take against it, see Find information about detected
items (page 60).
Full scan required
This item may be cleanable, but a full scan of the endpoint is required before the
cleanup can be carried out. For instructions, see Scan computers now (page 61).
Restart required
The item has been partially removed, but the endpoint needs to be restarted to
complete the cleanup.
Note: Endpoints must be restarted locally, not from Enterprise Console.
Cleanup failed
The item could not be removed. Manual cleanup may be required. For more
information, see Deal with detected items if cleanup fails (page 62).
Cleanup in progress
(started <time>)
Cleanup is in progress.
59
Sophos Enterprise Console
Cleanup status
Description and actions to take
Cleanup timed out
(started <time>)
Cleanup has timed out. The item may not have been cleaned up. This may happen,
for example, when the endpoint is disconnected from the network or the network
is busy. You may try to clean up the item again later.
If you decided to allow an item, see Authorize adware and PUAs (page 93) or Authorize suspicious
items (page 102).
5.9.3 Find information about detected items
If you want to learn more about a threat or other item detected on an endpoint and reported in
the console, or need advice on what action to take against the item, follow these steps:
1. In the Endpoints view, in the computer list, double-click the affected computer.
2. In the Computer details dialog box, scroll to the Outstanding alerts and errors section. In
the list of detected items, click the name of the item you are interested in.
This connects you to the Sophos website, where you can read a description of the item and
advice on what actions to take against it.
Note: Alternatively, you can go to the Security analyses page on the Sophos website
(http://www.sophos.com/security/analyses/), go to the tab for the type of item you want to find, and
either type the name of the item in the search box or look for the item in the list of items.
5.9.4 Clear endpoint alerts or errors from the console
If you use role-based administration, you must have the Remediation - cleanup right to clear
alerts or errors from the console. For more information, see About roles and sub-estates (page 17).
If you are taking action to deal with an alert, or are sure that a computer is safe, you can clear the
alert sign displayed in the console.
Note: You cannot clear alerts about installation errors. These are cleared only when Sophos
Endpoint Security and Control is installed successfully on the computer.
1. In the Endpoints view, select the computer(s) for which you want to clear alerts. Right-click
and select Resolve Alerts and Errors.
The Resolve alerts and errors dialog box is displayed.
2. To clear alerts or Sophos product errors from the console, go to the Alerts or Errors tab,
respectively, select the alerts or errors you want to clear and click Acknowledge.
Acknowledged (cleared) alerts are no longer displayed in the console.
60
Help
For information about clearing update manager alerts from the console, see Clear update manager
alerts from the console (page 88).
5.10 Scanning computers
5.10.1 About scanning
By default, Sophos Endpoint Security and Control detects known and unknown viruses, Trojans,
worms, and spyware automatically as soon as a user attempts to access files that contain them. It
also analyzes behavior of the programs running on the system.
You can also configure Sophos Endpoint Security and Control to:
■
Scan computers for suspicious files. See Scan for suspicious files during on-access scanning (page
97).
■
Scan for adware and other potentially unwanted applications. See Scan for adware and PUAs
(page 92).
■
Scan computers at set times. See Scan computers at set times (page 103).
For more information about configuring scanning, see About the anti-virus and HIPS policy (page
90).
This section describes how to perform a full system scan of selected computers immediately.
5.10.2 Scan computers now
You can scan a computer or computers immediately, without waiting for the next scheduled scan.
If you use role-based administration, you must have the Remediation - updating and scanning
right to scan computers. For more information, see About roles and sub-estates (page 17).
Note: Only Windows 2000 or later computers and UNIX computers can perform immediate full
system scans originated from the console.
To scan computers immediately:
1. Select the computers in the computer list or a group in the Groups pane. Right-click and select
Full system scan.
Alternatively, on the Actions menu, select Full system scan.
2. In the Full system scan dialog box, review the details of the computers to be scanned and click
OK to start the scan.
Note: If the scan detects components of a threat in memory, the scan stops and an alert is sent to
Enterprise Console. This is because further scanning could enable the threat to spread. You must
clean up the threat before running the scan again.
61
Sophos Enterprise Console
5.11 Cleaning up computers
5.11.1 Clean up computers now
You can immediately clean up Windows 2000 and later or Mac computers that are infected with
a virus or have unwanted applications on them.
If you use role-based administration, you must have the Remediation - cleanup right to clean up
computers. For more information, see About roles and sub-estates (page 17).
Note: To clean up Linux or UNIX computers, you can either set up automatic cleanup from the
console (see Set up automatic cleanup for on-access scanning (page 63)) or clean up the computers
individually as described in Deal with detected items if cleanup fails (page 62).
If an item (for example, a Trojan or potentially unwanted application) has been “partially detected”,
before cleaning up the affected computer you will need to carry out a full system scan of the
computer to find all the components of the partially detected item. In the computer list, Endpoints
view, right-click the affected computer and click Full System Scan. For more information, see
Partially detected item (page 230).
To clean up computers immediately:
1. In the computer list, Endpoints view, right-click the computer(s) that you want to clean up
and then click Resolve Alerts and Errors.
2. In the Resolve Alerts and Errors dialog box, on the Alerts tab, select the check box for each
item you want to clean up, or click Select all. Click Cleanup.
If the cleanup is successful, the alerts shown in the list of computers will no longer be displayed.
If any alerts remain, you should clean up computers manually. See Deal with detected items if
cleanup fails (page 62).
Note: Cleanup of some viruses causes a full system scan to be run on the affected computers,
which tries to clean up all the viruses. This might take a long time. The alerts are updated at the
end of the scan.
5.11.2 Deal with detected items if cleanup fails
If you cannot clean up computers from the console, you can perform the cleanup manually.
1. In the computer list, double-click the infected computer.
2. In the Computer details dialog box, scroll to the Outstanding alerts and errors section. In
the list of detected items, click the name of the item you want to remove from the computer.
This connects you to the Sophos website, where you can read advice on how to clean up the
computer.
62
Help
3. Go to the computer and carry out the cleanup manually.
Note: The Sophos website provides special downloadable disinfectors for certain viruses and
worms.
5.11.3 Set up automatic cleanup for on-access scanning
If you use role-based administration:
■
You must have the Policy setting - anti-virus and HIPS right to perform this task.
■
You cannot edit a policy if it is applied outside your active sub-estate.
For more information, see About roles and sub-estates (page 17).
By default, Sophos Endpoint Security and Control automatically cleans up computers as soon as
a virus or other threat is found. You can change the settings for automatic cleanup as described
below.
1. Check which anti-virus and HIPS policy is used by the group(s) of computers you want to
configure.
See Check which policies a group uses (page 30).
2. In the Policies pane, double-click Anti-virus and HIPS.
3. Double-click the policy you want to change.
The Anti-Virus and HIPS Policy dialog box is displayed.
4. In the On-access scanning panel, beside Enable on-access scanning, click Configure.
5. In the On-access scan settings dialog box, click the Cleanup tab.
6. Set the options as described in Automatic cleanup settings for on-access scanning (page 63).
5.11.4 Automatic cleanup settings for on-access scanning
Viruses/spyware
Select or clear the Automatically clean up items that contain a virus/spyware check box.
You can also specify what should be done with the items if cleanup fails:
Deny access only
Delete
Deny access and move to default location
Deny access and move to (enter a full UNC path)
63
Sophos Enterprise Console
Note: The Deny access and move to default location and Deny access and move to settings do
not apply to Linux or UNIX computers and will be ignored by them.
Suspicious files
Note: These settings only apply to Windows 2000 and later.
You can specify what should be done with suspicious files when they are detected:
Deny access only
Delete
Deny access and move to default location
Deny access and move to (enter a full UNC path)
5.11.5 Set up automatic cleanup for scheduled scanning
If you use role-based administration:
■
You must have the Policy setting - anti-virus and HIPS right to perform this task.
■
You cannot edit a policy if it is applied outside your active sub-estate.
For more information, see About roles and sub-estates (page 17).
By default, Sophos Endpoint Security and Control automatically cleans up computers as soon as
a virus or other threat is found. You can change the settings for automatic cleanup as described
below.
1. Check which anti-virus and HIPS policy is used by the group(s) of computers you want to
configure.
See Check which policies a group uses (page 30).
2. In the Policies pane, double-click Anti-virus and HIPS.
3. Double-click the policy you want to change.
The Anti-Virus and HIPS Policy dialog box is displayed.
4. In the Scheduled scanning panel, select the scan, and then click Edit.
5. Beside Change scanning and cleanup settings, click Configure.
The Scanning and cleanup settings dialog box is displayed.
6. Click the Cleanup tab.
7. Set the options as described in Automatic cleanup settings for scheduled scanning (page 65).
64
Help
5.11.6 Automatic cleanup settings for scheduled scanning
Viruses/spyware
Select or clear the Automatically clean up items that contain a virus/spyware check box.
You can also specify what should be done with the items if cleanup fails:
Log only
Delete
Move to default location
Move to (enter a full UNC path)
Notes
■
Moving an executable file reduces the likelihood of it being run.
■
You cannot automatically move a multi-component infection.
Adware and PUA
Select Automatically clean up adware and PUA.
Note
■
This setting only applies to Windows 2000 and later.
Suspicious files
You can specify what should be done with suspicious files when they are detected:
Log only
Delete
Move to default location
Move to (enter a full UNC path)
Notes
■
These settings only apply to Windows 2000 and later.
■
Moving an executable file reduces the likelihood of it being run.
■
You cannot automatically move a multi-component infection.
65
Sophos Enterprise Console
6 Updating computers
6.1 Configuring the update manager
6.1.1 What is an update manager?
An update manager enables you to set up automatic updating of Sophos security software from
a Sophos website. An update manager is installed with and managed from Enterprise Console.
Note: To update encryption software, use the protect computers wizard. For information, see
Install encryption software automatically (page 52).
You can install additional update managers. For example, if you have a complex network with
several locations, you may want to install an additional update manager at a remote location. For
information, see Add an additional update manager (page 72).
6.1.2 How does an update manager work?
Once you have configured an update manager, it:
■
Connects at a scheduled frequency to a data distribution warehouse at Sophos or on your
network.
■
Downloads updates to the threat detection data and updates for the security software to which
the administrator has subscribed.
■
Places the updated software in one or more network shares in a form suitable for installation
on endpoint computers.
The computers update automatically from the shares, provided the Sophos software installed on
them has been configured to do so, for example, by applying an updating policy.
6.1.3 View or edit update manager configuration
If you use role-based administration, you must have the Policy setting - updating right to configure
an update manager. For more information, see About roles and sub-estates (page 17).
1. If you are in the Endpoints view, click the Update managers button on the toolbar to display
the Update managers view.
2. In the list of update managers, select the update manager whose configuration you want to
view or edit. Right-click and click View/Edit configuration.
Note: Alternatively, select the update manager, go to the Actions menu, point to Update
manager, and then click View/Edit configuration.
The Configure update manager dialog box appears.
66
Help
3. Edit the configuration as described in the following topics:
■
Select an update source for an update manager (page 67).
■
Select which software to download (page 68).
■
Specify where the software is placed (page 69).
■
Create or edit an update schedule (page 70).
■
Configure the update manager log (page 71).
■
Configure the self-updating of an update manager (page 71).
For information about clearing update manager alerts from the console, see Clear update manager
alerts from the console (page 88).
After you configure the update manager, you can configure your updating policies and apply them
to the endpoint computers.
6.1.4 Select an update source for an update manager
If you use role-based administration, you must have the Policy setting - updating right to configure
an update manager. For more information, see About roles and sub-estates (page 17).
You need to select a source from which an update manager will download security software and
updates for distribution across the network.
You can select several sources. The first source in the list is the primary source. Additional sources
in the list are optional alternate locations that the update manager uses if it cannot collect an
update from the primary source.
1. If you are in the Endpoints view, click the Update managers button on the toolbar to display
the Update managers view.
2. In the list of update managers, select the update manager for which you want to select an update
source. Right-click and click View/Edit configuration.
3. In the Configure update manager dialog box, on the Sources tab, click Add.
4. In the Source details dialog box, in the Address field, enter the address of the source. The
address can be a UNC or HTTP path.
If you want to download software and updates directly from Sophos, select Sophos.
5. If necessary, in the Username and Password fields, enter the username and password for the
account that will be used to access the update source.
■
■
If the update source is Sophos, enter the download credentials supplied by Sophos.
If the update source is the default update share created by an update manager located higher
in the updating hierarchy, the Username and Password fields will be pre-populated.
The default update share is a UNC share \\<ComputerName>\SophosUpdate, where
ComputerName is the name of the computer where the update manager is installed.
67
Sophos Enterprise Console
■
If the update source is a non-default update share on your network, enter credentials for
the account that has read rights to the share. If the Username needs to be qualified to
indicate the domain, use the form domain\username.
6. If you access the update source via a proxy server, select Use a proxy server to connect. Then
enter the proxy server Address and Port number. Enter a Username and Password that give
access to the proxy server. If the username needs to be qualified to indicate the domain, use
the form domain\username. Click OK.
The new source appears in the list in the Configure update manager dialog box.
If you have already installed an update manager on a different computer, the share where that
update manager downloads software and updates will appear on the list of addresses. You can
select it as a source for the update manager you are configuring. Then you can move the address
that you want to be the primary one to the top of the list, using the Move up and Move down
buttons to the right of the list.
6.1.5 Select which software to download
If you use role-based administration, you must have the Policy setting - updating right to configure
an update manager. For more information, see About roles and sub-estates (page 17).
You need to select the subscriptions that the update manager will keep up to date.
1. If you are in the Endpoints view, click the Update managers button on the toolbar to display
the Update managers view.
2. In the list of update managers, select the update manager for which you want to select the
software to download. Right-click and click View/Edit configuration.
3. In the Configure update manager dialog box, on the Subscriptions tab, select a software
subscription in the list of available subscriptions.
To view the details of the subscription, for example, what software is included in the
subscription, click View details.
4. To move the selected subscription to the “Subscribed to” list, click the “Add” button.
To move all subscriptions to the “Subscribed to” list, click the “Add all” button.
68
Help
6.1.6 Specify where the software is placed
If you use role-based administration, you must have the Policy setting - updating right to configure
an update manager. For more information, see About roles and sub-estates (page 17).
After you have selected which software to download, you can specify where it should be placed
on the network. By default, the software is placed in a UNC share
\\<ComputerName>\SophosUpdate, where ComputerName is the name of the computer where
the update manager is installed.
You can distribute downloaded software to additional shares on your network. To do this, add
an existing network share to the list of available shares and then move it to the list of update shares
as described below. Ensure that the SophosUpdateMgr account has read rights to the shares.
For a list of platforms on which network shares are supported, see On what platforms are network
shares supported? (page 70)
To specify where the software is placed:
1. If you are in the Endpoints view, click the Update managers button on the toolbar to display
the Update managers view.
2. In the list of update managers, select the update manager for which you want to select network
shares for distributing the software. Right-click and click View/Edit configuration.
3. In the Configure update manager dialog box, on the Distribution tab, select a software
subscription from the list.
4. Select a share from the “Available” shares list and move it to the “Update to” list by clicking
the “Add” button (>).
The default share \\<ComputerName>\SophosUpdate is always present in the “Update to”
list. You cannot remove this share from the list.
The “Available” shares list includes all the shares that Enterprise Console knows about and
that are not already being used by another update manager.
You can add an existing share to or remove a share from the “Available” shares list, using the
“Add” button (>) or “Remove” button (<).
5. If you want to enter a description for a share or credentials needed to write to the share, select
the share and click Configure. In the Share Manager dialog box, enter the description and
credentials.
If you want to enter the same credentials for multiple shares, select the shares in the “Update
to” list and click Configure. In the Configure multiple shares dialog box, enter credentials
that will be used to write to the shares.
69
Sophos Enterprise Console
6.1.7 On what platforms are network shares supported?
Network shares on the following platforms are supported:
■
Shares on Windows NT and later.
■
Samba shares hosted on a Linux server, for example, SUSE Linux Enterprise 10 (SLES 10).
■
Samba shares hosted on Netware 5.1 SP3 and Netware 6.5 SP3 to SP7, Netware kernel.
■
Samba shares hosted on Mac OSX 10.2 or later.
■
Samba shares hosted on Unix.
■
Novell Storage Services (NSS) shares, supporting NDS authentication, hosted on Novell Open
Enterprise Server 1 and 2, Linux kernel.
■
Netware File System (NFS) shares, supporting NDS authentication, hosted on Netware 5.1 SP3
and Netware 6.5 SP3 to SP7, Netware kernel.
■
NetApp filers.
■
Samba shares hosted on Novell Open Enterprise Server 1 and 2.
■
Novell Storage Services (NSS) shares, supporting NDS authentication, hosted on Netware 5.1
SP3 and Netware 6.5 SP3 to SP7, Netware kernel.
6.1.8 Create or edit an update schedule
If you use role-based administration, you must have the Policy setting - updating right to configure
an update manager. For more information, see About roles and sub-estates (page 17).
By default, an update manager checks the Sophos databank for threat detection data updates
every 10 minutes.
You can change this update interval. The minimum is 5 minutes and the maximum 1440 minutes
(24 hours). We recommend an update interval of 10 minutes for threat detection data, so that
you receive protection from new threats promptly after the detection data is published by Sophos.
By default, an update manager checks the Sophos databank for software updates every 60 minutes.
You can change this update interval. The minimum is 10 minutes and the maximum 1440 minutes
(24 hours).
For software updates, you can either specify an update interval that is used every hour of every
day, or you can create more sophisticated schedules, in which each day can be specified
independently and each day can be divided into periods with different update intervals.
Note: You can create a different schedule for each day of the week. Only a single schedule can be
associated with a day of the week.
1. If you are in the Endpoints view, click the Update managers button on the toolbar to display
the Update managers view.
70
Help
2. In the list of update managers, select the update manager for which you want to create an
update schedule. Right-click and click View/Edit configuration.
3. In the Configure update manager dialog box, on the Schedule tab, enter the interval between
threat detection data updates.
4. Enter the interval between software updates.
■
If you want to specify an update interval that is used every hour of every day, select the
Check for updates every n minutes option and enter the interval in minutes.
■ If you want to create a more sophisticated schedule, or different schedules for different days
of the week, select the Set up and manage scheduled updates option and click Add.
In the Update schedule dialog box, enter a name for the schedule, select the days of the
week, and update intervals.
6.1.9 Configure the update manager log
If you use role-based administration, you must have the Policy setting - updating right to configure
an update manager. For more information, see About roles and sub-estates (page 17).
1. If you are in the Endpoints view, click the Update managers button on the toolbar to display
the Update managers view.
2. In the list of update managers, select the update manager for which you want to configure the
log. Right-click and click View/Edit configuration.
3. In the Configure update manager dialog box, on the Logging tab, select the number of days
you want to keep the log for and the log's maximum size.
6.1.10 Configure the self-updating of an update manager
If you use role-based administration, you must have the Policy setting - updating right to configure
an update manager. For more information, see About roles and sub-estates (page 17).
1. If you are in the Endpoints view, click the Update managers button on the toolbar to display
the Update managers view.
2. In the list of update managers, select the update manager for which you want to configure
self-updating. Right-click and click View/Edit configuration.
3. In the Configure update manager dialog box, on the Advanced tab, select an update manager
version you want to keep up to date with.
For example, if you select “recommended”, the update manager will always be upgraded to
the version that is labeled as such at Sophos. The actual update manager version will change.
71
Sophos Enterprise Console
6.1.11 Make an update manager check for updates immediately
If you use role-based administration, you must have the Remediation - updating and scanning
right to perform this task. For more information, see About roles and sub-estates (page 17).
After you have configured an update manager, it checks for updates and downloads them from
its update source to the update shares it maintains automatically, according to the specified
schedule. If you want an update manager to check for and download threat detection data updates,
software updates for endpoint computers and software updates for the update manager itself
immediately, follow these steps:
1. If you are in the Endpoints view, click the Update managers button on the toolbar to display
the Update managers view.
2. In the list of update managers, select the update manager which you want to update. Right-click
and click Update Now.
6.1.12 Make an update manager comply with the configuration settings
If you use role-based administration, you must have the Remediation - updating and scanning
right to perform this task. For more information, see About roles and sub-estates (page 17).
1. If you are in the Endpoints view, click the Update managers button on the toolbar to display
the Update managers view.
2. In the list of update managers, select the update manager which you want to comply with the
configuration settings. Right-click and click Comply with Configuration.
6.1.13 Add an additional update manager
Sophos Update Manager (SUM) is always installed on the computer where you install Enterprise
Console. If you selected Custom Setup during the installation, this is the computer where the
management server is installed.
You can add one or more additional update managers to your network. You may want to do this
to reduce the load on the update manager that is already installed and distribute updates more
efficiently. You can install an additional update manager on a computer that does not yet have an
update manager installed.
Important: Do not remove the update manager installed on the same computer as the Enterprise
Console management server. Enterprise Console cannot protect the network fully until this update
manager is configured with an update source. This will enable Enterprise Console to receive
necessary updates (for example, information about the versions of security software that endpoint
computers should be running, new and updated Content Control Lists for data control, or the
list of new controlled devices and applications).
To enable an additional update manager to download security software from Sophos or another
update manager via HTTP, open port 80 on the computer on which you want to install the
72
Help
additional update manager. To enable the update manager to download security software from
another update manager via a UNC path, open ports 137, 138, 139, and 445 on the computer.
If the computer is running a version of Windows that includes the Network Discovery feature,
and the feature is turned off, turn it on and restart the computer.
If the computer is running Windows Server 2008, turn off User Account Control (UAC) and
restart the computer. You can turn UAC on again after you have installed the update manager
and subscribed to Sophos updates.
If the computer is running Windows 2000, be prepared to restart it after installation.
If the computer is in a domain, log on as a domain administrator.
If the computer is in a workgroup, log on as a local administrator.
The update manager installer is located on the computer where Enterprise Console management
server is installed, in the shared folder \\Servername\SUMInstallSet. To view the location of the
installer, go to the View menu and click Sophos Update Manager Installer Location.
You can install Sophos Update Manager using Windows Remote Desktop.
To install an additional update manager:
1. Run the Sophos Update Manager installer Setup.exe.
An installation wizard is launched.
2. On the Welcome page of the wizard, click Next.
3. On the License Agreement page, read the license agreement and click I accept the terms in
the license agreement if you agree to the terms. Click Next.
4. On the Destination folder page, accept the default or click Change and enter a new destination
folder. Click Next.
5. On the Sophos Update Manager Account page, select an account that endpoint computers
will use to access the default update share created by the update manager. (The default update
share is \\<ComputerName>\SophosUpdate, where ComputerName is the name of the
computer where the update manager is installed.) This account must have read rights to the
share and does not need to have administrative rights.
You can select the default user, select an existing user, or create a new user.
By default, the installer will create the SophosUpdateMgr account with read rights to the
default update share and no interactive logon rights.
If you want to add more update shares later, select an existing account or create a new account
that has read rights to those shares. Otherwise, ensure that the SophosUpdateMgr account has
read rights to the shares.
6. On the Sophos Update Manager Account Details page, depending on the option you selected
on the previous page, enter a password for the default user, details for the new user, or select
an existing account.
The password for the account must comply with your password policy.
73
Sophos Enterprise Console
7. On the Ready to Install the Program page, click Install.
8. When installation is complete, click Finish.
The computer where you installed Sophos Update Manager should now appear in Enterprise
Console, Update managers view. (On the View menu, click Update Managers.)
To configure the update manager, select it, right-click, and then click View/Edit Configuration.
6.1.14 Publish security software on a web server
You might want to publish Sophos security software on a web server for computers to access via
HTTP. If you want to install Sophos Anti-Virus for UNIX, version 4, you must do this, although
you can leave this until you have downloaded Sophos Anti-Virus for UNIX, version 4 if you want
to.
To publish security software on a web server:
1. To find out the path of the shared folder to which the security software has been downloaded,
known as the bootstrap location:
a) In Enterprise Console, on the View menu, click Bootstrap Locations.
In the Bootstrap Locations dialog box, the Location column displays the bootstrap location
for each platform.
b) Make a note of the path up to but not including the CIDs folder. For example:
\\server name\SophosUpdate
2. Make the bootstrap location, including subfolders, available on the web server.
3. Specify usernames and passwords to prevent unauthorized access to this folder on the web
server.
The Sophos AutoUpdate component of Sophos Endpoint Security and Control supports the
following HTTP authentication types:
■
Basic
■
NTLM (v1 and v2)
■
Digest (AutoUpdate may fail to update with digest authentication on some web servers)
Sophos recommends that you use a secure option (i.e. NTLM v2) when configuring your
company's website for Sophos updating.
The documentation for your web server should describe how to share a folder over the web and
how to set up usernames and passwords for it. For more information about how to do this, contact
your web server vendor.
Using Internet Information Services (IIS) with Sophos software
74
Help
If you use Internet Information Services (IIS) 6.0, which is supplied with Windows 2003, only
files with extensions registered in the IIS MIME types list will be served. To ensure that IIS serves
Sophos files, add each extension used by those files to the list (alternatively use a wildcard '.*'). To
do this, find the top-level Sophos directory, right-click and then click Properties. In the Web Site
Properties dialog box, click the HTTP Headers tab. Then select MIME types and add the extensions,
mapping them to the MIME type "application/octet-stream".
If you use IIS with anonymous authentication and you want to use the web server as the primary
update server in your updating policy, you will still need to enter credentials for the primary server
in the updating policy. Otherwise, you will not be able to protect endpoint computers from the
console. See Change primary server credentials (page 83).
6.2 Configuring software subscriptions
6.2.1 About software subscriptions
A software subscription specifies which versions of endpoint software are downloaded from Sophos
for each platform.
The Download Security Software Wizard sets up a default subscription called “Recommended.”
This subscription includes the recommended versions of any selected software.
If you want to subscribe to a version other than the recommended one, configure the subscription
as described in Subscribe to security software (page 76).
If you haven't completed the wizard after you installed Enterprise Console, see Run the Download
Security Software Wizard (page 79).
6.2.2 What types of update are available?
There are several versions of the software associated with each major version of a solution (for
example, Sophos Endpoint Security and Control 9) and platform (for example, Windows 2000
or later).You can choose which software version to download from Sophos for further deployment
to endpoint computers by selecting an update type in the subscription. You can select among three
labeled versions and three fixed versions of the software.
Labeled versions
There are three labeled versions:
Label
Description
Recommended
The version that we considers to be the most appropriate for those who want the
most up-to-date version of the product. We normally recommend that the latest
version of the endpoint software is deployed to endpoints as soon as it is released.
75
Sophos Enterprise Console
Label
Previous
Oldest
Description
The previously-recommended version.
The oldest version that Sophos is still supporting with updates.
Note: We may add new labels over time.
The Download Security Software Wizard sets up a subscription that specifies the recommended
versions of any selected software.
When subscribed to a labeled version, the actual version(s) downloaded will usually change each
month.
Fixed versions
Fixed versions are updated with new threat detection data, but not with the latest software version
each month.
If you want to evaluate new versions of the software before placing them on your main network,
you may want to consider using fixed versions of the software on the main network while evaluating
the new versions.
Usually, there are three fixed versions for each operating system, representing the previous three
monthly releases. An example of a fixed version is Sophos Endpoint Security and Control for
Windows 2000 and later, version 9.4.3.
Fixed versions are downloaded for as long as they are available from Sophos. If a fixed version is
due to retire, you will see an alert in the Update managers view next to any update managers that
are subscribed to that version. If email alerting is active, the administrator will also receive an
email alert.
By default, when a subscribed fixed version is retired, Enterprise Console will redefine the
subscription to use the oldest fixed version that is still available.
Note: You can change this behavior in the subscription by clearing the check box Automatically
upgrade fixed version software when it is no longer supported by Sophos. Be aware, however,
that running unsupported software will leave you unprotected against new security threats.
Therefore, we recommend that you upgrade any unsupported versions as soon as possible.
6.2.3 Subscribe to security software
If you use role-based administration:
■
You must have the Policy setting - updating right to edit a software subscription.
■
You cannot edit a subscription if it is applied to an updating policy that is applied outside your
active sub-estate.
For more information about role-based administration, see About roles and sub-estates (page 17).
76
Help
To subscribe to security software:
1. On the View menu, click Update Managers.
2. In the Software Subscriptions pane, double-click the subscription you want to change, or click
the Add button at the top of the pane to create a new subscription.
The Software Subscription dialog box appears.
Alternatively, if you want to create a copy of an existing subscription, select the subscription,
right-click and click Duplicate Subscription. Type a new name for the subscription and then
double-click it to open the Software Subscription dialog box.
3. In the Software Subscription dialog box, edit the name of the subscription, if you wish.
4. Select the platforms for which you want to download the software.
Important: If you want to download Sophos Anti-Virus for NetWare, please read Sophos
support knowledgebase article 59192
(http://www.sophos.com/support/knowledgebase/article/59192.html).
77
Sophos Enterprise Console
5. For each of the selected platforms, click in the Version field next to the platform and then click
again. In the drop-down list of available versions, select the version you want to download.
Normally you subscribe to the Recommended version(s) to ensure that your software is kept
up to date automatically. To learn what other types of update are available, see What types of
update are available? (page 75)
Important: If you select a fixed version, for example, 10.1.2, we recommend that you leave
the Automatically upgrade fixed version software when it is no longer supported by Sophos
check box selected. Running unsupported software leaves you unprotected against new security
threats.
After you have subscribed to the security software, you can set up subscription email alerts. For
more information about subscription email alerts, see Set up software subscription alerts (page 192).
If you created a new software subscription, configure the update manager to maintain it as described
in View or edit update manager configuration (page 66).
78
Help
6.2.4 Subscribe to encryption software
Note: We recommend that you create a new subscription for encryption. To update encryption
software, use the protect computers wizard. For information, see Install encryption software
automatically (page 52)
To subscribe to the encryption software:
1. In Enterprise Console, on the View menu, click Update Managers.
2. To create a new subscription, in the Software Subscriptions pane, click Add at the top of the
pane. In the Software Subscription dialog box, type a name for the subscription in the
Subscription name box. Under Encryption Products, next to Windows XP and above, click
in the Version box, and select 5.61 Recommended. Click OK.
3. To add the subscription to the Update Managers, in the Update managers pane, right-click
the update manager and select View/Edit configuration. In the Configure update manager
dialog box, on the Subscriptions tab, select the subscription in the Available list and click the
> button to move it to the Subscribed to list. Click OK.
The encryption software is downloaded to the default share
\\<server_name>\SophosUpdate\CIDs\<subscription>\ENCRYPTION.
Note: You cannot have the encryption software installed by applying update polices to a group
of computers. To install and update encryption software, use the protect computers wizard. For
information, see Install encryption software automatically (page 52)
6.2.5 Run the Download Security Software Wizard
If you use role-based administration, you must have the Policy setting - updating right to run
the Download Security Software Wizard. For more information, see About roles and sub-estates
(page 17).
If you haven't completed the Download Security Software Wizard after you installed Enterprise
Console, do the following:
■
On the Actions menu, click Run the Download Security Software Wizard.
The Download Security Software Wizard guides you through selecting and downloading
software.
6.2.6 See which updating policies use the software subscription
To see which updating polices use a particular software subscription:
■
Select the subscription, right-click and then click View Subscription Usage.
In the Software Subscription Usage dialog box, you see a list of updating polices that use the
subscription.
79
Sophos Enterprise Console
6.3 Configuring the updating policy
6.3.1 About updating policy
Updating policies enable you to keep your computers up to date with your chosen security software.
Enterprise Console checks for updates and updates computers, if necessary, at a specified interval.
The default updating policy enables you to install and update the software specified in the
“Recommended” subscription.
If you want to change the default updating policy or create a new updating policy, follow the
instructions in the following topics:
■
Select a subscription (page 80)
■
About update server locations (page 81)
■
Schedule updates (page 85)
■
Select a different source for initial installation (page 86)
■
Log updates (page 86)
Note: If you use role-based administration:
■
You must have the Policy setting - updating right to configure an updating policy.
■
You cannot edit a policy if it is applied outside your active sub-estate.
For more information about role-based administration, see About roles and sub-estates (page 17).
6.3.2 Select a subscription
If you use role-based administration:
■
You must have the Policy setting - updating right to configure an updating policy.
■
You cannot edit a policy if it is applied outside your active sub-estate.
For more information, see About roles and sub-estates (page 17).
A subscription specifies which versions of endpoint software are downloaded from Sophos for
each platform. The default subscription includes the latest software for Windows 2000 and later.
To select a subscription:
1. Check which updating policy is used by the group(s) of computers you want to configure.
See Check which policies a group uses (page 30).
2. In the Policies pane, double-click Updating. Then double-click the policy you want to change.
80
Help
3. In the Updating policy dialog box, click the Subscription tab and select the subscription for
the software you want to keep up to date.
6.3.3 Configuring update server locations
6.3.3.1 About update server locations
By default, computers update from a single primary source UNC share,
\\<ComputerName>\SophosUpdate, where <ComputerName> is the name of the Update
Manager's computer. You can also specify an alternative secondary source for updates and enable
location roaming. If endpoint computers cannot contact their primary source, they attempt to
update from their secondary source (if one has been specified). We recommend that you always
specify a secondary source.
Both primary and secondary update server locations may be either UNC shares or HTTP URLs
from any accessible Update Manager on your network. The secondary update server location may
alternatively be set to get updates directly from Sophos over the internet via HTTP.
Note: Update Managers may have multiple distribution shares available, depending on how you
have set them up.
6.3.3.2 Location roaming
6.3.3.2.1 About location roaming for laptops
Some laptop users may roam extensively or internationally within an organization. When location
roaming is enabled (on an updating policy for roaming laptops), roaming laptops attempt to
locate and update from the nearest update server location by querying other (fixed) endpoints on
the local network they are connected to, minimizing update delays and bandwidth costs.
A roaming laptop gets update server locations and credentials by querying fixed computers on
the same local network. If multiple locations are returned, the laptop determines which is nearest
and uses that. If none work, the laptop uses the primary (then secondary) location(s) defined in
its updating policy.
Note: When fixed computers send update locations and credentials to the laptop, passwords are
obscured both in transmission and storage. However, accounts set up for endpoints to read update
server locations should always be as restrictive as possible, allowing only read-only access. See
Specify where the software is placed (page 69).
If you want to know in more detail how location roaming works, see How does location roaming
work? (page 82)
Location roaming is only usable where:
■
There is a single common Enterprise Console for both roaming and fixed endpoints.
■
The fixed endpoints use the same software subscription as the roaming laptops.
■
There is a primary update location specified in the updating policy used by the roaming laptops.
81
Sophos Enterprise Console
■
Enterprise Console is version 4.7 or later and Endpoint Security and Control is version 9.7 or
later on both fixed and roaming endpoints.
■
Any third-party firewalls are configured to allow update location queries and responses. The
port used is normally 51235 but is configurable; for details see
http://www.sophos.com/support/knowledgebase/article/110371.html.
You enable location roaming as part of specifying sources for updates. Location roaming should
only be enabled on groups of machines that frequently move from office to office. For information
on how to enable location roaming, see Change primary server credentials (page 83).
For frequently asked questions about location roaming, see Sophos support knowledgebase article
112830 (http://www.sophos.com/support/knowledgebase/article/112830.html).
6.3.3.2.2 How does location roaming work?
Location roaming is a method of intelligent updating for roaming laptops where updates are
performed from a ''best'' update location and updating does not rely solely on the primary and
secondary update locations specified in the laptops' updating policy.
When location roaming is enabled, the following happens:
1. When a laptop changes its location, the Sophos AutoUpdate component of Endpoint Security
and Control installed on the laptop determines that the MAC address of the default gateway
on the connected network has changed since the last update. It then sends an ICMP broadcast
over the local subnet to neighboring AutoUpdate installations, using port 51235 by default.
2. The neighboring AutoUpdate installations reply with their updating policy, using the same
port. Only the primary update location is sent in the response.
All Endpoint Security and Control 9.7 or later installations listen for broadcasts regardless of
whether location roaming is enabled or not.
Sensitive information in replies is obfuscated and fields are hashed for integrity.
Reply messages have a randomized reply time, to avoid message storms. The replies are also
ICMP broadcasts, so any other machine that would have replied with the same details will also
receive the broadcast and know not to respond.
3. AutoUpdate chooses the "best" location from the locations received and checks whether the
sender is managed by the same Enterprise Console and the subscription ID matches the one
used by AutoUpdate on the laptop.
The "best" update location is determined based on the amount of hops required to access the
update location.
4. An update is then attempted and, if successful, the location is cached.
A maximum of four accessible update locations with the same subscription ID and the lowest
hop count are stored on the laptop (in the file iustatus.xml in the following location: C:\Program
Files\Sophos\AutoUpdate\data\status\iustatus.xml).
These update locations are checked every time AutoUpdate performs an update.
82
Help
Note: If you need to revert back to using the primary and secondary update locations specified
in the updating policy (for example, if you wish to roll out customizations from the update
location specified in the policy), you will need to disable location roaming.
6.3.3.2.3 Enable location roaming
If you use role-based administration:
■
You must have the Policy setting - updating right to configure an updating policy.
■
You cannot edit a policy if it is applied outside your active sub-estate.
For more information, see About roles and sub-estates (page 17).
You should only enable location roaming on groups of machines that frequently move from office
to office.
To enable location roaming:
1. In the Policies pane, double-click Updating. Then double-click the updating policy you want
to change.
2. In the Updating Policy dialog box, on the Primary Server tab, select the Allow location roaming
check box.
3. In the Groups pane, select a group that uses the updating policy you just changed. Right-click
and select Comply with, Group updating policy.
Repeat this step for each group that uses this updating policy.
Note: If you later need to revert back to using the primary and secondary update locations specified
in the updating policy, disable location roaming.
6.3.3.3 Change primary server credentials
If you use role-based administration:
■
You must have the Policy setting - updating right to configure an updating policy.
■
You cannot edit a policy if it is applied outside your active sub-estate.
For more information, see About roles and sub-estates (page 17).
To change the primary server credentials:
1. In the Policies pane, double-click Updating. Then double-click the updating policy you want
to change.
83
Sophos Enterprise Console
2. In the Updating Policy dialog box, on the Primary Server tab, enter new credentials that will
be used to access the server. Change other details, if appropriate.
Note: If your primary update source is a folder on your website and you are using Internet
Information Services (IIS) with anonymous authentication, you will still need to enter credentials
on the Primary Server tab. Use the credentials for the "initial install source" UNC share, even
if you don't need them to access the webserver. If you leave the Username and Password fields
on the Primary Server tab blank, you will not be able to protect endpoint computers from the
console.
3. In the Groups pane, select a group that uses the updating policy you just changed. Right-click
and select Comply with, Group updating policy.
Repeat this step for each group that uses this updating policy.
6.3.3.4 Set the secondary update server location
If you use role-based administration:
■
You must have the Policy setting - updating right to configure an updating policy.
■
You cannot edit a policy if it is applied outside your active sub-estate.
For more information, see About roles and sub-estates (page 17).
To set the secondary update server location:
1. Check which updating policy is used by the group(s) of computers you want to configure.
See Check which policies a group uses (page 30).
2. In the Policies pane, double-click Updating, then double-click the policy you want to change.
3. In the Updating Policy dialog box, click the Secondary Server tab, and then select the Specify
secondary server details check box.
4. In the Address (HTTP or UNC) box, do one of the following:
■
Enter the HTTP URL or UNC network path of the update server share.
■ Select Sophos.
Important: If you choose an HTTP URL or a share that is not maintained by a managed Update
Manager, Enterprise Console cannot check that the specified software subscription is available.
You must manually ensure that the share contains the specified software subscription, otherwise
computers will not be updated.
5. If the policy includes Mac endpoints and you specified a UNC path in the Address field, under
Select a file-sharing protocol for Mac OS X, select a protocol for Macs to access the update
share.
84
Help
6. If necessary, in the Username field, enter the username for the account that will be used to
access the server, and then enter and confirm the password. For Sophos HTTP, this is your
subscription credentials.
This account should have only read-only (browsing) access rights to the share you entered in
the address field above.
Note: If the username needs to be qualified to indicate the domain, use the form
domain\username. For information about how to check a Windows user account, see Sophos
support knowledgebase article 11637
(http://www.sophos.com/support/knowledgebase/article/11637.html).
7. To throttle bandwidth, click Advanced. In the Advanced settings dialog box, select the Limit
amount of bandwidth used check box, and then use the slider control to specify the maximum
bandwidth in Kbits/second.
8. If you access the update source via a proxy server, click Proxy details. In the Proxy details
dialog box, select the Access the server via a proxy check box, and then enter the proxy server
Address and Port number. Enter a Username and Password that give access to the proxy
server. If the username needs to be qualified to indicate the domain, use the form
domain\username.
Note: Some internet service providers require HTTP requests to be sent to a proxy server.
9. Click OK to close the Updating Policy dialog box.
10. In the Groups pane, right-click a group that uses the updating policy you just changed, and
then click Comply with > Group Updating Policy .
Repeat this step for each group that uses this updating policy.
6.3.4 Schedule updates
If you use role-based administration:
■
You must have the Policy setting - updating right to configure an updating policy.
■
You cannot edit a policy if it is applied outside your active sub-estate.
For more information, see About roles and sub-estates (page 17).
By default, endpoint computers check for updates in the network share every 5 minutes.
Note: If the computers download updates directly from Sophos, this update interval does not
apply. Computers running Sophos PureMessage can check for updates every 15 minutes. Computers
that are not running Sophos PureMessage will update every 60 minutes.
To specify the update interval:
1. Check which updating policy is used by the group(s) of computers you want to configure.
See Check which policies a group uses (page 30).
2. In the Policies pane, double-click Updating. Then double-click the policy you want to change.
85
Sophos Enterprise Console
3. In the Updating policy dialog box, on the Schedule tab, leave Enable networked computers
to use Sophos updates automatically selected. Enter the interval between software updates
(in minutes).
4. If the computers update via a dial-up connection to the internet, select Check for updates on
dial-up.
Computers will then attempt to update whenever they connect to the internet.
6.3.5 Select a different source for initial installation
If you use role-based administration:
■
You must have the Policy setting - updating right to configure an updating policy.
■
You cannot edit a policy if it is applied outside your active sub-estate.
For more information, see About roles and sub-estates (page 17).
By default, security software is installed on computers and then kept updated from the source
specified on the Primary server tab. You can specify a different source for initial installation.
Note:
This setting applies only to Windows 2000 and later.
If your primary server is an HTTP (web) address, and you want to perform installation on the
computers from the console, you must specify a first-time install source.
To make the initial installation from a different source:
1. Check which updating policy is used by the group(s) of computers you want to configure.
See Check which policies a group uses (page 30).
2. In the Policies pane, double-click Updating. Then double-click the policy you want to change.
3. In the Updating policy dialog box, on the Initial install source tab, clear the Use primary
server address check box. Then enter the address of the source you want to use.
6.3.6 Log updates
If you use role-based administration:
■
You must have the Policy setting - updating right to configure an updating policy.
■
You cannot edit a policy if it is applied outside your active sub-estate.
For more information, see About roles and sub-estates (page 17).
By default, computers log their updating activity. The default maximum log size is 1 MB. The
default log level is normal.
86
Help
To change the logging settings:
1. Check which updating policy is used by the group(s) of computers you want to configure.
See Check which policies a group uses (page 30).
2. In the Policies pane, double-click Updating. Then double-click the policy you want to change.
3. In the Updating policy dialog box, on the Logging tab, leave Log Sophos AutoUpdate activity
selected. In the Maximum log size field, specify a maximum size for the log in MB.
4. In the Log level field, select Normal or Verbose logging.
Verbose logging provides information on many more activities than usual, so the log will grow
faster. Use this setting only when detailed logging is needed for troubleshooting.
6.4 Monitoring the update manager
6.4.1 Monitor update managers
Check the update manager status on the Dashboard
The status of the update managers is displayed in the Updates panel on the Dashboard. This will
tell you when the last update was downloaded from Sophos and display a warning if the time since
the last update exceeds the warning or critical threshold.
Note: The Updates section of the dashboard does not report an alert or error if an update manager
is temporarily unable to update. Alerts and errors are only generated if the time since the last
update of the update manager exceeds the warning or critical threshold set in Configure the
Dashboard (page 54).
Check the update manager alerts and errors
Update manager alerts and errors are displayed in the Update managers view, Alerts and Errors
columns, respectively.
If you subscribed to a fixed version of software, an alert will be displayed when that version is
nearing retirement or is retired. An alert will also be displayed if your product license has changed.
To view update manager alerts and errors:
1. If you are in the Endpoints view, click the Update managers button on the toolbar to display
the Update managers view.
2. In the list of update managers, look in the Alerts and Errors columns for any possible problems.
3. If there is an alert or error displayed next to an update manager, right-click that update manager
and click View Update Manager Details.
In the Update manager details dialog box, you can see the time of the last threat detection
data and software updates, status of the subscription or subscriptions that the update manager
keeps up to date, and update manager status.
87
Sophos Enterprise Console
4. To learn more about a particular update manager status and for information on how to resolve
it, follow the link in the Description column.
If you need to check or change your subscription, for example, if the product you are subscribed
to is nearing retirement, or your product license has changed and the new license does not include
that product, see Subscribe to security software (page 76).
If new features become available as a result of a license change, you may need to configure new
policies before you can use the features. You can find help with configuring the new policies in
the Configuring policies section.
Subscribe to email alerts
You can set up email alerts to be sent to your chosen recipients when the product version you are
subscribed to is nearing retirement or is retired, or when your Sophos product features change as
a result of a license change. For more information, see Set up software subscription alerts (page 192).
6.4.2 Clear update manager alerts from the console
If you use role-based administration, you must have the Remediation - cleanup right to clear
alerts from the console. For more information, see About roles and sub-estates (page 17).
To clear update manager alerts from the console:
1. In the Update managers view, select the update manager(s) for which you want to clear alerts.
Right-click and select Acknowledge Alerts.
The Update manager alerts dialog box is displayed.
2. To clear alerts from the console, select the alerts you want to clear and click Acknowledge.
Acknowledged (cleared) alerts are no longer displayed in the console.
6.5 Update out-of-date computers
If you use role-based administration, you must have the Remediation - updating and scanning
right to update computers. For more information, see About roles and sub-estates (page 17).
After you have set up the updating policies and applied them to your networked computers, the
computers are kept up to date automatically. You do not need to update computers manually
unless there is a problem with updating.
If in the Endpoints view, in the computer list, you see a clock icon next to a computer in the Up
to date column on the Status tab, the computer has out-of-date security software. The text indicates
how long the computer has been out of date.
A computer can be out of date for one of two reasons:
■
88
That computer has failed to fetch an update from the server.
Help
■
The server itself does not have the latest Sophos software.
To diagnose the problem and update the computers:
1. In the Endpoints view, select the group that contains out-of-date computers.
2. On the Status tab, click the Up to date column heading to sort computers by up-to-dateness.
3. Click the Update details tab and look in the Primary server column.
This shows you the directory that each computer updates from.
4. Now look at the computers that update from one particular directory.
■
If some are out of date, but others are not, the problem is with individual computers. Select
them, right-click and click Update Computers Now.
■ If all are out of date, the problem could be with the directory. On the View menu, click
Update Managers. Select the update manager that maintains the directory that you suspect
to be out of date, right-click and click Update Now. Then on the View menu, click
Endpoints. Select the out-of-date computers, right-click and click Update Computers Now.
If you have several update managers and are not sure which one maintains the out-of-date
directory, use the Updating Hierarchy report to see which shares are maintained by each update
manager. To view the Updating Hierarchy report, on the Tools menu, click Manage Reports.
In the Report Manager dialog box, select Updating hierarchy and click Run. Look in the
“Shares managed by update managers” section of the report.
89
Sophos Enterprise Console
7 Configuring policies
7.1 Configuring the anti-virus and HIPS policy
7.1.1 About the anti-virus and HIPS policy
An anti-virus and HIPS policy enables you to detect and clean up viruses, Trojans, worms, spyware
as well as adware and other potentially unwanted applications. Using it, you can also scan your
computers for suspicious behavior, suspicious files, and rootkits. You can use different settings
for each set of computers.
By default, Sophos Endpoint Security and Control does the following:
■
Detects known and unknown viruses, Trojans, worms, and spyware automatically as soon as
a user attempts to access files that contain them.
■
Analyzes the behavior of the programs running on the system.
■
Automatically cleans up computers as soon as a virus or other threat is found.
Note: You can change the settings for automatic cleanup as described in Set up automatic cleanup
for on-access scanning (page 63).
You can also configure Sophos Endpoint Security and Control to:
■
Scan for suspicious files during on-access scanning (page 97)
■
Scan for adware and PUAs (page 92)
■
Scan computers at set times (page 103)
Note: Enterprise Console cannot perform on-access scans on UNIX computers. Use an alternative
scanning option or refer to the Sophos Anti-Virus for UNIX user manual.
7.1.2 Scan for viruses, Trojans, worms, and spyware
By default, Sophos Endpoint Security and Control detects known and unknown viruses, Trojans,
worms, and spyware automatically as soon as a user attempts to access files that contain them.
7.1.3 Sophos Live Protection
7.1.3.1 About Sophos Live Protection
Sophos Live Protection uses in-the-cloud technology to instantly decide whether a suspicious file
is a threat and take action specified in the anti-virus and HIPS policy.
90
Help
Live Protection improves detection of new malware without the risk of unwanted detections. This
is achieved by doing an instant lookup against the very latest known malicious files. When new
malware is identified, Sophos can send out updates within seconds.
To take full advantage of Live Protection, you must ensure that the following options are enabled.
■
Enable Live Protection
If the anti-virus scan on an endpoint computer has identified a file as suspicious, but cannot
further identify it as either clean or malicious based on the threat identity (IDE) files stored
on the computer, certain file characteristics such as checksum are sent to Sophos to assist with
further analysis. The in-the-cloud checking performs an instant lookup of a suspicious file in
the SophosLabs database. If the file is identified as clean or malicious, the decision is sent back
to the computer and the status of the file is automatically updated.
■
Automatically send file samples to Sophos
If a file is deemed potentially malicious but cannot be positively identified as malicious based
on its characteristics alone, Live Protection allows Sophos to request a sample of the file. If this
option is enabled and Sophos does not already hold a sample of the file, the file is submitted
automatically.
Submission of such sample files helps Sophos to continuously enhance detection of malware
without the risk of false positives.
Note: The maximum sample size is 10 MB. The timeout for sample upload is 30 seconds. It
is not recommended to automatically send samples over a slow connection (less than 56 Kbps).
Important: You must ensure that Sophos domain to which the file data is sent is trusted in your
web filtering solution. For details, see support knowledgebase article 62637
(http://www.sophos.com/support/knowledgebase/article/62637.html).
If you use a Sophos web filtering solution, for example the WS1000 Web Appliance, you do not
need to do anything - Sophos domains are already trusted.
7.1.3.2 Turn Sophos Live Protection on or off
If you use role-based administration:
■
You must have the Policy setting - anti-virus and HIPS right to perform this task.
■
You cannot edit a policy if it is applied outside your active sub-estate.
For more information, see About roles and sub-estates (page 17).
By default, Endpoint Security and Control sends file data such as checksums to Sophos, but does
not send sample files. To take full advantage of Sophos Live Protection, you must enable both
Sophos Live Protection options.
91
Sophos Enterprise Console
To turn Live Protection options on or off:
1. Check which anti-virus and HIPS policy is used by the group or groups of computers you want
to configure.
See Check which policies a group uses (page 30).
2. In the Policies pane, double-click Anti-virus and HIPS. Then double-click the policy you want
to change.
3. In the Anti-virus and HIPS Policy dialog box, click the Sophos Live Protection button.
4. In the Sophos Live Protection dialog box:
■
To turn the sending of file data to Sophos on or off, select or clear the Enable Live Protection
check box.
■ To turn the sending of sample files to Sophos on or off, select or clear the Automatically
send file samples to Sophos check box.
Note: When a file sample is sent to Sophos for online scanning, the file data is always sent with
the sample.
7.1.4 Adware and PUAs
7.1.4.1 Scan for adware and PUAs
If you use role-based administration:
■
You must have the Policy setting - anti-virus and HIPS right to perform this task.
■
You cannot edit a policy if it is applied outside your active sub-estate.
For more information, see About roles and sub-estates (page 17).
Note: This option applies only to Sophos Endpoint Security and Control for Windows 2000 and
later.
We recommend that you begin by using a scheduled scan to detect potentially unwanted
applications. This lets you deal safely with applications that are already running on your network.
You can then enable on-access detection to protect your computers in future.
1. Check which anti-virus and HIPS policy is used by the group(s) of computers you want to
configure.
See Check which policies a group uses (page 30).
2. In the Policies pane, double-click Anti-virus and HIPS. Then double-click the policy you want
to change.
The Anti-virus and HIPS Policy dialog box is displayed.
3. In the Scheduled scanning panel, click Add to create a new scan, or double-click a scan in the
list to edit it.
4. In the Scheduled scan settings dialog box, click Configure (at the bottom of the page).
92
Help
5. In the Scanning and cleanup settings dialog box, on the Scanning tab, under Scan files for,
select Adware and PUAs. Click OK.
When the scan is carried out, Sophos Endpoint Security and Control may report some adware
or other potentially unwanted applications.
6. If you want your computers to run the applications, you must authorize them (see Authorize
adware and PUAs (page 93)). Otherwise, remove them (see Clean up computers now (page
62)).
7. If you want to enable on-access detection, open the Anti-Virus and HIPS policy dialog box
again. Make sure the Enable on-access scanning check box is selected. Click the Configure
button next to the check box. In the On-access scan settings dialog box, under Scan for, select
Adware and PUAs.
Note: Some applications "monitor" files and attempt to access them frequently. If you have
on-access scanning enabled, it detects each access and sends multiple alerts. See Frequent alerts
about potentially unwanted applications (page 230).
7.1.4.2 Authorize adware and PUAs
If you use role-based administration:
■
You must have the Policy setting - anti-virus and HIPS right to perform this task.
■
You cannot edit a policy if it is applied outside your active sub-estate.
For more information, see About roles and sub-estates (page 17).
If you have enabled Sophos Endpoint Security and Control to detect adware and other potentially
unwanted applications (PUAs), it may prevent the use of an application that you want.
To authorize such applications:
1. Check which anti-virus and HIPS policy is used by the group(s) of computers you want to
configure.
See Check which policies a group uses (page 30).
2. In the Policies pane, double-click Anti-virus and HIPS. Then double-click the policy you want
to change.
3. In the Anti-virus and HIPS policy dialog box, click the Authorization button.
4. In the Authorization manager dialog box, on the Adware and PUAs tab, in the Known adware
and PUAs list, select the application you want. Click Add to add it to the Authorized adware
and PUAs list.
5. If you cannot see the application you want to authorize, click New entry.
The Add new adware or PUA dialog box is displayed.
6. Go to the Sophos security analyses web page, http://www.sophos.com/security/analyses/. On the
Adware and PUAs tab, find the application you want to authorize.
93
Sophos Enterprise Console
7. In Enterprise Console, in the Add new adware or PUA dialog box, enter the name of the
application you want to authorize and click OK.
The application is added to the Known adware and PUAs list.
8. Select the application and click Add to add it to the Authorized adware and PUAs list.
If you want to remove an application from the list, select the application and click Delete entry.
7.1.5 Web protection
7.1.5.1 About web protection
Web protection provides enhanced protection against web threats. It includes the following
features:
■
Live URL filtering, which blocks access to websites that are known to host malware. This feature
works by performing a real-time lookup against Sophos’s online database of infected websites.
■
Content scanning, which scans data and files downloaded from the internet (or intranet) and
proactively detects malicious content. This feature scans content hosted at any locations,
including those not listed in the database of infected websites.
Web protection is supported on the following web browsers: Internet Explorer, Firefox, Google
Chrome, Safari and Opera. Web content accessed via an unsupported browser is not filtered and
will not be blocked.
When access to a malicious website is blocked, an event is logged that can be viewed in the Web
Event Viewer and in the Computer details of the endpoint computer where the event occurred.
If you use the Web Control feature, both web protection and web control events are displayed in
the Web Event Viewer and Computer details. See View web events (page 210) and View latest web
events on a computer (page 211).
By default, web protection is enabled. For information on how to turn web protection on or off,
see Turn web protection on or off (page 94).
Note: If you want to have more control over which websites users are allowed to access, for
example, if you wish to protect users from visiting websites for which your organization could be
legally liable, use the Web Control feature. For more information, see About the web control policy
(page 183).
7.1.5.2 Turn web protection on or off
If you use role-based administration:
■
You must have the Policy setting - anti-virus and HIPS right to perform this task.
■
You cannot edit a policy if it is applied outside your active sub-estate.
For more information, see About roles and sub-estates (page 17).
94
Help
To turn web protection on or off:
1. Check which anti-virus and HIPS policy is used by the group or groups of computers you want
to configure.
See Check which policies a group uses (page 30).
2. In the Policies pane, double-click Anti-virus and HIPS.
3. Double-click the policy you want to change.
4. In the Anti-virus and HIPS policy dialog box, next to Block access to malicious websites,
select On or Off to enable or disable web protection. This option is enabled by default.
For information on how to authorize specific websites, see Authorize websites (page 95).
5. To enable or disable scanning of data and files downloaded from the internet, next to Download
scanning, select On, As on access, or Off.
By default, As on access is selected, that is, download scanning is disabled or enabled
simultaneously with on-access scanning.
7.1.5.3 Authorize websites
If you use role-based administration:
■
You must have the Policy setting - anti-virus and HIPS right to perform this task.
■
You cannot edit a policy if it is applied outside your active sub-estate.
For more information, see About roles and sub-estates (page 17).
Caution: Authorizing a website that has been classified as malicious could expose you to threats.
Ensure it is safe to access the website before you authorize it.
If you want to unblock a website that Sophos has classified as malicious, you can add it to the list
of authorized sites. Authorizing a website will prevent URLs from that website being verified with
Sophos's online web filtering service.
Note: If you have download scanning enabled and visit a website that contains a threat, access to
the site will be blocked even if it is listed as an authorized website.
To authorize a website:
1. Check which anti-virus and HIPS policy is used by the group(s) of computers you want to
configure.
See Check which policies a group uses (page 30).
2. In the Policies pane, double-click Anti-virus and HIPS. Then double-click the policy you want
to change.
3. In the Anti-virus and HIPS policy dialog box, click the Authorization button.
95
Sophos Enterprise Console
4. In the Authorization manager dialog box, on the Websites tab, click Add to add a website
using one of the available options.
You can add a website by entering its domain name, IP address, or IP address with subnet
mask.
Note: If you use the web control feature, when you authorize a website that is blocked by your
Web control policy, the website will still be blocked. To allow access to the website, you will
need to exempt it from web control filtering as well as authorize in the anti-virus and HIPS
policy. For more information about web control, see About the web control policy (page 183).
If you want to edit or remove a website from the list, select the website and click Edit or Remove
accordingly.
7.1.6 On-access scanning
7.1.6.1 About on-access scanning best practice
7.1.6.2 Turn on-access scanning on or off
If you use role-based administration:
■
You must have the Policy setting - anti-virus and HIPS right to perform this task.
■
You cannot edit a policy if it is applied outside your active sub-estate.
For more information, see About roles and sub-estates (page 17).
By default, Sophos Sophos Endpoint Security and Control scans files as the user attempts to access
them, and denies access unless the file is clean.
You may decide to turn off on-access scanning on Exchange servers or other servers where
performance might be affected. In this case, put the servers in a special group and change the
anti-virus and HIPS policy used for that group as shown below.
To turn on-access scanning on or off:
1. Check which anti-virus and HIPS policy is used by the group or groups of computers you want
to configure.
See Check which policies a group uses (page 30).
2. In the Policies pane, double-click Anti-virus and HIPS. Then double-click the policy you want
to change.
The Anti-Virus and HIPS policy dialog box is displayed.
3. In the On-access scanning panel, select or clear the Enable on-access scanning check box.
Important: If you turn off on-access scanning on a server, we recommend that you set up scheduled
scans on the relevant computers. For instructions on how to set up scheduled scans, see Scan
computers at set times (page 103)
96
Help
7.1.6.3 Change when on-access scanning occurs
If you use role-based administration:
■
You must have the Policy setting - anti-virus and HIPS right to perform this task.
■
You cannot edit a policy if it is applied outside your active sub-estate.
For more information, see About roles and sub-estates (page 17).
You can specify whether files are scanned when users open them, save them, or rename them.
To change when on-access scanning occurs:
1. Check which anti-virus and HIPS policy is used by the group(s) of computers you want to
configure.
See Check which policies a group uses (page 30).
2. In the Policies pane, double-click Anti-virus and HIPS.
3. Double-click the policy you want to change.
The Anti-Virus and HIPS policy dialog box is displayed.
4. In the On-access scanning panel, beside Enable on-access scanning, click the Configure
button.
5. On the Scanning tab, in the Check files on panel, set the options as described below.
When to scan
Option
Copy, move, or open file
On read
Start program
On read
Rename file
On rename
Save file
On write
7.1.6.4 Scan for suspicious files during on-access scanning
If you use role-based administration:
■
You must have the Policy setting - anti-virus and HIPS right to perform this task.
■
You cannot edit a policy if it is applied outside your active sub-estate.
For more information, see About roles and sub-estates (page 17).
Suspicious files display certain characteristics (for example, dynamic decompression code) that are
common to malware. However, these characteristics are not sufficiently strong for the file to be
identified as a new piece of malware.
97
Sophos Enterprise Console
Note: This option applies only to Sophos Endpoint Security and Control for Windows 2000 and
later.
1. Check which anti-virus and HIPS policy is used by the group(s) of computers you want to
configure.
See Check which policies a group uses (page 30).
2. In the Policies pane, double-click Anti-virus and HIPS.
3. Double-click the policy you want to change.
The Anti-Virus and HIPS policy dialog box is displayed.
4. In the On-access scanning panel, beside Enable on-access scanning, click the Configure
button.
5. On the Scanning tab, in the Scan for panel, select the Suspicious files check box.
When a suspicious file is detected, you can either remove or authorize the file. See Clean up
computers now (page 62) and Authorize suspicious items (page 102).
7.1.6.5 Exclude items from on-access scanning
If you use role-based administration:
■
You must have the Policy setting - anti-virus and HIPS right to perform this task.
■
You cannot edit a policy if it is applied outside your active sub-estate.
For more information, see About roles and sub-estates (page 17).
You can exclude items from on-access scanning.
Note:
These options apply only to Windows 2000 or later, Mac OS X, and Linux.
Enterprise Console 5.1 cannot perform on-access scans on UNIX computers.
1. Check which anti-virus and HIPS policy is used by the group(s) of computers you want to
configure.
See Check which policies a group uses (page 30).
2. In the Policies pane, double-click Anti-virus and HIPS. Then double-click the policy you want
to change.
The Anti-virus and HIPS Policy dialog box is displayed.
3. In the On-access scanning panel, click the Configure button.
4. Click the tab for Windows Exclusions, Mac Exclusions, or Linux/UNIX Exclusions. To add
items to the list, click Add and enter the full path in the Exclude Item dialog box.
The items you can exclude from scanning differ on each type of computer. See Items that can
be excluded from scanning (page 105).
98
Help
Important: If you select Exclude remote files on the Windows Exclusions tab, data control will
not scan files uploaded or attached from a network location using a monitored application, for
example, an email client, a web browser, or an instant messaging (IM) client. This is because data
control uses the same set of exclusions as the Sophos Anti-Virus on-access scanner, so if remote
file scanning is disabled, it will not send any remote files for a data control check. This restriction
does not apply to storage device monitoring.
You can export the list of Windows exclusions to a file and then import it into another policy. For
more information, see Import or export Windows scanning exclusions (page 110).
7.1.7 Behavior monitoring
7.1.7.1 About behavior monitoring
As part of on-access scanning, Sophos Behavior Monitoring protects Windows 2000 and later
computers from unidentified or "zero-day" threats and suspicious behavior.
Runtime detection can intercept threats that cannot be detected before execution. Behavior
monitoring uses the following runtime detection methods to intercept threats:
■
Malicious and suspicious behavior detection
■
Buffer overflow detection
Malicious and suspicious behavior detection
Suspicious behavior detection uses Sophos’s Host Intrusion Prevention System (HIPS) to
dynamically analyze the behavior of all programs running on the computer to detect and block
activity that appears to be malicious. Suspicious behavior may include changes to the registry that
could allow a virus to run automatically when the computer is restarted.
Suspicious behavior detection watches all system processes for signs of active malware, such as
suspicious writes to the registry or file copy actions. It can be set to warn the administrator and/or
block the process.
Malicious behavior detection dynamically analyses all programs running on the computer to detect
and block activity that is known to be malicious.
Buffer overflow detection
Buffer overflow detection is important for dealing with zero-day exploits.
It dynamically analyzes the behavior of programs running on the system in order to detect when
an attempt is made to exploit a running process using buffer overflow techniques. It will catch
attacks targeting security vulnerabilities in both operating system software and applications.
7.1.7.2 Enable behavior monitoring
If you use role-based administration:
■
You must have the Policy setting - anti-virus and HIPS right to perform this task.
99
Sophos Enterprise Console
■
You cannot edit a policy if it is applied outside your active sub-estate.
For more information, see About roles and sub-estates (page 17).
1. Check which anti-virus and HIPS policy is used by the group or groups of computers you want
to configure.
See Check which policies a group uses (page 30).
2. In the Policies pane, double-click Anti-virus and HIPS.
3. Double-click the policy you want to change.
The Anti-Virus and HIPS policy dialog box is displayed.
4. In the On-access scanning panel, select the Enable behavior monitoring check box.
7.1.7.3 Detect malicious behavior
If you use role-based administration:
■
You must have the Policy setting - anti-virus and HIPS right to perform this task.
■
You cannot edit a policy if it is applied outside your active sub-estate.
For more information, see About roles and sub-estates (page 17).
Malicious behavior detection is the dynamic analysis of all programs running on the computer to
detect and block activity that is known to be malicious.
To change the settings for detecting and reporting malicious behavior:
1. Check which anti-virus and HIPS policy is used by the group or groups of computers you want
to configure.
See Check which policies a group uses (page 30).
2. In the Policies pane, double-click Anti-virus and HIPS.
3. Double-click the policy you want to change.
The Anti-Virus and HIPS policy dialog box is displayed.
4. In the On-access scanning panel, select the Enable behavior monitoring check box.
5. Beside Enable behavior monitoring, click Configure
6. To alert the administrator and block malicious behavior, select the Detect malicious behavior
check box.
7.1.7.4 Detect suspicious behavior
If you use role-based administration:
■
You must have the Policy setting - anti-virus and HIPS right to perform this task.
■
You cannot edit a policy if it is applied outside your active sub-estate.
For more information, see About roles and sub-estates (page 17).
100
Help
Suspicious behavior detection watches all system processes for signs of active malware, such as
suspicious writes to the registry or file copy actions. It can be set to warn the administrator and/or
block the process.
To change the settings for detecting and reporting suspicious behavior:
1. Check which anti-virus and HIPS policy is used by the group or groups of computers you want
to configure.
See Check which policies a group uses (page 30).
2. In the Policies pane, double-click Anti-virus and HIPS.
3. Double-click the policy you want to change.
The Anti-Virus and HIPS policy dialog box is displayed.
4.
5.
6.
7.
In the On-access scanning panel, select the Enable behavior monitoring check box.
Beside Enable behavior monitoring, click Configure
Select the Detect malicious behavior check box.
To alert the administrator and block suspicious processes, select the Detect suspicious behavior
check box.
8. To alert the administrator, but not block suspicious processes, select the Alert only, do not
block suspicious behavior check box.
For the strongest protection, we advise you to enable suspicious file detection. See Scan for suspicious
files during on-access scanning (page 97) and Scan for suspicious files during a scheduled scan (page
104).
7.1.7.5 Detect buffer overflows
If you use role-based administration:
■
You must have the Policy setting - anti-virus and HIPS right to perform this task.
■
You cannot edit a policy if it is applied outside your active sub-estate.
For more information, see About roles and sub-estates (page 17).
Buffer overflow detection dynamically analyzes the behavior of programs running on the system
in order to detect when an attempt is made to exploit a running process using buffer overflow
techniques.
To change the settings for detecting and reporting buffer overflow attacks:
1. Check which anti-virus and HIPS policy is used by the group or groups of computers you want
to configure.
See Check which policies a group uses (page 30).
2. In the Policies pane, double-click Anti-virus and HIPS.
3. Double-click the policy you want to change.
The Anti-Virus and HIPS policy dialog box is displayed.
101
Sophos Enterprise Console
4. In the On-access scanning panel, select the Enable behavior monitoring check box.
5. Beside Enable behavior monitoring, click Configure.
■
To alert the administrator and block buffer overflows, select the Detect buffer overflows
check box and clear the Alert only, do not block check box.
■ To alert the administrator, but not block buffer overflows, select both the Detect buffer
overflows check box and the Alert only, do not block check box.
7.1.7.6 Authorize suspicious items
If you use role-based administration:
■
You must have the Policy setting - anti-virus and HIPS right to perform this task.
■
You cannot edit a policy if it is applied outside your active sub-estate.
For more information, see About roles and sub-estates (page 17).
If you have enabled one or more HIPS options (for example, suspicious behavior detection, buffer
overflow detection, or suspicious file detection), but you want to use some of the items detected,
you can authorize them as follows:
1. Check which anti-virus and HIPS policy is used by the group or groups of computers you want
to configure.
See Check which policies a group uses (page 30).
2. In the Policies pane, double-click Anti-virus and HIPS.
3. Double-click the policy you want to change.
The Anti-Virus and HIPS policy dialog box is displayed.
4. Click Authorization.
The Authorization Manager dialog box is displayed.
5. Click the tab for the type of behavior that has been detected, for example, “Buffer overflow.”
■
To authorize a program that has been detected, find the program in the Known list and
move it from the Known list to the Authorized list.
■ To allow an item that Sophos Endpoint Security and Control has not yet classified as
suspicious, click New entry. Browse to the item and select it to add it to the Authorized
list.
If you want to remove an item from the list, select the item and click Delete entry. If you have
authorized the item, removing it from the list effectively blocks it again, so use this option only if
you are sure that it does not need to be authorized. This option does not delete the item from disk.
102
Help
7.1.8 Scheduled scanning
7.1.8.1 Scan computers at set times
If you use role-based administration:
■
You must have the Policy setting - anti-virus and HIPS right to perform this task.
■
You cannot edit a policy if it is applied outside your active sub-estate.
For more information, see About roles and sub-estates (page 17).
You can have computers scanned at set times.
Note: On Mac computers, scheduled scans are supported only by Sophos Anti-Virus version 8.0
or later.
1. Check which anti-virus and HIPS policy is used by the group(s) of computers you want to
configure.
See Check which policies a group uses (page 30).
2. In the Policies pane, double-click Anti-virus and HIPS. Then double-click the policy you want
to change.
3. In the Anti-virus and HIPS policy dialog box, in the Scheduled scanning panel, click Add.
4. In the Scheduled scan settings dialog box, enter a name for the scanning job. Select the items
to scan (by default, all local hard disks or mounted filesystems are scanned). Select the days
and times at which you want the scan to run.
5. If you want to change other scanning options or configure this scan to clean up computers,
click Configure at the bottom of the dialog box.
For instructions on how to change the options for a scheduled scan, see Change scheduled scan
settings (page 103).
Note: If the scan detects components of a threat in memory, and you have not set up automatic
cleanup for the scan, the scan stops and an alert is sent to Enterprise Console. This is because
further scanning could enable the threat to spread. You must clean up the threat before running
the scan again.
7.1.8.2 Change scheduled scan settings
If you use role-based administration:
■
You must have the Policy setting - anti-virus and HIPS right to perform this task.
■
You cannot edit a policy if it is applied outside your active sub-estate.
For more information, see About roles and sub-estates (page 17).
103
Sophos Enterprise Console
To change the settings for scheduled scanning:
1. Check which anti-virus and HIPS policy is used by the group(s) of computers you want to
configure.
See Check which policies a group uses (page 30).
2. In the Policies pane, double-click Anti-virus and HIPS. Then double-click the policy you want
to change.
3. In the Anti-virus and HIPS policy dialog box, in the Scheduled scanning panel, change settings
as appropriate.
You can change two different kinds of setting:
■
To change the types of files scanned by all scheduled scans, click Extensions and Exclusions.
■
To change settings specific to each scan (what is scanned, times, scanning options, cleanup),
highlight the scan and click Edit. Then in the Scheduled scan settings dialog box, click
Configure.
Note: For full details of how to use scanning options, see Scan for suspicious files during on-access
scanning (page 97), Scan for adware and PUAs (page 92), and Scan inside archive files (page
107). For details of how to use cleanup options, see Automatic cleanup settings for scheduled
scanning (page 65).
7.1.8.3 Scan for suspicious files during a scheduled scan
If you use role-based administration:
■
You must have the Policy setting - anti-virus and HIPS right to perform this task.
■
You cannot edit a policy if it is applied outside your active sub-estate.
For more information, see About roles and sub-estates (page 17).
Suspicious files display certain characteristics (for example, dynamic decompression code) that are
common to malware. However, these characteristics are not sufficiently strong for the file to be
identified as a new piece of malware.
Note: This option applies only to Sophos Endpoint Security and Control for Windows 2000 and
later.
1. Check which anti-virus and HIPS policy is used by the group(s) of computers you want to
configure.
See Check which policies a group uses (page 30).
2. In the Policies pane, double-click Anti-virus and HIPS.
3. Double-click the policy you want to change.
The Anti-Virus and HIPS policy dialog box is displayed.
4. In the Scheduled scanning panel, select an existing scan and click Edit.
104
Help
5. Beside Change scanning and cleanup settings, click Configure.
The Scanning and cleanup settings dialog box is displayed.
6. On the Scanning tab, in the Scan files for panel, select the Suspicious files check box.
When a suspicious file is detected, you can either remove or authorize the file. See Clean up
computers now (page 62) and Authorize suspicious items (page 102).
7.1.8.4 Exclude items from scheduled scanning
If you use role-based administration:
■
You must have the Policy setting - anti-virus and HIPS right to perform this task.
■
You cannot edit a policy if it is applied outside your active sub-estate.
For more information, see About roles and sub-estates (page 17).
You can exclude items from scheduled scanning.
Note:
The “excluded items” settings for scheduled scans also apply to full system scans run from the
console and "scan my computer" scans run on networked computers. See Scan computers now
(page 61).
1. Check which anti-virus and HIPS policy is used by the group(s) of computers you want to
configure.
See Check which policies a group uses (page 30).
2. In the Policies pane, double-click Anti-virus and HIPS. Then double-click the policy you want
to change.
3. The Anti-virus and HIPS policy dialog box is displayed. In the Scheduled scanning panel,
click Extensions and Exclusions.
4. Click the Windows Exclusions, Linux/UNIX Exclusions, or Mac Exclusions tab. To add items
to the list, click Add and enter the full path in the Exclude item dialog box.
The items you can exclude from scanning differ on each type of computer. See Items that can
be excluded from scanning (page 105).
You can export the list of Windows exclusions to a file and then import it into another policy. For
more information, see Import or export Windows scanning exclusions (page 110).
7.1.9 Scanning options
7.1.9.1 Items that can be excluded from scanning
On each type of computer, there are different limitations on the items that you can exclude from
scanning.
105
Sophos Enterprise Console
Windows
On Windows 2000 and later, you can exclude drives, folders and files.
You can use the wildcards * and ?
The wildcard ? can be used only in a filename or extension. It generally matches any single character.
However, when used at the end of a filename or extension, it matches any single character or no
characters. For example file??.txt matches file.txt, file1.txt and file12.txt but not file123.txt.
The wildcard * can be used only in a filename or extension, in the form [filename].* or
*.[extension]. For example, file*.txt, file.txt* and file.*txt are invalid.
For further details, see the section “Using Sophos Anti-Virus” in Help for the endpoint software,
Sophos Endpoint Security and Control.
Mac OS X
On Mac OS X, you can exclude files, folders, and volumes.
You can specify which items are excluded by prefixing or suffixing the exclusion with a slash or
suffixing the exclusion with a double slash.
For further details, see the Sophos Anti-Virus for Mac OS X Help.
Linux or UNIX
On Linux and UNIX, you can exclude directories and files by specifying a path (with or without
wildcards).
Note: Enterprise Console supports only path-based Linux and UNIX exclusions. You can also set
up other types of exclusion directly on the managed computers. Then you can use regular
expressions, exclude file types and filesystems. For instructions, see the Sophos Anti-Virus for Linux
user manual or the Sophos Anti-Virus for UNIX user manual.
If you set up another path-based exclusion on a managed Linux or UNIX computer, this computer
will be reported to the console as differing from the group policy.
7.1.9.2 Change types of file scanned
If you use role-based administration:
■
You must have the Policy setting - anti-virus and HIPS right to perform this task.
■
You cannot edit a policy if it is applied outside your active sub-estate.
For more information, see About roles and sub-estates (page 17).
By default, Sophos Endpoint Security and Control scans file types that are vulnerable to viruses.
You can scan additional file types or choose to exempt some file types from scanning.
The file types scanned by default differ between operating systems and change as the product is
updated. To see a list of the file types, go to a computer with the relevant operating system, open
the Sophos Endpoint Security and Control or Sophos Anti-Virus window and look for the
“Extensions” configuration page.
106
Help
Note:
These options apply to Windows computers only.
You can make changes on Mac OS X computers with the Sophos Update Manager, a utility supplied
with Sophos Anti-Virus for Mac OS X. To open Sophos Update Manager, on a Mac OS X computer,
in a Finder window, browse to the Sophos Anti-Virus:ESOSX folder. Double-click Sophos Update
Manager. For further details, see Sophos Update Manager Help.
You can make changes on Linux computers using the savconfig and savscan commands as described
in the Sophos Anti-Virus for Linux user manual.
You can make changes on UNIX computers using the savscan command as described in the Sophos
Anti-Virus for UNIX user manual.
To change types of files scanned:
1. Check which anti-virus and HIPS policy is used by the group(s) of computers you want to
configure.
See Check which policies a group uses (page 30).
2. In the Policies pane, double-click Anti-virus and HIPS. Then double-click the policy you want
to change.
3. In the Anti-virus and HIPS Policy dialog box, set the options as follows:
■
To configure on-access scanning, in the On-access scanning panel, make sure the Enable
on-access scanning check box is selected. Click the Configure button next to the check
box.
■ To configure scheduled scans, in the Scheduled scanning panel, click Extensions and
Exclusions.
4. On the Extensions tab, select Scan executable and infectable files.
■
To scan additional file types, click Add and type the file extension, for example, PDF, in the
Extension field.
■ To exempt some of the file types that are usually scanned by default, click Exclude. This
opens the Exclude extensions dialog box. Enter the file extension.
By default, files with no extension are scanned.
Note: You can also select to scan all files, although this will affect computer performance.
7.1.9.3 Scan inside archive files
If you use role-based administration:
■
You must have the Policy setting - anti-virus and HIPS right to perform this task.
■
You cannot edit a policy if it is applied outside your active sub-estate.
For more information, see About roles and sub-estates (page 17).
107
Sophos Enterprise Console
Note: Scanning inside archive files makes scanning significantly slower and is generally not
required. Even if you do not select the option, when you attempt to access a file extracted from
the archive file, the extracted file is scanned. Sophos therefore does not recommend selecting this
option.
1. Check which anti-virus and HIPS policy is used by the group(s) of computers you want to
configure.
See Check which policies a group uses (page 30).
2. In the Policies pane, double-click Anti-virus and HIPS. Then double-click the policy you want
to change.
3. In the Anti-virus and HIPS policy dialog box, in the Scheduled scanning panel, click Add (or
select an existing scan and click Edit).
4. In the Scheduled scan settings dialog box, enter your settings and then click Configure (at
the bottom of the page).
5. In the Scanning and cleanup settings dialog box, on the Scanning tab, under Other scanning
options, select Scan inside archive files. Click OK.
7.1.9.4 Scan for rootkits
If you use role-based administration:
■
You must have the Policy setting - anti-virus and HIPS right to perform this task.
■
You cannot edit a policy if it is applied outside your active sub-estate.
For more information, see About roles and sub-estates (page 17).
Scanning for rootkits is always performed when you run a full system scan of a computer (see
Scan computers now (page 61)). However, if you want to change the setting for a scheduled scan,
do as follows.
Note: This option applies only to Sophos Endpoint Security and Control for Windows 2000 and
later.
1. Check which anti-virus and HIPS policy is used by the group(s) of computers you want to
configure. See Check which policies a group uses (page 30).
2. In the Policies pane, double-click Anti-virus and HIPS. Then double-click the policy you want
to change.
3. In the Anti-virus and HIPS policy dialog box, in the Scheduled scanning panel, click Add (or
select an existing scan and click Edit).
4. In the Scheduled scan settings dialog box, enter your settings and then click Configure.
5. In the Scanning and cleanup settings dialog box, on the Scanning tab, under Scan files for,
select the Rootkits check box. Click OK.
7.1.9.5 Scan system memory
If you use role-based administration:
■
108
You must have the Policy setting - anti-virus and HIPS right to perform this task.
Help
■
You cannot edit a policy if it is applied outside your active sub-estate.
For more information, see About roles and sub-estates (page 17).
You can enable Endpoint Security and Control for Windows to scan system memory for threats.
System memory is the memory that is used by the operating system. Endpoint Security and Control
can scan system memory periodically in the background while on-access scanning is enabled and
as part of a scheduled scan.
To scan system memory:
1. Check which anti-virus and HIPS policy is used by the group or groups of computers you want
to configure.
See Check which policies a group uses (page 30).
2. In the Policies pane, double-click Anti-virus and HIPS. Then double-click the policy you want
to change.
3. In the Anti-virus and HIPS Policy dialog box, set the options as follows:
■
On-access scanning
To configure on-access scanning, in the On-access scanning panel, make sure the Enable
on-access scanning check box is selected. Click the Configure button next to the check
box.
On the Scanning tab, in the Other scanning options panel, select the Scan system memory
check box.
■ Scheduled scanning
To configure scheduled scans, in the Scheduled scanning panel, click Add (or select an
existing scan and click Edit).
In the Scheduled scan settings dialog box, enter your settings and then click Configure.
In the Scanning and cleanup settings dialog box, on the Scanning tab, in the Other scanning
options panel, select the Scan system memory check box.
Note: If you have set up automatic cleanup of viruses that are detected by on-access scanning,
the cleanup of some viruses causes a full system scan to be run, which tries to clean up all the
viruses on the computer. This might take a long time.
7.1.9.6 Run scan at lower priority
If you use role-based administration:
■
You must have the Policy setting - anti-virus and HIPS right to perform this task.
■
You cannot edit a policy if it is applied outside your active sub-estate.
For more information, see About roles and sub-estates (page 17).
You can configure a custom scan to run at a lower priority so that it has minimal impact on user
applications.
109
Sophos Enterprise Console
Note: This option applies only to Sophos Endpoint Security and Control for Windows Vista and
later.
1. Check which anti-virus and HIPS policy is used by the group(s) of computers you want to
configure. See Check which policies a group uses (page 30).
2. In the Policies pane, double-click Anti-virus and HIPS. Then double-click the policy you want
to change.
3. In the Anti-virus and HIPS policy dialog box, in the Scheduled scanning panel, click Add (or
select an existing scan and click Edit).
4. In the Scheduled scan settings dialog box, enter your settings and then click Configure.
5. In the Scanning and cleanup settings dialog box, on the Scanning tab, under Other scanning
options, select the Run scan at lower priority check box. Click OK.
7.1.9.7 Import or export Windows scanning exclusions
If you use role-based administration:
■
You must have the Policy setting - anti-virus and HIPS right to perform this task.
■
You cannot edit a policy if it is applied outside your active sub-estate.
For more information, see About roles and sub-estates (page 17).
You can export the list of Windows exclusions for on-access or scheduled scanning to a file and
then import it into another policy.
1. Check which anti-virus and HIPS policy is used by the group(s) of computers you want to
configure.
See Check which policies a group uses (page 30).
2. In the Policies pane, double-click Anti-virus and HIPS. Then double-click the policy you want
to change.
3. In the Anti-virus and HIPS Policy dialog box, do as follows:
■
To import or export on-access scanning exclusions, make sure the Enable on-access scanning
check box is selected and click the Configure button next to the check box.
■ To import or export scheduled scanning exclusions, in the Scheduled scanning panel, click
Extensions and Exclusions.
4. On the Windows Exclusions tab, click Export or Import.
110
Help
7.2 Configuring the firewall policy
7.2.1 Basic firewall configuration
7.2.1.1 Set up a basic firewall policy
By default, the firewall is enabled and blocks all non-essential traffic. Therefore, you should
configure it to allow the applications you want to use, and test it before installing it on all computers.
See the Sophos Enterprise Console policy setup guide for detailed advice.
For more information about the default firewall settings, see Sophos support knowledgebase article
57756 (http://www.sophos.com/support/knowledgebase/article/57756.html).
For information about preventing network bridging, see About device control (page 163).
Important: When you apply a new or updated policy to computers, applications that were allowed
before may be blocked briefly until the new policy is fully applied. You should notify your users
about this before you apply new policies.
Note: If you use role-based administration:
■
You must have the Policy setting - firewall right to configure a firewall policy.
■
You cannot edit a policy if it is applied outside your active sub-estate.
For more information about role-based administration, see About roles and sub-estates (page 17).
To set up a basic firewall policy:
1. In the Policies pane, double-click Firewall.
2. Double-click the Default policy to edit it.
The Firewall Policy wizard appears. Follow the instructions on the screen. There is additional
information on some of the options below.
3. On the Configure firewall page, select the type of location:
■
Select Single location for computers that are always on the network, for example, desktops.
■ Select Dual location if you want the firewall to use different settings according to the location
where computers are used, for example, in the office (on the network) and out of office (off
the network). You may want to set up dual location for laptops.
111
Sophos Enterprise Console
4. On the Operational mode page, select how the firewall will handle inbound and outbound
traffic:
Mode
Description
Block inbound and
outbound traffic
■ Default level. Offers the highest security.
■ Only allows essential traffic through the firewall and authenticates the
identity of applications using checksums.
■ To allow applications commonly used in your organization to
communicate through the firewall, click Trust. For more information,
see About trusting applications (page 118).
Block inbound and
allow outbound
traffic
■ Offers a lower security level than Block inbound and outbound traffic.
■ Allows your computers to access the network and internet without you
having to create special rules.
■ All applications are allowed to communicate through the firewall.
Monitor
■ Applies to network traffic the rules that you have set up. If traffic has no
matching rule, it is reported to the console, and only allowed if it is
outbound.
■ Enables you to collect information about your network, and to then
create suitable rules before deploying the firewall to your computers. For
more information, see About using monitor mode (page 112).
5. On the File and printer sharing page, select Allow file and printer sharing if you want to allow
computers to share local printers and folders on the network.
After you have set up the firewall, you can view firewall events (for example, applications blocked
by the firewall) in the Firewall - Event Viewer. For details, see View firewall events (page 204).
The number of computers with events over a specified threshold within the last seven days is also
displayed on the Dashboard.
7.2.1.2 About using monitor mode
You can enable monitor mode on test computers and use the Firewall Event Viewer to view which
traffic, applications, and processes are being used.
You can then use the Event Viewer to create rules that allow or block reported traffic, applications,
and processes, as described in Create a firewall event rule (page 115).
Note: When you create a rule using the Firewall Event Viewer and add it to the firewall policy,
the firewall mode changes from Monitor to Custom.
If you do not want to allow unknown traffic by default, you can use interactive mode.
112
Help
In interactive mode, the firewall prompts the user to allow or block any applications and traffic
for which it does not have a rule. For details, see About interactive mode (page 117) and the other
topics in the "Working in interactive mode" section.
7.2.1.3 Add and trust an application
Note: If you use role-based administration:
■
You must have the Policy setting - firewall right to configure a firewall policy.
■
You cannot edit a policy if it is applied outside your active sub-estate.
For more information, see About roles and sub-estates (page 17).
Trusted applications are allowed full and unconditional network access, including access to the
internet.
To add an application to the firewall policy and trust it:
1. Check which firewall policy is used by the group(s) of computers you want to configure.
See Check which policies a group uses (page 30).
2. In the Policies pane, double-click Firewall, and then double-click the policy you want to
change.
3. On the Operational mode page of the Firewall Policy wizard, click Trust.
The Firewall Policy dialog box appears.
4. Click Add.
The Firewall policy - Add trusted application dialog box appears.
5. In the Search period field, click the drop-down arrow and select the period for which you want
to display application events.
You can either select a fixed period, for example, Within 24 hours, or select Custom and specify
your own time period by selecting the starting and ending dates and times.
6. If you want to view application events of a certain type, in the Event type field, click the
drop-down arrow and select the event type.
7. If you want to view application events for a certain file, in the File name field, enter the file
name.
If you leave this field empty, application events for all files will be displayed.
You can use wildcards in this field. Use ? for any single character and * for any string of
characters.
8. Click Search to display a list of application events.
9. Select an application event, and then click OK.
The application is added to the firewall policy and marked as Trusted.
113
Sophos Enterprise Console
7.2.1.4 Allow all traffic on a LAN
Note: If you use role-based administration:
■
You must have the Policy setting - firewall right to configure a firewall policy.
■
You cannot edit a policy if it is applied outside your active sub-estate.
For more information, see About roles and sub-estates (page 17).
To allow all traffic between computers on a LAN (Local Area Network):
1. Check which firewall policy is used by the group(s) of computers you want to configure.
See Check which policies a group uses (page 30).
2. In the Policies pane, double-click Firewall, and then double-click the policy you want to
change.
3. On the File and printer sharing page of the Firewall Policy wizard, select Use custom settings,
and then click Custom.
4. In the LAN settings list, select the Trusted check box for a network.
Notes
■
If you allow all traffic between the computers on a LAN, you also allow file and printer sharing
on it.
7.2.1.5 Allow file and printer sharing
Note: If you use role-based administration:
■
You must have the Policy setting - firewall right to configure a firewall policy.
■
You cannot edit a policy if it is applied outside your active sub-estate.
For more information, see About roles and sub-estates (page 17).
To allow computers to share local printers and folders on the network:
1. Check which firewall policy is used by the group(s) of computers you want to configure.
See Check which policies a group uses (page 30).
2. In the Policies pane, double-click Firewall, and then double-click the policy you want to
change.
3. On the File and printer sharing page of the Firewall Policy wizard, select Allow file and printer
sharing.
7.2.1.6 Allow flexible control of file and printer sharing
Note: If you use role-based administration:
114
■
You must have the Policy setting - firewall right to configure a firewall policy.
■
You cannot edit a policy if it is applied outside your active sub-estate.
Help
For more information, see About roles and sub-estates (page 17).
If you want more flexible control of file and printer sharing on your networks (for example,
uni-directional NetBIOS traffic), you can do the following:
1. Allow file and printer sharing on other LANs (Local Area Networks) than those in the LAN
settings list. This allows NetBIOS traffic on those LANs to be processed by the firewall rules.
2. Create high-priority global rules which allow communication to/from hosts with the appropriate
NetBIOS ports and protocols. We recommend that you create global rules to explicitly block
all unwanted file and printer sharing traffic rather than let it be handled by the default rule.
To allow file and printer sharing on other LANs than those in the LAN settings list:
1. Check which firewall policy is used by the group(s) of computers you want to configure.
See Check which policies a group uses (page 30).
2. In the Policies pane, double-click Firewall, and then double-click the policy you want to
change.
3. On the File and printer sharing page of the Firewall Policy wizard, select Use custom settings,
and then click Custom.
4. Clear the Block file and printer sharing for other networks check box.
7.2.1.7 Block unwanted file and printer sharing
Note: If you use role-based administration:
■
You must have the Policy setting - firewall right to configure a firewall policy.
■
You cannot edit a policy if it is applied outside your active sub-estate.
For more information, see About roles and sub-estates (page 17).
To block file and printer sharing on LANs other than those specified in the LAN settings list on
the LAN tab:
1. Check which firewall policy is used by the group(s) of computers you want to configure.
See Check which policies a group uses (page 30).
2. In the Policies pane, double-click Firewall, and then double-click the policy you want to
change.
3. On the File and printer sharing page of the Firewall Policy wizard, select Use custom settings,
and then click Custom.
4. Select the Block file and printer sharing for other networks check box.
7.2.1.8 Create a firewall event rule
Note: If you use role-based administration:
■
You must have the Policy setting - firewall right to configure a firewall policy.
■
You cannot edit a policy if it is applied outside your active sub-estate.
115
Sophos Enterprise Console
For more information, see About roles and sub-estates (page 17).
You can create rules for all firewall events except the “modified memory” events.
To create a firewall event rule:
1. On the Events menu, click Firewall Events.
2. In the Firewall - Event Viewer dialog box, select an event for the application you want to create
a rule for and click Create Rule.
3. In the dialog box that appears, select an option that you want to apply to the application.
4. Select which location you want to apply the rule to (primary, secondary, or both). If you select
to apply the rule to the secondary location or both locations, the rule will be added only to
policies which have a secondary location configured. Click OK.
Note: The “new application” and “modified application” events are location independent
(they add checksums which are shared between both locations). You cannot select a location
for these events.
5. From the list of firewall policies, select a policy or policies which you want to apply the rule to.
Click OK.
Note: You cannot add a rule to a policy that is applied outside your active sub-estate.
Note: If you want to create an application rule directly from a firewall policy, using the advanced
firewall policy configuration pages, see Create an application rule from a firewall policy (page 134).
7.2.1.9 Temporarily disable the firewall
Note: If you use role-based administration:
■
You must have the Policy setting - firewall right to configure a firewall policy.
■
You cannot edit a policy if it is applied outside your active sub-estate.
For more information, see About roles and sub-estates (page 17).
By default, the firewall is enabled. Occasionally, you may need to temporarily disable the firewall
for maintenance or troubleshooting, and then re-enable it.
To turn the firewall off for a group of computers:
1. Check which firewall policy is used by the group(s) of computers you want to configure.
See Check which policies a group uses (page 30).
2. In the Policies pane, double-click Firewall. Then double-click the policy you want to change.
The Firewall Policy wizard appears.
116
Help
3. On the welcome page of the wizard, do one of the following:
■
If you want to turn the firewall off for all locations you have set up (primary location and
secondary location, if you configured one), click Next. On the Configure firewall page,
select Allow all traffic (the firewall is turned off). Complete the wizard.
■ If you want to turn the firewall off for one of the locations (primary or secondary), click
the Advanced firewall policy button. In the Firewall Policy dialog box that appears, select
Allow all traffic next to Primary location or Secondary location. Click OK. Complete the
Firewall Policy wizard.
If you disable the firewall, your computers are unprotected until you re-enable it. To enable the
firewall, clear the Allow all traffic check box.
7.2.2 Advanced firewall configuration
7.2.2.1 Open the advanced configuration pages
Note: If you use role-based administration:
■
You must have the Policy setting - firewall right to configure a firewall policy.
■
You cannot edit a policy if it is applied outside your active sub-estate.
For more information, see About roles and sub-estates (page 17).
If you want to have greater control over the firewall settings and the ability to fine-tune them, you
can use the advanced firewall policy configuration pages to configure the firewall.
To open the advanced firewall configuration pages:
1. Double-click the firewall policy you want to change.
2. On the Welcome page of the Firewall Policy wizard, click Advanced firewall policy.
3. Under Configurations, click Configure next to the location for which you want to configure
the firewall.
7.2.2.2 Working in interactive mode
7.2.2.2.1 About interactive mode
In interactive mode, the firewall displays a learning dialog on the endpoint computer each time
an unknown application or service requests network access. The learning dialog asks the user
whether to allow or block the traffic, or whether to create a rule for that type of traffic.
7.2.2.2.2 Enable interactive mode
Note: If you use role-based administration:
■
You must have the Policy setting - firewall right to configure a firewall policy.
■
You cannot edit a policy if it is applied outside your active sub-estate.
117
Sophos Enterprise Console
For more information, see About roles and sub-estates (page 17).
The firewall can work in interactive mode, asking the user how to deal with detected traffic. For
more information, see About interactive mode (page 117).
To put the firewall in interactive mode on a group of computers:
1. Check which firewall policy is used by the group(s) of computers you want to configure.
See Check which policies a group uses (page 30).
2. In the Policies pane, double-click Firewall, and then double-click the policy you want to
change.
3. On the Welcome page of the Firewall Policy wizard, click Advanced firewall policy.
4. Under Configurations, click Configure next to the location that you want to configure.
5. On the General tab, under Working mode, click Interactive.
7.2.2.2.3 Change to a non-interactive mode
Note: If you use role-based administration:
■
You must have the Policy setting - firewall right to configure a firewall policy.
■
You cannot edit a policy if it is applied outside your active sub-estate.
For more information, see About roles and sub-estates (page 17).
There are two non-interactive modes:
■
Allow by default
■
Block by default
In the non-interactive modes, the firewall deals with network traffic automatically using your
rules. Network traffic which has no matching rule is either all allowed (if it is outbound) or all
blocked.
To change to a non-interactive mode on a group of computers:
1. In the Policies pane, double-click Firewall, and then double-click the policy you want to
change.
2. On the Welcome page of the Firewall Policy wizard, click Advanced firewall policy.
3. Under Configurations, click Configure next to the location that you want to configure.
4. Click the General tab.
5. Under Working mode, click Allow by default or Block by default.
7.2.2.3 Configuring the firewall
7.2.2.3.1 About trusting applications
To help provide security for your computers, the firewall blocks traffic from unrecognised
applications on your computers. However, applications commonly used in your organization may
be blocked, thus preventing users from performing their everyday tasks.
118
Help
You can trust these applications, so that they can communicate through the firewall. Trusted
applications are allowed full and unconditional access to the network and the internet.
Note: For greater security, you can apply one or more application rules to specify the conditions
under which the application can run. For information on how to do this, see Create an application
rule (page 133) and other topics in the section Application rules.
7.2.2.3.2 Add an application to a firewall policy
Note: If you use role-based administration:
■
You must have the Policy setting - firewall right to configure a firewall policy.
■
You cannot edit a policy if it is applied outside your active sub-estate.
For more information, see About roles and sub-estates (page 17).
To add an application to a firewall policy:
1. Check which firewall policy is used by the group(s) of computers you want to configure.
See Check which policies a group uses (page 30).
2. In the Policies pane, double-click Firewall, and then double-click the policy you want to
change.
3. On the Welcome page of the Firewall Policy wizard, click Advanced firewall policy.
4. Under Configurations, click Configure next to the location that you want to configure.
5. Click the Applications tab.
6. Click Add.
The Firewall Policy - Add application dialog box appears.
7. In the Search period field, click the drop-down arrow and select the period for which you want
to display application events.
You can either select a fixed period, for example, Within 24 hours, or select Custom and specify
your own time period by selecting the starting and ending dates and times.
8. If you want to view application events of a certain type, in the Event type field, click the
drop-down arrow and select the event type.
9. If you want to view application events for a certain file, in the File name field, enter the file
name.
If you leave this field empty, application events for all files will be displayed.
You can use wildcards in this field. Use ? for any single character and * for any string of
characters.
10. Click Search to display a list of application events.
11. Select an application event, and then click OK.
■
The application is added to the firewall policy and marked as Trusted.
■
The application's checksum is added to the list of allowed checksums.
119
Sophos Enterprise Console
7.2.2.3.3 Remove an application from a firewall policy
Note: If you use role-based administration:
■
You must have the Policy setting - firewall right to configure a firewall policy.
■
You cannot edit a policy if it is applied outside your active sub-estate.
For more information, see About roles and sub-estates (page 17).
To remove an application from a firewall policy:
1. Check which firewall policy is used by the group(s) of computers you want to configure.
See Check which policies a group uses (page 30).
2. In the Policies pane, double-click Firewall, and then double-click the policy you want to
change.
3. On the Welcome page of the Firewall Policy wizard, click Advanced firewall policy.
4. Under Configurations, click Configure next to the location that you want to configure.
5. Click the Applications tab.
6. Select the application in the list, and then click Remove.
7.2.2.3.4 Trust an application
Note: If you use role-based administration:
■
You must have the Policy setting - firewall right to configure a firewall policy.
■
You cannot edit a policy if it is applied outside your active sub-estate.
For more information, see About roles and sub-estates (page 17).
To trust an application on a group of computers:
1. Check which firewall policy is used by the group(s) of computers you want to configure.
See Check which policies a group uses (page 30).
2. In the Policies pane, double-click Firewall, and then double-click the policy you want to
change.
3. On the Welcome page of the Firewall Policy wizard, click Advanced firewall policy.
4. Under Configurations, click Configure next to the location that you want to configure.
5. Click the Applications tab.
If the application is not in the list, follow the instructions in Add an application to a firewall
policy (page 119) to add it.
6. Select the application in the list, and then click Trust.
120
■
The application is added to the firewall policy and marked as Trusted.
■
The application's checksum is added to the list of allowed checksums.
Help
Trusted applications are allowed full and unconditional network access, including access to the
internet. For greater security, you can apply one or more application rules to specify the conditions
under which the application can run.
■
Create an application rule (page 133)
■
Apply preset application rules (page 135)
7.2.2.3.5 Trust an application using the Firewall Event Viewer
Note: If you use role-based administration:
■
You must have the Policy setting - firewall right to configure a firewall policy.
■
You cannot edit a policy if it is applied outside your active sub-estate.
For more information, see About roles and sub-estates (page 17).
If the firewall reports an unknown application or blocks an application on your networked
computers, an event is displayed in the Firewall Event Viewer. This topic describes how to trust
an application from the Firewall Event Viewer and apply the new rule to your chosen firewall
policies.
To find details of reported or blocked applications in the Firewall Event Viewer, and trust them
or create new rules for them:
1. On the Events menu, click Firewall Events.
2. In the Firewall - Event Viewer dialog box, select the entry for the application you want to trust
or create a rule for, and then click Create Rule.
3. In the dialog box that appears, select whether to trust the application or create a rule for it
using an existing preset.
4. From the list of firewall policies, select the firewall policies to which you want to apply the rule.
To apply the rule to all policies, click Select All and then click OK.
■
If you are using checksums, you may have to add the application's checksum to the list of
allowed checksums. See Add an application checksum (page 124).
■
You can also add an application as trusted directly in a firewall policy, using the advanced
firewall policy configuration pages. See Create an application rule from a firewall policy (page
134).
7.2.2.3.6 Block an application
Note: If you use role-based administration:
■
You must have the Policy setting - firewall right to configure a firewall policy.
■
You cannot edit a policy if it is applied outside your active sub-estate.
For more information, see About roles and sub-estates (page 17).
121
Sophos Enterprise Console
To block an application on a group of computers:
1. Check which firewall policy is used by the group(s) of computers you want to configure.
See Check which policies a group uses (page 30).
2. In the Policies pane, double-click Firewall, and then double-click the policy you want to
change.
3. On the Welcome page of the Firewall Policy wizard, click Advanced firewall policy.
4. Under Configurations, click Configure next to the location that you want to configure.
5. Click the Applications tab.
If the application is not in the list, follow the instructions in Add an application to a firewall
policy (page 119) to add it.
6. Select the application in the list, and then click Block.
7.2.2.3.7 Allow applications to launch hidden processes
Note: If you use role-based administration:
■
You must have the Policy setting - firewall right to configure a firewall policy.
■
You cannot edit a policy if it is applied outside your active sub-estate.
For more information, see About roles and sub-estates (page 17).
An application sometimes launches another hidden process to perform some network access for
it.
Malicious applications can use this technique to evade firewalls: they launch a trusted application
to access the network rather than doing so themselves.
To allow applications to launch hidden processes:
1. Double-click the firewall policy you want to change.
2. On the Welcome page of the Firewall Policy wizard, click Advanced firewall policy.
3. Under Configurations, click Configure next to the location for which you want to configure
the firewall.
4. Click the Processes tab.
5. In the upper area, click Add.
The Firewall Policy - Add application dialog box appears.
6. In the Search period field, click the drop-down arrow and select the period for which you want
to display application events.
You can either select a fixed period, for example, Within 24 hours, or select Custom and specify
your own time period by selecting the starting and ending dates and times.
7. If you want to view application events of a certain type, in the Event type field, click the
drop-down arrow and select the event type.
122
Help
8. If you want to view application events for a certain file, in the File name field, enter the file
name.
If you leave this field empty, application events for all files will be displayed.
You can use wildcards in this field. Use ? for any single character and * for any string of
characters.
9. Click Search to display a list of application events.
10. Select an application event, and then click OK.
If you enable interactive mode, the firewall can display a learning dialog on the endpoint computer
when it detects a new launcher. For details, see Enable interactive mode (page 117).
7.2.2.3.8 Allow applications to use rawsockets
Note: If you use role-based administration:
■
You must have the Policy setting - firewall right to configure a firewall policy.
■
You cannot edit a policy if it is applied outside your active sub-estate.
For more information, see About roles and sub-estates (page 17).
Some applications can access a network through rawsockets, which gives them control over all
aspects of the data they send over the network.
Malicious applications can exploit rawsockets by faking their IP address or send deliberately
corrupt messages.
To allow applications to access the network through rawsockets:
1. Double-click the firewall policy you want to change.
2. On the Welcome page of the Firewall Policy wizard, click Advanced firewall policy.
3. Under Configurations, click Configure next to the location for which you want to configure
the firewall.
4. Click the Processes tab.
5. In the lower area, click Add.
The Firewall Policy - Add application dialog box appears.
6. In the Search period field, click the drop-down arrow and select the period for which you want
to display application events.
You can either select a fixed period, for example, Within 24 hours, or select Custom and specify
your own time period by selecting the starting and ending dates and times.
7. If you want to view application events of a certain type, in the Event type field, click the
drop-down arrow and select the event type.
123
Sophos Enterprise Console
8. If you want to view application events for a certain file, in the File name field, enter the file
name.
If you leave this field empty, application events for all files will be displayed.
You can use wildcards in this field. Use ? for any single character and * for any string of
characters.
9. Click Search to display a list of application events.
10. Select an application event, and then click OK.
If you enable interactive mode, the firewall can display a learning dialog on the endpoint computer
when a rawsocket is detected. For details, see Enable interactive mode (page 117).
7.2.2.3.9 Add an application checksum
Note: If you use role-based administration:
■
You must have the Policy setting - firewall right to configure a firewall policy.
■
You cannot edit a policy if it is applied outside your active sub-estate.
For more information, see About roles and sub-estates (page 17).
Each version of an application has a unique checksum. The firewall can use this checksum to
decide whether an application is allowed or not.
By default, the firewall checks the checksum of each application that runs. If the checksum is
unknown or has changed, the firewall blocks it.
To add a checksum to the list of allowed checksums:
1.
2.
3.
4.
Double-click the firewall policy you want to change.
On the Welcome page of the Firewall Policy wizard, click Advanced firewall policy.
Click the Checksums tab.
Click Add.
The Firewall Policy - Add application checksum dialog box appears.
5. In the Search period field, click the drop-down arrow and select the period for which you want
to display application events.
You can either select a fixed period, for example, Within 24 hours, or select Custom and specify
your own time period by selecting the starting and ending dates and times.
6. In the Event type field, click the drop-down arrow and select whether you want to add a
checksum for a modified application or a new application.
7. If you want to view application events for a certain file, in the File name field, enter the file
name.
If you leave this field empty, application events for all files will be displayed.
You can use wildcards in this field. Use ? for any single character and * for any string of
characters.
124
Help
8. Click Search to display a list of application events.
9. Select the application event for which you want to add a checksum, and then click OK.
The application checksum is added to the list of allowed checksums in the Firewall Policy dialog
box.
If you enable interactive mode, the firewall can display a learning dialog on the endpoint computer
when it detects a new or modified application. For details, see Enable interactive mode (page 117).
7.2.2.3.10 Turn blocking of modified processes on or off
Note: If you use role-based administration:
■
You must have the Policy setting - firewall right to configure a firewall policy.
■
You cannot edit a policy if it is applied outside your active sub-estate.
For more information, see About roles and sub-estates (page 17).
Malware may attempt to evade the firewall by modifying a process in memory that has been
initiated by a trusted program, and then using the modified process to access the network on its
behalf.
You can configure the firewall to detect and block processes that have been modified in memory.
To turn blocking of modified processes on or off:
1. Double-click the firewall policy you want to change.
2. On the Welcome page of the Firewall Policy wizard, click Advanced firewall policy.
3. Under Configurations, click Configure next to the location for which you want to configure
the firewall.
4. On the General tab, under Blocking, clear the Block processes if memory is modified by
another application check box to turn blocking of modified processes off.
To turn blocking of modified processes on, select the check box.
If the firewall detects that a process has been modified in memory, it adds rules to prevent the
modified process from accessing the network.
Notes
■
We do not recommend that you turn blocking of modified processes off permanently. You
should turn it off only when you need to.
■
Blocking of modified processes is not supported on 64-bit versions of Windows.
■
Only the modified process is blocked. The modifying program is not blocked from accessing
the network.
7.2.2.3.11 Filter ICMP messages
Note: If you use role-based administration:
■
You must have the Policy setting - firewall right to configure a firewall policy.
125
Sophos Enterprise Console
■
You cannot edit a policy if it is applied outside your active sub-estate.
For more information, see About roles and sub-estates (page 17).
Internet Control Message Protocol (ICMP) messages allow the computers on a network to share
error and status information. You can allow or block specific types of incoming or outgoing ICMP
message.
You should only filter ICMP messages if you are familiar with networking protocols. For
explanations of the ICMP message types, see Explanation of ICMP message types (page 126).
To filter ICMP messages:
1. Double-click the firewall policy you want to change.
2. On the Welcome page of the Firewall Policy wizard, click Advanced firewall policy.
3. Under Configurations, click Configure next to the location for which you want to configure
the firewall.
4. On the ICMP tab, select the In or Out check box to allow incoming or outgoing messages of
the specified type.
7.2.2.3.12 Explanation of ICMP message types
126
Echo Request, Echo Reply
Used to test destination accessibility and status. A host sends an
Echo Request and listens for a corresponding Echo Reply. This
is most commonly done using the ping command.
Destination Unreachable,
Echo Reply
Sent by a router when it cannot deliver an IP datagram. A
datagram is the unit of data, or packet, transmitted in a TCP/IP
network.
Source Quench
Sent by a host or router if it is receiving data too quickly for it to
handle. The message is a request that the source reduce its rate
of datagram transmission.
Redirect
Sent by a router if it receives a datagram that should have been
sent to a different router. The message contains the address to
which the source should direct future datagrams. This is used to
optimize the routing of network traffic.
Router Advertisement,
Router Solicitation
Allow hosts to discover the existence of routers. Routers
periodically broadcast their IP addresses via Router
Advertisement messages. Hosts may also request a router address
by broadcasting a Router Solicitation message to which a router
replies with a Router Advertisement.
Time Exceeded for a
Datagram
Sent by a router if the datagram has reached the maximum limit
of routers through which it can travel.
Help
Parameter Problem for a
Datagram
Sent by a router if a problem occurs during the transmission of
a datagram such that it cannot complete processing. One potential
source of such a problem is invalid datagram header.
Timestamp Request,
Timestamp Reply
Used to synchronize the clocks between hosts and to estimate
transit time.
Information Request,
Information Reply
Obsolete. These messages were used earlier by hosts to determine
their inter-network addresses, but are now considered outdated
and should not be used.
Address Mask Request,
Address Mask Reply
Used to find the mask of the subnet (i.e. what address bits define
the network). A host sends an Address Mask Request to a router
and receives an Address Mask Reply in return.
7.2.2.4 Firewall rules
7.2.2.4.1 About firewall rules
Global rules
Global rules apply to all network communications and to applications even if they have application
rules.
Application rules
You can have one or more rules for an application. You can either use preset rules created by
Sophos or create custom rules to give you fine control over the access allowed for an application.
7.2.2.4.2 About the order in which rules are applied
For connections that use rawsockets, only the global rules are checked.
For connections that do not use rawsockets, various rules are checked, depending on whether the
connection is to a network address that is listed on the LAN tab or not.
If the network address is listed on the LAN tab, the following rules are checked:
■
If the address has been marked as Trusted, all traffic on the connection is allowed with no
further checks.
■
If the address has been marked as NetBIOS, file and printer sharing on any connection that
meets the following criteria is allowed:
Connection
Port
Range
TCP
Remote
137-139 or 445
TCP
Local
137-139 or 445
UDP
Remote
137 or 138
127
Sophos Enterprise Console
Connection
Port
Range
UDP
Local
137 or 138
If the network address is not listed on the LAN tab, other firewall rules are checked in the following
order:
1. Any NetBIOS traffic that has not been allowed using the LAN tab is dealt with according to
the setting of the Block file and printer sharing for other networks check box:
■
If the check box is selected, the traffic is blocked.
■
If the check box is cleared, the traffic is processed by the remaining rules.
2. The high-priority global rules are checked, in the order in which they are listed.
3. If the connection has not already had rules applied to it, the application rules are checked.
4. If the connection has still not been handled, the normal-priority global rules are checked, in
the order in which they are listed.
5. If no rules have been found to handle the connection:
■
In Allow by default mode, the traffic is allowed (if it is outbound).
■
In Block by default mode, the traffic is blocked.
■
In Interactive mode, the user is asked to decide.
Note: If you have not changed the working mode, the firewall will be in Block by default mode.
7.2.2.4.3 About local network detection
You can assign the local network for a computer to firewall rules.
When the firewall starts, it determines the computer's local network, and then monitors for any
changes whilst it is running. If any change is detected, the firewall updates any local network rules
with the new local network address range.
Caution: We strongly advise caution when using local network rules as part of secondary
configurations. If the computer is a laptop, and it is used out of the office, it may connect to an
unknown local network. If this happens, firewall rules in the secondary configuration that use the
local network as an address may inadvertently allow unknown traffic.
7.2.2.4.4 Global rules
7.2.2.4.4.1 Default global rule settings
This topic describes the conditions and actions for the default global rules. Use these settings if
you want to create a new default global rule.
Allow DNS Resolving (TCP)
■
128
Protocol: TCP
Help
■
Direction: Outbound
■
Remote port: DOMAIN
■
Action: Allow
Allow DNS Resolving (UDP)
■
Protocol: UDP
■
Direction: Outbound
■
Remote port: DNS
■
Action: Allow Stateful inspection
Allow Outgoing DHCP
■
Protocol: UDP
■
Local port: BOOTPS,BOOTPC,546,547
■
Action: Allow
Allow Inbound Identification
■
Protocol: TCP
■
Direction: Inbound
■
Local port: AUTH
■
Action: Allow
Allow Loopback
■
Protocol: TCP
■
Direction: Inbound
■
Local port: 127.0.0.0 (255.255.255.0)
■
Action: Allow
Allow GRE Protocol
■
Protocol: TCP
■
Protocol type: Outbound
■
Action: Allow
Allow PPTP Control Connection
■
Protocol: TCP
■
Direction: Outbound
■
Remote port: PPTP
129
Sophos Enterprise Console
■
Local port: 1024-65535
■
Action: Allow
Block RPC Call (TCP)
■
Protocol: TCP
■
Direction: Inbound
■
Local port: DCOM
■
Action: Block
Block RPC Call (UDP)
■
Protocol: UDP
■
Local port: 135
■
Action: Block
Block Server Message Block Protocol (TCP)
■
Protocol: TCP
■
Direction: Inbound
■
Local port: MICROSOFT_DS
■
Action: Block
Block Server Message Protocol (UDP)
■
Protocol: TCP
■
Local port: 445
■
Action: Block
Allow Localhost UDP Connection
■
Protocol: UDP
■
Remote host: 255.255.255.255 (0.0.0.0)
■
Local host: 255.255.255.255 (0.0.0.0)
■
Where the local port is equal to the remote port: True
■
Action: Allow
7.2.2.4.4.2 Create a global rule
Note: If you use role-based administration:
130
■
You must have the Policy setting - firewall right to configure a firewall policy.
■
You cannot edit a policy if it is applied outside your active sub-estate.
Help
For more information, see About roles and sub-estates (page 17).
Important: We recommend that you create global rules only if you are familiar with networking
protocols.
Global rules apply to all network communications and to applications which do not already have
a rule.
To create a global rule:
1. Double-click the firewall policy you want to change.
2. On the Welcome page of the Firewall Policy wizard, click Advanced firewall policy.
3. Under Configurations, click Configure next to the location for which you want to configure
the firewall.
4. Click the Global Rules tab.
5. Click Add.
6. Under Rule name, type a name for the rule.
The rule name must be unique within the list of rules. Two global rules cannot have the same
name.
7. To apply the rule before any application rules or normal priority global rules, select the High
priority rule check box.
For information on the order in which rules are applied, see About the order in which rules are
applied (page 127).
8. Under Select the events the rule will handle, select the conditions that the connection must
match for the rule to apply.
9. Under Select the actions with which the rule will respond, select either Allow it or Block it.
10. Do one of the following:
■
To allow other connections to and from the same remote address while the initial connection
exists, select Concurrent connections.
Note: This option is only available for TCP rules, which are stateful by default.
■
To intelligently allow replies from the remote computer based on the initial connection,
select Stateful inspection.
11. Under Rule description, click an underlined value. For example, if you click the TCP link, the
Select Protocol dialog box opens.
7.2.2.4.4.3 Edit a global rule
Note: If you use role-based administration:
■
You must have the Policy setting - firewall right to configure a firewall policy.
■
You cannot edit a policy if it is applied outside your active sub-estate.
For more information, see About roles and sub-estates (page 17).
131
Sophos Enterprise Console
Important: We recommend that you change global rules only if you are familiar with networking
protocols.
To edit a global rule:
1. Double-click the firewall policy you want to change.
2. On the Welcome page of the Firewall Policy wizard, click Advanced firewall policy.
3. Under Configurations, click Configure next to the location for which you want to configure
the firewall.
4. Click the Global Rules tab.
5. In the Rule list, select the rule that you want to edit.
6. Click Edit.
For information on the global rule settings, see Default global rule settings (page 128).
7.2.2.4.4.4 Copy a global rule
Note: If you use role-based administration:
■
You must have the Policy setting - firewall right to configure a firewall policy.
■
You cannot edit a policy if it is applied outside your active sub-estate.
For more information, see About roles and sub-estates (page 17).
To copy a global rule and append it to the list of rules:
1. Double-click the firewall policy you want to change.
2. On the Welcome page of the Firewall Policy wizard, click Advanced firewall policy.
3. Under Configurations, click Configure next to the location for which you want to configure
the firewall.
4. Click the Global Rules tab.
5. In the Rule list, select the rule that you want to copy.
6. Click Copy.
7.2.2.4.4.5 Delete a global rule
Note: If you use role-based administration:
■
You must have the Policy setting - firewall right to configure a firewall policy.
■
You cannot edit a policy if it is applied outside your active sub-estate.
For more information, see About roles and sub-estates (page 17).
1. Double-click the firewall policy you want to change.
2. On the Welcome page of the Firewall Policy wizard, click Advanced firewall policy.
3. Under Configurations, click Configure next to the location for which you want to configure
the firewall.
132
Help
4. Click the Global Rules tab.
5. In the Rule list, select the rule that you want to delete.
6. Click Remove.
7.2.2.4.4.6 Change the order in which global rules are applied
Note: If you use role-based administration:
■
You must have the Policy setting - firewall right to configure a firewall policy.
■
You cannot edit a policy if it is applied outside your active sub-estate.
For more information, see About roles and sub-estates (page 17).
Global rules are applied in the order in which they appear from top to bottom in the list of rules.
To change the order in which the global rules are applied:
1. Double-click the firewall policy you want to change.
2. On the Welcome page of the Firewall Policy wizard, click Advanced firewall policy.
3. Under Configurations, click Configure next to the location for which you want to configure
the firewall.
4. Click the Global Rules tab.
5. In the Rule list, click the rule that you want to move up or down in the list.
6. Click Move Up or Move Down.
7.2.2.4.5 Application rules
7.2.2.4.5.1 Create an application rule
Note: If you use role-based administration:
■
You must have the Policy setting - firewall right to configure a firewall policy.
■
You cannot edit a policy if it is applied outside your active sub-estate.
For more information, see About roles and sub-estates (page 17).
To create a custom rule which allows fine control over the access allowed for an application:
1. Double-click the firewall policy you want to change.
2. On the Welcome page of the Firewall Policy wizard, click Advanced firewall policy.
3. Under Configurations, click Configure next to the location for which you want to configure
the firewall.
4. Click the Applications tab.
5. Select the application in the list, and then click the arrow next to Custom .
6. In the Application Rules dialog box, click Add.
133
Sophos Enterprise Console
7. Under Rule name, type a name for the rule.
The rule name must be unique within the list of rules. Two application rules cannot have the
same name, but two applications can each have a rule with the same name.
8. Under Select the events the rule will handle, select the conditions that the connection must
match for the rule to apply.
9. Under Select the actions with which the rule will respond, select either Allow it or Block it.
10. To intelligently allow replies from the remote computer based on the initial connection, select
Stateful inspection.
11. Under Rule description, click an underlined value. For example, if you click the TCP link, the
Select Protocol dialog box opens.
7.2.2.4.5.2 Create an application rule from a firewall policy
Note: If you use role-based administration:
■
You must have the Policy setting - firewall right to configure a firewall policy.
■
You cannot edit a policy if it is applied outside your active sub-estate.
For more information, see About roles and sub-estates (page 17).
You can create an application rule directly from a firewall policy using the advanced firewall policy
configuration pages.
To create an application rule from a firewall policy:
1. Double-click the policy you want to change.
2. On the welcome page of the Firewall Policy wizard, click the Advanced firewall policy button.
3. In the Firewall Policy dialog box that appears, click Configure next to the location for which
you want to configure the firewall.
4. Do one of the following:
■
If you want to add an application to the firewall policy, in the dialog box that appears, go
to the Applications tab and click Add.
■ If you want to allow an application to launch hidden processes, go to the Processes tab and
click Add in the upper area.
■ If you want to allow an application to access the network using rawsockets, go to the
Processes tab and click Add in the lower area.
The Firewall policy - Add application dialog box appears.
5. If you are adding an application, in the Event type box, select whether you want to add a
modified application, a new application, or an application for which there is no application
rule set up in the firewall policy.
6. Select an entry for the application you want to add or allow to launch hidden processes or use
rawsockets, and click OK.
The application is added to the firewall policy.
134
Help
If you added an application on the Applications tab, the application is added as trusted. If you
want, you can block it or create a custom rule for it.
7.2.2.4.5.3 Edit an application rule
Note: If you use role-based administration:
■
You must have the Policy setting - firewall right to configure a firewall policy.
■
You cannot edit a policy if it is applied outside your active sub-estate.
For more information, see About roles and sub-estates (page 17).
1. Double-click the firewall policy you want to change.
2. On the Welcome page of the Firewall Policy wizard, click Advanced firewall policy.
3. Under Configurations, click Configure next to the location for which you want to configure
the firewall.
4. Click the Applications tab.
5. Select the application in the list, and then click the arrow next to Custom .
6. In the Application Rules dialog box, click Edit.
7. Under Rule name, type a name for the rule.
The rule name must be unique within the list of rules. Two application rules cannot have the
same name, but two applications can each have a rule with the same name.
8. Under Select the events the rule will handle, select the conditions that the connection must
match for the rule to apply.
9. Under Select the actions with which the rule will respond, select either Allow it or Block it.
10. To intelligently allow replies from the remote computer based on the initial connection, select
Stateful inspection.
11. Under Rule description, click an underlined value. For example, if you click the TCP link, the
Select Protocol dialog box opens.
7.2.2.4.5.4 Apply preset application rules
Note: If you use role-based administration:
■
You must have the Policy setting - firewall right to configure a firewall policy.
■
You cannot edit a policy if it is applied outside your active sub-estate.
For more information, see About roles and sub-estates (page 17).
A preset is a set of application rules created by Sophos. To append preset rules to the list of rules
for an application:
1. Double-click the firewall policy you want to change.
2. On the Welcome page of the Firewall Policy wizard, click Advanced firewall policy.
3. Under Configurations, click Configure next to the location for which you want to configure
the firewall.
135
Sophos Enterprise Console
4. Click the Applications tab.
5. Select the application in the list, and then click the arrow next to Custom .
6. Point to Add rules from preset, and then click a preset.
7.2.2.4.5.5 Copy an application rule
Note: If you use role-based administration:
■
You must have the Policy setting - firewall right to configure a firewall policy.
■
You cannot edit a policy if it is applied outside your active sub-estate.
For more information, see About roles and sub-estates (page 17).
To copy an application rule and append it to the list of rules:
1. Double-click the firewall policy you want to change.
2. On the Welcome page of the Firewall Policy wizard, click Advanced firewall policy.
3. Under Configurations, click Configure next to the location for which you want to configure
the firewall.
4. Click the Applications tab.
5. Select the application in the list, and then click the arrow next to Custom .
6. In the Application Rules dialog box, click Copy.
7.2.2.4.5.6 Delete an application rule
Note: If you use role-based administration:
■
You must have the Policy setting - firewall right to configure a firewall policy.
■
You cannot edit a policy if it is applied outside your active sub-estate.
For more information, see About roles and sub-estates (page 17).
1. Double-click the firewall policy you want to change.
2. On the Welcome page of the Firewall Policy wizard, click Advanced firewall policy.
3. Under Configurations, click Configure next to the location for which you want to configure
the firewall.
4. Click the Applications tab.
5. Select the application in the list, and then click the arrow next to Custom .
6. In the Application Rules dialog box, click Remove.
7.2.2.4.5.7 Change the order in which application rules are applied
Note: If you use role-based administration:
136
■
You must have the Policy setting - firewall right to configure a firewall policy.
■
You cannot edit a policy if it is applied outside your active sub-estate.
Help
For more information, see About roles and sub-estates (page 17).
Application rules are applied in the order in which they appear from top to bottom in the list of
rules.
To change the order in which the application rules are applied:
1. Double-click the firewall policy you want to change.
2. On the Welcome page of the Firewall Policy wizard, click Advanced firewall policy.
3. Under Configurations, click Configure next to the location for which you want to configure
the firewall.
4. Click the Applications tab.
5. Select the application in the list, and then click the arrow next to Custom .
6. In the Rule list, click the rule that you want to move up or down in the list.
7. Click Move Up or Move Down.
7.2.2.5 Location awareness
7.2.2.5.1 About location awareness
Location awareness is a feature of Sophos Client Firewall that assigns a firewall configuration to
each network adapter on a computer, depending on the current location of the computer's network
adapters.
The most common scenario in which this feature is used is where an employee has a company
laptop and works from home. They are using two network connections simultaneously:
■
For work use, they connect to the office network through a VPN client and a virtual network
adapter.
■
For personal use, they connect to their ISP through a network cable and a physical network
adapter.
In this scenario, you need the office configuration to be applied to the virtual office connection
and the non-office, generally more restrictive, configuration to be applied to the non-office ISP
connection.
Note: The non-office configuration requires sufficient rules to allow the "virtual" office connection
to be established.
7.2.2.5.2 About setting up location awareness
1. Define the list of gateway MAC addresses or domain names of your primary locations. Typically,
these are your office networks.
2. Create the firewall configuration to be used for your primary locations. Typically, this
configuration is less restrictive.
3. Create a secondary firewall configuration. Typically, this configuration is more restrictive.
4. Choose a configuration to apply.
137
Sophos Enterprise Console
Depending on the detection method you are using, the firewall obtains the DNS or gateway address
for each computer's network adapters, and then matches it against your list of addresses.
■
If any of the addresses in your list matches the address of a network adapter, the adapter is
assigned the configuration for the primary location.
■
If none of the addresses in your list matches the address of a network adapter, the adapter is
assigned the policy for the secondary location.
Important: The secondary configuration switches from Interactive mode to Block by default
mode on a computer when both the following conditions are met:
■
Both locations are active.
■
The primary configuration is not interactive.
7.2.2.5.3 Define your primary locations
1. Double-click the firewall policy you want to change.
2. On the Welcome page of the Firewall Policy wizard, click Advanced firewall policy.
3. Under Configurations, click Configure next to the location for which you want to configure
the firewall.
4. Click the Location detection tab.
5. Under Detection method, click Configure next to the method that you want to use to define
your primary locations:
Option
Description
DNS lookup
You create a list of domain names and expected IP addresses that
correspond to your primary locations.
MAC address detection
You create a list of gateway MAC addresses that correspond to your
primary locations.
6. Follow the instructions on the screen.
7.2.2.5.4 Create a secondary configuration
1. Double-click the firewall policy you want to change.
2. On the Welcome page of the Firewall Policy wizard, click Advanced firewall policy.
3. Under Configurations, click Configure next to the location for which you want to configure
the firewall.
4. Select the Add configuration for a second location check box.
Now set up your secondary configuration. For information on how to do this, see the Configuring
the firewall section.
Caution: We strongly advise caution when using local network rules as part of secondary
configurations. If the computer is a laptop, and it is used out of the office, it may connect to an
138
Help
unknown local network. If this happens, firewall rules in the secondary configuration that use the
local network as an address may inadvertently allow unknown traffic.
7.2.2.5.5 Choose a configuration to apply
1. Double-click the firewall policy you want to change.
2. On the Welcome page of the Firewall Policy wizard, click Advanced firewall policy.
3. Under Configurations, click Configure next to the location for which you want to configure
the firewall.
4. On the General tab, under Applied location, click one of the following options:
Option
Description
Apply the configuration for the
detected location
The firewall applies either the primary or secondary
configuration to each network connection according to the
detection settings for location awareness (as described in
About setting up location awareness (page 137)).
Apply the configuration for the
primary location
The firewall applies the primary configuration to all network
connections.
Apply the configuration for the
secondary location
The firewall applies the secondary configuration to all
network connections.
7.2.2.6 Firewall reporting
7.2.2.6.1 About firewall reporting
By default, the firewall on an endpoint computer reports state changes, events, and errors to
Enterprise Console.
Firewall state changes
The firewall regards the following as state changes:
■
Changes to the working mode
■
Changes to the software version
■
Changes to whether the firewall is configured to allow all traffic
■
Changes to whether the firewall complies with policy
When you are working in interactive mode, your firewall configuration may deliberately differ
from the policy applied by Enterprise Console. In that case, you can choose not to send "differs
from policy" alerts to Enterprise Console when you make changes to certain parts of your firewall
configuration.
For more information, see Turn reporting of local changes on or off (page 140).
Firewall events
139
Sophos Enterprise Console
An event is when the endpoint computer's operating system, or an unknown application on the
endpoint computer, tries to communicate with another computer over a network connection.
You can prevent the firewall from reporting events to Enterprise Console.
For more information, see Turn off reporting of unknown network traffic (page 140).
7.2.2.6.2 Turn reporting of local changes on or off
Note: If you use role-based administration:
■
You must have the Policy setting - firewall right to configure a firewall policy.
■
You cannot edit a policy if it is applied outside your active sub-estate.
For more information, see About roles and sub-estates (page 17).
If the firewall configuration on endpoint computers differs from policy, you can turn reporting
of local changes off.
Turning reporting of local changes off stops the firewall sending "differs from policy" alerts to
Enterprise Console about changes made to the global rules, applications, processes, or checksums.
You may want to do this, for example, when the endpoint computers are in interactive mode,
since these are settings that can be changed by using the learning dialogs.
If the firewall configuration on endpoint computers is intended to conform to policy, you should
turn reporting of local changes on.
To turn reporting of local changes off:
1. Double-click the firewall policy you want to change.
2. On the Welcome page of the Firewall Policy wizard, click Advanced firewall policy.
3. Under Configurations, click Configure next to the location for which you want to configure
the firewall.
4. Click the General tab.
5. Under Reporting, do one of the following:
■
To turn reporting of local changes on, select the Display an alert in the management console
if local changes are made to the global rules, applications, processes or checksums check
box.
■ To turn reporting of local changes off, clear the Display an alert in the management console
if local changes are made to the global rules, applications, processes or checksums check
box.
7.2.2.6.3 Turn off reporting of unknown network traffic
Note: If you use role-based administration:
140
■
You must have the Policy setting - firewall right to configure a firewall policy.
■
You cannot edit a policy if it is applied outside your active sub-estate.
Help
For more information, see About roles and sub-estates (page 17).
You can prevent the firewall on endpoint computers from reporting unknown network traffic to
Enterprise Console. The firewall regards traffic as unknown if there is no rule for it.
To prevent the firewall on endpoint computers from reporting unknown network traffic to
Enterprise Console:
1. Double-click the firewall policy you want to change.
2. On the Welcome page of the Firewall Policy wizard, click Advanced firewall policy.
3. Under Configurations, click Configure next to the location for which you want to configure
the firewall.
4. Click the General tab.
5. Under Blocking, select the Use checksums to authenticate applications check box.
6. Under Reporting, clear the Report unknown applications and traffic to the management
console check box.
7.2.2.6.4 Turn off reporting of firewall errors
Important: We do not recommend that you turn off reporting of firewall errors permanently.
You should turn off reporting only when you need to.
To prevent the firewall on endpoint computers from reporting errors to Enterprise Console:
1. Double-click the firewall policy you want to change.
2. On the Welcome page of the Firewall Policy wizard, click Advanced firewall policy.
3. Under Configurations, click Configure next to the location for which you want to configure
the firewall.
4. Click the General tab.
5. Under Reporting, clear the Report errors to the management console check box.
7.2.2.7 Import or export firewall configuration
Note: If you use role-based administration:
■
You must have the Policy setting - firewall right to configure a firewall policy.
■
You cannot edit a policy if it is applied outside your active sub-estate.
For more information, see About roles and sub-estates (page 17).
You can import or export the firewall general settings and rules as a configuration file (*.conf).
You can use this feature to do the following:
■
Back up and restore your firewall configuration.
■
Import application rules created on one computer and use them to create a policy for other
computers running the same set of applications.
■
Merge configurations created on several different computers to create a policy that is valid for
one or more groups of computers on the network.
141
Sophos Enterprise Console
To import or export firewall configuration:
1. Check which firewall policy is used by the group(s) of computers you want to configure.
See Check which policies a group uses (page 30).
2. In the Policies pane, double-click Firewall, and then double-click the policy you want to import
to or export from.
3. On the Welcome page of the Firewall Policy wizard, click Advanced firewall policy.
4. In the Firewall Policy dialog box, on the General tab, under Managing configuration, click
Import or Export.
7.3 Configuring the NAC policy
7.3.1 About NAC
You can set up network access control (NAC), so that computers are only allowed to log on to the
network if they comply with conditions you set. By default, computers are allowed to access the
network.
Enterprise Console works together with NAC Manager to give this network protection. You need
to have installed the following:
■
The NAC Manager. You install this separately from Enterprise Console.
■
The NAC Agent. You install this on your networked computers, so that they can communicate
with the NAC Manager. You can install this using the Protect Computers Wizard. See Protect
computers automatically (page 50).
This section assumes that you have installed both.
Note: If you use role-based administration, you must have the Policy setting - NAC right to view
a NAC policy. For more information, see About roles and sub-estates (page 17).
7.3.2 Set up the NAC server URL
If you want to use NAC, the URL of the NAC server (computer where NAC Manager is installed)
must be specified in Enterprise Console. This is so that:
■
Your computers can communicate with the NAC Manager and receive their NAC policy.
■
You can configure NAC policies in the NAC Manager.
When you first install Enterprise Console, it attempts to locate the NAC server and connect to it.
However, if it fails, or if you change the location of the NAC server, you may need to specify the
URL.
142
Help
To enter or change the URL:
1. On the Tools menu, select Configure NAC URL.
2. In the Sophos NAC URL dialog box, enter the URL of the NAC server (for example,
http://server).
Note: If Sophos NAC is installed on more than one server, use the address of the computer
running the application, not the computer with the database.
3. To check whether Enterprise Console can connect to the NAC server using the supplied URL,
click Test Connection.
7.3.3 Start NAC Manager
NAC Manager is the interface that enables you to edit NAC policies.
To start NAC Manager:
1. Click the NAC button on the toolbar.
Alternatively, on the Tools menu, select Manage NAC.
Note: You may be prompted to specify the NAC server URL, if this has not been detected or
specified previously.
2. Log in with your Sophos NAC user credentials (as issued by the Sophos NAC administrator).
For full details of the interface, see the Sophos NAC Manager help files or Sophos NAC for Endpoint
Security and Control NAC Manager Guide .
7.3.4 What are the default NAC settings?
By default, the Default NAC policy is applied to computers on which the NAC feature has been
installed. Unless you have changed the “policy mode,” this means that:
■
The computers are allowed access to the network.
■
NAC operates in report-only mode.
For details of the pre-defined Managed and Unmanaged policies, see What are the pre-defined
NAC policies? (page 143)
7.3.5 What are the pre-defined NAC policies?
Three pre-defined policies are available. You can edit the settings in each policy, as described in
Edit a NAC policy (page 144).
143
Sophos Enterprise Console
Default
This policy is applied by default to computers on which the NAC feature has been installed. Unless
you have changed the settings for this policy, computers are allowed to access the network. NAC
operates in Report Only mode.
Managed
This policy can be used for computers that are managed by Enterprise Console and have NAC
installed. Its initial settings are the same as those of the Default policy.
Unmanaged
This policy can be used for computers from outside the company, which are not managed by
Enterprise Console and do not have NAC installed. Your company can ask such guest users to
connect to a website, where a web agent assesses them against the policy before allowing them to
access the network.
7.3.6 Edit a NAC policy
If you use role-based administration, you must have the Policy setting - NAC right to edit a NAC
policy. For more information, see About roles and sub-estates (page 17).
You can change the settings for any of the pre-defined NAC policies. You can edit the policies in
the NAC Manager to change the policy mode, the profiles that are in the policy, or which network
access templates are applied to the policy.
To edit a NAC policy:
1. In the Policies pane, double-click NAC. Double-click the policy you want to configure.
NAC Manager is launched.
2. Log in with your credentials.
3. In the page for the policy, edit the options.
For more information about updating the pre-defined policies, see the Sophos NAC Manager
configuration guide.
7.4 Configuring the application control policy
7.4.1 About application control
Enterprise Console enables you to detect and block "controlled applications", that is, legitimate
applications that are not a security threat, but that you decide are unsuitable for use in your office
environment. Such applications may include instant messaging (IM) clients, Voice over Internet
Protocol (VoIP) clients, digital imaging software, media players, or browser plug-ins.
144
Help
Note: This option applies only to Sophos Endpoint Security and Control for Windows 2000 and
later.
Applications can be blocked or authorized for different groups of computers with complete
flexibility. For example, VoIP can be switched off for office-based desktop computers, yet authorized
for remote computers.
The list of controlled applications is supplied by Sophos and updated regularly. You cannot add
new applications to the list, but you can submit a request to Sophos to include a new legitimate
application you would like to control on your network. For details, see Sophos support
knowledgebase article 35330 (http://www.sophos.com/support/knowledgebase/article/35330.html).
This section describes how to select the applications you want to control on your network and set
up scanning for controlled applications.
Note: If you use role-based administration:
■
You must have the Policy setting - application control right to configure an application control
policy.
■
You cannot edit a policy if it is applied outside your active sub-estate.
For more information about role-based administration, see About roles and sub-estates (page 17).
Application control events
When an application control event occurs, for example, a controlled application has been detected
on the network, the event is written in the application control event log that can be viewed from
Enterprise Console. For details, see View application control events (page 202).
The number of computers with events over a specified threshold within the last seven days is
displayed on the Dashboard.
You can also set up alerts to be sent to your chosen recipients when an application control event
has occurred. For details, see Set up application control alerts and messages (page 195).
7.4.2 Select the applications you want to control
If you use role-based administration:
■
You must have the Policy setting - application control right to configure an application control
policy.
■
You cannot edit a policy if it is applied outside your active sub-estate.
For more information, see About roles and sub-estates (page 17).
145
Sophos Enterprise Console
By default, all applications are allowed. You can select the applications you want to control as
follows:
1. Check which application control policy is used by the group(s) of computers you want to
configure.
See Check which policies a group uses (page 30).
2. In the Policies pane, double-click Application control. Then double-click the policy you want
to change.
3. In the Application control policy dialog box, click the Authorization tab.
4. Select an Application type, for example, File sharing.
A full list of the applications included in that group is displayed in the Authorized list below.
■
To block an application, select it and move it to the Blocked list by clicking the “Add”
button.
■
To block any new applications that Sophos adds to that type in the future, move All added
by Sophos in the future to the Blocked list.
■
To block all applications of that type, move all applications from the Authorized list to the
Blocked list by clicking the “Add all” button.
5. On the Scanning tab of the Application control policy dialog box, make sure that scanning
for controlled applications is enabled. (See Scan for applications you want to control (page 146)
for details.) Click OK.
7.4.3 Scan for applications you want to control
If you use role-based administration:
■
You must have the Policy setting - application control right to configure an application control
policy.
■
You cannot edit a policy if it is applied outside your active sub-estate.
For more information, see About roles and sub-estates (page 17).
You can configure Sophos Endpoint Security and Control to scan for applications you want to
control on your network on access.
1. Check which application control policy is used by the group(s) of computers you want to
configure.
See Check which policies a group uses (page 30).
146
Help
2. In the Policies pane, double-click Application control. Then double-click the policy you want
to change.
The Application control policy dialog box is displayed.
3. On the Scanning tab, set the options as follows:
■
To enable on-access scanning, select the Enable on-access scanning check box. If you want
to detect applications but do not want to block them on access, select the Detect but allow
to run check box.
■
To enable on-demand and scheduled scanning, select the Enable on-demand and scheduled
scanning check box.
Note: Your anti-virus and HIPS policy settings determine which files are scanned (that is, the
extensions and exclusions).
If you want to remove controlled applications found on your networked computers, follow the
instructions in Uninstall controlled applications you do not want (page 147).
You can also have alerts sent to particular users if a controlled application is found on any of the
computers in the group. For instructions, see Set up application control alerts and messages (page
195).
7.4.4 Uninstall controlled applications you do not want
Before you uninstall controlled applications, ensure that on-access scanning for controlled
applications is disabled. This type of scanning blocks the programs used to install and uninstall
applications, so it may interfere with uninstallation.
You can remove an application in one of two ways:
■
Go to each computer and run the uninstaller for that product. You can usually do this by
opening the Windows Control Panel and using Add/Remove Programs.
■
At the server, use your usual script or administration tool to run the uninstaller for that product
on your networked computers.
Now you can enable on-access scanning for controlled applications.
7.5 Configuring the data control policy
7.5.1 About data control
Note: This feature is not included with all licenses. If you want to use it, you might need to change
your license. For more information, see
http://www.sophos.com/en-us/products/complete/comparison.aspx.
147
Sophos Enterprise Console
Data control enables you to reduce accidental data loss from workstations by monitoring and
restricting the transfer of files containing sensitive data. You do this by creating data control rules
and then adding the rules to the Data control policies.
You can monitor and control the transfer of files to specified storage devices (e.g. removable
storage device or optical drive) or by specified applications (e.g. email client or web browser).
To enable you to quickly define and roll out a data control policy, SophosLabs maintain a library
of sensitive data definitions (Content Control Lists). The main focus for this library is personally
identifiable information, but it also covers other common data structures. You can use Content
Control Lists in Enterprise Console, as described further in this section.
7.5.2 How does data control work?
Data control identifies accidental data loss that is typically caused by employees mishandling
sensitive data. For example, a user sends a file containing sensitive data home via web-based email.
Data control enables you to monitor and control the transfer of files from computers to storage
devices and applications connected to the internet.
■
Storage devices: Data control intercepts all files copied onto monitored storage devices using
Windows Explorer (this includes the Windows desktop). However, direct saves from within
applications, such as Microsoft Word, or transfers made using the command prompt are not
intercepted.
It is possible to force all transfers onto monitored storage devices to be made using Windows
Explorer by using either the Allow transfer on acceptance by user and log event action or the
Block transfer and log event action. In either case, any attempt to save directly from within
an application or transfer files using the command prompt are blocked by data control, and a
desktop alert is displayed to the user requesting that they use Windows Explorer to complete
the transfer.
When a data control policy only contains rules with the Allow file transfer and log event action,
direct saves from within applications and transfers using the command prompt are not
intercepted. This behavior enables users to use storage devices without any restrictions. However,
data control events are still logged for transfers made using Windows Explorer.
Note: This restriction does not apply to application monitoring.
■
Applications: To ensure only file uploads by users are monitored, some system file locations
are excluded from data control monitoring. This significantly reduces the risk of data control
events being generated by applications opening configuration files as opposed to users uploading
files.
Important: If you experience erroneous events generated by an application opening
configuration files, the problem can usually be solved by adding custom location exclusions
or by configuring a data control rule to be less sensitive. For more information, see support
knowledgebase article 113024
(http://www.sophos.com/support/knowledgebase/article/113024.html).
148
Help
Note: If you exclude remote files from on-access scanning in the anti-virus and HIPS policy,
data control will not scan files uploaded or attached from a network location using a monitored
application, for example, an email client, a web browser, or an instant messaging (IM) client.
This is because data control uses the same set of exclusions as the Sophos Anti-Virus on-access
scanner, so if remote file scanning is disabled, it will not send any remote files for a data control
check. This restriction does not apply to storage device monitoring. For information about
configuring on-access scanning exclusions, see Exclude items from on-access scanning (page
98).
Data control policies
Data control enables you to monitor and control the transfer of files by defining data control
policies and applying them to groups of computers on your network.
Important: Data control is not supported on Windows 2008 Server Core and must be disabled
on computers running this operating system. To exclude Windows 2008 Server Core computers
from data control scanning, put them in a group that has a data control policy with data control
scanning disabled. For details, see Turn data control on or off (page 152).
Data control policies include one or more rules that specify conditions and actions to be taken
when the rule is matched. A data control rule can be included in multiple policies.
When a data control policy contains several rules, a file that matches any of the rules in the data
control policy violates the policy.
Data control rule conditions
The data control rule conditions include destination, file name and extension, file type, or file
content.
Destination includes devices (for example, removable storage devices, such as USB flash drives)
and applications (for example, internet browsers and email clients).
The matching of file content is defined using a Content Control List. This is an XML based
description of structured data. SophosLabs provide an extensive set of Content Control Lists which
can be used within your data control rules.
For more information about data control rules and conditions applied to files, see About data
control rules (page 150).
For more information about Content Control Lists (CCLs) that define file content, see About
Content Control Lists (page 151).
149
Sophos Enterprise Console
Figure 2: Data Control
Data control rule actions
When data control detects all the conditions specified in a rule, the rule is matched, and data
control takes the action specified in the rule and logs the event. You can specify one of the following
actions:
■
Allow file transfer and log event
■
Allow transfer on acceptance by user and log event
■
Block transfer and log event
If a file matches two data control rules that specify different actions, the rule that specifies the
most restrictive action is applied. Data control rules that block file transfer take priority over the
rules that allow file transfer on user acceptance. Rules that allow file transfer on user acceptance
take priority over the rules that allow file transfer.
By default, when the rule is matched and file transfer is blocked or user confirmation of file transfer
is required, a message is displayed on the endpoint computer's desktop. The rule that has been
matched is included in the message. You can add your own custom messages to the standard
messages for user confirmation of file transfer and for blocked file transfer. For more information,
see Set up data control alerts and messages (page 196).
7.5.3 About data control rules
Data control rules specify conditions for data control scanning to detect, actions to be taken if
rules are matched, and any files to be excluded from scanning.
150
Help
You can create your own rules or use the sample rules provided. We provide a number of
preconfigured data control rules that you can use unmodified or customize to your own needs.
These rules are provided as examples only and are not updated.
There are two types of data control rule: file matching rule and content rule.
File matching rules
A file matching rule specifies action to be taken if a user attempts to transfer a file with the specified
file name or of the specified file type (true file type category, e.g. a spreadsheet) to the specified
destination, for example, block the transfer of databases to removable storage devices.
Data control includes true file type definitions for over 150 different file formats. We may add
additional true file types from time to time. The newly added types will be automatically added
to any data control rules that use the relevant true file type category.
File types not covered by a true file type definition can be identified using their file extensions.
Content rules
A content rule is a rule that contains one or more Content Control Lists and specifies action to be
taken if a user attempts to transfer data that matches all the Content Control Lists in the rule to
the specified destination.
7.5.4 About Content Control Lists
A Content Control List (CCL) is a set of conditions that describe structured file content. A Content
Control List may describe a single type of data (for example, a postal address or social security
number) or a combination of data types (for example, a project name near to the term
"confidential").
You can use SophosLabs Content Control Lists that are provided by Sophos or create your own
Content Control Lists.
SophosLabs Content Control Lists provide expert definitions for common financial and personally
identifiable data types, for example, credit card numbers, social security numbers, postal addresses,
or email addresses. Advanced techniques, such as checksums, are used in SophosLabs Content
Control Lists to increase the accuracy of sensitive data detection.
You cannot edit SophosLabs Content Control Lists, but you can submit a request to Sophos to
create a new SophosLabs Content Control List. For details, see Sophos support knowledgebase
article 51976 (http://www.sophos.com/support/knowledgebase/article/51976.html).
Note: Double-byte characters (for example, Japanese or Chinese characters) are not officially
supported in the current version of Content Control Lists. However, you can enter double-byte
characters in the Content Control List editor.
Setting up the quantity for SophosLabs Content Control Lists
Most SophosLabs Content Control Lists have quantity assigned to them.
151
Sophos Enterprise Console
A quantity is the volume of the Content Control List key data type that must be found in a file
before the Content Control List is matched. You can edit the quantity of a SophosLabs Content
Control List in a content rule that includes that Content Control List.
Using quantity, you can fine-tune your data control rules and avoid blocking documents that do
not contain sensitive information (for example, a document containing one postal address or one
or two telephone numbers, possibly in the letterhead or signature). If you search for a single postal
address, thousands of documents may match the rule and trigger a data control event. However,
if you want to prevent the loss of a customer list, you may want to only detect the transfer of
documents containing, for example, more than 50 postal addresses. In other cases, however, it
may be advisable to search for a single instance of content, for example, a credit card number.
7.5.5 About data control events
When a data control event occurs, for example, the copying of a file containing sensitive data to
a USB flash drive, the event is sent to Enterprise Console and can be viewed in the Data Control
- Event Viewer. The event is also logged locally on the endpoint computer and can be viewed,
with the appropriate permissions, in Sophos Endpoint Security and Control.
Note: An endpoint computer can send to Enterprise Console a maximum of 50 data control
events per hour. All events are logged locally on the endpoint computer.
In the Data Control - Event Viewer dialog box, you can use filters to display only the events you
are interested in. You can also export the list of data control events to a file. For details, see View
data control events (page 203) and Export the list of events to a file (page 211).
The number of computers with data control events over a specified threshold within the last seven
days is displayed on the Dashboard. For information on how to set up the threshold, see Configure
the Dashboard (page 54).
You can also set up alerts to be sent to your chosen recipients when a data control event has
occurred. For details, see Set up data control alerts and messages (page 196).
7.5.6 Turn data control on or off
If you use role-based administration:
■
You must have the Policy setting - data control right to configure a data control policy.
■
You cannot edit a policy if it is applied outside your active sub-estate.
For more information, see About roles and sub-estates (page 17).
By default, data control is turned off and no rules are specified to monitor or restrict the transfer
of files over the network.
152
Help
To turn data control on:
1. Check which data control policy is used by the group or groups of computers you want to
configure.
See Check which policies a group uses (page 30).
2. In the Policies pane, double-click Data control. Then double-click the policy you want to
change.
The Data control policy dialog box is displayed.
3. On the Policy Rules tab, select the Enable data control scanning check box.
4. Click the Add Rule button. In the Data Control Rule Management dialog box, select the rules
you want to add to the policy and click OK.
Important: If you do not add any data control rules, data control will not monitor or restrict
the transfer of files until you do so.
If you later want to disable data control scanning, clear the Enable data control scanning check
box.
7.5.7 Create a file matching rule
If you use role-based administration:
■
You must have the Data control customization right to create or edit data control rules.
■
You must have the Policy setting - data control right to set up data control policies.
■
You cannot edit a policy if it is applied outside your active sub-estate.
For more information, see About roles and sub-estates (page 17).
For an overview of file matching rules, see About data control rules (page 150).
To create a file matching rule and add it to a data control policy:
1. Check which data control policy is used by the group or groups of computers you want to
configure.
See Check which policies a group uses (page 30).
Alternatively, you can create a rule from the Tools menu and add it to a policy or policies later.
On the Tools menu, point to Manage Data Control, and then click Data control rules and
perform steps 4 to 10.
2. In the Policies pane, double-click Data control. Then double-click the policy you want to
change.
3. In the Data control policy dialog box, on the Policy Rules tab, make sure the Enable data
control scanning check box is selected and click Manage Rules.
4. In the Data Control Rule Management dialog box, click the Add File Matching Rule button.
153
Sophos Enterprise Console
5. In the Create a File Matching Rule dialog box, under Rule name, type a name for the rule.
6. Under Rule description (optional), enter the rule's description, if you wish.
7. Under Select the rule's conditions, select conditions for the rule.
The destination condition is preselected and must be included in the rule.
By default, all file types are scanned. If you want to scan only certain file types, select Where
the file type is. You can then set up this condition as described in step 10.
8. Under Select the action to take if the rule is matched, select the action.
9. If you want to exclude some files from data control scanning, under Select files to exclude,
select the Where file name matches or Where the file type is check box.
154
Help
10. Under Rule content, click each underlined value and set up the rule's conditions.
For example, if you click Select destination, the Match Destination Type Condition dialog
box opens, where you can select the devices and/or applications to which you want to restrict
the transfer of data.
Select or enter conditions for each underlined value.
Click OK.
The new rule appears in the Data Control Rule Management dialog box.
11. To add the rule to the policy, select the check box next to the rule's name and click OK.
The rule is added to the data control policy.
You can set up alerts and messages that will be sent to the user when a rule in the data control
policy is matched. See Set up data control alerts and messages (page 196).
155
Sophos Enterprise Console
7.5.8 Create a content rule
If you use role-based administration:
■
You must have the Data control customization right to create or edit data control rules and
Content Control Lists.
■
You must have the Policy setting - data control right to set up data control policies.
■
You cannot edit a policy if it is applied outside your active sub-estate.
For more information, see About roles and sub-estates (page 17).
For an overview of content rules and Content Control Lists, see About data control rules (page
150).
To create a content rule and add it to a data control policy:
1. Check which data control policy is used by the group or groups of computers you want to
configure.
See Check which policies a group uses (page 30).
Alternatively, you can create a rule from the Tools menu and add it to a policy or policies later.
On the Tools menu, point to Manage Data Control, and then click Data control rules and
perform steps 4 to 13.
2. In the Policies pane, double-click Data control. Then double-click the policy you want to
change.
3. In the Data control policy dialog box, on the Policy Rules tab, make sure the Enable data
control scanning check box is selected and click Manage Rules.
4. In the Data Control Rule Management dialog box, click the Add Content Rule button.
5. In the Create a Content Rule dialog box, under Rule name, type a name for the rule.
6. Under Rule description (optional), enter the rule’s description, if you wish.
7. Under Select the rule's conditions, the file content and destination conditions are already
selected. You must set up both conditions for a content rule.
8. Under Select the action to take if the rule is matched, select the action.
9. If you want to exclude some files from data control scanning, under Select files to exclude,
select the Where file name matches or Where the file type is check box.
10. Under Rule content, click the “select file content” underlined value.
11. In the Content Control List Management dialog box, select the Content Control Lists you
want to include in the rule.
If you want to add a SophosLabs Content Control List, select the one that applies to your
country or select a global Content Control List.
If you want to create a new Content Control List, see Create or edit a simple Content Control
List (page 160) or Create or edit an advanced Content Control List (page 161).
Click OK.
156
Help
12. If you want to change quantity assigned to a SophosLabs Content Control List, under Rule
content, click the “quantity” underlined value (“n or more matches”) that you want to change.
In the Quantity editor dialog box, enter a new quantity.
13. Under Rule content, select or enter conditions for the rest of the underlined values.
Click OK.
The new rule appears in the Data Control Rule Management dialog box.
14. To add the rule to the policy, select the check box next to the rule’ name and click OK.
The rule is added to the data control policy.
You can set up alerts and messages that will be sent to the user when a rule in the data control
policy is matched. See Set up data control alerts and messages (page 196).
157
Sophos Enterprise Console
7.5.9 Add a data control rule to a policy
If you use role-based administration:
■
You must have the Policy setting - data control right to perform this task.
■
You cannot edit a policy if it is applied outside your active sub-estate.
For more information, see About roles and sub-estates (page 17).
To add a data control rule to a policy:
1. Check which data control policy is used by the group or groups of computers you want to
configure.
See Check which policies a group uses (page 30).
2. In the Policies pane, double-click Data control. Then double-click the policy you want to
change.
The Data control policy dialog box is displayed.
3. On the Policy Rules tab, click Add Rule.
The Data Control Rule Management dialog box is displayed.
4. Select the rules you want to add to the policy and click OK.
7.5.10 Remove a data control rule from a policy
If you use role-based administration:
■
You must have the Policy setting - data control right to perform this task.
■
You cannot edit a policy if it is applied outside your active sub-estate.
For more information, see About roles and sub-estates (page 17).
To remove a data control rule from a policy:
1. Check which data control policy is used by the group or groups of computers you want to
configure.
See Check which policies a group uses (page 30).
2. In the Policies pane, double-click Data control. Then double-click the policy you want to
change.
The Data control policy dialog box is displayed.
3. On the Policy Rules tab, select the rule you want to remove and click Remove Rule.
158
Help
7.5.11 Exclude files or file types from data control
If you use role-based administration, you must have the Data control customization right to
exclude files from data control. For more information, see About roles and sub-estates (page 17).
You can exclude files and file types from data control by setting up exclusions in a data control
rule.
To exclude a file or file type from data control, exclude it in a rule with the highest priority (that
is, specifying the most restrictive action).
To exclude files or file types from data control:
1. On the Tools menu, point to Manage Data Control, and then click Data Control Rules.
2. In the Data Control Rule Management dialog box, select the rule you want to edit and click
Edit, or create a new rule by clicking the Add file matching rule or Add content rule button.
3. To exclude files from data control, in the Rule Editor dialog box, under Select files to exclude,
select the Where file name matches check box.
4. Under Rule content, click the underlined value to specify excluded file names.
5. In the Exclude File Name Condition dialog box, click Add and specify the names of the files
you want to exclude.
You can use the wildcards * and ?
The wildcard ? can be used only in a filename or extension. It generally matches any single
character. However, when used at the end of a filename or extension, it matches any single
character or no characters. For example file??.txt matches file.txt, file1.txt and file12.txt but
not file123.txt.
The wildcard * can be used only in a filename or extension, in the form [filename].* or
*.[extension]. For example, file*.txt, file.txt* and file.*txt are invalid.
6. To exclude file types from data control, in the Rule Editor dialog box, under Select files to
exclude, select the Where the file type is check box.
7. Under Rule content, click the underlined value to specify excluded file types.
8. In the Exclude File Type Condition dialog box, select the file types you want to exclude and
click OK.
7.5.12 Import or export a data control rule
If you use role-based administration, you must have the Data control customization right to
import or export a data control rule. For more information, see About roles and sub-estates (page
17).
Data control rules can be imported into or exported from Enterprise Console as XML files.
159
Sophos Enterprise Console
To import or export a data control rule:
1. On the Tools menu, point to Manage Data Control, and then click Data control rules.
2. In the Data Control Rule Management dialog box, click Import or Export.
■
If you want to import a rule, in the Import dialog box, browse to the rule you want to
import, select it and click Open.
■ If you want to export a rule, in the Export dialog box, browse to select a destination for the
file, type a name for the file and click Save.
7.5.13 Create or edit a simple Content Control List
If you use role-based administration, you must have the Data control customization right to
create a Content Control List. For more information, see About roles and sub-estates (page 17).
For an overview of Content Control Lists, see About Content Control Lists (page 151).
To create or edit a Content Control List:
1. On the Tools menu, point to Manage Data Control, and then click Data Control Content
Control Lists.
2. In the Content Control List Management dialog box, click Add to create a new Content
Control List, or select an existing Content Control List and click Edit.
3. In the Add Content Control List dialog box, in the Name field, enter a name for the Content
Control List.
4. In the Description field, enter a description for the Content Control List, if you wish.
5. If you want to add tags or edit the tags assigned to the Content Control List, click Change next
to the Tags field.
You can assign tags to identify the Content Control List's type and region where it applies.
6. In the Edit Content Control List Tags dialog box, in the Available tags list, select the tags you
want to assign and move them to the Selected tags list. Click OK.
7. In the Scan for content matching section, select a search condition (“Any of these terms”, “All
of these terms”, or “Exactly this phrase”) and enter the search terms you want to find in
documents, separated by a space. Click OK.
Note: The search is case insensitive.
Quotation marks are not supported in simple Content Control Lists. Use the “Exactly this
phrase” condition to scan for an exact phrase.
To create more complex expressions, use the advanced Content Control List editor as described
in Create or edit an advanced Content Control List (page 161).
The new content control list appears in the Content Control List Management dialog box.
160
Help
Examples
Search condition
Example
Description
Match any term
confidential secret
Matches documents containing either
"confidential" or "secret".
Match all terms
project confidential
Matches documents containing both
"project" and "confidential".
Exact match
for internal use only
Matches documents containing the
phrase "for internal use only".
Now you can add the new Content Control List to a content rule.
7.5.14 Create or edit an advanced Content Control List
If you use role-based administration, you must have the Data control customization right to
create a Content Control List. For more information, see About roles and sub-estates (page 17).
For an overview of Content Control Lists, see About Content Control Lists (page 151).
You can create a Content Control List that consists of one or more regular expressions and a
trigger score. To do this, use the advanced editor.
To create or edit a Content Control List using the advanced editor:
1. On the Tools menu, point to Manage Data Control, and then click Data Control Content
Control Lists.
2. In the Content Control List Management dialog box, click Add to create a new Content
Control List, or select an existing Content Control List and click Edit.
3. In the Add Content Control List dialog box, in the Name field, enter a name for the Content
Control List.
4. In the Description field, enter a description for the Content Control List, if you wish.
5. If you want to add tags or edit the tags assigned to the Content Control List, click Change next
to the Tags field.
You can assign tags to identify the Content Control List's type and region where it applies.
6. In the Edit Content Control List Tags dialog box, in the Available tags list, select the tags you
want to assign and move them to the Selected tags list. Click OK.
7. Click the Advanced button.
8. In the Advanced pane, click Create to create a new expression, or select an existing expression
and click Edit.
161
Sophos Enterprise Console
9. In the Content Control List - Advanced dialog box, enter a Perl 5 regular expression.
For a description of Perl 5 regular expressions, refer to Perl documentation or visit
http://www.boost.org/doc/libs/1_34_1/libs/regex/doc/syntax_perl.html.
10. In the Expression score field, enter the number that will be added to the total score for a
Content Control List when the regular expression is matched.
11. In the Maximum count field, enter the maximum number of matches for the regular expression
that can be counted towards the total score.
For example, an expression with the score of 5 and the maximum count of 2 can add the
maximum of 10 to the total score of the Content Control List. If the expression is found 3
times, it still adds 10 to the total score.
Click OK.
12. Repeat steps 5 to 11 if you want to add more regular expressions to the Content Control List.
13. In the Trigger score field, enter the number of times a regular expression must be matched
before the Content Control List is matched.
For example, consider a Content Control List that has the trigger score of 8 and consists of 3
expressions (A, B, and C) with the following scores and maximum counts:
Expression
Score
Maximum count
Expression A
5
2
Expression B
3
1
Expression C
1
5
This Content Control List is matched if data control finds 2 matches of expression A or 1 match
of expression A and 1 match of expression B, or 1 match of expression B and 5 matches of
expression C.
Click OK.
The new Content Control List appears in the Content Control List Management dialog box.
Regular expression example
(?i)\b[a-ceghj-npr-tw-z][a-ceghj-npr-tw-z]\s?\d{2}\s?\d{2}\s?\d{2}\s?[abcd]?\b
This regular expression matches UK National Insurance numbers, for example, AA 11 11 11 A.
162
(?i)
Makes the match case-insensitive.
\b
Matches a boundary between a word character and a non-word character.
Help
[a-ceghj-npr-tw-z]
Matches any single character in the range of characters (A to C E G H J to
N P R to T W to Z).
?
Matches the preceding element zero or one time.
\s?
Matches zero or one whitespace.
\d{2}
Matches two digits.
[abcd]
Matches any single character from the list (A, B, C, or D).
Now you can add the new Content Control List to a content rule.
7.5.15 Import or export a Content Control List
If you use role-based administration, you must have the Data control customization right to
import or export a Content Control List. For more information, see About roles and sub-estates
(page 17).
Content Control Lists can be imported into or exported from Enterprise Console as XML files.
You can share Content Control Lists between Sophos products that support them.
Note: SophosLabs Content Control Lists cannot be exported.
To import or export a Content Control List:
1. On the Tools menu, point to Manage Data Control, and then click Data control content
control lists.
2. In the Content Control List Management dialog box, click Import or Export.
■
If you want to import a Content Control List, in the Import dialog box, browse to the
Content Control List you want to import, select it and click Open.
■ If you want to export a Content Control List, in the Export dialog box, browse to select a
destination for the file, type a name for the file and click Save.
7.6 Configuring the device control policy
7.6.1 About device control
Note: This feature is not included with all licenses. If you want to use it, you might need to change
your license. For more information, see
http://www.sophos.com/en-us/products/complete/comparison.aspx.
Important: Sophos device control should not be deployed alongside device control software from
other vendors.
163
Sophos Enterprise Console
Device control enables you to prevent users from using unauthorized external hardware devices,
removable storage media, and wireless connection technologies on their computers. This can help
to significantly reduce your exposure to accidental data loss and restrict the ability of users to
introduce software from outside of your network environment.
Removable storage devices, optical disk drives, and floppy disk drives can also be set to provide
read-only access.
Using device control, you can also significantly reduce the risk of network bridging between a
corporate network and a non-corporate network. The Block bridged mode is available for both
wireless and modem types of device. The mode works by disabling either wireless or modem
network adapters when an endpoint is connected to a physical network (typically through an
Ethernet connection). Once the endpoint is disconnected from the physical network, the wireless
or modem network adapters are seamlessly re-enabled.
By default, device control is turned off and all devices are allowed.
If you want to enable device control for the first time, we recommend that you:
■
Select device types to control.
■
Detect devices without blocking them.
■
Use device control events to decide which device types to block and which, if any, devices
should be exempt.
■
Detect and block devices or allow read-only access to storage devices.
For more information about the recommended settings for device control, see the Sophos Enterprise
Console policy setup guide.
Note: If you use role-based administration:
■
You must have the Policy setting - device control right to configure a device control policy.
■
You cannot edit a policy if it is applied outside your active sub-estate.
For more information, see About roles and sub-estates (page 17).
7.6.2 About device control events
When a device control event occurs, for example, a removable storage device has been blocked,
the event is sent to Enterprise Console and can be viewed in the Device Control - Event Viewer
dialog box.
In the Device Control - Event Viewer dialog box, you can use filters to display only the events
you are interested in. You can also export the list of device control events to a file. For details, see
View device control events (page 203) and Export the list of events to a file (page 211).
You can use device control events to add exemptions for specific devices or device models to the
device control policies. For more information about exempting devices, see Exempt a device from
a single policy (page 169) or Exempt a device from all policies (page 168).
164
Help
The number of computers with device control events over a specified threshold within the last
seven days is displayed on the Dashboard. For information on how to set up the threshold, see
Configure the Dashboard (page 54).
You can also set up alerts to be sent to your chosen recipients when a device control event has
occurred. For details, see Set up device control alerts and messages (page 197).
7.6.3 What types of device can be controlled?
Device control enables you to block three types of device: storage, network, and short range.
Storage
■
Removable storage devices (for example, USB flash drives, PC Card readers, and external hard
disk drives)
■
Optical media drives (CD-ROM/DVD/Blu-ray drives)
■
Floppy disk drives
■
Secure removable storage devices (SanDisk Cruzer Enterprise, SanDisk Cruzer Enterprise FIPS
Edition, Kingston Data Traveler Vault - Privacy Edition, Kingston Data Traveler BlackBox,
and IronKey Enterprise Basic Edition USB flash drives with hardware encryption)
Using the secure removable storage category, you can easily allow the use of supported secure
removable storage devices while blocking other removable storage devices. For an up-to-date list
of supported secure removable storage devices, see Sophos support knowledgebase article 63102
(http://www.sophos.com/support/knowledgebase/article/63102.html).
Network
■
Modems
■
Wireless (Wi-Fi interfaces, 802.11 standard)
For network interfaces, you can also select the Block bridged mode that helps to significantly
reduce the risk of network bridging between a corporate network and a non-corporate network.
The mode works by disabling either wireless or modem network adapters when an endpoint is
connected to a physical network (typically through an Ethernet connection). Once the endpoint
is disconnected from the physical network, the wireless or modem network adapters are seamlessly
re-enabled.
Short Range
■
Bluetooth interfaces
■
Infrared (IrDA infrared interfaces)
Device control blocks both internal and external devices and interfaces. For example, a policy
which blocks Bluetooth interfaces will block both of the following:
■
The built-in Bluetooth interface in a computer
165
Sophos Enterprise Console
■
Any USB-based Bluetooth adapters plugged into the computer
7.6.4 Select device types to control
If you use role-based administration:
■
You must have the Policy setting - device control right to edit a device control policy.
■
You cannot edit a policy if it is applied outside your active sub-estate.
For more information, see About roles and sub-estates (page 17).
Important: You should not block Wi-Fi connections on computers that are managed by Enterprise
Console via Wi-Fi.
1. Check which device control policy is used by the group(s) of computers you want to configure.
See Check which policies a group uses (page 30).
2. In the Policies pane, double-click Device control. Then double-click the policy you want to
change.
3. In the Device control policy dialog box, on the Configuration tab, under Storage, select the
type of storage device you want to control.
4. Click in the Status column next to the device type, and then click the drop-down arrow that
appears. Select the type of access that you want to allow.
By default, devices have full access. For removable storage devices, optical disk drives and floppy
disk drives, you can change that to “Blocked” or “Read only.” For secure removable storage
devices, you can change that to “Blocked.”
5. Under Network, select the type of network device you want to block.
6. Click in the Status column next to the type of network device, and then click the drop-down
arrow that appears.
■
■
Select “Blocked” if you want to block the device type.
Select “Block bridged” if you want to prevent network bridging between a corporate network
and a non-corporate network. The device type will be blocked when an endpoint is connected
to a physical network (typically through an Ethernet connection). Once the endpoint is
disconnected from the physical network, the device type will be re-enabled.
7. Under Short Range, select the type of short-range device you want to block. In the Status
column next to the device type, select “Blocked.”
Click OK.
7.6.5 Detect devices without blocking them
If you use role-based administration:
■
166
You must have the Policy setting - device control right to edit a device control policy.
Help
■
You cannot edit a policy if it is applied outside your active sub-estate.
For more information, see About roles and sub-estates (page 17).
You can detect devices without blocking them. This is useful if you intend to block devices in
future, but want to detect and exempt the devices you need first.
To detect devices without blocking them, enable device control scanning in a device control policy
and turn on the detection-only mode. Change the status of the devices you want to detect to
“Blocked.” This will generate events for devices used on endpoint computers when the policy
would have been infringed, but the devices will not be blocked.
For information about viewing device control events, see View device control events (page 203).
To detect devices without blocking them:
1. Check which device control policy is used by the group(s) of computers you want to configure.
See Check which policies a group uses (page 30).
2. In the Policies pane, double-click Device control. Then double-click the policy you want to
change.
3. In the Device control policy dialog box, on the Configuration tab, select Enable device control
scanning.
4. Select Detect but do not block devices.
5. If you haven’t done so already, change the status of devices you want to detect to “Blocked.”
(For details, see Select device types to control (page 166).)
Click OK.
7.6.6 Detect and block devices
If you use role-based administration:
■
You must have the Policy setting - device control right to edit a device control policy.
■
You cannot edit a policy if it is applied outside your active sub-estate.
For more information, see About roles and sub-estates (page 17).
1. Check which device control policy is used by the group(s) of computers you want to configure.
See Check which policies a group uses (page 30).
2. In the Policies pane, double-click Device control. Then double-click the policy you want to
change.
3. In the Device control policy dialog box, on the Configuration tab, select the Enable device
control scanning check box.
4. Clear the Detect but do not block devices check box.
167
Sophos Enterprise Console
5. If you haven’t done so already, change the status of devices you want to block to “Blocked.”
(For details, see Select device types to control (page 166).)
Click OK.
7.6.7 Exempt a device from all policies
If you use role-based administration:
■
You must have the Policy setting - device control right to edit a device control policy.
■
You cannot edit a policy if it is applied outside your active sub-estate.
For more information, see About roles and sub-estates (page 17).
You can exempt a device from all policies, including the default one. That exception will then be
added to all new policies you create.
You can exempt a device instance (“this device only”) or a device model (“all devices of this
model”). Do not set exemptions at both the model and device instance level. If both are defined,
the device instance level will take precedence.
To exempt a device from all device control policies:
1. On the Events menu, click Device Control Events.
The Device Control - Event Viewer dialog box appears.
2. If you want to display only certain events, in the Search criteria pane, set the filters as
appropriate and click Search to display the events.
For more information, see View device control events (page 203).
3. Select the entry for the device that you want to exempt from the policies, and then click Exempt
Device.
The Exempt device dialog box appears. Under Device details, you see the type, model, and ID
of the device. Under Exemption details, Scope, you see the words “All policies.”
Note: If there is no event for the device you want to exempt, for example, an integral CD or
DVD drive on an endpoint computer, go to the computer containing the device and enable
the device in the Device Manager. (To access Device Manager, right-click My Computer, click
Manage, and then click Device Manager.) This will generate a new “block” event that will
appear in the Device Control - Event Viewer dialog box. You can then exempt the device as
described earlier in this step.
4. Select whether you want to exempt this device only or all devices of this model.
5. Select whether you want to allow full access or read-only access to the device.
6. In the Comment field, enter a comment, if you wish. For example, you can specify who requested
to exempt the device.
7. Click OK.
168
Help
7.6.8 Exempt a device from a single policy
If you use role-based administration:
■
You must have the Policy setting - device control right to edit a device control policy.
■
You cannot edit a policy if it is applied outside your active sub-estate.
For more information, see About roles and sub-estates (page 17).
You can exempt a specific device from a device control policy.
You can exempt a device instance (“this device only”) or a device model (“all devices of this
model”). Do not set exemptions at both the model and device instance level. If both are defined,
the device instance level will take precedence.
To exempt a device from a policy:
1. Check which device control policy is used by the group(s) of computers you want to configure.
See Check which policies a group uses (page 30).
2. In the Policies pane, double-click Device control. Then double-click the policy you want to
change.
3. In the Device control policy dialog box, on the Configuration tab, click Add exemption.
The Device Control - Event Viewer dialog box appears.
4. If you want to display only certain events, in the Search criteria pane, set the filters as
appropriate and click Search to display the events.
For more information, see View device control events (page 203).
5. Select the entry for the device that you want to exempt from the policy, and then click Exempt
Device.
The Exempt device dialog box appears. Under Device details, you see the type, model, and ID
of the device. Under Exemption details, Scope, you see the words “This policy only.”
Note: If there is no event for the device you want to exempt, for example, an integral CD or
DVD drive on an endpoint computer, go to the computer containing the device and enable
the device in the Device Manager. (To access Device Manager, right-click My Computer, click
Manage, and then click Device Manager.) This will generate a new “block” event that will
appear in the Device Control - Event Viewer dialog box. You can then exempt the device as
described earlier in this step.
6. Select whether you want to exempt this device only or all devices of this model.
7. Select whether you want to allow full access or read-only access to the device.
8. In the Comment field, enter a comment, if you wish. For example, you can specify who requested
to exempt the device.
9. Click OK.
169
Sophos Enterprise Console
7.6.9 View or edit the list of exempt devices
If you use role-based administration:
■
You must have the Policy setting - device control right to edit a device control policy.
■
You cannot edit a policy if it is applied outside your active sub-estate.
For more information, see About roles and sub-estates (page 17).
To view or edit the list of exempt devices:
1. Check which device control policy is used by the group(s) of computers you want to configure.
See Check which policies a group uses (page 30).
2. In the Policies pane, double-click Device control. Then double-click the policy you want to
change.
3. In the Device control policy dialog box, on the Configuration tab, select the type of device
for which you want to view exemptions, for example, optical drive. Click View Exemptions.
The <Device type> exemptions dialog box is displayed. If an exemption is for all devices of
that model, the Device ID field is blank.
4. If you want to edit the list of exempt devices, do one of the following:
■
If you want to add an exemption, click Add. For more information, see Exempt a device
from a single policy (page 169).
■ If you want to edit an exemption, select the exemption and click Edit. Edit the settings in
the Exempt device dialog box as appropriate.
■ If you want to remove an exemption, select the exempt device and click Remove.
This will remove the exempt device from the policy you are editing. If you want to remove
the device from other policies, repeat the steps in this task for each policy.
7.7 Configuring the full disk encryption policy
7.7.1 About full disk encryption
Note: This feature is not included with all licenses. If you want to use it, you might need to change
your license. For more information, see
http://www.sophos.com/en-us/products/complete/comparison.aspx.
Full disk encryption protects the data on endpoint computers from being read or changed by
unauthorized persons. Volumes on disks are encrypted transparently. Users do not need to decide
what data is to be encrypted. Encryption and decryption are performed in the background.
170
Help
By default, computers protected by full disk encryption run the Power-on Authentication (POA)
before the operating system starts. After the user has logged on at the Power-on Authentication,
the operating system starts and the user is logged on to Windows.
For convenient access, full disk encryption offers several features that aid IT operations on endpoint
computers:
■
The Power-on Authentication can be temporarily deactivated for Wake on LAN, for example
to facilitate patch management.
■
Normally, the first user who logs on to an endpoint computer after the encryption software
has been installed, activates the Power-on Authentication. You can configure Windows accounts
for logon to endpoint computers without activating the Power-on Authentication. This helps
members of the IT team, for example rollout operators. With the Windows accounts you specify
in the full disk encryption policy as Power-on Authentication exceptions, they can log on to
new computers for installation and verification tasks before end users log on and activate the
Power-on Authentication.
■
You can configure a POA user account to a member of the IT team to log on to endpoint
computers for administrative tasks when the Power-on Authentication is already active.
For recovery on computers protected by full disk encryption, the following logon recovery methods
are available:
■
Challenge/Response helps users who cannot log on to their computers or access encrypted
data. A Challenge/Response procedure involves the assistance of a help desk. During the
Challenge/Response procedure, the user provides a challenge code generated on the endpoint
computer to the help desk officer. The help desk officer then generates a response code that
authorizes the user to perform a specific action on the computer.
■
With Local Self Help users who have forgotten their password can log on at their computer
without the assistance of a help desk. Users log on by answering predefined questions in the
Power-on Authentication. Local Self Help reduces the number of help desk calls and allows
help desk staff to concentrate on more complex support requests.
For more information about the recommended settings for full disk encryption see the Sophos
Endpoint Security and Control policy setup guide.
7.7.2 Configure full disk encryption
Warning: If you are installing the Sophos encryption software for the first time, we strongly
recommend that you enable and test each setting step-by-step.
If you use role-based administration:
■
You must have the Policy setting - full disk encryption right to edit a full disk encryption
policy.
■
You cannot edit a policy if it is applied outside your active sub-estate.
For more information, see About roles and sub-estates (page 17).
171
Sophos Enterprise Console
By default, full disk encryption is not enabled.
To enable and configure full disk encryption:
1. Check which full disk encryption policy is used by the group or groups of computers you want
to configure.
See Check which policies a group uses (page 30).
2. In the Policies pane, double-click Full disk encryption. Then double-click the policy you want
to change.
The Full disk encryption dialog box is displayed.
3. Under Volumes to encrypt, specify which volumes you want to encrypt by selecting the relevant
check box(es):
■
■
Boot volumes
Non-boot volumes
4. Select Fast initial encryption (only encrypts used space on a drive) to reduce the time needed
for initial encryption on endpoint computers.
Note: The fast initial encryption mode leads to a less secure state if a disk has been in use before
encryption is applied. Unused sectors may still contain data.
5. Click OK.
When you assign the full disk encryption policy with these settings to a group of computers with
the latest Sophos encryption software installed, the encryption process starts once the policy is
received. The user can carry on working.
Note: To decrypt computers, clear the relevant options under Volumes to encrypt and assign the
policy to the group of computers to be decrypted. Users are then allowed to manually decrypt the
respective drives.
7.7.3 Configure logon
If you use role-based administration:
■
You must have the Policy setting - full disk encryption right to edit a full disk encryption
policy.
■
You cannot edit a policy if it is applied outside your active sub-estate.
For more information, see About roles and sub-estates (page 17).
By default, computers that use a full disk encryption policy are protected by Power-on
Authentication.
172
Help
To configure how users log on at the Power-on Authentication on their computers:
1. Check which full disk encryption policy is used by the group or groups of computers you want
to configure.
See Check which policies a group uses (page 30).
2. In the Policies pane, double-click Full disk encryption. Then double-click the policy you want
to change.
The Full Disk Encryption dialog box is displayed.
3. Go to Power-on Authentication (POA).
4. Make sure that Enable Power-on Authentication is selected.
In addition, you can specify Windows accounts that can log on to endpoint computers for
post-installation tasks without activating the Power-on Authentication:
a) Click the Exceptions button next to the Enable Power-on Authentication field.
The Exceptions dialog box is displayed.
b) Click Add, enter the User name and the Computer or Domain Name of the relevant
Windows account(s) and click OK.
Note: In the fields User name and Computer or Domain Name you can use wildcards as
the first or last character. In the User name field, the ? character is not allowed. In the
Computer or Domain Name field, the characters / \ [ ] : ; | = , + ? < > " are not allowed.
5. Select Fingerprint, to enable users to log on with Lenovo Fingerprint Reader.
6. To specify a user who can log on to the endpoint computer for administrative tasks when the
Power-on Authentication is already active, select POA user and click the Configure button.
a) In the Configure POA User dialog box, enter a logon name of your choice for the POA
user in the User name field. You can freely define the logon name, with the following
exceptions:
Note: In the User name field, the characters / \ [ ] : ; | = , + ? < > " * are not allowed.
Note: When setting up and entering logon names for POA users in Japanese, you have to
use Romaji (Roman) characters to successfully log on at the POA.
b) Click the Set button next to the Password field.
The POA User Password dialog box is displayed.
c) Enter and confirm a password for the POA user account and click OK.
Note: When setting up and entering passwords for POA users in Japanese, you have to use
Romaji (Roman) characters to successfully log on at the POA.
d) In the Configure POA User dialog box, click OK.
173
Sophos Enterprise Console
7. To configure the temporary deactivation of the Power-on Authentication for Wake on LAN,
select Temporary deactivation (for Wake on LAN).
For more information, see Configure temporary POA deactivation for Wake on LAN (page 174)
8. In the Full Disk Encryption dialog box, click OK.
Note: If you clear Enable Power-on Authentication, you are prompted to confirm if you want
to disable Power-on Authentication or not. For security reasons, we strongly recommend that
you click No to keep Power-on Authentication enabled. Deactivating Power-on Authentication
reduces system security to Windows logon security and increases the risk of unauthorized access
to encrypted data.
7.7.4 Configure temporary POA deactivation for Wake on LAN
If you use role-based administration:
■
You must have the Policy setting - full disk encryption right to edit a full disk encryption
policy.
■
You cannot edit a policy if it is applied outside your active sub-estate.
■
In the full disk encryption policy, the Enable Power-on Authentication field must be selected.
For more information, see About roles and sub-estates (page 17).
By default, computers who use a full disk encryption policy are protected by Power-on
Authentication. You can temporarily deactivate the Power-on Authentication for Wake on LAN,
for example to facilitate patch management. Wake on LAN is activated by running the scheduling
script SGMCMDIntn.exe on the endpoint computer.
Note: Deactivating the POA - even for a limited number of boot processes - reduces the level of
security of your system.
1. Check which full disk encryption policy is used by the group or groups of computers you want
to configure.
See Check which policies a group uses (page 30).
2. In the Policies pane, double-click Full disk encryption. Then double-click the policy you want
to change.
The Full Disk Encryption dialog box is displayed.
3. Under Power-on Authentication (POA), make sure that the Enable Power-on Authentication
field is selected.
4. Select Temporary deactivation (for Wake on LAN) and click the Configure button.
The Configure Temporary Deactivation dialog box is displayed.
5. In the Start and End fields, specify the start and end time for the Wake on LAN process.
174
Help
6. Select Allow Windows logon during this time to permit Windows logon during Wake on
LAN, for example for software updates.
7. In the Auto logon limit field, specify how often the computer is restarted without authentication
through the Power-on Authentication during Wake on LAN.
Note: We recommend that you allow three more restarts than necessary in case of any problems.
8. Click OK.
7.7.4.1 Wake on LAN example
For a software rollout planned between 03:00 am and 06:00 am on a specific date, two restarts are
required. The local software rollout agent must be able to log on to Windows.
In the full disk encryption policy, under Temporary deactivation (for Wake on LAN) you configure
the following settings:
Policy setting
Value
Start
Day before software rollout, 12:00 noon
End
Day of software rollout 06:00 am
Allow Windows logon during this time
Yes
Auto logon limit
5
As the auto logon limit is set to 5 the endpoint computer starts 5 times without authentication
through POA.
Note: In this example, the autologon limit is set to 5 as we recommend that you allow three more
restarts than necessary in case of any problems.
By setting the start time to 12:00 noon on the day before the software rollout, you make sure that
the scheduling script SGMCMDIntn.exe is started in time and that the Wake on LAN process
starts no later than 03:00 am on the day of the software rollout.
The following two commands have to be created for the scheduling script SGCMDIntn.exe by the
software rollout team:
■
Start on the day before software rollout, 12:15 am, SGMCMDIntn.exe -WOLstart
■
Start on the day after the software rollout, 09:00 am, SGMCMDIntn.exe -WOLstop
The date of the software rollout script is defined as the day of the rollout, 03:00 am. Wake on LAN
can explicitly be deactivated again at the end of the script with SGMCMDIntn.exe -WOLstop.
All endpoint computers that log on before the date specified for Start and connect to the rollout
servers receive the new policy and the scheduling commands.
175
Sophos Enterprise Console
Any endpoint computer on which the schedule triggers the command SGMMCMDIntn -WOLStart
between the day before the rollout at 12:00 noon and the day of the rollout at 06:00 am falls within
the WOL time interval. Therefore Wake on LAN is activated.
7.7.5 Configure Challenge/Response
If you use role-based administration:
■
You must have the Policy setting - full disk encryption right to edit a full disk encryption
policy.
■
You cannot edit a policy if it is applied outside your active sub-estate.
■
In the full disk encryption policy, the Enable Power-on Authentication field must be selected.
For more information, see About roles and sub-estates (page 17).
Challenge/Response helps users who cannot log on to their computers or access encrypted data.
A Challenge/Response procedure involves the assistance of a help desk.
To configure Challenge/Response:
1. Check which full disk encryption policy is used by the group or groups of computers you want
to configure.
See Check which policies a group uses (page 30).
2. In the Policies pane, double-click Full disk encryption. Then double-click the policy you want
to change.
The Full Disk Encryption dialog box is displayed.
3. Under Power-on Authentication (POA), make sure that the Enable Power-on Authentication
field is selected.
4. Under Logon recovery methods, make sure that Challenge/Response (help desk needed) is
selected.
5. Click the Configure button next to Challenge/Response (help desk needed).
The Configure Challenge/Response Welcome Text dialog box is displayed.
6. In the text field, you can enter text that is displayed when the user initiates a Challenge/Response
procedure in the Power-on Authentication. For example: "Please contact the help desk on the
phone number 1234-56789." After you have entered the text click OK.
7. Click OK.
7.7.6 Configure Local Self Help
If you use role-based administration:
■
176
You must have the Policy setting - full disk encryption right to edit a full disk encryption
policy.
Help
■
You cannot edit a policy if it is applied outside your active sub-estate.
■
To configure global settings for Local Self Help, you must have the right Global encryption
settings.
■
In the full disk encryption policy, the Enable Power-on Authentication field must be selected.
For more information, see About roles and sub-estates (page 17).
With Local Self Help, users who have forgotten their password can log on to their computers
without the assistance of a help desk. Users log on by answering predefined questions in the
Power-on Authentication.
To configure Local Self Help:
1. Check which full disk encryption policy is used by the group or groups of computers you want
to configure.
See Check which policies a group uses (page 30).
2. In the Policies pane, double-click Full disk encryption. Then double-click the policy you want
to change.
The Full Disk Encryption dialog box is displayed.
3. Under Power-on Authentication (POA), make sure that the Enable Power-on Authentication
field is selected.
4. Under Logon recovery methods, select Local Self Help (without help desk) and click OK.
5. To configure further settings for Local Self Help, click Global Encryption Settings.
The Global Encryption Settings dialog box is displayed.
6. Under Local Self Help, configure the following settings:
a) In the The user has to answer: drop-down list, select how many questions users must answer
correctly to log on.
b) To allow users to define their own questions, select Allow users to define their own
questions.
7. Click OK.
7.7.7 Configure global encryption settings
If you use role-based administration, you must have the right Global encryption settings.
For more information, see About roles and sub-estates (page 17).
Besides the settings in full disk encryption policies you can configure global encryption settings:
display settings, global settings for Local Self Help and logging settings.
177
Sophos Enterprise Console
To configure global encryption settings:
1. In the Policies pane, double-click Full disk encryption. Then double-click the policy you want
to change.
The Full Disk Encryption dialog box is displayed.
2. Click Global Encryption Settings.
The Global Encryption Settings dialog box is displayed.
3. Under Display, configure the following settings:
a) To show the full disk encryption icon in the Windows notification area on endpoint
computers for quick and easy access to all user functions, select Icon in Windows
notification area.
b) To show the encryption icon in Windows Explorer on endpoint computers for encrypted
drives, select Encryption status in Windows Explorer.
c) To display your chosen text before the user logs on at the Power-on Authentication, select
Legal notice when the computer starts. To configure the text to be displayed (for example
legal notices required by law or information for anyone who finds a lost laptop) click
Configure, enter the required text in the Configure Legal Notice dialog box and click OK.
4. Under Local Self Help, you can define global settings for the Local Self Help logon recovery
method. For more information, see Configure Local Self Help (page 176).
5. Click OK.
7.7.8 Back up company certificate
If you use role-based administration, you must have the right Global encryption settings.
For more information, see About roles and sub-estates (page 17).
Certificates are used to secure the communication between the endpoint computers and the
database. When encryption is installed the company certificate is used to recover a corrupt database.
The company certificate is backed up during Enterprise Console installation, but you can back it
up to different locations any time.
Note: Besides the company certificate there is a second type of certificate, the MSO certificate.
This certificate is used to recover a corrupt server. The MSO certificate can only be backed up
during Enterprise Console installation. Make sure that you do not lose this backup.
To back up the company certificate:
1. On the Tools menu, click Manage encryption and select Backup company certificate.
2. In Backup company certificate click Export.
3. Select a location for the backup store and enter and confirm a password to encrypt the store.
take a note of the password.
178
Help
7.8 Configuring the tamper protection policy
7.8.1 About tamper protection
Tamper protection enables you to prevent unauthorized users (local administrators and users
with limited technical knowledge) and known malware from uninstalling Sophos security software
or disabling it through the Sophos Endpoint Security and Control interface.
Note: Tamper protection is not designed to protect against users with extensive technical
knowledge. Nor does it protect against malware which has been specifically designed to subvert
the operating system to avoid detection. This type of malware is only detected by scanning for
threats and suspicious behavior. (For more information, see About the anti-virus and HIPS policy
(page 90).)
After you enable tamper protection and create a tamper-protection password, a member of the
SophosAdministrator group on the endpoint who does not know the password will not be able
to:
■
Re-configure on-access scanning or suspicious behavior detection settings in Sophos Endpoint
Security and Control.
■
Disable tamper protection.
■
Uninstall the Sophos Endpoint Security and Control components (Sophos Anti-Virus, Sophos
Client Firewall, Sophos AutoUpdate, or Sophos Remote Management System).
■
Uninstall Sophos Disk Encryption.
If you want to enable SophosAdministrators to perform these tasks, you must provide them with
the tamper protection password so that they can authenticate themselves with tamper protection
first.
Tamper protection does not affect members of the SophosUser and SophosPowerUser groups.
When tamper protection is enabled, they will be able to perform all tasks that they are usually
authorized to perform, without the need to enter the tamper protection password.
Note: If you use role-based administration:
■
You must have the Policy setting - tamper protection right to configure a tamper protection
policy.
■
You cannot edit a policy if it is applied outside your active sub-estate.
For more information, see About roles and sub-estates (page 17).
Tamper protection events
When a tamper protection event occurs, for example, an unauthorized attempt to uninstall Sophos
Anti-Virus from an endpoint computer has been prevented, the event is written in the event log
179
Sophos Enterprise Console
that can be viewed from Enterprise Console. For details, see View tamper protection events (page
205).
There are two types of tamper protection event:
■
Successful tamper protection authentication events, showing the name of the authenticated
user and the time of authentication.
■
Failed attempts to tamper, showing the name of the targeted Sophos product or component,
the time of the attempt, and the details of the user responsible for the attempt.
7.8.2 Turn tamper protection on or off
If you use role-based administration:
■
You must have the Policy setting - tamper protection right to configure a tamper protection
policy.
■
You cannot edit a policy if it is applied outside your active sub-estate.
For more information, see About roles and sub-estates (page 17).
To turn tamper protection on or off:
1. Check which tamper protection policy is used by the group(s) of computers you want to
configure.
See Check which policies a group uses (page 30).
2. In the Policies pane, double-click Tamper protection. Then double-click the policy you want
to change.
3. In the Tamper Protection Policy dialog box, select or clear the Enable tamper protection
check box.
If you want to enable tamper protection for the first time, click Set under the Password box.
In the Tamper Protection Password dialog box, enter and confirm a password.
Tip: We recommend that the password should be at least eight characters long and contain
mixed-case letters and numbers.
7.8.3 Change the tamper protection password
If you use role-based administration:
■
You must have the Policy setting - tamper protection right to configure a tamper protection
policy.
■
You cannot edit a policy if it is applied outside your active sub-estate.
For more information, see About roles and sub-estates (page 17).
180
Help
To change the tamper protection password:
1. Check which tamper protection policy is used by the group(s) of computers you want to
configure.
See Check which policies a group uses (page 30).
2. In the Policies pane, double-click Tamper protection. Then double-click the policy you want
to change.
3. In the Tamper Protection Policy dialog box, click Change under the Password box. In the
Tamper Protection Password dialog box, enter and confirm a new password.
Tip: The password should be at least eight characters long and contain mixed-case letters and
numbers.
7.9 Configuring the patch policy
7.9.1 About patch assessment
Note: This feature is not included with all licenses. If you want to use it, you might need to change
your license. For more information, see
http://www.sophos.com/en-us/products/complete/comparison.aspx.
Enterprise Console enables you to check that your computers have the most up-to-date security
patches installed.
SophosLabs provides ratings that help you determine the most critical security patch issues so that
you can resolve them quickly. SophosLabs ratings take the latest exploits into account and therefore
may differ from a vendor's severity level.
Before using patch, you must install the patch agent on your networked computers so that they
can perform patch assessments and communicate status to Enterprise Console. You can install
this using the Protect Computers Wizard. See Protect computers automatically (page 50).
This section assumes that you have installed the patch agent.
Note: If you use role-based administration:
■
You must have the Policy setting - patch right to configure a patch policy.
■
You cannot edit a policy if it is applied outside your active sub-estate.
For more information about role-based administration, see About roles and sub-estates (page 17).
7.9.2 How does patch assessment work?
Patch assessment is disabled in the default policy. Once patch assessment is enabled, computers
begin an assessment. This can take several minutes. Subsequent assessments occur at the interval
set in policy, which is daily by default.
181
Sophos Enterprise Console
Note: If computers run an assessment before Enterprise Console has downloaded patch data from
Sophos for the first time, the Patch Event viewer displays no results. The download can take several
hours. To check if this has completed, see the Patch updates field in Events > Patch Assessment
Events.
If the patch agent cannot update from Enterprise Console, for any reason, it will continue to assess
computers against the previously downloaded patch detections.
Computers are only assessed for security patches on software that is installed on the computer. If
a new patch is released that supersedes an older patch, then patch assessment will no longer check
for the presence of the older patch. Only the new patch will be assessed.
You can configure Sophos NAC to use patch assessment results when deciding whether a computer
should have network access.
7.9.2.1 What are superseded patches?
If a vendor releases a patch that replaces an earlier patch, the new patch is called a superseding
patch. The patch it replaces is referred to as the superseded patch.
Sophos recommends you install the superseding patch to keep your computers up-to-date.
Example: If you search for virusX and see that the fix for the virus is available in patch P01, which
is superseded by patch P02, Sophos recommends you install P02.
7.9.3 About patch assessment events
When a patch assessment event occurs, for example, a computer is missing a patch, the event is
sent to Enterprise Console and can be viewed in the Patch Assessment - Event Viewer.
In the Patch Assessment - Event Viewer, you can use filters to display only the events you are
interested in. You can also export the list of patch assessment events to a file. For details, see View
patch assessment events (page 207) and Export the list of events to a file (page 211).
7.9.4 Turn patch assessment on or off
If you use role-based administration:
■
You must have the Policy setting - patch right to configure a patch policy.
■
You cannot edit a policy if it is applied outside your active sub-estate.
For more information, see About roles and sub-estates (page 17).
To turn patch assessment on or off:
1. Check which patch policy is used by the group(s) of computers you want to configure.
See Check which policies a group uses (page 30).
2. In the Policies pane, double-click Patch. Then double-click the policy you want to change.
182
Help
3. In the Patch Policy dialog box, select or clear the Enable patch assessments check box, and
click OK.
7.9.5 Select the patch assessment interval
If you use role-based administration:
■
You must have the Policy setting - patch right to configure a patch policy.
■
You cannot edit a policy if it is applied outside your active sub-estate.
For more information, see About roles and sub-estates (page 17).
To set the patch assessment interval:
1. Check which patch policy is used by the group(s) of computers you want to configure.
See Check which policies a group uses (page 30).
2. In the Policies pane, double-click Patch. Then double-click the policy you want to change.
3. In the Patch Policy dialog box, click the drop-down arrow of the Assess for missing patches
field, and select the appropriate interval. Click OK.
To assess at this interval, patch assessment must be enabled in the policy.
7.10 Configuring the web control policy
7.10.1 About the web control policy
Note: This feature is not included with all licenses. If you want to use it, you might need to change
your license. For more information, see
http://www.sophos.com/en-us/products/complete/comparison.aspx.
By default, the web control policy is turned off in Enterprise Console. Selecting Enable web control
allows you to choose one of the following policy options:
■
Inappropriate Website Control: This basic web control option includes 14 essential site
categories. It is designed to protect users from visiting websites for which your organization
could be legally liable. For more information, see About Inappropriate Website Control (page
184).
■
Full Web Control: This option uses a complete web policy that is configured and deployed via
a Sophos Web Appliance or Security Management Appliance. It enforces a comprehensive,
full-featured web control policy, and provides complete reporting on web traffic. A Sophos
Web Appliance or Management Appliance is required for this option. For more information,
see About Full Web Control (page 189).
When using Inappropriate Website Control, you can either edit an existing web control policy,
or create a new policy. For more information, see Create a policy (page 34). You can set the various
183
Sophos Enterprise Console
site categories to “Block,” “Warn,” or “Allow.” Web control status and web events are displayed
in Enterprise Console. For more information about web events, see View web events (page 210).
If, instead, you are using the Full Web Control policy, Enterprise Console requires the location
of the Web Appliance or Management Appliance from which the full web-filtering policy is
configured, together with a shared key to secure communication between the appliance and
Enterprise Console. When the Full Web Control policy is selected, most of the reporting and
monitoring is shifted to the Web Appliance or Management Appliance; however, websites scanned
and assessed by Sophos Endpoint Security and Control's live URL-filtering (Web Protection) are
displayed in Enterprise Console as web events.
Note: If you use role-based administration:
■
You must have the Policy setting - web control right to edit a web control policy.
■
You cannot edit a policy if it is applied outside your active sub-estate.
For more information about role-based administration, see About roles and sub-estates (page 17).
7.10.2 Inappropriate Website Control
7.10.2.1 About Inappropriate Website Control
Note: This feature is not included with all licenses. If you want to use it, you might need to
customize your license. For more information, see
http://www.sophos.com/en-us/products/complete/comparison.aspx.
With this basic form of website control, you can filter the web activity of users, based on 14 website
categories. There is a default action for each category (described in About website categories (page
185)), but, if necessary, you can select a different action, as described in Select a website category
action (page 187).
Users can be blocked from visiting restricted websites. An event is triggered that is shown to the
user and sent to Enterprise Console.
Alternatively, users can be warned by means of a notification when visiting controlled websites;
even if the user does not proceed, a warning event is triggered. If the user proceeds and views a
site despite the warning, a second event is triggered and sent to Enterprise Console.
Note: Although HTTP and HTTPS sites are both filtered in all supported web browsers, user
notifications are different, depending on whether the URL is HTTP or HTTPS. With HTTP sites,
users see notification pages for sites in categories set to “Block” or “Warn.” For HTTPS, users only
see “Block” notifications, and they are displayed as a balloon tip in the Windows System Tray.
HTTPS “Warn” actions are neither displayed to the user nor are they logged. Instead, users are
allowed to continue to the requested page, and the event is logged as a “Proceed” in Enterprise
Console.
If you select the “Allow” action for a website category, users can access all websites within this
category, unless website exceptions are specified. “Allow” events are not logged when Inappropriate
Website Control is selected.
184
Help
Note: Allowed sites are still scanned and assessed by Sophos Endpoint Security and Control's live
URL-filtering (Web protection) feature.
7.10.2.2 Turn on Inappropriate Website Control
Perform the following steps to turn on web control in Enterprise Console and use Inappropriate
Website Control.
Note: If you use role-based administration:
■
You must have the Policy setting - web control right to edit a web control policy.
■
You cannot edit a policy if it is applied outside your active sub-estate.
For more information about role-based administration, see About roles and sub-estates (page 17).
To turn on Inappropriate Website Control:
1. Check which web control policy is used by the group(s) of computers you want to configure.
For more information, see Check which policies a group uses (page 30).
2. In the Policies pane, double-click Web control. Then double-click the policy you want to
change.
The Web Control Policy dialog box is displayed.
3. On the General tab, select Enable web control.
The Inappropriate Website Control policy is displayed. Although there is a default action for
each of the 14 site categories, you can set a different action. For more information, see Select
a website category action (page 187).
7.10.2.3 About website categories
By selecting Inappropriate Website Control, you can configure 14 website categories, controlling
the internet content that users can access through a web browser. For more information, see About
Inappropriate Website Control (page 184).
The website categories described below are filtered. The default action for each category is indicated
in brackets. Each category can be configured as Block, Warn, or Allow. Selecting Allow gives users
access to all sites within that category. To change the action, see Select a website category action
(page 187).
■
Adult Sexually Explicit (Block): This category includes sites for adult products including sex
toys, CD-ROMs, and videos; child pornography and pedophilia (including the IWF list); adult
services including video-conferencing, escort services, and strip clubs; erotic stories and textual
descriptions of sexual acts; explicit cartoons and animation; online groups, including newsgroups
and forums that are sexually explicit in nature; sexually-oriented or erotic sites with full or
partial nudity; depictions or images of sexual acts, including with animals or inanimate objects
used in a sexual manner; sexually exploitive or sexually violent text or graphics; bondage,
fetishes, genital piercing; naturist sites that feature nudity; and erotic or fetish photography
that depicts nudity.
185
Sophos Enterprise Console
Note: We do not include sites regarding sexual health, breast cancer, or sexually transmitted
diseases (except those with graphic examples).
■
Alcohol and Tobacco (Warn): This category includes sites that promote or distribute alcohol
or tobacco products for free or for a charge.
■
Anonymizer Proxies (Block): This category includes sites for remote proxies or anonymous
surfing, search engine caches that circumvent filtering, and web-based translation sites that
circumvent filtering.
■
Criminal Activity (Block): This category includes sites for advocating, instructing, or giving
advice on performing illegal acts; tips on evading law enforcement; and lock-picking and
burglary techniques.
■
Gambling (Warn): This category includes sites of online gambling or lottery websites that
invite the use of real or virtual money; information or advice for placing wagers, participating
in lotteries, gambling, or running numbers; virtual casinos and offshore gambling ventures;
sports picks and betting pools; and virtual sports and fantasy leagues that offer large rewards
or request significant wagers.
■
Hacking (Block): This category includes sites for the promotion, instruction, or advice on the
questionable or illegal use of equipment and software for purpose of hacking passwords, creating
viruses, gaining access to other computers and computerized communication systems; sites
that provide instruction or work-arounds for filtering software; cracked software and
information sites; warez; pirated software and multimedia download sites; and computer crime
sites.
■
Illegal Drugs (Block): This category includes sites for recipes, instructions or kits for
manufacturing or growing illicit substances for purposes other than industrial usage;
glamorizing, encouraging, or instructing on the use of or masking the use of alcohol, tobacco,
illegal drugs, or other substances that are illegal to minors; information on "legal highs",
including glue sniffing, misuse of prescription drugs, or abuse of other legal substances;
distributing illegal drugs free or for a charge; and displaying, selling, or detailing the use of
drug paraphernalia.
■
Intolerance and Hate (Block) : This category includes sites that advocate or incite degradation
or attack of specified populations or institutions based on associations such as religion, race,
nationality, gender, age, disability, or sexual orientation; sites that promote a political or social
agenda that is supremacist in nature and exclusionary of others based on their race, religion,
nationality, gender, age, disability, or sexual orientation; holocaust revisionist or denial sites
and other revisionist sites that encourage hate; coercion or recruitment for membership in a
gang1 or cult 2; militancy and extremist sites; and flagrantly insensitive or offensive material,
including those with a lack of recognition or respect for opposing opinions and beliefs.
Note: We do not include news, historical, or press incidents that may include the above criteria
(except in graphic examples).
1
A gang is defined as a group whose primary activities are the commission of felonious criminal
acts, which has a common name or identifying sign or symbol, and whose members individually
or collectively engage in criminal activity in the name of the group.
186
Help
2
A cult is defined as a group whose followers have been deceptively and manipulatively recruited
and retained through undue influence such that followers' personalities and behavior are
altered; a group in which leadership is all-powerful, ideology is totalistic, and the will of the
individual is subordinate to the group; and a group that sets itself outside of society.
■
Phishing and Fraud (Block): This category includes sites involved in phishing and telephone
scams, service theft advice sites, and plagiarism and cheating sites, including the sale of research
papers.
■
Spam URLs (Block): This category includes URLs found in spam, particularly on these topics:
computing, finance and stocks, entertainment, games, health and medicine, humor and
novelties, personal and dating, products and services, shopping, and travel.
■
Spyware (Block): This category includes sites that provide or promote information gathering
or tracking that is unknown to, or done without the explicit consent of, the end user or the
organization, including sites that carry malicious executables or viruses, third party monitoring,
and other unsolicited commercial software, spyware, and malware "phone home" destinations.
■
Tasteless and Offensive (Warn): This category includes sites that feature offensive or violent
language, including through jokes, comics, or satire, and excessive use of profanity or obscene
gesticulation.
■
Violence (Warn): This category includes sites portraying, describing or advocating physical
assault against humans, animals, or institutions; depicting torture, mutilation, gore, or horrific
death; advocating, encouraging, or depicting self-endangerment, or suicide, including through
eating disorders or addictions; instructions, recipes, or kits for making bombs or other harmful
or destructive devices; sites promoting terrorism; and excessively violent sports or games,
including videos and online games.
Note: We do not block news, historical, or press incidents that may include the above criteria,
except those that include graphic examples.
■
Weapons (Warn): This category includes sites with online purchasing or ordering information,
including lists of prices and dealer locations; any page or site predominantly containing, or
providing links to, content related to the sale of guns, weapons, ammunition or poisonous
substances; displaying or detailing the use of guns, weapons, ammunition or poisonous
substances; and clubs which offer training on machine guns, automatics, other assault weapons,
and sniper training.
Note: Weapons are defined as something (as a club, knife, or gun) used to injure, defeat, or
destroy.
7.10.2.4 Select a website category action
With web control turned on and the Inappropriate Website Control policy selected, you can
configure the action for each website category. You can also create a new policy that is based on
the default policy. For more information, see Create a policy (page 34).
187
Sophos Enterprise Console
To select a site category action:
1. On the General tab, on the drop-down list next to the site category or categories that you want
to configure, select one of the following:
■
Block: Prevents users from viewing sites in this category. If it is an HTTP web page, a block
notification is displayed to the user, explaining why the site was blocked. If it is an HTTPS
page, a balloon tip is displayed to the users in the Windows System Tray.
■
Warn: Warns users that they are at risk of violating their organization's web use policy, but
allows them to proceed. If it is an HTTP page, a warn notification is displayed to users,
cautioning them about proceeding to the site. If it is an HTTPS page, the user does not
receive a notification, and is allowed to continue to the website. The event is logged as a
“Proceed” in Enterprise Console.
■
Allow: Lets users view sites in this category. The event is not logged.
2. Click OK.
7.10.2.5 Manage website exceptions
If you have selected the Inappropriate Website Control policy, you can create exceptions to the
“Block” and “Warn” actions. You can exempt websites from filtering by adding them to the
“Websites to Allow” or “Websites to Block” list. Entries can take the form of IP addresses and
domain names. You can also edit existing website entries, and remove websites from a list.
Note: If there are conflicting or overlapping entries in the 'Block' and 'Allow' lists, the entries in
the Block list will always take precedence. For example, if the same IP address is included in the
Block list and the Allow list, the website is blocked. Furthermore, if a domain is included in the
Block list, but a subdomain of that same domain is included in the Allow list, the Allow entry is
ignored, and the domain and all of its subdomains are blocked.
To add a website exception:
1. On the Website Exceptions tab, click the Add button next to the Websites to Allow or Websites
to Block text box.
2. In the Add Website to Allow dialog box, click Domain name, IP address with subnet mask,
or IP address. Examples of each format are displayed above the associated text box.
3. In the text box, enter the domain name or IP address for the website you want to allow or
block.
4. Click OK.
If you want to edit a website or remove it from a list, select the website, and click Edit or Remove
accordingly.
188
Help
7.10.3 Full Web Control
7.10.3.1 About Full Web Control
Note: This feature is not included with all licenses. If you want to use it, you might need to
customize your license. For more information, see
http://www.sophos.com/en-us/products/complete/comparison.aspx.
If you have a Sophos Web Appliance or Security Management Appliance, you can distribute an
appliance-based policy to your users by way of Enterprise Console.
Endpoint computers communicate with Enterprise Console in the same way as when the
Inappropriate Website Control policy is selected, but the web-filtering rules and web activity logs
are synchronized with the Sophos Web Appliance or Management Appliance that you specify.
The policy is stored on endpoint computers and applied, based on the latest Sophos data.
Users are blocked, warned or allowed, according to the web control policy. You can view user
activity data using the Reports and Search features on the Web Appliance or Management
Appliance. “Block,” “Warn,” and “Allow” events are all recorded on the appliance; however, sites
scanned and assessed by Sophos Endpoint Security and Control's live URL-filtering (Web
protection) are recorded as web events in Enterprise Console.
Note: Although HTTP and HTTPS sites are both filtered in all supported web browsers, user
notifications are different, depending on whether the URL is HTTP or HTTPS. With HTTP sites,
users see notification pages for sites in categories set to “Block” or “Warn.” For HTTPS, users only
see “Block” notifications, and they are displayed as a balloon tip in the Windows System Tray.
HTTPS “Warn” actions are not displayed to users, nor are they logged. Instead, users are allowed
to continue to the requested page, and it is logged as a “Proceed” event in the Web Appliance or
Management Appliance.
Optionally, you can configure the Web Appliance or Management Appliance to use LiveConnect
so that policy updates are distributed to users, and reporting data from endpoint computers is
uploaded, even when users are not connected from within the network.
With Full Web Control selected, a full-featured policy takes effect. Full Web Control offers the
following benefits over basic web control:
■
Users are warned or blocked, based on over 50 categories of URLs.
■
Differentiated “Special Hours” policies can be applied.
■
Numerous additional policies can be used as per-user or per-group exceptions to the default
and Special Hours policies.
■
Detailed logs and reports are available on the Web Appliance or Management Appliance.
■
LiveConnect allows distribution of policy updates and uploading of report data, even when
users connect remotely.
■
Users can submit feedback regarding the handling of blocked URLs.
189
Sophos Enterprise Console
■
Customized notification pages that include your logo, and text that is specific to your
organization, can be displayed to users. For more information, see the Sophos Web Appliance
documentation.
■
Users are automatically restricted from browsing to inappropriate sites from within popular
search engines when SafeSearch is enabled.
For more information on configuring a full Web Appliance policy, see the Sophos Web Appliance
documentation available at http://wsa.sophos.com/docs/wsa/.
7.10.3.2 Turn on Full Web Control
Note: The following procedure assumes that you have a Sophos Web Appliance or Management
Appliance that is configured, fully functioning, and using endpoint web control.
By default, the web control policy is turned off. Perform the following steps to enable web control
and use the Full Web Control policy.
Note: If you use role-based administration:
■
You must have the Policy setting - web control right to edit a web control policy.
■
You cannot edit a policy if it is applied outside your active sub-estate.
For more information about role-based administration, see About roles and sub-estates (page 17).
To turn on Full Web Control:
1. Check which web control policy is used by the group(s) of computers you want to configure.
For more information, see Check which policies a group uses (page 30).
2. In the Policies pane, double-click Web control. Then double-click the policy you want to
change.
The Web Control Policy dialog box is displayed.
3. On the General tab, click Enable web control.
4. Select Full Web Control.
5. In the Settings panel, enter the Appliance Hostname. You must provide a fully qualified
hostname.
6. In the Settings panel, enter the Security Key for Policy Exchange. This key must match the
one that is displayed on the Endpoint Web Control page of the Sophos appliance. For more
information, see the Sophos Web Appliance documentation available at
http://wsa.sophos.com/docs/wsa/.
7. Optionally, select Block browsing if the website category cannot be determined. If an endpoint
computer is unable to retrieve data about website categorization, URLs that cannot be
categorized are blocked until the service is restored.
This check box is not selected by default, which allows users to continue browsing if the
categorization service fails.
190
Help
8. Click OK.
Enterprise Console reconfigures endpoint computers to communicate with the Web Appliance
or Management Appliance.
191
Sophos Enterprise Console
8 Setting up alerts and messages
8.1 About alerts and messages
There are several alerting methods used in Enterprise Console.
■
Alerts displayed in the console
If an item that requires attention is found on a computer, or an error has occurred, Sophos
Endpoint Security and Control sends an alert to Enterprise Console. The alert is displayed in
the computer list. For more information about dealing with such alerts, see Deal with alerts
about detected items (page 59).
These alerts are always displayed. You do not need to set them up.
■
Events displayed in the console
When an application control, firewall, patch assessment, web, data control, device control,
encryption or tamper protection event occurs on an endpoint computer, for example, an
application has been blocked by the firewall, that event is sent to Enterprise Console and can
be viewed in the respective event viewer.
■
Alerts and messages sent by the console to your chosen recipients
By default, when an item is found on a computer, a message is displayed on the computer
desktop and an entry is added to the Windows event log. When an application control, data
control, or device control event occurs, a message is displayed on the computer desktop.
You can also set up email alerts or SNMP messages for administrators.
Note: If you want to use authenticated SMTP for email alerts, see Sophos support
knowledgebase article 113780
(http://www.sophos.com/support/knowledgebase/article/113780.html).
This section describes how to set up alerts to be sent to your chosen recipients.
8.2 Set up software subscription alerts
If you use role-based administration, you must have the System configuration right to perform
this task. For more information, see About roles and sub-estates (page 17).
Enterprise Console displays alerts raised by the update manager in the Alerts column in the Update
managers view. If you subscribed to a fixed version of software, an alert will be displayed when
that version is nearing retirement or is retired. An alert will also be displayed if your product
license has changed.
If you have chosen to Automatically upgrade fixed version software when it is no longer
supported by Sophos, your subscription will be upgraded automatically.
192
Help
If you have chosen not to be upgraded automatically, you will be instructed to change your
subscription.
Important: Running unsupported software leaves you unprotected against new security threats.
We recommend that you upgrade to a supported version as soon as possible.
You can also set up email alerts to be sent to your chosen recipients when the product version you
are subscribed to is nearing retirement or is retired.
1. On the Tools menu, select Configure email alerts.
The Configure email alerts dialog box is displayed.
2. If SMTP settings have not been configured, or if you want to view or change the settings, click
Configure.
In the Configure SMTP settings dialog box, enter the details as described below.
a) In the Server address text box, type the host name or IP address of the SMTP server.
b) In the Sender text box, type an email address to which bounces and non-delivery reports
can be sent.
c) Click Test to test the connection.
3. In the Recipients panel, click Add.
The Add a new email alert recipient dialog box appears.
4. In the Email address field, enter the address of your recipient.
5. In the Language field, select the language in which email alerts should be sent.
6. In the Subscriptions pane, select “Software subscriptions” email alerts you want to send to
this recipient. There are three alerts you can subscribe to:
■
A software subscription includes a version of a product that is shortly to be retired at Sophos.
■
A software subscription includes a version of a product which is no longer available.
This alert is sent if the product you are subscribed to has been retired, or your license has
changed and the new license does not include that product.
■
The Sophos license information has been updated. Product features may have changed.
8.3 Set up anti-virus and HIPS email alerts
If you use role-based administration:
■
You must have the Policy setting - anti-virus and HIPS right to perform this task.
■
You cannot edit a policy if it is applied outside your active sub-estate.
For more information, see About roles and sub-estates (page 17).
193
Sophos Enterprise Console
You can have email alerts sent to particular users if a virus, suspicious behavior, an unwanted
application or an error is encountered on any of the computers in a group.
Important: Mac OS X computers can send email alerts to only one address.
1.
2.
3.
4.
In the Policies pane, double-click the anti-virus and HIPS policy you want to change.
In the Anti-virus and HIPS policy dialog box, click Messaging.
In the Messaging dialog box, go to the Email alerting tab and select Enable email alerting.
In the Messages to send panel, select the events for which you want to send email alerts.
Note: The Suspicious behavior detection, Suspicious file detection, and Adware and PUA
detection and cleanup settings apply only to Windows 2000 and later. The Other errors setting
applies only to Windows.
5. In the Recipients panel, click Add or Remove to add or remove, respectively, email addresses
to which email alerts should be sent. Click Rename to change an email address you have added.
Important: Mac OS X computers will send messages only to the first recipient in the list.
6. Click Configure SMTP to change the settings for the SMTP server and the language of the
email alerts.
7. In the Configure SMTP settings dialog box, enter the details as described below.
■
In the SMTP server text box, type the host name or IP address of the SMTP server. Click
Test to send a test email alert.
■
In the SMTP sender address text box, type an email address to which bounces and
non-delivery reports can be sent.
■
In the SMTP reply-to address text box, you can type in the text box an email address to
which replies to email alerts can be sent. Email alerts are sent from an unattended mailbox.
■
In the Language panel, click the drop-down arrow, and select the language in which email
alerts should be sent.
8.4 Set up anti-virus and HIPS SNMP messaging
If you use role-based administration:
■
You must have the Policy setting - anti-virus and HIPS right to perform this task.
■
You cannot edit a policy if it is applied outside your active sub-estate.
For more information, see About roles and sub-estates (page 17).
You can have SNMP messages sent to particular users if a virus or error is encountered on any of
the computers in the group.
Note: These settings apply only to Windows 2000 and later.
1. In the Policies pane, double-click the anti-virus and HIPS policy you want to change.
194
Help
2. In the Anti-virus and HIPS policy dialog box, click Messaging.
3. In the Messaging dialog box, go to the SNMP messaging tab and select Enable SNMP
messaging.
4. In the Messages to send panel, select the types of event for which you want Sophos Endpoint
Security and Control to send SNMP messages.
5. In the SNMP trap destination text box, enter the IP address of the recipient.
6. In the SNMP community name text box, enter the SNMP community name.
8.5 Configure anti-virus and HIPS desktop messaging
If you use role-based administration:
■
You must have the Policy setting - anti-virus and HIPS right to perform this task.
■
You cannot edit a policy if it is applied outside your active sub-estate.
For more information, see About roles and sub-estates (page 17).
By default, desktop messages are displayed on the computer on which a virus, suspicious item or
potentially unwanted application is found. You can configure these messages.
1. In the Policies pane, double-click the anti-virus and HIPS policy you want to change.
2. In the Anti-virus and HIPS policy dialog box, click Messaging.
3. In the Messaging dialog box, click the Desktop messaging tab.
By default, Enable desktop messaging and all the options in the Messages to send panel are
selected. Edit these settings, if appropriate.
Note: The Suspicious behavior detection, Suspicious file detection, and Adware and PUA
detection settings apply only to Windows 2000 and later.
4. In the User-defined message text box, you can type a message that will be added to the end of
the standard message.
8.6 Set up application control alerts and messages
If you use role-based administration:
■
You must have the Policy setting - application control right to configure an application control
policy.
■
You cannot edit a policy if it is applied outside your active sub-estate.
For more information, see About roles and sub-estates (page 17).
You can send messages to particular users when a controlled application is found.
1. In the Policies pane, double-click the application control policy you want to change.
195
Sophos Enterprise Console
2. In the Application control policy dialog box, go to the Messaging tab.
In the Messaging panel, the Enable desktop messaging check box is enabled by default. When
an unauthorized controlled application is detected by on-access scan and blocked, a desktop
message will be displayed to the user informing them that the application has been blocked.
3. In the Message text box, type a message that will be added to the end of the standard desktop
message.
4. If you want to send email alerts about detected controlled applications, select the Enable email
alerting check box.
5. Select the Enable SNMP messaging check box, if you want to send SNMP messages.
Note: Your anti-virus and HIPS policy settings determine email and SNMP messaging
configuration and recipients. For more information, see Set up anti-virus and HIPS SNMP
messaging (page 194).
8.7 Set up data control alerts and messages
If you use role-based administration:
■
You must have the Policy setting - data control right to configure a data control policy.
■
You cannot edit a policy if it is applied outside your active sub-estate.
For more information, see About roles and sub-estates (page 17).
Enterprise Console uses events and messages to report when the transfer of sensitive data is detected
or blocked.
For information about data control policies and events, see About data control (page 147).
When data control is enabled, the following events and messages are logged or displayed by default:
■
Data control events are logged on the workstation.
■
Data control events are sent to Enterprise Console and can be viewed in the Data Control Event Viewer. (To open the event viewer, on the Events menu, click Data Control Events.)
Note: Each computer can send to Enterprise Console a maximum of 50 data control events
per hour.
■
The number of computers with data control events over a specified threshold within the last
seven days is displayed on the Dashboard.
■
Desktop messages are displayed on the workstation.
You can also configure Enterprise Console to send the following messages:
Email alerts
196
An email message is sent to the recipients that you specify.
Help
SNMP messages
An SNMP message is sent to the recipients specified in your anti-virus
and HIPS policy settings.
To set up data control messaging:
1. Check which data control policy is used by the group or groups of computers you want to
configure.
See Check which policies a group uses (page 30).
2. In the Policies pane, double-click Data control. Then double-click the policy you want to
change.
The Data control policy dialog box is displayed.
3. In the Data control policy dialog box, go to the Messaging tab. Desktop messaging is enabled
by default and Include matched rules in messages is selected.
4. Type messages that will be added to the standard messages for user confirmation of file transfer
and for blocked file transfer, if you wish.
You can enter a maximum of 100 characters. You can also add an HTML link to the message,
for example, <a href="http://www.sophos.com">About Sophos</a>.
5. To enable email alerting, select the Enable email alerting check box. In the Email recipients
field, enter the email addresses of the recipients. Separate each address with a semicolon (;).
6. To enable SNMP messaging, select the Enable SNMP messaging check box.
The email server and SNMP trap settings are configured via the anti-virus and HIPS policy.
8.8 Set up device control alerts and messages
If you use role-based administration:
■
You must have the Policy setting - device control right to edit a device control policy.
■
You cannot edit a policy if it is applied outside your active sub-estate.
For more information, see About roles and sub-estates (page 17).
Enterprise Console uses events and messages to report when a controlled device is detected or
blocked.
For information about device control policies and events, see About device control (page 163).
When device control is enabled, the following events and messages are logged or displayed by
default:
■
Device control events are logged on the workstation.
■
Device control events are sent to Enterprise Console and can be viewed in the Device Control
- Event Viewer. (To open the event viewer, on the Events menu, click Device Control Events.)
197
Sophos Enterprise Console
■
The number of computers with device control events over a specified threshold within the last
seven days is displayed on the Dashboard.
■
Desktop messages are displayed on the workstation.
You can also configure Enterprise Console to send the following messages:
Email alerts
An email message is sent to the recipients that you specify.
SNMP messages
An SNMP message is sent to the recipients specified in your anti-virus
and HIPS policy settings.
To set up device control messaging:
1. Check which device control policy is used by the group(s) of computers you want to configure.
See Check which policies a group uses (page 30).
2. In the Policies pane, double-click Device control. Then double-click the policy you want to
change.
3. In the Device control policy dialog box, on the Messaging tab, desktop messaging is enabled
by default. To further configure messaging, do the following:
■
To enter a message text for desktop messaging, in the Message text box, type a message that
will be added to the end of the standard message.
You can enter a maximum of 100 characters. You can also add an HTML link to the message,
for example, <a href="http://www.sophos.com">About Sophos</a>.
■ To enable email alerting, select the Enable email alerting check box. In the Email recipients
field, enter the email addresses of the recipients. Separate each address with a semicolon
(;).
■ To enable SNMP messaging, select the Enable SNMP messaging check box.
The email server and SNMP trap settings are configured via the anti-virus and HIPS policy.
8.9 Set up network status email alerts
If you use role-based administration, you must have the System configuration right to configure
the network status email alerts. For more information, see About roles and sub-estates (page 17).
You can set up email alerts to be sent to your chosen recipients when a warning or critical level
has been exceeded for a dashboard section.
1. On the Tools menu, select Configure email alerts.
The Configure email alerts dialog box is displayed.
198
Help
2. If SMTP settings have not been configured, or if you want to view or change the settings, click
Configure. In the Configure SMTP settings dialog box, enter the details as described below.
a) In the Server address text box, type the host name or IP address of the SMTP server.
b) In the Sender text box, type an email address to which bounces and non-delivery reports
can be sent.
c) Click Test to test the connection.
3. In the Recipients panel, click Add.
The Add a new email alert recipient dialog box appears.
4. In the Email address field, enter the address of your recipient.
5. In the Language field, select the language in which email alerts should be sent.
6. In the Subscriptions pane, select “warning level exceeded” and “critical level exceeded” email
alerts you want to send to this recipient.
8.10 Set up Active Directory synchronization email alerts
If you use role-based administration, you must have the System configuration right to configure
the Active Directory synchronization email alerts. For more information, see About roles and
sub-estates (page 17).
You can set up email alerts to be sent to your chosen recipients about new computers and groups
discovered during synchronizations with Active Directory. If you choose to protect computers in
synchronized groups automatically, you can also set up alerts about automatic protection failures.
1. On the Tools menu, select Configure email alerts.
The Configure email alerts dialog box is displayed.
2. If SMTP settings have not been configured, or if you want to view or change the settings, click
Configure.
In the Configure SMTP settings dialog box, enter the details as described below.
a) In the Server address text box, type the host name or IP address of the SMTP server.
b) In the Sender text box, type an email address to which bounces and non-delivery reports
can be sent.
c) Click Test to test the connection.
3. In the Recipients panel, click Add.
The Add a new email alert recipient dialog box appears.
4. In the Email address field, enter the address of your recipient.
5. In the Language field, select the language in which email alerts should be sent.
199
Sophos Enterprise Console
6. In the Subscriptions pane, select “Active Directory synchronization” email alerts you want to
send to this recipient.
“Active Directory synchronization” email alerts:
■
New groups discovered
■
New computers discovered
■
Automatic computer protection has failed
8.11 Configure Windows event logging
If you use role-based administration:
■
You must have the Policy setting - anti-virus and HIPS right to perform this task.
■
You cannot edit a policy if it is applied outside your active sub-estate.
For more information, see About roles and sub-estates (page 17).
By default, Sophos Endpoint Security and Control adds alerts to the Windows 2000 or later event
log when a virus or spyware is detected or cleaned up, suspicious behavior or file is detected, or
adware or PUA is detected or cleaned up.
To edit these settings:
1. In the Policies pane, double-click the anti-virus and HIPS policy you want to change.
2. In the Anti-virus and HIPS policy dialog box, click Messaging.
3. In the Messaging dialog box, go to the Event log tab.
By default, event logging is enabled. Edit the settings, if appropriate.
Scanning errors include instances when Sophos Endpoint Security and Control is denied access
to an item that it attempts to scan.
8.12 Turning reporting to Sophos on or off
If you use role-based administration, you must have the System configuration right to turn
reporting to Sophos on or off. For more information, see About roles and sub-estates (page 17).
You can choose to allow Sophos Enterprise Console to report to Sophos the number of managed
computers and information about the types and versions of operating systems and Sophos products
in use each week. Sophos will use this information to provide a better support service and also to
increase our understanding of how customers use our products. Any information reported to
Sophos about your computers will not identify individuals or specific computers. Sophos will not
use the information reported to Sophos to identify your company unless you provide us with your
Sophos username and/or a contact email address.
200
Help
By default, reporting to Sophos is enabled. You are given the option of disabling reporting to
Sophos when installing or upgrading the console, in the Sophos Enterprise Console installation
wizard.
If you want to turn reporting to Sophos on or off after installation, do the following:
1. On the Tools menu, click Reporting to Sophos.
2. In the Reporting to Sophos dialog box, you can enable or disable reporting.
■
If you want to enable reporting to Sophos, read the agreement and select the I agree check
box if you agree to the terms.
■ If you want to disable reporting to Sophos, clear the I agree check box.
If you want to enable Sophos customer support to contact you directly, for example, if there
is a platform or version issue, enter your Sophos username and/or contact email address.
If you are happy to enable reporting, but would like to remain anonymous, you need not
provide the username or email address.
201
Sophos Enterprise Console
9 Viewing events
9.1 About events
When an application control, data control, device control, firewall, patch assessment, tamper
protection, web control or encryption event occurs on an endpoint computer, for example, an
application has been blocked by the firewall, that event is sent to Enterprise Console and can be
viewed in the respective event viewer.
Using the event viewers, you can investigate events that have occurred on the network. You can
also generate a list of events based on a filter you configure, for example, a list of all data control
events for the past seven days generated by a certain user.
The number of computers with events over a specified threshold within the last seven days is
displayed on the Dashboard (except for tamper protection events). For information on how to
set up the threshold, see Configure the Dashboard (page 54).
You can also set up alerts to be sent to your chosen recipients when an event has occurred. For
more information, see About alerts and messages (page 192).
9.2 View application control events
To view application control events:
1. On the Events menu, click Application Control Events.
The Application Control - Event Viewer dialog box appears.
2. In the Search period field, click the drop-down arrow and select the period for which you want
to display the events.
You can either select a fixed period, for example, Within 24 hours, or select Custom and specify
your own time period by selecting the starting and ending dates and times.
3. If you want to view events for a certain user or computer, enter the name in the respective field.
If you leave the fields empty, events for all users and computers will be displayed.
You can use wildcards in these fields. Use ? for any single character and * for any string of
characters.
4. If you want to view events for a certain application type, in the Application type field, click
the drop-down arrow and select the application type.
By default, the event viewer displays events for all application types.
5. Click Search to display a list of events.
You can export the list of application control events to a file. For details, see Export the list of events
to a file (page 211).
202
Help
9.3 View data control events
If you use role-based administration, you must have the Data control events right to view data
control events in Enterprise Console. For more information about role-based administration, see
About roles and sub-estates (page 17).
To view data control events:
1. On the Events menu, click Data Control Events.
The Data Control - Event Viewer dialog box appears.
2. In the Search period field, click the drop-down arrow and select the period for which you want
to display the events.
You can either select a fixed period, for example, Within 24 hours, or select Custom and specify
your own time period by selecting the starting and ending dates and times.
3. If you want to view events for a certain user, computer, or file, enter the name in the respective
field.
If you leave the fields empty, events for all users, computers, and files will be displayed.
You can use wildcards in these fields. Use ? for any single character and * for any string of
characters.
4. If you want to view events for a certain rule, in the Rule name field, click the drop-down arrow
and select the rule name.
By default, the event viewer displays events for all rules.
5. If you want to view events for a certain file type, in the File type field, click the drop-down
arrow and select the file type.
By default, the event viewer displays events for all file types.
6. Click Search to display a list of events.
You can export the list of data control events to a file. For details, see Export the list of events to a
file (page 211).
9.4 View device control events
To view device control events:
1. On the Events menu, click Device Control Events.
The Device Control - Event Viewer dialog box appears.
2. In the Search period field, click the drop-down arrow and select the period for which you want
to display the events.
You can either select a fixed period, for example, Within 24 hours, or select Custom and specify
your own time period by selecting the starting and ending dates and times.
203
Sophos Enterprise Console
3. If you want to view events for a certain device type, in the Device type field, click the drop-down
arrow and select the device type.
By default, the event viewer displays events for all device types.
4. If you want to view events for a certain user or computer, enter the name in the respective field.
If you leave the fields empty, events for all users and computers will be displayed.
You can use wildcards in these fields. Use ? for any single character and * for any string of
characters.
5. Click Search to display a list of events.
In the Device Control - Event Viewer dialog box, you can exempt a device from the device control
policies. For details, see Exempt a device from all policies (page 168).
You can export the list of device control events to a file. For details, see Export the list of events to
a file (page 211).
9.5 View firewall events
Firewall events are sent only once from an endpoint computer to the console. Identical events
from different endpoints are grouped together in the Firewall - Event Viewer. In the Count
column, you can see the total number of times that an event has been sent from different endpoints.
To view firewall events:
1. On the Events menu, click Firewall Events.
The Firewall - Event Viewer dialog box appears.
2. In the Search period field, click the drop-down arrow and select the period for which you want
to display the events.
You can either select a fixed period, for example, Within 24 hours, or select Custom and specify
your own time period by selecting the starting and ending dates and times.
3. If you want to view events of a certain type, in the Event type field, click the drop-down arrow
and select the event type.
By default, the event viewer displays all types of events.
4. If you want to view events for a certain file, in the File name field, enter the file name.
If you leave this field empty, events for all files will be displayed.
You can use wildcards in this field. Use ? for any single character and * for any string of
characters.
5. Click Search to display a list of events.
In the Firewall - Event Viewer dialog box, you can create a firewall rule as described in Create a
firewall event rule (page 115).
204
Help
You can export the list of firewall events to a file. For details, see Export the list of events to a file
(page 211).
9.6 View encryption events
To view events logged for computers protected by full disk encryption:
1. On the Events menu, click Encryption Events.
The Encryption Events - Event Viewer dialog box appears.
2. In the Search period field, click the drop-down arrow and select the period for which you want
to display the events.
You can either select a fixed period, for example, Within 24 hours, or select Custom and specify
your own time period by selecting the starting and ending dates and times.
3. If you want to view events for a certain user or computer, enter the name in the respective field.
If you leave the fields empty, events for all users and computers will be displayed.
You can use wildcards in these fields. Use ? for any single character and * for any string of
characters.
4. If you want to view events of a certain level, in the Level field, click the drop-down arrow and
select the event level: All, Error, or Warning.
By default, the event viewer displays events of all levels.
5. Click Search to display a list of events.
You can export the list of events to a file. For details, see Export the list of events to a file (page 211).
Note: On the endpoint computer, all events are logged. You can view them in the Windows event
log.
9.7 View tamper protection events
There are two types of tamper protection event:
■
Successful tamper protection authentication events, showing the name of the authenticated
user and the time of authentication.
■
Failed attempts to tamper, showing the name of the targeted Sophos product or component,
the time of the attempt, and the details of the user responsible for the attempt.
To view tamper protection events:
1. On the Events menu, click Tamper Protection Events.
The Tamper Protection - Event Viewer dialog box appears.
205
Sophos Enterprise Console
2. In the Search period field, click the drop-down arrow and select the period for which you want
to display the events.
You can either select a fixed period, for example, Within 24 hours, or select Custom and specify
your own time period by selecting the starting and ending dates and times.
3. If you want to view events of a certain type, in the Event type field, click the drop-down arrow
and select the type of event.
By default, the event viewer displays events of all types.
4. If you want to view events for a certain user or computer, enter the name in the respective field.
If you leave the fields empty, events for all users and computers will be displayed.
You can use wildcards in these fields. Use ? for any single character and * for any string of
characters.
5. Click Search to display a list of events.
You can export the list of events to a file. For details, see Export the list of events to a file (page 211).
9.8 Viewing patch assessment events
9.8.1 About patch assessment event views
The Patch Assessment - Event Viewer contains information about security patches and results
of patch assessments.
The Patch updates field displays the download status of patch information. It displays one of the
following status messages:
■
Not downloaded indicates patch information is not downloaded or you do not have the license
to use the Patch feature.
■
Downloading indicates the first download, after install, is in progress.
■
OK indicates patch information is up-to-date.
■
Out of date indicates that there has not been a fully successful update of patch data in the past
72 hours. Typically this status is displayed if SEC is not up-to-date, due to issues with network
connectivity. It may also be displayed if you change your license from a SEC that has the Patch
feature, to another without it. It is possible that a partial update may have occurred when this
status message is displayed.
The Patch Assessment - Event Viewer has the following tabs:
Patches by rating
This tab by default displays missing patches. Each patch is displayed, along with a count of the
computers missing the patch, and the threats and vulnerabilities linked to the patch. You can use
filters to show a full list of all the supported patches with a count of the number of computers
missing them.
206
Help
Computers missing patches
This tab displays patch assessment status by computer. Each computer is displayed, along with its
missing patches. Computers are listed multiple times if missing more than one patch.
9.8.2 View patch assessment events
To view patch assessment events:
1. On the Events menu, click Patch Assessment Events.
The Patch Assessment - Event Viewer dialog box appears.
2. Click on one of the tabs Patches by rating or Computers missing patches. For more information
about tabs, see About patch assessment event views (page 206).
3. In the search panel, if you want to view events for a certain patch by its name, computer, threat,
or vulnerability, enter the information in the respective field. Available criteria are based on
the information displayed in the tab.
If you leave the fields empty, events for all patch names, patch IDs, and computer names will
be displayed.
You can use wildcards in these fields. Use ? for any single character and * for any string of
characters.
4. If you want to view events for a certain patch by its status, rating, vendor, group, or release
date, click the drop-down arrow of the respective field and select the appropriate option.
Available criteria are based on the information displayed in the tab.
By default, the event viewer displays events for the threat ratings, vendors, groups, threats, and
patch names for the missing patches.
5. Click Search to display a list of patch assessment events.
For information on results that are displayed, see Search result categories (page 208).
You can right-click on an individual hyperlink to copy its name, or use Ctrl+C to copy a patch
assessment event row to the Clipboard.
You can export the list of patch assessment events. For details, see Export the list of events to a file
(page 211).
You can view details about a specific patch by clicking the provided link. For more information,
see View patch, threat, or vulnerability details (page 207).
9.8.3 View patch, threat, or vulnerability details
To view patch, threat, or vulnerability details:
1. On the Events menu, click Patch Assessment Events.
The Patch Assessment - Event Viewer dialog box appears.
207
Sophos Enterprise Console
2. Click on one of the tabs Patches by rating or Computers missing patches, select the required
options, and click Search to display a list of events.
For information on results that are displayed, see Search result categories (page 208).
3. Click the patch name for which you want to view additional details.
4. In the Patch Detail dialog box, you can view a description of the patch and information about
the threats and vulnerabilities it protects against. If available, you can:
■
Click the patch name to open a web browser and view vendor information about a patch.
Click the threat to open a web browser and view the Sophos threat analysis and
recommendations.
■ Click the vulnerability to open a web browser and view common vulnerabilities and
exposures (CVE) information.
■ Click the patch name in the Previously addressed by column to open a web browser and
view vendor information about a patch that has been superseded.
■
The list is sorted alphabetically by threat and then by vulnerability.
9.8.4 Patch assessment search results
9.8.4.1 Search result categories
The search results are displayed in different categories based on the tab:
■
Patches by rating (page 208)
■
Computers missing patches (page 209)
9.8.4.2 Patches by rating
The search results are displayed based on the following categories:
■
Threats: A threat can be a virus, Trojan, worm, spyware, malicious website as well as adware
and other potentially unwanted applications. You can click on the threat name to view the
Sophos threat analysis and recommendations in a web browser.
■
Vulnerabilities: A vulnerability is a software weakness which can be exploited by an attacker.
The potential damage that could be caused by the exploitation is dependant upon the nature
of the vulnerability, and the affected software. Patches are provided to fix vulnerabilities so
that exploitation is no longer possible. You can click on the vulnerability name to view common
vulnerabilities and exposures (CVE) information in a web browser.
■
Rating: Patches are rated by SophosLabs.
Note: We recommend all the missing patches are applied irrespective of their rating.
■
208
Critical: It is almost certain that one or more vulnerabilities addressed by this patch will be
exploited.
Help
■
High: It is highly likely that one or more vulnerabilities addressed by this patch will be
exploited.
■
Medium: It is possible that one or more vulnerabilities addressed by this patch will be
exploited.
■
Low: It is unlikely that any vulnerabilities addressed by this patch will be exploited.
■
Patch name: Displays the name of the patch. You can click on the patch name to open a web
browser and view vendor information about a patch.
■
Vendor: Displays the name of the vendor that published the patch.
■
Computers: Displays the number of computers that are affected. If one or more computers
are affected, you can click on the number to view the details in the Computers missing patches
tab. If a "-" is displayed, it indicates that the patch is not assessed.
■
Superseded by: Displays the name(s) of any superseding patches. You can click on the patch
name to open the Patch detail dialog box to view information about the superseding patch.
■
Release date: Displays the patch release date.
9.8.4.3 Computers missing patches
The search results are displayed based on the following categories:
■
Computer: Displays the name of the computer that is affected.
■
Rating: Patches are rated by SophosLabs.
Note: We recommend all the missing patches are applied irrespective of their rating.
■
Critical: It is almost certain that one or more vulnerabilities addressed by this patch will be
exploited.
■
High: It is highly likely that one or more vulnerabilities addressed by this patch will be
exploited.
■
Medium: It is possible that one or more vulnerabilities addressed by this patch will be
exploited.
■
Low: It is unlikely that any vulnerabilities addressed by this patch will be exploited.
■
Patch name: Displays the name of the patch. You can click on the patch name to open a web
browser and view vendor information about a patch.
■
Superseded by: Displays the name(s) of any superseding patches. You can click on the patch
name to open the Patch detail dialog box to view information about the superseding patch.
■
Last assessment: Displays the date when a computer was last assessed for missing patches.
■
Vendor: Displays the name of the vendor that published the patch.
■
Release date: Displays the patch release date.
■
Group: Displays the group name to which the computer belongs.
209
Sophos Enterprise Console
9.9 Viewing web events
9.9.1 View web events
If you use role-based administration, you must have the Web events right to view web events in
Enterprise Console. For more information about role-based administration, see About roles and
sub-estates (page 17).
You can view the following web events in the Web Event Viewer:
■
Malicious websites blocked by the Web Protection feature in the Anti-virus and HIPS policy.
■
Web control events, if you use the web control feature.
Web control events are displayed differently, depending on which web control policy is selected.
Although the Web Event Viewer can be used in both policy modes, the content is different.
When the Inappropriate Website Control policy option is selected, you can view any “Block”
and “Warn” actions. Visited HTTPS sites categorized as “Warn” are logged as “Proceed” events
because Sophos Endpoint Security and Control responds differently to HTTPS (see the note in
About Inappropriate Website Control (page 184)).
When Full Web Control is selected, events are displayed on the Sophos Web Appliance or
Management Appliance. You can view browsing activity using the Reports and Search features.
“Block,” “Warn,” and “Allow” actions are all shown. Visited HTTPS sites categorized as “Warn”
are displayed as “Proceed” events because Sophos Endpoint Security and Control responds
differently to HTTPS (see the note in About Full Web Control (page 189)).
Note: Regardless of which policy you select, websites scanned and assessed by Sophos Endpoint
Security and Control's live URL-filtering (Web Protection) are displayed as web events in Enterprise
Console.
To view web events:
1. On the Events menu, click Web Events.
The Web - Event Viewer dialog box appears.
2. In the Search period box, click the drop-down arrow, and select the period for which you want
to display the events.
You can either select a fixed period, for example, Within 24 hours, or select Custom and specify
your own time period by selecting the starting and ending dates and times.
3. If you want to view events for a certain User or Computer, enter the name in the respective
field.
If you leave the fields empty, events for all users and computers will be displayed.
You can use wildcards in these fields. Use ? for any single character and * for any string of
characters.
210
Help
4. If you want to view events associated with a certain action, in the Action field, click the
drop-down arrow and select the action.
5. If you want to view events associated with a specific domain, enter it in the Domain field.
6. If you want to view events that were triggered for a particular Reason, click the drop-down
arrow and select the reason.
7. Click Search to display a list of events.
You can export the list of web events to a file. For details, see Export the list of events to a file (page
211).
9.9.2 View latest web events on a computer
You can view the last 10 events for which an action was taken on an endpoint computer, for
example, recently blocked websites.
To view the latest web events:
1. In the Endpoints view, in the computer list, double-click the computer for which you want to
view activity.
2. In the Computer details dialog box, scroll to the Latest web events section.
You can also view the number of events for a user by generating a report. For more information,
see Configure the Events by user report (page 218).
9.10 Export the list of events to a file
You can export the list of application control, data control, device control, firewall, patch
assessment, encryption, tamper protection, or web events to a comma separated value (CSV) file.
You can also export the list of patch assessment events to a PDF file.
1. On the Events menu, click one of the “events” options, depending on which event list you
want to export.
The Event Viewer dialog box appears.
2. If you want to display only certain events, in the Search criteria pane, set the filters as
appropriate and click Search to display the events.
For more information, see View application control events (page 202), View data control events
(page 203), View device control events (page 203), View encryption events (page 205), View firewall
events (page 204), View patch assessment events (page 207), View tamper protection events (page
205), or View web events (page 210).
3. Click Export.
4. In the Save As window, browse to select a destination for the file, enter a file name in the File
name dialog box, and select a file type in the Save as type dialog box.
5. Click Save.
211
Sophos Enterprise Console
10 Generating reports
10.1 About reports
Reports provide textual and graphical information on a variety of aspects of your network's security
status.
Reports are available via the Report Manager. Using the Report Manager, you can quickly create
a report based on an existing template, change configuration of an existing report, and schedule
a report to run at regular intervals, with the results being sent to your chosen recipients as an email
attachment. You can also print reports and export them in a number of formats.
Sophos provides a number of reports that you can use out of the box or configure to tailor your
needs. These reports are:
■
Alert and event history
■
Alert summary
■
Alerts and events by item name
■
Alerts and events by time
■
Alerts and events per location
■
Endpoint policy non-compliance
■
Events by user
■
Managed endpoint protection
■
Updating hierarchy
Reports and role-based administration
If you use role-based administration, you must have the Report configuration right to create,
edit, or delete a report. If you do not have this right, you can only run a report. For more
information about role-based administration, see About roles and sub-estates (page 17).
A report can only include data from the active sub-estate. You cannot share reports between
sub-estates. The default reports are not copied from the Default sub-estate to new sub-estates you
create.
When you delete a sub-estate, all reports in that sub-estate are also deleted.
10.2 Create a new report
If you use role-based administration, you must have the Report configuration right to perform
this task. For more information, see About roles and sub-estates (page 17).
212
Help
To create a report:
1. Click the Reports icon on the toolbar.
2. In the Report Manager dialog box, click Create.
3. In the Create new report dialog box, select a report template and click OK.
A wizard guides you through creating a report based on your chosen template.
If you do not want to use the wizard, in the Create new report dialog box, clear the Use the
wizard to create report check box. You can then configure your new report in the report
properties dialog box. For more information, see the topic on configuring the relevant report.
10.3 Configure the Alert and event history report
If you use role-based administration, you must have the Report configuration right to perform
this task. For more information, see About roles and sub-estates (page 17).
The Alert and event history report shows alerts and events per specified reporting period.
1. Click the Reports icon on the toolbar.
2. In the Report Manager dialog box, select Alert and event history and click Properties.
3. In the Alert and Event History Properties dialog box, on the Configuration tab, set up the
options you want.
a) In the Report details panel, edit the name and description of the report, if you wish.
b) In the Reporting period panel, in the Period text box, click the drop-down arrow and select
a time period.
You can either select a fixed period, for example, Last month, or select Custom and specify
your own time period in the Start and End boxes.
c) In the Report location panel, click Group of computers or Individual computer. Then
click the drop-down arrow to specify a group or computer name.
d) In the Alert and event types to include panel, select alert and event types you want to include
in the report.
By default, the report shows all alert and event types.
Alternatively, you can configure the report to show only locations that have reported a
particular alert or event. To specify a single alert or event, click Advanced and click an alert
or event name in the list. To specify more than one alert or event, type a name in the text
box, using wildcards. Use ? for any single character in the name, and * for any string of
characters. For example, W32/* would specify all viruses with names beginning W32/.
4. On the Display options tab, select how you want to sort the alerts and events.
By default, alert and event details are sorted according to Alert and event name. However,
reports can also be sorted by Computer name, computer Group name, or Date and time.
213
Sophos Enterprise Console
5. On the Schedule tab, select Schedule this report if you want to run the report at regular
intervals, with the results being sent to your chosen recipients as email attachments. Enter the
start date and time and the frequency with which the report will be generated, specify the output
file format and language, and enter the email addresses of the recipients of the report.
10.4 Configure the Alert summary report
If you use role-based administration, you must have the Report configuration right to perform
this task. For more information, see About roles and sub-estates (page 17).
The Alert summary report provides statistics on the overall health and status of your network.
1. Click the Reports icon on the toolbar.
2. In the Report Manager dialog box, select Alert summary and click Properties.
3. In the Alert Summary Properties dialog box, on the Configuration tab, set up the options
you want.
a) In the Report details panel, edit the name and description of the report, if you wish.
b) In the Reporting period panel, in the Period text box, click the drop-down arrow and select
a time period.
You can either select a fixed period, for example, Last month, or select Custom and specify
your own time period in the Start and End boxes.
4. In the Display options tab, under Display results per, specify the intervals of time at which
the non-compliance is measured, for example, each hour or each day, click the drop-down
arrow and select an interval.
5. On the Schedule tab, select Schedule this report if you want to run the report at regular
intervals, with the results being sent to your chosen recipients as email attachments. Enter the
start date and time and the frequency with which the report will be generated, specify the output
file format and language, and enter the email addresses of the recipients of the report.
10.5 Configure the Alerts and events by item name report
If you use role-based administration, you must have the Report configuration right to perform
this task. For more information, see About roles and sub-estates (page 17).
The Alerts and events by item name report provides statistics on all alerts and events from all
computers over a selected period, grouped by item name.
To configure the report:
1. Click the Reports icon on the toolbar.
2. In the Report Manager dialog box, select Alerts and events by item name and click Properties.
214
Help
3. In the Alerts and Events by Item Name Properties dialog box, on the Configuration tab, set
up the options you want.
a) In the Report details panel, edit the name and description of the report, if you wish.
b) In the Reporting period panel, in the Period text box, click the drop-down arrow and select
a time period.
You can either select a fixed period, for example, Last month, or select Custom and specify
your own time period in the Start and End boxes.
c) In the Report location panel, click Group of computers or Individual computer. Then
click the drop-down arrow to specify a group or computer name.
d) In the Alert and event types to include panel, select alert and event types you want to include
in the report.
By default, the report shows all alert and event types.
4. On the Display options tab, under Display, choose which alerts and events you want the report
to show.
By default, the report shows all alerts and events and the number of occurrences for each.
You can also configure the report to show only:
■
the top n alerts and events (where n is a number you specify), or
■
alerts and events with m occurrences or more (where m is a number you specify).
5. Under Sort by, select whether you want to sort alerts and events by the number or name.
By default, the report lists alerts and events in order of decreasing number of occurrences.
6. On the Schedule tab, select Schedule this report if you want to run the report at regular
intervals, with the results being sent to your chosen recipients as email attachments. Enter the
start date and time and the frequency with which the report will be generated, specify the output
file format and language, and enter the email addresses of the recipients of the report.
10.6 Configure the Alerts and events by time report
If you use role-based administration, you must have the Report configuration right to perform
this task. For more information, see About roles and sub-estates (page 17).
The Alerts and events by time report shows alerts and events summarized at specified intervals.
1. Click the Reports icon on the toolbar.
2. In the Report Manager dialog box, select Alerts and events by time and click Properties.
215
Sophos Enterprise Console
3. In the Alerts and Events by Time Properties dialog box, on the Configuration tab, set up the
options you want.
a) In the Report details panel, edit the name and description of the report, if you wish.
b) In the Reporting period panel, in the Period text box, click the drop-down arrow and select
a time period.
You can either select a fixed period, for example, Last month, or select Custom and specify
your own time period in the Start and End boxes.
c) In the Report location panel, click Group of computers or Individual computer. Then
click the drop-down arrow to specify a group or computer name.
d) In the Alert and event types to include panel, select alert and event types you want to include
in the report.
By default, the report shows all alert and event types.
Alternatively, you can configure the report to show only locations that have reported a
particular alert or event. To specify a single alert or event, click Advanced and click an alert
or event name in the list. To specify more than one alert or event, type a name in the text
box, using wildcards. Use ? for any single character in the name, and * for any string of
characters. For example, W32/* would specify all viruses with names beginning W32/.
4. On the Display options tab, specify the intervals of time at which the rate of alerts and events
is measured, for example, each hour or each day, click the drop-down arrow and select an
interval.
5. On the Schedule tab, select Schedule this report if you want to run the report at regular
intervals, with the results being sent to your chosen recipients as email attachments. Enter the
start date and time and the frequency with which the report will be generated, specify the output
file format and language, and enter the email addresses of the recipients of the report.
10.7 Configure the Alerts and events per location report
If you use role-based administration, you must have the Report configuration right to perform
this task. For more information, see About roles and sub-estates (page 17).
The Alerts and events per location report provides statistics on all alerts from all computers over
a selected period, grouped by location.
1. Click the Reports icon on the toolbar.
2. In the Report Manager dialog box, select Alerts and events per location and click Properties.
3. In the Alerts and Events per Location Properties dialog box, on the Configuration tab, set
up the options you want.
a) In the Report details panel, edit the name and description of the report, if you wish.
b) In the Reporting period panel, in the Period text box, click the drop-down arrow and select
a time period.
216
Help
You can either select a fixed period, for example, Last month, or select Custom and specify
your own time period in the Start and End boxes.
c) In the Report location panel, click Computers to show alerts per computer or Group to
show alerts for each group of computers.
d) In the Alert and event types to include panel, select alert and event types you want to include
in the report.
By default, the report shows all alert and event types.
Alternatively, you can configure the report to show only locations that have reported a
particular alert or event. To specify a single alert or event, click Advanced and click an alert
or event name in the list. To specify more than one alert or event, type a name in the text
box, using wildcards. Use ? for any single character in the name, and * for any string of
characters. For example, W32/* would specify all viruses with names beginning W32/.
4. On the Display options tab, under Display, choose which locations you want the report to
show.
By default, the report shows all computers and groups and the number of occurrences for each.
You can configure it to show only:
■
the top n locations that have recorded the most alerts and events (where n is a number you
specify), or
■
locations with m alerts and events or more (where m is a number you specify).
5. Under Sort by, select whether you want to sort locations by the number of items detected or
name.
By default, the report lists locations in order of decreasing number of alerts and events per
location. Select Location if you want them sorted by name in alphabetical order.
6. On the Schedule tab, select Schedule this report if you want to run the report at regular
intervals, with the results being sent to your chosen recipients as email attachments. Enter the
start date and time and the frequency with which the report will be generated, specify the output
file format and language, and enter the email addresses of the recipients of the report.
10.8 Configure the Endpoint policy non-compliance report
If you use role-based administration, you must have the Report configuration right to perform
this task. For more information, see About roles and sub-estates (page 17).
The Endpoint policy non-compliance report shows the percentage or number of computers that
do not comply with their group policy, summarized at specified intervals.
1. Click the Reports icon on the toolbar.
2. In the Report Manager dialog box, select Endpoint policy non-compliance and click Properties.
217
Sophos Enterprise Console
3. In the Endpoint Policy Non-Compliance Properties dialog box, on the Configuration tab,
set up the options you want.
a) In the Report details panel, edit the name and description of the report, if you wish.
b) In the Reporting period panel, in the Period text box, click the drop-down arrow and select
a time period.
You can either select a fixed period, for example, Last month, or select Custom and specify
your own time period in the Start and End boxes.
c) In the Show panel, select the policies you want to show in the report. By default, only
Anti-virus and HIPS policy is selected.
4. In the Display options tab, under Display results per, specify the intervals of time at which
the non-compliance is measured, for example, each hour or each day, click the drop-down
arrow and select an interval.
5. Under Display results as, select whether you want to display results as percentages or numbers.
6. On the Schedule tab, select Schedule this report if you want to run the report at regular
intervals, with the results being sent to your chosen recipients as email attachments. Enter the
start date and time and the frequency with which the report will be generated, specify the output
file format and language, and enter the email addresses of the recipients of the report.
10.9 Configure the Events by user report
If you use role-based administration, you must have the Report configuration right to perform
this task. For more information, see About roles and sub-estates (page 17).
The Events by user report shows application control, firewall, data control, and device control
events, along with web events, grouped by user.
1. Click the Reports icon on the toolbar.
2. In the Report Manager dialog box, select Events by user and click Properties.
3. In the Events by User Properties dialog box, on the Configuration tab, set up the options you
want.
a) In the Report details panel, edit the name and description of the report, if you wish.
b) In the Reporting period panel, in the Period text box, click the drop-down arrow and select
a time period.
You can either select a fixed period, for example, Last month, or select Custom and specify
your own time period in the Start and End boxes.
c) Under Event types to include, select the features for which you want to show events.
218
Help
4. On the Display options tab, under Display, choose which users you want the report to show.
By default, the report shows all users and the number of events for each. You can configure it
to show only:
■
the top n users that have recorded the most events (where n is a number you specify), or
■
users with m events or more (where m is a number you specify).
5. Under Sort by, select whether you want to sort users by the number of events or name.
By default, the report lists users in order of decreasing number of events per user. Select User
if you want them sorted by name in alphabetical order.
6. On the Schedule tab, select Schedule this report if you want to run the report at regular
intervals, with the results being sent to your chosen recipients as email attachments. Enter the
start date and time and the frequency with which the report will be generated, specify the output
file format and language, and enter the email addresses of the recipients of the report.
10.10 Configure the Managed endpoint protection report
If you use role-based administration, you must have the Report configuration right to perform
this task. For more information, see About roles and sub-estates (page 17).
The Managed endpoint protection report shows the percentage or number of protected computers,
summarized at specified intervals.
1. Click the Reports icon on the toolbar.
2. In the Report Manager dialog box, select Managed endpoint protection and click Properties.
3. In the Managed Endpoint Protection Properties dialog box, on the Configuration tab, set
up the options you want.
a) In the Report identity panel, edit the name and description of the report, if you wish.
b) In the Reporting period panel, in the Period text box, click the drop-down arrow and select
a time period.
You can either select a fixed period, for example, Last month, or select Custom and specify
your own time period in the Start and End boxes.
c) In the Show panel, select the features you want to show in the report.
4. In the Display options tab, under Display results per, specify the intervals of time at which
the non-compliance is measured, for example, each hour or each day, click the drop-down
arrow and select an interval.
5. Under Display results as, select whether you want to display results as percentages or numbers.
6. On the Schedule tab, select Schedule this report if you want to run the report at regular
intervals, with the results being sent to your chosen recipients as email attachments. Enter the
start date and time and the frequency with which the report will be generated, specify the output
file format and language, and enter the email addresses of the recipients of the report.
219
Sophos Enterprise Console
10.11 Updating hierarchy report
The Updating hierarchy report shows update managers on your network, update shares that they
maintain, and the number of computers that update from these shares.
You cannot configure the Updating hierarchy report. You can run the report as described in Run
a report (page 220).
10.12 Schedule a report
If you use role-based administration, you must have the Report configuration right to perform
this task. For more information, see About roles and sub-estates (page 17).
You can schedule a report to run at regular intervals, with the results being sent to your chosen
recipients as email attachments.
1.
2.
3.
4.
5.
6.
Click the Reports icon on the toolbar.
In the Report Manager dialog box, select the report you want to schedule and click Schedule.
In the dialog box that appears, on the Schedule tab, select Schedule this report.
Enter the start date and time and the frequency with which the report will be generated.
Specify the output file format and language.
Enter the email addresses of the recipients of the report.
10.13 Run a report
1. Click the Reports icon on the toolbar.
2. In the Report Manager dialog box, select the report you want to run and click Run.
The Reporting window, showing the report, is displayed.
You can change the report layout, print the report or export it to a file.
10.14 View a report as a table or chart
Some report can be viewed both as a table and as a chart. If this is the case, you will see two tabs,
Table and Chart in the Reporting window displaying the report.
1. Click the Reports icon on the toolbar.
2. In the Report Manager dialog box, select the report you want to run, for example, Alerts and
events per location, and click Run.
The Reporting window, showing the report, is displayed.
3. To view the report as a table or chart, go to the respective tab.
220
Help
10.15 Print a report
To print a report, click the Print icon on the toolbar at the top of the report.
10.16 Export a report to a file
To export a report to a file:
1. Click the Export icon in the toolbar at the top of the report.
2. In the Export report dialog box, select the type of document or spreadsheet you would like to
export the report to.
The options are:
■
PDF (Acrobat)
■
HTML
■
Microsoft Excel
■
Microsoft Word
■
Rich Text Format (RTF)
■
Comma separated values (CSV)
■
XML
3. Click the File Name browse button to select a location. Then enter a name. Click OK.
10.17 Change the report layout
You can change the page layout used for reports. For example, you can display a report in landscape
(wide-page) format.
1. Click the page layout icon in the toolbar at the top of the report.
2. In the Page Setup dialog box, specify page size, orientation and margins. Click OK.
The report is then displayed with these page settings.
These page settings are also used when you print or export the report.
221
Sophos Enterprise Console
11 Recovering access to encrypted computers
11.1 Recover access with Challenge/Response
Challenge/Response helps users who cannot log on to their computers or access encrypted data.
During the Challenge/Response procedure, the user provides a challenge code generated on the
endpoint computer to the help desk officer. The help desk officer then generates a response code
that authorizes the user to perform a specific action on the computer.
For users to be able to recover access with Challenge/Response, the following prerequisites must
be fulfilled:
■
Challenge/Response needs to be enabled for endpoint computers in a full disk encryption
policy.
■
If you use role-based administration, you must have the right Remediation - encryption
recovery. For more information, see About roles and sub-estates (page 17).
■
If the user has forgotten their password, you must reset it in the Active Directory before
generating the response code.
■
If the user cannot log on because the Power-on Authentication is corrupt, make sure that the
key recovery file is exported and available in the user environment to initiate the
Challenge/Response procedure, see Export key recovery file (page 223).
1. On the endpoint computer the user initiates a Challenge/Response procedure, generates a
challenge code and contacts you.
For further information about initiating a Challenge/Response procedure in case of a forgotten
password, see the Sophos Disk Encryption user help. For further information about initiating a
Challenge/Response procedure in case the Power-on Authentication is corrupt, see the Sophos
Disk Encryption tools guide.
2. In the Computers list, right-click the respective computer and select Encryption Recovery.
The Encryption Recovery wizard is launched.
3. On the Select the recovery method page, select the required recovery method and click Next.
■
■
If the user has forgotten their password, select Forgotten password (logon recovery).
If the user cannot log on because the Power-on Authentication is corrupt, select Power-on
Authentication corrupt (key recovery).
4. On the Enter the challenge page, enter the challenge code the user has provided and click Next.
The response code is generated and displayed on the Tell end user the response page.
5. Tell the end user the response code.
If you tell the user the response code over the phone, you can use the Phonetic Alphabet for
easy spelling.
222
Help
6. The user enters the response code on the endpoint computer.
Access to the endpoint computer is recovered.
11.1.1 Export key recovery file
If you use role-based administration, you must have the right Global encryption settings.
For more information, see About roles and sub-estates (page 17).
The key recovery file is used to initiate the Challenge/Response procedure on the endpoint computer
when the Power-on Authentication is corrupt and the user cannot log on to the computer. The
key recovery file must be exported. To initiate a Challenge/Response procedure when the Power-on
authentication is corrupt, see the Sophos Disk Encryption tools guide.
To export the key recovery file:
1. On the Tools menu, click Manage encryption and select Export key recovery file.
2. Select a location for the key recovery file *.TOK.
3. Make the key recovery file available to the help desk.
11.2 Recover access with Local Self Help
With Local Self Help users who have forgotten their password can log on at their computer without
the assistance of a help desk. Users log on by answering predefined questions in the Power-on
Authentication on the endpoint computer.
For users to be able to recover access with Local Self Help, Local Self Help has to be enabled in a
full disk encrypion policy.
To recover access with Local Self Help:
1. On the endpoint computer, in the Power-on Authentication, the user enters their user name
and clicks the Recovery button.
2. In the following five dialogs, the user answers a defined number of questions randomly selected
from the questions stored on the endpoint computer. After answering the last one, the user
confirms the answers with OK.
3. In the next dialog, the user can view the password by pressing ENTER or SPACEBAR, or by
clicking the blue display box.
The password is displayed for 5 seconds at the maximum. Afterwards, the startup process
continues automatically. The user can hide the password immediately by pressing ENTER, or
SPACEBAR, or by clicking the blue display box again.
4. After reading the password, the user clicks OK.
The user is logged on at the Power-on Authentication and to Windows and can use the password
for future logon.
223
Sophos Enterprise Console
12 Copying or printing data from Enterprise Console
12.1 Copy data from the computer list
You can copy information displayed in the computer list, in the Endpoints view, to the Clipboard
and then paste it into another document in a tab-separated format.
1. In the Endpoints view, in the Groups pane, select the group of computers for which you want
to copy data.
2. In the View drop-down list, select which computers you want to display, for example,
Computers with potential problems.
3. If the group contains subgroups, select also whether you want to display computers At this
level only or At this level and below.
4. In the computer list, go to the tab you want to display, for example, Anti-Virus Details.
5. Click anywhere in the computer list to bring the focus to it.
6. On the Edit menu, click Copy to copy the data to the Clipboard.
12.2 Print data from the computer list
You can print information displayed in the computer list, in the Endpoints view.
1. In the Endpoints view, in the Groups pane, select the group of computers for which you want
to print data.
2. In the View drop-down list, select which computers you want to display, for example,
Computers with potential problems.
3. If the group contains subgroups, select also whether you want to display computers At this
level only or At this level and below.
4. In the computer list, go to the tab you want to display, for example, Anti-Virus Details.
5. Click anywhere in the computer list to bring the focus to it.
6. On the File menu, click Print.
12.3 Copy computer details for a computer
You can copy information from the Computer details dialog box to the Clipboard and then paste
it into another document. The information includes computer name, computer’s operating system,
versions of the security software installed on the computer, any outstanding alerts and errors,
update status, and so on.
1. In the Endpoints view, in the computer list, double-click the computer for which you want to
copy the data.
2. In the Computer details dialog box, click Copy to copy the data to the Clipboard.
224
Help
12.4 Print computer details for a computer
You can print information from the Computer details dialog box. The information includes
computer name, computer’s operating system, versions of the security software installed on the
computer, any outstanding alerts and errors, update status, and so on.
1. In the Endpoints view, in the computer list, double-click the computer for which you want to
print the data.
2. In the Computer details dialog box, click Print.
225
Sophos Enterprise Console
13 Troubleshooting
13.1 Computers are not running on-access scanning
If there are computers not running on-access scanning:
1. Check which anti-virus and HIPS policy is used by those computers.
For details, see Check which policies a group uses (page 30).
2. Ensure that on-access scanning is enabled in that policy and that the computers comply with
the policy.
For details, see Turn on-access scanning on or off (page 96) and Make computers use the group
policy (page 36).
13.2 The firewall is disabled
If there are computers with the firewall disabled:
1. Check which firewall policy is used by those computers.
For details, see Check which policies a group uses (page 30).
2. Ensure that the firewall is enabled in that policy and that the computers comply with the policy.
For details, see Temporarily disable the firewall (page 116) and Make computers use the group
policy (page 36).
13.3 The firewall is not installed
Note: If you use role-based administration, you must have the Computer search, protection and
groups right to install the firewall. For more information, see About roles and sub-estates (page
17).
Before you attempt to install the client firewall on endpoint computers, check that the computers
are running a Windows client operating system (Windows 2000 or later).
Note: You cannot install the firewall on computers running server operating systems or Windows
Vista Starter.
If there are computers on which you want to install the firewall:
1. Select the computers, right-click and select Protect Computers.
The Protect Computers Wizard appears. Click Next.
2. When prompted to select features, select Firewall. Complete the wizard.
If the problem persists, contact Sophos technical support.
226
Help
13.4 Computers have outstanding alerts
■
If there are computers with a virus, or an application you do not want, see Clean up computers
now (page 62).
■
If there are computers with an adware or other potentially unwanted application that you do
want, see Authorize adware and PUAs (page 93).
■
If there are out-of-date computers, see Update out-of-date computers (page 88) for help with
diagnosing and fixing the problem.
Note: If you do not need the alert displayed any more, you can clear it. Select the computer(s)
with alerts, right-click and select Resolve Alerts and Errors. You must have the Remediation cleanup right to acknowledge (clear) alerts and errors.
13.5 Computers are not managed by the console
Windows, Mac, Linux, and UNIX computers should be managed by Enterprise Console, so that
they can be updated and monitored.
Note: Unless you use Active Directory synchronization (see About synchronization with Active
Directory (page 40)), new computers added to the network are not displayed or managed by the
console automatically. Click Discover computers in the toolbar to search for them and place them
in the Unassigned group.
If a computer is not managed, its details on the Status tab are grayed out.
To start managing unmanaged computers:
1. In the View drop-down list, select Unmanaged computers.
2. Select any computers that are listed. Right-click and select Protect Computers to install a
managed version of Sophos Endpoint Security and Control.
3. If there are computers on which Enterprise Console cannot install Sophos Endpoint Security
and Control automatically, carry out a manual installation.
For details, see the Sophos Enterprise Console advanced startup guide.
13.6 Cannot protect computers in the Unassigned group
The Unassigned group is only for holding computers that are not yet in groups created by you,
to which policies can be applied. You cannot protect computers until you place them in such a
group.
227
Sophos Enterprise Console
13.7 Sophos Endpoint Security and Control installation failed
If the Protect Computers Wizard fails to install Sophos Endpoint Security and Control on
computers, it could be because:
■
Enterprise Console does not know which operating system the computers are running. This
is probably because you did not enter your username in the format domain\user when finding
computers.
■
Automatic installation is not possible on that operating system. Perform a manual installation.
For instructions, see the Sophos Enterprise Console advanced startup guide.
■
The computers are running a firewall.
■
“Simple File Sharing” has not been turned off on Windows XP computers.
■
The “Use Sharing Wizard” option has not been turned off on Windows Vista computers.
■
You selected to install a feature that is not supported on the computers’ operating systems.
If installation of Compliance Control fails or there is an error during installation, you can view
the Compliance Control installation log. The log is in the %tmp% folder.
For a full list of requirements for the Sophos Endpoint Security and Control features, see the
system requirements page on the Sophos website (http://www.sophos.com/products/all-sysreqs.html).
13.8 Computers are not updated
See Update out-of-date computers (page 88) for help with diagnosing and fixing the problem.
13.9 Anti-virus settings do not take effect on Macs
Some anti-virus settings cannot be applied to Mac computers. In this case, there is a warning on
that page of settings.
You can change anti-virus settings on Mac computers with Sophos Update Manager, a utility
supplied with Sophos Anti-Virus for Mac. To open Sophos Update Manager, on a Mac computer,
in a Finder window, browse to the Sophos Anti-Virus:ESOSX folder. Double-click Sophos Update
Manager. For further details, see Sophos Update Manager Help.
13.10 Anti-virus settings do not take effect on Linux or UNIX
Some anti-virus settings cannot be applied to Linux or UNIX computers. In this case, there is a
warning on that page of settings.
You can change anti-virus settings on Linux computers using the savconfig and savscan commands
as described in the Sophos Anti-Virus for Linux user manual. You can change anti-virus settings
228
Help
on UNIX computers using the savscan command as described in the Sophos Anti-Virus for UNIX
user manual.
13.11 Linux or UNIX computer does not comply with policy
If you use a corporate configuration file in the CID, and the file contains a configuration value
which conflicts with the policy, the computer is shown as not complying with the policy.
Selecting the Comply with policy option brings the computer in compliance only temporarily,
until the CID-based configuration is reapplied.
To resolve the problem, review the corporate configuration file and, where possible, replace by
console-based configuration.
13.12 New scan appears unexpectedly on Windows 2000 or later
If you look at the local copy of Sophos Endpoint Security and Control on Windows 2000 or later
computers, you may see that a new "Available scan" is listed, even though the user has not created
one.
This new scan is actually a scheduled scan that you have set up from the console. You should not
delete it.
13.13 Connectivity and timeout problems
If the communications between Enterprise Console and a networked computer become slow or
the computer becomes unresponsive, there may be a connectivity problem.
Check the Sophos Network Communications Report that presents an overview of the current
state of communications between a computer and Enterprise Console. To view the report, go to
the computer where the problem occurred. On the taskbar, click the Start button, select All
Programs| Sophos| Sophos Endpoint Security and Control, and then click View Sophos Network
Communications Report.
The report shows possible problem areas and, if a problem is detected, remedial actions.
13.14 Adware and PUAs are not detected
If adware and other potentially unwanted applications (PUAs) are not detected, you should check
that:
■
Detection has been enabled. See Scan for adware and PUAs (page 92).
■
The applications are on a computer running Windows 2000 or later.
229
Sophos Enterprise Console
13.15 Partially detected item
Sophos Endpoint Security and Control may report that an item (for example, a Trojan or potentially
unwanted application) is "partially detected". This means that it has not found all the component
parts of that application.
To find the other components, you need to carry out a full system scan of the computer(s) affected.
On computers running Windows 2000 or later, you can do this by selecting the computer(s),
right-clicking and selecting Full system scan. You can also set up a scheduled scan for adware and
other potentially unwanted applications. See Scan for adware and PUAs (page 92).
If the application has still not been fully detected, it may be because:
■
you have insufficient access rights
■
some drives or folders on the computer, containing the application's components, are excluded
from scanning.
If the latter is the case, check the list of items excluded from scanning (see Exclude items from
on-access scanning (page 98)). If there are some items on the list, remove them from the list and
scan your computer again.
Sophos Endpoint Security and Control may not be able to fully detect or remove adware and other
potentially unwanted applications with components installed on network drives.
For advice, contact Sophos technical support.
13.16 Frequent alerts about potentially unwanted applications
You may receive very large numbers of alerts about potentially unwanted applications, including
multiple reports of the same application.
This can occur because some types of potentially unwanted application "monitor" files, trying to
access them frequently. If you have on-access scanning enabled, Sophos Endpoint Security and
Control detects each file access and sends an alert.
You should do one of the following:
230
■
Disable on-access scanning for adware and PUA. You can use a scheduled scan instead.
■
Authorize the application (if you want to have it running on your computers). See Authorize
adware and PUAs (page 93).
■
Clean up the computer(s), removing applications that you have not authorized. See Clean up
computers now (page 62).
Help
13.17 Cleanup failed
If Sophos Endpoint Security and Control fails in an attempt to clean up items ("Cleanup failed"),
the reason could be:
■
It has not found all the components of a multi-component item. Run a full system scan of the
computer(s) to find the other components. See Scan computers now (page 61).
■
Some drives or folders that contain item components are excluded from scanning. Check the
items excluded from scanning (see Exclude items from on-access scanning (page 98)). If there
are some items on the list, remove them from the list.
■
You have insufficient access rights.
■
It cannot clean up that type of item.
■
It has found a virus fragment, rather than an exact virus match.
■
The item is on a write-protected floppy disk or CD.
■
The item is on a write-protected NTFS volume (Windows 2000 or later).
13.18 Recover from virus side-effects
Cleanup can remove a virus from computers, but it cannot always reverse the side-effects.
Some viruses leave no side-effects. Others may make changes or corrupt data in ways that are hard
to detect. To deal with this, you should:
■
On the Help menu, click View Security Information. This connects you to the Sophos website,
where you can read the virus analysis.
■
Use backups or original copies of programs to replace infected programs. If you did not have
backup copies before the infection, create them now in case of future infections.
Sometimes you can recover data from disks damaged by a virus. Sophos can supply utilities for
repairing the damage caused by some viruses. Contact Sophos technical support for advice.
13.19 Recover from application side-effects
Cleanup can remove unwanted applications, but it cannot always reverse the side-effects.
Some applications modify the operating system, e.g. by changing your internet connection settings.
Sophos Endpoint Security and Control cannot always restore all settings. For example, if an
application changed the browser home page, Sophos Endpoint Security and Control cannot know
what the previous home page setting was.
Some applications install utilities, such as .dll or .ocx files, on your computer. If a utility is harmless
(that is, does not possess the qualities of a potentially unwanted application), e.g. a language library,
231
Sophos Enterprise Console
and is not integral to the application, Sophos Endpoint Security and Control may not detect it as
part of the application. In this case, cleanup won't remove the file from your computer.
Sometimes an application, such as adware, is part of a program that you intentionally installed,
and needs to be there for the program to run. If you remove the application, the program may
stop running on your computer.
You should:
■
On the Help menu, click View Security Information. This connects you to the Sophos website,
where you can read the application analysis.
■
Use backups to restore your system settings or programs you want to use. If you did not have
backup copies before, create them now in case of future incidents.
For more information or advice on recovering from an adware and PUA's side-effects, contact
Sophos technical support.
13.20 Data control does not detect files uploaded via embedded browsers
Data control intercepts documents which are uploaded via standalone web browsers. It does not
intercept documents uploaded via browsers embedded in third-party applications (for example,
Lotus Notes). If you have a third-party application with an embedded browser and want to monitor
all uploaded documents, you must configure the application to launch an external browser.
13.21 Data control does not scan uploaded or attached files
If data control does not scan files uploaded or attached from a network location using a monitored
application (for example, an email client, a web browser, or an instant messaging (IM) client), it
may be because you excluded remote files from on-access scanning in the anti-virus and HIPS
policy. Data control uses the same set of exclusions as the Sophos Anti-Virus on-access scanner,
so if remote file scanning is disabled, it will not send any remote files for a data control check.
For information about configuring on-access scanning exclusions, see Exclude items from on-access
scanning (page 98).
Note: This restriction does not apply to storage device monitoring. Data control will intercept
the transfer of files onto monitored storage devices from a network location, for example, copying
files to a removable storage device or burning data onto optical media.
13.22 Uninstalled update manager is displayed in the console
After you uninstall an additional update manager, it may still be displayed in Enterprise Console,
Update managers view.
To remove the update manager from the console, select it, right-click, and then click Delete.
232
Help
14 Glossary
Active Directory
synchronization event
An event that occurs during synchronization with Active Directory.
active sub-estate
A sub-estate displayed in the Groups pane.
advanced Content
Control List editor
An editor that enables a user to create a custom Content Control List
that consists of a score, maximum count, regular expression, and a
trigger score that must be reached before the Content Control List is
matched.
Application manager
A dialog box that enables you to allow or create new rules for
applications that have been blocked by Sophos Client Firewall.
automatic protection
Deployment of security software (installation and policy enforcement)
on all the computers in an Active Directory container as soon as they
are synchronized with Enterprise Console.
category
A specific tag that is used to classify SophosLabs Content Control
Lists according to their type, regulation that defines their contents,
or region they apply to.
Challenge/Response
(C/R)
A full disk encryption recovery method that helps users to log on to
their computers when they have forgotten their password or when
they cannot access encrypted data any more. Help desk assistance is
required.
Content Control List
(CCL)
A set of conditions that specify file content, for example, credit or
debit card numbers, or bank account details near to other forms of
personally identifiable information. There are two types of Content
Control List: SophosLabs Content Control List and custom Content
Control List.
content rule
A rule that contains one or more Content Control Lists and specifies
the action that is taken if the user attempts to transfer data that
matches all the Content Control Lists in the rule to the specified
destination.
controlled application
A non-malicious application that an organization might want to
detect or block because it undermines productivity or network
performance.
controlled data
Files that meet data control conditions.
controlled device
A device that is subject to device control.
critical level
A value that triggers the change of an item’s security status to Critical.
233
Sophos Enterprise Console
234
custom Content
Control List
A Content Control List that has been created by a Sophos customer.
There are two ways to create a custom Content Control List: create
a simple list of search terms with a specified search condition, such
as “any of these terms,” or use an advanced Content Control List
editor.
Dashboard
An at-a-glance view of the network’s security status.
Dashboard event
An event in which a dashboard health indicator exceeds critical level.
An email alert is generated when a dashboard event occurs.
data control
A feature to reduce accidental data loss from workstations. It works
by taking action when a workstation user tries to transfer a file that
meets criteria defined in the data control policy and rules. For
example, when a user attempts to copy a spreadsheet containing a list
of customer data to a removable storage device or upload a document
marked as confidential into a webmail account, data control will block
the transfer, if configured to do so.
database
The component of Sophos Enterprise Console that stores details about
computers on the network.
Default sub-estate
A sub-estate that has as its root the server root node of the group tree
and the Unassigned group. It is displayed by default when you open
Enterprise Console for the first time.
device control
A feature to reduce accidental data loss from workstations and restrict
introduction of software from outside of the network. It works by
taking action when a workstation user tries to use an unauthorized
storage device or networking device on their workstation.
estate
See IT estate.
exempt device
A device that is explicitly excluded from device control.
expression
See regular expression.
file matching rule
A rule that specifies the action that is taken if the user attempts to
transfer a file with the specified file name or of the specified file type
to the specified destination, for example, block the transfer of
databases to removable storage devices.
full disk encryption
A feature that protects data on endpoint computers from being read
or changed by unauthorized persons.
group
A group of managed computers defined in Sophos Enterprise Console.
health indicator
Generic term for icons depicting security status of a dashboard section
or item, or the overall health status of the network.
Help
Host Intrusion
Prevention System
(HIPS)
A security technology that protects computers from suspicious files,
unidentified viruses, and suspicious behavior.
IT estate
The company IT environment, including computers, network, and
so on.
Local Self Help (LSH)
A full disk encryption recovery method that helps users to log on to
their computers when they have forgotten their passwords. Users can
log on by answering predefined questions. Help desk assistance is not
required.
managed computer
A computer that has Remote Management System (RMS) installed
and on which Sophos Enterprise Console can report and install and
update software.
management console
The component of Sophos Enterprise Console that enables you to
protect and manage computers.
management server
The component of Sophos Enterprise Console that handles updating
and communications with networked computers.
maximum count
The maximum number of matches for a regular expression that can
be counted towards the total score.
out-of-date computer
A computer that has not got up-to-date Sophos software.
patch assessment
Evaluates computers for installed patches and identifies missing
patches.
policy
A group of settings, for example, for updating, applied to a group or
groups of computers.
potentially unwanted
application (PUA)
An application that is not inherently malicious but is generally
considered unsuitable for the majority of business networks.
Power-on
Authentication (POA)
A full disk encryption logon method that requires user authentication
directly after the computer has been switched on, before the operating
system starts. After the user has authenticated, the operating system
starts and the user is logged on to Windows.
quantity
The volume of the Content Control List key data type that must be
found in a file before the Content Control List is matched.
quantity key
The key type of data defined in a Content Control List, to which the
quantity setting is applied. For example, for a Content Control List
containing credit or debit card numbers, the quantity specifies how
many credit or debit card numbers must be found in a file before the
Content Control List is matched.
235
Sophos Enterprise Console
236
region
The scope of a SophosLabs Content Control List. The region either
specifies the country the Content Control List applies to (for
country-specific Content Control Lists) or shows “global” (for global
Content Control Lists that apply to all countries).
regular expression
A search string that uses special characters to match a text pattern in
a file. Data control uses Perl 5 regular expression syntax.
right
A set of permissions to perform certain tasks in Enterprise Console.
role
A set of rights that determines access to Enterprise Console.
role-based
administration
A feature that allows you to specify which computers a user can access
and which tasks they can carry out, depending on their role in your
organization.
rule
A rule specifies the action that is taken if a file meets certain
conditions. There are two types of data control rule: file matching
rule and content rule.
score
The number that is added to the total score for a Content Control
List when a regular expression is matched.
server root node
The topmost node of the group tree in the Groups pane, which
includes the Unassigned group.
Sophos Live Protection
A feature that uses in-the-cloud technology to instantly decide whether
a suspicious file is a threat and take action specified in the Sophos
anti-virus cleanup configuration.
Sophos Update
Manager (SUM)
A program that downloads Sophos security software and updates
from Sophos or another update server to shared update locations.
Sophos-defined rule
A rule that has been provided by Sophos as an example.
Sophos-defined rules are not updated by Sophos.
SophosLabs Content
Control List
A Content Control List that has been provided and is managed by
Sophos. Sophos can update SophosLabs Content Control Lists or
create new Content Control Lists and make them available in
Enterprise Console. The contents of SophosLabs Content Control
Lists cannot be edited. However, the quantity can be set for each such
Content Control List.
sub-estate
A named part of the IT estate, containing a subset of the computers
and groups.
sub-estate
administration
A feature that restricts the computers and groups that are available
to perform operations on.
Help
software subscription
A set of versions of software for a variety of platforms, selected by the
user, that Update Manager will download and keep updated. One
version can be specified for each supported platform (for example,
“Latest” for Windows 2000 and later).
suspicious behavior
detection
Dynamic analysis of the behavior of all programs running on the
system in order to detect and block activity which appears to be
malicious.
suspicious file
A file that exhibits a combination of characteristics that are commonly,
but not exclusively, found in viruses.
synchronization
interval
The period after which a synchronization point in Enterprise Console
is synchronized with the selected Active Directory container.
synchronization point
(for an Active
Directory tree)
A Sophos Enterprise Console group into which the contents of a
selected Active Directory container (groups and computers or groups
only) will be added for synchronization, their structure preserved.
synchronization with
Active Directory
A one-way synchronization of Sophos Enterprise Console group(s)
with Active Directory organizational units, or containers.
synchronized group
Any group below the synchronization point.
System Administrator
A preconfigured role that has full rights to manage Sophos security
software on the network and roles in Enterprise Console.
The System Administrator role cannot be deleted or have its rights
or name changed, and the Sophos Full Administrators Windows
group cannot be removed from it. Other users and groups can be
added to or removed from the role.
tag
A descriptor applied to a SophosLabs Content Control List to identify
the contents or scope of the Content Control List. There are three
types of tag: type, regulation, and region.
tamper protection
A feature that prevents known malware and unauthorized users (local
administrators and users with limited technical knowledge) from
uninstalling Sophos security software or disabling it through the
Sophos Endpoint Security and Control interface.
transparent encryption
An encryption method that encrypts and decrypts data without user
interaction. With full disk encryption, disks are encrypted
transparently.
threshold level
A value that triggers the change of an item’s security status to Warning
or Critical.
total score
The sum of the scores for a Content Control List, according to the
content that has been matched.
237
Sophos Enterprise Console
238
trigger score
The number of times a regular expression must be matched before a
Content Control List is matched.
true file type
The file type that is ascertained by analyzing the structure of a file as
opposed to the filename extension. This is a more reliable method.
type
The criteria according to which SophosLabs Content Control Lists
are classified, for example, a Content Control List defining passport
details, postal addresses, or email addresses belongs to the Personally
Identifiable Information type.
update manager
See Sophos Update Manager.
Wake on LAN (WOL)
A technology that is used on a network to remotely start a computer
or wake it from sleep mode for scheduled maintenance tasks.
warning level
A value that triggers the change of an item’s security status to Warning.
web control
A feature that allows you to set and enforce web access policies for
your organization, and to view reports on web browsing usage. You
can allow or block user access to certain categories of websites, and
users can also be warned whether visiting a website will violate your
policies.
web protection
A feature that detects threats in web pages. This feature blocks sites
that have hosted malicious content in the past and also prevents
malicious downloads. Web protection is part of the anti-virus and
HIPS policy.
Help
15 Technical support
You can find technical support for Sophos products in any of these ways:
■
Visit the SophosTalk community at http://community.sophos.com/ and search for other users
who are experiencing the same problem.
■
Visit the Sophos support knowledgebase at http://www.sophos.com/support/.
■
Download the product documentation at http://www.sophos.com/support/docs/.
■
Send an email to [email protected], including your Sophos software version number(s),
operating system(s) and patch level(s), and the text of any error messages.
239
Sophos Enterprise Console
16 Legal notices
Copyright © 2012 Sophos Limited. All rights reserved. No part of this publication may be
reproduced, stored in a retrieval system, or transmitted, in any form or by any means, electronic,
mechanical, photocopying, recording or otherwise unless you are either a valid licensee where the
documentation can be reproduced in accordance with the license terms or you otherwise have
the prior permission in writing of the copyright owner.
Sophos, Sophos Anti-Virus and SafeGuard are registered trademarks of Sophos Limited, Sophos
Group and Utimaco Safeware AG, as applicable. All other product and company names mentioned
are trademarks or registered trademarks of their respective owners.
ACE™, TAO™, CIAO™, and CoSMIC™
ACE1, TAO2, CIAO3, and CoSMIC4 (henceforth referred to as “DOC software”) are copyrighted
by Douglas C. Schmidt5 and his research group6 at Washington University7, University of
California8, Irvine, and Vanderbilt University9, Copyright © 1993–2005, all rights reserved.
Since DOC software is open-source, free software, you are free to use, modify, copy, and
distribute–perpetually and irrevocably–the DOC software source code and object code produced
from the source, as well as copy and distribute modified versions of this software. You must,
however, include this copyright statement along with code built using DOC software.
You can use DOC software in commercial and/or binary software releases and are under no
obligation to redistribute any of your source code that is built using DOC software. Note, however,
that you may not do anything to the DOC software code, such as copyrighting it yourself or
claiming authorship of the DOC software code, that will prevent DOC software from being
distributed freely using an open-source development model. You needn’t inform anyone that
you’re using DOC software in your software, though we encourage you to let us10 know so we can
promote your project in the DOC software success stories11.
DOC software is provided as is with no warranties of any kind, including the warranties of design,
merchantability, and fitness for a particular purpose, noninfringement, or arising from a course
of dealing, usage or trade practice. Moreover, DOC software is provided with no support and
without any obligation on the part of Washington University, UC Irvine, Vanderbilt University,
their employees, or students to assist in its use, correction, modification, or enhancement. A
number of companies12 around the world provide commercial support for DOC software, however.
DOC software is Y2K-compliant, as long as the underlying OS platform is Y2K-compliant.
Washington University, UC Irvine, Vanderbilt University, their employees, and students shall
have no liability with respect to the infringement of copyrights, trade secrets or any patents by
DOC software or any part thereof. Moreover, in no event will Washington University, UC Irvine,
or Vanderbilt University, their employees, or students be liable for any lost revenue or profits or
other special, indirect and consequential damages.
The ACE13, TAO14, CIAO15, and CoSMIC16 web sites are maintained by the DOC Group17 at the
Institute for Software Integrated Systems (ISIS)18 and the Center for Distributed Object Computing
of Washington University, St. Louis19 for the development of open-source software as part of the
240
Help
open-source software community20. By submitting comments, suggestions, code, code snippets,
techniques (including that of usage), and algorithms, submitters acknowledge that they have the
right to do so, that any such submissions are given freely and unreservedly, and that they waive
any claims to copyright or ownership. In addition, submitters acknowledgethat any such submission
might become part of the copyright maintained on the overall body of code, which comprises the
DOC software. By making a submission, submitter agree to these terms. Furthermore, submitters
acknowledge that the incorporation or modification of such submissions is entirely at the discretion
of the moderators of the open-source DOC software projects or their designees.
The names ACE, TAO, CIAO, CoSMIC, WashingtonUniversity, UC Irvine, and Vanderbilt
University, may not be used to endorse or promote products or services derived from this source
without express written permission from Washington University, UC Irvine, or Vanderbilt
University. Further, products or services derived from this source may not be called ACE, TAO,
CIAO, or CoSMIC nor may the name Washington University, UC Irvine, or Vanderbilt University
appear in their names, without express written permission from Washington University, UC
Irvine, and Vanderbilt University.
If you have any suggestions, additions, comments, or questions, please let me21 know.
Douglas C. Schmidt22
References
1. http://www.cs.wustl.edu/~schmidt/ACE.html
2. http://www.cs.wustl.edu/~schmidt/TAO.html
3. http://www.dre.vanderbilt.edu/CIAO/
4. http://www.dre.vanderbilt.edu/cosmic/
5. http://www.dre.vanderbilt.edu/~schmidt/
6. http://www.cs.wustl.edu/~schmidt/ACE-members.html
7. http://www.wustl.edu/
8. http://www.uci.edu/
9. http://www.vanderbilt.edu/
10. mailto:[email protected]
11. http://www.cs.wustl.edu/~schmidt/ACE-users.html
12. http://www.cs.wustl.edu/~schmidt/commercial-support.html
13. http://www.cs.wustl.edu/~schmidt/ACE.html
14. http://www.cs.wustl.edu/~schmidt/TAO.html
15. http://www.dre.vanderbilt.edu/CIAO/
16. http://www.dre.vanderbilt.edu/cosmic/
17. http://www.dre.vanderbilt.edu/
18. http://www.isis.vanderbilt.edu/
19. http://www.cs.wustl.edu/~schmidt/doc-center.html
20. http://www.opensource.org/
21. mailto:[email protected]
22. http://www.dre.vanderbilt.edu/~schmidt/
241
Sophos Enterprise Console
Apache
The Sophos software that is described in this document may include some software programs that
are licensed (or sublicensed) to the user under the Apache License. A copy of the license agreement
for any such included software can be found at http://www.apache.org/licenses/LICENSE-2.0.
Boost
Version 1.0, 17 August 2003
Permission is hereby granted, free of charge, to any person or organization obtaining a copy of
the software and accompanying documentation covered by this license (the “Software”) to use,
reproduce, display, distribute, execute, and transmit the Software, and to prepare derivative works
of the Software, and to permit third-parties to whom the Software is furnished to do so, all subject
to the following:
The copyright notices in the Software and this entire statement, including the above license grant,
this restriction and the following disclaimer, must be included in all copies of the Software, in
whole or in part, and all derivative works of the Software, unless such copies or derivative works
are solely in the form of machine-executable object code generated by a source language processor.
THE SOFTWARE IS PROVIDED “AS IS”, WITHOUT WARRANTY OF ANY KIND, EXPRESS
OR IMPLIED, INCLUDING BUT NOT LIMITED TO THE WARRANTIES OF
MERCHANTABILITY, FITNESS FOR A PARTICULAR PURPOSE, TITLE AND
NON-INFRINGEMENT. IN NO EVENT SHALL THE COPYRIGHT HOLDERS OR ANYONE
DISTRIBUTING THE SOFTWARE BE LIABLE FOR ANY DAMAGES OR OTHER LIABILITY,
WHETHER IN CONTRACT, TORT OR OTHERWISE, ARISING FROM, OUT OF OR IN
CONNECTION WITH THE SOFTWARE OR THE USE OR OTHER DEALINGS IN THE
SOFTWARE.
Common Public License
The Sophos software that is referenced in this document includes or may include some software
programs that are licensed (or sublicensed) to the user under the Common Public License (CPL),
which, among other rights, permits the user to have access to the source code. The CPL requires
for any software licensed under the terms of the CPL, which is distributed in object code form,
that the source code for such software also be made available to the users of the object code form.
For any such software covered under the CPL, the source code is available via mail order by
submitting a request to Sophos; via email to [email protected] or via the web at
http://www.sophos.com/support/queries/enterprise.html. A copy of the license agreement for any
such included software can be found at http://opensource.org/licenses/cpl1.0.php
ConvertUTF
Copyright 2001–2004 Unicode, Inc.
This source code is provided as is by Unicode, Inc. No claims are made as to fitness for any
particular purpose. No warranties of any kind are expressed or implied. The recipient agrees to
determine applicability of information provided. If this file has been purchased on magnetic or
242
Help
optical media from Unicode, Inc., the sole remedy for any claim will be exchange of defective
media within 90 days of receipt.
Unicode, Inc. hereby grants the right to freely use the information supplied in this file in the
creation of products supporting the Unicode Standard, and to make copies of this file in any form
for internal or external distribution as long as this notice remains attached.
Loki
The MIT License (MIT)
Copyright © 2001 by Andrei Alexandrescu
Permission is hereby granted, free of charge, to any person obtaining a copy of this software and
associated documentation files (the "Software"), to deal in the Software without restriction,
including without limitation the rights to use, copy, modify, merge, publish, distribute, sublicense,
and/or sell copies of the Software, and to permit persons to whom the Software is furnished to do
so, subject to the following conditions:
The above copyright notice and this permission notice shall be included in all copies or substantial
portions of the Software.
THE SOFTWARE IS PROVIDED "AS IS", WITHOUT WARRANTY OF ANY KIND, EXPRESS
OR IMPLIED, INCLUDING BUT NOT LIMITED TO THE WARRANTIES OF
MERCHANTABILITY, FITNESS FOR A PARTICULAR PURPOSE AND NONINFRINGEMENT.
IN NO EVENT SHALL THE AUTHORS OR COPYRIGHT HOLDERS BE LIABLE FOR ANY
CLAIM, DAMAGES OR OTHER LIABILITY, WHETHER IN AN ACTION OF CONTRACT,
TORT OR OTHERWISE, ARISING FROM, OUT OF OR IN CONNECTION WITH THE
SOFTWARE OR THE USE OR OTHER DEALINGS IN THE SOFTWARE.
OpenSSL cryptographic toolkit
The OpenSSL toolkit stays under a dual license, i.e. both the conditions of the OpenSSL License
and the original SSLeay license apply to the toolkit. See below for the actual license texts. Actually
both licenses are BSD-style Open Source licenses. In case of any license issues related to OpenSSL
please contact [email protected].
OpenSSL license
Copyright © 1998–2011 The OpenSSL Project. All rights reserved.
Redistribution and use in source and binary forms, with or without modification, are permitted
provided that the following conditions are met:
1. Redistributions of source code must retain the above copyright notice, this list of conditions
and the following disclaimer.
2. Redistributions in binary form must reproduce the above copyright notice, this list of conditions
and the following disclaimer in the documentation and/or other materials provided with the
distribution.
3. All advertising materials mentioning features or use of this software must display the following
acknowledgment:
243
Sophos Enterprise Console
“This product includes software developed by the OpenSSL Project for use in the OpenSSL
Toolkit. (http://www.openssl.org/)”
4. The names “OpenSSL Toolkit” and “OpenSSL Project” must not be used to endorse or promote
products derived from this software without prior written permission. For written permission,
please contact [email protected].
5. Products derived from this software may not be called “OpenSSL” nor may “OpenSSL” appear
in their names without prior written permission of the OpenSSL Project.
6. Redistributions of any form whatsoever must retain the following acknowledgment:
“This product includes software developed by the OpenSSL Project for use in the OpenSSL
Toolkit (http://www.openssl.org/)”
THIS SOFTWARE IS PROVIDED BY THE OpenSSL PROJECT “AS IS” AND ANY EXPRESSED
OR IMPLIED WARRANTIES, INCLUDING, BUT NOT LIMITED TO, THE IMPLIED
WARRANTIES OF MERCHANTABILITY AND FITNESS FOR A PARTICULAR PURPOSE ARE
DISCLAIMED. IN NO EVENT SHALL THE OpenSSL PROJECT OR ITS CONTRIBUTORS BE
LIABLE FOR ANY DIRECT, INDIRECT, INCIDENTAL, SPECIAL, EXEMPLARY, OR
CONSEQUENTIAL DAMAGES (INCLUDING, BUT NOT LIMITED TO, PROCUREMENT OF
SUBSTITUTE GOODS OR SERVICES; LOSS OF USE, DATA, OR PROFITS; OR BUSINESS
INTERRUPTION) HOWEVER CAUSED AND ON ANY THEORY OF LIABILITY, WHETHER
IN CONTRACT, STRICT LIABILITY, OR TORT (INCLUDING NEGLIGENCE OR OTHERWISE)
ARISING IN ANY WAY OUT OF THE USE OF THIS SOFTWARE, EVEN IF ADVISED OF THE
POSSIBILITY OF SUCH DAMAGE.
This product includes cryptographic software written by Eric Young ([email protected]). This
product includes software written by Tim Hudson ([email protected]).
Original SSLeay license
Copyright © 1995–1998 Eric Young ([email protected]) All rights reserved.
This package is an SSL implementation written by Eric Young ([email protected]). The
implementation was written so as to conform with Netscape’s SSL.
This library is free for commercial and non-commercial use as long as the following conditions
are adhered to. The following conditions apply to all code found in this distribution, be it the RC4,
RSA, lhash, DES, etc., code; not just the SSL code. The SSL documentation included with this
distribution is covered by the same copyright terms except that the holder is Tim Hudson
([email protected]).
Copyright remains Eric Young’s, and as such any Copyright notices in the code are not to be
removed. If this package is used in a product, Eric Young should be given attribution as the author
of the parts of the library used. This can be in the form of a textual message at program startup
or in documentation (online or textual) provided with the package.
Redistribution and use in source and binary forms, with or without modification, are permitted
provided that the following conditions are met:
1. Redistributions of source code must retain the copyright notice, this list of conditions and the
following disclaimer.
244
Help
2. Redistributions in binary form must reproduce the above copyright notice, this list of conditions
and the following disclaimer in the documentation and/or other materials provided with the
distribution.
3. All advertising materials mentioning features or use of this software must display the following
acknowledgement:
“This product includes cryptographic software written by Eric Young ([email protected])”
The word “cryptographic” can be left out if the routines from the library being used are not
cryptographic related :-).
4. If you include any Windows specific code (or a derivative thereof) from the apps directory
(application code) you must include an acknowledgement:
“This product includes software written by Tim Hudson ([email protected])”
THIS SOFTWARE IS PROVIDED BY ERIC YOUNG “AS IS” AND ANY EXPRESS OR IMPLIED
WARRANTIES, INCLUDING, BUT NOT LIMITED TO, THE IMPLIED WARRANTIES OF
MERCHANTABILITY AND FITNESS FOR A PARTICULAR PURPOSE ARE DISCLAIMED. IN
NO EVENT SHALL THE AUTHOR OR CONTRIBUTORS BE LIABLE FOR ANY DIRECT,
INDIRECT, INCIDENTAL, SPECIAL, EXEMPLARY, OR CONSEQUENTIAL DAMAGES
(INCLUDING, BUT NOT LIMITED TO, PROCUREMENT OF SUBSTITUTE GOODS OR
SERVICES; LOSS OF USE, DATA, OR PROFITS; OR BUSINESS INTERRUPTION) HOWEVER
CAUSED AND ON ANY THEORY OF LIABILITY, WHETHER IN CONTRACT, STRICT
LIABILITY, OR TORT (INCLUDING NEGLIGENCE OR OTHERWISE) ARISING IN ANY WAY
OUT OF THE USE OF THIS SOFTWARE, EVEN IF ADVISED OF THE POSSIBILITY OF SUCH
DAMAGE.
The license and distribution terms for any publically available version or derivative of this code
cannot be changed. i.e. this code cannot simply be copied and put under another distribution
license [including the GNU Public License.]
WilsonORMapper
Copyright © 2007, Paul Wilson
All rights reserved.
Redistribution and use in source and binary forms, with or without modification, are permitted
provided that the following conditions are met:
■
Redistributions of source code must retain the above copyright notice, this list of conditions
and the following disclaimer.
■
Redistributions in binary form must reproduce the above copyright notice, this list of conditions
and the following disclaimer in the documentation and/or other materials provided with the
distribution.
THIS SOFTWARE IS PROVIDED BY THE COPYRIGHT HOLDERS AND CONTRIBUTORS
"AS IS" AND ANY EXPRESS OR IMPLIED WARRANTIES, INCLUDING, BUT NOT LIMITED
TO, THE IMPLIED WARRANTIES OF MERCHANTABILITY AND FITNESS FOR A
PARTICULAR PURPOSE ARE DISCLAIMED. IN NO EVENT SHALL THE COPYRIGHT
245
Sophos Enterprise Console
HOLDER OR CONTRIBUTORS BE LIABLE FOR ANY DIRECT, INDIRECT, INCIDENTAL,
SPECIAL, EXEMPLARY, OR CONSEQUENTIAL DAMAGES (INCLUDING, BUT NOT LIMITED
TO, PROCUREMENT OF SUBSTITUTE GOODS OR SERVICES; LOSS OF USE, DATA, OR
PROFITS; OR BUSINESS INTERRUPTION) HOWEVER CAUSED AND ON ANY THEORY
OF LIABILITY, WHETHER IN CONTRACT, STRICT LIABILITY, OR TORT (INCLUDING
NEGLIGENCE OR OTHERWISE) ARISING IN ANY WAY OUT OF THE USE OF THIS
SOFTWARE, EVEN IF ADVISED OF THE POSSIBILITY OF SUCH DAMAGE.
246
Help
Index
A
access to Enterprise Console 27
acknowledge alerts 60
acknowledge errors 60
Active Directory
importing from 37
synchronization alerts 199
synchronizing with 42
Active Directory synchronization 40
adding applications 113, 119
adding computers 37
adding computers to groups 29
adding rights 20
adware 92
adware/PUA
authorize 93
alert icons 58
alerts 58, 192
acknowledge 60
Active Directory synchronization 199
clear 60
dealing with 59
email 193
information about detected items 60
network status 198
resolving 59
subscriptions 192
update manager 88
allow 187
allow file and printer sharing 114
allowing
file and printer sharing 114
hidden processes 122
LAN traffic 114
rawsockets 123
alternative update source 81
anti-virus 90
anti-virus and HIPS policy 90
application control 144–145
events 202
messaging 195
application control policy 144
applications
adding 113, 119
blocking 121
trusting 113, 118, 120–121
applying policies 35
archive files 107
assigning policies 35
authorize
adware/PUA 93
suspicious items 102
website 95
automatic cleanup 63–64
automatic disinfection 63–64
automatic protection
during synchronization with Active Directory 44
automatic updating 80
B
bandwidth
limiting 81, 84
basic 184
basic web control 185, 187
behavior monitoring 99
enabling 99
block 187
controlled applications 145
blocking
applications 121
file and printer sharing 115
bootstrap locations 53
buffer overflows
detecting 101
C
central reporting, configuring 139
Challenge/Response 176
key recovery file 223
recover password 222
checksums 124
cleanup 59, 62
automatic 63–64
failed 231
manual 62
247
Sophos Enterprise Console
cleanup status 59
company certificate 178
computer details
copying 224
printing 225
computer list
copying data from 224
printing data from 224
computers with problems 57
configurations, applying 139
configuring
central reporting 139
policies 33
configuring Dashboard 54
configuring update manager 66
connectivity problems 229
Content Control Lists
creating 160
creating using the advanced editor 161
editing 160
editing using the advanced editor 161
content data control rules
creating 156
controlled applications
block 145
scan for 146
controlled applications, uninstall 147
copying
computer details 224
computer list data 224
creating groups 28
creating policies 34
creating reports 212
creating roles 19
creating sub-estates 20
D
Dashboard
configuring 54
panels 7
security status icons 8
data control
actions 148
adding rules to a policy 158
CCL 151
248
data control (continued)
Content Control List advanced editor 161
Content Control Lists 151
content rules 156
creating Content Control Lists 160
editing Content Control Lists 160
enabling 152
enabling data control 152
events 152, 203
excluding files 159
exporting Content Control Lists 163
exporting rules 159
file matching rules 153
importing Content Control Lists 163
importing rules 159
messaging 196
overview 147
removing rules from a policy 158
rule conditions 148
rules 150
turning on or off 152
data control rules
adding to a policy 158
dealing with alerts 59
default global rules
further information 128
default NAC settings 143
deleting a group 30
deleting policies 36
deleting roles 19
desktop messaging 195
detecting buffer overflows 101
detecting malicious behavior 100
detecting suspicious behavior 100
device control
blocking devices 167
blocking network bridging 165
controlled devices 165
detecting and blocking devices 167
detecting devices without blocking 166
events 164, 203
exempting a device from a policy 169
exempting a device from all policies 168
list of exempt devices 170
messaging 197
overview 163
Help
device control (continued)
selecting device types 166
disconnected computers 11
discovering computers 37
by IP range 39
importing from Active Directory 37
importing from file 39
on the network 38
with Active Directory 38
disinfection 62
automatic 63–64
manual 62
download scanning
disabling 94
enabling 94
dual location 111, 137
E
editing policies 35
editing roles 19
email alerts
Active Directory synchronization 199
anti-virus and HIPS 193
network status 198
enabling location roaming 83
enabling web protection 94
encryption
Challenge/Response 222
credentials 52
events 205
install 52
key recovery file 223
Local Self Help 223
overview 170
Power-on Authentication 172
Protect Computers Wizard 52
recovery 222–223
settings 177
Endpoints view 9
copying data from 224
printing data from 224
Enterprise Console 4–5, 9
copying data from 224
printing data from 224
Enterprise Console access 27
Enterprise Console interface
Endpoints view 9
Update managers view 13
errors
acknowledge 60
clear 60
event logging 200
events 202
application control 202
data control 203
device control 203
encryption 205
exporting to a file 211
firewall 204
patch assessment 207
tamper protection 205
web 210–211
exclusions 105
importing or exporting 110
on-access scanning 98
scheduled scanning 105
exporting reports 221
extensions 106
F
failed cleanup 231
file and printer sharing
allowing 114
file and printer sharing, allowing 114
file and printer sharing, blocking 115
file matching data control rules
creating 153
file sharing, allowing 114
file sharing, blocking 115
file types scanned 106
filtering ICMP messages 125
finding computers
in Enterprise Console 12
firewall
adding applications 113, 119
adding checksums 124
advanced configuration 117
advanced options 117
allow file and printer sharing 114
creating a rule 115, 134
249
Sophos Enterprise Console
firewall (continued)
disabling 116
enabling 116
events 204
setting up 111
trusting applications 113, 118, 120–121
firewall configuration
exporting 141
importing 141
fixed versions 75
full disk encryption
Challenge/Response 176, 222
company certificate 178
configure encryption mode 171
configure logon mode 172
configure Wake on LAN 174–175
events 205
key recovery file 223
Local Self Help 176, 223
overview 170
recovery 222–223
settings 177
full system scan 61
G
getting started 14
global rules
setting 130, 133, 136
glossary 233
granting rights 20
groups 27–28
adding computers 29
creating 28
cutting and pasting 29
deleting 30
importing from Active Directory 37
policies used 30
removing computers 29
renaming 30
synchronizing with Active Directory 42
Unassigned 28
H
hidden processes, allowing 122
250
HIPS 90, 99
HIPS alerts
email 193
HIPS messaging
desktop 195
SNMP 194
Host Intrusion Prevention System 99
I
ICMP messages
filtering 125
information about 126
icons 11
immediate scan 61
immediate updating 88
importing computers
from file 39
in-the-cloud technology 90
initial installation source 86
installation failure
Sophos Endpoint Security and Control 228
intelligent updating 81–82
enabling 83
interactive mode, about 117
interactive mode, enabling 117
interface 4
Endpoints view 9
Update managers view 13
L
labeled versions 75
LAN traffic, allowing 114
Local Self Help 176
recover password 223
location awareness
about 137
setting up 137
using two network adapters 137
location roaming 81–82
enabling 83
Help
M
P
malicious behavior
detecting 100
managed computers 11
manual cleanup 62
manual disinfection 62
manual updating 88
messaging 192
application control 195
desktop 195
SNMP 194
monitor mode 112
partially detected item 230
patch assessment
default settings 181
disabling 182
enabling 182
event views 206
events 182, 207
interval 183
overview 181
patch details 207
turning off 182
turning on 182
policies 31, 183
anti-virus and HIPS 90
applying 35
assigning 35
checking 36
configuring 33
creating 34
default 31
deleting 36
editing 35
enforcing 36
full disk encryption 170
overview 30
renaming 35
which groups use 36
policy 189
potentially unwanted applications 92
Power-on Authentication 172
recovering 222
pre-authorize
suspicious items 102
website 95
preconfigured roles 18
primary locations, defining 138
primary server 81
changing credentials 83
printer sharing, allowing 114
printer sharing, blocking 115
printing
computer details 225
computer list data 224
N
NAC 142–144
NAC manager 143
NAC policy 143–144
NAC server URL 142
NAC URL 142
network access control 142–144
network shares
supported 70
network status alerts 198
new user 27
non-interactive mode, changing to a 118
O
on-access scanning
cleanup 63
disable 96
enable 96
excluding items from 98
importing or exporting exclusions 110
on read 97
on rename 97
on write 97
turn off 96
turn on 96
out-of-date computers 228
finding 56
updating 88
251
Sophos Enterprise Console
printing reports 221
priority, scanning 109
Protect Computers Wizard
credentials 50, 52
install encryption features 52
selecting features 50
protected computers 54–55
protected network 54
protecting computers
credentials 50
pre-requisites, anti-virus 48
pre-requisites, encryption 48
preparing for installation 48
Protect Computers Wizard 50
selecting features 50
protection, check 54
PUA 92
frequent alerts 230
not detected 229
side-effects 231
publishing software on a web server
Internet Information Services (IIS), using 74
R
rawsockets, allowing 123
recovery 222–223
key recovery file 223
removal tool
third-party security software 50
removing computers from groups 29
renaming groups 30
renaming policies 35
reporting to Sophos 200
reports
alert and event history 213
alert summary 214
alerts and events by item name 214
alerts and events by time 215
alerts and events per location 216
creating 212
displaying as table 220
endpoint policy non-compliance 217
endpoint protection by time 219
events by user 218
exporting 221
252
reports (continued)
layout 221
managed endpoint protection 219
overview 212
policy non-compliance by time 217
printing 221
running 220
scheduling 220
updating hierarchy 220
resolving alerts
actions to take 59–60
cleanup status 59
information about detected items 60
rights 22
adding 20
granting 20
roles 17
creating 19
deleting 19
editing 19
granting rights to 20
modifying 19
preconfigured 18
renaming 19
rootkits
scanning for 108
rule
set 131–132
rule priority 127
run scan at lower priority 109
running reports 220
runtime behavior analysis 99
S
scan now 61
scanning
exclusions 105
scheduled 103
scanning computers 61
immediately 61
scanning for
suspicious files 97, 104
scheduled scanning 103
cleanup 64
excluding items from 105
Help
scheduled scanning (continued)
importing or exporting exclusions 110
scheduling reports 220
scheduling updates 85
secondary configurations, creating 138
secondary server 81, 84
selecting software 68
selecting subscriptions 80
setting a rule 131–132
setting global rules 130, 133, 136
setup 14
site categories 185, 187
SNMP messaging 194
software
selecting 68
subscribing to 76
software distribution 69
Sophos Endpoint Security and Control installation
failure 228
Sophos Enterprise Console 3, 13
Sophos Live Protection
disabling 91
enabling 91
in-the-cloud technology 90
overview 90
turning off 91
turning on 91
Sophos Update Manager 66
sorting computer list
computers with problems 57
unprotected computers 57
spyware 90
start NAC manager 143
sub-estates 17
active 20
changing 20
copying 21
creating 20
deleting 21
editing 21
modifying 21
renaming 21
selecting 20
subscribing to software 76
subscription alerts 192
subscription usage 79
subscriptions 75
adding 76
selecting 80
supported network shares 70
suspicious behavior
detecting 100
suspicious files
scanning for 97, 104
suspicious items
allow 102
authorize 102
pre-authorize 102
synchronization point 42
synchronization with Active Directory 40, 42
automatic protection 44
disable 46
enable 46
properties, edit 45
synchronized group 42
system memory scanning 108
T
tamper protection
changing password 180
disabling 180
enabling 180
events 179, 205
overview 179
turning off 180
turning on 180
third-party security software removal tool 50
timeout 229
toolbar buttons 5
Trojans 90
troubleshooting
cleanup 231
connectivity problems 229
data control 232
data control, embedded browsers 232
firewall disabled 226
firewall not installed 226
Linux 228–229
Mac 228
on-access scanning 226
out-of-date computers 228
253
Sophos Enterprise Console
troubleshooting (continued)
outstanding alerts 227
partially detected item 230
PUA, frequent alerts 230
PUA, not detected 229
PUA, side-effects 231
Sophos Endpoint Security and Control
installation failure 228
timeout 229
Unassigned group 227
uninstalling Update Manager 232
UNIX 228–229
unmanaged computers 227
virus, side-effects 231
Windows 2000 or later 229
trusting applications 113, 118, 120–121
two network adapters
using 137
types of update 75
U
Unassigned folder 28
Unassigned group 28, 227
uninstall controlled applications 147
unmanaged computers 227
unprotected computers 57
up-to-date computers
checking 56
update manager 66
adding 72
additional 72
alerts
clearing 88
complying with configuration 72
configuring 66
errors 87
logging 71
monitoring 87
scheduling 70
selecting update source 67
self-updating 71
software distribution 69
status 87
supported network shares 70
updating 72
254
update manager (continued)
viewing configuration 66
Update managers view 13
update schedule 70
update server 66
update source 67
alternative 81
primary 81
secondary 81, 84
web server 74
updating
automatic 80
fixed versions 75
immediate 88
initial installation source 86
intelligent updating 81–82
intelligent updating, enabling 83
labeled versions 75
limiting bandwidth 81, 84
location roaming 81–82
location roaming, enabling 83
logging 86
manual 88
out-of-date computers 88
primary server 81
primary update source 81
proxy details 81, 84
publishing software on a web server 74
scheduling 85
secondary server 81, 84
secondary update source 81, 84
types 75
user roles
viewing 21
user sub-estates
viewing 21
V
virus
side-effects 231
virus alerts
email 193
virus messaging
desktop 195
SNMP 194
Help
viruses 90
W
Wake on LAN 174–175
warn 187
warning signs 11
web
events 210–211
web appliance 189
web control 183–185, 187, 189
web control policy 183
web protection
disabling 94
enabling 94
overview 94
website
allow 95
authorize 95
pre-authorize 95
website exceptions 188
working mode, changing to interactive 117
worms 90
255