1
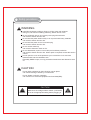
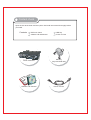
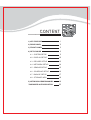
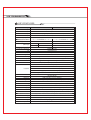
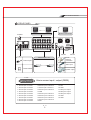
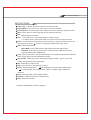
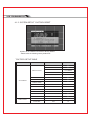
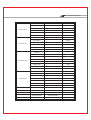
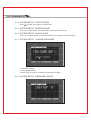
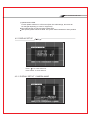
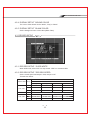
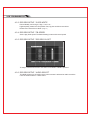
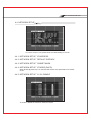
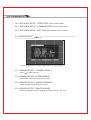
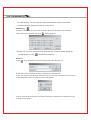
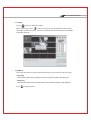
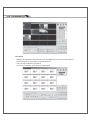
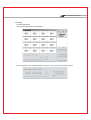
Digital Surveillance System
STANDALONE DVR
VD 1650C
TRIPLEX 16 CHANELL DVR
2005 DEC.
VR
16 Channels
Ver 1.1
Motion Detection
Safety precations
!
WARNING
Install this equipment avoiding a direct ray of light, heats and moistures.
Doing not, can result in lowering efficiency, electric shock or fire.
Do not pull electric wire or do not touch power plug with wet hands.
Can result in electric shock or fire.
Do not bend the power cable forcedly or do not press it with heavy materials.
Can result in electric shock or fire.
Do not bend the power cord or loose outlet plug.
Can result in electric shock or fire.
Do not use the outlet fully.
Can result in electronic shock or fire.
Do not disassemble, repair or convert this product without permission.
Can result in electric shock or fire. When repair is required, contact the service
Center.
Do not open the cover of the product at your convenience or do not insert
Inductive stick into the ventilation hole.
Especially SMPS is open, so only professional technicians are allowed to work
on.
!
CAUTION
Do not place equipment on the inclined or uneven plane.
Can cause lowering of efficiency or malfunction.
Do not vibrate or shock in operation.
Can cause out of order with equipment and hard disk(HDD).
CAUTION
!
Make sure the voltage selector switch (115V/230V)
is set to the appropriate setting before plugging in.
! Content check
Open the box at the clean and even place. And read user manual thoroughly before
you install.
Contents
DVR main frame
HDD Key
software CD and Manual
Power cord set
DVR mainframe
Hdd Key
(only with HDD rack)
al
nu
Ma
Software CD / Manual
Power cord set
CONTENT
16CH STANDALONE DVR
1) KEY FEATURE
1
2) REAR PANEL
2
3) FRONT PANEL
3
4) SETUP MODE
5
4.1 SYSTEM SETUP
5
4.2 DISPLAY SETUP
10
4.3 RECORD SETUP
12
4.4 NETWORK SETUP
14
4.5 SENSOR SETUP
15
4.6 SCHEDULE SETUP
16
4.7 BACKUP SETUP
17
4.8 STORAGE INFO
18
5) NETWORK VIEWER MANUEL
19
ˇPASSWORD AUTHORISATION
25
1
KEY FEATURES
Video Type
Video Input
NTSC
PAL
16 CH Input / 1V p-p / 75 Ohm / BNC
Audio Input
1 CH Input / RCA
Video Output
16 CH Looping Output/BNC, 2 CH Monitor Output/BNC
Audio Output
1 CH Output / RCA
Display Mode
Full Mode, 4/8/9/13/16 Division, Circulate Auto Switcher
Display Resolution
720 x 480
Recording Resolution
720 x 240
720 x 288
Compression Rate Normal image 13~17KB
(KB/image) Complex image 20~25KB
15~19KB
Recording Speed
Compression Algorithm
OS
Triplex
Recording Mode
720 x 576
22~27KB
Max. 120 fps
Max. 100 fps
Modified M-JPEG
Embedded Linux
Record / Playback / Network
Full-time, Manual, Schedule, Event
Schedule Recording
Choose recording section to minimum at 1 min. time intervals during days of week
Status Indicator (LED)
Power, Record, Playback, Network, USB Archive, Zoom magnify, Freeze, Key lock
Event Mode
Alarm Connect
Alarm Trigger, Motion Trigger
Recording Duration: 1~99 minute
Alarm In (16ch) / Relay Out (1ch / N.O. or N.C. selectable)
Normal: x1 multiple speed
Fast Forward: x2 / x4 / x8 / x16 multiple speed
Playback
Fast Backward: x2 / x4 / x8 / x16 multiple speed
Move 1 image per pushbutton at still image (STILL Controller)
Searching function: Move to search list, Time/ Event/ Manual/ Schedule
Network Protocol
Communication Protocol
HDD Type
HDD Management
P/T/Z Control
Archiving
Firmware Update
Multinational Language
Control Mode
Remote Control
Network Function
TCP/IP, DHCP
RS-232, RS-485
EIDE / ATA-66 / 3.5 inch / 7200rpm
Pre-formatting not required (Automatic formatting by system)
Internal Communication Protocol, RS-485 interface Control (Option)
USB 1.1, CD-R/W (Option)
Use mix with USB 1.1 to arrive at USB flash drive firmware update
English / Chinese (option) / Other (Option)
Faceplate / IR remote-controlled (Option) / Remote keypad ctrl (Option)
Net Viewer (PC application program) to LAN download
Live Play Viewer / Network event list Play Back / USB flash drive File Play
Power Supply
AC I/P VOL: AC115V/AC230V~CUR: 4/2A MAX. FREQ: 50~60Hz
Unit Dimension
43 (W) x37 (D) x9.6 (H) cm (standard 2U machine)
Weight
Ambient Temperature
Unit Weight (8kg) (NO Hard Discs)
5 ° C ~ 40 ° C
16CH STANDALONE DVR
2
REAR PANEL
Camera loop output 1~16
POWER
Monitor / VCR output
LOOP OUT
9
10
11
12
13
14
15
16
1
2
3
4
5
6
7
8
VIDEO OUT
VIDEO IN
AUDIO
RS-232
MONITOR
IN
9
10
11
12
13
14
15
16
1
2
3
4
5
6
7
8
LAN
VCR
OUT
RS-485
ALARM
D+ D- G
RS-485
Camera input 1~16
Power Input
RS-232
RJ-45
Network
connection
Audio Input
110
Power switcher
Speaker output
220
ALARM
1
Alarm sensor input / output (DB25)
25
1ˇ Sensor input of camera 1
2ˇ Sensor input of camera 2
3ˇ Sensor input of camera 3
4ˇ Sensor input of camera 4
5ˇ Sensor input of camera 5
6ˇ Sensor input of camera 6
7ˇ Sensor input of camera 7
8ˇ Sensor input of camera 8
9ˇ Sensor input of camera 9
10ˇSensor input of camera 10
11ˇSensor input of camera 11
12ˇSensor input of camera 12
13ˇGND
14ˇSensor input of camera 13
15ˇSensor input of camera 14
16ˇSensor input of camera 15
17ˇSensor input of camera 16
18ˇNUL
ˇ2ˇ
19ˇNUL
20ˇGND
21ˇRelay com output
22ˇRelay N.C output
23ˇRelay N.O output
24ˇGND
25ˇGND
3
FRONT PANEL
LOCK
Camera NO.
LED
POWER
REC
1
2
3
4
4X4
5
6
7
8
3X3
9
10
11
12
2X2
13
14
15
16
AUTO
Auto sequence
MENU
Menu / Exit
PLAY
NETWORK
Display mode
USB
ZOOM
FREEZE
LOCK
LOCK
USB
ZOOM
FREZ
INFO
Key Lock
System Info
Zom
USB backup Image freeze
Jog / Shuttle
ENTER
Playback
Direction
Pause
Stop
ˇ3ˇ
Rec
16CH STANDALONE DVR
FRONT PANEL
Camera No : To display channel in full screen, press camera No.
Display Mode : Full screen by CH, 4-div, 9-div or 16-div are available.
Auto sequence : Auto switching function support one CH and 4-div auto switching function .
Menu : Press “Menu” to enter setup page or save the setting and exit.
Info : Display system information.
Frez : 1. CH in full screen : press freeze button to freeze a screen.
2. In division mode : press freeze button, then select a camera number to freeze.
Zoom : In zoom mode, the bright area in a box will zoom in, press arrow key to move to the
area desired then press “
“ to zoom in and press “ZOOM” button again to exit.
USB : USB storage backup.
Movie Mode : Press “USB” button to start backup and press again to stop.
Still Mode : First switch CH to full screen mode then press “USB” button to take
snapshot and backup to USB storage.
Lock : Press “LOCK” button, the led of lock will light. The keyboard of front panel are disable.
Press “LOCK” again and enter password to unlock it.
Jog / Shuttle : ShuttleˇAs you turn, the speed of display increase. JogˇAs you turn left
or right, display images move step by step.
Rec : Press ”REC” to start record.
Stop : Press ”STOP” to stop playback or record.
Pause : Playback modeˇpress “
“
” to pause playback. Monitor / Record Modeˇpress
” to lock the display. The monitor will be in black, to enable it again, pleas enter
password.
Play : Press play button to enter playback Menu.
Direction : Select the setup item or adjust setting.
Enter : Enter the sub menu.
ˇPassword authorization, press the page 25.
4
SETUP MODE
ˇBASIC OPERATIONˇ
A Press ”Menu” to enter setup Mode.
B Enter ”Password” and login the system.
C Press “
D Press “
” button to move to setup Item.
” to enter sub-Menu.
E Press “Menu” to Exit.
4.1 SYSTEM SETUP
16CH STANDALONE DVR
4.1.1 SYSTEM SETUP ˇ TIME / DATE SETUP
When fist time operate DVR, please enter this page for time setting.
Date : Set the Date.
Time : Set the Time.
Format : Select the display format.
Display : Set the time display ON / OFF.
Local : Set the display location TOP / DOWN.
4.1.2 SYSTEM SETUP ˇ HDD FORMAT
Press “YES” to format the HDD.
Attention : All the HDD Data will be removed.
4.1.3 SYSTEM SETUP ˇ FACTORY RESET
System will be initialized and back to factory default.
ˇ Please refer the following factory default list.
ˇ FACTORY SETUP TABLE
1'st Menu
2'nd Menu
TIME/DATE SET
3'rd Menu
Default
DATE
NO
TIME
NO
FORMAT
YYYY/MM/DD
DISPLAY
ON
LOCAL
TOP
HDD FORMAT SET
NO
FACTORY RESET
NO
VIDEO SYSTEM
NO
BUZZER SOUND
ON
AUDIO SOUND
ON
SYSTEM SET
CHANGE PASSWORD
FIRMWARE UPDATE
ADMIN PASSWORD CHANGE
1111
USER PASSWORD CHANGE
2222
UPDATE METHOD
NO
UPDATE START
NO
CAMERA NAME
NUMBER
DISPLAY SET
COLOR SET
CON
50
16CH STANDALONE DVR
BRI
50
HUE
50
SAT
50
DISPLAY SET
AUTOSEQ SET
02 SEC
BOUND COLOR
WHITE
BLANK COLOR
BLUE
OVER WRITE
YES
REC SPEED
60F/SEC
REC QUALITY
HIGH
PB SPEED
AUTO
RECORD CH SET
ON
AUDIO SELECT
OFF
IP ADDR
NO
GATEWAY
NO
SUB NET
NO
IP MODE
STATIC IP
N/W ENABLE
ON
VIDEO PORT
5000
COMMAND PORT
5001
RECORD SET
NETWORK SET
MAC ADDR
CHANNEL SELECT
SENSOR SET
ALARM ENABLE
N.O.
MOTION ENABLE
OFF
MOTION LEVEL
NORMAL
MOTION AREA SET
BUZZER TIME
05 SEC
SENSE RECTIME
10 SEC
SCHEDULE SET
SCHEDULE RECORD
OFF
BACKUP SET
USB BACKUP
BACKUP MODE
USB INFORMATION
CD_RW BACKUP
STORAGE INFO
START TIME SET
MOVIE
4.1.4 SYSTEM SETUP ˇ VIDEO SYSTEM
Press
to select video system to NTSC / PAL.
4.1.5 SYSTEM SETUP ˇ BUZZER SOUND
To turn on / off the Buzzer. The system will be muet when buzzer is off.
4.1.6 SYSTEM SETUP ˇ AUDIO SOUND
To turn on / off audio output. To setup sound record CH, please refer Record setup
4.1.7 SYSTEM SETUP ˇ CHANGE PASSWORD
a. Password Change.
b. Setup password level.
ˇPlease refer to page 25 ” Password Authorization Table”
4.1.8 SYSTEM SETUP ˇ FIRMWARE UPDATE
16CH STANDALONE DVR
Update Method USB.
Put the update software on X://Firmware (Disk X is USB storage, the name will
be changed depending on each PC equipment).
Plug USB storage on DVR and select update start.
After update, please reboot the DVR. The system will be initialized to factory default.
4.2 DISPLAY SETUP
Press “
” to enter sub-menu.
Press “Menu” to save and exit.
4.2.1 DISPLAY SETUP ˇ CAMERA NAME
Press “
Using “
Press “
” button to select camera then press “
” to enter setup.
” to enter letter (Alphabet, numbers and symbols).
” to save and move to next channel.
4.2.2 DISPLAY SETUP ˇ COLOR SET
Adjust colors of images from cameras.
First select the CH then adjust the “Contrast” “Brightness” “Hue” and “Saturation” as
your preference.
4.2.3 DISPLAY SETUP ˇ AUTOSEQ SETUP
Setup the display time of each CH when you press “Auto” botton, display time 0-99
secs. 0 sec means the CH will be ignored and no display.
ˇ11ˇ
16CH STANDALONE DVR
4.2.4 DISPLAY SETUP ˇ BOUND COLOR
The color of video bound can be “White” ,”Gray” or “Black”.
4.2.5 DISPLAY SETUP ˇ BLANK COLOR
Set the background color of less video (Black / Blue).
4.3 RECORD SETUP
4.3.1 RECORD SETUP ˇ OVER WRITE
When HDD is full, select “NO” is to stop record “YES” is to overwrite HDD.
4.3.2 RECORD SETUP ˇ RECORD SPEED
Set the record speed max.60 fps in field, 120 fps in CIF.
ˇRecord Hour Sheet :
QUALITY
RESOLUTION FPS
NTSC
Hight +
720 * 240
60
8.8 GB / hour
6.4 GB / hour
Low+
4.9 GB / hour
30
4.6 GB / hour
3.4 GB / hour
2.9 GB / hour
2.5 GB / hour
20
2.2 GB / hour
1.6 GB / hour
1.32 GB / hour
1.2 GB / hour
Hight
Low
4.2 GB / hour
PAL
720 * 288
50
8.2 GB / hour
5.8 GB / hour
5.4 GB / hour
4.7 GB / hour
25
4.0 GB / hour
2.9 GB / hour
2.3 GB / hour
2.0 GB / hour
12
2.0 GB / hour
1.4 GB / hour
1.2 GB / hour
0.8 GB / hour
ˇ12ˇ
4.3.3 RECORD SETUP ˇ OVER WRITE
Record Quality can be High+, High , Low+, Low .
Highest quality means low compression rate, big size and short record time.
Please refer “Record Hour Sheet”.(Page 12)
4.3.4 RECORD SETUP ˇ PB SPEED
Set the play back speed. The default setting is same with record speed.
4.3.5 RECORD SETUP ˇ RECORD CH SET
To setup if camera will record or not when record button of DVR is pressed.
4.3.6 RECORD SETUP ˇ AUDIO SELECT
This DVR support one CH audio record, when camera is selected as audio record the
name of camera will be in “Yellow Color”.
16CH STANDALONE DVR
4.4 NETWORK SETUP
For remot monitor / view, please enter the related setting of TCP/ IP.
4.4.1 NETWORK SETUP ˇ IP ADDRESS
4.4.2 NETWORK SETUP ˇ DEFAULT GATEWAY
4.4.3 NETWORK SETUP ˇ SUBNET MASK
4.4.4 NETWORK SETUP ˇ IP MODE (DHCD)
When DHCP (Dynamic IP) is on the DVR will receive above parameters from DHCP
server.
4.4.5 NETWORK SETUP ˇ N / W ENABLE
To enable / disable the camers is viewed in remote.
4.4.6 NETWORK SETUP ˇ VIDEO PORT (Factory default 5000)
4.4.7 NETWORK SETUP ˇ COMMAND PORT (Factory default 5001)
4.4.8 NETWORK SETUP ˇ MAC ADD (MAC Address can’t be revised)
4.5 SENSOR SETUP
To setup if camera start record by alarm sensor or motion trigger.
4.5.1 SENSOR SETUP ˇ CHANNEL SELECT
Press
to select channel.
4.5.2 SENSOR SETUP ˇ ALARM ENABLE
Select alarm sensor type (N.O, N.C, or close)
4.5.3 SENSOR SETUP ˇ MONTION ENABLE
Enable / disable motion Detection Record.
4.5.4 SENSOR SETUP ˇ MONTION LEVEL
Setup the sensibilty of motion level (Hight +,Hight, Normal, Low,+ Low).
16CH STANDALONE DVR
4.5.5 SENSOR SETUP ˇ MOTION AREA
Yellow block represents motion detection area.
Dark block means motion is off.
4.5.6 SENSOR SETUP ˇ BUZZER TIME
Set the buzzer time on motion 1-99 secs.
4.5.7 SENSOR SETUP ˇ SENSE RECTIME
Set the record time when motion / sensor is triggered.(10-99 secs)
4.6 SCHEDULE SETUP
4.6.1 SCHEDULE SETUP ˇ RECORD SCHEDULE
To select if DVR will be recorded by schedule.
4.6.2 SCHEDULE SETUP ˇ SCHEDULE EVERYDAY
Setup the recording schedule every day.
4.7 BACKUP SETUP
This DVR supports CD-RW and USB backup , please select backup device.
4.7.1 BACKUP SETUP ˇ USB STORAGE
Select the backup type (Movie / Still)
USB information : status of USB storage and information of space used.
ˇ Caution
A fatal error may occur if the USB storage is remved while backup is under way.
16CH STANDALONE DVR
4.7.2 BACKUP SETUP ˇ CD-RW BACKUP
a. Setup the start time.
b. Setup the backup size (the system will automatically calculated the end
time).
c. Put the blank CD-R in CD-ROM.
d. Press backup start.
ˇp.s. If CD-RW is using, press “USB” button to format.
4.8 STORAGE INFO
Show the HDD statue (Mode NO, used size, overwrite).
5
NETWORK VIEWER MANUEL
ˇ INTRODUCTION
The Network Viewer software is using for remote monitor, playback and backup.
ˇ INTERFACE
(3)
(1 )
(4)
(5)
(2 )
(6)
(7)
(1) Camera No.
To display image of each Channel.
(2) Select a suitable Player:
There are 4 Players for different file types.
LivePlay ˇReal Time display the image of DVR in remoteˇ
PlayBack ˇPlayback the recorded film or even.
ScanDisk ˇIf the film is backed up on CD-ROM, using ScanDisk player to play the film.
FilePlay ˇIf the film is backup on USB or on PC HDD, select the FilePlay to play.
(3) Bakup Function
Real time monitor
Press to start monitor in remote.
Stop/Pause
Stop monitor or backup file.
AVI Format
Convert the file to .AVI formatˇ
HDD Backup
Backup film to HDD on Remote PC
(Using FilePlay to play)
16CH STANDALONE DVR
(4) Channel Information
Display the current stream information of each channelˇ
(5) Network Function
Setting
TCP/IP Setup and AVI Code select.
Connect
Connect to DVR ˇ
Disconnect
Disconnect
RecStart
DVR Start recording.
RecStop
DVR Stop recording
(6) Display mode:
Select the different display mode, CH, 4-Division, 9-Divison or 16-Division.
(7) Statue indicator.
DVR ˇ DVR record ˇ
ƒ AVI ˇ Convert the film to .AVI format ˇ
ƒ Local ˇ Backup the film to Remote PC, Local is lighted.
ˇ Network connection Settings
ˇSetup the IP Address of DVR and AV and Command Portˇ
ˇEnable One Channel Transfer: To improve video stream fluency through the internet,
Click this function. It's for remote monitor only, for backup in remote, please disable it.
ˇSelect a suitable AVI Codec to convert the film to .AVI format.
ˇOn Video Section, You can setup the image size and video system and fram/sec.
ˇOn Record Section, select the file folder on remote PC.
ˇ AVI Backup
Select the Channel No. you want to backup and click the OK to start backup.
When backup is finished, just click
to stop backupˇ
ˇAttentionˇTo convert to .AVI format may cause the CPU overload, please update the
PC Equipment or using
HDD Backup instead of.
ˇ Connect
Click
Connect buttonˇthe following dialogue box will pop-on.
Enter the correct IP Address(same with DVR) and Password ˇ
Click “OK” button, the Network Viewer will try to connect to DVR, if the connection
is succeeded the following dialogue box will appear.
If fail to connect DVR, please check the IP Address, Password and related internet
setting and try again.
16CH STANDALONE DVR
ˇ LivePlay
Press
button to start recordingˇ
When recording, press
button to store the recorded data as AVI format.
Click right button of mouse, store the recorded data as JPEG format or RESET
indicated channel.
ˇ PlayBack
There are two options for starting DVR playback to get event play and timed play.
ˇEvent Play
HDD selectionˇGet Event ListˇSelect Event listˇClick Event segmentˇStart playback
ˇTimed Play
HDD selectionˇGet Record ListˇSelect Record ListˇClick Event segmentˇStart Playback.
Press
to stop playback.
ˇ ScanDisk
Display recorded data that backup over CD-ROM when press Scan Disk button.
Select the path of CD-ROM in Physical Disk bar.
You can adjust speed of playback.
To turn on / off Audio when press Sound button.
16CH STANDALONE DVR
ˇ FilePlay
ˇPressFilePlaybutton.
ˇPressOpentoplaybacktherecordeddata.
You can playback the recorded data when main screen shows the following panel.
ˇPASSWORD AUTHORISATIONˇ
Adminiostor
Normal User
W/O Authoristaion
Reboot DVR
Record
Monitor
NO
Un-lock Display
NO
Un-lock Keyboard
NO
Playback
NO
Pause
NO
Enter Menu
NO
NO
Network Viewer
NO
NO
R12C16C001