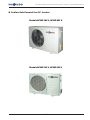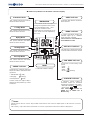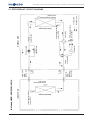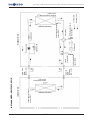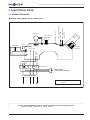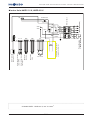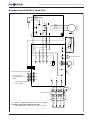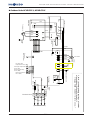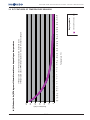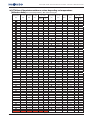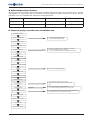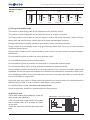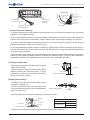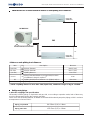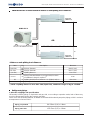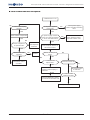
1
Technical Manual (07/2010 - VA1) Monosplit “Wall” type Air Conditioners “Personal Line DC Inverter” Models Indoor Units: HKED 261 X HKED 351 X HKED 511 X HKED 631 X Outdoor Units: HCND 261 X HCND 351 X HCND 511 X HCND 631 X Monosplit “Wall” Personal Line DC Inverter - Table of Contents Table of Contents 1. GENERAL INFORMATION............................................................................................................................ IG-1 1.1 GUIDELINES TO CONSULTATION & WARNINGS........................................................................................IG-1 1.2 ESSENTIAL FEATURES OF THESE MODELS...................................................................................................IG-2 1.3 APPEARANCE OF UNITS.............................................................................................................................IG-8 1.4 OUTLINE OF INDOOR & OUTDOOR UNITS...............................................................................................IG-13 1.5 IR REMOTE CONTROL...............................................................................................................................IG-14 1.6 LED PANEL ON INDOOR UNITS................................................................................................................IG-18 1.7 OPERATING USE CONDITIONS.................................................................................................................IG-20 1.8 HOW TO ADJUST AIR DIRECTION.............................................................................................................IG-21 1.9 EMERGENCY OPERATION & “SELF-CHECK”...........................................................................................IG-23 1.10 AUTO-RESTART FUNCTON AFTER A BLACKOUT....................................................................................IG-25 1.11 SUGGESTIONS FOR ECONOMIC USE OF SYSTEM.................................................................................IG-26 2. GENERAL TECHNICAL DATA......................................................................................................................DG-1 2.1 SPECIFICATIONS........................................................................................................................................DG-1 2.2 DIMENSIONS OF UNITS..............................................................................................................................DG-5 2.3 REFRIGERANT CIRCUIT DIAGRAMS..........................................................................................................DG-8 3. ELECTRICAL DATA........................................................................................................................................DE-1 3.1 WIRING DIAGRAMS...................................................................................................................................DE-1 3.2 R/T FEATURES OF TEMPERATURE SENSORS...............................................................................................DE-5 4. CONTROL LOGIC FUNCTIONS.................................................................................................................... FU-1 4.1 HARDWARE FEATURES............................................................................................................................... FU-1 4.2 SOFTWARE FEATURES................................................................................................................................. FU-2 4.3 BASIC FUNCTIONS.................................................................................................................................... FU-13 4.4 SOME INDICATIONS OF MALFUNCTIONS & PROTECTION FUNCTIONS............................................... FU-19 5. INSTALLATION...............................................................................................................................................IN-1 5.1 CHECKS AND PRELIMINARY OPERATIONS................................................................................................ IN-3 5.2 INSTALLATION OF INDOOR UNITS HKED 261, 351, 511, 631 X.................................................................. IN-6 5.3 INSTALLATION OF OUTDOOR UNITS HCND 261, 351, 511, 631 X........................................................... IN-21 5.4 VACUUM PROCEDURE AND REFRIGERANT CHARGE........................................................................... IN-30 6. DIAGNOSTIC & MAINTENANCE.................................................................................................................DM-1 6.1 AUTODIAGNOSIS OF MALFUNCTIONS: ERROR CODES ON INDOOR UNIT...........................................DM-2 6.2 FLOWCHARTS FOR MALFUNCTIONS’ SOLUTION....................................................................................DM-7 6.3 CLEANING & MAINTENANCE OF AIR CONDITIONER..........................................................................DM-13 - Table of Contents - Monosplit “Wall” Personal Line DC Inverter - Section 1: General Information 1. GENERAL INFORMATION 1.1 GUIDELINES TO CONSULTATION & WARNINGS This Manual describes operation, installation and procedures for solving operation malfunctions of HOKKAIDO Air Conditioners Monosplit “Wall” Personal Line DC Inverter HKED-HCND 261, 351, 511, 631 X”. This Manual is addressed to Installers and to Authorized Technical Service, that is charged to interventions for malfunction diagnosis and for repairing and/or servicing of system. This Manual implies that Installers and Authorized Technical Service do know well the equipments and tools which are usually used for repairing electric, mechanical parts and refrigerant components of air-conditioning systems with R410A refrigerant. Furthermore, people who this Manual is addressed to should know terms of current use that are used for describing relevant operations. In particular, it is recommended to read and follow carefully Safety Precautions and Warnings that are listed in this Manual. Missed observance of above prescriptions may lead to serious injuries to people, and even to death. Relevant Documents This Manual is not exhaustive about system operation, so it has to be consulted together with the User Manual, the Installation Sheets of Units and Spare Parts List referred to this Models of Units. General Precautions and Warnings WARNING In order to avoid the risk of death or of serious personal injuries caused by electric shocks, disconnect the power cable of Units before whatever intervention of repairing or maintenance. WARNING In order to avoid the risk of death or of serious personal injuries caused by electric shocks, NEVER tamper with the ground wire for any reason. The appliance must always been equipped with a ground wire. Do not remove the Safety label referred to ground wire, which is on the power cable. If the electric system on installation site is not equipped of ground wire, please contact a qualified Electrician, for conforming electric system to current Regulations. WARNING In order to avoid the risk of death or of serious personal injuries caused by overheating of the system’s components, it is recommended to always make the system checked for verifying if there are malfunctions or if the system often stops suddenly. WARNING In order to avoid the risk of death or of serious personal injuries caused by electric shocks, earth cables and cables whose sheath colour corresponds to ground wires, must not be used for power lines of Phase and Neutral. Standard colour of Ground wires is Green or Yellow/Green. The electric components such as compressor and fan motors are provided of an individual Ground wire, connected to a metal part of the appliance. When interventions of repairing or maintenance are carried out, the above Ground wires must not be disconnected, unless dismantling and replacing of components are needed. Before ending whatever intervention of repairing or maintenance, it is extremely important to connect again all Ground wires eventually disconnected before. IG-1 Monosplit “Wall” Personal Line DC Inverter - Section 1: General Information 1.2 ESSENTIAL FEATURES OF THESE MODELS â Power modulation by DC Inverter control Power supplied by system changes according to thermal load in installation environment. When temperature inside the room reaches a value which is close to value set by User, compressor rotation lowers, so as to allow a sensible reduction in power consumption. Moreover, as regards to traditional thermostatic control systems (On-Off), compressor’s stops and restarts are less frequent - thus permitting a reduction in power consumption and allowing an immediate increase in comfort. â Energy high efficiency (Class A/A) All capacities (261, 351, 511, 631) of these systems meet requirements of Class “A” Energy Efficiency, both for operation in Cooling mode and for operation in Heating mode. â “Ozone friendly” R410A refrigerant R410A refrigerant does not damage ozone at all (ODP=0). Best performances assured by R410A refrigerant allow a sensible reduction in refrigerant amount, which is required for the operation of system. Both factors reduce the environmental impact of system. â Advanced control for malfunction diagnosis In case of eventual operation malfunctions, the most common among them will be shown by “Error Codes” (“F_”) on LED Display of Indoor Unit and by the status of “Running” LED LED and “Timer” placed on Indoor Unit’s frontal panel. This allows targeted and therefore quicklier interventions for solving of eventual malfunctions. â Operation control by infrared remote control (IR) On IR remote control, there is a wide range of options, that is: The possibility to program Timer operation (“Timer On”, or “Timer Off”) of system, within max. 24 hours, by steps of ±1 hour. By “SLEEP” function, noise level of Indoor Unit can be reduced, as well as power consumption. This operation option, that foresees rotation of Indoor Unit’s fan at Low speed and gradual “correction” of temperature set by remote control, is available both in Cooling mode and in Heating mode. “TURBO” function allows to reach desired temperature value quickier, as indoor fan speed is set to max. available speed (“Ultra-HIGH”), for increasing the volume of air treated by Indoor Unit. IG-2 Monosplit “Wall” Personal Line DC Inverter - Section 1: General Information This operation option - which however is detrimental to noise level produced by Indoor Unit - is available both in Cooling mode and in Heating mode. “SWING” option: automatic swinging downwards and upwards of air outlet horizontal louver, for a uniform distribution of air supplied in the room by Indoor Unit. “Natural flow” option: sequence which consists in the upwards and downwards swinging of the air outlet horizontal louver, for twice, followed by a 30-seconds’ stop of the louver and so on. This is for simulating a light air current in the room. “AIR FLOW” option: automatic swinging rightwards and leftwards of air outlet vertical louvers, for a uniform distribution of air supplied in the room by Indoor Unit (this function is available on HKED 511 X and HKED 631 X Models only). â Automatic restart of Units after a power failure Normally, after 3 minutes since power is restored, the system is able to restart with the settings that were selected before the blackout. This means there is no need to press the “ON/OFF” button. However, if “TIMER” operation had been previously selected, it will be cancelled and need to be set again. “SLEEP” function (see above), has to be expressly selected again as well. “TURBO” function (see above), has to be expressly selected again as well. In the same way, if “SWING” and/or “AIR FLOW” options (see above) were active when the blackout occurred, they will be expressly selected again. â Devices for a higher salubrity of air HKED 261, 351, 511, 631 X Indoor Units are equipped of filters of mechanical type (net filters) at high efficiency air inlet, which can be easily reached for periodical cleaning. â Advanced control of rotation of Indoor Unit’s fan During starting in Heating mode, indoor fan will start rotating only after Indoor Unit’s heat exchanger has reached a temperature which avoids cold air supply by Indoor Unit. This “preheating” may require a time interval variable from 2 minutes to 5 minutes. During thermostatic pauses in Heating mode, indoor fan speed will be reduced to the lowest speed to avoid cold air supply by Indoor Unit. At the end of operation in Cooling mode, indoor fan will keep on rotating for a certain time interval since compressor’s stop, so as to allow the removal of the humidity left over on Indoor Unit’s heat IG-3 Monosplit “Wall” Personal Line DC Inverter - Section 1: General Information exchanger. This logic of operation is in order to prevent humidity stagnation and the consequent forming of mould on Indoor Uni’s heat exchanger. â Operation in Heating mode with very low temperature These systems are able to operate in Heating mode also if outdoor temperature is very low: in fact, the lowest value of operating range in Heating mode is - 15°C. However, in these extreme conditions, as a consequence of the operation principle of “heat pump” systems, the performance of system will result remarkably reduced as regards environmental normal use conditions of the system itself. â Appearance and functions: Indoor Units HKED 261, 351, 511, 631 X Operation in Emergency mode: also if the IR remote control is temporarily unavailable or malfunctioning, in any case it will be possible to start the system in “Auto Mode”. To that end, it will be necessary to press the special button placed below the up-and-over frontal panel of Indoor Unit. Therefore, the control electronics will automatically select the operation mode, on the basis of temperature conditions inside the room. These Indoor Units have a new design, so as to fit harmoniously in residential environments. Moreover, for each capacity of Indoor Unit it is available on demand a range that includes 4 frontal decorative boards in different colours (available colours: “Black”, “Gold”, “Silver”, “Light-Blue”), in addition to the white decorative board preinstalled in factory. The installation of one of frontal decorative board allows to adapt Indoor Unit’s appearance to different residential environments. This operation must be carried out only by qualified Personnel. On these Indoor Units there is a LED Display, of orange colour, with 2 alphanumeric characters, that is able to display alternatively the following information: set temperature value (°C), remaining time (hours) of operation programmed by “Timer” function, starting up of automatic defrosting function or an eventual “Error/Protection Code” in case of a malfunction of the system. As a consequence of this, it is always possible to carry out an instant monitoring of the system’s operation status. LED Display, which is usually off during system operation, may be lighted up according to User’s needs by pressing “LAMP” button on IR remote control. For turning off LED Display, it is necessary to press “LAMP” button again on IR remote control. By turning off LED Display, sources of light inside the room can be reduced, thus making night rest more comfortable. â Appearance and functions: Outdoor Units HCND 261, 351, 511, 631 X Frontal grille and back grille are both treated against corrosion, and the same is true for bolts IG-4 Monosplit “Wall” Personal Line DC Inverter - Section 1: General Information and fixation screws placed outside the chassis. The refrigerant fittings (service valves) and the electrical connections (terminal blocks) are protected from atmospheric agents (infiltrations of rainwater) by panels and service covers. IG-5 Monosplit “Wall” Personal Line DC Inverter - Section 1: General Information Recapitulatory outline of main available functions on Units Indoor Units ON/OFF by IR remote control Monitoring of temperature values Indoor temperature sensor and outdoor temperature sensor. Indoor heat exchanger temperature sensor and outdoor heat exchanger sensor. Ambient temperature control Room temperature is kept on the basis of temperature value set by remote control, by thermostat under microcomputer control and compressor operation at variable speed (control by DC Inverter). Anti-cold drafts prevention function During starting phase in Heating mode, indoor fan will rotate at set speed after a delay of a few seconds. Protection against close ON/OFF Between each ON/OFF cycle of system and the following one, at least 3 minutes must elapse. Speed ranges of indoor fan “ULTRA-HIGH” speed, “HIGH” speed, “MED” speed, “LOW” speed, “BREEZE” speed. Indications by Display + LED on frontal panel “Running” (Operation indicator), “Timer” (Indicator of starting up of Timer function, and corresponding remaining time), “dF” (Defrosting), “F_” (Error Code) and “P_” (Protection Intervention): Indications on LED Display with 2 digits). Logic control of horizontal air outlet flap If you press “SWING” button on remote control to select “natural flow” mode, the horizontal air outlet flap on Indoor Unit is controlled so as to simulate a light natural air inside the room. “Sleep” function and “Turbo” function “Sleep”: Control of indoor fan and of set temperature for reducing noise level and electric power consumption. “Turbo”: “ULTRA-HIGH” speed of indoor fan and max. frequency of compressor rotation, for reaching desired comfort quickier. “DRY” function In environments with high humidity, this function allows to restore quicklier your desired comfort conditions. Autodiagnosis of malfunctions function Wide range of Error/Protection Codes that can be shown on bright Display of Indoor Unit. “Self-Check” programme. “HOT- KEEP” function For preventing cold air supply during starting in Heating mode. Automatic defrosting “TIMER On/Off” function Stop/swinging of air outlet flaps Besides fixed stop positions, the automatic swinging of air outlet flaps is also available. Auto-Restart after a blackout Operation in Auto Mode During starting phase, operation mode is automatically selected according to indoor temperature conditions. IG-6 Simplified connections Monosplit “Wall” Personal Line DC Inverter - Section 1: General Information Outdoor Units Timed ON/OFF of compressor Min. interval between ON/OFF cycles of compressor is of 3 minutes. Control of compressor rotation speed by DC Inverter technology This kind of control allows a continuous modulation of system operation on the basis of thermal load and of desired comfort, and allows to reduce power consumption especially at medium-low speed. Outdoor fan with “silent” shape For reducing noise level of outdoor fan, the shape of fan wheel has been expressly redrawn. Special fins in treated aluminium Aluminium fins of outdoor heat exchanger ensure a higher efficiency in heat exchange. 4-ways valve “energy saving” control It absorbs energy during operation in Heating mode only. Protection against compressor’s overload Anticorrosive surface treatment of chassis Protection covers for electrical & refrigerant connections Operation in Heating mode up to -15°C outdoor temperature IG-7 Monosplit “Wall” Personal Line DC Inverter - Section 1: General Information 1.3 APPEARANCE OF UNITS Indoor Units “Wall” Personal Line DC Inverter: Models HKED 261 X, HKED 351 X Frontal board standard “White” (by factory) Models HKED 261 X, HKED 351 X Frontal board optional “Black” (HSD-2-BCK) Models HKED 261 X, HKED 351 X Frontal board optional “Gold” (HSD-2-GLD) IG-8 Monosplit “Wall” Personal Line DC Inverter - Section 1: General Information Indoor Units “Wall” Personal Line DC Inverter: Models HKED 261 X, HKED 351 X Frontal board optional “Silver” (HSD-2-SLV) Models HKED 261 X, HKED 351 X Frontal board optional “Light-Blue” (HSD-2-LBL) IG-9 Monosplit “Wall” Personal Line DC Inverter - Section 1: General Information Indoor Units “Wall” Personal Line DC Inverter: Models HKED 511 X, HKED 631 X Frontal board standard “White” (by factory) Models HKED 511 X, HKED 631 X Frontal board optional “Black” (HSD-3-BCK) Models HKED 511 X, HKED 631 X Frontal board optional “Gold” (HSD-3-GLD) IG-10 Monosplit “Wall” Personal Line DC Inverter - Section 1: General Information Indoor Units “Wall” Personal Line DC Inverter: Models HKED 511 X, HKED 631 X Frontal board optional “Silver” (HSD-3-SLV) Models HKED 511 X, HKED 631 X Frontal board optional “Light-Blue” (HSD-3-LBL) IG-11 Monosplit “Wall” Personal Line DC Inverter - Section 1: General Information Outdoor Units Personal Line DC Inverter: Models HCND 261 X, HCND 351 X Models HCND 511 X, HCND 631 X IG-12 Monosplit “Wall” Personal Line DC Inverter - Section 1: General Information 1.4 OUTLINE OF INDOOR & OUTDOOR UNITS Indoor Unit Air inlet Display Panel & LED Indicators Louver for adjusting air in horizontal direction. The louver is motorized on HKED 511, 631X Models only. Flap for adjusting air in vertical direction. Outlet air Note: The Figures sideways are for explicative aim only. The real appearance of components of Units may be different from what is shown in Figures. High efficiency air filter It removes impurities on air inlet. Drain tube Outdoor Unit Air inlet Electrical & refrigerant connections Air outlet Frontal panel of Indoor Unit b) Panel’s closing a) Panel’s opening Emergency button Frontal panel Press both sides of panel and pull the panel towards you till max. opening angle (about 60° as regards vertical position). Never force the panel more than max. opening angle. Below the panel there is the Emergency Button, which allows operation (in Auto Mode) if IR remote control is not available. Push the panel downwards till closing position, indicated by the “click” of blockage mechanism. IG-13 Monosplit “Wall” Personal Line DC Inverter - Section 1: General Information 1.5 IR REMOTE CONTROL nIR Remote Control for Models HKED (261, 351, 511, 631) X Notes: ¦For a detailed explication concerning the function of each button of IR remote control, and concerning symbols which are shown on remote control’s LCD Display, please refer to the “User Manual” provided with Indoor Units, or to the following pages. ¦For a detailed explication about options and operation modes of system, please refer to the “User Manual” provided with Indoor Units. ¦Concerning these Models HKED-HCND (261, 351, 531) G (On-Off), even if “TURBO” button and “LAMP” button are available on remote control, they refer to unavailable functions. Consequently, if you press these buttons, there will be no effect on these systems. IG-14 Monosplit “Wall” Personal Line DC Inverter - Section 1: General Information n Outline of IR remote control’s buttons Set Temperature “ON/OFF” Button These buttons allow to adjust ambient temperature. If you press “+” button, set temperature is increased by 1°C. If you press “-” button, set temperature is reduced by 1°C. The range of temperatures that can be set is the following: 16°C ~ 32°C. (In “AUTO” mode and in “DRY” mode, temp. is automatically set to 25°C and cannot be modified by the User). To start/stop the system. “SWING” Button To adjust motorized flap for air outlet in vertical direction (up/down): • “natural flow”: • Swinging: • Fixed position : (ON). (flashing). (ON). In “DRY” mode, the flap’s angle is adjusted in fixed position. Operation Mode To select operation mode: • “AUTO” • “COOL” • “DRY” • “HEAT” • “FAN”. - + Fan Speed MODE To change fan speed: • LOW: • MED: • HIGH: (flashing). • AUTO: “AIR FLOW” Button SWING FAN S P EED TIMER TURBO HOLD OW AIR FL SLEEP LAMP To select position of motorized louvers for air outlet in horizontal direction (left/right). Flaps may swing continuously, or stop in fixed position. This function is available on HKED 511 X, HKED 631 X Models only. “SLEEP” Button “Turbo” Button To select operation in “SLEEP” mode. In COOL and HEAT modes, if you press this button, operation in “Turbo” mode is started up. This function is not available on these Models On-Off. “LAMP” Button To light up/go out the Display on the Indoor Unit. This button is not operating on these Models. “Timer” Button “HOLD” Button To programme the automatic start (TIMER ON) or the automatic stop (TIMER OFF) of system. To lock/unlock all buttons of remote control. Reception of signals trasmitted to Indoor Unit If buttons of remote control are pressed by orienting correctly remote control itself towards the IR receiver on Indoor Unit, signals will be transmitted to Indoor Unit. If signals have been correctly received, the buzzer on Unit emits a sound. IG-15 Monosplit “Wall” Personal Line DC Inverter - Section 1: General Information n Outline of symboles on IR remote control’s Display Automatic Mode This symbol indicates that “AUTO” Mode has been selected. Cooling Mode This symbol indicates that “COOL” Mode has been selected. “SLEEP” Indicator TEMPERATURE This indicator shows set temperature. Range of temperature that can be set is the following: 16°C ~ 32°C. (In AUTO and DRY modes, temperature is automatically set to 25°C and it cannot be adjusted by the User). Drying Mode This symbol indicates that “DRY” Mode has been selected. It indicates that “SLEEP” mode has been selected. “TURBO” Indicator In COOL and HEAT modes, this indicator lights up if “TURBO” mode has been selected. This function is not available on these Models On-Off. “KEY LOCK” Indicator Heating Mode This indicator is displayed if remote control’s buttons have been locked. This symbol indicates that “HEAT” Mode has been selected. Fan only Mode This symbol indicates that “FAN” Mode has been selected. “SWING” Indicator It indicates the setting of motorized flap for air outlet in vertical direction (up/down): • “natural flow”: • Swinging: • Fixed position: “FAN SPEED” Indicator TIMER It indicates TIMER setting. It indicates current setting of fan speed: • LOW: • MED: • HIGH: (flashing). • AUTO: (ON). (flashing). “AIR FLOW” Indicator (ON). In “DRY” mode, the angle of flap is adjusted in fixed position by control electronics. It indicates current setting of motorized louvers for horizontal adjustment (right/left) of air outlet: • Automatic swinging: (flashing). • Fixed angle: . This function is available on HKED 511 X, HKED 631 X Models only. Notes: The Figure above shows all possible indications that can be displayed on IR remote control’s Display. In reality, only indications referred to current operation selections will be displayed. IG-16 Monosplit “Wall” Personal Line DC Inverter - Section 1: General Information n Recommendations for the correct use of IR remote control IR receiver for remote control Maximum allowed distance: 8 metres Make sure that batteries (“AAA” type, 1.5V) are fully charged and correctly fitted in the special case on remote control, by respecting the polarity marked on remote control itself. The average life of batteries is of about 1 year. Never use rechargeable batteries. Use the remote control by turning it towards the Indoor Unit at no more than 8 metres from the Unit’s IR receiver. Remote control will not work properly if curtains, doors or other objects placed between remote control and Indoor Unit’s IR receiver do not allow the transmission of signals sent to Indoor Unit. In these cases, the operating range of remote control will be remarkably reduced. If remote control is placed sideways as regards the signal receiver, remote control will operate within a maximum angle of 30° on the right or on the left of receiver. If remote control is fixed on its wall bearing, it will work within a side max. distance of 0.5 metres on the right or on the left of receiver. If IR receiver on Indoor Unit is exposed to direct sunlight, remote control (and consequently the air conditioner) may not work properly. In order to avoid interferences, keep remote control at least 1 metre away from Hi-Fi, TV, etc. If remote control does not work properly, press “RST” button (reset of settings) placed on the back of the remote control itself. Check if remote control do operate properly now. Otherwise, remove both batteries from remote control, then wait for a few minutes and reinstall batteries in their case. Never wet the remote control and prevent any liquid from falling on it. Do not use any liquid, solvent or detergent for cleaning the remote control. Use only a soft cloth, clean and dry. IG-17 Monosplit “Wall” Personal Line DC Inverter - Section 1: General Information 1.6 LED PANEL ON INDOOR UNITS 2 1 3 Remote control’s signal receiver “Running” LED (Orange): It lights up when the Indoor Unit is operating. It goes out when the Indoor Unit is OFF (stop by remote control). It flashes (once/second) when at operation start in Heating mode, the preheating of heat exchanger on Indoor Unit is in progress (Indoor Unit’s fan is still stopped). It flashes in different ways or it lights up (see “Section 6: Diagnostic & Maintenance” of this Technical Manual), respectively when a system’s malfunction occurs or in case of intervention of a protection function. LED Display with 2 alphanumeric characters (Orange): During normal operation, it displays temperature value set by IR remote control. If one of Timer options has been selected (“Timer On”, or “Timer Off”), LED Display shows the remaining time interval (hours) before the programmed start or stop. The same time interval is shown on LCD Display of IR remote control. While automatic defrosting is in progress (with reversal of refrigerant cycle as regards operation in Heating mode), LED Display shows “dF ” indication. If control electronics diagnoses a malfunction which is in the list of codified malfunctions, LED Display shows the corresponding Error Code [F _ ]. In case of intervention of a protection, LED Display shows the corresponding Protection Code [P _ ]. For the list of Error Codes or Protection Codes, please refer to “Section 6: Diagnostic & Maintenance” of this Technical Manual. “Timer” LED (Orange): It lights up when one of Timer options has been selected (“Timer On”, or “Timer Off”). It lights up or flashes in different ways (see “Section 6: Diagnostic & Maintenance” of this Technical Manual), respectively when a system malfunction occurs or in case of intervention of a protection function. IG-18 Monosplit “Wall” Personal Line DC Inverter - Section 1: General Information Lighting of LED Display: LED Display, usually off during system operation, can be lighted up according to the User’s needs by pressing “LAMP” on IR remote control. LED Display ON LED Display OFF To turn off or light up LED Display, it is necessary to press “LAMP” button on IR remote control. IG-19 Monosplit “Wall” Personal Line DC Inverter - Section 1: General Information 1.7 OPERATING USE CONDITIONS In order to obtain the best performances from the appliance, it is recommended its use under the following temperature conditions: Operation Mode Temperatures Cooling Heating Ambient temperature ≥ 16°C ≤ 32°C Outdoor temperature + 5°C ~ + 45°C - 15°C ~ + 24°C Use of the air conditioner out of the above mentioned temperature range could cause the intervention of built-in protection functions consequently stopping the system operation. Relative humidity inside the room should always be less than 80%. Otherwise, condensate may drip during operation in Dry mode, or frost may form on indoor heat exchanger during operation in Cooling mode. Note: ¦If the appliance operates in rooms which are satured with oil vapors or volatile matters, harmful substances could coat and clog the indoor heat exchanger. Besides, scalings of saltness could form on the Outdoor Units installed in sea-surroundings; if not removed, they will damage the Units in a very short time. ¦In both cases, please contact the Authorized Technical Service to require frequent maintenance. IG-20 Monosplit “Wall” Personal Line DC Inverter - Section 1: General Information 1.8 HOW TO ADJUST AIR DIRECTION n Adjustment of airflow in vertical direction Carry out this adjustment according to your comfort needs, and avoid to direct airflow to people, plants and animals. Angle of airflow in vertical direction can be set by remote control. How to orient airflow in vertical direction: a) Optimized airflow or fixed position Control electronics adjusts in optimal way (“natural flow”) the movement of horizontal flap so as to simulate a light air current inside the room. In this case, remote control’s display will show the indicator . If you would like to change the angle of horizontal flap as regards default setting for each operation mode, press “SWING” button twice, till fixed default position is reached. In this case, remote control’s display will show the indicator . Carr y out these adjustments wh i l e t h e system is operating. b) Continuous swinging (“SWING”) Carry out this adjustment while the system is operating. Press (once or twice) “SWING” button till r e a c h i n g c o n t i n u o u s sw i n g i n g i n ve r t i c a l direction (up/down) of horizontal airflow flap. In this case, remote control’s display will show the flashing indicator . Press “SWING” button again to go back to default fixed position of horizontal flap for each operation mode. Carry out these adjustments while the system is operating. CAUTION If system is OFF, “SWING” button does not start any function. Do not operate system for a long time with horizontal flap completely addressed downwards in Cooling mode and in Dr y mode, to avoid that condensate for ms on the flap itself, and that condensate may drip inside the room. When air conditioner is started, the horizontal flap will start moving after a certain time, that is after inner electronics has undertaken its control. If system is stopped by remote control, and air conditioner was operating in Cooling mode or in Dry mode, horizontal flap will automatically move to closing position only after about 30 seconds. This allows to remove the remaining humidity from Indoor Unit’s heat exchanger and prevent the forming of mould. If horizontal flap does not work properly, stop the system, disconnect it and wait for a few minutes. Then connect it again, start it and check if horizontal flap is operating properly now. The angle of horizontal flap must never be too much small, to avoid a too much choking of air outlet and consequent lowering in performances. Room relative humidity should always be lower than 80%. If air conditioner is operating in Cooling mode at higher levels of humidity, the surface of indoor heat exchanger may get convered with frost (till causing the intervention of special protective function). If this occurs, please adjust horizontal flap IG-21 Monosplit “Wall” Personal Line DC Inverter - Section 1: General Information to air outlet max. angle, and in Cooling mode, select “High” fan speed. ¦ When system is connected, each flap motor may emit a light whirr for about 10 seconds, however this is not a malfunction. ¦ Never try to move horizontal flap manually, but adjust it by using remote control only. In this way, adjustment mechanism will not be damaged. n Adjustment of airflow in horizontal direction (only HKED 511 X, HKED 631 X Models) Airflow supply in horizontal direction can be adjusted by IR remote control, through “AIR FLOW” button. Adjusting airflow in horizontal direction: Carr y out this adjustment when the system is Vertical louver for adjusting airflow in horizontal direction. operating. Press “AIR FLOW” button on remote control to select horizontal direction (left/right) for airflow supply. On IR remote control’s display display may appear the following indications: Flashing indicator. Automatic swinging of air outlet vertical louver has been set. FIxed indicator. A fixed position for air outlet vertical louver has been set. Note: The adjustment of airflow in horizontal direction is Continuous swinging of louver available in all operation modes of system. CAUTION When the system is OFF, “AIR FLOW” button does not start any function. Never try to move vertical louver manually, but adjust it by using remote control only. In this way, Adjstment mechanism will not be damaged. As far as HKED 261 X and HKED 351 X Models are concerned - that are not equipped with motorized vertical flaps - you can adjust airflow in horizontal direction by moving vertical louver by hand. IG-22 Monosplit “Wall” Personal Line DC Inverter - Section 1: General Information 1.9 EMERGENCY OPERATION & “SELF-CHECK” Access to Emergency Button: For reaching Emergency Button, open frontal panel. Opening of frontal panel: Seize both side ends of frontal panel. Pull the Frontal panel panel towards you and lift it till hearing the click of limit end. Do not force the opening of panel because this causes the breaking of hinges. Closing of frontal panel: Seize both side ends of frontal panel, and p u l l i t d ow n t owa r d s I n d o o r U n i t ’s b o d y. Emergency Button Gently push the panel till completely closing it. Emergency Operation: If remote control is temporarily unavailable or batteries are exhausted, nevertheless it is possible to use the air conditioner by pressing Emergency Button once while the system is OFF. In this way, Emergency operation in “AUTO” mode will be started up, and the system will operate in the most suitable mode according to temperature conditions inside the room, with temperature value (the so-called “set point”) set to 25°C (not modifiable value). In particolar, it occurs the following: If room temperature is lower than 21°C, operation in “HEAT” mode will be selected. If room temperature is 21°C ~ 26°C, operation in “FAN” mode will be selected. If room temperature is higher than 26°C, operation in “COOL” mode will be selected. End of Emergency Operation Press Emergency Button again during Emergency operation: system’s operation will be stopped (OFF). Besides, during Emergency operation it is sufficient to press ON/OFF button on remote control to restore normal operation of system. “Self-Check” Mode (quick autodiagnosis of malfunctions) You can enter this diagnostic mode by connecting the system through main power switch, and at the same time by pressing Emergency Button on Indoor Unit. IG-23 Monosplit “Wall” Personal Line DC Inverter - Section 1: General Information All indicators on Indoor Unit’s LED Display will light up in sequence and afterwards will go out, if no malfunction can be diagnosed by control electronics. Otherwise, an Error Code (“F_”) will be displayed and at the same time “Running” LED on frontal panel of Indoor Unit will flash according to the codification referred to the corresponding kind of malfunction (see “Section 6: Diagnostic & Maintenance” of this Technical Manual), while LED “Timer” indicator will be ON. IG-24 Monosplit “Wall” Personal Line DC Inverter - Section 1: General Information 1.10 AUTO-RESTART FUNCTON AFTER A BLACKOUT A blackout during system’s operation, immediately causes the system’s stop. When power is restored, Operation LED (“Running”) on Indoor Unit will start blinking. Normally, if the system was ON when the blackout occurred, it is able to automatically restart after 3 minutes have elapsed since power is restored. Therefore, it is not necessary to press ON/OFF button on remote control, except for accidental deletion of operation data memory (EEPROM). In this case only, the system cannot automatically restart, and it will be necessary to use the IR remote control or the Emergency Button. At the end of the blackout, the system’s operating setting will be the same as when the system stopped. Automatic start/stop of air conditioner, programmed by “Timer On/Off” functions, the starting up of “SLEEP” function or “TURBO” mode will be cancelled. Therefore, a new “TIMER”, “SLEEP” or “TURBO” setting must be carried out. CAUTION If the system is used to air-condition an environment where people live occasionally, it is recommended to stop it before leaving the building and to disconnect the system by main switch, and/or disconnect the plug from the power socket, such as additional safety measure. Move main switch to OFF Disconnect the plug from the power socket IG-25 Monosplit “Wall” Personal Line DC Inverter - Section 1: General Information 1.11 SUGGESTIONS FOR ECONOMIC USE OF SYSTEM Adjust temperature in a correct way Too cold! Clean the filters on Indoor Unit Insulate the room from outside Screen the windows n Set a suitable temperature value: ¦During operation in Heating mode, avoid to set a too high temperature value. ¦During operation in Cooling mode, avoid to set a too low temperature value. n Often clean air filters: ¦To keep air conditioner in perfect efficiency, it is necessary to clean filters on Indoor Unit at least every 2 weeks, as it is described in the “User Manual” of these systems. ¦If there is a lot of dust on filters, the system’s performances will be reduced. n Avoid to keep door and windows always open: ¦This reduces the system’s performances and causes an increase in electric power consumption. ¦Moreover, in case of thermic overload, it may occur the intervention of protective automatic functions of appliance, with consequent stop of system itself. n Limit exposure to sunlight: ¦During operation in Cooling mode, it is recommended to screen by curtains the windows exposed to sunlight during the warmest hours of day. ¦ In this way, you will experience substantial increase in comfort and a reduction in power supply consumption. Use TIMER in a correct way TIMER In Cooling mode Direct airflow in a suitable way n Use “TIMER” function according to real needs: ¦Do not programme operation for time intervals longer than real comfort needs, by considering above all the real stay of people in the air-conditioned room. n Adjust the airflow direction: ¦With some practice, it will be possible to evaluate by yourself the increase in comfort that results from a correct adjustment of airflow direction. In this way, electric power consumption being equal, comfort remarkably increases. IG-26 Monosplit “Wall” Personal Line DC Inverter - Section 1: General Information Use “TURBO” function according to real needs 20 minutes n Use “TURBO” function according to real needs: ¦If “TURBO” function is selected, system will operate for a max. time of 20 minutes at max. speed, so as to reach desired comfort quickier. ¦ However, this function requires max. power consumption by system. IG-27 Monosplit “Wall” Personal Line DC Inverter - Section 2: General Technical Data 2. GENERAL TECHNICAL DATA 2.1 SPECIFICATIONS HKED 261 X - HCND 261 X Power Supply Cooling Heating Ph-V-Hz 1- 220 ~ 240V- 50Hz Cooling capacity kW 2.60 (1.70 ~ 3.50) Power input (Cooling) Input Rated Current EER / Energy Level Class Annual Consumption (500h) kW A kW 0.710 (0.45 ~ 1.25) 3.0 3.66 / A 355 Heating capacity kW 3.00 (1.70 ~ 4.00) kW A L/h A - 0.806 (0.50 ~ 1.28) 3.3 3.72 / A 0.9 7.5 Rotary Toshiba - Treated aluminium Power input (Heating) Input Rated Current COP / Energy Level Class Drying capacity Max. current (starting current) Model Type Compressor Brand Heat exchanger Finning material (Indoor Unit) Drain hose diameter (Indoor Unit) mm Air treated by Indoor Unit (“High” speed) m3/h Noise level Indoor Unit (H / M / L), 1 m dB(A) mm Dimensions (L x H x P) Indoor Unit mm Packaging (L x H x P) kg Net/Gross Weight Heat exchanger Finning material (Outdoor Unit) Air treated by Outdoor Unit (Max.) m3/h Noise level Outdoor Unit, 1 (2.5) m dB(A) mm Dimensions (L x H x P) Outdoor Unit mm Packaging (L x H x P) kg Net / Gross Weight g Refrigerant / Precharged amount + additional refrigerant charge Operating pressure inside the circuit MPa mm (inches) ØLiquid Side / ØGas Side Refrigerant pipings Max. splitting distance (liquid) m m Max. splitting level difference between Units Wiring between Units n. (section) Power supply plug (Indoor Unit) A Remote control Temperature range that can be set °C Operating temperature range (Cooling) °C Operating temperature range (Heating) °C Ø16.5 550 / 400 / 300 38 / - / 28 800 x 280 x 190 865 x 358 x 275 10 / 12 Treated aluminium 1800 51 (43) 812 x 540 x 256 920 x 595 x 335 33 / 37 R410A / 1110 (refrigerant precharge up to 3.5m) + 30 g/m 4.2 6.35 (1/4”) / 9.52 (3/8”) 20 10 3 (1.5mm2) + Earth cable 10A IR Remote Control +16 ~ +32 - 15 ~ +24 0 ~ +45 Gold Light-Blue Silver Black White DG-1 Monosplit “Wall” Personal Line DC Inverter - Section 2: General Technical Data HKED 351 X - HCND 351 X Power Supply Cooling Heating Ph-V-Hz 1- 220 ~ 240V- 50Hz Cooling capacity kW 3.50 (1.70 ~ 4.10) Power input (Cooling) Input Rated Current EER / Energy Level Class Annual Consumption (500h) kW A kW 1.080 (0.45 ~ 1.40) 4.7 3.24 / A 540 Heating capacity kW 3.750 (1.70 ~ 1.50) Power input (Heating) Input Rated Current COP / Energy Level Class kW A L/h A - 1.010 (0.40 ~ 1.50) 4.3 3.71 / A 1.1 7.8 Rotary Toshiba Drying capacity Max. current (starting current) Model Compressor Type Brand Heat exchanger Finning material (Indoor Unit) Drain hose diameter (Indoor Unit) Air treated by Indoor Unit (“High” speed) Noise level Indoor Unit (H / M / L), 1 m Dimensions (L x H x P) Indoor Unit Packaging (L x H x P) Net / Gross Weight Heat exchanger Finning material (Outdoor Unit) - Treated aluminium mm m3/h dB(A) mm mm kg Ø16.5 550 / 400 / 300 38 / - / 28 800 x 280 x 190 865 x 358 x 275 10 / 12 - Treated aluminium Air treted by Outdoor Unit (Max.) m3/h Noise level Outdoor Unit, 1 (2.5) m dB(A) mm Dimensions (L x H x P) Outdoor Unit mm Packaging (L x H x P) kg Net / Gross Weight g Refrigerant / Precharged amount + additinal refrigerant charge Operating pressure inside the circuit MPa mm (inches) ØLiquid Side / ØGas Side Refrigerant pipings Max. splitting distance (liquid) m m Max. splitting level difference between Units Wiring between Units n. (section) Power supply plug (Indoor Unit) A Remote control Temperature range that can be set °C Operating temperature range (Cooling) °C Operating temperature range (Heating) °C 1900 51 (43) 812 x 540 x 256 920 x 595 x 335 33 / 37 R410A / 1150 (refrigerant precharge up to 3.5m) + 30 g/m 4.2 6.35 (1/4”) / 9.52 (3/8”) 20 10 3 (1.5mm2) + Earth cable 10A IR Remote Control +16 ~ +32 - 15 ~ +24 0 ~ +45 Gold Light-Blue Silver Black White DG-2 Monosplit “Wall” Personal Line DC Inverter - Section 2: General Technical Data HKED 511 X - HCND 511 X Power Supply Cooling Heating Ph-V-Hz 1- 220 ~ 240V- 50Hz Cooling capacity kW 5.10 (1.80 ~ 6.00) Power input (Cooling) Input Rated Current EER / Energy Level Class Annual Consumption (500h) kW A kW 1.497 (0.49 ~ 2.08) 6.1 3.41 / A 749 Heating capacity kW 5.98 (1.90 ~ 6.40) Power input (Heating) Input Rated Current COP / Energy Level Class kW A L/h A - 1.607 (0.48 ~ 2.10) 6.5 3.72 / A 1.8 12.0 Rotary Toshiba Drying capacity Max. current (starting current) Model Compressor Type Brand Heat exchanger Finning material (Indoor Unit) Drain hose diameter (Indoor Unit) mm Air treated by Indoor Unit (“High” speed) m3/h Noise level Indoor Unit (H / M / L), 1 m dB(A) mm Dimensions (L x H x P) Indoor Unit mm Packaging (L x H x P) kg Net / Gross Weight Heat exchanger Finning material (Outdoor Unit) Air treted by Outdoor Unit (Max.) m3/h Noise level Outdoor Unit, 1 (2.5) m dB(A) mm Dimensions (L x H x P) Outdoor Unit mm Packaging (L x H x P) kg Net / Gross Weight g Refrigerant / Precharged amount + additinal refrigerant charge Operating pressure inside the circuit MPa mm (inches) ØLiquid Side / ØGas Side Refrigerant pipings Max. splitting distance (liquid) m m Max. splitting level difference between Units Wiring between Units n. (section) Power supply plug (Indoor Unit) A Remote control Temperature range that can be set °C Operating temperature range (Cooling) °C Operating temperature range (Heating) °C Treated aluminium Ø16.5 800 / 700 / 600 46 / - / 42 900 x 292 x 215 990 x 377 x 300 13 / 15 Treated aluminium 2500 55 (47) 850 x 605 x 295 995 x 690 x 415 45 / 51 R410A / 1450 (refrigerant precharge up to 4.0m) + 30 g/m 4.2 6.35 (1/4”) / 12.7 (1/2”) 20 10 3 (2.5mm2) + Earth cable 16A IR Remote Control +16 ~ +32 - 15 ~ +24 0 ~ +45 Gold Light-Blue Silver Black White DG-3 Monosplit “Wall” Personal Line DC Inverter - Section 2: General Technical Data HKED 631 X - HCND 631 X Power Supply Cooling Heating Ph-V-Hz 1- 220 ~ 240V- 50Hz Cooling capacity kW 6.30 (1.80 ~ 6.50) Power input (Cooling) Input Rated Current EER / Energy Level Class Annual Consumption (500h) kW A kW 1.95 (0.49 ~ 2.25) 8.2 3.23 / A 975 Heating capacity kW 7.20 (1.90 ~ 7.40) Power input (Heating) Input Rated Current COP / Energy Level Class kW A L/h A - 1.94 (0.48 ~ 2.40) 7.6 3.71 / A 1.8 12.7 Rotary Toshiba Drying capacity Max. current (starting current) Model Compressor Type Brand Heat exchanger Finning material (Indoor Unit) Drain hose diameter (Indoor Unit) mm Air treated by Indoor Unit (“High” speed) m3/h Noise level Indoor Unit (H / M / L), 1 m dB(A) mm Dimensions (L x H x P) Indoor Unit mm Packaging (L x H x P) kg Net / Gross Weight Heat exchanger Finning material (Outdoor Unit) Air treted by Outdoor Unit (Max.) m3/h Noise level Outdoor Unit, 1 (2.5) m dB(A) mm Dimensions (L x H x P) Outdoor Unit mm Packaging (L x H x P) kg Net / Gross Weight g Refrigerant / Precharged amount + additinal refrigerant charge Operating pressure inside the circuit MPa mm (inches) ØLiquid Side / ØGas Side Refrigerant pipings Max. splitting distance (liquid) m m Max. splitting level difference between Units Wiring between Units n. (section) Power supply plug (Indoor Unit) A Remote control Temperature range that can be set °C Operating temperature range (Cooling) °C Operating temperature range (Heating) °C Treated aluminium Ø16.5 850 / 725 / 625 46 / - / 42 900 x 292 x 215 990 x 377 x 300 14 / 17.5 Treated aluminium 2600 55 (47) 850 x 605 x 295 995 x 690 x 415 45 / 51 R410A / 1650 (refrigerant precharge up to 4.0m) + 30 g/m 4.2 6.35 (1/4”) / 12.7 (1/2”) 20 10 2 3 (2.5mm ) + Earth cable 16A IR Remote Control +16 ~ +32 - 15 ~ +24 0 ~ +45 Gold Light-Blue Silver Black White DG-4 Monosplit “Wall” Personal Line DC Inverter - Section 2: General Technical Data 2.2 DIMENSIONS OF UNITS Indoor Units HKED 261 X, HKED 351 X Unit: mm Dimensions Width Height Depth HKED 261 X 800 280 190 HKED 351 X 800 280 190 Model DG-5 Monosplit “Wall” Personal Line DC Inverter - Section 2: General Technical Data Indoor Units HKED 511 X, HKED 631 X Unit: mm Dimensions Width Height Depth HKED 511 X 900 292 215 HKED 631 X 900 292 215 Model DG-6 Monosplit “Wall” Personal Line DC Inverter - Section 2: General Technical Data Outdoor Units HCND 261 X, HCND 351 X Unit: mm Dimensions Width Height Depth HCND 261 X 815 540 256 HCND 351 X 815 540 256 Model Outdoor Units HCND 511 X, HCND 631 X Unit: mm Dimensions Width Height Depth HCND 511 X 850 605 295 HCND 631 X 850 605 295 Model DG-7 Heat exchanger Indoor heat exchanger sensor (TP1) Indoor Unit Indoor temperature sensor (Tr) Models HKED - HCND (261, 351) X DG-8 Gas Side piping: (261, 351: Ø9.52, 3/8”) 3-way valve 2-way valve Liquid Side piping: (Ø6.35, 1/4”) Liquid accumulator Compressor Capillary tube One-way valve Heat exchanger Discharge pipe temp. sensor (Tdc) 4-way valve Outdoor heat exchanger sensor (TP2) Capillary tube Outdoor Unit Outdoor temperature sensor (Tao) Heating cycle Cooling cycle Monosplit “Wall” Personal Line DC Inverter - Section 2: General Technical Data 2.3 REFRIGERANT CIRCUIT DIAGRAMS Heat exchanger Indoor heat exchanger sensor (TP1) Indoor Unit Indoor temperature sensor (Tr) Models HKED - HCND (511, 631) X DG-9 Gas Side piping: (511, 631: Ø12.7, 1/2”) 3-way valve 2-way valve Liquid Side piping: (Ø6.35, 1/4”) Suction pipe temp. sensor (Tsc) Liquid accumulator Compressor Capillary tube One-way valve Heat exchanger Discharge pipe temp. sensor (Tdc) 4-way valve Outdoor heat exchanger sensor (TP2) Capillary tube Outdoor Unit Outdoor temperature sensor (Tao) Heating cycle Cooling cycle Monosplit “Wall” Personal Line DC Inverter - Section 2: General Technical Data Monosplit “Wall” Personal Line DC Inverter - Section 3: Electrical Data 3. ELECTRICAL DATA 3.1 WIRING DIAGRAMS Horizontal flap motor Indoor temperature sensor (Tr) CN114 CN104 3 Bleu 2(N) 1 Yellow / Green Terminal block Blue Power Supply: 1-Phase, 220~240V, 50Hz Brown Grey Black Black Yelow / Green Red Brown Black M2 4 CN L CNG CN103 CN112 CNC Yellow / Green CNE M1 CNT CNW CNU CN CN101 Black Yellow / Green Transformer l ca rti Ve p r fla oto m LED Display & IR Receiver Indoor heat exchanger sensor (TP1) Fan motor Emergency Button Indoor Units HKED 261 X, HKED 351 X (TO OUTDOOR UNIT) Note: Components in dotted line are optional. Min. recommended section of cables between Indoor and Outdoor Units: ¦ Models HKED - HCND 261 X, 351 X: 1.5mm2. DE-1 Monosplit “Wall” Personal Line DC Inverter - Section 3: Electrical Data CN111 ENC PT RT CNM2 CNM1 Blue Brown CN112 CN102 Red Yellow / Green Brown L N CN114 Yellow / Green CNT CN101 GND CN104 CNU OPTIONAL: Connection to an eventual outdoor fan Vertical flap motor Horizontal flap motor Indoor temperature sensor (Tr) Indoor heat exchanger sensor (TP1) LED Display & IR Receiver CNG Fan motor Min. recommended section of cables between Indoor and Outdoor Units: ¦ Models HKED - HCND 511 X, 631 X: 2.5mm2. DE-2 Power Supply: 1-Phase, 220~240V, 50Hz CN103 1 2(N) 3 Terminal block Transformer CNC (TO OUTDOOR UNIT) Indoor Units HKED 511 X, HKED 631 X Monosplit “Wall” Personal Line DC Inverter - Section 3: Electrical Data Outdoor Units HCND 261 X, HCND 351 X Brown Brown White CN707 DC+ W Red Yellow/ Green CN701 P L1 White CN703 AC1 CN705 Compressor V DC- CN706 AC2 U N CN708 L2 CN704 Inductor Black OPTIONAL CN517 Blue CN510 Yellow/ Green X501 CN511 Yellow/ Green N-OUT CN513 L-IN RT N-IN CN514 CN515 Brown Blue Black Outdoor temperature sensor (Tao) Yellow/ Green Terminal block (TO INDOOR UNIT) DE-3 Yellow / Green Black Grey Min. recommended section of cables between Indoor Unit and Outdoor Unit: ¦ Models HKED - HCND 261 X, 351 X: 1.5mm2. Brown 1 2(N) 3 Fan motor CN509 L-OUT K501 CN507 P2 3 Brown CN505 P1 CN506 N2 Blue CN504 N1 Blue Brown 4-way valve coil Heat exchanger sensor (TP2) Discharge pipe temperature sensor (Tdc) Resistance Yellow/ Green White Black Monosplit “Wall” Personal Line DC Inverter - Section 3: Electrical Data Outdoor Units HCND 511 X, HCND 631 X PFC Grey Blue +280V Brown N M L Black N Yellow/ Green OPTIONAL H R Resistance Blue Brown 30A 250V Fuse Yellow/ Green Yellow/ Green Min. recommended sections of cables between Indoor Unit and Outdoor Unit: ¦ Models HKED - HCND 511 X, 631 X: 2.5mm2. NO COM RLY1 Bridge_AC Bridge_AC 4-way valve coil N 4-WV Suction pipe temperature sensor (Tsc) Heat exchanger temp. sensor (TP2) Fan motor Yellow FAN-C FAN-C CN1 Orange IPM temperature sensor CT1 JX2 L JX1 N Red E (Earthing) JX2 L DE-4 AC1 AC2 CT7 P(+) Discharge pipe temperature sensor (Tdc) White Compressor thermal protection (TO INDOOR UNIT) DC+ Rosso W CN1 N(-) V Red DCCN1 U Yellow/ Green 1(L) 2(N) 3(S) Terminal block +15V +15V M White Black Black B+ B+ IPM Module CN2 Compressor Outdoor temperature sensor (Tao) Red Red Resistance (kΩ) DE-5 0 10 20 30 40 50 60 Temperature sensor Tr (temperature detected inside the room) Temperature sensor TP1 (temperatures on Indoor Unit’s heat exchanger) [All Indoor Units] R-T diagram of thermistor resistance depending on temperatures Standard Resistance (kΩ) Key to symbols: - 30 - 27 - 24 - 21 - 18 - 15 - 12 -9 -6 -3 0 3 6 9 12 15 18 21 24 27 30 33 36 39 42 45 48 51 54 57 60 63 66 69 72 75 78 Temperature (°C) Monosplit “Wall” Personal Line DC Inverter - Section 3: Electrical Data 3.2 R/T FEATURES OF TEMPERATURE SENSORS Monosplit “Wall” Personal Line DC Inverter - Section 3: Electrical Data R-T Tables of thermistors resistance values depending on temperatures [All Indoor Units] Tr (room temperature) | TP1 (heat exchanger) Temperature (°C) Res. Min. (kΩ) ˉ30 ˉ29 ˉ28 ˉ27 ˉ26 ˉ25 ˉ24 ˉ23 ˉ22 ˉ21 ˉ20 ˉ19 ˉ18 ˉ17 ˉ16 ˉ15 ˉ14 ˉ13 ˉ12 ˉ11 ˉ10 ˉ9 ˉ8 ˉ7 ˉ6 ˉ5 ˉ4 ˉ3 ˉ2 ˉ1 0 1 2 3 4 5 6 7 8 9 10 11 12 13 14 15 16 17 18 19 20 21 22 23 24 25 51.195 48.659 46.299 44.071 41.968 39.981 38.102 36.326 34.646 33.055 31.550 30.097 28.722 27.420 26.186 25.017 23.908 22.857 21.859 20.912 20.013 19.116 18.322 17.540 16.797 16.090 15.418 14.779 14.170 13.591 13.040 12.505 11.995 11.509 11.047 10.606 10.186 9.785 9.403 9.038 8.690 8.357 8.040 7.736 7.446 7.169 6.900 6.644 6.398 6.163 5.938 5.723 5.517 5.320 5.131 4.950 Standard Res. Max. (kΩ) (kΩ) 52.840 50.232 47.772 45.452 43.261 41.193 39.238 37.391 35.645 33.993 32.430 30.923 29.497 28.147 26.868 25.657 24.509 23.421 22.389 21.409 20.48 19.584 18.734 17.927 17.160 16.431 15.739 15.080 14.454 13.857 13.290 12.739 12.215 11.717 11.241 10.789 10.357 9.945 9.554 9.180 8.823 8.482 8.157 7.816 7.550 7.226 6.991 6.729 6.478 6.238 6.008 5.789 5.578 5.377 5.185 5 54.521 51.805 49.248 46.832 44.554 42.405 40.375 38.457 36.645 34.931 34.310 31.748 30.271 28.873 27.55 26.297 25.11 23.98 22.918 21.907 20.917 20.023 19.146 18.314 17.524 16.733 16.060 15.382 14.737 14.124 13.54 12.974 12.436 11.924 11.436 10.971 10.529 10.107 9.705 9.322 8.956 8.607 8.274 7.957 7.653 7.363 7.082 6.814 6.558 6.313 6.078 5.854 5.64 5.484 5.238 5.05 Circuit voltage (5V, 4.3K) Down Up 0.38 0.39 0.41 0.43 0.45 0.47 0.49 0.52 0.54 0.56 0.59 0.61 0.64 0.66 0.69 0.72 0.75 0.78 0.81 0.84 0.87 0.90 0.93 0.97 1.00 1.04 1.07 1.11 1.15 1.18 1.22 1.26 1.30 1.34 1.38 1.42 1.47 1.51 1.55 1.59 1.64 1.68 1.73 1.77 1.81 1.86 1.90 1.95 1.99 2.04 2.09 2.13 2.18 2.22 2.27 2.31 4.62 4.61 4.59 4.57 4.55 4.53 4.51 4.48 4.46 4.44 4.41 4.39 4.36 4.34 4.31 4.28 4.25 4.22 4.19 4.16 4.13 4.10 4.07 4.03 4.00 3.96 3.93 3.89 3.85 3.82 3.78 3.74 3.70 3.66 3.62 3.58 3.53 3.49 3.45 3.41 3.36 3.32 3.27 3.23 3.19 3.14 3.10 3.05 3.01 2.96 2.91 2.87 2.82 2.78 2.73 2.69 DE-6 Temperature Res. Min. (°C) (kΩ) 26 27 28 29 30 31 32 33 34 35 36 37 38 39 40 41 42 43 44 45 46 47 48 49 50 51 52 53 54 55 56 57 58 59 60 61 62 63 64 65 66 67 68 69 70 71 72 73 74 75 76 77 78 79 80 81 4.771 4.599 4.434 4.277 4.126 3.981 3.842 3.709 3.581 3.495 3.340 3.226 3.117 3.012 2.912 2.815 2.722 2.633 2.547 2.464 2.385 2.308 2.235 2.164 2.096 2.030 1.966 1.904 1.844 1.787 1.732 1.679 1.628 1.579 1.531 1.485 1.441 1.399 1.357 1.318 1.279 1.242 1.206 1.171 1.137 1.105 1.074 1.043 1.014 0.986 0.959 0.932 0.907 0.882 0.858 Standard (kΩ) Res. Max. (kΩ) 4.821 4.649 4.485 4.327 4.176 4.031 3.892 3.759 3.631 3.508 3.389 3.275 3.165 3.06 2.959 2.861 2.768 2.678 2.529 2.509 2.429 2.352 2.278 2.207 2.138 2.071 2.006 1.944 1.884 1.826 1.770 1.717 1.665 1.615 1.567 1.521 1.476 1.433 1.391 1.351 1.312 1.274 1.237 1.202 1.168 1.135 1.103 1.072 1.043 1.014 0.986 0.959 0.933 0.908 0.884 4.871 4.699 4.535 4.377 4.226 4.081 3.942 3.808 3.680 3.557 3.438 3.323 3.213 3.107 3.006 2.908 2.814 2.724 2.637 2.553 2.473 2.395 2.231 2.249 2.180 2.112 2.047 1.984 1.923 1.865 1.809 1.754 1.702 1.652 1.603 1.556 1.511 1.467 1.425 1.384 1.344 1.306 1.269 1.233 1.199 1.165 1.133 1.101 1.071 1.042 1.014 0.986 0.960 0.934 0.910 Circuit voltage (5V, 4.3K) Down Up 2.36 2.40 2.45 2.49 2.54 2.58 2.62 2.67 2.71 2.77 2.80 2.84 2.88 2.92 2.96 3.00 3.04 3.08 3.12 3.16 3.20 3.23 3.27 3.30 3.34 3.37 3.41 3.44 3.48 3.51 3.54 3.57 3.60 3.63 3.66 3.69 3.72 3.75 3.78 3.80 3.83 3.86 3.88 3.91 3.93 3.96 3.98 4.00 4.02 4.05 4.07 4.09 4.11 4.13 4.15 2.64 2.60 2.55 2.51 2.46 2.42 2.38 2.34 2.29 2.23 2.20 2.16 2.12 2.08 2.04 2.00 1.96 1.92 1.88 1.84 1.80 1.77 1.73 1.70 1.66 1.63 1.59 1.54 1.52 1.49 1.16 1.43 1.40 1.37 1.34 1.31 1.28 1.25 1.22 1.20 1.17 1.14 1.12 1.09 1.07 1.04 1.02 1.00 0.98 0.95 0.93 0.91 0.89 0.87 0.85 Monosplit “Wall” Personal Line DC Inverter - Section 3: Electrical Data R-T Tables of thermistors resistance values depending on temperatures [Outdoor Units HCND (261, 351) X] Tdc (discharge pipe temperature) Temperature (°C) Res. Min. (kΩ) Standard (kΩ) Res. Max. (kΩ) Temperature (°C) Res. Min. (kΩ) Standard (kΩ) Res. Max. (kΩ) -30 775,6 939,3 1126 16 75,25 84,33 94,42 -29 732,2 885 1069 17 71,98 80,55 90,07 -28 691,6 834,2 1005 18 68,87 76,97 85,94 -27 653,4 786,6 946,1 19 65,91 73,56 82,02 -26 617,5 741,9 890,7 20 63,09 70,31 78,29 -25 583,8 700,1 838,8 21 60,41 67,23 74,76 -24 552,1 660,8 790,2 22 57,85 64,3 71,4 -23 522,2 623,9 744,7 23 55,42 61,51 68,21 -22 494,2 589,3 702,1 24 53,1 58,86 65,18 -21 467,8 556,8 662,1 25 50,89 56,33 62,3 -20 443 526,3 624,6 26 48,78 53,92 59,56 -19 419,6 497,6 589,5 27 46,77 51,63 56,95 -18 397,6 470,6 556,5 28 44,85 49,45 54,47 -17 376,8 445,2 525,5 29 43,02 47,37 52,11 -16 357,2 421,3 496,4 30 41,27 45,39 49,87 -15 338,8 398,8 469,1 31 39,61 43,5 47,74 -14 321,4 377,7 443,5 32 38,02 41,7 45,7 -13 305 357,8 419,3 33 36,5 39,99 43,77 -12 289,5 339 396,7 34 35,05 38,35 41,92 -11 274,9 321,3 375,3 35 33,67 36,79 40,16 -10 261,1 304,7 355,2 36 32,34 35,3 38,49 -9 248 288,9 336,3 37 31,08 33,87 36,89 -8 235,7 274,1 318,5 38 29,87 32,52 35,37 -7 224 260,1 301,7 39 28,71 31,22 33,91 -6 213 246,9 285,9 40 27,6 29,98 32,53 -5 202,6 234,4 271 41 26,54 28,79 31,2 -4 192,7 222,7 257 42 25,53 27,66 29,94 -3 183,4 211,5 243,8 43 24,56 26,58 28,74 -2 174,6 201 231,3 44 23,63 25,54 27,58 -1 166,2 191,1 219,6 45 22,74 24,55 26,48 0 158,3 181,7 208,4 46 21,89 23,61 25,43 1 150,8 172,9 198 47 21,08 22,7 24,43 2 143,7 164,5 188,1 48 20,29 21,83 23,47 3 137 156,6 178,7 49 19,55 21,01 22,55 4 130,6 149 169,9 50 18,83 20,21 21,68 5 124,6 141,9 161,5 51 18,14 19,45 20,84 DE-7 Monosplit “Wall” Personal Line DC Inverter - Section 3: Electrical Data R-T Tables of thermistors resistance values depending on temperatures [Outdoor Units HCND (261, 351) X] Tdc (discharge pipe temperature) Temperature (°C) Res. Min. (kΩ) Standard (kΩ) Res. Max. (kΩ) Temperature (°C) Res. Min. (kΩ) Standard (kΩ) Res. Max. (kΩ) 6 118,9 135,2 153,6 52 17,48 18,72 20,03 7 113,4 128,8 146,1 53 16,85 18,02 19,27 8 108,3 122,8 139,1 54 16,24 17,36 18,53 9 103,4 117 132,4 55 15,66 16,72 17,83 10 98,72 111,6 126 56 15,1 16,1 17,15 11 94,29 106,4 120 57 14,57 15,51 16,51 12 90,09 101,5 114,4 58 14,05 14,95 15,89 13 86,09 96,9 109 59 13,56 14,41 15,3 14 15 82,29 78,68 92,49 88,3 103,9 99,02 60 61 13,08 12,63 13,89 13,39 14,73 14,19 16 75,25 84,33 94,42 62 12,19 12,92 13,67 Temperature (°C) Res. Min. (kΩ) Standard (kΩ) Temperature (°C) Res. Min. (kΩ) Standard (kΩ) Res. Max. (kΩ) 63 11,77 12,46 13,17 101 3,416 3,556 3,698 64 11,37 12,02 12,69 102 3,312 3,451 3,591 65 10,98 11,6 12,24 103 3,212 3,349 3,488 66 10,61 11,09 11,8 104 3,115 3,25 3,388 67 10,25 10,8 11,37 105 3,021 3,155 3,292 68 9,904 10,43 10,97 106 2,93 3,063 3,198 69 9,572 10,07 10,58 107 2,843 2,974 3,108 70 9,253 9,723 10,21 108 2,758 2,888 3,02 71 8,947 9,391 9,849 109 2,676 2,804 2,936 72 8,652 9,072 9,505 110 2,598 2,724 2,854 73 8,368 8,766 9,174 111 2,521 2,646 2,774 74 8,094 8,474 8,857 112 2,447 2,57 2,697 75 7,83 8,187 8,552 113 2,376 2,497 2,623 76 7,577 7,914 8,259 114 2,307 2,427 2,551 77 7,332 7,651 7,977 115 2,24 2,359 2,481 78 7,097 7,398 7,705 116 2,176 2,292 2,413 79 6,87 7,155 7,455 117 2,113 2,229 2,348 80 6,651 6,92 7,194 118 2,053 2,167 2,284 81 6,44 6,694 6,953 119 1,995 2,107 2,223 82 6,237 6,477 6,72 120 1,938 2,049 2,163 83 6,041 6,268 6,497 121 1,884 1,993 2,106 84 5,852 6,066 6,282 122 1,831 1,938 2,05 Res. Max. (kΩ) DE-8 Monosplit “Wall” Personal Line DC Inverter - Section 3: Electrical Data R-T Tables of thermistors resistance values depending on temperatures [Outdoor Units HCND (261, 351) X] Tdc (discharge pipe temperature) Temperature (°C) Res. Min. (kΩ) Standard (kΩ) Temperature (°C) Res. Min. (kΩ) Standard (kΩ) Res. Max. (kΩ) 85 5,699 5,871 6,075 123 1,78 1,886 1,996 86 5,494 5,684 5,876 124 1,731 1,835 1,943 87 5,324 5,504 5,684 125 1,683 1,785 1,892 88 5,16 5,33 5,499 126 1,637 1,738 1,843 89 5,002 5,162 5,321 127 1,592 1,691 1,795 90 4,85 5 5,15 128 1,548 1,646 1,749 91 4,694 4,844 4,994 129 1,506 1,603 1,704 92 4,545 4,693 4,843 130 1,466 1,561 1,661 93 4,4 4,548 4,697 94 4,261 4,408 40557 95 4,127 4,273 4,421 96 3,997 4,143 4,29 97 3,873 4,017 4,163 98 3,752 3,896 4,041 99 3,636 3,779 3,923 100 3,524 3,665 3,809 Res. Max. (kΩ) DE-9 Monosplit “Wall” Personal Line DC Inverter - Section 3: Electrical Data R-T Tables of thermistors resistance values depending on temperatures [Outdoor Units HCND (511, 631) X] Tdc (discharge pipe temperature) Temperature (°C) Nom. Resist. (kΩ) Voltage on circuit as to Earthing (V) Decimal system Temperature (°C) Nom. Resist. (kΩ) Voltage on circuit as to Earthing (V) Decimal system 163,447 94,9283 71,6526 DE-10 Monosplit “Wall” Personal Line DC Inverter - Section 3: Electrical Data R-T Tables of thermistors resistance values depending on temperatures [Outdoor Units HCND (511, 631) X] Tdc (discharge pipe temperature) Temperature (°C) Nom. Resist. (kΩ) Voltage on circuit as to Earthing (V) Decimal system Temperature (°C) Nom. Resist. (kΩ) Voltage on circuit as to Earthing (V) Decimal system DE-11 Monosplit “Wall” Personal Line DC Inverter - Section 3: Electrical Data R-T Tables of thermistors resistance values depending on temperatures [All Outdoor Units] TP2 (outdoor heat exchanger temperature) Tao (outdoor temperature) Tsc (suction pipe temperature): [HCND (511, 631) X only] Temperature (°C) Nom. Resist. (kΩ) Voltage on circuit as to Earthing (V) Decimal system Temperature (°C) Nom. Resist. (kΩ) Voltage on circuit as to Earthing (V) Decimal system 98,4599 40,4343 DE-12 Monosplit “Wall” Personal Line DC Inverter - Section 3: Electrical Data R-T Table of thermistors resistance values depending on temperatures [All Outdoor Units] TP2 (outdoor heat exchanger) Tao (outdoor temperature) Tsc (suction pipe temperature) → [HCND (511, 631) X only] Temperature (°C) Nom. Resist. (kΩ) Voltage on circuit as to Earthing (V) Decimal system Temperature (°C) Nom. Resist. (kΩ) Voltage on circuit as to Earthing (V) Decimal system DE-13 Monosplit “Wall” Personal Line DC Inverter - Section 4: Control Logic Functions 4. CONTROL LOGIC FUNCTIONS 4.1 HARDWARE FEATURES 4.1.1 Power supply requirements, operating conditions (temperature & humidity) of PCB The system is compatible with power supply voltage inside the range 165~265V AC, with power supply frequence of 50Hz. Temperature range for operation of PCB is -20°C ~ 85°C. Relative humidity range for operation of PCB is 30% ~ 95%. 4.1.2 LED Display with 2 alphanumeric characters on Indoor Unit On these Indoor Unit there is a LED Display, of orange colour, with 2 alphanumeric characters, which is able to display alternatively the following information: set temperature value (°C), remaining time (hours) of programmed operation with “TIMER”, activation of automatic defrosting or eventual “Error/Protection Code” referred to system operation. LED Display, usually OFF during system operation, can be lighted up according to the User’s needs by pressing “LAMP” button on IR remote control. To turn off LED Display, it is necessary to press again “LAMP” button on IR remote control. By turning off LED Display, sources of light inside the room can be reduced, thus making night rest more comfortable. 4.1.3 PCB on Indoor Unit and Outdoor Unit On each Indoor Unit there is a PCB with control functions and power supply functions. On each Outdoor Unit there are several PCB with different functions (please refer to “Section 3: Electrical Data” of this Technical Manual). FU-1 Monosplit “Wall” Personal Line DC Inverter - Section 4: Control Logic Functions 4.2 SOFTWARE FEATURES 4.2.1 Symbols referred to temperature values and indoor fan speed 1. Symbols referred to temperature values Ts: set temperature, in °C. Tr: room temperature, in °C. TP1: Indoor Unit’s heat exchanger temperature. 2. Indoor Unit’s fan speed The following Table shows, in Cooling mode and Heating mode, the parameters referred to Indoor Unit’s fan speed. These parameters can be programmed and are inside EEPROM. Speed Ultra-HIGH HIGH MED. LOW BREEZE Cooling FS5 FS4 FS3 FS2 FS1 Heating FS10 FS9 FS8 FS7 FS6 For these Models of Indoor Unit, control on indoor fan’s rotation takes place by speed “steps”. 4.2.2 System’s operation modes 1. Automatic Mode (“AUTO”) (1) In this mode, temperature Ts is set to 25°C, and this value cannot be modified by the User. (2) You can reach this mode by pressing Emergency Button placed under Indoor Unit’s frontal panel, or by pressing “MODE” button on IR remote control. (3) In this mode, system’s control electronics will select one of available operation modes, according to room temperature value (Tr) detected at operation start, as it is described in the following Table. Room temperature (Tr) Selected operation mode Tr < 21°C 21°C ≤ Tr ≤ 26°C Tr > 26°C Heating Fan Cooling (4) After control electronics has selected operation mode: a) If room temperature (Tr) changes, operation mode does not automatically changes. b) In order that control electronics can automatically select a new operation mode, it is always necessary to stop and restart system by IR remote control or by pressing Emergency Button. c) In case system is stopped and restarted as it is indicated at item b), compressor will stop for min. 3 minutes FU-2 Monosplit “Wall” Personal Line DC Inverter - Section 4: Control Logic Functions before restarting in new operation mode. (5) Compressor’s operation frequency depends on operation mode automatically selected by control electronics. (6) Position of 4-way valve depends on operatrion mode automatically selected by control electronics. (7) Outdoor fan speed depends on operation mode automatically selected by control electronics. 2. Cooling Mode (“COOL”) (1) In this mode, temperature (Ts) can be set in the range 16°C ~ 32°C. (2) Compressor operation: In Cooling mode, control electronics manages system operation according to a logic of “Fuzzy” type (“steps” logic), on the basis of the difference between room temperature (Tr) and set temperature (Ts) and variation of room temperature (Tr) over the time. According to this logic, compressor’s start and stop are commanded, and in “AUTO” mode indoor fan speed changes, so as to satisfy properly the User’s comfort needs. (3) Compressor frequency at start, increases or reductions in compressor’s operation frequency, conditions for start and stop of compressor, outdoor fan speed are controlled by the software implemented in the Outdoor Unit’s PCB. (4) Start and stop of system: In Cooling mode, conditions of thermostatic On/Off are described in the following graph. ON OFF -1 (0) Ts +1 Tr (°C) (5) Control of indoor fan motor: By IR remote control, User can select the following speeds: Ultra-HIGH (“Turbo” function), HIGH, MED., LOW, while “BREEZE” (or Ultra-LOW) speed can be commanded by control electronics only. If “AUTO” (automatic) speed of indoor fan is selected, Indoor Unit’s fan speed is automatically selected among available speeds, on the basis of the difference between room temperature (Tr) and set temperature (Ts), as it is shown in the graph at the following page. FU-3 Monosplit “Wall” Personal Line DC Inverter - Section 4: Control Logic Functions Vel. HIGH Vel. MED. Vel. LOW (0) Ts +1 +3 +5 Tr (°C) (6) Delayed stop of indoor fan in case of stop of system: In case of stop of system (OFF) by IR remote control or by Emergency Button, fan speed keeps on for 30 seconds at “Low” speed, while outlet horizontal flap keeps at opening position for 35 seconds and in the end moves to closing position. Both devices increase indoor heat exchanger temperature, by allowing the removal of remaining humidity from Indoor Unit. (7) Control of 4-way valve: During operation in Cooling mode, 3-way valve coil is de-energized. (8) Control of outlet horizontal flap in Cooling mode: 1) Position of total opening of outlet horizontal flap corresponds to the position that is indicated by Pch1 in the Figure besides, while position of total closing Pch2 corresponds to the position that is indicated by Pch2. a) When system is powered, outlet horizontal flap moves first to Pch1 position, then goes back to Pch2 position. Pc3 b) When system is stopped (OFF) by remote control or by Emergency Pc2 Button, outlet horizontal flap moves first to Pch1 position, then goes back to Pch2 position. c) When system is started (ON) by remote control or by Emergency Button, Pc1 Pch1 outlet horizontal flap moves first to Pch1 position, then moves to normal operation position. 2) In case of fixed position of outlet horizontal flap, in Cooling mode it occurs the following: a) If system is powered and then started (ON), outlet horizontal flap is set to fixed position Pc2 after it had moved to Pch1 position (total opening). b) If “natural flow” setting or continuous automatic swinging (“SWING”) of outlet horizontal flap is active and fixed position Pc2 of flap is selected, this position is kept in memory and restored when the User restarts system and selects fixed setting of outlet horizontal flap. FU-4 Monosplit “Wall” Personal Line DC Inverter - Section 4: Control Logic Functions 3) In case of automatic swinging (“SWING”) of outlet horizontal flap in Cooling mode, it occurs the following. a) The starting position of outlet horizontal flap in case of automatic swinging is Pc1. b) If automatic swinging of outlet horizontal flap is activated, by starting from a fixed position or from “natural flow” setting, the flap moves first to Pch1 position. c) If automatic swinging is active, outlet horizontal flap moves continuously from Pc1 to Pc3 and vice versa. 4) “Natural flow” setting - optimized airflow - foresees a sequence composed of 2 cycles of up/down swinging of horizontal flap, followed by a stop of the flap for 30 seconds, and so on. In brief, as far as operation in Cooling mode is concerned: Pch1 is the position of total opening of outlet flap; Pch2 is the position of total closing of outlet flap; Pc2 is the position of fixed stop of outlet flap; Pc1 is the initial angle for automatic swinging range of outlet flap; Pc3 is the final angle for automatic swinging range of outlet flap. All above parameters can be programmed as they are memorized in EEPROM. (9) Protection functions that can be activated if system operates in Cooling mode: For detailed outline of protection functions that can be activated and of autodiagnostic functions of system’s malfunctions, please refer to “Section 6: Diagnostic & Maintenance” of this Technical Manual. 3. Dry Mode (“DRY”) (1) In this mode, temperature (Ts) is automatically set to 25°C, and this setting cannot be modified by the User. (2) Control of compressor operation: compressor operation is controlled according to temperature value (Tr) detected inside the room. 1) If Tr is ≥ 23°C, compressor operates for 10 minutes at F1 frequence level, and afterwards for 5 minutes at F2 frequence level. 2) If Tr is < 23°C, compressor operates for 10 minutes at F3 frequency level, and afterwards for 5 minutes at F4 frequence level. 3) If Tr is ≤ 10°C, compressor stops, while indoor fan keeps on rotating at “Low” speed for 30 seconds and then stops as well. When Tr is > 13°C, normal operation of compressor is restored. FU-5 Monosplit “Wall” Personal Line DC Inverter - Section 4: Control Logic Functions (3) Control of outdoor fan operation: in Dry mode, outdoor fan operates in synchronous way as regards compressor. (4) Control of indoor fan operation: indoor fan speed is set by “FS11” parameter and it cannot be modified by the User. “FS11” is a parameter memorized in Indoor Unit’s EEPROM. (5) Control of 4-way valve operation: in Dry mode, 4-way valve coil is de-energized. (6) Control of outlet horizontal flap operation. In Dry mode, the angle of outlet horizontal flap is automatically set to P1 position, so as to prevent the forming of condensate on outlet; this setting cannot be modified by the User. P1 is a parameter memorized in Indoor Unit’s EEPROM. (7) In Dry mode, “SLEEP” function and “TURBO” function are not available. (8) In Dry mode, antifrost protection function of Indoor Unit’s heat exchanger is available. (9) At system’s start or stop, indoor fan and outlet horizontal flap are controlled as it has already been described about operation in Cooling mode. 4. Heating Mode (“HEAT”) (1) In this mode, temperature (Ts) can be set in the range 16°C ~ 32°C. (2) Compressor operation: In Cooling mode, control electronics manages system operation according to a logic of “Fuzzy” type ( “steps” logic), on the basis of the difference between room temperature (Tr) and set temperature (Ts) and the variation of room temperature (Tr) over the time. According to this logic, compressor’s start and stop are commanded and in “AUTO” mode, indoor fan speed is changed, so as to satisfy properly the User’s comfort needs. (3) Compressor frequency at start, the increases or reductions in compressor operation frequency, conditions for start and stop of compressor, outdoor fan speed are controlled by the software implemented in Outdoor Unit’s PCB. (4) Start and stop of compressor: In Heating mode, to room temperature (Tr) a compensation value is applied, equal to +3° as regards set temperature (Ts). If D T = (Tr - Ts), when D T is < 2°C, compressor starts, while when D T is ≥ 4°C, compressor stops. This is FU-6 Monosplit “Wall” Personal Line DC Inverter - Section 4: Control Logic Functions shown in the following graph. ON OFF (0) Ts 2 4 Tr (°C) (5) Control of indoor fan motor: 1) By IR remote control, User can select the following speeds: Ultra-HIGH (“Turbo” function), HIGH, MED., LOW, while “BREEZE” (or Ultra-LOW) speed can be commanded by control electronics only, as for example during indoor heat exchanger’s preheating (“HOT-KEEP”: anti-cold drafts prevention function), as it has already been described at the following item. 2) Anti-cold drafts prevention function intervenes during start in Heating mode, and foresees control on indoor fan rotation if indoor heat exchanger’s temperature is not sufficient to provide comfort. This control may be LOW speed Set speed shown by the following graph. LOW speed OFF BREEZE speed 25 30 36 TP1 (°C) If TP1 < 30°C and outlet horizontal flap is in default position (Ph4, see futher on) for preventing cold drafts, indoor fan rotates at “BREEZE” (Ultra-LOW) speed. a) If temperature TP1 increases and sets in the range 25°C ~ 30°C, indoor fan rotates at “BREEZE” (UltraLOW) speed. b) If temperature TP1 decreases and sets in the range 30°C ~ 25°C, indoor fan rotates at LOW speed. c) If temperature TP1 ≥ 30°C, indoor fan rotates at LOW speed and intervention of anti-cold drafts prevention function ends. In these conditions, outlet horizontal flap moves to the previous position as regards the intervention of anti-cold drafts prevention function. FU-7 Monosplit “Wall” Personal Line DC Inverter - Section 4: Control Logic Functions If TP1 < 25°C, indoor fan stops (OFF). If TP1 ≥ 25°C, outlet horizontal flap moves to default position (Ph4, see futher on) for anti-cold drafts prevention. If TP1 > 30°C, the intervention of anti-cold drafts prevention function ends. When compressor stops, outlet horizontal flap moves to default position (Ph4, see further on) and indoor fan rotates at “BREEZE” (Ultra-LOW) speed. In this condition, components’ operation is the same of operation described at previous item . 3) If “AUTO”(automatic speed) setting of indoor fan is selected, Indoor Unit’s fan speed is automatically selected among available speeds, on the basis of temperature (Tr) detected inside the room, as it is described in the following graph. HIGH speed MED. speed LOW speed -4 (0) Ts -2 +2 Tr (°C) Operation diagram shown on the above graph is valid starting from the end of intervention of anti-cold drafts prevention function. (6) Indication on Indoor Unit’s display when anti-cold drafts prevention function is active: in these conditions, “Running” indicator flashes at 1Hz frequence, that is once/sec. (7) Removal of remaining heat on Indoor Unit’s heat exchanger: if system is stopped (OFF) by IR remote control or by Emergency Button, indoor fan will keep on rotating for 30 seconds, so as to allow the lowering of temperature on indoor heat exchanger; in the same conditions, outlet horizontal flap will move to closing position 35 seconds after system’s OFF. (8) Control of outdoor fan in Heating mode: excepted time interval during which automatic defrosting occurs, control of Outdoor Unit’s fan operation takes places according to the same logics that have already been described about operation in Cooling mode. (9) Control of 4-way valve operation: 1) 4-way valve coil keeps energized till the moment when automatic defrosting starts. 2) 4-way valve coil is de-energized during automatic defrosting. 3) 4-way valve coil is de-energized in case of commutation of operation mode from Heating mode to Cooling mode, Dry mode or Fan mode, or in case of thermostatic OFF in Heating mode, after 2 minutes have elapsed since compressor’s stop. FU-8 Monosplit “Wall” Personal Line DC Inverter - Section 4: Control Logic Functions (10) Control of outlet horizontal flap in Heating mode: 1) Position of total opening of outlet horizontal flap corresponds to Pch2 the position indicated by Pch1 on the Figure besides, while position of total closing corresponds to the position indicated by Pch2. a) When system is powered, outlet horizontal flap moves first to Ph2 Ph4 Ph3 Pch1 position and then goes back to Pch2 position. Ph2 b) When system is stopped (OFF) by remote control or by the Emergency Button, outlet horizontal flap moves first to Pch1 Ph1 Pch1 position then goes back to Pch2 position. c) When system is started (ON) by remote control or by the Emergency Button, outlet horizontal flap moves first to Pch1 position, and then moves to normal operation position. 2) In case of compressor stop in Heating mode, if anti-cold drafts prevention function is active (“HOT-KEEP”) or if there are the conditions for automatic defrosting, outlet horizontal flap moves Ph4 position. As soon as anti-cold drafts prevention function ends, flap moves to the previous position as regards the intervention of anti-cold drafts prevention function. 3) In case of fixed position of outlet horizontal flap, in Heating mode it occurs the following. a) If system is powered, when it is started (ON), outlet horizontal flap is set to fixed Ph2 position after it had been set to Pch1 position (total opening). If the stop of outlet horizontal flap is commanded, flap’s position will be the position memorized at the previous stop. b) If “natural flow” setting or automatic swinging (“SWING”) of outlet horizontal flap are active, and a fixed position of flap is selected by remote control, this position is kept in memory and restored when the User restarts system and selects fixed setting of outlet horizontal flap. 4) In case of automatic swinging (“SWING”) of outlet horizontal flap in Heating mode, it occurs the following. a) The starting position of outlet horizontal flap in case of automatic swinging is Ph1. b) If automatic swinging of outlet horizontal flap is activated by starting from a fixed position or from “natural flow” setting, the flap moves first to Pch1 position. FU-9 Monosplit “Wall” Personal Line DC Inverter - Section 4: Control Logic Functions c) If automatic swinging is active, outlet horizontal flap moves continuous from Ph1 to Ph3 and vice versa. 5) “Natural flow” setting - or optimized airflow - foresees a sequence composed of 2 cycles of up/down swinging of horizontal flap, followed by a stop of 30 seconds, and so on. In brief, as far as Heating operation is concerned: Pch1 is the position of total opening of outlet flap; Pch2 is the position of total closing of outlet flap; Ph2 is the position of fixed stop of outlet flap; Ph1 is the initial angle for automatic swinging range of outlet flap; Ph3 is the final angle for automatic swinging range of outlet flap; Ph4 is the default angle for flap when anti-cold drafts protection function is active. All above parameters can be programmed as they are memorized in EEPROM. (11) Protection functions that can be activated when system operates in Heating mode: For detailed outline of protection functions that can be activated and autodiagnostic functions of system’s malfunctions, please refer “Section 6: Diagnostic & Maintenance” of this Technical Manual. (12) Automatic defrosting function: as far as automatic defrosting start is concerned, and duration and end of automatic defrosting procedure, the following conditions are valid. n All Models: HKED-HCND (261, 351, 511, 631) X 12.1 Conditions for automatic defrosting start When total time of compressor operation in Heating mode has exceeded 40 minutes, if temperature on outdoor heat exchanger (TP2) and outdoor temperature (Tao) meet for at least 5 minutes one of the following conditions, automatic defrosting starts. (1) Tao ≥ 5°C and TP2 ≤ - 3°C. (2) - 5°C ≤ Tao < 5°C and (Tao - TP2) > 7°C. (3) Tao < - 5°C and TP2 ≤ - 12°C. (4) Tao < - 12°C and (Tao - TP2) > 4°C. 12.2 Conditions for automatic defrosting end When at least one of the following conditions occurs, automatic defrosting ends and system’s normal operation in Heating mode is restored. (1) TP2 > 12°C. (2) Defrosting has lasted for 12 consecutive minutes. FU-10 Monosplit “Wall” Personal Line DC Inverter - Section 4: Control Logic Functions 12.3 Automatic defrosting During automatic defrosting, only ON/OFF button on IR remote control and Emergency Button placed under Indoor Unit’s frontal panel are active. If you press whatever button on IR remote control, you can hear the “bip” of impulse reception by Indoor Unit, but the button’s pressing has no effect on system operation. The following graph shows the state of functional components during automatic defrosting. Max. 10 minutes 15 sec. ON 80Hz 15 sec. 40Hz 15 sec. 15 sec. ON 40Hz ON ON OFF ON ON OFF ON ON OFF While automatic defrosting is in progress, indoor heat exchanger’s anti-frost protection function is not active. As soon as normal operation in Heating mode is restored, indoor fan rotation is controlled on the basis of anti-cold drafts protection function (“HOT-KEEP”). 3. Fan Mode (“FAN”) (1) In this operation mode, temperature (Ts) can be set in the range 16°C ~ 32°C. (2) Compressor operation: In this operation mode, compressor is OFF. (3) Control of outdoor fan: In this operation mode, outdoor fan is OFF. (4) Control of indoor fan motor: By IR remote control, the User can select the following speeds: HIGH, MED., or LOW. If “AUTO” (automatic speed) of indoor fan is selected, Indoor Unit’s fan speed is selected among available speeds, on the basis of the difference between room temperature (Tr) and set temperature (Ts), as it is shown on the graph at the following page. FU-11 Monosplit “Wall” Personal Line DC Inverter - Section 4: Control Logic Functions HIGH speed MED. speed LOW speed (0) Ts +1 +3 +5 Tr (°C) If indoor fan speed is set to “AUTO”, indoor fan’s current speed will be confirmed within a max. variation of ± 1°C of room temperature (Tr) as regards set temperature (Ts). (5) Control of 4-way valve: during operation in Fan mode, 4-way valve coil is de-energized. (6) Control of outlet horizontal flap in Fan mode: outlet horizontal flap is controlled according to the same logics that are foreseen for operation in Cooling mode. (7) In Fan mode, stop of indoor fan motor is not delayed, contrary to what it occurs in Cooling mode and in Heating mode. In other words, indoor fan stops as soon as system is stopped (OFF). (8) In Fan mode, when system is stopped (OFF), outlet horizontal flap immediately moves to closing position. FU-12 Monosplit “Wall” Personal Line DC Inverter - Section 4: Control Logic Functions 4.3 BASIC FUNCTIONS 4.3.1 Timer functions (“Timer On /Timer Off”) 1. Programmed start (“Timer On”) (1) If system is powered but it is in standby, it is possible to programme the delayed start of system by IR remote control. (2) Press “TIMER” button on remote control. (3) If the system is in standby, “Timer On” function will be selected (delayed start). At each press of “TIMER” button, the programmed time interval for start will be increased by 1 hour, up to max. 24 hours. On Indoor Unit’s frontal panel, “Timer” LED indicator will light up (of Orange colour), and LED Display with 2 digits on Indoor Unit will show time interval (in hours) set for delayed start of system. The same time interval (in hours) will be shown on LCD Display of IR remote control. If the programmed interval is of 24 hours, a further press on “TIMER” button will involve the cancellation of Timer function, and the corresponding indications on Indoor Unit and on IR remote control will be off. (4) “Timer On” function operates on the basis of a simple timer, therefore it is not possible to carry out a real time programming (start at ...h), but a programming based on a time interval. As set time passes by, the indication referred to the remaining time interval before the system’s start will be decreased by 1 hour’s steps. As soon as set time interval is wholly elapsed, system will start according to operating parameters that were defined when “Timer On” function was set. At the same time, every indication referred to the programming will disappear from Indoor Unit’s LED Display and from IR remote control’s LCD Display. (5) On these systems, it is not possible to programme the start followed by the stop or vice versa, therefore at the end of set time interval selected by “Timer On” function, the system keeps on operation until the User stops it by IR remote control. 2. Programmed stop (“Timer Off”) (1) When system is ON, it is possible to programme the delayed stop of system by IR remote control. (2) Press “TIMER” button on remote control. FU-13 Monosplit “Wall” Personal Line DC Inverter - Section 4: Control Logic Functions (3) If system is ON, “Timer Off” function willl be selected (delayed stop). At each press of “TIMER” button, programmed time interval for stop will be increased by 1 hour, up to max. 24 hours. On Indoor Unit’s frontal panel, “Timer” LED indicator will light up (of Orange colour), and LED Display with 2 digits on Indoor Unit will show time interval (in hours) set for the delayed stop of system. The same time interval (in hours) will be shown also on IR remote control’s LCD Display. If the programmed interval is of 24 hours, a further press on “TIMER” button will involve the cancellation of Timer function, and the corresponding indications on Indoor Unit and on IR remote control will be off. (4) “Timer Off” function operates according to a simple timer, therefore it is not possible to carry out a real time programming (stop at ...h), but a programming based on a time interval. As set time passes by, the indication referred to the remaining time interval before the system’s stop will be decreased by 1 hour’s steps. As soon as set time interval is wholly elapsed, the system will stop. At the same time, each indication referred to the programming will disappear from Indoor Unit’s LED Display and from IR remote control’s LCD Display. (5) On these systems, it is not possible to programme the stop followed by the start or vice versa, therefore at the end of time interval set by “Timer Off” function, the system is OFF until the the User restarts it by IR remote control. FU-14 Monosplit “Wall” Personal Line DC Inverter - Section 4: Control Logic Functions 4.3.2 Operation with “SLEEP” function (1) This function is available in the following operation modes: Cooling mode (“COOL”) and Heating mode (“HEAT”). (2) “SLEEP” function always foresees “Low” fixed speed of Indoor Unit’s fan, therefore “SLEEP” function allows to reduce noise level produced by Indoor Unit’s operation. (3) “SLEEP” function can be activated by pressing “SLEEP” function on IR remote control. On remote control’s LCD Display, “SLEEP” indicator will light up. (4) Operation with “SLEEP” function in Cooling mode. 1 hour after “SLEEP” function selection, set temperature (Ts) is increased by 1°C as regards value set by remote control; 2 hours after “SLEEP” function selection, set temperature (Ts) is increased again by 1°C. At the end of this time interval, set temperature value (Ts) keeps the same. In brief, set temperature is gradually increased up to max. +2°C as regards the initial value set by remote control when selecting “SLEEP” function. ¦This reduces comfort level progressively, but also decrease power consumption and allows to devote yourself to activities that require a silent environment. (5) Operation with “SLEEP” function in Heating mode. 1 hour after “SLEEP” function selection, set temperature (Ts) is decreased by 1°C as regards value set by remote control; 2 hours after “SLEEP” function selection, set temperature (Ts) is decreased by 3°C as regards value set by remote control; 3 hours after “SLEEP” function selection, set temperature (Ts) is decreased by 5°C as regards value set by remote control. At the end of this time interval, set temperature value (Ts) keeps the same. In brief, set temperature is gradually reduced up to max. - 5°C as regards initial value set by remote control when selecting “SLEEP” function. ¦This reduces comfort level progressively, but also decrease power consumption and allows to devote yourself to activities that require a silent environment. (6) For cancelling “SLEEP” function, press again “SLEEP” button on remote control, or stop system by IR remote control. (7) “SLEEP” function and “TURBO” function are not compatible, that is if one of them is active, the other one cannot be activated. FU-15 Monosplit “Wall” Personal Line DC Inverter - Section 4: Control Logic Functions 4.3.3 Operation with “TURBO” function (1) This function is available in the following operation modes: Cooling mode (“COOL”) and Heating mode (“HEAT”). (2) “TURBO” function can be activated by pressing the special button (“TURBO”) on IR remote control. On remote control’s LCD Display, “TURBO” indicator will light up. (3) However, max. duration of operation in “TURBO” mode is limited to 20 minutes since “TURBO” mode is selected. At the end of this time interval, “TURBO” function will be automatically cancelled. (4) “TURBO” function foresees “Ultra-HIGH” fixed speed of Indoor Unit’s fan, and therefore increases the volume of the air treated by Indoor Unit. It follows that comfort level (according to temperature value set by remote control) is reached within a time interval considerably reduced as regards what it occurs in normal operation. ¦“TURBO” function, by increasing indoor fan speed, inevitably involves an increase in noise level produced by Indoor Unit, therefore it is not advised during night-time, when you desire to rest or when activities you have to carry out require a silent environment. (5) If “TURBO” function has been selected, indoor fan speed cannot be changed. If you press “FAN SPEED” button, “FAN SPEED” indication on IR remote control’s LCD Display will change, but this has no effect on system and fan speed is not changed. (6) If “TURBO” function has been activated, operation frequency of compressor is set to max. allowed frequency, as it has been foreseen by the Manufacturer. (7) When “TURBO” function is cancelled, operation frequency of compressor goes back to values foreseen by the Manufacturer, according to current mode and to temperature conditions (thermal load) inside the room. (8) If “TURBO” function is active and set temperature value (Ts) is changed by remote control, this does not reset timer, which anyway foresees a max. duration of 20 minutes for “TURBO” function. (9) To cancel “TURBO” function, it is necessary to press once again “TURBO” button on remote control, or to stop system by IR remote control. (10) “TURBO” function can be activated also when starting the system, if it is programmed by “Timer On” function, which has already been described previously. (11) While system is operating in “TURBO” mode, all protection functions and diagnostic functions for malfunctions in control electronics can be activated when the foreseen conditions take place. (12) “TURBO” function and “SLEEP” function are not compatible, that is if one of them is active, the other one cannot be activated at the same time. FU-16 Monosplit “Wall” Personal Line DC Inverter - Section 4: Control Logic Functions 4.3.4 Operation by Emergency Button (1) If you press the Emergency Button placed under the Indoor Unit’s frontal panel, it is possible to start system temporarily without using IR remote control. This option is necessary if remote control’s batteries are exhausted and there is no possibility to replace them immediately, or if remote control is not available or it is malfunctioning. (2) If you press the Emergency Button when system is powered but OFF, Emergency Operation in “AUTO Mode” is selected, and air conditioner will start in the most suitable mode, according to indoor temperature conditions, at fixed set temperature of 25°C. To stop Emergency Operation, it will be sufficient to press ON/OFF button on remote control, or to press again the Emergency Button on Indoor Unit. (3) For details referred to operation in “AUTO Mode”, please refer to page FU-2 of this Technical Manual. 4.3.5 “Auto-Restart” function after a blackout (1) As it has already described previously (see “Section 1: General Information” of this Technical Manual), the system is able to restart automatically with the same settings as when the air conditioner stopped because of the blackout; therefore, it is not needed to use IR remote control. (2) Anyway, when system is restarted, the following functions and options are cancelled: a) At the end of blackout, “TIMER” setting previously selected will be cancelled and has to be set again by the User. b) At the end of blackout, “SLEEP” function, eventually active when blackout occurred, has to be expressly selected again by the User. c) At the end of blackout, “TURBO” function, eventually active when blackout, has to be expressly selected again by the User. d) At the end of blackout, “SWING” and/or “AIR FLOW” functions, eventually active when blackout occurred, have to be expressly selected again by the User. ¦In case of accidental cancellation of memory containing operation data - unusual but possible event system cannot automatically restart, therefore it will be necessary to press ON/OFF button on remote control to restore system operation. ¦Before system can restart, in any case it will be necessary to wait for 3 minutes since power is restored. This occurs as a protection function intervenes against close restarts of compressor, and foresees a min. interval (3 minutes) between each stop and next restart of compressor. FU-17 Monosplit “Wall” Personal Line DC Inverter - Section 4: Control Logic Functions 4.3.6 “Self-Check” Mode (quick autodiagnosis of malfunctions) You can reach this diagnostic mode by supplying power to the system through power supply main switch , and at the same time by keeping pressed Emergency Button on Indoor Unit. All indicators on Indoor Unit’s LED Display will light up in sequence and then go out, if no malfunctions can be diagnosed by control electronics. Otherwise, an “Error Code” (“F_”) will be shown, and at the same time “Running” LED indicator on Indoor Unit’s frontal panel will flash according to a codification depending on the detected malfunction (for an exhaustive outline, see “Section 6: Diagnostic & Maintenance” of this Technical Manual). 4.3.7 Advanced functions for diagnosis of malfunctions In case of eventual system’s operation malfunctions, the most common among them will be indicated by special “Error Codes” shown on Indoor Unit’s LED Display, and by codified flashings of “Running” indicator , placed on Indoor Unit’s frontal panel. This allows targeted and therefore quickier interventions for solving of eventual malfunctions. In case of intervention of a system protection function among those that are foreseen by control electronics, this will be indicated by special “Protection Codes” (“P_”) - which will be shown on Indoor Unit’s LED Display - and by codified flashings of “Timer” indicator , placed on Indoor Unit’s frontal panel. At the following page, some indications for malfunctions’ autodiagnosis and some protection functions integrated in these systems are described. ¦For the complete list of “Error Codes” and “Protection Codes”, for the outline of conditions that make them display and for indications on procedures and checks for problem solving, please refer to “Section 6: Diagnostic & Maintenance” of this Technical Manual. FU-18 Monosplit “Wall” Personal Line DC Inverter - Section 4: Control Logic Functions 4.4 SOME INDICATIONS OF MALFUNCTIONS & PROTECTION FUNCTIONS 4.4.1 Malfunction of a room temperature sensor or of heat exchangers’ temperature sensor (1) In case of malfunction (breakdown or short circuit) of Indoor Unit’s room temperature (Tr) or of outdoor temperature sensor (Tao), LED Display on Indoor Unit will show the corresponding “Error Codes” (respectively: “F2” and “F6”), and system stops. (2) In case of malfunction (breakdown or short circuit) of temperature sensor on Indoor Unit’s heat exchanger (TP1), Indoor Unit’s LED Display will show the Error Code “F3”, while system keeps on operating. 4.4.2 Malfunction of communication between Indoor Unit and Outdoor Unit In case a malfunction in communication between Indoor Unit and Outdoor Unit extends for at least 3 consecutive minutes, compressor stops and Indoor Unit’s LED Display shows the Error Code “F1”. If communication between Indoor Unit and Outdoor Unit gets back to normal for at least 1 minute, Error Code disappears and system normal operation is restored. 4.4.3 Malfunction of indoor fan motor While Indoor Unit’s fan motor (PG) is operating, if control electronics detects there is no return signal from fan motor - for a time interval that changes according to indoor fan’s current speed - (that is: 1ms at “HIGH” speed, 2ms at “MED.” speed, 2.5ms at “LOW” speed, 3ms at “BREEZE” speed), a communication malfunction with indoor fan motor is diagnosed. However, this does not involve stop of system, even if LED Display on Indoor Unit shows the Error Code “F4”. If after the malfunction’s diagnosis, return signal coming from fan motor is detected, anyway the Error Code “F4” does not disappear until next stop - followed by restart - of system. If indoor fan motor speed keeps lower than 200rpm for 60 consecutive minutes, a malfunction of indoor fan motor is diagnosed; in this case, system stops and LED Displayc on Indoor Unit shows the Error Code “F4”. During quick procedure of “Self-Check” (see the previous page), no diagnosis on fan motor operation (PG) is carried out. 4.4.4 Anti-frost protection for Indoor Unit’s heat exchanger, in Cooling Mode (1) If temperature on Indoor Unit’s heat exchanger (TP1) is lower than 6°C, compressor cannot FU-19 Monosplit “Wall” Personal Line DC Inverter - Section 4: Control Logic Functions start. (2) If temperature on Indoor Unit’s heat exchanger (TP1) is lower than 1°C, compressor stops and Indoor Unit’s LED Display will show the Protection Code “P1”. (3) If temperature on Indoor Unit’s heat exchanger (TP1) is lower than 3°C, compressor’s operating frequency is at first reduced to the lowest limit foreseen by Manufacturer; afterwards, compressor stops and Indoor Unit’s LED Display will show the Protection Code “P1”. (4) If temperature on Indoor Unit’s heat exchanger (TP1) is the same or higher than 3°C, but lower than 6°C, compressor’s operating frequency cannot be increased. (5) If temperature on Indoor Unit’s heat exchanger (TP1) is the same or higher than 6°C, system’s operation gets back to normal. (6) If Protection Code “P1” is shown for at least 1 minute, and at the end of this time interval, the conditions for anti-frost protection intervention cease, system operation will gets back to normal with no need of power supply reset. 4.4.5 Protection against overtemperature on Indoor Unit’s heat exchanger, in Heating Mode (1) If temperature on Indoor Unit’s heat exchanger (TP1) is the same or higher than 48°C, compressor cannot start. (2) If temperature on Indoor Unit’s heat exchanger (TP1) is the same or higher than 73°C, compressor stops and Indoor Unit’s LED Display will show the Protection Code “PA”. (3) If temperature on Indoor Unit’s heat exchanger (TP1) is the same or higher than 63°C, compressor’s operating frequency is at first reduced to the lowest limit foreseen by Manufacturer; afterwards, compressor stops and Indoor Unit’s LED Display will show the Protection Code “PA”. (4) If temperature on Indoor Unit’s heat exchanger (TP1) is the same or higher than 52°C, but lower than 63°C, compressor’s operating frequency cannot be increased. (5) If temperature on Indoor Unit’s heat exchanger (TP1) is lower than 52°C, system operation gets back to normal. (6) If the Protection Code “PA” is shown for at least 1 minute, and at the end of this time interval, the conditions for protection intervention against heat exchanger’s overtemperature cease, system operation will get back to normal with no need of power supply reset. 4.4.6 Protection against insufficient refrigerant charge or no switching of 4-way valve (1) In case of operation in Cooling Mode: FU-20 Monosplit “Wall” Personal Line DC Inverter - Section 4: Control Logic Functions After 5 minutes of compressor’s operation (this parameter is memorized in EEPROM, and therefore it can be programmed), if temperature (TP1) detected on indoor heat exchanger is not lower than at least 5°C as regards room temperature (Tr), indoor fan motor will automatically operate at “BREEZE” (Ultra-LOW) speed. If during the next 13 minutes, temperature on indoor heat exchanger does not meet the requirement previously mentioned, compressor stops and Indoor Unit’s LED Display will show the Error Code “PH”; in this case, system’s normal operation will be restored only by a power supply reset. (2) In case of operation in Heating Mode: If temperature on Indoor Unit’s heat exchanger keeps lower than 20°C (this parameter is memorized in EEPROM and therefore it can be programmed) for 20 minutes, compressor stops and Indoor Unit’s LED Display will show the Error Code “PH”; in this case, normal operation will be restored only by stopping and restarting system. This malfunction can be detected only within the first 20 minutes after compressor ON. Therefore, if malfunction occurs, please stop and restart system [by remote control or by the Emergency Button, but only if indoor temperature (Tr) is such as to make the system automatically start in Heating mode] and control system operation during the next 20 minutes. If malfunction occurs, indoor fan will be stopped, but outlet horizontal flap will not move to closing position. FU-21 Monosplit “Wall” Personal Line DC Inverter - Section 5: Installation 5. INSTALLATION All steps of installation must be carried out according to National and local laws and rules. The following directions do not meet all possible circumstances of installation. For more information or in case of particular problems, please contact the local Distributor. SAFETY PRECAUTIONS Please read carefully the following “Safety Precautons” first then accurately execute the installation work. The precautionary points indicated herein are divided under two headings, “WARNING” and “CAUTION”. If you do not observe what is indicated in “WARNING” you may have dramatic consequences such as death or serious injuries. In the same way, there is also a possibility of serious consequences in relationship to the points listed in the “CAUTION” section as well. In either case, important safety related information is indicated, so by all means, properly observe all that is mentioned. After completing the installation, along with confirming that no abnormalities were seen from the operation tests, please explain operating methods as well as maintenance methods to the User of this equipment, based on the Owner’s Manual.Moreover, ask the Customer to keep this sheet together with the Owner’s Manual. ! WARNING ¦ This system should be applied to places as households, residences and the like. Application to other environment such as engineering shop could cause equipment malfunction. ¦ Please entrust installation to either the Company which sold you the equipment or to a professional Installer. Defects from improper installations can be the cause of water leakage, electric shocks and fires. ¦ Execute the installation accurately, based on following the Installation instructions. Again, improper installations can result in water leakage, electric shocks and fires. ¦ If an air-conditioning system of high capacity is installed in a small room, it is needed to take the necessary countermeasures to face up to the rare event that in case of refrigerant leakages, the gas concentration exceeds the threshold value. In this rare possibility, there is a risk of lack of oxygen. In order to prepare the suitable countermeasures, please call the Distributor who sold you the air conditioner. ¦ If during the Indoor Unit’s installation work the refrigerant gas leaks, it is necessary to immediately ventilate the room, as if the gas gets in contact with a heating source or fire, it becomes toxic. Confirm after the installation work that refrigerant does not leak. If coming in contact with fire or heating sources (a fan heater, a stove or movable cooking stove, etc.), refrigerant leaking in the room could generate toxic gas. ¦ For installation, confirm that the installation site can sufficiently support heavy weight. When strength is insufficient, injury can result from a falling of the Units. ¦ For electrical work, please check that a licensed Electrician executes the work while following the safety standards related to electrical equipment, and local regulations as well as the installation instructions, and that only exclusive use circuits are used. Insufficient power source circuit capacity and defective instalment execution can be the cause of electric shocks and fires. ¦ Accurately connect wiring by using the proper cable, and ensure that the external force of the cable is not conducted to the terminal connection part, through properly securing it; improper connection or securing can result in heat generation or fire. Take care to insert the electrical cables into the electric box by the bottom side (so as to avoid water that may reach the cable to enter the electric box), and accurately install the special service cover on the Unit’s panel. ¦ Improper installation can result in heat generation or fire. When setting up or moving the location of the air conditioner, do not mix air or anything other than the designated refrigerant (R410A) within the refrigerating cycle. If air enters the refrigerating circuit, compressor may break down or it may occur malfunctions and/or abnornal high pressure. ¦ For the installation, always use accessories and components authorized by the Manufacturer. If using unauthorized parts, this may result in water leaks, electric shocks, fire and/or refrigerant leaks. IN-1 Monosplit “Wall” Personal Line DC Inverter - Section 5: Installation ! CAUTION ¦ Execute proper grounding. Do not connect the ground wire to a gas pipe, water pipe, lighting rod or telephone ground wire. Improper placement of ground wires can result in electric shock. ¦ The installation of an earth leakage breaker is necessary. Not installing an earth breaker may result in electric shock. ¦ Do not install Units where there is a hazard about leakage of combustible gas. The rare event of leaked gas collecting around Units could result in explosion or fire. ¦ For the drain pipe, follow the installation instructions to ensure that it allows proper drainage. it is very important to insulate the first section (about 1 metre) of the drain hose on Indoor Unit to prevent condensation outside the piping. Inadequate discharge piping can result in water leakage and/or damages on installation site. FPRECAUTIONS TO TAKE WHEN INSTALLING R410A AIR CONDITIONERSE ¦ All the fixtures used for installing and checking the refrigerant system (gauge manifold, service hoses, and so on) must be expressly designed for this kind of appliances (see further on). ¦ As the vapor pressure of R410A refrigerant is about 1.6 times higher than R22 refrigerant at the same temperature, you need to use refrigerant copper pipes having a sufficient thickness (at least 0.8mm), depending on piping’s diameter. ¦ Never use the same fixtures that are used on systems adopting R22 refrigerant. This is due to the fact that systems adopting R410A refrigerant do not tolerate infiltrations of mineral refrigerant oil deriving from circuit with R22. That above except for vacuum pump, provided that a one-way valve has been added to the vacuum pump. This one-way valve must be able to operate in case of accidental turn off of the vacuum pump itself (i.e.: blackout) during air purge operations. ¦ In particular, the gauge manifold, the service hoses, the torque wrench (for tightening of flare connections having 1/2” and 5/8” diameters), the flaring tool and the refrigerant cylinder must be exclusively designed for R410A refrigerant. ¦ Moreover, the electronic gas leakage detector must be exclusive for HFC refrigerant (high sensitiveness type) so the same device as for R407C refrigerant can be used. ¦ All the operation of refrigerant charging must be carried out with R410A refrigerant in liquid phase. For this purpose, an electronic balance and a refrigerant cylinder with suction from its bottom are necessary. In this way, the exact amount of refrigerant in liquid phase can be charged from the bottom of charging cylinder. ¦ The liquid phase of refrigerant drawed from the cylinder for the above mentioned operations must be over 90% (in weight percentage) compared to the gaseous phase. ¦ In case of considerable refrigerant leakage from the system, avoid to do partial topping up, because the exact amount of refrigerant left inside the air conditioner’s circuit will remain unknown, definitely leading to excessive or insufficient refrigerant charge. As R410 refrigerant is a binary mixture of R32 and R125, refrigerant leakage in gaseous phase may change slightly ratio between the two components, nevertheless this does not remarkably modify the working conditions inside refrigerant circuit. ¦ In case of leakages of R410A refrigerant, it is strongly recommended to discharge - of course by recovering it - all refrigerant, and to perform all necessary steps for a new charge of refrigerant, complete and weighed out according to indications on Outdoor Unit’s label, after vacuum operation. IN-2 Monosplit “Wall” Personal Line DC Inverter - Section 5: Installation 5.1 CHECKS AND PRELIMINARY OPERATIONS ¦Before starting the installation work, be sure to have all necessary tools and materials for carrying out all different phases of procedures. ¦Check if there are all accessories sold together with Units, and then buy on site all necessary accessories and components which are not sold with the appliance. nTools and components necessary for installation (not exhaustive list): Screw drivers Drill (flat and cross-shaped) Gas leakage detector for R410 and liquid soap Tape measure Thermometer Allen keys (4 and 5mm) Cutter Assembly and disassembly. Wall cutter (65mm diameter) Making holes into the wall. Making holes for fixation plugs. Fork wrench and adjustable spanner Connection tightening. Amperometric pliers Metre: for measuring length/distance Cutter: cutting of Check of gas leakages. plastic bands. Inlet and outlet temperature on Indoor Unit. Digital or analogue Isolation resistance meter multimeter Torque wrench Opening and closing of service valves. Roller pipe cutter Deburring tool For measuring resistance, voltage and current. Pipe connection tightening. Prevention of electric shocks. For cutting of pipings. For deburring of rims. Thermometric sensor Spirit level Digital multimeter (Tester) TH WI E US T NO 410A O R D Gas leak detector lamp Electrical cables Protection cover Pipe clips Rubber pads Wiring between For covering O.U. Absorption of (when it is not used) vibrations (O. U.). Units. Putty Vinyl adhesive Refrigerant pipings tape Fixing of cables and pipes. Adhesive Flexible drain hose Finishing. For draining condensate. IR Remote Control For Models HKED 261, 351, 511, 631 X Piping connections Finishing of wall between Units. hole (I.U. side) For taping cables and pipings. IN-3 Monosplit “Wall” Personal Line DC Inverter - Section 5: Installation R410A Refrigerant Specifications Working pressures of R410A refrigerant are about 1.6 times higher than those of R22 refrigerant. For systems with R410A, it is required the use of compressors having polyester synthetic lubrication oil (POE). Mineral lubrication oil is not compatible with refrigerant circuits with R410A. Refrigerant R22 (pure) R410A (mixture) R407C (mixture) Refrigerant oil Mineral oil (SONTEX 200L) Synthetic oil (POE) Synthetic oil (POE) Pressures Factor: “1” Factor: 1.6 as regards R22 Factor: 1.1 as regards R22 Sequence (purely as an indication) of installation work Planning of works Check of refrigerant 1. Check the required refrigerant. 2. Use indicated refrigerant only. Assignment of works Installation of Indoor Units Refrigerant pipings 1. Respect specifications (min. thickness) of pipings. 2. Use new and perfectly clean pipings. 3. Carry out eventual weldings in nitrogen atmosphere. Drain hose Canalization works Insulation Installation of remote controls Wiring 1. Do not connect power supply. Base of Outdoor Unit Installation of Outdoor Unit Refrigerant pipings Pressure test Purging method Eventual additional charge 1. Pressurize with nitrogen up to 4.15 MPa. 2. After 24 hours, check if pressure value has been kept. 1. Do not purge pipings by using refrigerant. 2. Use a vacuum pump provided with a one-way valve. 1. Calculate additional amount of R410A eventually required by installation and carry out additional charge. Check of leakages Installation of service panels Test of system Delivery of system IN-4 Monosplit “Wall” Personal Line DC Inverter - Section 5: Installation ■ Refrigerant pipings 1. Use refrigerant pipings and materials designed for R410A refrigerant. 2. For min. thickness of refrigerant pipings, refer to the following table. Pipings’ diameter Φ 6.35mm Min. thickness (mm) Φ 9.52mm 0.8 Φ12.7mm 0.8 Φ15.88mm 0.8 Φ19.05mm 1.0 1.2 Note: Carry out installation of refrigerant pipings in full observance of current regulations. ■ Tools The star (*) indicates tools that have been designed for R410A refrigerant specifically. Please keep these tools separately from those that are currently used for other kind of refrigerant. Tool Specific use of tool Roller pipe cutter Cutting of refrigerant pipings. *Flare tool Piping flaring. *Torque wrench Piping connection tightening. Countersink (weldings only) Expansion (“sockets”) of pipings. Tube bender Bending of pipings. Nitrogen cylinder (gas) For welding without oxidation. Cylinders and torch Braze welding. *Gaugemanifold *Service pipings (so-called “whips”) Vacuum operations and refrigerant charge. Electronic balance ■ Connections’ seal. Pressure test. Additional charge of R410A refrigerant. Elimination of air and humidity left over in refrigerant pipings. *Vacuum pump (with one-way valve) *Electronic gas leak detector Refrigerant pipings connections. Specific for HFC. Check of leakages. Additional charge: with R410A refrigerant. Useful suggestions Check of refrigerant required by system. Before starting installation, check which refrigerant (R410A) is required by system, and get ready the materials and tools specific for refrigerant itself. Refrigerant pipings. Respect usual precautions for a professional installation of pipings, in order to prevent any possible malfunction of system. If weldings are required, take care of making them in nitrogen atmosphere, in order to prevent any oxidation inside the pipings, near welding points. Pressure test. Keep the system under pressure (4.15 MPa) with nitrogen for about 24 hours so as to make sure that refrigerant connections have a satisfactory seal. Vacuum operation. Install a one-way valve on vacuum pump, in case this device is not already foreseen on the pump itself. Additional charge. Calculate the eventual additional amount of R410A, and add refrigerant in coorect way, by using an electronic precision balance and specific service pipings. IN-5 Monosplit “Wall” Personal Line DC Inverter - Section 5: Installation 5.2 INSTALLATION OF INDOOR UNITS HKED 261, 351, 511, 631 X ¦Before starting the air conditioner, please read carefully the information in this "USER'S MANUAL". The User's Manual contains very important suggestions relatied to installation, operation and maintenance of the air conditioner and concerning your personal safety. ¦The Manufacturer accept no responsibility for the damages that may arise due to non-observance of the instructions listed in this "USER'S MANUAL". nDisposal of an old air conditioner n Disposal of the packaging of your new air ¦Before disposing an old air conditioner, please make sure it is inoperative and carry out the disposal by adopting all safety precautions. Unplug it from the power line in order to avoid risks of electric shock. ¦All the packaging materials used in the package of your new air conditioner can be disposed without any danger for the environment. conditioner ¦The cardboard may be broken or cut into small pieces and given to a Waste Paper Disposal Service. The wrapping bag made of polyethylene and the polyethylene goam pads contain no fluorochloric hydrocarbon. ¦Please remember that an air conditioner contains refrigerant fluid, requiring specialized waste disposal. ¦The valuable materials contained in the air conditioner can be recycled. Contact your local Waste Disposal Center for adequate disposal or contact your Dealer for any question. ¦All these valuable materials may be taken to a Waste Collecting Center and used again after adequate recycling. ¦Please make sure that piping of your air conditioner does not get damaged before being picked up by the relevant Waste Disposal Center. You can contribute to the protection of the environment by adopting an appropriate anti-pollution method of disposal. ¦Consult your local Authorities for the name and address of the Waste Materials Collecting Centers and Waste Paper Disposal Services nearest to your house. nGeneral warnings for safety ¦Do not operate damaged air conditioners. In case of doubt, contact your Dealer. ¦Use of air conditioner must be carried out in strict compliance with the instructions listed futher on. ¦Do not damage any parts of the air conditioner that carry refrigerant by piercing or perforating the piping with sharp or pointed objects, by crushing or twisting the tubes or scraping off the surfaces' coatings. If the refrigerant spurts out and gets into eyes, this may result in serious injuries. ¦Do not obstruct or cover the ventilation grille of the air conditioner. Do not put fingers nor insert objects into the inlet/outlet vent or into the motorized louver. ¦Do not allow children to play with the air conditioner. Children should be never allowed to sit on the Oudoor Unit. ¦The appliance is not intended for children and disabled people. They must not operate the air conditioner without supervision. ¦Electrical works must be carried out according to the local laws. If the power cable is damaged, it must be replaced by the Manufacturer or by qualified Personnel. Size of power cables and connecting wires must be adequate to the characteristics of the air conditioner (current values and power input values). ¦If fuses on the PCB are blown, they must be replaced with new fuses of the same type and size. ¦After installation, power plug should be properly disposed. ¦Exhausted batteries (infrared remote controller) should be properly disposed. ¦Always remember to unplug the air conditioner before opening the inlet grille. Never try to unplug the air conditioner by pulling off the power cable. Always grip the power plug firmly and pull it straight out of the power socket. IN-6 Monosplit “Wall” Personal Line DC Inverter - Section 5: Installation • Strictly observe the instructions provided in this Technical Manual. • The air conditioning system contains inside its circuit a refrigerant gas (R410A) under pressure. Never disconnect for any reason refrigerant pipings before recovering refrigerant first. • Never perform any improper handling on Outdoor Unit’s service valves or on Indoor Unit’s pipe unions. • Invite the Customer to keep User’s Manual within reach for convenient reference, in case of need. • In case the system’s Units are transferred and reinstalled, the User’s Manual should always be attached to the appliance. SAFETY INSTRUCTIONS ¦Please read carefully the following Safety Instructions before operating the air conditioner. ¦A strict observance of the instructions indicated in this "USER'S MANUAL" will prevent personal hurt and incidents to the User. Moreover, correct operation and long life of the system will be ensured. ¦Depending on the seriousness of potential risks and damages, the reported Instructions are classified in two types: "WARNING" and "CAUTION". A strict observance of the Instructions is required to guarantee your personal safety and the safety of the environments where the Units are installed. ¦ The following Instructions are related to the air conditioner's installation. They have been reported also in the "USER'S MANUAL", just to allow the User to check that installation has been properly carried out. If an improper installation - not corresponding to the Instructions - is verified, please contact the Dealer or the Authorized Technical Service. The User must never attempt to repair, install or perform special maintenance of system by himself. KEY OF SYMBOLS ! WARNING ¦This symbol points out the risk of serious injury or death. ! CAUTION ¦This symbol points out the risk of injury or damage to the property. ¦Prohibition. Action or procedure not allowed, with serious effects on objects and people. ! ¦Obligation. Compulsory action or procedure. The missed observance could bring serious effects on objects and people. IN-7 Monosplit “Wall” Personal Line DC Inverter - Section 5: Installation SYSTEM’S INSTALLATION ¦Never try to install this system by yourself, i.e. without the support of Technical Personnel. Never try to reapir the system by yourself. The Units’ components can be reached only by opening or removing the covering panels, and this involves exposure to high voltage. Even by disconnecting power supply, it is not always possible to avoid the risk of electric shocks. ! WARNING ¦Please always contact the Dealer or the Authorized Service Center for installation. Never attempt to install the air conditioner by yourself, because improper installation could cause electric shock, injuries, water leakage or fire. ! ¦Please always contact the Dealer or the Authorized Service Center for any servicing operation or special maintenance. Never try to repair or carry out special maintenance by yourself. Improper repair or maintenance could cause electric shock, injuries, water leakage or fire. ! nPlease confirm that installation has been carried out according to the following Prescriptions: ! WARNING ¦When installing, all possible countermeasures must be taken to avoid refrigerant leaks. If there is a high concentration of refrigerant gas in the room, oxygen lack may occur. ! ¦Do not install the air conditioner near burners, heat sources or flammable gas. This is to avoid the risk of malfunctioning, fire or explosion. ¦Ensure that a circuit breaker has been installed on the power supply line of the air conditioner, to avoid the risk of electric shocks. ! ¦When installing in a small room, countermeasures should be taken in case of a refrigerant leak exceeds the proper range (0.3kg/m3). Otherwise, it will cause asphyxia. ! ! CAUTION ¦Ensure that drain hose and drain pipe installation has been carried out correctly. Incorrect installation or maintenance will cause water leakage. ! ¦Ensure that Indoor and Outdoor Units have been properly grounded. Defective grounding could cause electric shock. ! ¦This kind of appliance needs a specific circuit breaker with proper protective devices against overcurrent and short circuits (fuses or automatic switches). IN-8 Circuit breaker (specific) ! Monosplit “Wall” Personal Line DC Inverter - Section 5: Installation ¦Always observe the operating precautions listed in the following tables. In this way, correct operation and safeguard of people, animals and objects inside the air-conditioned room will be ensured. ! WARNING ¦Use the correct voltage and frequency for power supply. 220~240V, 50Hz ¦Do not insert the air conditioner’s plug into multiple sockets or into sockets to which other appliances are connected. Do not use plug adapters. ! ¦Fully insert the plug into the power socket and make sure the connection is secure and without play. Otherwise, sparks and fire may occur. ¦Take care not to damage power cable, and do not use faulty cables. Do not put heavy objects on power supply cord. ! ¦Do not pull the plug out of the power socket by drawing the power cord. Damaging to the power cod, to the plug or to the socket may occur, and this could result in electric shock or fire generation. ¦Never turn off the air conditioner by pulling the power supply plug out of the socket. This could cause electric shock or fire. Always press the “ON/OFF” button on remote control to stop system. ¦Do not apply extension cords to power supply cable. Do not use rolled power supply cords. ¦Never touch system’s main switch, plugs, sockets and Emergency Button with wet hands. ¦If you smell something burning, immediately turn off the air conditioner by pressing “ON/ OFF” button on remote control, switch the circuit breaker to “OFF” or “0”, and contact Authorized Technical Service. ¦Do not insert any object into the air inlet or outlet of Indoor and Outdoor Units. Even if fans are stopped, they could automatically start all at once. SET TEMPERATURE (°C) FAN HIGH MED LOW AUTO COOL DRY HEAT TEMP MODE SWING ON/OFF FAN SPEED SLEEP RESET LOCK AIR DIRECTION LED DISPLAY TIMER ON TIMER OFF TURBO ! ¦You should avoid to expose your body directly to cool air supplied by Indoor Unit for a long time. ¦Do not direct airflow towards children, aged or disabled people. IN-9 Monosplit “Wall” Personal Line DC Inverter - Section 5: Installation ! CAUTION Ventilation should be operated when using at Do not use sprays near the air conditioner and the same time the air conditioner and gas burners. Insufficient ventilation may cause lack of oxygen. do not spray anything towards the appliance. ! Do not place burners near airflow supplied by Do not expose plants or animals to direct airflow of air conditioner. Indoor Unit. For preventing the risk of electric shocks, do not Ventilate the room regularly while the system is sprinkle water nor other liquid on Indoor Unit. Do not clean the Indoor Unit by water spurts. operating. Fail to follow this advice could result in lack of oxygen inside the room. ! Do not expose food, plants, animals, precise For proper performance, operate the system devices or works of art to direct airflow supplied by Indoor Unit. under the recommended temperature and humidity range. If the Indoor Unit operates beyond these conditions, malfunctions may occur or dew may drip out of Indoor Unit’s body. ! When necessary, replace fuses with new ones Do not place anything in front of Indoor Unit. of same type. Never replace a fuse by a piece of iron or copper. ! Do not put any object on Indoor Unit. On the appliance’s upper part there is an air grille that must not be obstructed. Besides, eventual objects may damage the air conditioner’s components. Heavy objects may cause the detachment of Indoor Unit from wall fixation plate. Never touch heat exchangers’ metal flaps on Indoor and Outdoor Units. This could cause hurts due to the sharp shape of flaps. IN-10 Monosplit “Wall” Personal Line DC Inverter - Section 5: Installation (1) Selection of installation site for Indoor Units HKED (261, 351, 511, 631) X n Install Indoor Units in a place having the following requirements: - The fixing surface must be able to support the Unit’s weight. - Material features of wall must not cause vibrations. - There must be no heating sources nor vapors near the Unit. - There must be no obstacles on the air inlet and outlet. - Spaces for maintenance and air circulation (inlet and outlet) must be assured. - Indoor Unit must not be exposed to direct sunlight for a long time. - Drain hose must be correctly installed, so as the condensate water can easily flow away. - Laying of cables and refrigerant pipings towards outside must be easy. - Air supplied by Indoor Unit must reach whole room. n Installation must be avoided in places where there are the following conditions (not exhaustive list): - There are sources of electromagnetic noises (TV, radio, wireless appliances) or fluorescent lamps. - Kitchens with high humidity and vapors/oil sprinkles. - There are considerable sudden changes in power supply voltage. More than 15 cm More than 12 cm More than 12 cm More than 2.3 m CAUTION Install Indoor Unit to wall, by using the fixation plate, at more than 2.3m high from the floor. (2) Piping flaring n If piping’s length is too long or its end is damaged, it is necessary to cut it by the special pipe cutter, before carrying out piping flaring. 1. Pipes’ cutting 3. Nuts’ insertion 2. Deburring “A” Flare tool Flare tooling die IN-11 4. Piping flaring • Dimension “A” Pipe diameter: 6.35 mm (1/4”) 9.52 mm (3/8”) 12.7 mm (1/2”) “A” (mm): 0.7~1.3 1.0~1.6 1.0~1.6 Monosplit “Wall” Personal Line DC Inverter - Section 5: Installation Examples of piping flaring: Correct Wrong NO OK Lean NO Crack NO Damage of flare NO Partial NO Too outside (3) Fixing of installation plate The surface to which fixing plate will be installed must be perfectly vertical. The surface to which fixing plate will be installed must be as regular as possible. The fixing surface must be able to carry the weight of Indoor Unit easily. Otherwise, Indoor Unit may detach from wall and fall down, causing injuries to people and damages to objects. Fixing surface must not amplify vibrations generated by Indoor Unit during operation. Fixing surface must not amplify noise level generated by Indoor Unit, so as not to cause acoustic resonance phenomenons. Fixing surface of plate must be in good condition, that is it must not have cracks nor marks of plaster’s detachment. Do not install fixing plate on walls from which humidity oozes. Do not install fixing plate on metal vertical panels. Do not install fixing plate on wooden vertical panels or on flammable material panels. Do not suspend Indoor Unit to a fixing plate that is installed on plasterboard wall. Select installation position of fixing plate, so as all around Indoor Unit - that is on four sides - appropriate installation and service spaces are available for installation and maintenance operations of Indoor Unit. Once installation position of fixing plate has been selected, fix the plate temporarily by a wall nail and level it horizontally by a spirit level. Previously mark by a pencil on fixing surface the points where screw anchors must be positioned for definitive fixing of plate, in order to avoid to make holes in wrong places. For definitive fixing of plate, use 6/8 screw anchors 5mm. Select screw anchor suitable for material features of fixing surface. (4) Drilling of wall • Drill a hole of about 65mm diameter on wall, by using a wall cutter (Ø65mm). Installation of sleeve for wall hole: • Drill the hole with a light incline from indoor side to outdoor side, as it is shown on Figure on the right. L 5~7mm Ø65mm • Insert the sleeve for wall hole and seal it with putty. IN-12 9 10.5 22.5 4.5 25.5 IN-13 51 43.5 37.5 Indoor Units HKED 261 X, HKED 351 X: Measures of fixing plate for wall installation Unit: cm Monosplit “Wall” Personal Line DC Inverter - Section 5: Installation IN-14 5 5 26 58 51 Indoor Units HKED 511 X, HKED 631 X: Measures of fixing plate for wall installation 25.5 Unit: cm Monosplit “Wall” Personal Line DC Inverter - Section 5: Installation Monosplit “Wall” Personal Line DC Inverter - Section 5: Installation (5) Disposal of pipings and cables a) Right-rear and left-rear outlet of pipings: ¦Take out refrigerant pipings and flexible drain hose from Indoor Unit and orient them properly according to installation needs. b) Left-side outlet of pipings: ¦In case of pipings’ outlet on left side, remove the corresponding precut part. After removing precut part, take care to remove completely eventual protrusions of plastic material on hole’s edges, as they are sharp and may damage especially power supply cable and wiring. ¦Properly orient Indoor Unit’s refrigerant pipe fittings and flexible drain hose. c) Right-side outlet of pipings: ¦In case of piping outlet on right side, remove the corresponding precut part. After removing precut part, take care to remove completely eventual protrusions of plastic material on hole’s edges, as they are sharp and may damage especially power supply cable and wiring. ¦Properly orient Indoor Unit’s refrigerant pipe fittings and flexible drain hose. Right-side direction Left-side direction Open precut part Refrigerant pipe fittings 43mm Unit’s shape . .. . . . .. .... ................................................................ .............................Wall . . . .... ... . . Precut part (right side) Rear-right direction Rear-left direction ....... ............ Note: In case of right-side or left-side outlet of refrigerant pipings, bend refrigerant pipe fittings so as to keep a distance not higher than 43mm between refrigerant pipe fittings and wall, as it is shown in the Figure. (6) Access to terminal block for wiring b) Remove cover of terminal block a) Open frontal panel Cover of terminal block Frontal panel Below the frontal panel there is electric box’s cover, which is fixed by a screw. Remove the cover’s fixing screw and then cover itself, so as to reach power supply terminal block for connection between Indoor and Outdoor Units. Press both sides of panel and lift it till reaching max. opening angle (about 60°). Never force panel more than max. opening angle. IN-15 Monosplit “Wall” Personal Line DC Inverter - Section 5: Installation Indoor Unit Drain duct Wiring between Units Housing for cables and pipings Precut part for connection on the left Precut part for connection on the right Refrigerant pipings Heat insulating material Drain hose Join pipings and cables with adhesive tape FKeep in mind the following: 1. Wiring between Indoor and Outdoor Units and drain hose, must be taped together with refrigerant pipings, by using adhesive tape. 2. The corresponding position of pipes and cables is indicated on the above Figure on the right, that is drain hose must be kept downwards, electric cables higher and refrigerant pipings on rear side. 3. In case of left-side outlet (case described at item “b)”) or rear-left outlet of pipings, fix the whole of pipings and cables to Indoor Unit by special clips. 4. This air conditioning system requires insulation of pipings and of related connection points both on gas side and liquid side, as they can both reach low temperatures or high temperatures (depending on mode) during operation. ¦Strictly tape (no air pocket must be left between connections and insulating material) connection points by using heat insulating material, and seal by adhesive tape. If you fail this precaution, condensate may form on connection points, and water may drip inside the room. Temporarily suspension of Indoor Unit on upper hooks of fixing plate: ¦Insert a spacer (wooden block or other object) between Indoor Unit and fixing plate, so as to separate the Unit’s base from the wall and get space for carrying on work. Wall (7) Fixing of Indoor Unit Indoor Unit Spacer Fixing plate Space for maintenance (8) Refrigerant pipings ¦Oil flares’ back and indoor side of flare nuts by refrigerant synthetic oil. ¦Align to pipe fittings the axis of pipings to be connected and screw flare nuts on threaded pipe union of Indoor Unit. Indoor Unit’s pipe union Piping Flare nut ¦At first tighten the connection manually as much as possible. Fork wrench Fastening torque and pipe diameter Flare nut Torque wrench LIQUID Side Refrigerant pipings 17.6 N•m (1/4") Indoor Unit’s pipe union ¦Tighten the connection definitively with a torque wrench and a spanner: IN-16 GAS Side 41.2 N•m (3/8") 53.9 N•m (1/2") Monosplit “Wall” Personal Line DC Inverter - Section 5: Installation (9) Position of drain hose ¦As regards the whole formed by wiring and refrigerant pipings, drain hose must be positioned downwards, as it has already previously said. Besides, in particular, the first portion of drain hose that is the portion which is inside Unit - must be covered by insulating material. ¦In the Figure below, some examples of incorrect installation of drain hose are shown. It is a matter of most common errors during installation phase (so they must be avoided). NO NO NO Higher than specified The drain hose tip is in water Trap ¦The connection of drain hose is on right side of Indoor Unit only. If it is necessary to extend drin hose, use a pipe in semirigid plastic material (PVC) of VP16 type, to buy separately. ¦Connect the extension by using a special fitting. Drain hose’s extension Flexible drain hose Vinyl tape (narrow) Adhesive (10) Wiring 1. Wiring between Indoor Unit and Outdoor Unit (3 cables + Ground wire: min. section of 1.5mm2 for Models 261 X and 351 X; min. section of 2.5mm2 for Models 511 X and 631 X) must start from Indoor Unit’s back and get to connection terminal block of Outdoor Unit. Use cables in accordance with to law only. 2. Terminal block can be reached by removing electric box’s protection cover - which is fixed by a screw - placed on Indoor Unit’s right side, below up-and-over panel. 3. Firmly fix cables on screw terminal blocks, and always use the special pipe clips to avoid that any traction on the cable may be sent to terminal blocks’ contacts. 4. If protection fuse on Indoor Unit is broken, replace it by a fuse which is equivalent to original one. 5. Power supply line must be for system only, that is it must not be shared with other appliances. A switch must be installed which interrupts all contacts (in opening position, min. distance between contacts must be of 3 mm). Moreover, the installation of a circuit breaker is required, with suitable calibration (10A for Models 261 X and 351 X; 16A for Models 511 X and 631 X). Passage of wiring, connection of terminals and use of wire clips 1(L) 2(N) 3 Terminal blocks [Es.: HKED (511, 631) X] 1(L) 2(N) 3 Wire clips Grommet terminals CORRECT IN-17 WRONG Monosplit “Wall” Personal Line DC Inverter - Section 5: Installation Example of wiring: “DC Inverter” Models HKED-HCND (261, 351) X Power Supply (on Indoor Unit): 1-Phase, 220~240V, 50 Hz. Calibrations of circuit breaker and power supply switch: - Models 261 X and 351 X → 10A. Min. section of power supply cables: 2 - Models 261 X and 351 X → 1.5mm . L 4 3 2(N) 1 Yellow / Green Black Indoor Unit Blue Yellow / Green Black Outdoor Unit 3 2(N) 1 Min. section of wiring between Units: 2 - Models 261 X and 351 X → 1.5mm . IN-18 Power Supply: 1-Phase, 220~240V, 50Hz Monosplit “Wall” Personal Line DC Inverter - Section 5: Installation Example of wiring: “DC Inverter” Models HKED-HCND (511, 631) X Power Supply (on Indoor Unit): 1-Phase, 220~240V, 50 Hz. Calibrations of circuit breaker and power supply switch: - Models 511 X and 631 X → 16A. Min. section of power supply cables: 2 - Models 511 X and 631 X → 2.5mm . Power Supply: 1-Phase, 220~240V, 50Hz 1 2(N) 3 Indoor Unit Yellow / Green L N 3 2(N) 1 Min. section of wiring between Units: 2 - Models 511 X and 631 X → 2.5mm . IN-19 Outdoor Unit Monosplit “Wall” Personal Line DC Inverter - Section 5: Installation (11) Definitive fixing of Indoor Unit 1. Remove the spacer. 2. Suspend Indoor Unit to upper hooks of fixing plate and move Unit left side and right side to check if it is properly fixed. 3. In the end, hold Unit on both sides firmly, and press it on the installation plate till definitive fixing. Upper hook Spacer (to be removed after finishing wiring). Lower hook (12) Final checks 1. Check way and laying of drain hose and electrical wiring. 2. Check the correspondence between wires and terminals on terminal blocks of wiring between Indoor Unit and Outdoor Unit. 3. Check heat insulation of refrigerant pipings and drain hose. 4. Check correspondance of power supply as regards plate specifications required by system. 5. Check correct water drainage through drain hose. 6. Check if Indoor Unit is fixed to wall fixing plate firmly. 7. Check if there are refrigerant leakages near refrigerant connections (Flare connections). (13) Test of system ¦Start system normally by using IR remote control. ¦The system’s test in Cooling mode is possible at room temperature not lower than 17°C. ¦The system’s test in Heating mode is possible at room temperature not higher than 31°C. nDuring the test, first check the following: 1. Is it possible to adjust room temperature as you like? 2. Is it possible to change fan speed according to comfort needs? 3. Are there abnormal noises and/or excessive vibrations coming from Indoor and/or Outdoor Units? 4. Do horizontal outlet flap and vertical louvers properly reply to impulses sent by remote control, and do they work properly in “SWING” and “AIR FLOW” modes? 5. Does air supplied by Indoor Unit reach all installation environment uniformily? 6. Does condensate water drip from Indoor Unit into the room? 7. Does temperature difference between inlet and outlet (DT) on Indoor Unit show a satisfactory performance of system? IN-20 Monosplit “Wall” Personal Line DC Inverter - Section 5: Installation 5.3 INSTALLATION OF OUTDOOR UNITS HCND 261, 351, 511, 631 X Accessories required The following accessories must be available for Outdoor Unit’s installation: Nb. Appearance Quantity Description Drain elbow Rubber pads Clip Selection of place and installation position Place and supporting surface must not amplify vibrations generated by Outdoor Unit. The supporting surface must be able to bear Outdoor Unit’s weight. Air outlet must be oriented to 90° as regards wind’s prevailing direction. Noise generated by Outdoor Unit must not disturb the neighbours. A place where condensate or defrosting water drainage do not disturb to people nor damages to objects. Installation of a concrete bed for Outdoor Unit must be possible. The projection of anchor bolts (4 x Ø8mm, or 4 x Ø10mm) for Outdoor Unit’s base, must be of about 20mm as regards concrete bed. Please keep Outdoor Unit in safety by reinforcing the fixing system, if Outdoor Unit is exposed to strong wind or it may fall because of earthquakes or exceptional climatic occurrences. The installation of a snow shelter must be possible, according to climatic recurrent conditions in the environment. Sufficient spaces must be kept free for repairing and maintenance of Unit. Splitting level differences and max. splitting distances that are foreseen for system must be observed, also by taking into consideration the position of Indoor Units which belong to the system. A power supply line has to be prepared having such features as to respect the specificatons required by system. The wires of this power line must have a section suitable to the system’s features. Besies, the power line must be provided of a power switch and circuit breaker having a calibration suitable to the system’s absorption features, that are indicated on Outdoor Unit’s plate. Models HCND 261, 351, 511, 631 X: Dimensions for installation Dimension Unit: mm Distance between Distance between centers > holes centers > holes Width Height (Max.) Depth HCND 261 X HCND 351 X 812 540 256 510 278 HCND 511 X HCND 631 X 850 605 295 505 322 Model IN-21 Monosplit “Wall” Personal Line DC Inverter - Section 5: Installation Overall view of installation 1. When chased laying is carried out of refrigerant pipings, take care to seal the ends of these refiìrigerant lines, by pinching and welding them so as to protect them from infiltrations. 2. Check if chosen pipings have such diameters and features (copper thickness) as to be suitable to Units which belong to system and to R410A refrigerant. Fixing plates Mod. HKED 261 X, 351 X Mod. HKED 511 X, 631 X Outlet direction of pipings Rear-left Rear-right Left IR Remote Control Indoor Unit Right Cover the pipings with closed cells’ insulation material, resistant to temperatures of at least 120°C. It is important that there is no air pocket between insulating material and material which wraps refrigerant pipings. Drain hose must never go up NO Finishing of installation: strictly tape insulating material that wraps refrigerant pipings, by proceeding from the bottom upwards. Outdoor Unit (Example: HCND 511 X) re Mo A Mo re tha NOTE: at least 2 of sides that are indicated in the Figure by “A”, “B” and “C” must be kept free from obstacles. n tha 30 cm D C n3 0c Mor m e th Electrical wiring an 6 0 cm Refrigerant pipings B re Mo Drain hose m n2 tha Notes: 1. If there is the risk Outdoor Unit may fall down or overturn, it is advised to install tie rods in addition to anchor bolts (4 x Ø8mm, or 4 x Ø10mm) on Indoor Unit’s base. 2. The installation of a raised bearing bed as regards ground prevents snow from piling up around Outdoor Unit, and at the same time it makes easier condensate and defrosting water drainage. 3. Take care to fix Outdoor Unit by keeping it leveled as regards horizontal surface. IN-22 Monosplit “Wall” Personal Line DC Inverter - Section 5: Installation HKED-HCND 261 X: Limits related to distances and splitting level distances Indoor Unit (HKED 261 X) L HCND 261 X H1 OR L H2 Indoor Unit (HKED 261 X) Distances and splitting level distances Item Description Unit Measure Liquid Side Piping’s diameter Ø6.35 (1/4”) Gas Side Piping’s diameter Ø9.52 (3/8”) L (one line) Splitting distance Max. 20m L Standard H2 H1 (*) m Piping’s standard distance (on liquid side) for which no additional charge is required (*) m Splitting level distance between O.U. (higher) and I.U. m Splitting level distance between O.U. (lower) and I.U. 3.5m Max. 10m Max. 10m NOTE: If splitting distance is more than 3.5m (liquid side), additional charge is: 30g/m of R410A. Refrigerant pipings 1. Selection of pipings and specifications Thermally insulate pipings on liquid side and gas side, as according to operation mode, both of them may reach low temperatures during the system’s operation. Use close cells’ insulating material, in addition to the material that already wraps the pipings, which is resistant to temperatures of at least 120°C. Piping, Liquid Side Ø6.35mm (1/4”) x 0.8mm Piping, Gas Side Ø9.52mm (3/8”) x 0.8mm IN-23 Monosplit “Wall” Personal Line DC Inverter - Section 5: Installation HKED-HCND 351 X: Limits related to distances and splitting level distances Indoor Unit (HKED 351 X) L HCND 351 X H1 OR L H2 Indoor Unit (HKED 351 X) Distances and splitting level distances Item Description Unit Measure Liquid Side Piping’s diameter Ø6.35 (1/4”) Gas Side Piping’s diameter Ø9.52 (3/8”) L (one line) Splitting distance Max. 20m L Standard H2 H1 (*) m Piping’s standard distance (on liquid side) for which no additional charge is required (*) m Splitting level distance between O.U. (higher) and I.U. m Splitting level distance between O.U. (lower) and I.U. 3.5m Max. 10m Max. 10m NOTE: If splitting distance is more than 3.5m (liquid side), additional charge is: 30g/m of R410A. Refrigerant pipings 1. Selection of pipings and specifications Thermally insulate pipings on liquid side and gas side, as according to operation mode, both of them may reach low temperatures during the system’s operation. Use close cells’ insulating material, in addition to the material that already wraps the pipings, which is resistant to temperatures of at least 120°C. Piping, Liquid Side Ø6.35mm (1/4”) x 0.8mm Piping, Gas Side Ø9.52mm (3/8”) x 0.8mm IN-24 Monosplit “Wall” Personal Line DC Inverter - Section 5: Installation HKED-HCND 511 X: Limits related to distances and splitting level distances Indoor Unit (HKED 511 X) L HCND 511 X H1 OR L H2 Indoor Unit (HKED 511 X) Distances and splitting level distances Item Description Unit Measure Liquid Side Piping’s diameter Ø6.35 (1/4”) Gas Side Piping’s diameter Ø12.7 (1/2”) L (one line) Splitting distance Max. 20m L Standard H2 H1 (*) m Piping’s standard distance (on liquid side) for which no additional charge is required (*) m Splitting level distance between O.U. (higher) and I.U. m Splitting level distance between O.U. (lower) and I.U. 4.0m Max. 10m Max. 10m NOTE: If splitting distance is more than 4.0m (liquid side), additional charge is: 30g/m of R410A. Refrigerant pipings 1. Selection of pipings and specifications Thermally insulate pipings on liquid side and gas side, as according to operation mode, both of them may reach low temperatures during the system’s operation. Use close cells’ insulating material, in addition to the material that already wraps the pipings, which is resistant to temperatures of at least 120°C. Piping, Liquid Side Ø6.35mm (1/4”) x 0.8mm Piping, Gas Side Ø12.7mm (1/2”) x 0.8mm IN-25 Monosplit “Wall” Personal Line DC Inverter - Section 5: Installation HKED-HCND 631 X: Limits related to distances and splitting level distances Indoor Unit (HKED 631 X) L HCND 631 X H1 OR L H2 Indoor Unit (HKED 631 X) Distances and splitting level distances Item Description Unit Measure Liquid Side Piping’s diameter Ø6.35 (1/4”) Gas Side Piping’s diameter Ø12.7 (1/2”) L (one line) Splitting distance Max. 20m L Standard H2 H1 (*) m Piping’s standard distance (on liquid side) for which no additional charge is required (*) m Splitting level distance between O.U. (higher) and I.U. m Splitting level distance between O.U. (lower) and I.U. 4.0m Max. 10m Max. 10m NOTE: If splitting distance is more than 4.0m (liquid side), additional charge is: 30g/m of R410A. Refrigerant pipings 1. Selection of pipings and specifications Thermally insulate pipings on liquid side and gas side, as according to operation mode, both of them may reach low temperatures during the system’s operation. Use close cells’ insulating material, in addition to the material that already wraps the pipings, which is resistant to temperatures of at least 120°C. Piping, Liquid Side Ø6.35mm (1/4”) x 0.8mm Piping, Gas Side Ø12.7mm (1/2”) x 0.8mm IN-26 Monosplit “Wall” Personal Line DC Inverter - Section 5: Installation 2. Pipings’ cutting and flaring Cut pipings according to the desired length, by using the special roller pipe cutter. After finishing operation, remove the burr from pipings‘ ends by using the deburring tool. Insert flare nut on piping before carrying out the flaring. Dimension “A” “A” Pipe diameter: 6.35 mm (1/4”) 9.52 mm (3/8”) 12.7 mm (1/2”) Flare tool Flare tooling die “A” (mm): 0.7~1.3 1.0~1.6 1.0~1.6 Example of flaring: Correct Wrong NO OK Lean NO Damage of flare NO Crack NO Partial NO Too outside 3. Esecuzione dei collegamenti frigoriferi Remember to apply refrigerant synthetic oil on flares’ back and on flare nut’s inside before fastening the flare nuts, so as to assure the connections’ tightness. Always use a tube bender for bending the pipings, and take care that radius of curvature is always wide enough, so as to avoid narrowings on pipings. Carry out connection on gas side first, and then on liquid side, as piping on gas side has a larger diameter and requires wider operation distances. CAUTION: Always centre the piping on Outdoor Units’ refrigerant fitting before screwing by hand the flare nut and carrying out definitive tightening. Neglecting this device will cause damages to flare nuts‘ threads and to refrigerant fittings. Moreover, flares will be deformed with consequent refrigerant leakages. Use a spanner for holding still the Outdoor Unit’s refrigerant fitting and avoiding its torsion. Use a torque wrench for tightening flare nuts. Respect recommended fastening torques. Piping diameter (Ø) Fastening torque Liquid side: 6.35mm (1/4”) 17.6 N•m Gas side: 9.52mm (3/8”) 41.2 N•m Gas side: 12.7mm (1/2”) 53.9 N•m 4. Installation of drain elbow on Outdoor Unit This accessory, provided with the Unit, allows connection of a drain piping for condensate or defrosting water. Avoid to install the drain elbow in places where outdoor temperatures are very low (about or lower than 0°C) for long time periods. IN-27 Monosplit “Wall” Personal Line DC Inverter - Section 5: Installation n Electric wiring The electrical work must be carred out by Authorized Technical Personnel, that observes national and local current regulations. 1. Power supply line (on Indoor Unit) must be for air conditioner only. Install a switch that interrupts all contacts ( in opening position, min. distance betwen contacts must be of 3 mm). It is required the installation of a circuit breaker with a suitable calibration (10A for Models 261 X and 351 X; 16A for Models 511 X and 631 X). 2. Ground wire and neutral wire on power supply line must be kept separately. 3. Use only copper wires and in accordance with to law. 4. Respect the correspondance between the colour of wires’ sheathings and terminal blocks’ contacts, both on Indoor and Outdoor Units. 5. Power supply specifications are the following: 1-Phase, 220~240V, 50 Hz. 6. If protection fuse on Indoor Unit is damaged, it must be replaced by another fuse of original or equivalent type. Nevertheless, first of all it is needed to look for the reasons of fuse’s damaging. 7. The min. recommended sections for cables are the following: a) Models 261 X and 351 X: 1.5mm2. a) Models 511 X and 631 X: 2.5mm2. 8. To reach Outdor Unit’s terminal block, remove protection cover (fixed by screws) placed on Outdoor Unit’s right side. The electric wiring must make a bend (a sort of “U”) before entering Outdoor Unit’s electric box. This device is for preventing infiltrations of rain. 9. Firmly fix each wire to the corresponding contact on screw terminal blocks, and always use the special wire clips to avoid eventual tractions applied to cables to be transmitted to terminal blocks’ contacts. Access to terminal blocks, terminals’ connections and use of wire clips Protection cover of terminal block. HCND 261 X, HCND 351 X Protection cover of terminal block. HCND 511 X, HCND 631 X 1(L) 2(N) 3 Terminal blocks 1(L) 2(N) 3 Wire clips Grommet terminals CORRECT IN-28 WRONG Monosplit “Wall” Personal Line DC Inverter - Section 5: Installation n Final checks Before supplying power to the system: 1. Check the correspondance between wires and terminals on terminal blocks for connection between Indoor Unit and Outdoor Unit. 2. Check heat insulation of refrigerant pipings. 3. Check if condensate and defrosting water drainage takes place properly. Check if a drain pipe has been installed on Outdoor Unit’s base. 4. Check the correspondance of power supply as regards plate specifications required by system, indicated on identifying plates of each Model. 5. Check if Outdoor Unit is fixed firmly to the supporting surface (possibly in masonry and in excellent condition) and well leveled horizontally. 6. Make sure that vacuum of refrigerant pipings and of Indoor Units’ refrigerant circuit has been carried out. Also make sure that additional charge, if required, has been carried out too. 7. Check if service valves on Outdoor Unit are completely open, both on gas and liquid sides. 8. Check if there are no leakages of refrigerant gas near refrigerant connections, by using a highsensitivity gas leak detector for HFC. n Test of system ¦Start normally the system by using IR remote control. ¦Test of system in Cooling mode is possible if room temperature is not lower than 17°C. ¦Test of system in Heating mode is possible if room temperature is not higher than 31°C. nDuring the Test, first of all check the following: 1. Is it possible to adjust room temperature according to your needs? 2. Is it possible to change fan speed as it is required by your comfort needs? 3. Are there abnormal noises and/or excessive vibrations deriving from Indoor Unit and/or Outdoor Unit? 4. Do outlet horizontal flap and vertical louvers reply properly to impulses sent by remote control, and do they move properly in “SWING” and “AIR FLOW” modes? 5. Does air supplied by Indoor Unit reach the installation environment uniformily? 6. Does condensate water drip from Indoor Unit into the room? 7. Does temperature difference between inlet and outlet (DT) on Indoor Unit show a satisfactory performance of system? IN-29 Monosplit “Wall” Personal Line DC Inverter - Section 5: Installation 5.4 VACUUM PROCEDURE AND REFRIGERANT CHARGE (1) Why vacuum operation is needed Vacuum procedure is necessary to remove the impurities, the remains of not condensable gas, the air and humidity from refrigerant circuit, by a vacuum pump (equipped of one-way valve to avoid oil infiltrations, deriving from the pump, inside refrigerant circuit, in case of accidental stop of pump during vacuum operation). As R410A refrigerant is highly insoluble in water, even a small amount of remaining humidity inside refrigerant circuit may freeze and cause the clogging of the circuit itself. (2) Vacuum procedure of refrigerant pipings a) Make sure there is no pressure inside Indoor Units and inside refrigerant pipings. This may be detected by check joint (needle valve) placed on service valve (gas side) of Outdoor Unit. b) Connect service pipings from the pump to gaugemanifold and from gaugemanifold to check joint (needle valve) placed on service valve (gas side) of Outdoor Unit. Gaugemanifold and service pipings must be of specific type for R410 A refrigerant. c) Carry out operations according to the following sequence. Start vacuum pump. Outdoor Unit Check when pressure gauge shows 0.1 MPa (-76 mmHg). Indoor Unit Liquid line Gas line Keep pump operating for at least 15 min. after pressure gauge has shown 0.1 MPa pressure (-76 mmHg). Needle valve Close low pressure valve 1 of gaugemanifold. Service pipe (for R410A) Stop vacuum pump. Charge tube (for R410A) Gaugemanifold (for R410A) Notes: (1) Do not use refrigerant pressure for expelling air from the circuit. T h e s o - c a l l e d “ p u r g i n g ” m e t h o d i s n o t a l l owe d i n conformity with current regulations. ( 2 ) N eve r o p e r a t e c o m p r e s s o r fo r c a r r y i n g o u t va c u u m operation. (3) Do not start compressor during vacuum condition. Vacuum pump (provided with a one-way valve) Charge cylinder (R410A) and electronic high-precision balance (3) Recharge of refrigerant a) Discharge completely refrigerant from the circuit (by recovering it) and carry out the vacuum as it has already been described. Do not charge refrigerant before carrying out the vacuum, as this modifies operating conditions of system and leads to excessive or insufficient charge of refrigerant. b) Keep gaugemanifold connected and connect charge cylinder which contains the refrigerant. c) Place charge cylinder on precision electronic balance, and write down its weight. This is for measuring the exact amount of refrigerant that will be introduced in the refrigerant circuit. d) Eliminate air from service piping A , by proceeding in the following way. Disconnect piping A from gaugemanifold and open valve 3 of charge cylinder, for a few seconds. Immediately connect again piping A after checking gas goes out properly through piping itself. e) Open valves 1 and 3 . Refrigerant starts flowing away from charge cylinder to refrigerant circuit. Keep charge cylinder perfectly upright. f) When free refrigerant flow stops inside refrigerant circuit, it is necessary to operate compressor by starting system in Cooling mode, till amount (weight) of refrigerant introduced inside the circuit is exactly the same of that calculated previously. g) After checking that refrigerant amount inside circuit is correct, close valve 3 . h) Disconnect charge piping from the circuit. Protect inlet of needle valve and service valves by special screw caps, by tightening them strictly. i) Check for eventual gas leakages by using a gas leakage detector specific for R410A refrigerant. j) Start the appliance and make sure it operates properly, in particular as far as working pressures (high pressure portion and low pressure portion of refrigerant circuit) and temperature difference (∆T) between inlet and outlet on Indoor Unit are concerned. IN-30 Monosplit “Wall” Personal Line DC Inverter - Section 6: Diagnostic & Maintenance 6. DIAGNOSTIC & MAINTENANCE The following table shows a series of apparent malfunctions. Carry out the checks described below before contacting Authorized Technical Service. PROBLEM ¦ After a stop, system does not immediately restart. ¦“Running” lamp flashes. PROBABLE EXPLICATION ¦Air conditioner will restart after 3 minutes have elapsed since it stopped. Wait for 3 minutes. Does it not restart? ¦Each time operation has to restart after a stop of compressor, a 3-minutes protection function intervenes to avoid damages to compressor. ¦At start of operation in Heating mode, Indoor Unit does not supply air. ¦It is necessary to wait for 2 ~ 5 minutes before air will be supplied, to allow pre-heating (funzione “HOT KEEP”) of Indoor Unit’s heat exchanger and to avoid cool air currents. ¦Indoor Unit keeps on supplying air also after stop of operation in Cooling mode. ¦In this case, indoor fan rotates slowly for some time, so as to remove humidity from heat exchanger and avoid the forming of mould. Air outlet horizontal flap closes after 30 seconds. ¦In Heating mode, Indoor Unit does not supply air for 6 - 12 minutes. ¦If outodoor temperature is low with high humidity, Unit may carry out automatic defrosting. Wait for about 15 minutes. Durong automatic defrosting, water and vapour come out from Outdoor Unit. ¦In Dry mode, Indoor Unit does not supply air. ¦Sometimes, indoor fan may be stopped to reduce the forming of condensate (possible dripping). ¦In Cooling mode, Indoor Unit emits vapour. ¦This phenomenon may occur if indoor temperature and relative humidity are very high, and ends when temperature and humidity decrease. ¦ Indoor Unit emits a disagreeable smell. ¦Indoor Unit treats air inside the room and may absorb odours eventually present in the environment (for example: tobacco, beauty products, etc.). ¦Gurgling or hissing sounds comes out of Indoor Unit. ¦This is not a malfunction. These sounds are due to refrigerant flowing inside circuit, and are more frequent at start and/or stop of system. ¦Creaking sounds are heard after a system’s stop, or after disconnecting the plug from the power socket. ¦This occurs after thermal expansion of Indoor Unit’s plastic parts and is not a malfunction. ¦ After a blackout, system cannot restart automatically. ¦Microcomputer memory has been reset. Use remote control to restore system’s operation. ¦Signals sent by remote control are not received by Indoor Unit. No “beep” sound is heard coming from the buzzer on Indoor Unit. ¦Condensate forms on Indoor Unit’s air outlets. ¦If signal receiver on Indoor Unit is exposed to direct sunlight or to strong lighting, it is possible that signals sent by remote control are not received. ¦If there are obstacles in front of IR receiver on Indoor Unit, please remove these obstacles. ¦This occurs if system works for a long time in Cooling mode or in Dry mode in environments where humidity is very high. DM-1 Monosplit “Wall” Personal Line DC Inverter - Section 6: Diagnostic & Maintenance 6.1 AUTODIAGNOSIS OF MALFUNCTIONS: ERROR CODES ON INDOOR UNIT Error Codes (Autodiagnosis’ Functions) 2-digits Display (Code) F1 F2 F3 F4 “Running” LED (Status) Flashing (once) Flashing (twice) Flashing (3 times) Flashing (4 times) “Timer” LED (Status) ON ON ON ON Description Cause of malfunction. What it should be checked. Communication’s malfunction 1. Check wiring between Indoor Unit and Outdoor Unit (both power supply lines and communication line). 2. Measure the voltage between Earthing and communication line: the detected value should be 18~30V AC. Check if communication circuits on Indoor and Outdoor Units’ Control PCB are damaged: in this case, it is needed to replace one or both PCB. 3. Check if LED on Outdoor Unit‘s power supply PCB is ON: otherwise, it is needed to replace the PCB. 4. Check if there are sources of electromagnetic noises near the Units: in this case, it is necessary to remove these sources. Malfunction of Tr sensor (room temp.) 1. Measure resistance value [*] of Tr sensor. At temperature of 25°C, this value must be of about 5kΩ. Otherwise, replace Tr sensor. 2. Check if there is a short circuit or a break on sensor’s cables and if sensor’s connector is properly connected to Indoor Unit’s PCB. Correct eventual problems that are observed. 3. If checks at previous items 1. & 2. do not solve the malfunction, sensor circuit on Indoor Unit’s PCB is damaged and it is necessary to replace the PCB. Malfunction of TP1 sensor (Indoor Unit’s heat exchanger) 1. Measure resistance value [*] of TP1 sensor. At temperature of 25°C, this value should be of about 5kΩ. Otherwise, replace TP1 sensor. 2. Check if there is a short circuit or a break on sensor’s cables and if sensor’s connector is properly connected to Indoor Unit’s PCB. Correct eventual problems that are observed. 3. If checks at previous items 1. & 2. do not solve the malfunction, the circuit of one or both sensors on Indoor Unit’s PCB is damaged and it is necessary to replace the PCB. Malfunction of indoor fan motor 1. Check if output cable connectors of fan motor are properly inserted on corresponding bases on PCB. 2. Check if indoor fan motor is not damaged. Replace it, if necessary. 3. On Indoor Unit’s PCB, check if Control CPU and other components are not damaged. If necessary, replace the damaged component or the PCB. DM-2 Monosplit “Wall” Personal Line DC Inverter - Section 6: Diagnostic & Maintenance Error Codes (Autodiagnosis’ Functions) 2-digits Display (Code) F5 F6 F7 F8 “Running” LED (Status) Flashing (5 times) Flashing (6 times) Flashing (7 times) Flashing (8 times) “Timer” LED (Status) ON ON ON ON Description Cause of malfunction. What it should be checked. Malfunction of IPM Module 1. Check compressor’s wiring. Correct eventual malfunctions that are observed. 2. Check if heatsink is firmly fixed to power transistor. Eventually, apply thermal conductor compound between heatsink and transistor. 3. Inspect compressor (windings, mechanical part, etc.): in case of malfunctions, replace it. 4. Inspect IPM Module (“Intelligent Power Module”): in case of malfunctions, replace it. Malfunction of Tao sensor (outdoor air temp.) 1. Measure resistance value [*] of Tao sensor. At temperature of 25°C, this value should be of about 10kΩ. Otherwise, replace Tao sensor. 2. Check if there is a short circuit or a break on sensor’s cables and if sensor’s connector is properly connected to Indoor Unit’s PCB. Correct eventual problems that are observed. 3. If checks at previous items 1. & 2. do not solve the malfunction, sensor circuit on Indoor Unit’s PCB is damaged and it is necessary to replace the PCB. Malfunction of TP2 sensor (Outdoor Unit’s heat exchanger) 1. Measure resistance value [*] of TP2 sensor. At temperature of 25°C, this value should be of about 10kΩ. Otherwise, replace TP2 sensor. 2. Check if there is a short circuit or a break on sensors’ cables and if connectors of both sensors are properly connected to Indoor Unit‘s PCB. Correct eventual problems that are observed. 3. If checks at previous items 1. & 2. do not solve the malfunction, the circuit of one or both sensors on Indoor Unit’s PCB is damaged and it is necessary to replace the PCB. Malfunction of Tsc sensor (suction pipe) 1. If there is Tsc sensor, measure the resistance [*] of it. At temperature of 25°C, this value should be of about 10kΩ. Otherwise, replace Tsc sensor. 2. Check if there is a short circuit or a break on sensors’ cables and if connectors on both sensors are properly connected to Indoor Unit‘s PCB. Correct eventual problems that are observed. 3. If checks at previous items 1. & 2. do not solve the malfunction, the circuit of one or both sensors on Indoor Unit’s PCB is damaged and it is necessary to replace the PCB. DM-3 Monosplit “Wall” Personal Line DC Inverter - Section 6: Diagnostic & Maintenance Error Codes (Autodiagnosis’ Functions) 2-digits Display (Code) “Running” LED (Status) F9 Flashing (9 times) FA Flashing (10 times) FC FF Flashing (11 times) Flashing (14 times) “Timer” LED (Status) Description Cause of malfunction. What it should be checked. ON Malfunction of Tdc sensor (discharge pipe) 1. Measure resistance [*] of Tdc sensor, and check if the detected value corresponds to what it is indicated in R-T Tables for the considered Model od Outdoor Unit. Otherwise, replace Tdc sensor. 2. Check if there is a short circuit or a break on sensor’s cables and if sensor’s connector is properly connected to Indoor Unit’s PCB. Correct eventual problems that are observed. 3. If checks at previous items 1. & 2. do not solve the malfunction, sensor’s circuit on Indoor Unit’s PCB is damaged and it is necessary to replace the PCB. ON Malfunction voltage/circuit of reactor (Outdoor Unit) 1. Check if there are voltage malfunctions in reactor input. 2. Check if there is a break on reactor’s circuit. Malfunction of compressor (Outdoor Unit) 1. Disconnect and connect system again, then check if compressor operation has got back to normal. 2. Check wiring to compressor: correct/restore connections if necessary. 3. Check if there are damaged components on Outdoor Unit’s PCB: if necessary, replace damaged components or replace PCB. Other malfunctions 1. Check if working pressures in refrigerant circuit are normal. Are there refrigerant leakages from circuit? 2. Check if indoor heat exchanger’s temperature sensors are properly placed in the sockets. 3. Check operation of 4-way valve: does it work properly? ON ON Note [*]: R-T Tables about sensors’ resistance values, according to temperature, are shown in“Section 3: Electrical Data” of this Technical Manual. DM-4 Monosplit “Wall” Personal Line DC Inverter - Section 6: Diagnostic & Maintenance Protection Codes (Protection Functions) 2-digits Display (Code) P1 P2 P3 P4 P5 P6 P7 “Running” LED (Status) ON ON ON ON ON ON ON “Timer” LED (Status) Description Cause of malfunction. What it should be checked. Flashing (once) Anti-frost protection (I.U.) 1. Inspect air inlet filters (Indoor Unit): are they obstructed by dust or dirt? If necessary, clean the filters. 2. Check if air circulation around Indoor Unit is blocked by obstacles: if necessary, remove obstacles. 3. Check if fan motor on Indoor Unit works properly. If it does not work properly, check wiring of fan motor and if necessary, replace fan motor or Indoor Unit’s PCB. Flashing (twice) Overtemperature protection for IPM Module / Overcurrent protection 1. Check if heatsink is properly fixed to power transistor. 2. Check if compressor is not damaged: otherwise, replace it. 3. Check if IPM Module (“Intelligent Power Module”) is not damaged: otherwise, replace it. Flashing (3 times) Input overcurrent (AC) to frequency converter 1. Check if temperature conditions near Outdoor Unit are beyond higher limit of operation temperatures’ range. 2. Check if current sensor circuit is not damaged: otherwise, replace the PCB. Flashing (4 times) Overtemperature on compressor discharge (Tdc) 1. Check if working pressures inside refrigerant circuit are normal. 2. Check if R-T features [*] of Tdc sensor are correct, if sensor’s cables are OK and if sensor’s circuit is not damaged. Flashing (5 times) Overtemperature of compressor 1. Check if working pressures inside refrigerant circuit are normal. 2. Check wiring of bimetallic switch, verify if circuit is not open and if component’s circuit on PCB is not damaged. Flashing (6 times) Overtemperature on compressor suction (Tsc) 1. Check if working pressures inside refrigerant circuit are normal. 2. Check if R-T features [*] of Tsc sensor are correct, if sensor’s cables are OK and if sensor’s circuit is not damaged. Flashing (7 times) Power supply malfunction: too high / too low voltage 1. Check if power supply voltage is within the range 165~265V AC. 2. Check if circuit for voltage survey on IPM Module is not damaged: otherwise, replace Inverter PCB and/or Control PCB. DM-5 Monosplit “Wall” Personal Line DC Inverter - Section 6: Diagnostic & Maintenance Protection Codes (Protection Functions) 2-digits Display (Code) PA PC PH “Running” LED (Status) ON ON ON “Timer” LED (Status) Description Cause of malfunction. What it should be checked. Flashing (10 times) 1. Check if Indoor Unit’s heat exchanger is Overtemperature obstructed. on Indoor Unit’s 2. Check if thermal load is too high. heat exchanger 3. Check R-T values [*] of TP1 sensor and (in Heating mode) corresponding cables. Flashing (11 times) Outdoor air overtemperature (Tao) protection 1. Check outdoor temperature conditions. Are there heat sources near Outdoor Unit? Is Outdoor Unit exposed to sunlight even during the warmest hours of day? 2. Check R-T values [*] of Tao sensor and corresponding cables. Flashing (12 times) Insufficient charge protection / 4-way valve switching malfunction protection 1. Check working pressures inside refrigerant circuit. 2. Check if there are eventual refrigerant leakages and eliminate them. Fill up with R410A. 3. Check if 4-way valve works properly in switching from Heating mode to Cooling mode and vice versa. Note [*]: R-T Tables of sensors’ resistance values, according to temperature, are shown in “Section 3: Electrical Data” of this Technical Manual. DM-6 Monosplit “Wall” Personal Line DC Inverter - Section 6: Diagnostic & Maintenance 6.2 FLOWCHARTS FOR MALFUNCTIONS’ SOLUTION Case 1: Malfunction of temperature sensor “Tr” [Indoor Temperature] Malfunction of Tr sensor. Check connector of Tr on PCB: is it OK? NO Connect connector. YES Measure the resistance of Tr (5kΩ, 25°C): is it OK? NO Replace Tr sensor. YES PCB (Indoor Unit) broken. Replace the PCB (Indoor Unit). Case 2: Malfunction of temperature sensor “TP1” [Indoor heat exchanger’s temperature] Malfunction of TP1 sensor. Check the connector of TP1 on PCB: is it OK? NO Connect connector. YES Measure the resistance of TP1 (5kΩ, 25°C): is it OK? NO Replace TP1 sensor. YES PCB (Indoor Unit) broken. DM-7 Replace the PCB (Indoor Unit). Monosplit “Wall” Personal Line DC Inverter - Section 6: Diagnostic & Maintenance Case 3: Only indoor fan motor does not operate Primary check (1) Is it possible to detect the power supply voltage (200~240V) between “L” and “N” on Indoor Unit’s terminal block? (2) If system operates in Cooling mode, does Indoor Unit’s fan motor operate properly? Turn off power supply once, and turn it on again. Does compressor continue to operate? YES NO Start to operate system in Cooling mode at airflow level “LOW” and wait 3 minutes. Is it possible to detect AC 220V between pin “H”/“M”/“L” and pin common, on fan motor’s connector? Replace Indoor Unit’s PCB. NO Replace fan’s bearing. NO Replace motor’s condenser. YES NO Turn off system and check if is it possible to rotate Indoor Unit’s fan by hand. Does Indoor Unit’s fan operate? NO YES Inspect condenser of fan motor: is it OK? YES YES Replace indoor fan’s motor. Fan motor operates normally. DM-8 Monosplit “Wall” Personal Line DC Inverter - Section 6: Diagnostic & Maintenance Case 4: Compressor does not operate Primary check (1) Is room temperature (Tr) higher than preset temperature (Ts), in Cooling operation? (2) Are crossover cables between Indoor Unit and Outdoor Unit connected properly? Turn on power supply. NO Does “Running” LED light up? Check power supply. YES Is it possible that 3-minutes’ protection (compressor restart) is active? Do R-T values of room sensor (Tr) and heat exchanger sensor (TP1) correspond to values shown on the Table? NO YES YES Wait for 3 minutes. Is it possible to detect AC 220-240V on compressor’s power supply phases? PCB is defective or Indoor Unit’s CPU is defective. NO NO Room sensor (Tr) or heat exchanger sensor (TP1) is defective. Replace room sensor (Tr) or heat exchanger sensor (TP1). Replace the PCB. YES Is compressor’s wiring OK? NO Rewire or replace defective cords. YES Is compressor motor winding OK? NO Compressor is defective. Replace compressor. Condenser is defective. Replace condenser. Overload relay is defective. Replace overload relay. Compressor is defective. Replace compressor. Gas shortage (Gas leak). Search for leakages. Vacuum and charge. YES Is condenser for compressor OK? NO YES Is overload relay OK? NO YES Does compressor start? NO YES Does compressor stop after a while? YES Is amount of R410A refrigerant correct? NO YES Compressor is defective. YES DM-9 Replace compressor. Monosplit “Wall” Personal Line DC Inverter - Section 6: Diagnostic & Maintenance Case 5: Indoor Unit does not receive signals from remote control Primary check (1) No “beep” is heard from Indoor Unit to indicate remote control’s receiving signals. (2) On Indoor Unit, “Running” LED does not light up. 1) Press ON/OFF button on remote control. 2) Press “LAMP” button. Are LCD indicators on remote control’s display OK? NO YES Is IR receiver exposed to direct sunlight? YES Press “RST” button on remote control’s back. YES NO Are there light sources (fluorescent lamps) nearby? NO NO Does Indoor Unit operate when moving remote control near IR receiver on I.U.? YES YES NO Press ON/OFF button on remote control. Press “LAMP” button. Batteries are exhausted. Are LCD indicators on remote control’s display OK? Does “Autorestart” function start Unit? NO YES YES NO Is radio sound affected by remote control when a signal is transmitted at a distance of 5 cm from radio? Does Indoor Unit beep and operate? YES NO YES IR remote control is defective. Infrared PCB is defective. Avoid to expose IR receiver to direct sunlight. Keep fluorescent lamps away from IR receiver. Replace Infrared PCB. DM-10 Replace batteries. All is OK. Replace remote control. Monosplit “Wall” Personal Line DC Inverter - Section 6: Diagnostic & Maintenance Case 6: Indoor Unit does not operate A malfunction occurs. NO Is the power applied to the Unit? Is Indoor Unit’s Display normal? YES Check power supply cables and interconnection wires. NO YES Does Outdoor Unit operate? Is power supply normal? Check the voltage between “L” & “N” of terminal block. YES NO Check interconnection wires between Indoor Unit and Outdoor Unit. YES Check: cables and compressor condenser. Check compressor. Is operation OK? NO Press ON/OFF button on IR remote control. YES Does Indoor Unit operate? NO Check Error Codes on Tables. YES Does the beeper beep? Normal. NO YES NO Is Indoor Unit’s display OFF? Is remote control OK? NO YES YES Press “LAMP” button on remote control: Display is still OFF? YES Check PCB Display’s wiring on control PCB of Indoor Unit. IR remote control is defective. Is Indoor Unit’s Control PCB OK? NO Replace Control PCB. DM-11 Monosplit “Wall” Personal Line DC Inverter - Section 6: Diagnostic & Maintenance Case 7: Indoor Unit and Outdoor Unit do not operate Indoor Unit and Outdoor Unit do not operate. Does the electric switch cut off after a few minutes? Does the electric switch cut off? Reconnect the wires. Are interconnection wires between Indoor Unit and Outdoor Unit OK? NO Make the power supply on. Replace remote control. Does system operate? YES The problem is solved. NO YES Find the reason and YES solve the problem. NO YES YES YES Is the power supply no problem? Is the insulation of Indoor Unit and Outdoor Unit no problem? Press Emergency button. Does system operate? YES Replace Display’s IR receiver. NO Does the fuse of Indoor Unit’s PCB burn out? NO YES YES Replace the fuse. NO Replace the failure component. NO Is the resistance of each main component no problem? Does the transformer has output? NO Transformer must be replaced. YES YES Is there 12V and 5V voltage on Indoor Unit’s PCB? YES Normal operation. DM-12 NO Replace the PCB. Monosplit “Wall” Personal Line DC Inverter - Section 6: Diagnostic & Maintenance 6.3 CLEANING & MAINTENANCE OF AIR CONDITIONER Cleaning of air filters (high-efficiency, net type) CAUTION Before beginning cleaning operations: 1. Stop system by pressing ON/OFF button on remote control. 2. Move main power switch on “OFF” or “0”. 3. Pull out the plug from power socket. 4. To reach Indoor Unit, use a stepladder of other appropriate bearing strong enough to ensure your safety. If air filters, of net type, are blocked by dirt or dust, performances of system in Cooling mode or in Heating mode will be affected. At the same time, electric absorptions and noise level during operation of system will be increased. Therefore, air filters must be cleaned regularly (at least every 2 weeks). To carry out the cleaning correctly, observe the following Instructions or contact Authorized Technical Service. 1) Remove air filters from Indoor Unit. Gently press on both sides and bottom of frontal panel, Frontal panel Figure 1 then pull the panel towards you (see Figure 1) till max. opening. Opening angle of frontal panel must never be more than 60°. Gently lift each filter and remove it by pulling it towards you (Figure 2). WARNING Figure 2 Figure 3 After removing the filters, take care not to touch metal parts below (sharp fins of heat exchanger), as there is the risk of injuries. 2) Cleaning and drying of Indoor Unit’s air filters Clean air filters by using a vacuum cleaner. Select min. power. If filters are very dirty, wash them in lukewarm water (max. 30°C): see Figure 3). Dry filters in shaded place and away from heat sources. Do not exert too much force in pulling and stretching filters. 3) Reinstalling of air filters on Indoor Unit Do not start system if Indoor Unit has no filter or if air filters are damaged. This makes foreign bodies enter Indoor Unit and causes deposit of dust and other impurities on heat exchanger, with possible damages to mechanical moving parts placed inside Unit. DM-13 Monosplit “Wall” Personal Line DC Inverter - Section 6: Diagnostic & Maintenance Cleaning of Indoor Unit and Remote Control CAUTION Before beginning cleaning operations: 1. Stop system by pressing ON/OFF button on remote control. 2. Move main power switch on “OFF” or “0”. 3. Pull out the plug from power socket. 4. To reach Indoor Unit, use a stepladder of other appropriate bearing strong enough to ensure your safety. For cleaning of Indoor Unit and Remote Control, use a soft and dry cloth, or a vacuum cleaner by adjusting it at min. power. If Indoor Unit is very dirty, use a cloth soaked in lukewarm water (about 30°C) and neutral detergent. Wash with clean water and dry well, as the presence of humidity on Indoor Unit’s inlet grille may cause electric shocks. CAUTION er ov em nr i a St NO! Never use water for cleaning inside parts. If water enters inside, insulation system may be damaged, with consequent risk of electric shocks. For cleaning of Remote Control, never use clothes soaked in water. For cleaning of Units, never use petrol, thinner, polishing Thinner powder or any similar solvents, etc. In general, chemical products may crack or deform the NO! plastic and painted surfaces of Units. Notes: For cleaning of Indoor Unit, do not use abrasive sponges, thus avoiding to scratch Indoor Unit’s surfaces. If Indoor Unit’s frontal panel is open or has been removed, do not touch aluminium fins of heat exchanger, as fins’ profile is sharp. Do not expose Indoor Unit‘s grille or the Indoor Unit itself to direct sunlight, to avoid discolouring or deformation. Outdoor Unit’s cleaning Check regularly that air inlet and outlet on Outdoor Unit are not obstructed by dust or any other impurites. Any extraordinary cleaning or maintenance intervention on Outdoor Unit, must be always carried out by Authorized Technical Service. DM-14 Monosplit “Wall” Personal Line DC Inverter - Section 6: Diagnostic & Maintenance Ordinary maintenance: at the beginning of season At the beginning of each season or after a long period during which the system has not been used, carry out the following checks: 1. Air inlet and outlet must be free from obstacles Carry out this check both on Indoor Unit and on Outdoor Unit. 2. Fixing devices on Units must allow a safety operation Fixing devices may be subject to corrosion and must be checked regularly to prevent any possible collapse of Units. 3. Grounding Wires Grounding wires must be carried out professionally. This is essential for correct operation of system and for Safety. CAUTION In case of incorrect Grounding wires, there is the risk of electric shocks 4. Air filters on Indoor Unit If air filters have been removed or are damaged, reinstall them and eventually replace them. Filters must be cleaned at the beginning of each season. 5. Batteries of IR remote control Batteries that are previously removed must be fitted again into remote control after checking they are charged. 6. Power supply of system Supply power to the system a few hours before starting it, by inserting the plug into the power socket and moving main switch to “ON” or “I”. At the end of this time, it is possible to start system’s operation by pressing ON/OFF button on remote control. DM-15 Monosplit “Wall” Personal Line DC Inverter - Section 6: Diagnostic & Maintenance Ordinary maintenance: at the end of season At the end of each season, if you foresee a period during which the air conditioner is not used, please carry out the following devices: 1. Remove remaining humidity from Indoor Unit Operate system for some hours, by selecting “FAN” only mode and “HIGH” fan speed. This may allow to remove remaining humidity from Indoor Unit, and reduce the risk of forming of mould and bad smells during time when system is not used. 2. About 2 hours Disconnect the system Stop the system by pressing “ON/OFF” on remote control. Move power supply main switch to “OFF” or “0”. Disconnect the plug from the power socket. ! 3. Remove, clean and reinsert air filters on Indoor Unit In this way, Indoor Unit will be ready for use in following season. 4. Clean Indoor Unit and Outdoor Unit Clean Indoor Unit and Outdoor Unit as it has already been explained previously. In particular, protect Outdoor Unit by a waterproof cover that can be easily found on the market. 5. Remove batteries from IR remote control Carry out this operation so as to prevent acid from coming out of batteries themselves. Acid may damage contacts inside battery case. DM-16 Monosplit “Wall” Personal Line DC Inverter - Notes Notes Notes-1 Monosplit “Wall” Personal Line DC Inverter - Notes Notes Notes-2 Monosplit “Wall” Personal Line DC Inverter - Notes Notes Notes-3 Monosplit “Wall” Personal Line DC Inverter - Notes Notes Notes-4 Monosplit “Wall” Personal Line DC Inverter - Notes Notes Notes-5 HOKKAIDO ITALIA SRL 14, Via della Salute 40132 Bologna - Italy Tel. +39.051.41.33.111 Fax +39.051.41.33.146 www.hokkaido.it Due to on-going technological development of Products by Manufacturer, we reserve the right to vary the technical specifications at any time wothout notice.