1
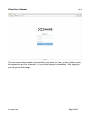
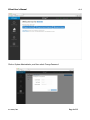
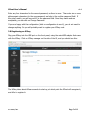
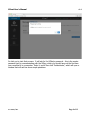
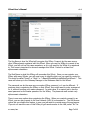
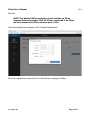
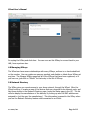
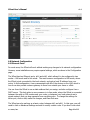
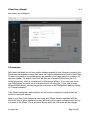
TM
User's Manual
TM
All contents copyright (c) 2015 x.o.ware, inc. XOnet and XOWARE are trademarks of x.o.ware, inc.
www.xoware.com
v1.0
XOnet User's Manual
v1.0
1. Basic Stuff
The XOnet VPEx Gateway provides secure encrypted access to a home network and the
Internet from anywhere in the world. The XOnet is designed to work with the x.o.ware XOkey
USB crypto, which creates a private tunnel from any open network, back to wherever the
XOnet is.
2.0 Initial Setup
For most installations, the XOnet does not require much configuration. Follow these steps for
the simplest configuration:
1. Connect the included Ethernet cable from the jack marked “eth1” on the rear panel to an
Ethernet port on your router (or a switch on your local network).
2. Plug the included AC adapter into the micro-USB connector on the rear panel (and into an
AC outlet).
This configuration relies on a DHCP server on the network that will assign the XOnet an
Internet (IP) address. You can change the address assigned to eth1 once you have access to
it, or access it via eth2, which has the default address of 192.168.59.1 (note that some early
versions of XOnet firmware used 192.168.2.1 as the default address for eth2, but we changed
it after discovering that many people had other networks with that address).
Once the XOnet has been connected to your local network and powered up for at least fifteen
seconds or so, you should be able to access its User Interface (UI) from any browser at
http://xonet.local. Note that if you power cycle the XOnet, and it is assigned a new IP
address by your router, your browser may not find it at that address. If this happens, you
can either use a different browser (which has not stored the address in its cache), or find out
the address your router has assigned to it, in its DHCP clients listing (more work).
When you are able to connect to the XOnet's UI, you should see this:
x.o.ware, inc.
Page 2 of 13
XOnet User's Manual
v1.0
The user name is always admin (case sensitive), and when it is new (or after a factory reset),
the password is any four characters. So you should change it immediately. After logging in,
you will get the status page:
x.o.ware, inc.
Page 3 of 13
XOnet User's Manual
v1.0
Click on System Administrator, and then select Change Password.
x.o.ware, inc.
Page 4 of 13
XOnet User's Manual
v1.0
Enter any four characters for the current password, as there is none. Then enter six or more
alphanumeric characters for the new password, and also in the confirm password field. If
they don't match, you will see red X's in the password field. Once they match and are
acceptable, you can click on Change Password.
If you are happy with the configuration (click on configuration to see it), you do not need to
change anything. So you will probably want to register your XOkey next.
3.0 Registering an XOkey
Plug your XOkey into the USB port on the front panel, using the microUSB adapter that came
with the XOkey. Click on XOkey manager on the side of the UI, and you should see this:
The XOkey takes about fifteen seconds to start up, at which point the XOnet will recognize it,
and offer to register it:
x.o.ware, inc.
Page 5 of 13
XOnet User's Manual
v1.0
So click yes to start that process. It will ask for the XOkey's password – this is the master
password just for communicating with the XOkey, which you should have set the first time
you connected it to a computer. Enter it, and it then click “Authenticate”, which will open a
window that will ask few more simple questions:
x.o.ware, inc.
Page 6 of 13
XOnet User's Manual
v1.0
The Key Name is how the XOnet will recognize this XOkey. It cannot be the same as any
other XOkey already registered with this XOnet. When you use the XOKey to connect to an
XOnet, you will not see this name anywhere, as it is only used by the XOnet it is registered
to. This name is important to whoever manages this XOnet. It must be at least four
alphanumeric characters.
The Real Name is what this XOkey will remember this XOnet. Since you can register your
XOkey with many XOnets, you will need a way to identify which one you want to connect to.
This could be called “Home” or “Work” or “<NameOfFriendWhoLetsMeUseTheirXOnet>”. This
name will show up in the Gateway Manager in the Nickname field for this XOnet.
The password can be the same as your master XOkey password, or it can be different. If
someone else is registering the XOkey on their XOnet, they might want to enter a password
for it, without knowing your master password. In most cases, it is easiest just to use the
same password as the master password for the XOkey. The password must contain only
alphanumeric characters.
There is one more option when registering the XOkey. When you remotely connect to an
XOnet, you can also connect to the local network (LAN) it is connected to. The LAN Access
option lets you disable this feature, in case you just want to provide secure Internet access.
If you do not want the user of this XOkey to get remote access to the LAN, select “No” for
x.o.ware, inc.
Page 7 of 13
XOnet User's Manual
v1.0
this field.
NOTE: This disable LAN Access feature is not available on XOnet
firmware before September 2015. All XOkeys registered to an XOnet
will have access to its LAN on versions prior to this.
Once these settings are complete, click “Complete Registration”.
When the registration process is done, it will tell you to unplug the XOkey:
x.o.ware, inc.
Page 8 of 13
XOnet User's Manual
v1.0
So unplug the XOkey and click done. You can now use this XOkey to connect back to your
LAN, from anywhere else.
4.0 Managing XOkeys
The XOnet can have secure relationships with many XOkeys, as there is no hard-coded limit
on the number. You can register as many as practical, and disable or delete those XOkeys at
any time. The Manage XOkeys page lists all of the XOkeys that have been registered, so if
you lose one, just click on “Delete” for that entry in the list of XOkeys.
5.0 Network Directory
The XOkey gives you remote access to your home network, through the XOnet. After the
XOnet boots up, it creates a map of the devices that are connected to its ethernet ports, and
lists those devices in the Network Directory page (under the Status page in the UI). The list
will also display the manufacturer of the devices, by looking up who the MAC address was
assigned to (not the user, the manufacturer). This information is passed to the XOkey when
you use the Network Directory feature while connected to an XOnet.
x.o.ware, inc.
Page 9 of 13
XOnet User's Manual
v1.0
6.0 Network Configuration
6.1 Ethernet Ports
For most users, the XOnet will work without making any changes to its network configuration.
However, some installations may require special settings, which are done in the Configuration
page.
The XOnet has two Ethernet ports, eth1 and eth2, which allows it to be configured in two
modes – LAN mode and In-line mode. The most common configuration is LAN mode, where
the XOnet is just connected to the local network, and gets a local IP address from your
router. In this configuration, it can communicate with all of the devices on the LAN, which is
how it can also provide a secure gateway to them from outside your home or office.
You can force the XOnet to use a static address that you assign, and also configure it as a
DHCP server. This last option is more common in in-line mode, where the XOnet is connected
between the cable or DSL modem and your router, or between your local network and a
private network that you keep separate from everything else. To change the settings for
either port, click on edit, make the changes, and then click save.
The XOnet can also perform as a basic router, between eth1 and eth2. In this case, you will
need to click on Advanced Settings and add or modify a static route. If you don't know what
x.o.ware, inc.
Page 10 of 13
XOnet User's Manual
v1.0
this means, don't change it.
6.2 Hostname
Since most individuals do not have a static address assigned to their Internet connection, the
XOnet must be assigned a unique host name, so it can be addressed and found by the XOkey.
To insure it is unique to the outside world, we generate a host name based on a random 16digit hex number. By default, the XOnet will also use a Dynamic DNS service (see 7.0)
hosted at vpex.org, which is operated just for XOnets and XOkeys. If you use vpex.org as
your DDNS server, you must use a host name that it will recognize. If you want to use a
different DDNS service, you can change the host name on the Configuration page by clicking
on “Change Hostname”.
If the XOnet is assigned a static address, you can set the hostname to anything that will
resolve to that static address.
Keep in mind that if you change the host name, and XOkeys that are registered with the
XOnet will have to be re-registered, as they will look for the original host name when you try
to connect to the XOnet. If you perform a factory reset, the host name will also change.
x.o.ware, inc.
Page 11 of 13
XOnet User's Manual
v1.0
7.0 Dynamic DNS (DDNS)
By default, the XOnet uses a DDNS service hosted by x.o.ware at vpex.org. The first time it is
powered up after getting its host name (either during manufacturing, or from a factory reset),
the XOnet registers the host name with vpex.org. In the Dynamic DNS configuration page
(just below Configuration on the UI), you can add a new DDNS service, but you will need to
manually register for it. Once you add a new DDNS service, you can disable the vpex.org
server.
8.0 System Administrator
8.1 Software Update
There are two ways to update the software in the XOnet: the easy way, using the x.o.ware
update server, or manually downloading and installing the new software file.
The UI of the XOnet always displays basic status at the top of the page, indicating whether
the XOnet can access the Internet, DNS servers, and if there is an update available. A green
check mark in a circle for each of those conditions indicates a true state: so if Update
Available is green, just below that is a blue button that you can click to download and install
the latest version from x.o.ware's update server.
If you have downloaded the new software image to the computer that is being used to access
the XOnet's UI, you can select that file from Software Update page, and it will be installed,
and the XOnet will automatically re-start. The whole process takes about a minute.
8.2 Change Password
This was covered as part of the initial setup, but you can change the password at any time.
It does not affect any of the XOkeys registered with it.
8.3 Export System Log
If you experience trouble using the XOnet, this function can help x.o.ware diagnose the
problem. It generates a text file that provides status information. You can ignore this if you
are not having any problems.
8.4 Factory Reset
This erases all changes you have made to the XOnet since you received it. It also assigns it a
new host name, and forces it to generate new encryption keys. When you do a factory reset,
all XOkeys that were registered will no longer connect to it – they will need to be reregistered.
x.o.ware, inc.
Page 12 of 13
XOnet User's Manual
v1.0
A Factory reset can also be performed by pushing a paper clip into the small hole on the rear
panel of the XOnet, between the micro-USB power jack and eth2, for about 20 seconds. Do
not, in either case, disconnect power from the unit until the log-in window is displayed in your
broswer.
x.o.ware, inc.
Page 13 of 13