1
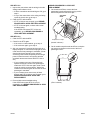
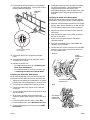
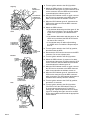
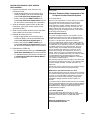
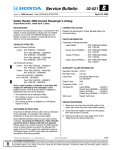
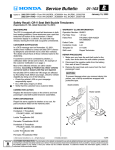
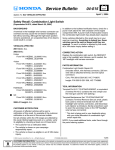
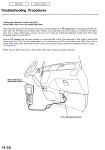
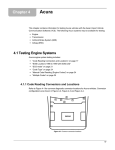
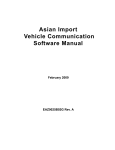
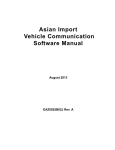
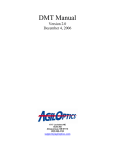
Service Bulletin
Applies To:
06-009
March 22, 2006
See VEHICLES AFFECTED
Warranty Extension: OPDS Unit or OPDS Sensor Triggers SRS
DTC(s) 15-1, 15-2, 15-3
(Supersedes 06-009, dated March 14, 2006, to update the information marked by the black bars.
Replaces 02-034, SRS Indicator Comes On with SRS DTC(s) 15-1, 15-2, 15-3, dated April 23, 2004)
BACKGROUND
2004 Civic 4-Door (U.S.-Produced) with OPDS –
Several vehicle models may have a problem with the
OPDS (occupant position detection system) that
causes the SRS indicator to stay on. Typically, one or
more of these DTCs will be set:
From VIN 1HGES....4L000001thru
1HGES....4L012089
2004 Civic 4-Door (Canada-Produced) with OPDS –
From VIN 2HGES....4H500001 thru
2HGES....4H539339
• SRS DTC 15-1 (faulty OPDS unit or OPDS not
initialized)
2003 Civic Hybrid – ALL with OPDS
• SRS DTC 15-2 (faulty side airbag indicator circuit)
• SRS DTC 15-3 (faulty OPDS sensor)
To ensure continued reliability with the OPDS,
American Honda is extending the warranty on the
OPDS unit and the OPDS sensor to 10 years or
150,000 miles, whichever occurs first.
This warranty extension does not apply to any vehicle
that has ever been declared a total loss, or any that
has been issued a salvage, branded, or similar title
under any state’s law. To check for vehicle eligibility,
you must do a VIN status inquiry.
VEHICLES AFFECTED
2004 Civic Hybrid with OPDS –
From VIN JHMES9...4S000003 thru
JHMES9...4S008085
2002–03 CR-V – ALL with OPDS
2004 CR-V (Japan-Produced) with OPDS –
From VIN JHLRD6...4C000039 thru
JHLRD6...4C003409
From VIN JHLRD7...4C000001 thru
JHLRD7...4C007839
2004 CR-V (U.K.-Produced) with OPDS –
From VIN SHSRD7...4U200007 thru
SHSRD7...4U227655
2000–01 Accord 2-Door and 4-Door – ALL with
OPDS
2003 Element – ALL with OPDS
2002 Accord 2-Door and 4-Door (U.S.-Produced) –
ALL with OPDS
2003 Pilot – ALL with OPDS
2002 Accord 2-Door and 4-Door (Japan-Produced)
with OPDS –
From VIN JHMCG5...2C000002 thru
JHMCG5...2C035622
From VIN JHMCG6...2C000414 thru
JHMCG6...2C030241
2002 Odyssey – ALL with OPDS
2004 Pilot (Canada-Produced) with OPDS –
From VIN 2HKYF1...4H500001 thru
2HKYF1...4H549091
CUSTOMER NOTIFICATION
2001–03 Civic 2-Door – ALL with OPDS
All owners of affected vehicles will be mailed a
notification of this warranty extension.
2004 Civic 2-Door –
From VIN 1HGEM2...4L000001 thru
1HGEM2...4L036872
CORRECTIVE ACTION
2002–03 Civic 3-Door (U.K.-Produced) – ALL with
OPDS
2004 Civic 3-Door (U.K.-Produced) with OPDS –
From VIN SHHEP3...4U000001 thru
SHHEP3...4U504046
Repair the vehicle as indicated by the INSPECTION
PROCEDURE. If needed, replace the OPDS unit. In
rare cases where an updated OPDS unit was already
installed, replace the OPDS sensor.
2001–03 Civic 4-Door – ALL with OPDS
© 2006 American Honda Motor Co., Inc. – All Rights Reserved
ATB 31996-32175 (0603)
1 of 7
CUSTOMER INFORMATION: The information in this bulletin is intended for use only by skilled technicians who have the proper tools, equipment,
and training to correctly and safely maintain your vehicle. These procedures should not be attempted by “do-it-yourselfers,” and you should not assume
this bulletin applies to your vehicle, or that your vehicle has the condition described. To determine whether this information applies, contact an
authorized Honda automobile dealer.
PARTS INFORMATION
OPDS Unit
2000–02 Accord 2-door:
P/N 81334-S80-A63, H/C 7639537
2000 Accord 4-door:
P/N 81334-S87-A73, H/C 7639545
2001–02 Accord 4-door (fabric seat):
P/N 81334-S84-A23, H/C 7639503
2001–02 Accord 4-door (leather seat):
P/N 81334-S87-A83, H/C 7639495
2001–02 Civic 2-door:
P/N 81334-S5P-306, H/C 7620115
WARRANTY CLAIM INFORMATION
Description
OP#
723507
FRT
SRS DTCs - Retrieve and clear
0.3
751109
Replace OPDS unit
0.3
751109
Odyssey: Replace OPDS unit
0.4
751110
Front Seat-Back Pad - Replace, includes
OPDS sensor
1.1
Failed Part:
OPDS Unit:
P/N 81334-S0K-A61
H/C 6268585
Defect Code:
5SA00
2003–04 Civic 2-door:
P/N 81334-S5P-A04, H/C 7639529
Symptom Code:
Q0800
Skill Level:
Repair Technician
2002 Civic 3-door:
P/N 81334-S5T-A03, H/C 7648447
Out of warranty: Any repairs to the SRS system for
problems other than the 15-1, 15-2, and 15-3 DTCs
that are done after warranty expiration may be eligible
for goodwill consideration by the District Parts and
Service Manager or your Zone Office. You must
request consideration, and get a decision, before
starting work.
2001–02 Civic 4-door:
P/N 81334-S5H-J12, H/C 7670805
2003–04 Civic 4-door:
P/N 81334-S5A-J04, H/C 7659873
2003 Civic Hybrid:
P/N 81334-S5B-J12, H/C 7635865
2004 Civic Hybrid:
P/N 81334-S5B-J04, H/C 7670680
2002–04 CR-V:
P/N 81334-S9A-J43, H/C 7629512
2003 Element:
P/N 81334-SCV-A72, H/C 7639511
2002 Odyssey:
P/N 81334-S0X-A03, H/C 7620123
2003–04 Pilot:
P/N 81334-S9V-A03, H/C 7621840
OPDS Sensor
Refer to the parts catalog for the applicable part
number if needed.
Seat-Back Panel Clips
Accord and Pilot only:
P/N 91566-SP0-003, H/C 3677440 (2 required)
TOOL INFORMATION
HDS with software version 2.002.006 or later, or
SCS Service Connector: T/N 07PAZ-0010100A
2 of 7
INSPECTION PROCEDURE
NOTE:
• When you check for SRS DTCs with the HDS, codes
other than 15-1, 15-2, and 15-3, are not covered by
this warranty extension bulletin. If you find other SRS
DTCs, file a claim only for the SRS DTCs - Retrieve
and clear (use operation number: 723507, defect
code: 5SA00, and symptom code: Q0800 as listed
under WARRANTY CLAIM INFORMATION).
• Other SRS codes and their repairs are not covered
by this bulletin. If the vehicle is covered by warranty,
repair it using the normal warranty repair
procedures. If the vehicle’s warranty is expired, give
your customer an estimate for the cost of the repair.
Do the appropriate inspection, based on the DTC.
SRS DTC 15-1
Clear the DTC with the HDS.
• If DTC 15-1 does not set again, go to REPAIR
PROCEDURE A: OPDS UNIT REPLACEMENT.
• If DTC 15-1 sets again, continue with normal
troubleshooting.
If the OPDS unit causes DTC 15-1 to set repeatedly,
go to REPAIR PROCEDURE A: OPDS UNIT
REPLACEMENT.
06-009
SRS DTC 15-2
1. Inspect the connections and the wiring in the side
airbag cutoff indicator circuit.
• If all the connections and the wiring are OK, go to
step 2.
• If any of the connections or the wiring are faulty,
repair the circuit, then go to step 2.
REPAIR PROCEDURE A: OPDS UNIT
REPLACEMENT
1. On Accords and Pilots, remove the front
passenger’s seat-back panel by prying out the
bottom. Replace the two lower clips.
SEAT-BACK
PANEL
2. Clear the DTC with the HDS.
• If DTC 15-2 does not set again, go to REPAIR
PROCEDURE A: OPDS UNIT REPLACEMENT.
• If DTC 15-2 sets again, continue with normal
troubleshooting.
If the OPDS unit causes DTC 15-2 to set
repeatedly, go to REPAIR PROCEDURE A:
OPDS UNIT REPLACEMENT.
SRS DTC 15-3
1. Clear the DTC with the HDS.
2. Check for the DTC again.
• If the code 15-3 does not set, go to step 3.
• If the code sets again, go to step 4.
3. Ask your customer if electrical devices such as a
laptop computer or a fluorescent map light are ever
used near the front passenger’s seat-back. (Some
electrical devices that plug into the vehicle’s
accessory power socket, especially those using a
power inverter/converter, can interfere with the
seat-back sensors and cause SRS DTC 15-3 to
set.)
• If your customer uses any of these devices,
operate the device near the front passenger’s
seat-back. If DTC 15-3 sets again, clear it, then
return the vehicle to the customer. Advise the
customer to avoid using the device near the front
passenger’s seat-back.
Replace these clips.
(Accord is shown.)
2. On all models except Accords and Pilots, unzip the
two seat cover zippers on the back of the front
passenger’s seat.
• If your customer does not use any of these
devices and DTC 15-3 does not set again, go to
REPAIR PROCEDURE A: OPDS UNIT
REPLACEMENT.
4. Proceed with normal troubleshooting.
If the OPDS unit causes DTC 15-3 to set
repeatedly, go to REPAIR PROCEDURE A: OPDS
UNIT REPLACEMENT.
06-009
(Civic is shown.)
3 of 7
3. Pull back the seat-back cover from the left side
bolster to access the OPDS unit cover.
7. Remove the mounting screws from the OPDS unit,
and gently pull out the unit.
4. Remove the OPDS unit cover from the seat frame.
LEFT SIDE
BOLSTER
OPDS UNIT
COVER
OPDS
UNIT
OPDS CONNECTORS
(Accord is shown.)
5. Check the part number of the installed OPDS unit.
• If the OPDS unit has an original part number, go
to step 6.
• If the OPDS unit has a new part number (refer to
PARTS INFORMATION) or higher, go to
REPAIR PROCEDURE B: OPDS SENSOR
REPLACEMENT.
6. Recline the seat-back to access the OPDS unit
mounting screws.
(Accord is shown.)
8. Disconnect the OPDS connectors, then remove the
OPDS unit.
9. Install a new OPDS unit, then snap on its cover.
10. Slip the seat-back cover over the OPDS unit.
11. On Accords, check the seat-back clip attachment
bosses on the seat-back panel:
• If the attachment bosses are OK, go to step 12.
• If the seat-back has a pocket, and the
attachment bosses are deformed or damaged,
do the repair procedure in S/B 02-010, SeatBack Panel Is Loose or Detached. Then go to
step 12.
• If the seat-back does not have a pocket, and the
attachment bosses are deformed or damaged,
replace the seat-back. Then go to step 12.
4 of 7
06-009
12. On Accords and Pilots, install the new seat-back
clips on the seat-back panel. Turn the clips so their
retaining tabs are horizontal.
SEAT-BACK
CLIPS
9. Follow the remaining screen prompts to complete
the OPDS initialization. If the initialization fails,
repeat the process two more times. If the
initialization fails again, check for SRS DTCs, then
troubleshoot them using the appropriate service
manual.
Initializing the OPDS Unit: Manual Mode
NOTE: Non-Honda seat covers will interfere with the
performance of the OPDS and are not recommended.
1. Adjust the front passenger’s seat-back to an upright
position, then remove anything on or near the seat.
2. Turn the ignition switch to the LOCK (0) position.
3. Connect the HDS to the vehicle’s DLC (data link
connector).
4. Keep the ignition switch in the LOCK (0) position,
and turn on the HDS.
5. At the screen prompts, enter the VIN and the
odometer reading.
6. From the Select Mode screen, select SCS, and
follow the screen prompts.
Retaining tabs should
be horizontal.
13. On Accords and Pilots, reinstall the seat-back
panel.
7. Connect the SCS service connector to the 2P MES
(memory erase signal) connector, as shown. Do
not use a jumper wire.
Accord
2P MES
CONNECTOR
(yellow)
14. On all models except Accords and Pilots, zip the
seat-back cover closed.
15. Initialize the OPDS unit.
• To initialize with the HDS, go to Initializing the
OPDS Unit: HDS Method.
• To initialize with the SCS service connector, go
to Initializing the OPDS Unit: Manual Mode.
Initializing the OPDS Unit: HDS Method
NOTE: Non-Honda seat covers will interfere with the
performance of the OPDS and are not recommended.
SCS SERVICE CONNECTOR
07PAZ-0010100
1. Adjust the front passenger’s seat-back to an upright
position, then remove anything on or near the seat.
2. Turn the ignition switch to the LOCK (0) position.
Civic
3. Connect the HDS to the vehicle’s DLC (data link
connector).
4. Turn the ignition switch to the ON (II) position, then
turn on the HDS.
5. At the screen prompts, enter the VIN and the
odometer reading. Also verify the correct date and
time.
SCS SERVICE
CONNECTOR
07PAZ-0010100
6. From the System Selection menu, select SRS.
7. From the Mode menu, select Miscellaneous Test.
8. From the Miscellaneous Test menu, select OPDS
Initialization.
06-009
2P MES
CONNECTOR
(yellow )
5 of 7
8. Turn the ignition switch to the ON (II) position.
Odyssey
2P MES
CONNECTOR
(yellow)
SCS SERVICE
CONNECTOR
07PAZ-0010100
9. Watch the SRS indicator. (It comes on for about
6 seconds and then goes off.) Disconnect the SCS
service connector from the MES connector within
4 seconds after the indicator goes off.
10. When the SRS indicator comes on again, connect
the SCS service connector to the MES connector
within 4 seconds after the indicator comes on.
11. When the SRS indicator goes off, disconnect the
SCS service connector from the MES connector
within 4 seconds.
12. Watch the SRS indicator:
• If the indicator blinks twice and then goes off, the
OPDS unit is initialized. Turn the ignition switch
to the LOCK (0) position, and disconnect the
HDS.
CR-V
• If the indicator blinks twice and then stays on, the
OPDS unit is initialized, but SRS DTCs need to
be cleared. Go to step 13.
• If the indicator stays on without first blinking,
the OPDS unit is not initialized. Repeat steps 3
thru 12.
SCS SERVICE
CONNECTOR
07PAZ-0010100
2P MES
CONNECTOR
(yellow )
Element
13. Turn the ignition switch to the LOCK (0) position,
then disconnect the HDS.
14. Reconnect the SCS service connector to the MES
connector. Do not use a jumper wire.
15. Turn the ignition switch to the ON (II) position.
2P MES
CONNECTOR
(yellow)
16. Watch the SRS indicator. (It comes on for about
6 seconds and then goes off.) Disconnect the SCS
service connector from the MES connector within
4 seconds after the indicator goes off.
17. When the SRS indicator comes on again, connect
the SCS service connector to the MES connector
within 4 seconds after the indicator comes on.
SCS
SERVICE
CONNECTOR
07PAZ-0010100
Pilot
18. When the SRS indicator goes off, disconnect the
SCS service connector from the MES connector
within 4 seconds. (The SRS indicator blinks twice to
indicate that the memory has been cleared.)
19. Turn the ignition switch to the LOCK (0) position,
and wait for 10 seconds.
20. Turn the ignition switch to the ON (II) position.
(The SRS is OK if the SRS indicator comes on
for 6 seconds and then goes off.) If the DTC
clearing fails, repeat the process two more times.
If the DTC clearing fails again, check for set SRS
DTCs, and troubleshoot them with the appropriate
service manual.
2P MES
CONNECTOR
(yellow)
SCS SERVICE
CONNECTOR
07PAZ-0010100
6 of 7
06-009
REPAIR PROCEDURE B: OPDS SENSOR
REPLACEMENT
1. Remove the seat-back cover from the front
passenger’s seat:
• Using the appropriate service manual, go to
section 20 (Body), and do the removal steps
under Front Seat Cover Replacement, or
• Online, enter keyword SEAT COVER, then
select Front Seat Cover Replacement from the
list, and do the removal steps in the procedure.
2. Slide the seat-back cushion (foam) off the seatback frame. (The OPDS sensor is built into the
seat-back cushion.)
3. Slide a new seat-back cushion over the seat-back
frame. Make sure the cushion is centered.
4. Reinstall the seat-back cover:
• Using the appropriate service manual, go to
section 20 (Body), and do the installation step
under Front Seat Cover Replacement, or
• Online, enter keyword SEAT COVER, then
select Front Seat Cover Replacement from the
list, and do the installation step in the procedure.
5. Reinitialize the OPDS unit:
• To reinitialize with the HDS, go to Initializing the
OPDS Unit: HDS Method in this service bulletin.
• To reinitialize with the SCS service connector, go
to Initializing the OPDS Unit: Manual Mode in
this service bulletin.
Example of Customer Letter
Spring 2006
Warranty Extension: Main Components of the
Occupant Position Detection System
Dear Honda Owner:
As part of our commitment to vehicle safety, your Honda
has several features that help protect you and your
passengers. One of these features is the occupant
position detection system (OPDS). Although we do not
encourage young children to ride in the front seat, the
OPDS reduces their risk of injury from an inflating side
airbag by turning off the airbag if they are out of position
and leaning toward the door.
Warranty Extension Details
To ensure the OPDS remains in top condition, we are
extending the warranty on the main components of the
system, the OPDS control unit and the OPDS sensor, to
10 years or 150,000 miles, whichever occurs first.
If the red supplemental restraint system (SRS) indicator
on the instrument panel stays on, take your vehicle to any
Honda dealer for an inspection. If there is a problem with
the OPDS control unit or the OPDS sensor, and your
vehicle is within the extended warranty time/mileage
period, the dealer will replace the control unit or the
sensor free of charge. The inspection is also free of
charge, even if there is not a problem with the OPDS
control unit or the OPDS sensor and your vehicle is within
the extended warranty time/mileage period. Other
components of the OPDS and the SRS are covered by
your vehicle’s normal warranty.
This warranty extension does not apply to any vehicle that
has ever been declared a total loss, or any that has been
issued a salvage, branded, or similar title under any
state’s law.
Please keep a copy of this letter in your glove box, along
with your vehicle’s warranty information booklet.
What to do if you feel this notice is in error
Our records show that you are the current owner or lessee
of a Honda receiving this warranty extension. If this is not
the case, or the name/address information is incorrect,
please fill out and return the enclosed, postage-paid
Information Change Card. We will then update our
records.
If you paid to have a defective OPDS control unit or OPDS
sensor replaced sometime in the past, you may be eligible
for reimbursement. Refer to the attached Instructions for
Reimbursement for eligibility requirements and the
reimbursement procedure.
If you have questions
If you have questions about this notice, or need
assistance with contacting a Honda dealer, please call
Automobile Customer Service at (800) 999-1009.
Sincerely,
American Honda Motor Co., Inc.
Honda Automobile Division
06-009
7 of 7
March 22, 2006
Dear Service Manager:
Effective immediately, Honda Motor Co., Ltd. is announcing an OPDS (occupant position detection
system) warranty extension for certain 2000–02 Accords, 2001–04 Civics, 2002–04 CR-Vs, 2003
Elements, 2002 Odysseys, and 2003–04 Pilots.
Some affected vehicles may have a problem with the OPDS that causes the SRS indicator to stay on
with one or more SRS DTCs. To ensure continued reliability with the OPDS, affected vehicles have an
extended warranty on the OPDS unit and the OPDS sensor. These parts are now covered for 10 years
or 150,000 miles, whichever occurs first.
Customer Notification
Notifications to all owners will start mailing the end of March and continue for 60 days. Since this is not
a campaign, you will not receive a campaign responsibility report. To see if a vehicle is eligible for the
OPDS extended warranty, you must do a VIN status inquiry.
Inspection/Repair Strategy
The only vehicles needing inspection and/or possible repair are those returned by customers with the
specific complaint of an SRS indicator that won’t go off. For repair, VIN, and warranty information, refer
to S/B 06-009, Warranty Extension: OPDS Unit or OPDS Sensor Triggers SRS DTCs 15-1, 15-2, 15-3.
NOTE: Whether or not a vehicle is within the extended warranty time/mileage period, the OPDS
inspection is free of charge to your customers.
Parts Information
Since this is not a campaign, the warranty extension should not cause any change in your current
OPDS unit or OPDS sensor parts demand. To help us keep enough parts in stock for open ordering,
do not order large quantities. If over-ordering causes rapid depletion of stock, ordering will be restricted
in the future.
Sincerely,
American Honda Motor Co., Inc.
Honda Automobile Division