1
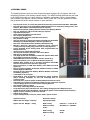
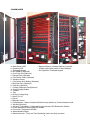
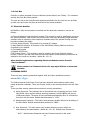
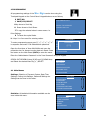
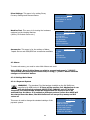
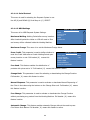
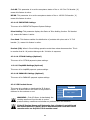
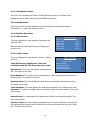
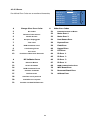
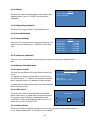
Mini-Buffet® USER’S MANUAL Version: 10.12 “SHE SELLS, YOU EARN” Headquarters & FACTORIES: Izmir Ataturk Industrial Zone M.K.Ataturk Blv.23 Cigli 35620 Izmir -TURKEY Phones : +90(0) 232-376 7300 Fax : +90(0) 232-376 7030 e-mail : [email protected] www.elektral.com.tr Contents Page INTRO 3 CONTENTS/ BEFORE USE 4 1. GENERAL DESCRIPTION 6 2. MAIN UNITS 7 2.1 Product Trays 8 2.2 Control Panel 9 2.2.1 Touch-Pad 9 2.2.2 LCD 9 2.2.3 Coin Mechanism 9 2.2.4 Change Giver Button 10 3. VENDING SAFETY 10 4. PROGRAMMING 12 4.1 Main Menu 12 4.2 Menu 13 4.2.1 Settings Main Menu 13 4.2.1.1. Payment System 13 4.2.1.1.1 Serial Protocol 14 4.2.1.1.2 MDB Settings 14 4.2.1.1.3 EXECUTIVE Settings 15 4.2.1.1.4 CC Talk Settings 15 4.2.1.1.5 impMDB Settings 15 4.2.1.1.6 PARALLEL Settings 15 4.2.1.2 IR Product Sensor 15 4.2.1.3 Cooling Unit 15 4.2.1.4 Date-Time Settings 15 4.2.1.5 Language Settings 15 4.2.1.6 Change Password 15 4.2.1.7 Illumination Settings 15 4.2.1.8. Authorizations 15 4.2.2 Statistics Main Menu 16 4.2.2.1 Total Products Sold 18 4.2.2.2 Money Amount 18 4.2.2.3 Errors 18 4.2. 2. 4 Resetting 19 4.2.2.5 Reports 19 4.2.3 Price Settings Main Menu 19 4.2.3.1 Setting Prices 19 1 4.2.3.2 Discount 19 4.2.4 Self Test 19 4.2.4.1 Motor Control 19 4.2.4.2 IR Control 19 4.2.4.3 Motor Connections (Hardware) 20 4.2.4.4 Payment System 20 4.2.4.5 Keypad 20 4.2.4.6. Relay Control 20 4.2.5 Accessories Main Menu 20 4.2.5.1. Alarm 20 4.2.5.2 GSM/GPRS 20 4.2.5.3 Impact Sensor 20 5. TECHNICAL SPECIFICATIONS AND ENERGY EFFICIENCY 20 6. TRANSPORTATION AND INSTALLATIONS 21 7. OPERATION OF MINI BUFFET 21 8. MAINTANCE & REPAIR 22 9. OPTIONAL UNITS 22 9.1 Cooling Unit 22 9.2 Additional Trays 22 9.3 SRC/SCADA Remote Controlling 23 9.4 GSM/GPRS Remote Access 23 9.5. Receipt Printer 23 9.6 Optional Heating /Conditioning 23 10. TROUBLESHOOTING 10.1 Warnings 23 10. 2 Frequently Asked Questions 23 10. 2.1 General Questions 23 10.2.2 Operational Questions 23 11. WARRANTY CONDITIONS............................................................................................................24 12. ENCLOSURES................................................................................................................................26 12.1 Menu Tree............... .......................... ....................................................................................26 2 INTRO Dear User; ELEKTRAL Inc. goes on with its research and development activities under ISO 9001:2008 QMS procedures, production in conformity with CE-European Union Norms with the strong belief that a real expansion can only be possible with a global thinking and this understanding, motivates its personnel. Our Hi-Tech products are being exported to Four Continents (Europe, Asia, America and Africa) and many different countries. Our original and OEM products are being distributed worldwide by our International Distributors. Besides that, "Elektral Worldwide Cooperation" always continue to grow. Elektral also have regular and continuous relationships with many governmental and private companies in our region. Awarded the 25th Anniversary and the Employment Growth Ratio by EBSO the Chamber of Industry with continuous R&D projects being supported by TUBITAK (Turkish Scientific Research Council). We dedicate ourselves to manufacture Top Quality, High-Tech Products in global competition. To reach our goals we are leading with our R&D activities. ELEKTRAL MINI Buffet, has been produced to service 24 hours a day with practical use which may ease your life. Elektral Products, Are produced in environment friendly facilities Cause no harm to the nature and living creatures. Made in Turkey Alterations Reserved No claims can be accepted by our firm regarding the applications of this instrument from the second or third parties. All rights are Reserved 3 CONTENTS Procedures & Safety Warnings before using the Mini Buffet Technical specifications of the Mini Buffet Installation of the Mini Buffet Mini Buffet Programming and further procedures The arrow-end lightning symbol inside the equilateral triangle informs that in the context of the product, there is enough amount of ‘uninsulated’ dangerous voltage to cause an electric shock. The exclamation mark inside the equilateral triangle informs the user that there are important instructions of usage and information inside the booklets given with the equipment. 4 Mini-Buffet® Before use and Safety Warnings Mini-Buffet® TruVEND Vending Machines are secured by three electronic PIN CODEs and two mechanic locks which only allows the owner to operate the machine. Please do not share your PIN CODE. If you forget or lose the code, get in contact with our factory premises. Mini-Buffet® Do not wet the machine. Please unplug and use only a damp cloth to clean the vending Machine. Only use the vending machine on Earthed Electrical Supply. Please carefully read the articles where you see this Warning Signal in the User’s Manual. Mini-Buffet®: With Cooling: 220 V AC ±%10 50 Hz, Without Cooling 90-260 V AC 50-60 Hz, is designed to operate between given electrical limitations. WARNING: Please follow the instructions given in the User’s Manuel. Otherwise incorrect usage can cause damage to the Vending Machine and the environment. 5 1 GENERAL USAGE The Vending Machine that you have chosen has been produced by our factory with high technology systems, and modern esthetic design. Tru-VEND Vending Machines can be used in all Public Areas such as; hotels, factories, hospitals, restaurants, clinics, movie theater, bus terminals, gas stations, doctor & lawyer offices, malls, etc. It is also possible to follow the products sold by the serial number on each machine. • • • • • • • • • • • • • • • • • • • • • • • • • • • • • • • • • • • International norms, In conformity with CE Norms and produced under ISO 9001: 2008 QMS. Fully Microprocessor Controlled MDB and EXECUTIVE protocols supporting Change Giver, Coin Selector, Bill Validator and Cashless Payment Systems. Multi-Selection Snack Vending Machine with Product Display Window Max. 14 Selections, 168 pcs Product Storage Capacity Adjustable Illumination Alarm against Vandalism and Tilt Sensor User Friendly Graphic LCD Ensures reliable operation with IR Product Sensor Easy Product Loading 3x4 User Friendly Touchpad Capacitive Keypad & Anti-Vandalism Weatherproof Metallic Keypad for Outdoor applications Real Time Time/Date Function Enabling Timetable Pricing Effective Electronic thermostat controlled energy efficiency cooling feature providing long product life (Cooling Optional) Preset timetable Power Saving Mode with programmable low temperature level Optional LCD for Digital Advertisement User Friendly Customer Interface and Control Menu High storage capacity EEPROM Very High Speed and availability of different Optional Units with 16-bit high performance processor GSM/GPRS Remote Access and Data Transfer (Telemetry) Data Transmission to PC via Bluetooth Module (Optional) Distance Data Transfer up to 1 km cable connection and RS485 interface for Master-Slave Operation (Optional) Data Transmission to USB Flash Memory with USB Host Mode (Optional) Remote Firmware Update Availability with Boot-loader for GPRS Modem Equipped Machines External SD Card, Ethernet Module, Wireless Module connection availability (Optional) Compatible to all currencies BITE (Built-in Test Equipment) automatically Fixing problems and/or Warning Messages on LCD and Collecting data on erroneous sales Enhanced Motor Control System enabling detailed functional control Adjustable Tray Selections enabling Production as per Customers requisites Compact Design Slim Line Small Location Vending Machine Easy Selection Pricing Feature Menu Entry with 4 Digit PIN Code Protection Large Dispensing Hole (140 mm) and Self Locking Swinging Product Dispensing Slot ALARM Equipped against Vandalism. 120 db Alarm against unauthorized and forced Access Highly corrosion-resistant production material Robust Steel Cabinet Project based quantity orders for custom made special vendors Physical Features Electrical Features Width: 810 mm Height: 1250 mm Operating Voltage Depth: 215 mm Weight: ~ 45 kg With Cooling : 220V AC +- %10- 50 Hz Without Cooling : 90-260 V AC – 50-60Hz Power With Cooling : 100 W Without Cooling : 20 W 6 2 MAIN PARTS a- Main Board (VMC) : Electronic Board / Vending Machine Controller b- Graphical LCD : 128x64 pixels white pixels on Blue Backlight c- Touchpad Keypad : 3x4 Capacitive Touchpad Keypad d- Bill Validator (Optional) e- Coin Entry Slot (Optional) f- Change Giver (Optional) g- Coin Return Chute (Optional) h- Vibration Sensor i- Coin Return Push Button (Optional) j- Cash Box Entry (Optional) k- Cash Box (Optional) l- Cooling Evaporator Fan(Optional) m- Power Supply Module n- Tweeter o- Tray p- Energy-Cooling Plugs r- Motors (24 V) s- Spirals t- Magnetic Sensor u- Compartment : Where Products fall before being picked up, Product dispense hole. v- Infrared (Receiver) y- Infrared ( Transmitter ) & Adjustable Light Intensity LED Illumination Module z- Power distribution board electronic module. q- Front view (Transparent LEXAN) w- Advertisement Space x- Mechanical Lock : There are Two Mechanical Locks and they are same 7 2.1 Product Trays Filling up the Vending Machine and Placing the Products to the Trays The vending machine has 12 Trays (standard). The machines with an optional cooling unit, products can be placed on bottom trays. To avoid any damage, place any breakable products to the trays close to the compartment. To load products to the Trays: • Adjust the spiral to drop the product in an easy way by pulling the spiral forward, turn and let go. • Start placing the products between Spiral Steps. • Place only one product in each section. • Select right spiral steps for your products Use Aluminum Magnet Guides both sides of the Spirals to provide a successful vending. There is the possibility to change the Spiral Selections (size/loading capacity and step of the Spirals) within available Spiral Types. Maximum number of trays can be 14 (Optional). WARNING: Placing the products in a wrong way may cause failure on dispensing the products. 8 2.2 Control Panel All operational controls can be followed on Graphic LCD Screen, Payment System and Touchpad Keypad is assembled on this panel. 2.2.1 Touchpad Keypad Being used for Selecting Products and Vending Machine Settings. It has been explained in details under programming section. IP 65 Weatherproof Anti-vandalism Metal Keypad is Optional. 2.2.2 Graphic LCD Screen All the operations are being displayed on Graphic Liquid Crystal Display-GLCD for easy usage. Will be called Screen thereafter. 2.2.3 Payment System (Optional) Coin selectors accept pre-defined coins and precede the payment process. It recognizes the domestic currency which had been programmed. The mechanism will not accept the currency which has not been defined and will be returned from the Coin Return Chute. The system has Automatic Currency Recognition feature as per the assembled Payment System. The Vending Machine which is eligible for MDB protocol can be equipped with Change Giver, Coin Selector, Bill Validator and/or a combination of Bill Validator and Change Giver, Cashless Payment Systems as per customers’ choice. Please note that the Payment System is Optional and not all Mini Buffet Vending Machines are Equipped with Payment System. 2.2.3.1 Coin Selector Only accepts coins. Can accept different type of Coins. There is No Change Function. 2.2.3.2 Change Giver There are 4 tubes (may change as per the ordered model) where the coins are being collected for change giving. The coins of the main currency which is being used at the machine are being collected in these 4 tubes to be used for pay back. The other coins of which had been defined to the machine is being sent to the Cash Box under the Change Giver Unit. 9 There are Coin Tubes with Change Giver Payment Systems. When in Operation, the Change Giver Payment System automatically sorts the coins into defined tubes else coins are collected in the cash box. When the tubes are full, coins are collected into cash box automatically. Please check Article Nr. 4.2.1.1 for settings of the Change Giver Unit. 2.2.3.3 Bill Validator Bill validator will accept only the pre-defined banknotes and precedes the payment process. It recognizes the currency which had been programmed and will return the unidentified or imitation banknotes. 2.2.3.4 Cashless (Prepaid) Payment Systems This modern application enables the regular customers shop without using Money but a Prepaid Card (Key) instead. This cashless system enables the customers load credits to their cards/keys and use their credits for Shopping on the Vending Machine. When inserted into its slot on the Vending Machine, the available credit of the User is displayed on Graphic LCD. Customers may easily load credits into their cards/keys by inserting Money and the shopping value is being deducted from their credits. 2.3 Coin Return Push Button This button is used for getting the Change after shopping. After pressing this button Change can be collected from the Coin Return Chute. 2.4 Coin Entry Slot This entry slot is used for inserting coins into Vending Machine. Coins are being placed into the slot then simply being lifted upwards. Inserted coin value can be seen on Screen. If the inserted coin is not defined and/or an imitation then the coin shall drop down to the Coin Return Chute and shall not be accepted. 2.5 Coin Return Chute This chute is for the Change and/or Coins which cannot be validated. After coins fall into the return chute the coins can be collected. 10 2.6 Cash Box Cash Box is where accepted Coins are collected (excess Money over Tubes). For increased security the Cash Box has a padlock. The cash box has to be controlled and emptied periodically else the cash box can be filled up with coins and coins may drop around which may cause problems. 2.7 Electronic Modules Mini-Buffet is fully microprocessor controlled and the electronic modules in use are as follows; a) Power distribution board electronic module: This module is used for distributing energy to the Vending Machine. With its two fuse controls this units helps preventing might electrical problems may be caused by other electronic modules and/or the optional cooling unit and provides increased the safety. b) Power Supply Module: This module is to provide DC Voltage c) Main Electronic Module: All functions of the Mini-Buffet Vending Machine are being controlled by this Module. d) Touchpad Keypad e) Graphic LCD Screen f) IR Product Sensor : This module is used for checking the Proper Physical Vending Process. If there is no real vend then the credit will remain so that another product can be selected or the credit can be taken. (Article Nr. 4.2.1.2) More detailed explanations regarding Electronic Modules can be found in “Service Manual”. Please contact our Technical Service for any might failures on electronic modules. 3 VENDING SAFETY There are many security precautions against theft and other vandalism occasions with the Mini-Buffet. The Cabinet and the Solid Lexan Front has been designed with maximum safety using robust production materials. There are Security Locks on the Vending Machine and the Cash box. There are three security passwords as electronic security precautions. a) Alarm Password: This password has to be entered prior to opening the door of the Mini-Buffet. When opened without entering password, the Mini-Buffet will give an 120db audio alarm. The alarm is being activated automatically after 10 seconds the front door will be closed. Default alarm password is “1234 ”. b) Administrator Password : This admin level password enables Access to all settings of the Mini-Buffet. Default administrative password is “8888 ”. c) User Password : This level menu entry enables Access to menus which are authorized by the administrator. (Article Nr. 4.2.1.8) . Default User Password is “ 0000 ”. Administrator Password and User Password cannot be the same. 11 4 PROGRAMMING All programming settings of the Mini-Büffet can be done using the Touchpad Keypad on the Control Panel. Keypad buttons are as follows; X EXIT/NO √ SAVE/YES/SELECT www.elektral.com.tr 8 Up Arrow to Scroll Up READY TO OPERATE 0 Down Arrow to Scroll Down Please Insert Coin 7 To copy the selected value in some menus i.e. 26 C Price Settings 12: 34 9 To Paste the copied Value Nr. Keys 1 to 9 are used for entering values. MAIN MENU To enter programming menu pres ‘X’, ‘√’, ‘√’, ‘√’, ‘√’, ‘√’ in sequence and enter 1234 default alarm password. Open the front door of thew Mini-Buffet and open the protective door for Access to main electronic board. Press the button on the Main Board (BUT1)to enter the menu. SETTINGS PASSWORD STATISTICS [****] PRICES FİYATLARI MACHINE TEST ACCESSORIES Enter the ‘Administrator Password’ or the ‘User Password’ using the keypad. SCROLL IN THE MENU Using (8) UP and (0) DOWN keys and Select the desired Menu by (√ ) SELECT. MAIN MENU SETTINGS STATISTICS PRICES FİYATLARI MACHINE TEST 4.1 Main Menus ACCESSORIES Settings: Selection of Payment System, Date-Time Settings, Cooling Unit Settings, Password Settings etc. Settings can be done in this menu. Statistics: All statistical information available can be seen inside this menu. SETTINGS VALIDATORS IR SENSOR COOLING UNIT DATE-TIME LANGUAGE SETTING CHANGE PASSWORD STATISTICS SALE COUNTER CASH COUNTER ERRORS RESET GET REPORT 12 Price Settings: This menu is for setting Prices, Currency Settings and Discount Rates. PRICES PRICE SETTINGS EXCHANGE OF RATE DISCOUNT Machine Test: This menu is for testing the hardware equipped on the Vending Machine (motors, IR Product Sensor etc.). Accessories: This menu is for the settings of Alarm, Impact Sensor and GSM/GPRS etc. accessories available. MACHINE TEST MOTOR CONTROL IR CONTROL MOTOR STATUS VALIDATORS TOUCHBOARD RELAY CONTROL ACCESSORIES ALARM BILL GSM/GPRS TILT SENSOR 4.2 Menus To enter sub menus, you need to enter Main Menus and scroll. Using SCROLL Keys find the Menu you wish to proceed and press (√ ) SELECT. The proceed with entering new values and/or using (√ ) SELECT button save the changes or Exit with X button. 4.2.1 Settings Main Menu 4.2.1.1 Payment System WARNING: The standard Coin Mechanisms installed on the Mini Buffet are compliant with MDB protocol. If there will be another Coin Mechanism in use with the following protocols; EXECUTIVE, PARALEL and CCTALK the Compliant Coin Mechanisms should be installed and the Protocol has to be selected from the Menu. If by mistake a different protocol (other than MDB) will be selected from the Menu, the Mini Buffet will not accept any money and will return all. This menu is used to change the standard settings of the payment system. 13 VALIDATORS SERIAL PROTOCOL MDB SETTINGS EXECUTIVE SETTINGS CCTALK SETTINGS İmpMDB SETTINGS PARALLEL SETTINGS 4.2.1.1.1 Serial Protocol This menu is used for selecting the Payment System in use. Use UP (8) and DOWN (0) Scroll Keys to (√ ) SELECT. 4.2.1.1.2 MDB Settings SERIAL PROTOCOL This menu is for MDB Payment System Settings. Maximum Waiting: Waiting Period after money insertion. After threshold period the Value on LCD will reset to Zero MDB EXECUTIVE CCTALK MDB PARALLEL and money will be collected inside the Vending Machine. Maximum Change: This menu is to set the Maximum Change Value. Erase Credit: This parameter is used to define whether to reset the Credit Value after a Certain Waiting Period upon money insertion or not. Full bracket (X) means this feature is active. Free Vend: This feature enables free distribution of MDB SETTINGS MAX. WAIT MAX CHANGE ERASE CREDIT FREE VEND CHANGE BACK MANUAL DISPENSE 60sn 5.00 products with prices set to ‘0’. Full bracket ( X) means this feature is active. Change Back: This parameter is used for activating or deactivating the Change Function. Full bracket ( X) means this feature is active. Manual Dispense: This parameter is used to activate or deactivate Manual Dispensing of the Coins in the tubes using the buttons on the Change Giver unit. Full bracket ( X) means this feature is active. Free Change: This parameter is used to activate or deactivate the Change Function without purchasing any product from the Vending Machine. Full bracket ( X) means this feature is active. Automatic Change: This feature enables automatic Change without the need to press Coin Return Push Button. Full bracket ( X) means this feature is active. 14 Coin XX: This parameter is to set the acceptance status of the nr. XX Coin. Full bracket ( X) means this feature is active. Bill XX: This parameter is to set the acceptance status of the nr. XX Bill. Full bracket ( X) means this feature is active. 4.2.1.1.3 EXECUTIVE Settings This menu is for EXECUTIVE Payment System Settings. Price Holding: This parameter displays the Status of Price Holding function. Full bracket (X) means this feature is active. Free Vend: This feature enables free distribution of products with prices set to ‘0’. Full bracket ( X) means this feature is active. Product (XX): When in Price Holding operation mode these values become active. This is to mention that Nr. XX product belongs to Nr. XX Value in sequence. 4.2.1.1.4 CCTALK Settings (Optional) This menu is for CCTALK payment system settings. 4.2.1.1.5 ImpMDB Settings (Optional) This menu is for impMDB payment system settings. 4.2.1.1.6 PARALLEL Settings (Optional) This menu is for PARALLEL payment system settings. 4.2.1.2 IR Product Sensor SETTINGS This menu is to activate or deactivate the IR Product Sensor. IR Product Sensor will control if the product is delivered to the customer or not. VALIDATORS IRSENSOR STATUS IR SENSOR COOLING UNIT ON OFF DATE-TIME LANGUAGE SETTING CHANGE PASSWORD WARNING: If the IR Sensor is deactivated, the vending machine will not be able to control product delivery conditions and whether no products left in the machine. If the IR Product Sensor will determine that a Product is not delivered the related Selection (Spiral) will be deactivated and customers credit remains active on Graphic LCD for another vend. 15 Incase upon 5 Vends in a row there will not be a vend, the IR Product Sensor turns off itself. The Vending Machine operates without IR Product Sensor. IR Product Sensor can be activated from the menu again. 4.2.1.3 Cooling Unit (Optional) This menu is for Cooling Unit Settings. Using the menu you may activate and/or deactivate the Cooling System, proceed temperature settings and the Economy-Mode Operation Settings for certain periods. UNIT SET ECO-MOD SET ECO-TIME COOLING UNIT : OFF : 8ºC : OFF : 15ºC : 00:00 – 00:00 4.2.1.4 Date-Time Settings This menu is to set Time and Date. Press (√ ) SELECT the Part to enter Value Highlights. The values can be entered in sequence. Wrong entries are not accepted. Weekday is automatic as per Date Settings. 4.2.1.5 Language Selection This menu is for Language Selection. Desired Language should be highlighted and (√ ) SELECT. Languages other than Turkish and English are Optional. DATE - TIME 13:44 2010.09.06 MONDAY LANGUAGE SETTING TURKISH ENGLISH GERMAN SPANISH 4.2.1.6 Change Password Move onto the Password you want to change using UP and DOWN arrow Keys and press (√) SELECT. First, you need to enter the old password. If the old password is correct then you may proceed next and Enter the New Password. For approval you need to re-enter the New Password. CHANGE PASSWORD Admin Password: This password enables Access to all settings of the Mini-Buffet. Default administrative password is “ 8888 ”. ADMIN PASSWORD USER PASSWORD ALARM PASSWORD User Password: This level password entry enables Access to menus which are authorized by the administrator. Default User Password is “ 0000 ” and cannot be the same with the Admin Password. Please check article Nr. 4.2.1.8 Authorization. Alarm Password: This password has to be entered prior to opening the door of the MiniBuffet. When opened without entering password, the Mini-Buffet will give an 120db audio alarm. The alarm is being activated automatically after 10 seconds the front door will be closed. Default alarm password is “ 1234 ”. 16 4.2.1.7 Illumination Power This menu is for adjusting the Power of LED Illumination of the Low-E Glass Front. Adjustment can be made using UP (8) and DOWN (0) Buttons. 4.2.1.8 Authorization This menu is set the Access limitations of the User Password by the administrator. Full bracket ( X) means this feature is active. 4.2.2 Statistics Main Menu 4.2.2.1 Sale Counter This menu displays the total number of products sold after last reset. Each and every Product Selection can be chosen and Reset to Zero. SALE COUNTER PROD. (01): 0 pcs. PROD. (02): 1 pcs. PROD. (03): 9 pcs. PROD. (04): 3 pcs. PROD. (05): 4 pcs. PROD. (06): 5 pcs. 4.2.2.2 Cash Counter This menu displays the total amount of cash in defined currency. Total VM Revenue: Displays the Total Cash collected by the VM. This Value cannot be reset. Net Revenue: This is the Net Amount collected by the VM. This value can be reset. CASH COUNTER TOTAL VM REVENUE 158,25 EUR NET REVENUE GROSS REVENUE DISCOUNT SALES TOTAL DISCOUNTS Gross Revenue: This value is for the total amount of sales excluding discount amount of Discount Sales. This value can be reset. Discount Sales: This value displays the total revenue generated whilst discount period. This value can be reset. Total Discounts: This value displays the total discounts applied. This value can be reset. Overpaid: This value is to display remain (overpaid) credit reset in the machine. This value can be reset. Normal Sales:This value displays the sales amount without any discounts applied. This value can be reset. Cash Box Total: This value displays the total amount of money collected in the cash box. VM equipped with Change Giver first collects the coins into its tubes then fills up the Cash Box. This value can be reset. 17 4.2.2.3 Errors ERROR (01): 06.09.10 ERROR (02): ERROR (03): ERROR (04): ERROR (05): Pre-defined Error Codes are as mentioned hereunder; # ERRORS 052-11 12:10 (3) 068-02 000-00 000-00 000-00 # Change Giver Error Codes Other Error Codes 3 No Credit1 51 Extreme Current on Motor 4 Defective Tube Sensor1 52 Motor Error 1 5 Double Arrival1 53 Motor Error 2 6 Acceptor Unplugged2 54 Heat Sensor Error 7 Tube Jam1 56 Eeprom Error 8 ROM checksum error1 58 Flash Error 9 Coin Routing Error1 60 Keypad Error 12 Coin Jam1 62 RTC Error 13 Possible Credited Coin Removal1 64 IR Error 1 65 IR Error 2 # Bill Validator Errors 66 IR Error 3 21 Defective Motor3 67 IR Error 4 22 Sensor Problem3 68 MDB Communication Error 24 ROM Checksum Error3 70 WDT Reset Error 25 Validator Jammed3 72 Brownout Reset Error 27 Bill Removed1 74 Address Error 28 Cash Box out of position3 30 Invalid Escrow request1 32 Possible Credited Bill Removal1 18 4.2.2.4 Reset This menu is used for resetting whole values kept in the Statistics Menu. Press (√ ) SELECT and confirm the application. RESET SALE COUNTER CASH COUNTER 4.2.2.5 Reporting (Optional) This menu is to report Values in the Statistics Menu. 4.2.3 Prices Main Menu 4.2.3.1 Price Settings This menu is to set prices. Move onto the Product Nr. You wish to set prices and press (√ ) SELECT to enter New Price. PROD. (01): PROD. (02): PROD. (02): PROD. (03): PROD. (04): PROD. (05): PRICES 0,50 EUR 1,50 EUR 0,25 EUR 0,00 EUR 0,50 EUR 0,50 EUR 4.2.3.2 Discount (Optional) This menu is to set timetable discount pricing for certain periods and to adjust discount ratio. 4.2.4 Machine Test Main Menu 4.2.4.1 Motor Control MOTOR CONTROL You may test the Motors of the Mini Buffet through this menu. For example; to test the second motor of the first tray, you need to enter ‘1’, ‘2’ values. The selected motor will turn a complete tour as if to dispense a single product. Choose Motor…12 Motor OK Motor Current: 114ma You may also see whether the motors are connected and Motor Currents as well. 4.2.4.2 IR Control This menu is to test the IR Product Sensor operation. When in this menu, an object will be moved throughout the passage of the IR Sensor (Compartment) there should be an audio-visual indication and also the nr. Of events can be seen on Graphic LCD. IR CONTROL 4 4.2.4.3 Motor Status This menu is used for checking whether the motors are connected to the Vending Machine or not. Motors marked with “X” on the list are connected. 19 4.2.4.4. Payment Systems This menu displays the Payment Systems information connected to MDB serial interface. If there is no connected Payment System available this information can also be seen. 4.2.4.5 Touch board Keypad (Optional) This menu is for Keypad Controls. 4.2.4.6 Relay Control This menu is for checking the Relay Controls of the Cooling Unit. Relay controls are as follows; 1st Relay can be opened using Nr. 1 Key and Closed Using Nr. 4 Key, 2nd Relay can be opened using Nr. 2 Key and Closed Using Nr. 5 Key, 3rd Relay (Optional) can be opened using Nr. 3 Key and Closed Using Nr. 6 Key 4.2.5 Accessories Main Menu 4.2.5.1 Alarm This menu is used for activating or deactivating the Alarm against Unauthorized Access (Without Password Entry) to Door Opening. (Please check Article Nr. 3. VENDING SAFETY) 4.2.5.3 GSM/GPRS (optional) This menu is for GSM/GPRS module settings. 4.2.5.4 Impact Sensor This menu is used for activating or deactivating the Impact Sensor against Vandalism as an increased safety precaution. 5 TECHNICAL FEATURES and ENERGY EFFICIENCY Electric (With Cooling) : 220 VAC ±%10 50 Hz Electric (Without Cooling) : 90-260 VAC 50-60 Hz (Norm Earthed Mains Supply is a must) Power Consumption (With Cooling) : 100 W Power Consumption (Without Cooling) : 20 W Dimensions : Height 125 Width 81 Depth 21,5 cm cm cm Maximum Non-Condensed Humidity : %90 Operation Temperature : -20 ̴ +70 ̊C For Energy Efficiency please keep unused parts of your machine closed. Before adjusting temperature levels of the Mini-Buffet with Cooling Unit, please consider the necessities. There is no need for extreme cooling unnecessarily. 20 6 TRANSPORTATION AND INSTALLATIONS The Vending Machine has to be protected from all means of physical damages and has to be in Vertical Position during transportation process. If by any reason there will be a must to change the upright position of the Vending Machine, all necessary precautions has to be taken and utmost attention must be given to Solid Lexan Front, Product Trays and the Cooling Unit. Please read the User’s Manual Carefully before installation. The Mini-Buffet is being delivered in it’s box and ready to operate. The Mini-Buffet can either be used on its base or on the wall. (There are 4 Fixing Screws on Corners in the base and mini buffet) After removal of packing materials the Vending Machine has to be controlled against any might damages during transportation. These controls should be the general look, if any physical damages, whether trays are in their positions or not, the control panel is closed or not etc. (Article Nr. 2 Main Units). The Power Cable for Mains Connection is delivered with the Mini-Buffet. Vending Machine has to be connected to Mains to start operation. Before proceeding with Product Loading and Price Setting it is suggested that the main functions should be controlled from the Machine Test Menu (Article Nr. 4.2.4). Only operate the Vending Machine on Norm Earthed Mains Supply. Vending Machines with Cooling Unit; There must be min. 10 cm space between the back side of the Vending Machine and the Walls. The Vending machine must not be operated for 30 minutes after transportation. If the Upright (Vertical) Position of the Vending Machine will not be kept during transportation, the waiting period before use should not be less than 3 hours. The VM must not operate under direct sunlight. 21 7 OPERATION OF MINI BUFFET Necessary controls and settings the users should proceed regarding the operation of the Mini-Buffet are described under Product Loading (Article Nr. 2.1), Pricing (Article Nr. 4.2.3) and Machine Tests (Article Nr. 4.2.4). Instructions for the Customers who will purchase from the Mini Buffet are as follows; ‘INSTRUCTIONS FOR USE’; 1- Enter “Product Code” to see the Price of the Selection 2- Insert enough Money to buy the selection. 3- Enter the “Products Code” you would like to purchase. 4- Pick up the product from the Compartment. 5- Press the Coin Return Push Button. 8 MAINTENANCE and REPAIR Mini-Buffet is designed to operate 7/24 basis. The Mini-Buffet can be operated only after proceeding necessary steps described in the User’s Manual. Do not use water directly to clean the Machine. Use dry or damp cloth for cleaning. Electronic units should be protected from water. There is no periodical maintenance need. However, product loading and cash collection from the VM the Vending Machine will be require often opening of the VM during which the “Errors” menu can be controlled and necessary corrections has to be made at the earliest. Unauthorized staff should not try maintenance of the equipment. Whilst maintenance, proceed as per “Service Manual” instructions. 9. OPTIONAL UNITS 9.1 Cooling Unit Our Mini Buffet has an Optional Modular Cooling unit for vending. It has high cooling capacity of 100 W Cooling Power. The modular Cooling Units and thermostat controlled economy mode operation are superiorities. The Cooling Unit has a complete modular design enabling ease of assembly and maintenance. Modular Cooling Unit can be equipped to a Standard Mini-Buffet at a later time as an optional unit. 22 9.2 Additional Tray / Canned Drink Dispenser Mini Buffet has 12 Standard Trays with the possibility to add 2 Optional Tray. Special design and adjustments can be done as per the buyer’s requests to vend different packing size/shape products requiring different storage conditions other than the standard configuration. 9.3 SRC/SCADA Remote Controlling Software One of the advanced features of our Mini Buffet which is making it unique equipment is the SRC Scada Remote Access feature enabling the fill up personnel/operators reach the Vending Machine from their offices using a standard PC Internet Connection. All statistical data about sold products, collected money, product prices etc. can be viewed. Our SRC Scada Remote Control Software is using RS 232 Cable Connection. Warning: If you will control the Mini-Buffet through SRC Scada Software, the PC Using the Scada Software and the Mini Buffet has to operate on the same Earthed Mains Line. Otherwise, it may cause problems. 9.4 GSM/GPRS Web Based Remote PC Access & Control Feature The offered optional GSM/GPRS module provides remote access to all Vending Machine statistical data and fill up / storage condition of the Vending Machine. The operators can precede Discount Menu Settings via Remote Access. 9.5 Receipt Printer Receipt Printer is an optional unit which can be equipped on Mini-Buffet. Receipt Printer will enable you to give receipt after shopping from the VM. 9.6 Optional Heating /Conditioning The Optional heating unit will enable the Mini-Buffet vend such products may need special heating like bakery products and/or such products should be stored at a certain temperature level. Please contact our Sales Department for your inquiries. 10 TROUBLESHOOTING 10.1 Warnings Mini-Buffet must be taken into operation only after all necessary precautions and instructions in this User’s Manual are fulfilled. Misusage of the Vending Machine may cause malfunctions and/or cause harm to humans. Never operate your Vending Machine if there is no Norm Earthed Mains Supply. Do operate the Mini-Buffet fixed in Vertical Position. Periodically Check the Operation of the Mini-Buffet. 23 10.2 Frequently Asked Questions In this section you may find information about Frequently Asked Questions regarding Installation and the use of your vending machine. 10.2.1 General Questions: *There is no Earth / Grounding on Mains Supply. What should I do? Do not operate your Vending Machine without earthed electric supply. Such operation without earthed supply is risky and has serious inconvenience in respects of reliable operation and security. * When there is a problem regarding the vending machine, can I directly interfere or should I get in contact with a technician? If the problem is not solved after trying all procedures given in the User’s Manuel, you may contact our technical service. Any maintenance job done by third parties will void the Vending Machine Warranty Terms. * How many hours a day can the Vending Machine operate? Your Vending Machine is designed to operate 24 hours/day year round basis. * How can I clean the Machine? Do not use water directly to clean the Machine. Use dry or damp cloth for cleaning. 10.2.2 Operational Questions: *Does long time non-operational storage require settings and maintenance? Proper Storage Conditions does not require any additional settings and/or maintenance before use. * One of the motors is not operating, what can I do? First of all control the PINs inside the Motor Socket. Then check the 24 PIN Sockets and Cables in Connectors connecting to the Electronic Board. WARNING: Please do not force the sockets and PINs. The sockets are easy to connect and disconnect. * I forgot my Password, what can I do? Please get in contact with our Technical Service Department with the Warranty Card. *Cooling Unit is not operating, what should I do? Cooling Unit might have been deactivated from the Menu. Please check Article Nr. 4.2.1.3. Front door can be Open. There should not be the “Door Open” warning on Screen. All Three LEDs on the Power Distribution Board Electronic Module (Article Nr. 2) must be lit. 24 11 WARRANTY CONDITIONS SERVICE STATION: ELEKTRAL ELEKTROMEKANIK SAN. VE. TIC. A.S. IZMIR ATATURK INDUSTRIAL ZONE M.K. ATATURK BLV. 23 CIGLI 35620, IZMIR/TURKEY Tel:+90 (232) 376 7300 Fax: +90 (232) 376 7030 e.mail: [email protected] 25 10.5 CERTIFICATE OF WARRANTY FULL WARRANTY CERTIFICATE Your Unit, Model :..................................................................................... Serial/Model No :.................................. Which you purchased on __/__20__ is hereby warranted against defect in workmanship and material for a period as follows: 1 YEAR 1. 2. 3. Within the Warranty period, ELEKTRAL will repair or replace, without charge, any part or parts that prove to be defective. The defective instruments should be returned, accompanied by the attached SERVICE OR REPAIR CARD to ELEKTRAL Izmir Ataturk Industrial Zone M.K. Ataturk Blv. 23 Cigli 35620 Izmir-Turkey where the overhaul is performed also. Upon expiration of the Warranty, ELEKTRAL A.S. further guarantees to repair this merchandise at a cost of the current listed ELEKTRAL price. This warranty is void if the instrument has been damaged or broke down through misuse instrument has been altered or tampered with in any way instrument has been damaged through accident, misuse or negligence the seal, ties or stickers on the instrument has been broken damage or defects occur because of through lightning and fire replacement or repair is necessitated be loss or damage resulting from any cause beyond the control of ELEKTRAL the instrument has been used against the instructions stated in the user’s manual your warranty has not been among our files by your request with “Warranty Information Card” only ELEKTRAL A.S. is authorized to confirm above mentioned particulars. all price and costs are EXW Izmir-TR. All the transport or travel costs are bared by the buyer. 4. 5. ELEKTRAL is not to be labeled for loss of other damage allegedly resulting from defects in its products. This Warranty gives you specific legal rights. Please Include Model Number and purchase date in correspondence regarding this instrument. All Warranty Services are at our Factory. All transportation risks and costs to and pro our Factory belongs to Customer. Thank you for selecting a product manufactured by ELEKTRAL A.S. Before using your new item please take a minute to read and fill out the forms on the reverse side of this card. The Warranty Information Card helps us learn more about you and what you purchase. From this information come improvements and new products for you, our valued customers. Please return this card within 10 days of purchase. The full Warranty Certificate tells you that we stand behind our products and will repair this item as long as you own the product, per the terms of the warranty certificate. The Service or repair card is your way of communicating with our Customer Service Department should a problem occur. It helps us to quickly service your product and return it as soon as possible. Please complete and include this card whenever you return a product again. Thank you once again for selecting our product. We hope this will be one of the many ELEKTRAL products you will own. Date/Place Purchased :.................................. Invoice Date, No :.................................. Dealer Company’s Title :.................................. Address :.......................................................... ........................................................................ Telephone-Fax :................................... E-mail :................................... DEALER COMPANY Seal & Signature :................................... E-mail :................................... 26 12 ENCLOSURES 12.1 Menu Three Menus Settings Statistics Prices Payment Sale Counter Price System Machine Test Accessories Motor Control Alarm IR Control GSM / GPRS Motor Status Impact Settings IR Sensor Cash Counter Cooling Unit Errors Discount Sensor Date-Time Payment Reset System Language Get Report Keypad Setting Change Relay Control Password Illumination Power Authorization 27