1
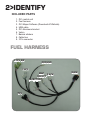
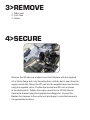
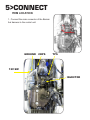
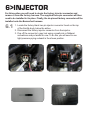
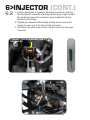
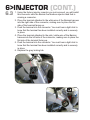
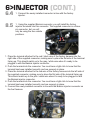
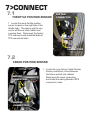
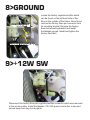
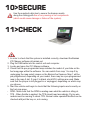
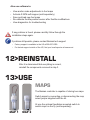
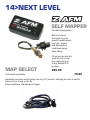
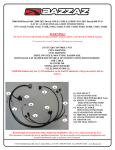
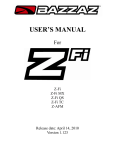
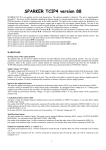
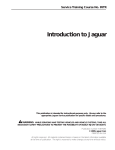
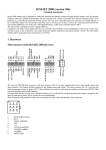
INSTALLATION INSTRUCTIONS
R
UNLEASH.
THE SMARTEST PERFORMANCE TUNING TECHNOLOGY
FUEL
YAMAHA YZ250F 2014
F732
1>READ
WARNINGS > INSTALLING
•
•
•
•
•
We strongly suggest that an experienced technician install this product.
Read through all instructions before beginning installation.
This document is intended for use by qualified technicians.
This is not a replacement for the factory Engine Control Unit (ECU).
Refer to a factory service manual for more specific stock component
identification/location information and removal/assembly procedures.
WARNINGS > USING
• Use only in race or other closed-course applications and never on public roads.
• Z-Fi products are not certified by the California Air Resource Board (CARB) for
use on CA public lands.
GETTING HELP
• Factory support is available in the US at 909-597-8300.
• For fastest support outside of the US, find your local importer at bazzaz.net.
2>IDENTIFY
INCLUDED PARTS
1. Z-Fi control unit
2. Fuel harness
3. Z-Fi Maper Software (Download off Website)
4. USB cable
5. Z-Fi Aluminum bracket
6. Velcro
7. Bazzaz stickers
8. Cable ties
9. 3 Pin connector
FUEL HARNESS
+12V SW
GROUND
CKPS
MAP Z-AFM
SELECT
INJECTOR
TPS
MAIN
3>REMOVE
1. Rider seat
2. Fuel Tank
3. Airbox
4>SECURE
Remove the left side rear engine mount bolt. Replace with the supplied
m8 x 30mm flange bolt, only threading them until the bolt is seen from the
engine mount side. Mount the ZFi unit into the supplied aluminum bracket
using the supplied velcro. Position the bracket and ZFi unit as shown
in the above photo. Tighten the engine mount bolt to 32 ft-lb (45mm).
Secure the bracket using the supplied 8mm flange nut. Connect the
Bazzaz fuel harness to the control unit and begin to route the harness to
it’s appropriate locations.
5>CONNECT
ITEM LOCATION
1. Connect the main connector of the Bazzaz
fuel harness to the control unit.
GROUND
CKPS
TPS
12V SW
INJECTOR
6>INJECTOR
For this section you will need to de-pin the factory injector connector and
remove it from the factory harness. The supplied three-pin connector will then
need to be installed in its place. Finally, the de-pinned factory connector will be
installed onto the Bazzaz fuel harness.
6.1
1. Locate the factory black two-pin injector connector found on the top
of the throttle body, below the airbox.
2. Disconnect the factory injector connector from the injector.
3. Pop off the connector’s grey lock using a small pick or flathead
screwdriver and put aside for now. To do this you will need to use
light pressure prying outward in the shown position.
6>INJECTOR (CONT.)
6.2
1. Using a small pick or jeweler’s flat head screwdriver, with the
factory injector connector’s locking tab facing up, begin to slide
the small tool inside the connector, just beneath the factory
terminal until it stops.
2. Slightly pry downward while lightly pulling on the wire until it
begins to come out of the back of the connector.
3. Do this for the other wire as well until the connector has been
removed.
CONNECTOR’S LOCKING TAB
FACING UP
#1
#3
6>INJECTOR (CONT.)
6.3
1. Using the factory injector conector you just removed, you will install
this connector onto the Bazzaz fuel harness injector lead that is
missing a connector.
2. Place the terminal attached to the white wire of the Bazzaz harness
into the right side of the connector, making sure to place the flat
side of the terminal facing up.
3. Push the terminal into the connector. You must hear a light click to
know that the terminal has been installed correctly and is securely
in place.
4. Place the terminal attached to the pink / white wire of the Bazzaz
harness into the left side of the connector, making sure to place the
flat side of the terminal facing up.
5. Push the terminal into the connector. You must hear a light click to
know that the terminal has been installed correctly and is securely
in place.
6. Replace the grey locking tab.
#2
#6
6>INJECTOR (CONT.)
6.4
8.5
1. Connect the newly installed connector in-line with the factory
injector.
1. Using the supplied Bazzaz connector, you will install the factory
injector terminals into this connector. The supplied connector is a threepin connector, but you will
only be using the two outside
positions.
1. Place the terminal attached to the red / black wire of the factory harness into the
right side of the supplied connector, making sure to place the flat side of the terminal
facing up. This should match up to the gray / white wire when it’s ready to be
plugged in with the Bazzaz injector connector.
2. Push the terminal into the connector. You must hear a light click to know that the
terminal has been installed correctly and are securely in place.
3. Place the terminal attached to the red wire of the factory harness into the left side of
the supplied connector, making sure to place the flat side of the terminal facing up.
This should match up to the pink / white wire when it’s ready to be plugged in with
the Bazzaz injector connector.
4. Push the terminal into the connector. You must hear a light click to know that the
terminal has been installed correctly and are securely in place.
5. Connect the newly installed connector in-line with the Bazzaz injector connector on
the fuel harness.
7>CONNECT
7.1
THROTTLE POSITION SENSOR
FACTORY
CONNECTOR
1. Locate the stock throttle position
sensor located on the right side of the
throtte body. The sensor and the connector will have a black rubber boot
covering them. Disconnect the factory
TPS connector and install the Bazzaz
TPS connectors inline.
BAZZAZ
CONNECTORS
7.2
CRANK POSITION SENSOR
FACTORY
CONNECTORS
BAZZAZ
CONNECTORS
1. Locate the grey factory Crank Position
Sensor connectors, found between
the frame and left side radiator.
Disconnect the stock connectors
and install the mating Bazzaz CKPS
connectors in-line.
8>GROUND
OEM 8MM BOLT
Locate the factory regulator/rectifier which
can be found on the left hand side of the
bike on the outside of the frame. Once found
remove the factory three pin connector from
its mounting bracket. Remove the factory
8mm bolt mounting bracket and install
the Bazzaz ground. Install and tighten the
factory 8mm bolt.
BAZZAZ GROUND LUG
9>+12W SW
Disconnect the factory three pin regulator/rectifier connector which was removed
in the previous step. Install the Bazzaz +12V SW power connectors in line and
secure away from any moving parts.
10>SECURE
Use the supplied cable ties to secure the harness neatly
along the routing path free of any moving or hot components
(which could cause damage or failure of the system).
11>CHECK
1. In order to check that the system is installed correctly, download the Bazzaz
Z-Fi Mapper software at bazzaz.net.
2. Plug the USB cable into the control unit and computer.
3. Locate and open the Z-Fi Mapper software.
4. Check that the pre-programmed map matches the model of your bike on the
fuel map page within the software. You can switch from map 1 to map 2 by
unplugging the map select jumper on the Bazzaz fuel harness. Map 1 will be
pre-programmed; depending on your model, there may be a pre-programmed
map in the map 2 slot. If map 2 is blank, stock ECU settings are used. Make
sure that the jumper is left plugged in or unplugged, depending on which map
you choose.
5. Start the vehicle and begin to check that the following inputs read correctly on
the fuel map page.
• RPM - Make sure that the RPM is reading near what the vehicle is idling at.
• TPS - When throttle is applied, the TPS should read accordingly. Fly-by-wire
models must be running to check TPS. Normal cable operated throttles can be
checked with just the key on, not running.
Also use software to:
•
•
•
•
•
View and/or make adjustments to fuel maps
Activate Z-AFM self mapper (sold separately)
Save and load new fuel maps
Re-calibrate throttle position sensor after throttle modifications
View diagnostics for troubleshooting
If any problem is found, please carefully follow through the
installation steps again.
If problem still persists, please contact Bazzaz tech support
• Factory support is available in the US at 909-597-8300.
• For fastest support outside of the US, find your local importer at bazzaz.net
12>REINSTALL
After it is determined that everything is correct,
reinstall the components removed in step 3.
13>USE
MAPS
The Bazzaz controller is capable of storing two maps.
Switch maps by connecting or disconnecting the map
select jumper supplied with the kit.
Or use the optional handlebar-mounted switch to
switch maps on the fly (sold separately).
MAP 1
MAP 2
14>NEXT LEVEL
SELF MAPPER
Purchased separately.
Build race-level
fuel maps for your
specific modifications,
fuel type, engine,
and atmospheric
conditions simply
while riding.
MAP SELECT
Purchased separately.
02 sensor mounts into
exhaust and control
box easily plugs in
to any Bazzaz Z-Fi
product.
299.95
79.95
Handlebar-mounted switch plugs into any Z-Fi product, allowing the user to switch
between fueL maps on the fly.
Easy installation. Weatherproof toggle.
NOTES:
NOTES:
R
THE SMARTEST PERFORMANCE TUNING TECHNOLOGY
F732