1
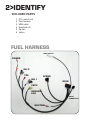
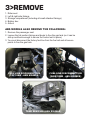
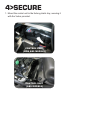
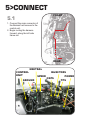
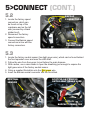
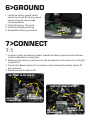
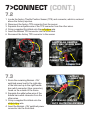
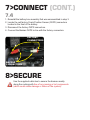
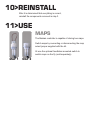
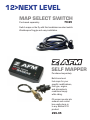
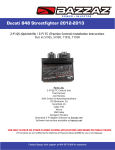
INSTALLATION INSTRUCTIONS
R
UNLEASH.
THE SMARTEST PERFORMANCE TUNING TECHNOLOGY
HONDA NC700X, 2012-2013
F380 FUEL CONTROL
1>READ
WARNINGS > INSTALLING
•
•
•
•
•
We strongly suggest that an experienced technician install this product.
Read through all instructions before beginning installation.
This document is intended for use by qualified technicians.
This is not a replacement for the factory Engine Control Unit (ECU).
Refer to a factory service manual for more specific stock component
identification/location information and removal/assembly procedures.
WARNINGS > USING
• Use only in race or other closed-course applications and never on public roads.
• Z-Fi products are not certified by the California Air Resource Board (CARB) for
use on CA highways.
GETTING HELP
• Factory support is available in the US at 909-597-8300.
• For fastest support outside of the US, find your local importer at bazzaz.net.
2>IDENTIFY
INCLUDED PARTS
1. Z-Fi control unit
2. Fuel harness
3. USB cable
4. Scotchlok (3)
5. Zip ties
6. Velcro
FUEL HARNESS
MAP SELECT
POWER
INJ 2
TPS
INJ 1
SPEED
MAIN
CKPS
GROUND
LUG
Z-AFM
CONNECTOR
NEUTRAL
3>REMOVE
1. Rider seat
2. Left & right side fairings
3. Storage compartment (including all small attached fairings)
4. Battery box
5. Airbox
ABS MODELS ALSO REMOVE THE FOLLOWING:
1. Remove the passenger seat.
2. Loosen the tail section fairings and begin to free the gas tank (so it can be
slid up and back enough to secure the control unit in place).
3. You must disconnect the factory fuel line from the fuel rail and all secure
points to free the gas tank.
FUEL LINE DISCONNECTION
(TOP VIEW - ABS MODELS)
FUEL LINE DISCONNECTION
(SIDE VIEW - ABS MODELS)
TANK REMOVAL (ABS MODELS)
4>SECURE
1. Mount the control unit in the factory plastic tray, securing it
with the Velcro provided.
CONTROL UNIT
(NON ABS MODELS)
CONTROL UNIT
(ABS MODELS)
5>CONNECT
FRONT
5.1
1. Connect the main connector of
the Bazzaz fuel harness to the
control unit.
2. Begin routing the harness
forward, along the left side
frame rail.
REAR
CONTROL
UNIT
NEUTRAL
GROUND
SPEED
INJECTORS
CKPS
POWER
TPS
5>CONNECT (CONT.)
5.2
1. Locate the factory speed
connectors, which can
be found on top of the
crankcase and on the left
side (covered by a black
rubber boot).
2. Disconnect the factory
speed connectors.
3. Connect the Bazzaz speed
connectors in-line with the
factory connectors.
BAZZAZ
CONNECTORS
FACTORY
CONNECTORS
5.3
1. Locate the factory neutral sensor (has light green wire), which can be found behind
the front sprocket cover and near the shift shaft.
2. Follow the wire from the sensor to just before the main harness.
3. With caution, use a razor blade to open the sheathing just enough to expose the
light green wire of the factory neutral sensor.
4. Crimp a supplied Scotchlok onto the light green wire.
5. Insert the Bazzaz neutral connector into the Scotchlok.
NEUTRAL
SENSOR
SCOTCHLOK CRIMPED
ONTO LIGHT GREEN WIRE
BAZZAZ CONNECTOR
6>GROUND
1. Locate the factory ground, which
can be found near the factory speed
sensor, along the rear storage
mounting bracket.
2. Unbolt the factory 10mm bolt.
3. Install the Bazzaz ground lug.
4. Reinstall the factory ground bolt.
GROUND
7>CONNECT
7.1
1. Continue routing the harness forward, towards the factory injectors which will have
a black rubber boot covering them.
2. Disconnect the factory connectors from the two injectors. Left is injector #1 and right
is injector #2.
3. Connect the Bazzaz injector #1 connectors in-line, between the factory injector #1
and connector.
4. Repeat process for injector #2.
FACTORY INJECTOR #1
FACTORY INJECTOR #2
FACTORY
CONNECTOR
BAZZAZ
CONNECTORS
FACTORY
CONNECTOR
BAZZAZ
CONNECTORS
7>CONNECT (CONT.)
7.2
1. Locate the factory Throttle Position Sensor (TPS) and connector, which is centered
above the factory injectors.
2. Disconnect the factory TPS connector from the sensor.
3. Separate the red/yellow wire of the TPS connector from the other wires.
4. Crimp a supplied Scotchlok onto the red/yellow wire.
5. Insert the Bazzaz TPS connector into the Scotchlok.
6. Reconnect the factory TPS connector to the sensor.
SCOTCHLOK CRIMPED
ONTO RED/YELLOW WIRE
FACTORY
TPS
BAZZAZ
CONNECTOR FACTORY
CONNECTOR
7.3
FACTORY
CONNECTOR
1. Route the remaining Bazzaz +12V
switched power lead to the right side
BAZZAZ
of the bike and up to the right handle
CONNECTOR
bar switch connector (blue connector),
found on the outside of the frame.
2. Separate the white/yellow wire of the
handle bar switch connector from the
other wires.
SCOTCHLOK CRIMPED
3. Crimp a supplied Scotchlok onto the
ONTO WHITE/YELLOW WIRE
white/yellow wire.
4. Insert the Bazzaz +12V switched power
connector into the Scotchlok.
7>CONNECT (CONT.)
7.4
1. Reinstall the battery box assembly that was unassembled in step 3.
2. Locate the red factory Crank Position Sensor (CKPS) connectors
located in the front of the battery.
3. Disconnect the factory CKPS connectors.
4. Connect the Bazzaz CKPS in-line with the factory connectors.
FACTORY
CONNECTORS
BAZZAZ
CONNECTORS
8>SECURE
Use the supplied cable ties to secure the harness neatly
along the routing path free of any moving or hot components
(which could cause damage or failure of the system).
9>CHECK
1. In order to check that the system is installed correctly, download the Bazzaz
Z-Fi Mapper software at bazzaz.net.
2. Plug the USB cable into the control unit and computer.
3. Locate and open the Z-Fi Mapper software.
4. Check that the pre-programmed map matches the model of your bike on the
fuel map page within the software. This is done by switching from map 1 to
map 2 by unplugging the map select jumper on the Bazzaz fuel harness.
Map 1 will be pre-programmed and, depending on your model, there may be
a pre-programmed map in the map 2 slot. Make sure that the jumper is left
plugged in or unplugged, depending on which map you choose. If map 2 is
blank, stock ECU settings are used.
5. Start the vehicle and begin to check that the following inputs read correctly
on the fuel map page. Use precaution when testing componentry. It’s not
necessary to put vehicle in gear while under load.
• RPM - Make sure that the RPM is reading near what the vehicle is idling at.
• GPS - The vehicle should read neutral (or whichever gear it is in).
• TPS - When throttle is applied, the TPS should read accordingly.
Use software to also:
•
•
•
•
•
•
•
View and/or make adjustments to fuel maps
Activate Z-AFM self mapper (sold separately)
Save and load new fuel maps
Re-calibrate throttle position sensor after throttle modifications
View diagnostics for troubleshooting
Change quickshift settings
Make traction control adjustments
If any problem is found, please carefully follow through the
installation steps again.
If problem still persists, please contact Bazzaz tech support
• Factory support is available in the US at 909-597-8300.
• For fastest support outside of the US, find your local importer at bazzaz.net
10>REINSTALL
After it is determined that everything is correct,
reinstall the components removed in step 3.
11>USE
MAPS
The Bazzaz controller is capable of storing two maps.
Switch maps by connecting or disconnecting the map
select jumper supplied with the kit.
Or use the optional handlebar-mounted switch to
switch maps on the fly (sold separately).
MAP 1
MAP 2
12>NEXT LEVEL
MAP SELECT SWITCH
79.95
Purchased separately.
Switch maps on the fly with this handlebar-mounted switch.
Weatherproof toggle and easy installation.
SELF MAPPER
Purchased separately.
Build race-level
fuel maps for your
specific modifications,
fuel type, engine,
and atmospheric
conditions simply
while riding.
02 sensor mounts into
exhaust and control
box easily plugs in
to any Bazzaz Z-Fi
product.
299.95
>NOTES
>NOTES
>NOTES
R
THE SMARTEST PERFORMANCE TUNING TECHNOLOGY
F380