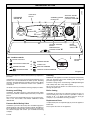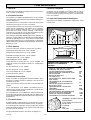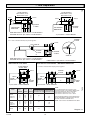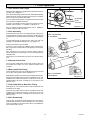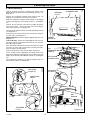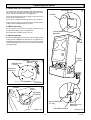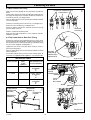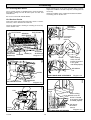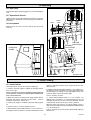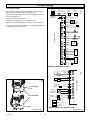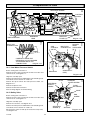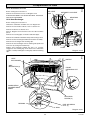
1
221742D.11.00
Instructions for Use
Installation and Servicing
7086
To b e l e f t w i t h t h e u s e r
COMPACT 80e
G.C. No. 47 047 07A
Fanned Flue Combination Boiler
This is a Cat I2H Appliance
The instructions consist of three parts, User, Installation and Servicing Instructions, which include the Guarantee Registration Card.
The instructions are an integral part of the appliance and must, to comply with the current issue of the Gas Safety (Installation and Use)
Regulations, be handed to the user on completion of the installation.
Guarantee Registration
Thank you for installing a new Glow-worm appliance in your home.
Glow-worm appliances' are manufactured to the very highest standard so we are pleased
to offer our customers' a Comprehensive First Year Guarantee.
In the centre pages are to be found your Guarantee Registration Card, which we recommend you complete and
return as soon as possible.
If this card is missing you can obtain a copy or record your registration by telephoning the Heatcall Customer
Service number 01773 828100.
Our Guarantee gives you peace of mind plus valuable protection against breakdown by covering the cost of:
✔
❑
✔
❑
✔
❑
All replacement parts
All labour charges
All call-out charges
REGISTER YOUR GLOW-WORM APPLIANCE
FOR 1ST YEAR GUARANTEE PROTECTION
CALL 0208 247 9857
Customer Services:
Tel: (01773) 828100
One Contact Local Service Fax: (01773) 828070
Hepworth Heating Ltd.,
Nottingham Road, Belper, Derbyshire. DE56 1JT
General/Sales enquiries:
Tel: (01773) 824141 Fax: (01773) 820569
Important Information
Testing and Certification
This boiler is tested and certificated for safety and performance. It is therefore important that no alteration is made to the boiler,
without permission, in writing, from Hepworth Heating Ltd.
Any alteration not approved by Hepworth Heating Ltd., could invalidate the certification, boiler warranty and may also infringe the
current issue of the Statutory Requirements, see Section 1.4.
CE Mark
This boiler meets the requirements of Statutory Instrument No. 3083 The boiler (Efficiency) Regulations, and therefore is
deemed to meet the requirements of Directive 92/42/EEC on the efficiency requirements for new hot water boilers fired with
liquid or gaseous fuels.
Type test for purposes of Regulation 5 certified by: Notified body 0086.
Product/production certified by: Notified body 0086.
The CE mark on this appliance shows compliance with:
1. Directive 90/396/EEC on the approximation of the laws of the Member States relating to appliances burning
gaseous fuels.
2. Directive 73/23/EEC on the harmonization of the Laws of the Member States relating to the electrical equipment
designed for use within certain voltage limits.
3. Directive 89/336/EEC on the approximation of the Laws of the Member States relating to electromagnetic
compatibility.
Substances Hazardous to Health
The adhesives and sealants used in this appliance are cured and give no known hazard in this state.
INSULATION PADS/CERAMIC FIBRE, GLASSYARN, MINERAL WOOL
These can cause irritation to skin, eyes and the respiratory tract.
If you have a history of skin complaint you may be susceptible to irritation. High dust levels are usual only if the material is
broken.
Normal handling should not cause discomfort, but follow normal good hygiene and wash your hands before eating, drinking or
going to the lavatory.
If you do suffer irritation to the eyes or severe irritation to the skin seek medical attention.
CONTENTS
INSTRUCTIONS
FOR USE
INSTALLATION
INSTRUCTIONS
SERVICING
INSTRUCTIONS
221742D
DESCRIPTION
SECTION
Introduction
Clock Settings
Lighting the Boiler
PAGE No.
3
4
5
General Data
Boiler Position
Flue and Ventilation
Heating System
Domestic Hot Water System
Installation Preparation and
Gas/Water Connections
Flue Preparation
Mounting the Boiler
Electrical Connections
Commissioning
1
2
3
4
5
7
9
10
11
12
6
7
8
9
10
13
13
16
20
22
General Data
Servicing
Fault Finding
Replacement Parts
Spare Parts
11
12
13
14
15
25
25
27
32
43
2
Instructions for Use
Introduction
Alternatively a fused 3A 3 pin plug and shuttered unswitched
socket may be used.
Please read these instructions and follow them carefully for the
safe and economical use of your Combination boiler.
The colours of three core flexible cable are, blue - neutral, brown
- live, green and yellow - earth.
This boiler must have been installed by a competent person in
accordance with the current rules in force in the countries of
destination at the time of installation.
As the markings on your plug may not correspond with these
colours continue as follows:The wire coloured blue must be connected to the terminal
marked “N” or “Black”.
Once the controls are set, the boiler is automatic in operation.
The Compact combination boiler is able to provide room heating
as part of a central heating system and domestic hot water
direct from the cold water supply, without the need for secondary
storage.
The wire coloured brown must be connected to the terminal
marked “L” or “Red”.
The wire coloured green and yellow must be connected to the
.
terminal marked “E” or “Green” or the earth symbol
The boiler can be fitted with one of two makes of clock, which
look like this:-
6937
Clock / Timers
0
I AUTO
RUN P
13 12 11 1
0
19 18 17 1
6
20
7
24 23
22
Digital timer
1
MIN
R
Note. The boiler safety cutoff may have operated, please refer
to the following section to reset.
2
HR
3
21
5
DAY
Normal operation of the boiler should resume when the electrical
supply is restored.
6
P
The boiler will not work without an electrical supply.
4
W Th F S Su
8
M T
Electrical Supply Failure
I
9
15
14
PVC flexible cable having a conductor size of 0.75mm2 (24/
0.20mm) must be used within the boiler casing to connect to the
boiler.
Reset any external controls, to resume normal operation of the
central heating.
Electro / mechanical
clock / timer
The digital timer, has a lithium battery back up and will not need
resetting. Unless it is without power for a considerable period.
IMPORTANT NOTICE:
Boiler Safety Cutoff Reset Button
This boiler is for use only on G20 gas.
The boiler is fitted with a safety cutoff device to prevent damage
through overheating.
Gas Leak or Fault
Should the main burner go out during a demand the red lockout
light “F” will illuminate on the control fascia situated above the
Reset Button “G”, see diagram 4.
If a gas leak or fault exists or is suspected, turn the boiler off and
consult your local gas company or your local installation/
servicing company.
The red light will not illuminate if there is no system demand.
Mains Water Temperature
Allow the boiler and system to cool down waiting at least
a minimum of four minutes before pressing the Reset
button “G”.
NOTE: The mains incoming water temperature in the winter is
lower than in summer.
The boiler will take a few seconds to reset after the button is
pressed.
To achieve the same outlet water temperature in the winter, it
will be necessary to reduce the water flow rate using the hot
water tap.
If the problem persists, turn the boiler off and consult your
installation/ servicing company.
Boilers Installed in Compartments
If the boiler has been fitted into a compartment or cupboard, do
not obstruct the compartment air supply vents.
The Gas Safety (Installation & Use)
Regulations
Do not use the compartment for storage.
In your interests and that of safety it is the law that ALL gas
appliances are installed by competent persons in accordance
with the current issue of the above regulations.
Electrical Supply
WARNING. The boiler must be earthed.
The boiler must be connected to a 230V~50Hz permanent
supply.
Connection of the whole electrical system of the boiler and any
heating system controls to the electrical supply, must be through
one common isolator.
Isolation should preferably be by a double pole switched fused
spur box. The fused spur box should be readily accessible and
preferably adjacent to the appliance. It should be identified as
to its use.
3
221742D
Instructions for Use
Setting Instructions for Electro/mechanical
Clock - if fitted
3. Set day of week by pressing button DAY.
This clock has a twenty four hour dial, that is, 1pm is 13.
5. Set RUN switch to the central position, colon will flash, this
indicates the clock is set.
4. Set time of day by pressing buttons HR and MIN.
To set the time, turn the whole face clockwise until the pointer
is against the time of day.
With the clock set, the factory preset programme shown below
will operate.
To set any “Off” time, push the tappets outwards.
To set any “On” time, push the tappets inwards.
Setting Timed Programmes
Time can be set either “On” or “Off” in fifteen minute segments.
With the clock set to the correct time, see SETTING THE
CLOCK paragraphs 1-4, and then continue as follows:
Note. The clock supplied could be fitted with an override device,
see diagram 1, which switches the clock programme “On” or
“Off” permanently.
1.
Set RUN switch to P , the display will indicate
MON/FRI
SAT/SUN
The switch will need to be repositioned to resume programmed
working.
CLOCK FACE
ON OFF ON OFF -
6938
OVERRIDE
SWITCH
0
13 12 11 1
0
2.
19 18 17 1
6
20
4
7
8
6
21
5
POINTER
Set day of week to be programmed by pressing the
DAY button.
An arrow will be displayed under the day
or days selected.
2
3.
Set time of day by pressing the buttons HR and MIN.
4.
Press button P to confirm programmes, the
display will indicate the 2nd (OFF) preset programme
and subsequently, 3rd, 4th, 5th, 6th, 7th, 8th.
5.
Repeat procedures 2, 3 and 4 until desired
programmes are set.
Diagram 1
Note. It is not a requirement to use the 8 on/off
programmes.
1
24 23
22
Setting Instructions for the 7 Day Digital
Clock/Timer
6.
This is a 24 hour clock/timer, that is 1pm is 13:00, and has 8
“ON” and 8 “OFF” daily switching actions.
General Notes.
With the AUTO switch in the O position the central
heating will not operate.
6939
M T
RUN P
Set the RUN switch the central position, your
appliance will now operate at the programmed times.
With the AUTO switch in the I position the central
heating will operated constantly ON.
It is fitted with a lithium battery back up which protects the
programme in the event of an electrical failure. The battery
should have a life of several years.
I AUTO
.
Mon-Fri., Mon-Sat., Mon-Sun., Sat/Sun.
3
CONSTANT OFF
PROGRAMMED
CONSTANT ON
07:00
09:00
16:00
23:00
Note: The days can be selected individually or as
groups:
TAPPETS
0
I
ON OFF ON OFF -
the 1st (ON) preset programme and the symbol
I
9
15
14
06:30
08:30
16:30
22:30
Soft Override button indicated by the
, this function will override the current
symbol
central heating programme for the next available.
W Th F S Su
ON time programmes are indicated by the symbol
.
To Light the Boiler
P
DAY
HR
1. Check that all four isolating valves are open, the levers in line
with the valve body, see diagram 3.
MIN
R
2. Open the controls cover door and familiarize yourself with the
controls, see diagram 4.
Diagram 2
3. CAUTION. A sealed pressurised system must be filled and
pressurised by a competent person. (Optional extra filling loop
kit No. 457120).
Setting the Clock - Diagram 2
1. With both AUTO and RUN switches set to the central
position, press R reset button, the display will flash.
2. Set RUN switch to
221742D
Only operate the boiler when you are sure that the system has
been filled and pressurised. Check this by looking at the
pressure gauge “A”, it should read 0.7bar minimum.
.
4
Instructions for Use
4. Open a hot water tap, check that water flows, then close it.
Summer / Winter Selector Button
5. If you are in any doubt about the boiler being filled with water
contact your installation/servicing company or the local gas
company.
Adjust the central heating water temperature control knob “N” to
desired setting.
6. Check that the electrical supply to the boiler is ON at the
external isolator.
For central heating set button “J” to Winter light “K” will illuminate.
The main burner will light. The burner ON light “D” will
illuminate.
7. Check lockout light, refer to boiler safety cutoff reset button.
When the heating is controlled by a room thermostat and/or a
time switch, button “J” must be set to Winter light “K” will
illuminate.
8. Set the switch “B” to 1 situated on the control fascia.
9. Set the summer / winter button “J”, light “L” or “K” will
illuminate.
If a hot water tap is opened while the boiler is on for heating,
priority will be given to hot water.
10. Set “C”, clock/timer (if fitted) and any remote controls as
required.
To turn the heating off for short periods, set button “J” to summer
“Off” light “L” will illuminate.
11. Check the lights “D” and “E” are illuminated on the control
fascia.
To turn on again set button “J” to winter “On”, light “K” will
illuminate.
Close the controls cover door.
In certain circumstances, a surge in water pressure may cause
the appliance to operate momentarily, this will be indicated by
the pump starting and the fan speed increasing. This is quite
normal.
To Turn the Boiler Off
Domestic Hot Water Temperature
Maintenance and Servicing
The sanitary water temperature control knob “M”, see diagram
4, will control the desired temperature of the water until the flow
exceeds the capability of the boiler to give the required
temperature rise.
To ensure the continued efficient and safe operation of the
appliance it is recommended that it is checked and serviced as
necessary at regular intervals. The frequency of servicing will
depend upon the particular installation conditions and usage,
but in general once a year should be enough.
To turn the boiler off, set switch "B" to O.
To turn on again follow the operating instructions.
Then the temperature is determined by controlling the hot water
flow from the tap ie: reduce flow - increase temperature
increase flow - reduce temperature
If this appliance is installed in a rented property there is a duty
of care imposed on the owner of the property by the current
issue of the Gas Safety (Installation and Use) Regulations,
Section 35.
NOTE : The mains incoming water temperature in the winter is
lower than in the summer.
To obtain service, please call your installer or Heatcall (Glowworm’s own service organisation) using the telephone number
behind the controls cover door.
7013
SAFETY VALVE
DISCHARGE PIPE POSITION
Servicing/maintenance should be carried out by a competent
person in accordance with the rules in force in the countries of
destination.
Please be advised that the ‘Benchmark’ logbook should be
completed by the installation engineer on completion of
commissioning and servicing.
All CORGI Registered Installers carry a CORGI ID card, and
have a registration number. Both should be recorded in your
boiler Logbook. You can check your installer is CORGI registered
by calling CORGI direct on :- 01256 372300.
Clearances
HEATING
FLOW
The boiler requires a clearance in front, below and at the sides
of the casing for safety, servicing and maintenance access, see
diagram 2.1.
HEATING
COLD
GAS
HOT
RETURN
WATER SERVICE WATER
SUPPLY
IN
COCK
OUT
Protection Against Freezing
The boiler has a 2 stage built in frost protection. Provided power
and gas are available and there is adequate pressure in the
system, if the water temperature within the appliance falls below
10oC approx. the pump only will come on. If the water temp
continues to fall to 6oC approx. the main burner will fire at min
rate until the water in the appliance is greater than 15oC approx.
This is a separate function to any remote frost protection fitted.
LEVER (OPEN)
HEATING
FLOW/ RETURN
LEVER (OPEN)
COLD WATER
SUPPLY IN/OUT
SLOT (OPEN)
GAS SERVICE
COCK
Diagram 3
5
221742D
Instructions for Use
6941
CONTROLS
FASCIA
PRESSURE
GAUGE ‘A’
SUMMER/ WINTER
BUTTON ‘J’
‘F’
RESET
BUTTON ‘G’
‘L’
SANITARY WATER
TEMPERATURE
CONTROL KNOB ‘M’
CLOCK TIMER
IF FITTED ‘C’
‘P’
‘H’
‘D’
‘Q’
‘K’
‘E’
CENTRAL HEATING
WATER
TEMPERATURE
CONTROL KNOB ‘N’
7565
KEY TO NEON LIGHTS
‘F’
BOILER LOCKOUT
‘H’
LOW WATER PRESSURE
‘L’
SUMMER SETTING
‘K’
MAINS
ELECTRIC
SWITCH ‘B’
WINTER SETTING
‘D’
BURNER IGNITED
‘E’
POWER ‘ON’
‘P’
SANITARY DEMAND
‘Q’
CENTRAL HEATING DEMAND
CONTROLS
COVER
Diagram 4
Cleaning
Other system pipework external to the boiler may require frost
protection.
WARNING. This appliance contains metal parts (components)
and care should be taken when handling and cleaning with
particular regard to edges.
If the boiler is to be out of use for any long periods during severe
weather, it is recommended that the whole system, including
the boiler, should be drained to avoid the risk of freezing. Make
sure that, if fitted, the immersion heater in the cylinder is
switched off.
The boiler casing can be cleaned using a mild liquid detergent
with a damp cloth, then a dry cloth to polish.
Do not use any form of abrasive or solvent cleaner as you may
damage the paint work
If in doubt, contact you installation/servicing company for advice.
Draining and Filling
Boiler Casing
CAUTION. This boiler works in a pressurised system which
must only be drained, refilled and pressurised by a competent
person.
CAUTION. Do not remove or adjust the casing in any way, as
incorrect fitting may result in incorrect operation or failure to
operate at all. If in doubt seek advice from the local gas
company or your installation/servicing company.
Note: If the pressure gauge indicates a loss of system pressure,
that is, less than 0.7bar, YOU MUST CONTACT YOUR
INSTALLER.
Replacement Parts
If replacement parts are required apply to your local supplier or
British Gas.
Pressure Relief Safety Valve
CAUTION. A pressure relief safety valve and discharge pipe is
fitted to the boiler. This valve must not be touched. Should there
be any discharge from the pipe, turn the boiler off, isolate from
the electrical supply and contact your installation/servicing
company.
221742D
Please quote the name of the appliance.
6
1 General Data
C
E
6942
D
Optional flue kits are available
Horizontal top outlet and Vertical.
P
M
N
CL
D
F
CL
G
E
B
9mm
H
K
K
L
J
A
Diagram 1.1
A
B
C
D
E
F
G
H
J
K
L
M
N
P
450
700
300
100
75
138
142
18
135
65
110
138
85
103
TABLE 1
1.1 Installation
Lift Weight
31.7kg (69.89b)
Materials and equipment should be fit for their purpose and of
suitable quality and workmanship.
Total Weight
41.1kg (90.61lb)
1.2 Important Notice
Gas connection
Ø 15mm compression
This boiler is for use only on natural gas, G20.
Heating and return
Ø 22mm compression
Domestic hot water
Ø 15mm compression
Safety valve
Preset 3bar (43.5lbf/in2)
Safety valve discharge
Ø 15mm copper
Water content
1.42 litres (0.31 gallon)
1.3 Sheet Metal Parts
WARNING. When installing or servicing this boiler care should
be taken when handling the edges of sheet metal parts to avoid
any possibility of personal injury.
■ Expansion vessel capacity 6 litres (1.32 gallons)
1.4 Requirements
Heating cold fill
pressure minimum
The installation of this boiler must be carried out by a competent
person in accordance with the current rules in force in the
countries of destination at the time of installtion.
❋ D.H.W
0.7bar
(10.1lbf/in2)
0.8 to 10bar
working pressure
Manufacturer’s instructions, supplied.
■ Maximum Heating
1.5 Data Label
system water
content using
fitted expansion
vessel.
60 litres
(13.2 gallons)
with a cold
fill pressure
of 0.7bar
The data label is on the inner case front, see diagram 1.2.
Electrical supply
230V~50Hz
1.6 Data
Electrical rating
150W fused 3A
Internal Fuse rating
1) Type T2A
Manufacturer’s instructions must not be taken as overriding
statutory requirements.
See table 1 and diagrams 1.1, 1.2. & 1.3.
❋ Boiler starts at an inlet pressure of 0.5bar but
requires 0.8bar for maximum output.
■ For larger systems use an additional expansion
vessel, see Section 4.
The Seasonal Efficiency Domestic Boilers UK (SEDBUK) is
77.7%.
The value is used in the UK Government’s Standard Assessment
Procedure (SAP) for energy rating of dwellings. The test data
from which it has been calculated have been certified by B.S.I.
Approximate gas
rate at max input
7
2.47m3/h
(87.17ft3/h)
221742D
1 General Data
1.7 Gas Supply
1.9 Heating System Controls
The gas installation shall be in accordance with the rules in force
in the countries of destination.
The heating system should have installed: a timer and room
thermostat controlling the boiler.
The supply from the governed meter must be of adequate size
to provide a steady inlet working pressure of 20mbar (8in wg) at
the boiler. With all other appliances operating.
Thermostatic radiator valves may be installed, however they
must not be fitted in a room where the room thermostat is
located.
1.8 Electrical Supply
Note: All systems must have at least one radiator not fitted with
a thermostatic valve.
WARNING. This boiler must be earthed.
The electrical installation shall be in accordance with the current
rules in force in the countries of destination at the time of
installation.
HEPWORTHHEATINGLTD.,
BELPER,DERBYS.DE56 1JT
Connection of the whole electrical system of the boiler and any
heating system controls to the electrical supply, must be through
one common isolator.
COMPACT
80E
9020
Note: For further information, see The Building Regulations
1991 - Conservation of fuel and power, 1995 edition - Appendix
G, table 4b.
All system components shall be of an approved type.
457101
230V~ 50Hz 150W Fused at 3A TYPE : C12 - C32
For use on :I 2H -G20 - 20 mbar NOx Class 3
GC No. 47-047-07A
This boiler is intended exclusively
0086 GB IE
to be installed on a gas supply
with a governed meter
86/AU/587
SPECIFIC WATER RATE 11.22 l/min.
DOMESTIC CIRCUIT PMW = 10 bar
HEATING CIRCUIT PMS
= 2.5 bar
G20
DHW MAX. CH MAX. MIN
HOT BURNER PRESSURE mbar 15.01 15.01 1.71
HEAT INPUT NETT Q = kW
25.92 25.92 10.85
= kW
23.45 23.45 8.79
HEAT OUTPUT P
SERIALNo.
INJECTOR:4.2mm 205769
Isolation should be by a double pole switched fused spur box,
having a minimum contact separation of 3mm in each pole.
The fused spur box should be readily accessible and preferably
adjacent to the appliance. It should be identified as to its use.
Alternatively, a fused 3A 3pin plug and unswitched socket may
be used, provided they are not used in a room containing a bath
or shower.
The mains supply cable and other cables connected to the
boiler must be the PVC flexible type of at least 0.75mm2 (24/
0.20mm) .
The appliance flue type is a C12 and C32. This refers to a concentric
flue where the fan is downstream of the heat exchanger. The C12 is
a horizontal flue termination, and the C32 is a vertical flue termination.
FANNED FLUE
EXPANSION
VESSEL
7641
Diagram 1.2
HEAT EXCHANGER
OVERHEAT
CUT-OFF
LOW WATER
PRESSURE
SWITCH
PRESSURE
DIFFERENTIAL
MICRO SWITCH
MOTORISED
3 WAY VALVE
HOUSING
TEMP.
SENSOR
C.H.
RETURN
221742D
MAIN BURNER
GAS VALVE
TEMP.
SENSOR
VALVE
PUMP
HOUSING
D.H.W.
MICRO SWITCH
PLATE TO PLATE
HEAT EXCHANGER
SAFETY
VALVE
BYPASS
VALVE
D.H.W.
HOT
OUTLET
AUTOMATIC
AIR VENT
D.H.W. C.H.
COLD FLOW
INLET
GAS
8
SAFETY
VALVE
DISCHARGE
Diagram 1.3
2 Boiler Position
2.1 Location
This boiler must be installed in accordance with the rules in
force in the countries of destination.
7087
25 ABOVE THE TOP OF THE BOILER CASE
OR THE FLUE ELBOW IF FITTED
This boiler is not suitable for fitting outside.
Any electrical switch must be positioned so that it cannot be
touched by a person using the bath or shower.
The boiler must be mounted on a flat wall which is sufficiently
robust to take its weight, refer to Table 1, “Data”.
If the location of the boiler or any part of the system is subject
to severe cold weather conditions, it is recommended that a
frost thermostat is fitted. Any part of the system that may be
vulnerable to freezing must be protected.
5
5
450
2.2 Boilers in a compartment
Where the installation of the boiler will be in an unusual position,
the current issue of BS6798 gives detailed guidance on these
requirements.
An existing cupboard or compartment modified for the purpose
may be used, providing minimum clearances are maintained.
Details of essential requirements for cupboard or compartment
design are given in the current issue of BS6798.
The door way opening should be of sufficient size to allow for
easy removal of the boiler.
150
Where the boiler is fitted in a cupboard or compartment,
permanent ventillation is not required.
To achieve minimum "Installation" clearance of 5mm.
The side panels will have to be fitted prior
to boiler mounting.
Any existing compartment air vents must not be removed or
blocked off.
DIMENSIONS IN MILLIMETRES
2.3 Clearances
Diagram 2.1
The boiler should be positioned so that at least the minimum
operational and servicing clearances are provided, see diagram
2.1. Additional clearances may be required around the boiler for
installation.
2.4 Timber Frame Buildings
If the boiler is to be installed in a timber frame building it should
be fitted in accordance with the Institute of Gas Engineers
document IGE/UP/7/1998. If in doubt seek advice from the local
gas undertaking or Hepworth Heating Ltd.
9
221742D
3 Flue and Ventilation
3.1 General
3.6 Room Ventilation
The flue must be installed in accordance with the rules in force
in the countries of destination.
Ventilation must be provided in accordance with the rules in
force in the countries of destination. The boiler is room sealed,
so where the boiler is fitted in a room or space, a permanent air
vent is not required.
3.2 Terminal Position
The minimum acceptable siting dimensions for the terminal
from obstructions, other terminals and ventilation openings are
shown in diagram 3.1.
3.7 Cupboard/Compartment Ventilation
If the boiler is to be fitted in a cupboard or compartment. Refer
to Section 2.2.
The terminal must be exposed to the external air, the position
allowing free passage of air across it at all times.
2816
Car port or similar extensions of a roof only, or roof and one wall,
require special consideration with respect to any openings,
doors, vents or windows under the roof. Care is required to
protect the roof if made of plastic sheeting. If the car port
comprises of a roof and two or more walls seek advice from the
local gas undertaking before installing the boiler.
C
A
If the terminal is fitted within 600mm below plastic guttering, an
aluminium shield 1500mm long should be fitted immediately
beneath the guttering or eaves. If the terminal is fitted within
450mm below painted eaves or a painted gutter, an aluminium
shield 750mm long should be fitted immediately beneath the
guttering or eaves.
B,C
B,C
G
A
F
G
F
F
A
E
K
L
K
G
G
L
K
G
UNDER CAR PORT etc.
3.3 Flue Options
There are various flue systems to choose from, as follows:
Standard Top Outlet Flue Pack - Pt.No. 230483
D
J
F
Standard Rear Outlet Flue Pack - Pt.No. 230482
K
H,I
Extended Top Outlet Flue Pack - Pt. No. 230487
1 Metre Extension Kit - Pt. No. 230484
Optional Wall Liner Kit No. 900862
A Flue Bend Kit or Vertical Flue Kit can be supplied, see
Hepworth Heating "Flue Options Guide" for configurations
available.
MINIMUM SITING DIMENSIONS FOR
FANNED FLUE TERMINALS
POSITION
mm
45o Flue Bend Pack - Pt. No. 230485
A DIRECTLY BELOW AN OPENABLE
WINDOW, AIR VENT, OR ANY
OTHER VENTILATION OPENING
B BELOW GUTTER, DRAIN/SOIL PIPE
C BELOW EAVES
D BELOW A BALCONY
OR CAR PORT
E FROM VERTICAL DRAIN PIPES AND
SOIL PIPES
F FROM INTERNAL OR EXTERNAL
CORNERS
G ABOVE ADJACENT GROUND OR
BALCONY LEVEL
H FROM SURFACE FACING THE
TERMINAL
I FACING TERMINALS
J FROM OPENING (DOOR/WINDOW)
IN CAR PORT INTO DWELLING
K VERTICAL FROM A TERMINAL
L HORIZONTALLY FROM A TERMINAL
90o Flue Bend Pack - Pt. No. 230486
In Line Flue Adapter Kit - Pt. No. 230488
Vertical Flue Kit No. 458115
3.4 Internal Access Flue
All flue assemblies are designed for internal installation, given
that there is sufficient clearances opposite to the flue for the
installation of the flue.
If there is insufficient clearance the flue can be installed from
outside.
For a wall thickness up to 300mm, provided that there is
sufficient space and the optional wall liner kit is used, the flue
can be installed from the inside.
For a wall thickness of over 300mm the external flue hole will
need to be made good from the outside, this also applies if you
use the flue kit without the optional wall liner kit, irrespective of
wall thickness.
300
25
25
25
200
25
25
300
600
1200
1200
1500
300
TERMINAL GUARD TYPE K3
SUPPLIED BY :
Tower Flue Components Ltd.
Morley Road
Tonbridge
Kent
TN9 1RA
Diagram 3.1
3.5 Terminal Guard
A terminal guard is required if persons could come into contact
with the terminal or the terminal could be subject to damage.
If a terminal guard is required, it must be positioned to provide
a minimum of 50mm clearance from any part of the terminal and
be central over the terminal.
The guard should be similar to that shown in diagram 3.1 .
221742D
MINIMUM
SPACING
10
7608
4 Heating System
Diagram 4.1
4.1 General Notes
4.7 Bypass
The boiler is intended for use in a sealed system only.
The bypass is an integral part of the boiler.
4.2 Safety Valve
4.8 Filling Sealed Systems
The safety valve is an integral part of the boiler.
An optional extra filling loop is available Part No. 457120
Provision for filling the system at a low level must be made.
Three methods of filling are shown in diagram 4.3.
It cannot be adjusted but has a manual test device.
4.3 Pressure Gauge
There must be no permanent connection to the mains water
supply, even through a non-return valve.
A pressure gauge is incorporated into the boiler to indicate the
system pressure.
NOTE: It is important that fittings used for connection to potable
water comply with the water undertakers requirements.
The gauge has a cold fill set pointer.
4.9 Corrosion Inhibitor
4.4 Pump
If an inhibitor is to be used in the system, contact the inhibitor
manufacturer so that they can recommend their most suitable
product.
The circulation pump is integral with the boiler.
The remaining circulating pressure head available from the
boiler is shown in diagram 4.1, Glow-worm pump.
When fitting the boiler into an existing system, special care
should be taken to drain the entire system, including radiators,
then thoroughly cleaning out before fitting the boiler whether or
not adding an inhibitor.
4.5 Expansion Vessel
The boiler has an integral expansion vessel with a capacity of
6 Litres. If the system water content exceeds the maximum
quoted in Table 1, Data, an additional vessel should be connected
into the system as close as possible to the central heating return
connection of the boiler, see diagram 4.2.
4.10 Draining
A draining tap must be provided at the lowest points of the
system, which will allow the entire system to be drained. An
additional draining tap MUST be fitted close to the boiler.
The charge pressure shall not be less that the static head at the
point of connection, that is, the height of the top point of the
system above the expansion vessel.
The flow and return isolation valves are provided with drain
points for boiler heat exchanger drainage.
4.6 Flow Rate
A valve must be incorporated in the main flow or return of the
system, valve “A” shown in the flow diagram 4.2. This valve
must be lockable and positioned so that inadvertent closure or
unauthorised interference is not possible. The design differential
can be between 11°C (20°F) and 17°C (30°F), dependent upon
the system resistance and the available pump head.
11
221742D
4 Heating System
ADDITIONAL
EXPANSION
VESSEL
(if required)
6951
METHOD 1
COMBINED
CHECK VALVE
AND VACUUM
BREAKER
TEMPORARY
HOSE
SERVICING
VALVE
HOSE
UNIONS
SUPPLY
PIPE
OPTIONAL FILLING
KIT AVAILABLE
No. 457120
SUPPLY STOP
VALVE
METHOD 2
HEATING
DOUBLE CHECK SYSTEM
VALVE ASSEMBLY
TEMPORARY
HOSE
FILLING
POINT
HEATING
SYSTEM
3132
HOT
BOILER
ALTERNATIVE METHODS OF FILLING
COLD SUPPLY
DOMESTIC
WATER
RETURN
HEATING
CIRCUIT
HOSE
UNIONS
’A’
FLOW
CONTROL
VALVE
DRAIN
POINT
SUPPLY
PIPE
SERVICING
VALVE
SUPPLY STOP
VALVE
METHOD 3
Diagram 4.2
CISTERN
OVERFLOW
HEATING
SYSTEM
PRESSURE
SERVICING
REDUCING
VALVE
VALVE
SUPPLY
STOP VALVE
SUPPLY
PIPE
HOSE
UNIONS
DOUBLE CHECK
VALVE ASSEMBLY
Diagram 4.3
5 Domestic Hot Water System
5.1 General
5.3 “Hard” Water Areas
The domestic hot water service must be in accordance with the
rules in force in the countries of destination.
In areas where the water is “hard”, more than 200mg/litre, it is
recommended that a proprietary scale reducer is fitted in the
cold water supply to the boiler. Consult the local water company
for additional advice.
5.2 Water Pressure
A double check valve assembly must be fitted upstream of the
scale reducer. For the relative position of the scale reducer and
pressure reducing valve, if required, refer to the manufacturer’s
instructions.
For the minimum and maximum working pressures of the
domestic hot water circuit of the boiler refer to diagram 1.2.
If the cold water supply pressure exceeds the maximum, a
governor must be fitted in the supply to the boiler to reduce the
pressure to within the limits given.
221742D
12
6 Installation Preparation and Gas / Water Connections
The installation requires the following components :Plumbing jig Carton
2.
Boiler Carton
3.
Flue Pack
SAFETY DISCHARGE PIPE
ROUTING POSITION
6956
1.
6.1. Plumbing Jig
Remove from the carton the wall template, then follow the
instructions given on the template.
Note: It is important that the wall hanging bracket and the
service cock bracket are fitted to a flat and true wall area for
correct alignment with the boiler. Where this cannot be achieved
it is acceptable to pack out the service cock bracket to obtain the
correct alignment with the wall hanging bracket.
HEATING
FLOW
HOT
WATER
OUT
COLD
GAS
SERVICE WATER
SUPPLY
COCK
IN
HEATING
RETURN
6.2 Gas Connection
Provision is made for the gas supply to be connected from
below the boiler, see diagrams 1.1 and 6.1 for position.
Refer also to “Gas Supply”, Section 1.7.
Make the gas supply connection to the gas service cock. While
making the connection, do not subject the gas service cock to
heat as you may damage the seals.
LEVERS (OPEN)
HEATING
FLOW/ RETURN
6.3 Water Connections
Provision is made for the domestic cold water inlet to be
connected from below or through an internal wall at the rear of
the boiler, see diagram 1.1 and 6.1 for position.
LEVERS (OPEN)
COLD WATER
SUPPLY IN/OUT
SLOT (OPEN)
GAS SERVICE
COCK
Diagram 6.1
6.4 Safety Valve Discharge
Refer also to Section 5 “Domestic Hot Water System”.
Provision is made for the water connections to be connected
from below or from above, passing down either side of the
boiler. Take care that any pipework connected from above will
clear the expansion vessel. Refer to the wall template. If
connecting from above a vertical piping kit 457160 is available
and is recommended.
WARNING. It must not discharge above an entrance or window
or any type of public access area.
NOTE: Top rear flue outlet is not possible with a vertical piping
kit.
This must be extended, using not less than 15mm od metal
pipe, to discharge, in a visible position, outside the building,
facing downwards, preferably over a drain. The pipe must have
a continuous fall and be routed to a position so that any
discharge of water, possibly boiling, or steam cannot create any
danger to persons, damage to property or external electrical
components and wiring.
A short discharge pipe is supplied loose with the boiler, which
when fitted to the safety valve, will end below the boiler the
position is next to the heating return, for position see diagram
6.1.
If necessary, temporarily fit the boiler.
Flush out the domestic water and heating system before
connecting the boiler.
Make the connections to the domestic hot water outlet and the
heating system by means of the isolating valves, see diagram
6.1.
Note. To ease future servicing it is advisable to use a compression
type fitting to extend the discharge pipe.
While making the connections. Do not subject any of the
isolating valves to heat as you may damage the seals.
Make sure that the drain and operating screw heads on the
isolating valves are accessible.
13
221742D
7 Flue Preparation
7510
TOP OUTLET FLUE PACK
FLUE LENGTH
FLUE LENGTH
MAX 840mm (extd.)
MAX 570mm (std)
MAX 840mm (extd.)
MAX 570mm (std)
5mm
15mm
54mm
15mm
239mm
SCREW
& TAPE
’X’
TOP OUTLET/
SIDE FLUE
TOP OUTLET/
REAR FLUE
RHD SIDE FLUE ’X’ plus 254mm = FLUE LENGTH
LHD SIDE FLUE ’X’ plus 10mm = FLUE LENGTH
SCREW
& TAPE
’Y’
’Y’ plus 69mm = FLUE LENGTH
STD./EXTD. TOP OUTLET FLUE PACK & 1 METRE EXTENSION KIT
SCREW
& TAPE
2 x 1 metre extension kits may be joined together.
15mm
VIEW ’B’
SCREW
& TAPE
SCREW
& TAPE
’Y’
’X’
VIEW ’B’
RHD SIDE FLUE ’X’ plus 254mm = FLUE LENGTH
LHD SIDE FLUE ’X’ plus 10mm = FLUE LENGTH
REAR OUTLET FLUE PACK
REAR FLUE ’Y’ plus 69mm = FLUE LENGTH
REAR OUTLET FLUE PACK & 1 METRE EXTENSION KIT
FLUE LENGTH
510mm MAX.
2 x 1 metre extension kits may be joined together.
15mm
SCREW
& TAPE
’Y’
’Y’ plus 95mm = FLUE LENGTH
FLUE
PACKS
TOP STD.
REAR
SIDE R.H.
SIDE L.H.
TOP EXTD.
REAR
SIDE R.H.
SIDE L.H.
REAR STD.
REAR
80mm
FOAM
SEAL
’Y’
15mm
SCREW
& TAPE
’Y’ plus 95mm = FLUE LENGTH
MAXIMUM DISTANCE FROM
MAXIMUM
"Y"
"X"
FLUE
BOILER MOUNTING FACE
BOILER CASING TO
LENGTH
MINIMUM
WALL
THICKNESS
MINIMUM
FLUE
LENGTH
75
75
75
144
334
90
570
570
570
500
-
316
560
75
75
75
144
334
90
840
840
840
770
-
586
830
75
170
510
415
-
TO EXTERNAL WALL FACE EXTERNAL WALL FACE
NOTE :
IF IT IS NECESSARY TO CUT THE DUCTS
TO ACHIEVE THE "FLUE LENGTH" MAKE SURE
THAT THE OVERLAPS ARE AS FOLLOWS :THE OVERLAP FOR AIR DUCT = 25mm
THE OVERLAP FOR FLUE DUCT = 50mm
7639
80mm
FOAM
SEAL
SCREW
& TAPE
THE MAXIMUM LENGTHS CAN BE INCREASED
BY AN ADDITIONAL 2 METRES WITH THE USE
OF THE 1 METRE EXTENSION KITS.
NOTE :THIS APPLIES TO STANDARD KITS ONLY.
Diagram 7.1
221742D
14
7 Flue Preparation
7148
7.1 Flue Position and Length
Determine flue application, length and terminal position before
starting, refer to diagram 7.1.
Note: The Standard Top Outlet Flue Pack and the Extended Top
Outlet Flue Pack contains a flue duct extension piece complete
with "O" rings, this should be discarded.
OPTIONAL
FLUE
COLLAR
If you are using a Flue Bend or a Vertical Flue Kit, please follow
the instructions supplied with the kit.
To make a neat finish to the flue outlet a flue collar kit, part No.
443286, with instructions, is available, see diagram 7.2.
7.2 Flue Assembly
WITH WALL LINER KIT ONLY
Extend the telescopic flue to the required length, making sure
that the minimum overlap is no less than 25mm, and that the flue
terminal projects 15mm minmum beyond wall face, see diagram
7.1.
WALL THICKNESSUP TO 300mm
7102
Diagram 7.2
Note: If required an optional wall liner kit, part no. 900862, is
available complete with instructions.
FOAM SEAL
Carefully drill though air duct pilot hole and secure with self
tapping screw provided in fittings pack, see diagram 7.1.
Seal the joint with the tape provided.
If the flue system requires the addition of flue extension kits,
drill, seal and secure them with the self tapping screw and tape
provided.
Q
Note: Should any one of the flue sections require cutting to
obtain desired flue system length, cut at the end opposite the
expanded end.
15mm
If the boiler is not to be fitted for some time cover the hole in the
wall.
FOAM SEAL
Q-35mm
7.3 Internal Access Flue
If access to the outside wall is not practical, the flue system can
be installed from inside. Use of the optional wall liner kit is
required.
Q
7.4 Rear Outlet Flue Fixing
Fit the self adhesive foam seal provided in the flue pack around
the air duct at the position shown in diagram 7.1.
WALL THICKNESSOVER 300mm
Make good around the flue outside after installation of the boiler.
Diagram 7.3
Important: If the wall liner kit is used, the self adhesive foam seal
included in the wall liner kit must be used in place of the one
supplied with the flue pack, see diagram 7.3 for position of self
adhesive seal.
7.5 Top Outlet Side or Rear Flue Fixing
Make good the area around the flue inside and outside after
installation of the boiler.
Important: If the wall liner kit is used, the self adhesive foam seal
included in the wall liner kit must be used in place of the one
supplied with the flue pack, see diagram 7.3 for position of self
adhesive seal.
7.6 Flue Positioning
Push the flue assembly into and through the hole such that it is
within the wall, and does not stick out into the room. Do not push
the flue assembly too far into the hole as it has to be pulled back
into the boiler and secured.
15
221742D
8.1 Boiler Mounting
Remove the inner case front, secured by two clamps at the
bottom lift up and unhook from the threaded lugs at the top, see
diagram 8.1.
RETAINING
LUG (4)
COMBUSTION
CHAMBER PANEL
7011
8 Mounting the boiler
Remove the combustion chamber panel transit screws, see
diagram 8.2. (It will not be necessary to refit these).
Slide the combustion chamber panel upwards to disengage
from the retaining lugs, pull forward to remove, see diagram
8.2.
Remove the fan electrical connections by pulling the plastic
boots not the wires. Remove the tubes from fan, noting the
colour tubes positions. see diagram 8.3.
Remove the fan and flue collector assembly by pulling it forward
see, diagram 8.3.
Remove the rear outlet restrictor plate and retain if using the
rear flue outlet, see diagram 8.4.
TRANSIT
SCREW (2)
REAR FLUE ONLY Fit the flue spigot supplied seperately, see
diagram 8.5.
Diagram 8.2
CLEAR
Note: Should the side clearances be less than 30mm. It will be
necessary to fit the side panels before mounting the boiler.
Refer to Section 10.10 for fitting.
AIR
PRESSURE
TUBE (3)
Remove the protective caps from the boiler water pipes.
Fit the sealing washers (supplied in the fittings pack) to the
boiler water pipes by inserting them into the tubing nuts (the
nipples on the washers will hold them in position), see diagram
8.8.
RED
ELECTRICAL
CONNECTIONS
6965
Lift the boiler into position on the top mounting brackets use
hand holes provided, see diagram 8.6.
SECURING
CLAMP (2)
6984
TOP FLUE ONLY Remove the blanking plate from the top of
the boiler and use to blank the hole where the rear restrictor
plate (discard) was fitted.
RETAINING LIP
AT REAR
FAN
INNER CASE
FRONT
Pull
Forward
THREADED
LUG (2)
221742D
Diagram 8.1
Diagram 8.3
16
8 Mounting the boiler
6955
8.2 Water and Gas Connections
RETAINING LUG
Locate the boiler water pipes and gas supply pipe making sure
the washers are retained in the tubing nuts onto the isolation
valves, fully push the boiler back, see diagram 8.8.
BOILER
Ensure the bottom boiler bracket is sitting on top of the service
cock bracket, see diagram 8.6.
Secure all the tubing nuts finger tight, plus 3/4 turn maximum.
Connect the gas pipe to the isolation valve ensuring that the
sealing washer (supplied fitted) is in position.
8.3 Boiler Securing
Secure the boiler to the service cock bracket with the screws
provided in the fittings pack, see diagram 8.6.
TOP MOUNTING
BRACKET
An anti theft kit is available, Kit No. 457110.
8.4 Discharge Pipe
Fit the short discharge pipe to the safety valve using the nut and
sealing washer supplied in the fittings pack, see diagram 8.9.
Extend the discharge pipe, using only a compression type fitting
to join the discharge extension, refer also to Section 6.4 “Safety
Valve Discharge”.
7644
RESTRICTOR
PLATE
AIR PRESSURE
SWITCH
HAND
HOLES
SECURING
SCREW (3)
GASKET
FLUE
SPIGOT
7304
Diagram 8.4
SECURING
SCREW (3)
BOILER BRACKET
(On Top)
SERVICE COCK
BRACKET
SECURING SCREW
Diagram 8.5
Diagram 8.6
17
221742D
8.5 Rear Outlet Flue Fixing
FITTED TO HYDRO BLOCK
Make sure that the ductings do not slope down towards the
boiler.
8080
8 Mounting the boiler
GAS SUPPLY
Fit the air duct into the flue spigot by pulling the air duct into the
flue spigot, locating cutouts. Turn the air duct anti-clockwise to
lock into the cutouts, see diagram 8.10.
Note: It is important the correct restrictor plate is fitted or refitted,
see restrictor table.
Fit the flue connecting sleeve onto the fan, see diagram 8.11.
Fit the fan to the flue ducting, see diagram 8.11.
Fit the fan and flue collector the electrical connections and air
pressure tubes to the fan.
SERVICE
COCKS (4)
Refit the combustion chamber panel.
Make the outer wall weatherproof. A Flue Collar Kit Part No.
443286 is available.
8.6 Top Outlet Side or Rear Flue Fixing
Position the restrictor plate supplied in the loose items pack,
between the flue elbow and boiler , (gasket facing upwards). Fit
the flue elbow to the restrictor plate and top of the boiler using
the four screws supplied, see diagram 8.7.
Tighten the four screws of the flue elbow evenly to ensure a
good seal at the gasket.
Note: It is important the correct restrictor plate is fitted or omitted
where instructed.
SEALING
WASHER (4)
(INSERT INTO
TUBING NUT)
For top flue outlet be sure to use the correct restrictor plate, all
restrictors are supplied with the appliance, see restrictor table.
RESTRICTOR TABLE
FLUE OUTLET
MAX.
FLUE
LENGTH
USE RESTRICTOR
PLATE MARKED
1. REAR
0M to 0.5M
COMP 75E/80E
0.5M-MAX
or
'F'
0.5M to 2.5M
COMP 75E/80E
0.5m-3.5M
or
'G'
3. TOP
0M to 2.5M
COMP 75E/80E
2.5M-MAX
or
'E'
FLUE ELBOW
(REAR FLUE
SHOWN)
RESTRICTOR/
GASKET
SECURING
SCREW (4)
PRODUCTS
PROBE
DISCHARGE
PIPE
PRESSURE
GAUGE
CONNECTION
SAFETY
VALVE
DISCHARGE
SEAL
UNION CONNECTION
7405
2. REAR
7022
Diagram 8.8
DISCHARGE
PIPE
Diagram 8.7
221742D
Diagram 8.9
18
8 Mounting the boiler
Make sure that the ductings do not slope down towards the
boiler.
Remove the fan from the flue collector, secured with a screw
and retaining lip.
Fit the flue connecting sleeve onto the fan, see diagram 8.12.
7404
Fit the fan to the flue ducting, Holding it up in position fit the flue
collector, see diagram 8.13.
Secure the fan to the flue collector with the securing screw and
retaining lip, see diagram 8.14.
Fit the electrical connections and air pressure tubes to the fan.
Refit the combustion chamber panel.
Push
to fit
Make the outer wall weatherproof. A Flue Collar Kit Part No.
443286 is available.
FLUE
CONNECTING
SLEEVE
FAN
7307
7305
Diagram 8.12
AIR
DUCT
FLUE
DUCTING
RETAINING
LIP
FLUE
CONNECTING
SLEEVE
FAN
(Push up
to fit)
FLUE
SPIGOT
TAB (2)
CUTOUT (2)
FLUE
COLLECTOR
FLUE
DUCTING
FLUE
DUCTING
Diagram 8.13
CLEAR
7306
FLUE
CONNECTING
SLEEVE
7308
Diagram 8.10
ELECTRICAL
CONNECTIONS
RED
FAN
AIR
PRESSURE
TUBE (2)
FLUE
CONNECTING
SLEEVE
Diagram 8.11
19
FAN
SECURING
SCREW
RETAINING
LIP
Diagram 8.14
221742D
9.1 Supply Cable Connection
CAUTION: To prevent an induced current from switching the
central heating on, when not required, it is important that the
heating system control cables are separated from the other
mains supply cables.
CONTROLS
FASCIA
SECURING
SCREW (2)
6964
9 Electrical Connections
Open the controls cover door. Remove the two screws securing
the controls facia, see diagram 9.1.
Hinge the control fascia open.
The boiler requires a permanant mains supply through an
external isolator which must also isolate any heating system
controls, see diagram 9.2.
Any heating system controls must not interrupt the permanent
mains supply to the boiler.
Using PVC cable of a suitable length and rating as stated in
Section 1.8 “Electrical Supply”, route the mains supply cable
and connect to the appropriate terminals of the connector block,
restrain with the cable clamp supplied, see diagram 9.2.
CONTROLS COVER
Diagram 9.1
Make the earth cable of a greater length so that if the cable is
strained the earth would be the last to become disconnected.
CAUTION: It is ESSENTIAL to make sure that the polarity is
correct.
RED
LINK
CONNECTION
BLOCK
9.2 Heating System Controls
All external controls and wiring are required to provide a
minimum of reinforced insulation at 250Vrms between the parts
of those devices operating at mains hazardous voltage and the
user accessible parts af those devices.
CABLE
CLAMP
7024
Standard colours are, Brown - Live, Blue - Neutral, Green and
Yellow - Earth.
GROMMET
R2
R1
Note: For further information, see The Building Regulations
1991 - Conservation of fuel and power, 1995 edition - Appendix
G, table 4b.
N
If electrical controls are not to be used to regulate the heating
system, do not remove the red link cable.
L
When any form of external electrical control is being used to
regulate the heating system, remove the red link cable and
connect heating system controls in series.
The mains cable outer insulation must not be cut back external
to the plug.
SCREW (2)
9.3 Clock/timer Kit (if applicable)
MAINS
CABLE
Fit the clock/timer kit following the appropriate sections of the
instructions supplied with it..
9.4 Frost Thermostat
If the installation requires protection by a “frost thermostat”,
connect a single pole type, to the appropriate terminals of the
connector.
Keep all cables away from hot surfaces.
9.5 Electrical Test
Carry out preliminary electrical system checks as below:
1. Test insulation resistance to earth of mains cables.
2. Test earth continuity and short circuit of all cables
3. Test the polarity of the mains.
Refit the control fascia.
Diagram 9.2
221742D
20
EXTERNAL CLOCK
TO BOILER
RED LINK.
REMOVE WHEN
CONNECTING ANY
HEATING SYSTEM
CONTROLS
5 WAY TERMINAL BLOCK
INTEGRAL CLOCK
(N)
(R1)
TO BOILER
5 WAY TERMINAL BLOCK
(L)
(L)
7100
9 Electrical Connections
(N)
(R1)
(R2)
(R2)
RED
LINK
MAINS
POTENTIAL
FROST STAT.
SWITCH
CONTACTS
CLOCK
JUNCTION
BOX
TIME
CONTROL
3 AMP
FUSE
L
JUNCTION
BOX
E
230V~50Hz
DOUBLE
PERMANENT MAINS
POLE
N SUPPLY
ISOLATOR
230V~50Hz
FROST STAT. NO ROOM STAT.
INTEGRAL CLOCK
TO BOILER
5 WAY TERMINAL BLOCK
3 AMP
FUSE
DOUBLE
POLE
ISOLATOR
230V~50Hz
PERMANENT
MAINS SUPPLY L
(L)
(N)
(R1)
(R2)
ROOM
THERMOSTAT
N
MAINS
POTENTIAL
FROST STAT.
FROST
THERMOSTAT
E
ELECTRICITY SUPPLY CONNECTIONS
INTEGRAL CLOCK
TO BOILER
JUNCTION
BOX
MAINS
POTENTIAL
ROOM STAT.
5 WAY TERMINAL BLOCK
3 AMP
FUSE
(L)
(N)
(R1)
(R2)
L
3 AMP
FUSE
L
DOUBLE
POLE
ISOLATOR
E
230V~50Hz
PERMANENT MAINS
N SUPPLY
230V~50Hz
PERMANENT MAINS
DOUBLE
N SUPPLY
POLE
ISOLATOR
RED LINK.
REMOVE WHEN
CONNECTING
SYSTEM CONTROLS
230V~50Hz
230V~50Hz
FROST STAT. ROOM STAT. USED AS LINK
MAINS POTENTIAL
ROOM STAT.
JUNCTION
BOX
E
RED LINK.
REMOVE WHEN
CONNECTING
SYSTEM CONTROLS
INTEGRAL CLOCK
TO BOILER
5 WAY TERMINAL BLOCK
230V~50Hz ROOM STAT. NO FROST STAT.
(L)
INTEGRAL CLOCK
(N)
(R1)
TO BOILER
230V~50Hz
POTENTIAL
FROST STAT.
5 WAY TERMINAL BLOCK
(L)
(N)
3 AMP
FUSE
L
DOUBLE
N
POLE
ISOLATOR
(R2)
(R1)
(R2)
JUNCTION
BOX
E
230V~50Hz
PERMANENT MAINS
SUPPLY
3 AMP
FUSE
POTENTIAL FREE
ROOM STAT.
RED LINK.
REMOVE WHEN
CONNECTING
SYSTEM CONTROLS
L
230V~50Hz
DOUBLE
PERMANENT MAINS
POLE
N SUPPLY
ISOLATOR
230V~50Hz
ROOM STAT.
POTENTIAL
FREE ROOM STAT. NO FROST STAT.
E
230V~50Hz
POTENTIAL
ROOM STAT.
RED LINK.
REMOVE WHEN
CONNECTING
SYSTEM CONTROLS
230V~50Hz
FROST STAT.
Diagram 9.3
21
221742D
10 Commissioning
Please ensure the “Benchmark” logbook is completed and left
with the user.
The burner pressure is factory preset and no adjustment should
be required.
10.1 Filling Domestic Water Circuit
Check the burner pressure is within +/-0.2mbar. of 15.01mbar.
If this is incorrect, the burner pressure may be adjusted to the
correct setting by turning the hot water gas pressure adjuster
(potentiometer), located on the control board. To gain access
remove the two screws securing the controls facia, see diagram
9.1.
Check that the boiler is isolated from the electrical supply, at the
external isolator.
Fully open the domestic water supply stop cock or valve in the
supply to the boiler.
Hinge the control facia forward.
Open the inlet domestic water isolation valve, lever in line with
the valve body, see diagram 6.1.
Remove the plastic plugs. Using the burner adjusting tool
supplied. (clockwise to increase), see diagram 10.2. Turn the
adjuster slowly, always making adjustment by reducing below
the required pressure then increasing up to the required setting.
Open all hot water draw-off taps and close them when water
flows. Check for water soundness of the whole domestic water
system and boiler.
Close the hot water draw off.
10.2 Filling the Heating System
If the maximum pressure cannot be obtained, check that the gas
supply of adequate size, refer to Section 1.7.
Open the two central heating isolating valves, levers in line with
the valve body, see diagram 6.1.
10.5 Gas Rate Modulation
Flush, fill and vent the system refer to Section 4.8 “Filling
Sealed Systems”.
The burner pressures are factory preset and no adjustment
should be required.
WARNING. SEVERAL COMPONENTS OPERATE ON MAINS
VOLTAGE AND WITH THE OUTER CASE REMOVED, LIVE
COMPONENTS BECOME EXPOSED.
When checked if they are not consistant with the information in
table 1. the following steps should be taken.
Fully open a domestic hot water tap ensure there is no modulation.
Turn the domestic burner pressure potentiometer to minimum
by turnining anticlockwise with the tool supplied (do not force it),
see diagram 10.2.
Make sure that the automatic air vent is operating correctly.
Take care not to splash any of the electrical components.
Open the controls cover.
Carefully turn the minimum stop screw on the gas control valve.
When the correct setting is achieved adjust the potentiometer
on the control board (PCB) until the maximum is achieved. If it
is not possible to abtain the maximum required turn the
potentiometer fully clockwise (do not force it). Removing the
cover screw on the main gas control valve and turn the adjustment
screw until a pressure of 1mbar above the maximum stated in
table 1. is achieved. Refit the cover and adjust the potentiometer
to give the stated maximum setting by turning below the setting,
then slowly increasing upwards.
Refer to diagram 4 Instructions for Use. Operate button “J”
between “L” summer and “K” winter to ensure that water flows
through all parts of the boiler and air is not trapped in the boiler
internal bypass.
Pressurise the system until the pressure is 1.5bar. Check the
heating system and boiler for water soundness.
Check the operation of the safety valve by turning the safety
valve knob in the direction of the arrow.
Lower the pressure to the initial cold fill design pressure, refer
to Table 1. Position the set pointer on the boiler pressure gauge
at this pressure also.
10.6 Domestic Water Flow Rate
This is factory preset and can not be adjusted.
Refit inner case front.
10.7 Burner Pressure - Heating
10.3 Preparation for Lighting
The burner pressure is factory preset and no adjustment should
be required.
Isolate the boiler from the mains electrical supply at the external
isolator.
Purge gas supply test for soundness . Turn on the gas service
cock, slot in line with the length of the cock.
Check that all remote heating system controls, room thermostats,
integral clock and the like are switched on/programmed and
calling for heat.
Loosen the burner pressure test point screw and connect a
suitable pressure gauge, see diagram 10.1.
Refer to diagram 4 Instructions for Use. Set button “J” to “K”
winter, see diagram 4.
10.4 Burner Pressure - Hot Water
The pump will circulate water through the boiler and the main
burner will light.
Connect the electrical supply; the pump will operate for about
30 seconds, then the pump will stop.
Check that the burner pressure, with the heating system cold to
prevent any modulation of the gas pressure, is within +/0.2mbar of 15.01mbar, the central heating pressure.
Fully open the largest hot water draw off tap whereby the main
burner will light, the flames gradually increasing to the maximum.
If the burner pressure is incorrect, it may be adjusted to the
correct setting by turning the central heating gas pressure
adjuster (potentiometer), located on the control board to gain
access remove the two screws securing the controls facia.
Check the soundness of the boiler gas joints, with the main
burner on, using a leak detection fluid. Take care not to splash
any of the electrical components.
Using the burner adjusting tool supplied. (clockwise to increase),
see diagram 10.2. Turn the adjuster slowly, always making
adjustment by reducing below the required pressure then
increasing up to the required setting.
To achieve this flow rate a water pressure of at least 0.8bar is
required during commissioning, although subsequently the
appliance will work at a minimum pressure of 0.5bar.
This flow rate should prevent any modulation of the gas
pressure.
221742D
Isolate the boiler from the electrical supply.
22
10 Commissioning
Remove the pressure gauge and tighten the test point screw.
10.11 Instruct the User
Test for gas soundness around the burner pressure test point
with the main burner alight, using leak detection fluid. Take care
not to splash any of electrical components.
Instruct and demonstrate the lighting procedure, then advise
the user of the efficient and safe operation of the boiler.
Replace plastic plugs and refit the control fascia.
Instruct and demonstrate the operation of any heating system
controls.
10.8 Temperature Settings
Advise the user on the use and maintenance of any scale
reducer and pass on any relevant instructional documents.
The maximum temperature setting for the domestic hot water
outlet is 65oC.
Advise the user that to ensure the continued efficient and safe
operation of the appliance it is recommended that it is checked
and serviced at regular intervals. The frequency of servicing will
depend upon the particular installation and usage, but in general
once a year should be enough.
The maximum flow temperature setting for central heating is
80oC.
10.9 Heating System - Commissioning
Draw attention, if applicable, to the current issue of the Gas
Safety (Installation and Use) Regulations, Section 35, which
imposes a duty of care on all persons who let out any property
containing a gas appliance.
Check that all remote controls and integral clock are calling for
heat.
Fully open all radiator valves.
It is the Law that any servicing is carried out by a competent
person.
Set the heating system in operation and balance the radiators.
Refer to Section 4.6 and diagram 4.1.
Advise the user of the precautions necessary to prevent damage
to the system and building in the event of the heating system
being out of use during frost and freezing conditions.
Allow the system to reach maximum temperature then switch
off, isolate the boiler from the electrical supply and drain the
system rapidly whilst still hot.
Reminder - Leave these instructions and the “Benchmark”
logbook with the user.
Remove the inner case front.
Fill and vent the system as described in Section 10.2 “Filling the
Central Heating Circuit”. Add inhibitor, if applicable, refer to
Section 4.9 “Corrosion Inhibitor”.
6989
Lower the pressure to the initial cold fill design pressure, using
the external draining tap, close to the boiler, refer Table 1 and
Section 4.10.
10.10 Completion
Fit the side panels, hook into the threaded lugs at the top. see
diagram 10.4.
Fit the case base, slide back engage the rear lugs, secure with
four screws, see diagram 10.3.
GAS
CONTROL
VALVE
Set the boiler and any remote heating control to the desired
settings, then close the control cover door.
EARTH LEAD
CABLE ENTRY COVER
BURNER
PRESSURE
TEST POINT
Diagram 10.1
SECURING SCREW (2)
Slacken do not remove
7649
Fit the outer case front by locating it on one side then wrap it
around locating it on the opposite side, slide down locating on
to the threaded lugs at the top and behind the controls cover at
the bottom, secure with nuts ,see diagram 10.5.
CLOCK-TIMER
COVER
PLASTIC
PLUG (2)
IGNITION
LEADS (2)
SENSING
LEAD
SECURING
SCREW (4)
CONTROL BOARD
COVER
BURNER PRESSURE
ADJUSTING TOOL
DOMESTIC HOT
WATER BURNER
PRESSURE
POTENTIOMETER
HEATING
BURNER PRESSURE
POTENTIOMETER
Diagram 10.2
23
221742D
7020
10 Commissioning
CASE
BASE
7235
WRAP AROUND
SECURING SCREWS
CUTOUT
CUTOUT
7021
Diagram 10.3
SECURING
NUT (2)
SIDE
PANEL
SECURING
SCREW (2)
OUTER
CASE
FRONT
SECURING
SCREW (2)
Diagram 10.4
221742D
Diagram 10.5
24
11 General Data
11.1 Servicing or Replacing Parts
11.3 Isolation of Boiler
To ensure the continued efficient and safe operation of the
boiler it is recommended that it is checked and serviced as
necessary at regular intervals.
Before starting any servicing or the replacement of parts, isolate
the boiler from the electrical supply at the external isolator.
When servicing or replacing any cold/hot water or heating
system components close all water cocks and drain appliance.
The frequency of servicing will depend upon the particular
installation conditions and usage, but in general once a year
should be enough.
Close the gas service cock, see diagram 6.1.
BEFORE DRAINING THE BOILER, REFER TO SECTION
11.6.
The servicing of this boiler must be carried out by a competent
person in accordance with the rules in force in the countries of
destination.
11.4 Outer Case Front Removal
NOTE: To obtain a products of combustion reading, remove
the cap from the analyser probe positioned on the top of the
boiler, see diagram 12.7. Disconnect the analyser tube after
use replace the cap.
Remove the two nuts securing the outer case front then lift up
unhook the case at the top from the threaded lugs, pull it off on
one side to release then remove, see diagram 10.5.
Typical values for this boiler at maximum domestic hot water
demand is:- CO2 = 5.8 - 7 and CO < 0.006. These are based
on a 300mm length rear flue.
11.5 Inner Case Front
Remove the inner case front, secured by two clamps at the
bottom lift up and unhook at the top, see diagram 8.1.
Make sure the appliance does not modulate whilst checking
combustion and allow the appliance to warm up for 15 minutes
before taking a reading.
11.6 System Pressures and Draining
All parts containing water of the central heating circuit within the
boiler, are under the system pressure. Before any parts of this
circuit are disconnected, reduce the system pressure at the
external draining tap, turn the central heating isolating valves
off, and drain at the drain points on the appropriate valves, see
diagram 6.1.
Unless stated otherwise, parts removed or renewed during
servicing should be fitted in the reverse order to removal.
After completing any servicing, or renewing of gas carrying
components, ALWAYS test for gas soundness and carry out
functional checks of controls.
All water containing parts of the domestic hot water circuit of the
boiler will be under the supply water pressure. Before any parts
of this circuit are disconnected, turn the domestic cold water
isolating valve off, open the hot water taps to reduce the water
pressure in the boiler, close the hot water isolating valve and
drain the boiler at the valves, see diagram 6.1.
Dispose of all used sealing washers, gaskets and “O” rings
when renewing components.
Use the new ones supplied with the replacement.
11.2 Data Label
The data label is positioned on the inner case front, refer to
diagram 1.2.
After replacing any water containing part of the central heating
circuit, make up the water loss, vent all air and pressurise the
system. Refer to “Commissioning” in the Installation Instructions.
Check for water soundness and that the safety valve seats
without leaking.
12 Servicing
12.1 Isolation and Access REAR FLUE ONLY
Remove the fan electrical connections by pulling the boots not
the wires and air pressure switch tubes, see diagram 12.2.
Before commencing, refer to Section 11.
Remove the fan.
Remove the combustion chamber panel unhook and lift off, see
diagram 8.2.
Remove flue collector assembly by pulling it forward see,
diagram 12.3.
Remove the fan electrical connections by pulling the boots not
the wires and air pressure switch tubes, see diagram 8.3.
Disconnect the three electrode leads, see diagram 12.1. (White
lead sensing electrode).
Remove the fan and flue collector assembly by pulling it forward
see, diagram 8.3.
Remove the burner retaining bracket by sliding it out, see
diagram 12.4.
Disconnect the three electrode leads, see diagram 12.1. (White
lead sensing electrode).
Carefully pull the burner forward to remove, see diagram 12.5.
Take care not to damage the combustion chamber insulation.
Remove the burner retaining bracket by sliding it out, see
diagram 12.4.
12.2 Cleaning Heat Exchanger
Carefully pull the burner forward to remove, see diagram 12.5.
Take care not to damage the combustion chamber insulation.
Place a sheet of paper or similar in the combustion chamber, to
act as a collector for deposits removed.
12.2 Isolation and Access HORIZONTAL TOP
FLUE OUTLET ONLY
Brush the heat exchanger with a suitable brush, remove paper
together with any debris.
Take care not to damage the insulation.
Before commencing, refer to Section 11.
Do not use a brush with metallic bristles.
Remove the combustion chamber panel unhook and lift off, see
diagram 8.2.
25
221742D
12 Servicing
Before replacing any of the parts removed during servicing,
inspect the condition of all seals and joints, renewing them as
necessary.
12.3 Cleaning Main Burner
Use a vacuum cleaner or suitable brush to clean the burner
thoroughly, making sure that all burner ports are clear and
unobstructed.
Check the condition of the combustion chamber insulation.
If renewing, refer to Section 4.27.
Do not use a brush with metallic bristles.
12.4 Service Checks
Check the main injector, cleaning or renewing as necessary,
refer to Section 14.3.
SECURING
SCREW (3)
LEADS (3)
BURNER
7648
SENSING
ELECTRODE
IGNITION
ELECTRODE
Pull bracket
forward to
remove
SILICONE
SLEEVE (3)
Diagram 12.1
ELECTRICAL CONNECTIONS
GUIDE
7306
IGNITION
ELECTRODE
BURNER
RETAINING
BRACKET
6962
Inspect the spark and sensing electrodes, Clean or renew if
necessary, refer to Sections 14.4 and 14.5.
When refitting
make sure the
bracket is located
in the guide
and fitted properly.
SECURING
LIP
FAN
AIR PRESSURE
TUBE (2)
Diagram 12.2
7307
SECURING SCREW
Diagram 12.4
6963
RIGHT HAND SIDE OF BURNER
BURNER
GUIDE
FAN
When refitting
make sure the
burner is located
in the burner guide
and fitted properly.
FLUE
COLLECTOR
221742D
Pull burner
forward to
remove
Diagram 12.5
LEFT HAND SIDE OF BURNER
Diagram 12.3
26
12 Servicing
7647
12.6 Spark Gap
Check that the spark and sensing gaps are as shown in diagram
12.6.
12.7 Operational Checks
Light the boiler, carry out operational checks and any necessary
adjustments as described in “Commissioning” in the Installation
Instructions.
4mm
1.5mm
- 2mm
12.8 Completion
Slide the outer case front on secure with the nuts previously
removed.
7076
IGNITION
ELECTRODE
PRODUCTS
PROBE
SENSING
ELECTRODE
1.5mm
- 2mm
IGNITION
ELECTRODE
Diagram 12.7
SPARK GAPS
Diagram 12.6
13 Fault Finding
13.1 Initial Checks
supply is available and water flows freely from the hot taps.
Close the taps.
If the boiler fails to operate, first check the following:1) That the electrical supply is available at the boiler and the
fuses are in order.
6) With the boiler Summer/Winter Button “J” set to Winter “K”,
see diagram 4 User Instructions, check that all heating system
controls, if fitted, are working correctly and calling for heat. If not
isolate the boiler from the electrical supply.
NOTE: THE BOILER CONTROL BOARDS CAN BE DAMAGED
BY INCORRECT TESTING OF COMPONENTS AND WIRING
WITH THE POWER ON.
Test for continuity, at mains.
2) Make sure that the system pressure gauge registers 0.7bar,
minimum, and that the automatic air vent works. Refer to
Installation Instructions, Section 10.2.
7) Check Summer/Winter Button “J” is set to Winter, see
diagram 4 User Instructions. In certain circumstances the red
neon light may not come on, due to no system demand. Turn on
a domestic hot water draw off tap to create a demand.
3) That the gas supply is available at the boiler and purged of
air.
Allow the boiler and system to cool down waiting at least a
minimum of four minutes before pressing Summer/Winter Button
“J” to set to Winter “K”.
4) That the boiler is set for the required service.
5) With the boiler Summer/Winter Button “J” set to summer “L”,
see diagram 4 User Instructions, check that the domestic water
If this is satisfactory proceed with the detailed fault finding as
Section 13.3.
27
221742D
13 Fault Finding
PERMANENT
MAINS 230V-50HZ
If the clock has failed it can be bypassed by disconnecting the
plug and reconnecting the link, see diagram 13.1.
L
brown
Gain access by removing the two screws securing the controls
facia, see diagram 9.1.
X3
SPARK
ELECTRODES
Hinge the control facia forward.
brown
brown
F1 T2A
red
X3
Remove the clock timer cover, see diagram 10.2.
ON/OFF
SWITCH
TERMINAL
BLOCK
PUMP
black
Disconnect the clock wiring harness plug and connect the link.
X3
This is a temporary measure and the clock should be repaired
or replaced as soon as possible.
X2
7670
13.2 Clock/Timer
AIR
PRESSURE
SWITCH
grey
grey
X2
FAN
brown
X2
CONTROL BOARD
blue
OVERHEAT
CUTOFF
X2
yellow
X2
black
white
X2
brown
X11
black
X11
PRESSURE
DIFFERENTIAL
WATER
DIVERTER
VALVE
blue
X11
red
X1
blue
X1
GAS
VALVE
black
X1
white
X1
X3
yellow
yellow
X3
CLOCK
TIMER PLUG
X3
blue
N
MAINS FUNCTIONAL FLOW
CH THERMISTOR
purple
7025
purple
X5
X5
X5
X5
DHW THERMISTOR
white
DHW
FLOW
SWITCH
CLOCK/TIMER
PLUG
black
black
WATER
PRESSURE
SWITCH
EXTERNAL
CONTROLS
CLOCK/TIMER
C
N/C
white
grey
N/O
1
2
7467
orange
X4
X4
X4
X4
CONTROL BOARD
orange
X4
grey
X3
X3
purple
orange
PCB
CLOCK
TIMER PLUG
LINK
LOW VOLTAGE FUNCTIONAL FLOW
Diagram 13.2
Diagram 13.1
221742D
28
13 Fault Finding
13.3 Electrical
Before replacing any part please read points below:-
Preliminary electrical system checks, as outlined in a Multimeter
Instruction book, are the first checks to be carried out during a
fault finding procedure.
Replacement of parts must only be carried out by a competent
person.
Isolate the boiler from the electrical supply, refer to Section
11.3.
2. Always isolate the boiler from the electrical supply and as
required, the gas supply, as Section 11.3.
Gain access to the boiler controls by removing the outer case
front, refer to diagram 10.5.
3. On completion, make good any water loss and pressurise the
system to initial design pressure, refer to “Commissioning” in
the Installation Instructions.
1. Refer to Section 11.1.
Remove the two screws securing the controls facia, see diagram
9.1.
Before starting refer to Section 11.1
Hinge the control facia forward.
Isolate the boiler from the electrical supply, refer to Section
11.3.
Remove the controls board cover by slackening the cable entry
cover screws, see diagram 10.2.
Remove the covers.
Ease the cover up and clear.
Check that all cables, multipin connectors and connectors are
secure on the board.
Test the fuse on the main control board and renew as necessary.
Fuse 1 type (2AT). If a fuse fails repeatedly or the initial faultfinding checks described in Section 13.1 indicate a boiler fault,
check the boiler electrical circuits and follow the fault finding
procedures, see diagram 13.2, 13.3, and for clock/timer fault
finding, diagram 13.4 and 13.5.
On completion of a fault finding task that has required the
disconnection and making of electrical connections then checks,
for earth continuity, polarity and resistance to earth must be
carried out.
TO TEST FOR COMPONENT OPERATION / FAILURE
Power to the appliance :- Test for 230V~ across live (brown) and earth (yellow and green), 230V~ across live and neutral (blue),
and zero potential across neutral and earth.
Thermistors :- With the power off unplug the connector and test resistance is 10k ohms at 25°C
Differential pressure switch :- With the power off seperate the in-line connector and test for continuity across male end. restore
the power and with demand off, open circuit, demand on closed circuit.
Domestic Hot Water demand switch :- With the power off seperate in-line connector and test for continuity across male end.
Tap open, continuity between black and white cables, black and red are open circuit. With demand off there is continuity between
black and red and that black and white are open circuit.
Overheat thermostat :- With the power off unplug the connectors and test for continuity (zero resistance).
Power to the gas control valve :- With a demand on test for voltages of 24 to 50V~ across the black and white cable connectors
and 130V~ across the red and blue cable connectors.
Power to the fan :- With a demand on and the front cover removed test for 230v~ at the fan connectors.
Fan failure :- with the power off and the supply leads to the fan disconnected (pull the boots only) the resistance across the fan
coil should not be greater than 50Ω.
Pump :- With the power off unplug the connector from the pump. Restore the power and check that there is 230V~ between live
(red) and neutral (black) or live and the appliance earth.
Air pressure switch :- With the power off and the front cover removed pull one of the supply cables from the fan and ensure
it is electrially safe. Restore the power establish a demand, check that there is 230v~ at one of the APS cables but not at the other.
Turn the power off, refit the fan cable, restore the power and check that there is now 230V~ at both the APS connectors (Caution,
the appliance will light unless the spark leads are temporarily unplugged from the electrodes and laid where they cannot spark
and ignite the gas and are electrically safe). This indicates that the APS changes state when the fan is run.
The three way valve :- Seperate the cable connector from the motor noting its orientation and the connector numbering marked
on the motor housing. Check that with a DHW demand there is 230V~ across sockets 2 and 1 and with a CH demand there is
230V~ across sockets 2 and 3 (or ground and 1, ground and 3 respectively).
29
221742D
13 Fault Finding
7402
Check appliance installation and
that it is mechanically correct.
YES
Check filters are clean and allow
adequate water flow.
YES
NO
Check fuses and power supply.
Is mains L.E.D. illuminated.
YES
Open a tap to create demand.
YES
NO
If lockout L.E.D. is illuminated, press reset.
YES
A
NO
Demand L.E.D. illuminated.
Check flow switch operation.
YES
B
NO
Pump starts.
Check the pump is not mechanically stuck.
Check 230V supply to pump.
YES
C
NO
Fan starts.
Check air pressure
switch operation.
Check 230V
supply to fan.
Check thermistor.
Unplug fan and check
coil resistance.
YES
D
NO
Start spark.
Check spark electrodes
and cables.
Check primary circuit
overheat continuity.
Check air pressure switch status
and operation.
YES
E
Gas control valve opens at
ignition rate (5-6 mbar).
NO
Check gas control
valve cables.
Check gas control
valve voltage.
Check venturi and
connecting tubes.
YES
F
Burner pressure increases
to full rate.
NO
Goes to lockout.
Check sensing electrode
and cables.
Check burner for
cross lighting.
YES
G
Turn control thermostat or flow
rate down to induce modulation.
NO
Is heating circuit
getting hot.
Check 3 way
valve operation.
YES
Manually push brass splindle in diverter
valve. Does domestic hot water get hot
when pushed in and central heating
water get hot when released.
Domestic hot water operates.
YES
Unclip motor. Turn domestic hot water
Off and On. Does pin move in and out.
Switch to central heating demand.
YES
NO
Demand L.E.D. illuminates.
Replace motor.
If domestic hot water demand is still illuminated.
Faulty domestic hot water switch.
YES
Follow B-G.
YES
Correct operation.
Diagram 13.3
221742D
30
7461
13 Fault Finding
NB. The clock can be by passed by refitting the plug link which should be inside the clock timer cover.
Check continuity of clock/timer harness, ensure an electrical supply is available,
ensure that remote controls are calling for heat.
Isolate the boiler from electrical supply remove outer case.
YES
NO
Switch on electrical supply,
is there a display on clock/timer?
Faulty clock/timer.
Replace.
YES
Disconnect and insulate the cables
from heating common and heating on.
YES
NO
Advance clock/timer until a demand is indicated
Is there now continuity between heating
common and heating on?
Faulty clock/timer.
Replace.
YES
Clock/timer in order if no central heating,
refer to main fault finding.
DIGITAL CLOCK/TIMER FAULT FINDING
Diagram 13.4
7463
NB. The clock can be by passed by refitting the plug link which should be inside the clock timer cover.
Check continuity of clock/timer harness, ensure an electrical supply is available at the clock,
ensure that remote controls are calling for heat, ensure the override switch, if fitted, is in overide position.
NO
Does clock keep time?
Faulty clock/timer.
Replace.
YES
NO
Isolate electrical supply, set clock to an on period.
Is there continuity across common and heating?
Faulty clock/timer.
Replace.
YES
YES
ELECTRO/MECHANICAL CLOCK/TIMER FAULT FINDING
31
(N)
Faulty clock/timer.
Replace.
EXTERNAL
CONTROLS
PURPLE
(L)
YELLOW
Clock/timer in order if no central heating,
refer to main fault finding.
YELLOW
NO
ORANGE
Set clock to off period. Is there continuity across
common and heating on?
PLUG FROM CLOCK/TIMER
Diagram 13.5
221742D
14 Replacement of Parts
14.1 Fan
14.6 Boiler Overheat Cutoff
Before starting refer to Section 11.
Before starting refer to Section 11.
Disconnect the two electrical connectors at the fan by pulling the
boots not the wires, see diagram 14.1.
Disconnect the electrical connections, unclip to remove the
overheat cutoff, see diagram 14.4.
Remove the two flexible tubes from the fan, see diagram 14.1.
14.7 Pressure Gauge
Note: When replacing the tubes from the air pressure switch
ensure the lower (red) tube from the fan connects to the upper
connection of the switch.
Before starting refer to Section 11.
Remove case base, see diagram 10.3.
Remove the fan, secured with a screw at the front, ease the fan
outlet from the flue duct and retaining lip at the rear, see diagram
14.1.
Open the controls cover door. Remove the two screws securing
the controls facia, see diagram 9.1.
Hinge the control fascia open.
Note: To fit the fan, locate it into the flue duct and rear retaining
lip, push fully up to ensure a good seal, then secure the fan with
the screw, see diagram 14.1.
Release the water pressure and drain the central heating circuit
of the boiler, refer to Section 11.3 and 11.6.
The polarity of the two electrical connectors is not important.
Disconnect the pressure gauge connection from the safety
valve, discard the washer, see diagram 14.5.
ELECTRICAL
CONNECTION
(2)
Before starting refer to Section 11.
Remove as described in Servicing Section 12.
CLEAR
AIR PRESSURE
TUBES
6985
14.2 Main Burner
RED
Remove the spark electrode assemblies from the burner secured
by three screws see diagram 12.1.
Fit spark electrode assemblies to new burner.
Taking care fit new burner.
14.3 Main Injector
Before starting refer to Section 11.
Remove as described in Servicing Section 12.
Unscrew the main injector.
When fitting the new main injector, fit the new copper sealing
washer, supplied, to ensure gas soundness, see diagram 14.2.
14.4 Spark Electrodes and Sensing Electrode
RETAINING
LIP
Before starting refer to Section 11 General Data.
Isolate the boiler from the electrical supply.
FAN
SECURING
SCREW
Diagram 14.1
6961
Remove the outer case front and the inner case front, refer to
Sections 11.4 and 11.5.
Remove the spark electrode lead and silicone sleeve, remove
the securing screw and electrode, see diagram 12.1.
14.5 Ignition Leads and Sensing Lead
Before starting refer to Section 11.
COPPER
SEALING
WASHER
Disconnect the silicone sleeve and lead at the electrode, see
diagram 12.1. (White to sensing electrode).
Important Note : If replacing one of the ignition leads it will
be necessary to disconnect both from their electrodes and
untwist them from one another and the earth lead. Make
sure when replacing the two ignition leads that they are
tightly twisted together again, and the earth lead is twisted
round the pair, see diagrams 10.2 and 12.1.
INJECTOR
Disconnect leads from the two retaining clips at the side of case.
Remove the two screws securing the controls facia, see diagram
9.1.
MANIFOLD
Hinge the control fascia open.
Remove the control board cover, see diagram 10.2.
Diagram 14.2
Remove the lead on the control board and withdraw from
grommet, see diagram 14.8.
221742D
32
14 Replacement of Parts
THERMISTOR
CENTRAL
HEATING
Locate the supplied washer under the pressure gauge connection
when refitted to the safety valve.
GAS CONTROL
VALVE
7994
Remove the pressure gauge, see diagram 14.6.
CLIP
14.8 Control Board
Before starting refer to Section 11.
OVERHEAT
CUTOFF
Remove the two screws securing the controls facia, see diagram
9.1.
Hinge the control fascia open.
Remove the cable entry covers, see diagram 10.2.
Disconnect the multi-pin connectors retained by clips, see
diagram 14.7.
Remove the controls board cover, see diagram 10.2.
RETURN
FLOW
PIPE
Disconnect the remaining multi-pin connector retained by a clip.
Remove the control board securing screw and the control board
from the support posts, see diagram 14.8.
Diagram 14.4
7085
THE MAIN CONTROL BOARD MUST BE KEPT IN THE ANTI
STATIC HOLDER UNTIL IMMEDIATE REQUIREMENT.
ELECTRICAL
CONNECTORS
When replacing the main control board check and if necessary
adjust the main burner gas pressure in both the hot water and
central heating modes. Refer to “Commissioning” in the
Installation Instructions.
14.9 Gas Control Valve
UNION
NUT
Before starting refer to Section 11.
Remove the two screws securing the controls cover door and
controls fascia, see diagram 9.1.
Hinge the assembly open.
Disconnect multi-pin connector
Support the gas control valve, remove the eight socket head
capscrews at the sides of the gas control valve, see diagram
14.9.
SAFETY VALVE
WASHER
Separate the valve from the pipes, noting the fitted position.
7026
Discard the “O” rings and fit the new ones supplied.
Check and adjust the main burner gas pressure in the hot water
and central heating modes, refer to “Commissioning” in the
Installation Instructions.
FACSIA
SECURING
SCREW (2)
Diagram 14.5
RETAINING
BRACKET
(2)
14.10 Pump
Before starting refer to Section 11.
Remove the two screws securing the controls facia, see diagram
9.1.
Hinge the assembly open.
Release the water pressure and drain the central heating circuit
of the boiler, refer to Section 11.3 and 11.6.
PRESSURE
GAUGE
Remove the electrical plug at the pump, see diagram 14.10.
Diagram 14.6
Remove the four cap head screws, see diagram 14.10.
Make sure that the pump is fitted in the correct orientation.
The pump adjuster on the new pump should be set to that of the
original, refer also to Section 4.4.
The flow rate should be controlled by means of a valve in the
heating flow, refer to Section 4.6.
33
221742D
6982
14 Replacement of Parts
SECURING SCREW
CONTROL
BOARD
MULTI PIN
CONNECTORS
SUPPORT
POSTS (4)
Diagram 14.8
MULTI PIN
CONNECTOR
GAS
CONTROL
VALVE
SOCKET
HEAD
CAPSCREW
(8)
6986
SENSING
LEAD
7244
IGNITION LEADS
CAREFULLY BEND THE
RETAINING CLIPS FORWARD
TO RELEASE MULTI PIN
Diagram 14.7
CONNECTORS
14.11 Low Water Pressure Switch
Before starting refer to Section 11.
GAS SUPPLY
PIPE)
MANIFOLD
Remove the two screws securing the controls cover door and
controls fascia, see diagram 9.1.
Diagram 14.9
Release the water pressure and drain the central heating circuit
of the boiler, refer to Section 11.3 and 11.6.
PLUG
Remove the clip to remove the water pressure switch, see
diagram 14.11.
ELECTRICAL
SUPPLY
LEADS
Remove the plastic cover.
TERMINAL
COVER SCREW
6988
Hinge the assembly open.
PUMP
ADJUSTER
Remove the electrical connectors.
Refer to wiring diagram 14.29 when fitting.
PUMP
14.12 Safety Valve
END
SCREW
Before starting refer to Section 11.
Remove the two screws securing the controls cover door and
controls fascia, see diagram 9.1.
Hinge the assembly open.
Remove the case base, see diagram 10.3.
Release the water pressure and drain the central heating circuit
of the boiler, refer to Section 11.3 and 11.6.
SECURING
SCREW 4)
Disconnect the union nut and clip to release the safety valve,
see diagram 14.5.
221742D
SPINDLE
Diagram 14.10
34
14 Replacement of Parts
14.13 Diverter Switch
7815
RETAINING
CLIP
LOW WATER
PRESSURE
SWITCH
Before starting refer to Section 11.
Isolate the boiler from the electrical supply.
Remove outer case front as section 11.4.
Remove the two screws securing the controls cover door and
controls fascia, see diagram 9.1.
Hinge the assembly open.
Remove the electrical plug, the retaining clip ease the switch
from the diverter valve, see diagram 14.12.
14.14 Diverter Valve
Before starting refer to Section 11.
Remove the diverter switch as section 14.13.
LEFT HAND
HYDO BLOCK
Remove the diverter valve securing pin, ease the diverter valve
from its housing, see diagram 14.13.
RETAINING
CLIP
14.15 Thermistor - Domestic Hot Water.
PLASIC
COVER
Diagram 14.11
Before starting refer to Section 11.
Drain domestic hot water.
14.18 Pressure Differential Micro Switch
Remove outer case front as section 11.4.
Before starting refer to Section 11.
Remove the two screws securing the controls cover door and
controls fascia, see diagram 9.1.
Drain central heating water.
Remove outer case front as section 11.4.
Hinge the assembly open.
Remove the two screws securing the controls cover door and
controls facia, see diagram 9.1.
Remove the electrical connection, securing pin, ease the
thermistor from its housing, see diagram 14.14.
Hinge the assembly open.
14.16 Thermistor - Central Heating.
Disconnect the inline connector to the pressure differential
micro switch.
Before starting refer to Section 11.
Remove the micro switch securing clip, ease the micro switch
from its housing, see diagram 14.16.
Remove outer case front as section 11.4.
Remove the two screws securing the controls cover door and
controls facia, see diagram 9.1.
14.19 Domestic Hot Water Micro Switch
Hinge the assembly forward.
Before starting refer to Section 11.
Disconnect the electrical connections, unclip to remove the
thermistor, see diagram 14.4.
Drain domestic hot water.
Remove outer case front as section 11.4.
14.17 Flow Regulator / Filter
Before starting refer to Section 11.
Remove the two screws securing the controls cover door and
controls fascia, see diagram 9.1.
Drain domestic hot water.
Hinge the assembly open.
Remove outer case front as section 11.4.
Disconnect the inline connector to the hot water micro switch.
Remove the two screws securing the controls cover door and
controls fascia, see diagram 9.1.
Remove the micro switch securing clip, ease the micro switch
from its housing, see diagram 14.17.
Hinge the assembly open.
Release the water pressure and drain the domestic hot water
circuit of the boiler, refer to Section 11.3 and 11.6.
Remove the flow regulator/filter, see diagram 14.15.
35
221742D
WATER INLET
FILTER
RETAINING
CLIP
ELECTRICAL
PLUG)
'O' RING
REGULATOR
DIVERTER VALVE
RETAINING
CLIP
O RING
Make sure
spindle is
located
properly
Diagram 14.15
6992
Diagram 14.12
SECURING
PIN
SECURING
CLIP
6983
DIVERTER SWITCH
7027
6991
14 Replacement of Parts
PRESSURE
DIFFERENTIAL
MICRO SWITCH
DIVERTER
VALVE
SECURING
PIN
6993a
'O' RING
DOMESTIC
HOT WATER
MICRO SWITCH
SECURING CLIP
6987
Diagram 14.16
Diagram 14.13
ELECTRICAL
CONNECTOR
THERMISTOR
DOMESTIC
HOT WATER
SECURING PIN
Diagram 14.14
221742D
Diagram 14.17
36
14 Replacement of Parts
Remove securing pins 4,5 and 6, see diagram 14.18.
14.20 Hydro Block Assembly Left hand side
(see diagram 14.18)
Remove the plate to plate heat exchanger, refer to Section
14.23.
Before starting refer to Section 11.
Remove the bypass tube refer to Section 14.22.
Remove the two screws securing the controls cover door and
controls fascia, see diagram 9.1.
Remove the right hand side of the hydro block.
Hinge the assembly open.
See inset on diagram 14.18 to remove heating return filter.
Remove the heat exchanger, refer to Section 14.26.
14.22 Bypass Tube/Valve
Remove the diverter switch, refer to Section 14.13.
Remove the diverter switch, refer to Section14.13.
Remove low water pressure switch, refer to Section 14.11.
Remove the plate to plate heat exchanger, refer to section
14.23.
Disconnect the pressure differential micro switch inline electrical
connector, refer to Section 14.18.
Unplug gas control valve multi pin connector.
Remove the bypass tube by removing the two securing pins,
see Diagram 14.19.
Remove securing pins 1,2 and 3, see diagram 14.18.
Remove the bypass valve, see diagram 14.20.
Remove the plate to plate heat exchanger, refer to Section14.23.
14.23 Plate to Plate Heat Exchanger
Remove the bypass tube refer to Section 14.22
Before starting refer to Section 11.
Remove the left hand side of the hydro block.
Remove the two screws securing the controls cover door and
controls fascia, see diagram 9.1.
14.21 Hydro Block Assembly Right hand side
(see diagram 14.18)
Hinge the assembly open.
Before starting refer to Section 11.
Remove the securing screws to release the plate to plate heat
exchanger, see diagram 14.21.
Remove the two screws securing the controls cover door and
controls fascia, see diagram 9.1.
Remove the diverter switch, refer to Section14.22.
Hinge the assembly open.
Push it out, tilt and remove, see diagram 14.21.
Remove the heat exchanger, refer to Section 14.26.
When re-fitting it will only fit one way.
Remove the diverter switch, refer to Section 14.13.
Disconnect the domestic hot water micro switch inline electrical
connector, refer to Section 14.19.
Unplug gas control valve multi pin connector.
LOW WATER
PRESSURE
SWITCH
DOMESTIC
HOT WATER
MICRO SWITCH
SECURING
PIN 1
HYDRO BLOCK
ASSEMBLY
SECURING
PIN 6
PLUG
7019a
GAS CONTROL
VALVE MULTI PIN
CONNECTOR
PUMP
RETAINING CLIP
DIVERTER
SWITCH
RIGHT
HAND
LEFT
HAND
PRESSURE
DIFFERENTIAL
MICRO SWITCH SECURING PIN
2 and 3
DOMESTIC HOT
WATER THERMISTOR
37
7077
ELECTRICAL
PLUG
SECURING
PIN 4 and 5
FILTER
Diagram 14.18
221742D
14 Replacement of Parts
6995a
14.24 Expansion Vessel
Remove securing
screws and push
back to release
Before starting refer to Section 11.
Renewal of the expansion vessel requires the boiler to be
removed from the wall. As an alternative, a separate expansion
vessel of the same specification may be connected as close as
possible to the boiler, leaving the original in position, refer to the
Installation Instructions.
Disconnect the boiler water connection union nuts at the front
of the isolating valves, see 6.1.
Disconnect the gas service cock union.
Disconnect the safety valve discharge pipe from the boiler.
Disconnect the mains supply cable at the connector block on
the back of the controls fascia.
SECURING
SCREW (2)
Remove the two screws at the service cock bracket. Pull the
boiler from the isolating valves. Unhook the boiler at the top,
easing the boiler from the flue outlet and lift off.
Tilt and pull out
between pump and
gas supply pipe
Carefully lay the boiler down on its side for access to the
expansion vessel.
Disconnect the union nut connection, see diagram 14.22 and
discard the sealing washer for the new one supplied.
Remove the expansion vessel, secured with two clamping
screws.
Connect the union nut, when fitting the expansion vessel,
before clamping it.
6981
SEALING
WASHER (4)
PLATE TO
PLATE HEAT
EXCHANGER
'O' RING (2)
BYPASS
TUBE
Diagram 14.19
SECURING
PIN
UNION
NUT CONNECTION
6997
SECURING
PIN (2)
Be sure to fit
sealing washers
when refitting
Diagram 14.21
7015
REAR OF THE
BOILER
'O' RING
HYDRO
BLOCK
BYPASS
VALVE
SECURING
SCREW (2)
EXPANSION
VESSEL
Diagram 14.20
221742D
38
Diagram 14.22
14.25 Automatic Air Vent
Before starting refer to Section 11.
AIR VENT
CAP
Remove the automatic air vent, see diagram 14.23.
AUTOMATIC AIR VENT
SLACKEN THE SMALL CAP ON THE AIR VENT. THIS MUST
NOT BE RE-TIGHTENED.
7494
14 Replacement of Parts
SECURING
CLIP
14.26 Heat Exchanger
Before starting refer to Section 11.
Unhook the combustion chamber front, see diagram 8.2.
Remove the fan and flue collector, refer to Section 14.1.
Remove the burner see Section 14.2.
Refer to diagram 14.24 and remove the two side insulation
pieces.
Remove the securing clips on the inlet and outlet pipes.
Remove the combustion chamber main panel securing screws.
Remove the heat exchanger/combustion chamber assembly.
Remove heat exchanger front retaining clips.
Remove the heat exchanger from its retaining tabs positioned
at the rear by easing it forward and up.
PUMP
Replace heat exchanger making sure that it is correctly
engaged on the retaining lugs at the back of the combustion
chamber, carefully refit the pipe securing clips and front retaining
clips.
HEAT
EXCHANGER
7642a
Diagram 14.23
BAFFLE
SIDE
INSULATION (2)
FRONT
RETAINING CLIP
(2)
COMBUSTION
CHAMBER MAIN
PANEL
SECURING
SCREW (4)
BEADING
PIPE SECURING
CLIP (2)
'O' RING
Diagram 14.24
39
221742D
7001
14 Replacement of Parts
COMBUSTION
CHAMBER
FRONT PANEL
REAR
INSULATION
SIDE
INSULATION
SIDE
INSULATION
FRONT
INSULATION
14.27 Combustion Chamber Insulation
7886
Diagram 14.25
MICA WINDOW
Remove outer case front as section 11.4.
Remove the inner case front as Section 11.5.
Unhook the combustion chamber front, see diagram 8.2.
Remove the burner see section 14.2.
Remove the front insulation piece, see diagram 14.25.
Slide out both side insulation pieces
OPENING
(BOILER INNER
CASE FRONT)
14.28 Viewing Window
Before starting refer to Section 11.
SELF ADHESIVE
ALUMINIUM FOIL
GASKET
Remove the old self adhesive aluminium foil gasket and the old
mica window. Replace with a new mica window, see diagram
14.26. Peel off the backing paper and secure with new self
adhesive aluminium foil gasket. Ensure no air bubbles are
trapped underneath the foil.
AIR PRESSURE
SWITCH
Important
Make sure that the mica window fully covers the opening and
that the hole in the aluminium foil gasket is centred over
opening.
SECURING
SCREW (2)
14.29 Inner Casing Seal
PEEL OFF
BACKING
PAPER
Diagram 14.26
AIR
PRESSURE
SWITCH
TUBE (2)
6980
Pull the lower rear insulation forwards, then slide the upper rear
insulation down from behind the heat exchanger.
RED
Before starting refer to Section 11.
Remove the old seal, clean out the old adhesive.
Glue the new seal into place, making sure that there are no
breaks in it.
CLEAR
ELECTRICAL
CONNECTION (2)
Diagram 14.27
221742D
40
14 Replacement of Parts
14.30 Air Pressure Switch
7005
ELECTRICAL
CONNECTION (4)
Before starting refer to Section 11.
SECURING
SCREW (4)
Disconnect the two electrical connectors at the air pressure
switch, see diagram 14.27.
Remove the flexible tubes from the switch.
Remove the air pressure switch, secured with two screws.
When replacing the tubes to the air pressure switch make sure
that the red tube from the fan connects to the upper connection
of the switch.
The polarity of the electrical connections is important, refer to
diagram 14.29.
CLOCK/
TIMER
N
L
14.31 Clock/Timer - ELECTRO/MECHANICAL
and DIGITAL if fitted
Before starting refer to Section 1 General Data.
Isolate the boiler from the electrical supply.
PLUG
Remove outer case front as section 11.4.
Diagram 14.28
Remove the two screws securing the controls cover door and
controls facia, see diagram 9.1.
Hinge the assembly forward.
Remove the clock timer cover, see diagram 10.2.
Disconnect the clock timer wiring harness plug, remove the
clock/timer and electrical connections, see diagram 14.28.
41
221742D
b
br
w-
WHITE
g-
GREY
b-
BLUE
or-
ORANGE
BLACK
r-
RED
br - BROWN
y-
YELLOW
g/y- GREEN/
YELLOW
p-
PURPLE
bk-
g
DIVERTER
SWITCH
THERMISTOR
(CENTRAL
HEATING)
BOILER
OVERHEAT
CUT-OFF
PRESSURE
DIFFERENTIAL
MICRO SWITCH
bk
g
or
or
DOMESTIC
HOT WATER FLOW
MICRO SWITCH
r
y
bk
w
AIR PRESSURE
SWITCH
FAN
KEY
7671a
14 Replacement of Parts
p
THERMISTOR
(DOMESTIC
HOT WATER)
bk
bk
w PLUG
p
w
g/y
bk
w
r
230V-50Hz
PERMANENT
MAINS SUPPLY
FUSED AT 3A
g
1
r
2
PLUG
r
b
bk
GAS VALVE
w
PUMP
NOTE 1
E
N
L
br
br
b
g
MAINS
SWITCH
N/O
N/C
w
bk
C
X2
WATER
PRESSURE
SWITCH
g/y
X1
X3
X4
IGNITION
ELECTRODE
X5
FUSED
AT 2A
IGNITION
ELECTRODE
br X11
g/y
X9
CHASSIS
EARTH
b bk
SENSING
ELECTRODE
CONTROL BOARD
y
p
y
o
PLUG
ROOM STAT
CLOCK TIMER
NOTE 2
NOTE
r
1 Red link to be removed when external room stat is used.
2 Plug C/W link to be removed when clock timer is used. (The removed plug to be left inside the clock timer cover.)
Diagram 14.29
221742D
42
15 Spare Parts
15.1 Part Identification
The key number in diagram 15.1 and the first column of the list
will help identify the spare part.
15.2 Ordering
When ordering any spare part, please quote the part number
and the description from the list together with the model name
and serial number information from the data label.
The data label is positioned on the inner case front, see diagram
8.1 Installation Instructions.
Key No
Part No
Description
GC No
1
457077
Fan assembly
E27122
2
205769
Main injector assembly
E27119
3
202639
Spark electrode Assembly
E39443
4
202638
Sensing electrode
E39442
5
801179
Boiler over heat cut off assy
E27159
6
801199
Domestic Hot Water Micro Switch
E27185
7
801166
Pressure gauge assembly
E26680
8
227106
Control board
********
9
801189
Pressure Differential Micro Switch
E27177
10
801194
Plate to Plate Heat Exchanger
E27161
11
801203
Thermistor assembly-Domestic
E27207
12
227004
Thermistor assembly-Heating
********
13
801192
Pump (not illustrated)
E27211
14
202226
Fuse (not illustrated)
278136
15
801182
Gas control valve
E27124
16
227070
Air pressure switch assy
********
17
801186
Automatic air vent assembly
E27166
18
801208
Safety valve assembly
E27115
19
801181
Low water pressure switch
E27143
20
227060
Mains switch
E26675
43
221742D
7007a
15 Spare Parts
16
5
9
11
12
4
3
1
8
17
18
6
9
2
7
19
10
15
20
Diagram 15.1
Because of our constant endeavour for improvement, details may vary slightly from those shown in these instructions.
221742D
44