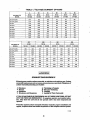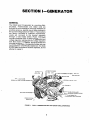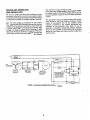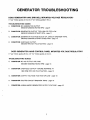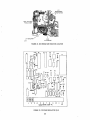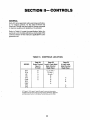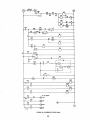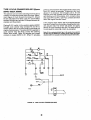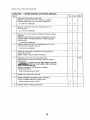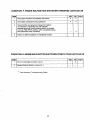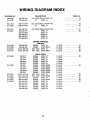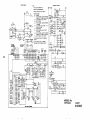
1
Caution: This document contains mixed page sizes (8.5 x 11 or 11 x
17), which may affect printing. Please adjust your printer settings
according to the size of each page you wish to print.
Service
Manual
300 to 750 k W
Generators
And Controls
Troubleshooting and
Test Procedures For
Generators
Regulator
Controls
9oo-0192
9-80
Printed in USA
I
3
TABLE OF CONTENTS
.
TITLE
PAGE
Safety Precautions....................................................
2
Introduction
3
Voltage/Current Options
4
..........................................................
..............................................
. .
...........................................
5
................................................ 7
.................................................
7
..............................
.......................... 17
SECTION II - CONTROLS ..........................
.:...... .I. ......... 33
Relay Control Operation ............................................
34
Relay Control Troubleshooting ......................................
39
Solid State Control Operation........................................
51
Solid State Control Troubleshooting ...................................
55
One Fault Lamp Control ...............................
:........57
Six Fault Lamp Control ...........................................
57
SECTION I .GENERATORS
Troubleshooting Generators with End Bell Mounted
Voltage Regulators
Troubleshooting Generators with Control Panel Mounted
Voltage Regulator
Procedures
:
.
Wiring Diagram Index
.................................................
'
.
i
1
72
SAFETY PRECAUTIONS
The following symbols in this. manual highlight
conditions potentially dangerous to the operator, or
equipment. Read this manual carefully. Know when
these conditions can exist. Then, take necessary
steps to protect personnel as well as equipment.
.
If adjustments are made while the unit is running, use
'extreme caution around hot manifolds, moving parts,
etc.
Do not work on this equipment when mentally or
physically fatigued.
This symbol warns of immediate
k@!@@d
hazards which wlll result in severe
personal injury or death.
GUARD AGAINST ELECTRIC SHOCK
Disconnect electric power before removing protective shields or touching electrical equipment. Use
rubber insulative mats placed on dry wood platforms
over floors that are metal or concrete when around
electrical equipment. Do not wear damp clothing
(particularly wet shoes) or allow skin surfaces to be
damp when handling electrical equipment.
This symbol refers to a hazard or
1 severe
- personal injury
unsafe practice which can result in
or death.
This symbol refers to a hazard 'or
unsafe practice which can result in
personal injury or product or property damage.
>
,
Disconnect batteries to prevent accidental engine
start. Jewelry is a good conductor of electricity and
should be removed before working on electrical
equipment.
PROTECT AGAINST MOVING PARTS
Use extreme caution when working on electrical
components. High voltages cause injury or death.
Avoid moving parts of the unit. Loose jackets, shirts or
sleeves should not be worn because of the danger of
becoming caught in moving parts.
Follow all state and local electrical codes. Have all
electrical installations performed by a quaiified
licensed electrician.
Make sure all nuts and bolts are secure. Keep power
shields and guards in position.
ABBREVIATIONS
To avoid repetitious use of terms or designations, abbreviations have been used as follows:
R-S-R
N.C.'
Nor
.
>.
VDC
VAC
L,op
HET
Kc
Q.
,
R"
i
.
I
e
O B
O/C
. LET
,
Run-Stop-Remote
Normally closed
Normally open
Volts Direct Current
Volts Alternating Current
Cow Oil Pressure
High Engine TempGrature
Relay
Transistor'
Resistance/Rheostat,
Capacitor
Overspeed
Overcran k
Low Engine Temp
Crystal Rectifier (diodes)
Voltage Regulator
Circuit Breaker
Reactor
Transformer
l i m e Delay
Light Emitting Diode
Silicon Controlled Rectifier
CR
VR
CB
L
T
T.D.
LED
SCR
,
'
J
2
INTRODUCTION
FOREWORD
* .
1
This manual is divided into two sections as follows:
1. GENERATOR-Consists
of general
s p e c i f i c a t i o n s o n t h e UV generator,
troubleshooting guides, and procedures for
testing and repairing the systems.
2. CO NTR 0LS-T r o u b les h o o t i t i g g u ides ,
procedures for testing and repairing the system
are contained in this section. A description of
components and an analysis of module circuitry
are included.
This manual provides troubleshooting and repair
information for ONAN series U V generators. It is
intended to provide the maintenance technician,
serviceman or Onan distributor with a logical
procedure to enable him to systematically locate and
repair malfunctions in the generator and control
systems. This information is not applicable to the
prime mover; refer to the engine manufacturer's
manual.
Repair information is not extensive because solidstate printed circuit modules lend themselves more to
replacement than repair. ONAN does not recommend
repair of the printed circuit module, except at the
factory and has initiated a returdexchange service
obtainable through distributors, whereby faulty
modules can be returned and exchanged for good
units. For more information, contact your distributor
or the ONAN service department.
TEST EQUIPMENT
Most of the tests outlined in this manual can be
performed with an AC-DC multimeter such as a
Simpson 260 or 262 VOM.
Exercise care when purchasing a foreign
made VOM. Some units deliver +9VDC,
others, +22VDC to the circuit under test on R x 1scale. Maximum
recommended voltage is +l.SVDC. Damage to solid state devices
can result from excessive voltage application.
m
Application of meters or high heat soldering
irons to modules by other than qualified
personnel can result in unnecessary and expensive damage.
CAUTION
.
'
EZ3
The use of high potential test equipment
(meggers) on generator windings can cause
damage to solid state components. Isolate these components prior
to testing.
I
GENERATING SET.
MALFUNCTION
I
I
ENGINE FAILSSEE ENGINE
SERVICE MANUAL
GENERATOR
FAILS-SEE
GENERATOR SECTION
PAGES 5 THRU 32
CONTROL FAILSCONTROL SECTION
.PAGES 33 THRU 71
3
-
TABLE I.-VOLTAGE/CURRENT OPTIONS
KILOWATTS/
c
625 DFZ
2255
I
I
1187
1128
-1
2169
I
.2050
I
1084
'Exhaust,gases-contain-carbonmonoxidei an odorless and colrrless-gas. Carbon monoxideis poisonous and cancause.unconsciousnessand death.3yyptoms 6f
caibonmonoxidqpoisoning:can'include:
0 $Dizziness
4 Nausea
' 0 .Headache
J
Weakness and-Sleepiness
'a !Thrdbbing in$emples
'MuscularXwitohing
.Vomiting
0 'Inability to=Think.Coherently
'
IF YOU OR-ANYONE-ELSEEXPERIENCE ANY OF THESE SYMPTOMS, GETOUT
INTO THE FRESMdIR IMMEDIATELY. If symptoms persist, seek medical attention. Shut down the unit and:do not operate until it has been inspected and
repaired.
'Protection against carbon monoxide inhalation includes proper installation and
regular, frequent visual and audible inspections of the complete exhaustsystem.
1-PlEM
I
1025
SECTION I-GENERATQR
GENERAL
-+
The ONAN series UV generator is a revolving field,
brushless, 4-wire 3-phase unit. Stator coils are
brought out and connected to a bus-bar assembly to
produce series wye, parallel wye or delta windings in
the current/voltage options of Table 1. These options
are factory connected to customer requirements.
Loads are connected to the bus-bar assembly
through a load transfer switch. Phase rotation is
counter-clockwise (ACB). In early UV generators the
voltage regulator was mounted on the generator end
bell. More recent models have the voltage regulator
mounted in the control cabinet. The three diodes and
two SCR’s, that make up the regulator bridge, are now
encapsulated in a hermetically sealed box. If a diode
or SCR fails the entire box must be replaced, do not
attempt to repair it.
RECTIFIERS
AINALTERNATOR ROTOR
VR 1 VOLTAGE
REGU LA7‘OR (COVER REMOVE
c
,EXCITER
L
FIELD C O I L
BEARING
DOUBLE SEALED
(INSULATED)
STATOR WINDING
-AUTOMATIC
OVERSPEED S H U T D O W N
COMMUTATING
FIGURE 1. EARLY UV GENERATOR END VIEW (FRONT GRILLE REMOVED)
5
BRUSHLESS GENERATOR
AND REGULATOR
The moment of gate energizing shifts t o an earlier
point when the voltage sensing circuit detects a drop
in voltage output. Firing earlier causes the exciter t o
produce greater output and thus increase generator
output.
All the UV series generators are brushless exciter
controlled. Alternating current from onestator output
winding is fed through a normally closed field breaker
to a regulator bridgeon thevoltage regulatorchassis.
The generator output increases because the exciter
field causes a rise in the exciter armature output
which is converted to DC by the rotating diode
network (mounted on the exciter armature) and
supplied to the generator: rotor field. A rise in
generator output then causes the voltage sensing
circuit in the regulator to fire SCR’s for a shorter
period in the AC wave and reduce exciter output to a
normal level.
The full wave bridge is composed of two silicon
controlled rectifiers (SCRs) and three rectifierdiodes.
This SCR bridge delivers rectified current from the
voltage sensing circuit to the generator’s exciter field
in timed pulses, determined by an increase in gate
voltage, to change positive and negative (PN) junctions from Reverse to forward bias. This change lets
current flow until the half cycle reaches zero voltage.
6
b-
’GENERATOR TROUBLESHOOTING
DOES GENERATOR HAVE END BELL MOUNTED VOLTAGE REGULATOR?
If “yes” follow guides A thru D; i f “no”. follow guides E thru 1.
TROUBLESHOOTING GUIDES
A. CONDITION: NO GENERATOR OUTPUT
ENGINE RUNNING RATED RPM - page 9
B. CONDITION: GENERATOR OUTPUT TOO HIGH OR TOO LOW
ENGINE RUNNING STEADY RPM - page 11
C. CONDITION: GENERATOR VOLTAGE BUILDS UP, CIRCUIT BREAKER TRIPS.
ENGINE RUNNING STEADY RATED RPM - page 12
D. CONDITION: UNSTABLE OUTPUT.
ENGINE RPM NOT FLUCTUATING
- page 12
DOES GENERATOR HAVE CONTROL PANEL MOUNTED VOLTAGE REGULATOR?
If “yes” follow guides E thru I; if “no”follow guides A thru D.
TROUBLESHOOTING GUIDES
E. CONDITION: NO AC OUTPUT VOLTAGE
ENGINE RUNNING RATED RPM - page 13
F. CONDITION: UNSTABLE OUTPUT-ENGINE RUNNING AT
1800 RPM WITH NO FLUCTUATION - page 15
G. CONDITION: OUTPUT VOLTAGE TOO HIGH OR LOW
H. CONDITION: EXCITER CIRCUIT BREAKER TRIPS
I.
- page 15
- page 16
CONDITION: UNBALANCED GENERATOR OUTPUT VOLTAGE
7
- page 16
PREPARATIONA few simple checks could expose the probable
source of trouble or at least cut down on
troubleshooting time.
Check all modifications, repairs, replacements
performed since last satisfactory operation of set.
A loose wire connection, overlooked when installing a replacement part could cause problems. An
incorrect connection, an opened circuit breaker,
a relay not secure are all potential malfunction
areas to be eliminated by a visual check.
Unless absolutely sure that panel instruments are
accurate, use portable test meters for
troubleshooting.
Visually inspect components on printed circuit
boards. Burned resistors, arcing tracks are all
identifiable. Do not mark on printed circuit board
with a pencil. Graphite lines are conductive and
can cause short circuits between components.
c
The question and answer troubleshooting guides
which follow, give a step-by-step procedure for
checking t h e generator.
To use this guide, answer the question either “yes? or
“no” then proceed to the step given in the column
containing .your answer. When a ietter appears inlhe.
Method column, refer to that letter in the Procedure
section for the recommended method for testing or
repairing.
a
..
QUESTION AND ANSWER TROUBLESHOOTING GUlDE
To correct a problem, answer the question “Yes” or “No,” then proceed t o the next step given in whichever
column the question was answered.
ITEM
2
2
Is panel circuit breaker (CBl) in the ON position?
4
3
Switch CB1 to ON.
Does generator output build up?
a. Is output high or low? (See Guide B)
b. Does CB 1 trip? (See Guide C)
c. Is output unstable? (See Guide D)
~
NO
~
METHOD
I
I
Is panel meter selection switch positioned correctly
for a voltage/current reading?
1
.
YES
4. CONDITION: NO GENERATOR OUTPUT
ENGINE RUNNING RATED RPM
~
Shut down engine.
Apply temporary jumper across TB1-66 and TB1-65 inside
control cabinet. Restart engine.
Does voltage build up?
Remove jumper.
Shut down engine.
Check wiring between TBl-65, TBI-66 and CB1.
If wiring is good, replace CBl.
Check wiring between voltage regulator (VRl) and control
panel terminal board. Refer to applicable wiring diagram.
7
Check wiring between VR1 and bus-bar assembly.
8
8
Restart engine. Measure VAC across VR1 terminals
4 and 5 (residual voltage).
Does voltmeter read 20 to 24 VAC?
10
9
10
.
With engine running, place CBI to OFF. Using method
described under A in procedure section, flash
exciter field to restore residual magnetism.
Place CB1 to ON.
Does the AC voltage build up?
A
-
10
15
11
Shut down engine.
Check continuity of fuse F1 on VR1 circuit board.
Is continuity obtained?
12
-
Check silicon controlled rectifiers CR1 and CR2.
Are SCRs CRI and CR2 OK?
13
-
Measure VDC across V R l terminals 2 and 3
(positive lead on 3) with engine running.
Does voltmeter read 10 to 90 VDC?
1
~
11
12
_
_
~
~
9
~
B
TEM
A. CONDITION: NO GENERATOR OUTPUT
ENGINE RUNNING RATED RPM (Continued)
YES
NO
METHOD
Check diodes CR3 and CR4.
Are diodes CR3 and CR4 OK?
14
-
C
Check L1 commutating reactor for continuity.
Is L l good?
15
D
Disconnect exciter stator leads F1 and F2 at VR1 terminals.
2 and 3. Measure continuity between F1 and F2.
Is continuity obtained?
I6
E
16
Are rotating diodes CRI thru CR6 on exciter rotor OK?
17
C
17'
Replace Voltage regulator VR1.
Resta'it engine.
Does getierafor vbltage build up3
13
14
NOTE: Reactor L1 is connected across VR1-1 and 5.
See Figure 1 for location.
15
.
18
-
.
IS excifet'
.
.
.
.
.
.
~
.
J
..
rotor winding' OK?
...........
19'
Are. ge'ner'ator stator windings OK?..
20
Are gerierdtoi roWr windiri$s&?
. . .
~
.....
..
F
L .
..
. . . . . .
.
,
-
G
. . . . . .
i,
_.....
. . . . . . . . . . . . . . . . . . .- . . . .
10
.
._.
.
.
.
.
H'
ITEM
1
B. CONDITION: GENERATOR OUTPUT TOO HIGH OR TOO
LOW-ENGINE RUNNING STEADY RPM
Rotate voltmeter/ammeter phase selector switch.
Is discrepancy identifiable on all switch positions?
I
I
YES
I
NO
4
1
2
I
2
Can condition be corrected by adjustment of voltage
control rheostat R1 on panel?
3
If output is too low, is unit overloaded?
9
5
4
Connect portable voltmeter across panel voltmeter
terminals, rotate selector switch.
Do portable meter and panel meter readings agree?
5
8
c
5
METHOD
r
Measure VAC across VR1-6 and 8.
Does voltmeter read I20VAC?
6
7
-
6
Replace voltage regulator VR1.
-
7
Replace voltage reference transformer in control cabinet.
-
8
Replace voltmeter.
9
If all phases overloaded, remove non-essential loads
until low voltage condition is corrected. I f overloaded on one or two phases, rearrange single phase
loads until phases are balanced.
~
Single phase load capacity is W3 that of total rated 3 phase
capacity of unit, Le., total 3 phase capacity 450 kW, 1 phase
capacity 300 kW.
11
J
~~
ITEM
1
C. CONDITION: GENERATOR VOLTAGE BUILDS UP,
CIRCUIT BREAKER TRIPS-ENGINE RUNNING
STEADYRATEDRPM
YES
Does generator voltage build up excessively
before circuit breaker CB1 trips?
2
Are all wires and connections at voltage regulator
V R l in good condition?
3
3
Are diodes CR19, CR1 thru CR4 on VR1 good?
6
4
Check rotating diodes CR1 ,thruGR6.
Are diodes good?
2
.
~
5
Replace circuit breaker CBI.
6
Replace voltage regulator V R I .
ITEM
i
METHOD
.5
~~~
.-
I
... ..
.D. :CONDITION: 'UNSTABLE:O.UTPUT.'.
.
PB3 in control cabinet.
1
Check conngctions at VRl;
.Was repair required?
2
Can condition be corrected by adjustment of damping
potentiometer R19.on V R l ?
3
Replace voltage .regulator V.Rl.
.... .'
L
',YES
'.
I
I-
12
i
METHOD
:
'
I
ITEM E. CONDITION: NO AC OUTPUT VOLTAGE
ENGINE RUNNING RATED RPM
1.
2.
I
-
YES
Isthe Exciter Circuit Breaker (CB21) on the meter panel
in the “ON” position?
3
Switch CB21 to the “ON” position. Does the AC voltage build up?
~
3.
4.
5.
7
9.
2
-
-
Is the AC voltage measured at terminals 1 and 2 on voltage
regulator (VR21) printed circuit board 5 to 10 volts?
4
-
Is the AC voltage measured at terminals 11 and 12 on
VR21 5 to 10 volts?
5
7
Replace reactor assembly (L21).
~
~-
Is the DC voltage measured at terminals + and - on
Rectifier Bridge (CR21) 5 to 10 volts?
15
Shut down generator set. Check continuity between terminal
2 on VR21 and T8 on generator, between terminal 1
on VR21 and T7 on generator. Is there continuity between
these connections?
VR21-2 to T8
VR21-1 to T7
14
14
~
8.
METHOD
3
~~
~~~
6.
NO
-
NOTE: If voltage builds up but is high, low or unstable,
or causes CB21 to trip, refer to section G or H of the
troubleshooting guide.
.
I I
~
If no continuity exists between VR21-1 and T7
(CB21-ON) apply a shorting jumper across CB21.
Is continuity obtained?
-
~~
9
Replace circuit breaker CB21.
10.
Check for loose or broken wires on VR21, CR21,
reference voltage transformer (T21), generator
bus-bars and terminal board (TB21) in control
box. Secure or repair where necessary. If
repairs have been made, restart engine.
Does AC voltage now build up?
11.
Are diodes CR1, CR2 and CR3 on CR21 assembly good?
(See method 0 in procedure section for checking
diodes.) If faulty diode located, replace CR21.
12
0
12.
Are SCRs 4 and 5 in CR21 good?,
(See method 0 in procedure section for checking
diodes.) If faulty SCR’s located, replace CR21.
13
0
13
E
’
-
I
E. CONDITION: NO AC OUTPUT VOLTAGE
ENGINE RUNNING RATED RPM (Continued)
YES
I
I
I
NO
13.
Fault probably lies with a defective component on VR21.
Replace voltage regulator VR21.
-
14.
Start engine. Place CB21 in “OFF” position. Using method
prescribed under “M” in procedure section flash the exciter
field to restore residual magnetism. Place CB21 ON.
Does the AC output voltage build up?
15
I
METHOD
M
15.
Shut off engine. Is the exciter field winding OK?
16
E
16.
Are the rotating diodes CRl through CR6 on the exciter
rotor OK?
17
C
17.
Is the main generator field winding OK?
18
H
18.
Is the exciter rotor winding OK?
19
-
F
18.
Are the generator stator windings OK?
13
-
G
. ..
.,
I
.
.
..
.
,
?
.
.
,
I
. ,
.,
’..
-.
14
.
F. CONDITION: UNSTABLE OUTPUT-ENGINE RUNNING AT
YES
1800 RPM WITH NO FLUCTUATION
Are there any loose or broken wires or connections at voltage
regulator VR21 terminals?
Does adjustment of R26 (damping control potentiometer)
on VR21 stabilize generator voltage?
II-
NO
METHOD
2 1
-
Replace VR21 voltage regulator.
I
‘
I
I
I ITEM I G. CONDITION: OUTPUT VOLTAGE TOO HIGH OR LOW
I
I
I
YES
I
Does adjustment of R21 “voltage adjust knob” on the
meter panel correct voltage level?
I-
Does adjustment of R18 potentiometer on VR21 correct
voltage level?
Are rotating diode heat sink mounting screw insulators OK?
1
5
Replace voltage regulator VR21.
-
I
METHOD
I
31
4
Are the reconnections correct and secure?
15
NO
-I
L
I ITEM I H. CONDITION: EXCITER CIRCUIT BREAKER TRIPS
1.
I
Does AC output build up to 150% or more of rated voltage
before CB21 trips?
YES
I
NO
I METHOD I
NO
I METHOD
2
Are there loose or broken terminals or connections at
voltage regulator VR21?
2'
3.
Is CR21 rectifier assembly OK?
4.
Are the reference voltage transformer (T21) windings
and connections OK?
5.
Replace voltage regulator VR21.
6.
Does AC output build up to rated value before tripping CB21?
7.
Are the rotating diodes CRI through CR6 on the exciter
rotor OK?
-
Is the exciter stator winding OK?
I
9.
I Is
the generator main field winding OK?
10
Is the exciter rotor winding OK?
10.
L
YES
1. CONDITION: UNBALANCED GENERATOR OUTPUT VOLTAGE
-
Remove load from generator terminals. Is output
still unbalanced?
1
2
Are generator leads properly connected or grounded?
3
Is generator stator winding continuous?
4
4.
Is grounding procedure of generator and load correct?
5
5.
Check for ground faults on load.
-
16
+'
4
Remove frontal griile to gain access to voltage
regulator. Disconnect lead F1 at VRI-3. Start unit.
Touch positive lead of supply to F1 and negative to
VRI-2. Hold leads on terminals just long enough for
vohage to start building up. Shut down unit and
reconnect wires.
'FLASHING THE FIELD
*
- I f output voltage does not build up, it may be
necessary to restore residual magnetism of the poles
by flashing the field. Assemble a six-volt dry cell
(lantern) battery and diode as shown in Figure 3. If a
lantern battery is not available, a 12 volt automotive
(generator set) battery can be used by installing a 20
ohm, 2 watt resistor in series with diode; or a 24 volt
automotive (generator set) battery can be used by
;Increasing resistor value to 40 ohms.
a
If generator output builds up, high voltage
will be present on voltage regulator terminals. Use caution in vicinity of high voltage equipment, otherwise
personal injury or death may result.
WARNING
Do not keep field flashing circuitryconnected
longer than 5-seconds or damage may occur
to exciter and regulator.
FI
REMOVED FROM
TERMINAL 3
e
&/
12 AMP
300 PIV
DIODE
F2 TERMINAL 2
........
........
........
..................
..................
.............
.........
.
FIGURE 3. FIELD FLASHING CIRCUIT
17
TESTING SCRs
To check silicon controlled rectifiers (gated diodes),
proceed as follows:
Alternate method
If an ohmmeter is not available, or if output voltage of
ohmmeter is excessive, assemble test circuitry as in
Figure 4D, using a6voltdrycell andacurrent-limiting
bulb.
1. Remove voltage regulator V R I cover to gain
access to SCRs.
2. SCRs on V R l are identified CR1 and CR2, and are
positioned closest to the terminal board. See
Figure 15.
Perform test per items 4 and 5; bulb should not light.
With leads connected as in Figure 4D, apply jumper
from anode to gate, bulb should light, and remain ON
when jumper is removed.
It is important to know correct polarity of theohmmeter leads.
Red and black, or + and - on the meter are not necessarilyan
indicationof the battery output polarity of themeter on OHMS
range.
Results different from those given above indicate a
bad SCR. Replace
3. Remove gate and cathode wires from SCR.
4. With ohmmeter set on R x 10K scale, measure
resistance across anode and cathode. Meter
should read 1 megohm or greater (Figure 4A).
5. Reverse leads as shown in Figure 4B. Reading
should again be 1 megohm or greater.
6. With leads connected as in step 5 (meteron R x 1
scale), short gate to anodeasshown in Figure4C.
The resistance should drop to 25 ohms or less.
7. Remove the short between gate and anode; the
resistance should .remain unchanged.
8 . Results n,ot in accord with those given above
indicate a bad S'CR. Replace.
D
I
'ANODE
0
A
OHMMETER
OHMMETER
SH'ORT BET.WEEP~
GATE, A N D ANODE
.
i'
.. ..
rGATE
ANODE
"--"LEAD
.
ANODE
FIGURE 4.
I
TESTING SCRs (GATED DIODES)
18
"+"LEAD
.
REPLACING SCRs and CRs
1. Unsolder leadwires from terminals.
2. Use proper size wrenches to hold the body while
removing the nut.
3. Push the rectifier free of its mounting hoie in the
heat sink.
4. Insert new rectifier into its mounting hole in the
heat sink. Using nut and washer provided, secure
rectifier to heat sink.
5. Torque diodes on rotating exciter assembly to 15
Ib. in. (1.7 Nmm).
TESTING DIODES
Six diodes labeled CR1 thru CR6 are mounted on the'
rotating exciter assembly as shown in Figures 2 and 5
.labeled CR3 and CR4, on V R l . Test diodes as follows:
1. Remove one diode at a time from heat sink. Test
that diode and reinstall on heat sink before
proceeding to the next one.
2. Check the resistance of the diode with an
ohmmeter. Connect one lead to the top of the
diode and other lead to the diode stud. Observe
reading. See Figure 6.
3. Now reverse leads and again observe reading. A
good diode should have a higher reading in one
direction than the other. If both readings are high,
or if both readings are low, diode is defective and
must be replaced with a new, identical part.
6. Solder leadwires to new rectifiers.
Use a 40 watt soldering iron. Hold a
needlenose pliers between rectifier and
soldering point to prevent destructive heating. Excessiveheat
on these components will destroy them.
,
1CR3 A N D C R 4
- Excessive
dust or.dirt on diodes and
other components will cause
overheating and eventual failure. Keep these assemblies
clean!
VR I
'CRl
- CR6
R O T A T I N G RECTIFIER
FIGURE 5. ROTATING RECTIFIER ASSEMBLY
,
LEAD
LEAD
GOOD D I O D E W I L L H A V E H I G H RESISTANCE READING I N O N E D I R E C T I O N
AND L O W READING W H E N OHMMETER L E A D S ARE REVERSED.
FIGURE 6. TESTING DIODES
19
rD1
'CHECKING REACTORS
To measure resistance of the L1 commutating reactor
(315-0301) use a Wheatstone bridge; use a Simpson
260 ohmmeter for measuring coil resistance on L2
reactor (315-0300),
and insulation resistanceon both
L1 and L2.
L1 and L2 are mounted on voltage regulator VR1.
Resistance measurement of L1 is taken' across coil
termirials, see Figure 7. Reading should be 0.0693 to
0.0847-ohms at 20" C (68OF). Sefohmm'eter'scale to R
x IOK, measure between either coil terminal' and
frame. A reading less than infinity indicates low
insulation resistance in the coil winding. Replace
reactor.
,
Resistance.measurement.of C2:is.taken across.coil'
terminals 1 and 4.; see Figure 8. Reading should' be,
308':8 to 977.4 ohms at' 20°C (6'8"F), meter on-R'x 1
scale. With meter'on:R:x IOK seale;:a reading..ofless.
than infinity between any coil terminal arid:.frame
indicates. low. insulation' resistarlce, replace reactor.
. ..
Measure con'tinuity between eithertermiildl Tor4 and
termitials-.2and.3'to..veiifytapS.arxi not.-broken:.
..
gzi
MEASURE
MEASURE
8306
FIGURE '7. L1 (315-0301)
FIGURE 8.
20
L2 (315-0300)
,
[El
CF1
~~
EXCITER ROTOR
-
The resistance of the exciter rotor is extremely small.
Accurate measurement with an ohmmeter is not
possible, however an open winding can be detected
with an ohmmeter. To check the rotorwindingsforan
open remove rotating diodes CRI, CR2, CR3, Figure
IO, from the heat sinks. Measure rotor winding
resistance as shown in Figure 11. The ohmmeter
should indicate a short.
TESTING EXCITER STATOR
Testing for grounds: Using an ohmmeter (R x 10K
scale), measure the insulation resistance between
either lead F1 or F2 and the generator frame. A
reading of less than infinity indicates a ground.
Exciter stator leads F1 and F2 are connected across voltage
regulator V R l terminals 2 and 3.
.
.
CR2 rftr
CR3
Testing winding resistance: Measure coil resistance
between leads F1 and F2 with an ohmmeter (scale R x
1). Resistance should be 14.85 to 18.15 ohms at 20°C
(68°F). See Figure 9.
FIGURE 10. ROTATING DIODE ASSEMBLY
Test f romCRI toCR2
CR1 to CR3
CR4 to CR5
CR4 to CR6
Replace rotating diodes on heat sinks. Hold body of
diode with proper size wrench while torquing, to
prevent wire from twisting. Torque to 15 Ib-in.
(1.7 Nom). Using an ohmmeter on R x 10K scale,
measure between any rotating diode lead and
generator frame. A reading of less than infinity
indicates low insulation resistance of the exciter
windings.
FIGURE 9. MEASURING FIELD RESISTANCE
. .
.
.. .
..
. ..
.
.. .
.
.. .. .
.
.
..: ...
.
.. .
. .
.
.
. .' ..
.:. .
.
.
I
.
.
..
. .
..
.
.
.
21
,
..
. .
. .
[GI
TESTING GENERATOR STATOR
TESTING GENERATOR ROTOR
Testing for Grounds: Disconnect stator leads from
Testing for grounds: Remove F+ and F- rotor leads
from diode heat sin'k assemblies. Connect an
ohmmeter (R x 10K scale) between either rotor lead
and the rotor shaft. A reading of less than infinity
indicates a ground. See Figure 13.
bus bar assembly; observe wire identification. Connect all stator output leads (TI-T12) together. Use an
ohmmeter set on the R x 10K scale and measure the
insulation resistance between thesewindings and the
stator frame. A reading of less than infinity indicates a
ground. See Figure 12.
.
C O N T A C T O N E PROD T O E A C H O F T H E FIELD
LEADS . A N D T H E OTHER P R O D T O T H E ROTOR
SHAFT.
FIGURE 13. .TESTING ROTOR FOR GROUNDS
FIGURE 12. TESTING STATOR WINDINGS
Testing for Shorts: Connect an ohmmeter (R x 10K
scale) between each individual winding and the other
windings connected together. Repeat until all Six
Coils have been tested. A readingpf less than infin'ity
indicates a short. See Figure 12A.
Accurate measurement of the generator rotor windings resistance with an ohmmeter is impossible,
however an open winding can bedetected. On agood
generator rotor the ohmmeter. would indicate a
rq,i?ance
Of lessthan five Ohms*
Accurate measurement of the generator statorwindings resistance with an ohmmeter is impossible,
however an open winding can be detscted. The
ohmmeter normally would indicate a short.
- ..
...
-. .
..
.-'a;
1-
. , .
FIGURE 12A. STATOR COILS (SCHEMATIC)
22
FIGURE 14..
MEASJ~INGROTOR WINDING
RESISTANCE
[JI
VOLTAGE
REGULATOR
Voltage adjustment of generators with voltage
regulators VRl mounted on the end bell is accomplished by turning Voltage Regulator rheostat on
control panel. If voltage is unstable or tends to hunt
adjust R18 potentiometer on the regulator board to
eliminate output instability. Refer to Figures 15 and
16.
FIGURE 15. VOLTAGE REGULATOR PRINTED CIRCUIT BOARD (TYPICAL)
VOLTS I
m
'1'
T O EXCITER FIELD
i= *d !
VOLTAGE ADJUSTING RHEOSTAT
12ov
-
ON CONTROL PANEL
Ln
VOLT
REF
FIGURE 16. VOLTAGE REGULATOR SCHEMATIC (TYPICAL)
rKl
’GENERATOR ASSEMBLY
Pre-assembly Procedure
‘GENERATOR DISASS EMBLY
(300-500 kW)
1. Inspect bearing; replace if necessary. Torque
bearing locknut 150 to 200 Ib f t (203to 271 Nom).
2. Inspect bearing rubber holding ring. Replace if
If testing determines that generator needs repair,
disassemble and remove according to Figure 17 and
the following instructions:
1. Disconnect batteries.
2. Disconnect and remove load wires.
3. Disconnect lead wires from control box. Check
wire markings for legibility to ease assembly. Reidentify if necessary. Arrange leads so that they
can be withdrawn easily from control box.
4. Disconnect engine control wires and voltage
regulator wires and pull back into cabinet.
5. Remove ten 3/8 inch bolts (1) and lift control
cabinet assembly (2)clear of set.
6. Remove two 3/8 inch bolts (3)and cooling fan
grille (4).
7. Remove six 3/8 inch bolts (5)and remove upper
and lower sheet metal covers (6).
8. Remove. four 10-32 screws (7) and voltage
regulator.
9. Support generator on wooden blocks placed
across skid base.
IO. Remove two 5/8 bolts (8),two 5/8 studs (9),four
3/4 inch bolts (10) from generator support
bracket. Remove shims from between support
bracket and skid base; identify shims with placement reference; save for reinstallation. Remove
generator support bracket (11).
11. Remove six 3/8inch bolts (12)and endbell (13).
12. Attach overhead hoist and sling to stator
assembly. Tension hoist sufficiently to take
weight of stator. Remove support blocks.
13. Remove sixteen 1/2 inch bolts securing stator,
and slide stator assembly clear of rotor.
Ez3
necessary. Apply Molykote to ring before installing.
3. Inspect all mounting bolts. Replace any bolts that.
show’signs of being stretched.
ASSEMBLY
1. Hang rotor in place; rotate40 align; insert six 5/8
inch bolts with lock washers. Torque bolts 120to
125 Ib ft (162to 1.70Nom).
2. Using hoist and sling, slide stator assembly in .
,
place.
Ezz3
Use care to ensure that damagedoesnot
occur to rotor or stator windings while
stator is being positioned;
,
CAUrlo~
Align stator, insert sixteen 1/2 inch bolts and
lockwashers. Pull up bolts evenly, then torque 65
t o 70 Ib f t (88t o 95 Nom).
3. Install end bell assembly. Ensure rubber holding
ring is not distorted while end bell is being
positioned on rotor bearing. Rock gently into
place and pull up evenly with six 3/8 inch bolts
and washers. Torque bolts 30 to 35 Ib ft (40to
48 Nom).
4. Atta,ch generator support bracket; insert two 5/8
inch bolts with washers. Torque bolts 195 to 200
Ib ft (264to 272 Nom).
5. Insert two 5/8 inch studs with nuts and
lockwashers. Torque 195 to 200 Ib ft (264 to
272 Nom).
6. Install shims in same position from which they
were removed.
7. Insert support bracket-to-skid base bolts and
tighten.
8. Reinstall voltage regulator, upper and lower sheet
metal covers, cooling fan grille, and control
cabinet assemblies.
9. Refer to parts catalog for replaceable parts and
assemblies. Refer to wiring diagrams for
reconnection.
Exercise care when sliding stator over
rotor. Collision with coils can cause
damage.
14. Attach sling and hoist to rotor. Tension hoist to
take weight of rotor.
15. Remove six 5/8 inch bolts and slide rotor. clear
from flywheel.
16. Lower rotor and place on a support cradle where
coils cannot receive damage.
#
c. ._I
,
When removing drive diskfromflywheel,
do not bend disk.
24
1 (IO
PLACES)
9
-aJSTATOR ASSY.
END B E L L I
3
FAN
DRIVE
DISC
..
SUPPORT
3
FIGURE 17.
GENERATOR DISASSEMBLY
25
.
I
generator support bracket (11).
11. Install wedges between rotor and stator, Figure
18.
12. Remove six 3/8 inch bolts (12) and endbell (13).
13. Install rotor support rod to free end of rotor,
Figure 19.
14. Support the free end of the rotor support rod.
15. Attach overhead hoist and sling to stator
assembly. Tension hoist sufficiently to take
weight of stator. Remove support blocks.
16. Remove wedges from between the rotor and
stator.
17. Remove sixteen 1/2 inch bolts securing stator,
and slide stator assembly clear of rotor, keeping
the rotor supported at end of rotor shaft.
18. Install support under rotor whenstator is clear of
rotor, Figure 20.
GENERATOR DISASSEMBLY
(600 & 750 kW Only)
If testing determines that generator needs repair,
disassemble and remove accordingto Figure 17 thru
20 and the following instructions:
1. Disconnect batteries.
2. Disconnect and remov,e load wires.
3. Disconnect lead wires.from control box. Check
wire markings for legibility to ease assembly. Reidentify if necessary. Arrange leads so that they
can be withdrawn easily from control box.
4. Disconnect engine control wires and voltage
regulator wires and pull back into cabinet.
5. Remove two 3/8 inch bolts (3) and lift control
cabinet assembly
- (2)
. . clear of set.
6. Remove six 3/8 inch bolts (3) and cooling fan
grille (4).
Exercise ,care when sliding stator over
.,.. 7. Remove six 3/8 inch bolts (3) and remove upper
rotor. CQliision with coils can cause
and lower sheet metal covers (6).
damase.
8. Remove four
screws (7) and "'Itage
.19. Attach sling and hoist to rotor. Tension hoist to
regulator.
take weight of rator.
9. Support generator on wooden blacks placed
20. Remove rotor support rod.
across skid base.
21. Unbolt the drive disk from engine.
10. Remove two 5/8 bolts (8), two 5/8 studs (9); four.
.
When removing drive disk from engine,
3/4 inch bolts (10) from generator support do not bend disk.
bracket. Remove shims from between s u ~ ~ o r t
22.. Lower rotor and place on a support cradle where
bracket and skid base; identify shims with place- .
coils cannot be damaged. .
ment -reference; save for reinstallation. Remove
'
!
' FIGURE
18. WEDGE INSTALLATION '
26
FREE END O F ROTOR
.I/
I
I
ROTOR SYPPORT ROD
I
!t-n--wpI----
-
-+
\
-I
"AID
-
ROTOR
,
I
I
SUPPORT
FROM FLOOR
STATOR
FIGURE 19. STATOR REMOVAL
I
I
DISC
I
!,
0" 48'
ENGINE
--
---
-+SKID
--- I\-ROTOR
SUPPORT
FIGURE 20. ROTOR REMOVAL
GENERATOR ASSEMBLY
Pre-assembly Procedure
1. Inspect bearing; replace if necessary. Torque
bearing locknut 150to 200 Ib-ft (203 to 271 Nom).
2. Inspect bearing rubber holding ring. Replace if
necessary. Apply Molykote to ring before installing.
3. Inspect all mounting bolts. Replace any bolts that
show signs of being stretched.
27
5. Align stator, insert sixteen 1/2 inch bolts and
lockwashers. Pull up bolts evenly, then torque 65
to 70 Ib ft (88 to 95 Nom).
6. Place wedges between the rotor and stator. See
Figure 18. Then remove the rotor support rod
from the rotor.
7. Install end bell assembly. Ensure rubber holding
ring is not distorted while end bell is being
positioned on rotor bearing. Rock gently into
place and pull up evenly with six 3/8 inch bolts
and washers. Torque 6 bolts 30-35 lbft (41to 48
Nom):
8. Attach generator support bracket; insert two 5/8
inch bolts with washers. Torque bolts 195 to 200
Ib ft (264 to 271 Nam).
9. Insert two 5/8 inch studs with nuts and lock
washers. Torque 195to 2001bft (264to 271 Nom).
10. .In.stall shims 'in. same position .from which they
were .removed; .
11. I-nsert. support bracket-to-skid base -bolts arid
ASSEMBLY
1. Support rotor and attach drive disk toengine. See
Figure 20.Torque bolts 120to 2001bft (163to271
Nom).
When installing drive disk to engine, do
not bend disk.
2. Install support under rotor.
3. Install rotor support rod to free end of rotor,
supporting the free end of the rotor support rod.
See Figure 19.
4. Using hoist and sling, slide stator in place. See
Figure 21.
Exercise care when sliding stator over
rotor. Collision with mils tan cause
damage.
ROTOR SUPPORT ROD
.
tighten.
. . . 12. Re4nsW .voltage regulator, upper and. lower
'
R.
ROTOR
.
.STATC)R:
.
.FIGURE 21. STATOh'fNS?ALL:A%lON
.
.
Sheet.metalcovers, coaling fangrille, and conlroi
c86iriet'assemblies. : 13. Refer to parts catalog for replaceable parts and
assemblies. Refer. .to wiring diagrams for
.reconnection. . . :
'14. Rtpnn'ect lead w.ires to coritrol box.
15. hstall and: 'recoritfeot.laad .wires,
16. .Reconne6t...batteries.
'
-'
28
.
.
L21 REACTOR
\
/
CR2l
SCR BRIDGE
8199
FIGURE 22. SCR BRIDGE AND REACTOR LOCATION
c5
CR3
I
CR15
1
I
I
'B
F3
~ 1 4
R13
.
I
I.
2
3
4
5
7
6
VR21 BOARD
8
9
I011
A!33-PC
FIGURE 23. VOLTAGE REGULATOR VR-21
29
12
TBI
I
VOLTAGE ADJUSTMENT
After replacement, voltage regulator (VR21) adjustment is performed as follows (see Figure 24):
1. Center the voltage adjust knob so pointer is in a
vertical position.
2. Open meter panel doors. Start unit.
3. Using a screwdriver, turn R18 potentiometer on
printed circuit board VR21. Observe voltmeter on
meter panel while making adjustment. Set voltage
with no load connected to generator. (Example:
For a 120/240 volt connection, set no-load voltage to. approximately 246 volts.)
RECTIFIER BRIDGE
FIGURE 25. FIELD FLASHING CIRCUIT
If voltage is unstable or tends to hunt, turn R26
potentiometer on VR21 in the direction shown on
printed circuit board to increase voltage dampening
(Le., decrease sensitivity).
TESTING L21 REACTOR
The L21 commutating reactor mounts inside the
control box, below the VR21 Voltage Regulator.
i
ADJUST R26
HERE
The coils 1-2 and 3-4 are wound on the same.core.
Resistance between 1-2 and 3-4 should be equal.
Resistance between coils (e.g., 1-4) or from any
terminal to frame of the reactor should be infinity
(Figure 26).
\
ADJUST R18
HERE
FIGURE 24. ADJUSTING VOLTAGE ON VR21
FLASHING THE FIELD
If output voltage does not build up it may be
necessary to restore the residual magnetism of the
poles by flashing the field. Assemble a sixvolt battery
and diode as shown in Figure 25. If a six volt lantern
battery is not available, a 12 volt (generator set
battery) or a 24 volt battery can be used; however, a 20
ohm or 40 ohm, 2 watt resistor must be used with the
12 amp, 300 volt diode. Start the generator set, touch
positive lead to +on rectifierbridge, and negative lead
to the - terminal. Hold leads on terminals just long
enough for voltage to build up.
jl[
I
rn
Do not keep excitation circuitry connected
longer than 5-seconds, or damage may occur
to !he exciter regulator.
cAutlo.N
FIGURE 26. L21 REACTOR
30
4
TESTING RECTIFIER BRIDGE ASSEMBLY
(CR21)
The rectifier bridge located within thecontrol cabinet,
below the voltage regulator, contains 3 diodes, CRI,
CR2, and CR3, and two silicon -controlled rectifiers,
CR4 and CR5. These diodes and SCRs are encapsulated within an hermetically sealed box, therefore
failure of any diode or SCR means the entire unit has
to be replaced. See Figure 27.
<
Ti
CR4
A2
AC TERMINALS ARE
GIVEN NUMERIC
DESIGNATIONS FOR
T E X T REFERENCE
ONLY. DOES NOT
APPEAR ON UNIT.
'G2
AC-2 1D
FIGURE 27. RECTIFIER ASSEMBLY
Disconnect wires from rectifier unit prior to testing.
Test unit in order shown in Table 2. Refer to Figure 28
for CR4 and CR5 test circuit. When test is complete
and satisfactory, reconnect unit observing correct
wiring hook-up.
'
7---
6 VOLT
DRY C E L L
BATTERY
D C VOLTMETER
FIGURE 28. TESTING SCR
31
TABLE 2. TESTING SCR ASSEMBLY CR21
TEST
OHMMETER LEAD
+
-
RECTIFIER
TERMINALS
X
-
+
X
1
X
2
x
i
,I
:
-
+
TES
CR
-
REMARKS
METER SCALE
CR3
Infinity
RXlOK
6 to50.Ohms
R X I
DC Voltmeter
4ead
DC Voltmeter
Reading
CR3
-
3
-
. . . .
.i,CRl
.?I
.
.,
X
,5
:
- :;j(
. . .
.!
_ . l.
x
16
'!;
3
-
..
'
.ACJ
-
+--
AG2
................
...
7
!,.
GRd
..............
,
i
-
;x
.:
3
:
....
-
:AC2
-
CR2
~
-
x
8
..
J
.CR2
AC2
6 V Battery
with 100R
Resistor
+
+
-
AC1
9*
lo**
AC2
+
AC2
r'* Apply temporary jumper from AC1 to G1 to test CR4. Remove jumper,
8
read voltmeter. See Figure 28.
** Apply temporary jumper from AC2 to G2 to test CR4. Remove jumper,
read voltmeter. See Figure 28.
32
-
I
+
+
less than
'I
3 Volts
3 Volts
GENERAL
Early UV series generator sets used relays exclusively, for engine controls. As the state-of-the-art has
improved, O N A N has been able to change concepts
to improve quality and reliability of its product.
Refer to Table 3. Locate the specification letter of a
particular unit, the tablewill tell you which pageof the
controls section of this manual is applicable to your
generator set.
TABLe 3. CONTROLS LOCATION
Page 52
1 and 5 Light Solid
State Control
Begin Spec
DFT
DFU
WF
WK
DFV
DFW
DFY
DWV
DFX
DFZ
.
B
C
A
A
D
A
C, D only *
D only *
B only *
B
E
B
A
A
Page 54
6 Light Solid
State Control
Begin Spec
H
k
B
A
A
DFT spec E. DFU spec E. and WF spec C controls information
located in theYB series majorservice manual, ONAN No. 900-0181,
and Generator Section 9. of Master Service Manual, 922-0500.
33
K14. FUEL RELAY (One and four lamp
systems)
The following operational description is applicable
only to relay-operated engine controls. See Figures
29 and 30.
Same type of relay as K13.
K11. OIL PRESSURE TIME-DELAY RELAY
(One and four fault lamp systems)
Energized when R-S-R switch is placed in Run
position. N.O. contacts 6-8 close to apply 24VDC to
battery charging alternator for field excitation.
Energized after engine has started, by output from
AUX terminal of battery charging alternator. Relay
contacts close 15 seconds after 24VDC is applied to
coil. This delay allows engine to startand oil pressure
t o build-up while the Low Oil Pressure switch is still
closed. When K11 relay actuates, N.O. contacts close
and complete circuit between K15 and. LOPCO
switch.
N.O. contacts 1-3 close to apply 24VDC to the
following:
a.
. b.
c.
d.
e.
K12. CRANKING LIMITER TIME-DELAY
RELAY (One and four fault lamp controls)
Energized when R k - R switch is placed in Run
Oil pressure gauge (M11)
Water temperature’gauge (M13)
K2 fuel solenoid valve
K1 starter solenoid (thru K13 N.C. contacts)
K12 cranking limiter relay (thru K13 N.C. contacts)
after K13 relay has actuated-N.O.
contacts close-
f. K11 time delay relay; oil pressure
g. K3 water solenoid valve
position and K14 actuates. Relay energizes at initial
current application and contacts OPEN 45 to 90
seconds later. This delay limits the period of time the
engine starter will crank. If the engine does not start
within this time period, N.O. contacts will open and
allow K14 relay to drop out. On fourlight installations
N.C. contacts will close and light the PLANT FAILED
TO START fault light.
If the engine starts, N.C. contacts K13, 1-4 will open
and remove 24VDC from K12 coil, thus preventing
any further time-out action.
K15. EMERGENCY SHUTDOWN RELAY
(Single light control only)
In addition, on four lampsystemsonly, two extra N.O.
contacts close when relay actuates. One set lights
“Plant Failed to.Start” lamp, the other applies 24VDC
to an external alarm circuit.
Normally a de-energized relay, operates only with
Low Oil Pressure, High Water Temperature, or
Overspeed malfunction. LOPCO and HETCO circuits
are “armed” when K11 operates. Closure of either of
these two cut off switches applies a ground (through
K11 contacts) to the coil of K15, causing it to energize
with the following result:
Cranking limiter is not used when a cycle cranker is
installed at a remote station.
”
a. N.C. contacts open to de-energize K14forengine
shutdown and de-energize K15 coil.
b. N.O. contacts close to light DS12 fault lamp.
c. N.O. contacts close to apply 24VDC to common
alarm circuit.
K13. ‘START DISCONNECT RELAY (One
and four fault lamp controls)
Two pole, double throw relay, standard octal base
plug-in. In the de-energized position N.C. contacts 14 connect t o K1 starter solenoid and K12 cranking
limiter. The relay is energized when output from the
battery charging alternator reaches coil pull-in value.
N.C. contacts 1-4 open and remove 24VDC from K1
and K12, preventing further operation. N.O. contacts
1-3 close and apply24VDCto K11 which energizes, to
arm the LOPCO circuit. Contacts 1-3 hold 24VDC on
the water solenoid for engine cooling.
If the relay has been energized, it is reset by manually
pressing the latch button. Overspeed switch is a
centrifugal unit which closes at 2000 to 2200 rpm
and applies a ground to K15 to perform the functions
previously described. Overspeed shutdown is not
“armed” by K11 relay, therefore is not affected by its
operation.
34
s12
-
I
1 -
DSll
I7
I
PANEL LIGHT
,
FIGURE 29. SCHEMATIC, SINGLE LIGHT
35
b
b. N.O. contacts close to light DS15, Overspeed
fault lamp.
c. N.O. contacts close to apply 24VDC to alarm.
K15. LOW OIL PRESSURE SHUTDOWN
(Four fault lamp controls)
With a four fault light panel, K15 relay has only one
function, Low oil Pressure shutdown and fault lamp
indication. Armed by K11 as previously noted, closure
of LOPswitch (Sl)will applyagroundtoK15coiland
cause it to actuate, with the following switching
Fction:
The preceding operational description refers to R-S-R switch in
Run position. This is for purposes of brevity only. Identical
functions will result with R-S-R switch in Remote, when remote
station circuits are complete.
a. N.C. contacts open, K14 drops out to shutdown
engine, K15 coil is de-energized.
b. N.O. contacts close to light DS13 LOP fault lamp.
c. N.O. contacts close to apply 24VDC to alarm.
OPTIONAL RELAYS
K12. ALARM RELAY (Specs 9560A; 6925A;
5504A)
The following relays are used with four fault lamp
control panels. See Figure 30.
Energized .by signal from remote station, which also
lights “Failed to Start”fault lamp. N.O. contactsclose,
apply 24VDC to TB11-12 for external alarm.
K16. HIGH WATER TEMPERATURE‘
SHUTDOWN (HETCO)
K18. REMOTE START
RELAY (Spec 9560A) .
Placing R-S-R switch to Run applies 24VDC to K16
coil. The relay is then in a ready condition and when
the high water temp switch S2 closes at approximately 216°F (102OC) aground is applied to theotherside
of K16 coil.
TIME-DELAY
Used only with remote start. The three-second delay
between energize and actuate prevents unit-engine
start when a sudden drop in utility company voltage
indicates a power-out, unless thevoltagedip exceeds
3-seconds.
The relay will actuate and perform the following
switching action:
Actuation of the relay closed N.O. contacts to complete circuit between TB12-Remote and R-S-Rswitch in Remote position.
a. N.C. contacts open, K14 drops out to shut down
engine.
b. N.O. contacts close to light DS14 High Water
Tem peratu re Fault light.
c. N.O. contacts close to apply 24VDC to alarm.
ENGINE CONTROL OPERATION, Spec
9730A
r
’
,
1
L
This system has engine shutdown for Overcrank and
Overspeed only, all other malfunctions operate
alarms. Operation of K12 Cranking Limiter, K13 Start
Disconnect, K14 Fuel Relay and K15 Overspeed
Shutdown are as previously described.
K17. OVERSPEED SHUTDOWN
Placing R-S-R switch to Run applies 24VDC to K17
coil. Relay is then in a ready condition. An engine
Overspeed condition i n excess of 2000 rpm will cause
a centrifugal switch mounted on the generator shaft,
to close and complete the relay ground circuit.
The following relaysK16 Low Oil Pressure alarm,
K17 High Water Temperature alarm,
K18 Low Engine Temperature alarm,
K19 High oil Temperature alarm,
-are double pole, single throw units. Each has one
set of N.O. contacts which close to apply 24VDC to
TB13, then to a remote annunciator panel. See Figure
31 for schematic diagram.
The relay will actuate and perform the following
switching action:,:
a. N.C. contacts open, K14 drops out to shut down
engine.
36
W
K1
K13
r\
rk
K12
K I3
4
6
1
1
HI
11
"
1
CBI
I
I
.ipJ-@i
I
,
-
I
. .
17
DS12
J'i
K15
I I
DS15
12
-
T O ALARMS
.7
K17
FIGURE 30. SCHEMATIC, FOUR LIGHT
37
TYPE 3 CYCLE CRANKER 625-0821 (Specs
power is removed from the engine starter circuit, and
from K2, which de-actuates -10-seconds later and
allows K1 to dropout. K2 will again pull in, K1 will
energize and then actuate, and the crank/rest time
will continue until K3 actuates, N.O. contacts close
K4 to pull-in,open N.C. contacts and shut
and
circuit.
down the engine
'
550419; 6925A; 9560A)
This optional unit combines cranking limit time and a
number of crank/rest cycles within this time. Referring to Figure 31 it will be seen that relays K1, K2and
K3 are adjustable time-delay units. K1 and K3 delay
between energize and actuate, K2 delays between deenergize and de-actuate.
Placing R-S-R switch in Run position applies24VDC
through cycle
relay 'Ontact'
K4 and K1 to
control panel relay K14 which pulls-hand starts the
engine cranking cycle. This same24VDC is applied to
cycle cranker 7elay K3 which controlthe cranking
limiter time period. Relay K2 actuates and doses
Contacts to apply 24VDC to K1. When K1 actuates,
'
If the engine starts within the K3 energize/actuate
time limitroutput from the battery charging alternator
will actuate relay K13 which will switch and apply
24VDC to cycle cranking relay K5. This relay will pull
in and keep the cranking circuit de-energized.
Relay K4 is a mechanical-latch type..In the event of non-start, K4
will drop out and disable the cranking circuit, which will remain
disabled until K4 Is manually reset by depressing the latch button.
6309
FIGURE 31. TYPE 111 CYCLE CRANKER (625-0821)
38
RELAY CONTROL TROUBLESHOOTING
Is this a single fault lamp control? If “yes” see guides A thru C, I and J. If “no” see guides D thru
TROUBLESHOOTING GUlDES
A. CONDITION: Engine will not crank.
R-S-R switch in run position
- page 41
B. CONDITION: Engine will not crank
R-S-R switch in remote position - page 43
C. CONDITION: Engine will not crank
R-S-R switch in remote position - page 44
1. CONDITION: Engine running
Starter re-engages - page 49
J. CONDITION: Engine will not start, but continues
to crank in excess of 90-seconds
cranking limiter time - page 50
Isthisafourfault lamp control? 1f“yes”seeguides Dthru H, I and J;if“no”seeguidesAthruC, I and J.
TROUBLESHOOTING GUIDES
D. CONDITION: Engine will not crank
R-S-R switch in run position
- page 45
E. CONDITION: Engine malfunction shutdown
Plant failed to start
- page 46
F. CONDITION: Engine malfunction shutdown
Low oil pressure page 47
-
G. CONDITION: Engine malfunction shutdown
High water temperature - page 47
H. CONDITION: Engine malfunction shutdown
Overspeed condition page 48
-
1.
CONDITION: Engine running
Starter re-engages
- page 49
J. CONDITION: Engine will not start but continues
to crank in excess of 90-seconds
limiter
time - page 50
-cranking
_*.
. .
.
H.
GENERAL
Before you start the troubleshooting procedure,
visually inspect all wiring and connections. Check
relay plug-in receptacles for cold solder joints. Look
at the engine control and wiring. Check that no
broken or shooed wires and no loose terminals exist.
This troubleshooting guide assumes that your
knowledge of the electric generating set will allow
you to consider the nature of the fault before
proceeding.
Forexample, your set cranks without starting; you will
check fuel, fuel lines, ignition,carburetion, etc. If it
does not crankCheck Batteries
Connected properly?
Connections secure?
Fully charged?
Starter Connections secure?
‘Remote Station start switch in correct
position?
A few minutes spent logically analyzing a malf,unction
can save hours and expense on an inoperative
generating set. This manual will help you with your
electrical control problems. Consult your engine
operator’s manual .for engine troubleshooting infor.mation.
To use-this guide, answer the question either‘!yes” or
“no” then .proceed -to the step given in the column
containing your answer.
40
QUESTION AND ANSWER TROUBLESHOOTING GUIDE
To correct a problem, answer the question "Yes" or"No", then proceed to the next step given in whichever column
the question was answered.
Preparation for troubleshooting. Check batteries for state of charge. Check wiring and connections for correct
connection and security.
DFT, DFU. DFV. DFW. Specs R8/1A; R8/50A, R8/8554A, R8/9730A.
WF. WK. R8/1A.
Single Fault Lamp Control
CONDITION: A. ENGINE WILL NOT CRANK
R-S-R SWITCH IN RUN POSITION
Item
Is Fault lamp lit?
1
2
3
I Yes
2
Reset relay K15 latch button.
a. Does fault lamp go OFF. Does engine crank?
b. Does fault lamp stay ON?
c. Does fault lamp QO OFF, then ON?
Replace K15 relay.
~
~
No
4
~
~
R-S-R
Run
3
5
_
_
~
I-
Reset relay K12.
Does engine crank?
5
stop
Unplug K14 relay. Measure resistance from TB11-11 to ground.
Is resistance reading Infinity?
6
-
Disconnect wire to Overspeed switch.
Measure resistance of lead to ground.
Is resistance reading Infinity?
8
7
--
Replace or readjust Overspeed switch
8
9
Measure resistance from TI31 1-1 1 (O/S switch still
disconnected) to ground.
Is resistance reading Infinity?
10
Replace K 1 1 , Oil Pressure Cut-off relay.
10
Reconnect wires disconnected at TB11-3 1.
Plug-in K14 relay.
11
Measure voltage at starter.*
Does coil wire read 24 VDC (solenoid terminal wired to B+)
Does motor input read 24 VDC (cable from solenoid terminal
t o terminal on top of starter)
Run
'DFX and DFZ units have two starters wired in series.
12
Replace starter.
13
Measure voltage at TBll-6.
Does voltmeter read 24 VDC?
14
Measure voltage at starter circuit breaker where wire
connects from relay K1.
Does voltmeter read 24 VDC?
41
I
l4
15
17
18
-
Item
I A.
ENGINE WILL NOT CRANK (Continued)
Place temporary jumper across circuit breaker terminals.
Does engine crank?
I
Replace circuit breaker.
I I
Check wiring and connections between battery and terminal
board. Repair, replace, secure where necessary.
l7
18
Measure voltage at TB11-5.
Does voltmeter read 24 VDC?
I
Yes
I
16
17
-
-
Run
23
Measure voltage .at coil input ,terminal on starter solenoid .K1..
Does voltmeter read 24 V.DC?
20 :
22
Measure .resistance from ,Klcoil .return co.nnec,tion to ground.
.Is continuity obtained?
21
22
21
Replace starter solenoid K1.
-
-
22
Check all wiring and connections to KI.
Replace, repair, secure as necessary.
-
-
23
4Joplug relay ,K13.
Measure voltage at receptacle pin 1.
Does voltmeter read 24 VDC?
Reinsert K13 relay..
20
24
'
24
26
25
25
Replace K13 Relay.
-
-
26
Toggle R-S-R switch between Run and Stop positions;
watch relay K14 during this operation.
Does K14 relay actuate?
-
27
Unplug relay K14.
Measure voltage at receptacle pin 7.
Does voltmeter read 24 VDC?
Reinstall Relay K14.
stop
Run'
31
.
Recheck latching of K12 and' K15 relays.
Check wiring and connections (refer to schematic).
Replace, repair, secure where necessary. Was repair required?
stop
32
30
Check wiring and connections between K14-7 and TB12-Ground.
Repair, replace, secure where necessary.
-
31
Replace relay K14.
-
42
28
-.
Measure continuity between K14 and pin 2 and ground.
Is continuity obtained?
29
'
-
28
Stop
'Run
Check wiring and connections between K13-4 and TBll-5.
Replace, repair, secure as necessary. Was repair required?
27
stop
1-119
19
R-S-R
NO
Item
32
33
1 A. ENGINE WILL NOT CRANK (Continued)
I
Measure voltage at R-S-R switch.
Does voltmeter read 24 VDC?
Check wiring and connections at R-S-R switch.
Repair, replace, secure where necessary. Was repairrequired?
-
stop
-
34
Replace R-S-R switch.
Itern
1
2
3
Switch R-S-R switch to Run position.
Does engine crank?
Return R-S-R switch to Remote.
Apply temporary jumper across TB12-B+ and Remote terminals.
Does engine crank?
Apply temporary jumper across Start switch at remote station.
Does engine crank?
2
AI
3
5
4
6
.
4
Replace remote station start switch.
5
Check wiring between TB12-Remote and R-S-R 'switch.
Repair, replace, secure where necessary.
-
6
Measure continuity between TB12 and Remote station.
Repair, replace, secure where necessary.
-
-
43
t
f
-I
-
-E,
CONDITION: c. ENGINE
Itern
-
MALFUNCTION SHUTDOWN
Yes
.
No
-
Did engine shut down immediately after start
(i.e., within 3 seconds)?
5
2,
2
Did engine shut down 10 to 20 seconds after start?
6
3
Did engine shut down 45 to 90 seconds after start?
14
1
-
4
Did engine shut down after running, crank for
45 to 90 seconds, then shut down without cranking?
Fqult light ON after cranking cycle complete?
WF and WK sets only.
5
Check throttle Jinkage for freedom of movement.
Check governor setting.
Check overspeed switch. Readjust or replace as necessary.
6
Check engine crankcase .oil.
Does oil need replenishing?
7
Disconnect switch y i r e at TB-11-14.
Restart engine. Watch oil pressure gauge.
Does Engine run satisfactorily?
Does oil pressure build up to normal?
8
Refer to engine manufacturer’s manuaJ for oil system
troubleshooting guides.
9
Disconnect oil pressure switch.
Measure resistance between wire and ground,
Ohmmeter scale R x 10K.
Is reading less than infinity?
-.
14
l.6
30
10
Repair or replace wire.
11
Connect ohmmeler (R x 1 scale) between oil pressure
switch and ground. Start engine, observing ohmmeter.
Does ohmmeter reading go to infinity when engine starts?
12
Replace oil pressure switch.
13
Shut down .engine. Visually check oil pressure time-delay
relay contacts. Manually operate armature and make sure
contacts make and break properly. If contacts hang up
or are stuck, replace relay.
14
15
Check fuel.
Are tanks (day tank and main fuel tanks) full?
Check fu.el system; lines, pump, etc.
16
Check fuel lines; gas pressure, etc:
17
‘Check ignition system. Refer to engine manufacturer’s
,manual for troubleshooting
. .
fueland ignition
. . systems.
.
;
44
15
11
Preparation for troubleshooting. Check batteries for state of charge. Check wiring and connections for correct
connection and security.
Four Fault Lamp Control
R-S-R SWITCH IN RUN POSITION
~
~~~~
~
Yes
-
~
Is one of the following fault lamps ON?
a. Generator Set Failed to Start? Refer to guideb. Low oil pressure? Refer to guidec. High Water Temperature? Refer to guided. Overspeed? Refer to guide-
E
F
G
H
Toggle R-S-R switch between Stop and Run; watch K14 relay.
Does K14 operate?
No
2
-
-
-
8
3
5
4
Refer to Figure 26, Schematic Diagram.
Progressively measure continuity from R-S-R switch
through K12, K17, K16, K15, to K14-7.
Repair, replace or secure wiring or connections where
necessary.
-
-
Measure continuity between K14-2 and TI312 Ground.
Is continuity obtained?
6
7
Replace K14 Relay.
-
-
Check wiring and connections between K14-2 and TB12 Ground.
Replace, repair, secure where necessary. Reinsert relay.
-
-
Toggle R-S-R switch betweenstop andRun; hold
K1 Starter solenoid.
Does K1 operate?
13
9
~
~
~~
I-S-R
Run
~~
Unplug K14 relay.
Measure continuity between K14-7 and R-S-R switch armature.
Is continuity obtained?
stop
--
Measure voltage at TB11-5.
Does voltmeter read 24VDC?
Run
10
18
Measure voltage at coil terminal of K1.
Does voltmeter read 24VDC?
11
-
Measure continuity fromyround side of K1 coil
terminal to ground.
Is continuity obtained?
12
-
Replace K1 Starter solenoid.
-
-
~
~
~~
stop
~~
Measure voltage at starter motor relay coil terminal.
Does voltmeter read 2.4 VDC?
~
Run
16
14
15
-
~~
Apply temporary jumper across circuit breaker CB1.
Does starter crank?
45
Item
15
D. ENGINE WILL NOT CRANK
R-S-R SWITCH IN RUN POSITION (Continued)
Replace starter circuit breaker.
16
Are starter to battery cable connections secure?
17
Replace starter motor.
18
Unplug relay K13.
Measure continuity across relay pins 1 and 4.
Is continuity obtained?
19
Replace relayK13.
20
Check wiring and connections between TBll and K13
and K14 relays.
Repair, replace, secure where necessary.
2
t
Yes
No
Reset latch button on relay K12.
Does engine crank?
Does engine start?
-
c2
2
Refer to engine manufacturer’s manual for engine
non-start troubleshooting guides.
-
-
Item
1
R-S-R
stop
46
Four Fault Lamp Control
LOW OIL PRESSURE SHUTDOWN
Itern
1
Yes
No
-
2
Does oil pressure build up to normal, then
engine shut down?
Does engine shut down before pressure build up?
3
7
-
Disconnect lead from low oil pressure switch (Sl).
Measure continuity between lead and ground.
Is continuity obtained?
4
5
4
Repair or replace lead.
-
-
5
Connect ohmmeter between S1 and ground.
Reset relay K15. Restart engine; watch ohmmeter.
Does switch open when oil pressure builds up?
-
6
Replace oil pressure switch.
-
-
Yes
NO
Check engine crankcase oil quantity.
Is oil required?
Reset latch button on K15 oil pressure relay.
Start engine; watch oil pressure gauge.
2
3
6
Refer to engine manufacturer's manual for low oil
Four Fault Lamp Control
~ONDITION: G. ENGINE MALFUNCTION SHUTDOWN
HIGH WATER TEMPERATURE SHUTDOWN
Itern
Check coolant.
1
Avoid removing the pressure cap on the radiator until unit
has cooled. If this is impractical, the system may be opened
while hot i f certain precautions are taken. While wearing rubber insulated gloves
for protection, slowly open the cap allowing the pressure to vent. This is necessary to avoid personal injury from contact with hot coolant or steam.
~
2
Check fan belts.
3
Check coolant pump drive belts.
4
Check radiator (if appropriate) and remove any
obstructions to air flow.
Reset latch button on relay K16.
Restart engine. If city water cooled system,
adjust water flow to keep engine within normal
operating temperatures.
~~
Check load on generator.
Reduce load if excessive.
47
, '
Preparation for troubleshooting. Loss of governor control or ingestion of contaminated air will cause an engine to
overspeed. This can be caused by either a faulty governor, uncoupled, sticky or binding throttle linkage to the
governor; or intake air containing fuel or oil vapor.
When an engine has shut down because of an Overspeed condition, check the following before continuing with the
troubleshooting guide.
a. Throttle linkage for freedom of movement
b. Both banks of cylinders are connected to governor throttle linkage.
Four Fault Lamp Corirrd
c
CONDITION: H. ENGINE MALFUNCTIOW SHUTDOWrJ .
Item.
1
Yes
Disconnect Overspeed switch lead from TB11-11.
Measure continuity between disconnected lead
and ground.
Is continuity obtained?
2
Leaving ohmmeter connected, disconnect lead from
Overspeed switch on generator shaft.
Is continuity still maintained?
3
3
Repair or replace wire between TBl1-11 and
Overspeed switch.
-
4
Adjust or replace Overspeed switch.
-
2
48
Single or Four Fault Lamp Controls
~
I CONDITION:
c
I. ENGINE RUNNING. STARTER RE-ENGAGES.
Yes
No
Unplug K13 Start-disconnect relay.
Measure continuity from AUX terminal on battery
charging alternator to pin 7 of relay receptacle.
Is continuity obtained?
2
5
Measure continuity from relay receptacle pin 2 to
TB1 l-Ground.
Is continuity obtained?
3
5
4
5
6
5
Remove cover from battery charging alternator voltage
regulator.
Measure continuity from relay K14 receptacle, pin 6 to
input of battery charging alternator voltage regulator
(ye1Iow w ire).
Is continuitv obtained?
Measure continuity from K13 receptacle pin 4 to coil
input terminal of starter relay K1.
Is continuity obtained?
3-S-R
Check all wiring and connections in the previously
mentioned circuits.
Repair, replace, secure where necessary.
Replug K13 relay. Do not close panel door.
Restart engine; remove K13 relay as soon as engine
Proceed with care! High voltages are present
within the control cabinet, which could cause
shock or serious personal injury.
Measure voltage at AUX terminal of battery
charging alternator.
Does voltmeter read 24 VDC?
Replace K13 relay with new unit.
Measure voltage at excitation input terminal of
battery charging alternator (yellow wire).
Does voltmeter read 24 VDC?
Replace battery charging alternator.
49
Run
CONDITION: J. ENGINE WILL NOT START, BUT CONTINUES TO CRANK IN
EXCESS OF 90-SECONDS CRANKING LIMITER TIME
Item
Yes
1
Disconnect one wire from resistor R11 (cranking limiter).
Measure resistance from resistor tap to disconnected terminal.
Is resistance approximately 7.5 ohms?
3
I
No
2
2
If resistor indicates either open (infinity) or
shorted, replace resistor.
3
Measure voltage at coil input terminal of K12 relay.
Does voltmeter read 24'VDC? (after 90 seconds)
4
-
Replace K12 relay.
-
- .
4
-
3
.
50
.
R-S-R
Run
-.
GENERAL
Y
This section of the manual is intended to instruct the
serviceman on the operation of the relays and printed
circuit modules which comprise the UV control
system. Used in conjunction with the schematic
diagrams at the back of the manual this information
should provide the serviceman with greater understanding of the function of the system.
TABLE 4. FAULT LAMP OPTIONS
~
SYSTEM
PENN STATE
SINGLE LIGHT
STANDARD
SINGLE LIGHT
5 LIGHT
5 LIGHT
PR E-ALAR M
PENN STATE
FIVE LIGHT
6 LIGHT
FAULT
~
~~
FAULT
LAMP
STOP
ENGINE
X
X
X
I
Overcrank
Overspeed
Low Oil Pressure
High Engine Temperature
X
X'
X
Overcrank
Overspeed
Low Oil Pressure
High Engine Temperature
X
Overcrank
Overspeed
Low Oil Pressure
High Engine Temperature
Low Engine Temperature
X
X
X
X
X
X
X
X
Overcrank
Overspeed
Low Oil Pressure
High Engine Temperature
Low Engine Temperature
X
X
X
X
X
Overcrank
Overspeed
Low Oil Pressure
High Engine Temperature
Low Engine Temperature
X
X
X
X
Overc rank
Overspeed
Overvoltage
Low Oil Pressure
High Engine Temperature
Low Engine Temperature
X
X
X
X
X
X
X
X
X
X
X
X
* -
51
X
SINGLE LIGHT. PENNSYLVANIA STATE
STANDARD, SINGLE LIGHT SYSTEM
A single fault lamp is standard equipment on early U V
generator sets. The lamp will indicate a fault for any
engine malfunction. Refer to the appropriate
troubleshooting guide for single lamp fault location.
Overspeed
When the overspeed switch closes it completes a
circuit to ground permitting the engine monitor to
energize the fault lamp and relay K1, in turn
deenergizing run relay K12,removing power from the
Low Oil Pressure and High Engine Temperature
circuits, and completing the circuit for the external
alarm.
ENGINE MONITOR MODULE A l l
Overspeed
The overspeed switch will close between 2000 and
2200 rpm, completing a circuit to ground that will
allow the shutdown relay All-K1 to energize and
shutdown the engine by interrupting the circuit that
maintains relay K12 energized. The shutdown relay
energizes the external alarm circuit and deenergizes
. the low oil pressure, high engine temperature, and
overspeed circuits.
Overcrank
Operation is the same as the standard single light
system.
.
Overcrank
High Engine Temperature and
Low Oil Pressure
When the R-S-R switch is placed to RUN the engine
starts to crank and the overcrank circuit is energized.
The maximum crank time (nominal 75 seconds) is
determined by the charge rate of a capacitor in the
overcrank circuit. The charge rate is adjusted by a
rheostat (screwdriver adjustment). If the engine starts
within 75 seconds, voltage supplied by the battery
charging alternator will energize relay K11 and the
overcrank capacitor will be discharged to prevent
shutting down the engine. If the enginedoes not start,
then K11 remains deenergized. The overcrank
capacitor remains charged causing the engine
monitor to energize shutdown relay K1. resulting in
the same sequence of events described in the
overspeed shutdown.
There is no engine shutdown or fault lamp indication
for these conditions. When the appropriate switch
closes, relay K2 is energized which then closes contacts energizing the external alarm circuit.
High Engine Temperature and
tow Oil Pressure
If either of these conditions occur the appropriate
switch will complete a circuit to ground which will
allow shutdown relay All-K1 to .energize after a
nominal 12.5 second time delay. When the shutdown
relay is energized the engine is shutdown in thesame
manner as described for an overspeed condition.
Reset:
Relay K1 will remain energized as long as 24VDC is
available to it. To reset K1 place R-S-R to STOP, then
to. the desired operating position.
52
Y
FIVE LIGHT ENGINE CONTROLS
Overspeed
Available on early UV sets the five fault light installation performs the functions asdesignated in Table 4.
Refer to the appropriate troubleshooting guide for
fault location.
A centrifugal switch on the generator end bell closes
between 2000 and 2200 rpm completing a circuit to
ground enabling the engine monitor circuits to light
the fault lamp and energize relay K1. Thecontacts of
K1 initiatean engine shutdown as previouslydescribed.
High Engine Temperature
This fault indication system operates in two steps. A
pre-alarm and a shutdown.
Low Engine Temperature
The Low Engine Temperature fault lamp is lit at any
time the engine temperature is below a nominal 65" F
(18.3" C). After engine start, the light will remain ON
until engine temperature reaches 80" F to 90" F
(26.7" C to 32.2" C). There is no alarm or shutdown
with this indication.
Pre-Alarm: When engine temperature reaches 200" F
to 210" F (93.3"C to 98.9" C) the HET pre-alarm switch
will close completing a circuit to ground which will
allow engine monitor circuitry to energize the fault
lamp and A11-K2. Contacts of K2 arm relay K1
(shutdown relay) and energize the external alarm
circuit.
c
At a nominal 85" F (29.4" C) the LETswitch will open
and the fault light will go out.
Shutdown: High engine temperature switch closes
when engine temperature reaches 210°F t o 220°F
(98.9"C to 104"C), completing a circuit to ground
enabling the engine monitor to energize K1. The
contactsof'K1 in turn deenergize K12 to shutdown the
engine.
Lamp Test
Push type switch mounted on engine monitor board,
protruding through panel face, applies 24VDC and
ground to fault lamps for test. This switch does not
check out the module, and should be depressed
ONLY WHEN ENGINE IS RUNNING.
Low Oil Pressure
Pre-alarm switch closes at 18 psi to 22 psi (124 to
152 kPa) completing a circuit to ground which lights
the fault lamp and energizes relay K2. The contacts of
K2 arm K1 (shutdown relay) and energize the
external alarm circuitry. There isashort, (nominal 12.5
second), time delay before the fault lamp and relay
K2 energize, to allow oil pressure to build up when
first starting the engine.
Run-Stop/Reset-Remote Switch
Sing le-pole, doub le-th row, center-off toggle switch.
In Run Position: applies 24VDC through A11-18 to
engine monitor board.
Stop/Reset Position: stops engine and allows relay(s)
on engine monitor board to drop out.
Remote Position: allow engine to be started from a
remote station. Closure of, the remote station switch
applies 24VDC to A1 1-18 through R-S-R switch.
The LOP cut-off switch closes at 12 to 16 psi (83 to
110 kPa), completing a circuit to ground permitting
the engine monitor to energize K1, causing the
engine to shutdown.
FIVE LIGHT SYSTEM. PENNSYLVANIA
STATE
Normally the LOP pre-alarm switch would be closed
prior to starting the engine. Relay .K11 is energized
only when the engine is running so its N.O. contacts
in series with K2 prevent K2 from energizing and
inhibiting engine starting.
Essentially the same as the standard five light system
previously described, but with the following exceptions:
1. No pre-alarm switches.
2. High engine temperature, alarm and light only.
No engine shutdown.
3. Low Oil Pressure, alarm and light only. No engine
shutdown.
4. Low Engine Temperature, light only.
5. Engine shutdown on Overcrank or Overspeed
only. Use standard five light troubleshooting
guides.
Overcrank
The operation oftheovercrankcircuits in thefivelight
control is similar to the single light control system.
. .
Should the engine shutdown through loss of fuel, relay K11 will
drop out, the engine will go through the 70 to 80 second crank
cycle, then shutdown with an Overcrank indication.Therefore, the
first things to check with an Overcrankshutdownareloss of fuel or,
if applicable, ignition failure.
53
SIX LIGHT ENGINE CONTROLS
Overvoltage
The six light installation is standard equipment on UV
series generator sets listed in Table 2. Light emitting
diodes on the engine control modules light for each
fault condition. These diodes should be used as a
diagnostic device during troubleshooting, because
the control panel lamps can burn out. Refer to the
appropriate troubleshooting guide for fault location.
The six light control uses integrated circuits as well as
discrete solid state components. Even though the
hardware is different than the five light control the
basic operation of the LET fau,lt lamp and LED is the
same in the six light system as the five light system.
There is no external alarm or shutdown with this
indication.
The engine will be shutdown on a generator overvoltage condition. An auxiliary stepdown transformer
is the sensing device for the overvoltage circuit. The
primary winding of the auxiliary transformer receives
its power from the output of the generator, therefore
the secondary winding output voltage will be directly
proportional to generator output voltage. When
generator output voltage exceeds about 115% of the
rated voltage the overvoltage shutdown circuit will
provide the signal necessary to gate the SCR that
provides a path to ground energizing relay A l l - K l .
The shutdown is both time and magnitude dependent, that is the more severe the overvoltage condition the more rapidly the engine will be shutdown. At
110 to 120% overvoltage the time delay is infinite, but
at 200% shutdown will occur within 2 seconds f 1
second.
High Engine Temperature
Reset Switch
The operation of the HET pre-alarm and shutdown is
basically the same as the five light control although
the hardware used i n the circuits is different.
The reset switch on the front of the control panel will
reset the fault lamps on the control panel. When
depressed it also provides a circuit to test the fault
lamps.
Low Engine Temp erat ure
Low Oil Pressure
Run-Stop/Reset-Remote Switch
The basic operation of the LOP pre-alarm and
shutdown is essentially the same as the five light
system, except that it is performed with integrated
circuits as well as discrete solid state devices.
Double-pole, double-throw toggle switch. Switch is
maintained in all positions (Pennsylvania state is
spring return from STOP).
Run Position: applies 24VDC to generatorset control.
The Start Disconnect module prevents the Engine
Monitor from shutting down the engine on LOP
during the starting sequence. Once the engine is
running there is a 10-15, (nominal 12.5), second time
delay in the LOP shutdown circuit to allow the oil
pressure to build up to the normal pressure.
Stop/Reset Position: stops engine and allows shutdown and alarm relays, A l l - K 1 and K2, to drop out.
Remote Position: Allows engine t o be started from a
remote station.
Overcrank
This circuit allows a maximum engine crank time of
70-80 (nominal 75) seconds, regardless of the mode
of operation of the Cycle Cranker module. If the
engine does not start within 75 seconds the Engine
Monitor overcrank circuit will provide a path to
ground for relay A l l - K 1 (shutdown relay). When
energized A1 l - K 1 N.C. contacts open, deenergizing
K-12 (ignition relay) shutting down the engine.
Shutdown Pre-Alarm Selector Switch
Pre-alarm Position: the engine control system
operates as previously described. All Pennsylvania
state models use this position.
Shutdown Position: the engine will shutdown when
the pre-alarm switch for either HET or LOP operates.
There is no pre-alarm when the switch is in this
position.
If the engine starts before the 75 seconds of cranking
time expires the Start Disconnect module will inhibit
the overcrank shutdown circuit of the engine monitor
module.
Time Delay By-Pass Switch
Time Delay Position: allows the engine to start on a
time delay basis (0.5 to 10 seconds) when the Time
Delay Start/Stop Module is installed. This module
also delays the engine shutdown (0.5 to 5 minutes).
Overspeed
Engine speed is detected and sent to the Engine
Monitor by a magnetic sender. At 2010-2190,
(nominal 2100), rpm the Overspeed module will
provide the necessary signal to gate the SCR that
provides a path to ground for shutdown relay A1 1-K1.
When relay A l l - K 1 is energized the engine will
shutdown as previously described.
Bypass: there are no time delayfeatures, this position
should not be used when the Time Delay StaWStop
module is installed.
54
r
CONTROLS TROUBLESHOOTING
TROUBLESHOOTING SOLID STATE CONTROLS
The purpose of the following troubleshooting guides
is to help the technician restore an inoperative set to
service and eliminate valuable down-time. Before
proceding to a trouble call, make sure you havespare
printed circuit boards and spare relays which will fit
the set you are going to repair. A set of batteries (fully
charged) can be jumpered across the set's batteries
for starting and removed later if necessary.
Relays K11 and K12 are interchangeable. If K12 does not
operate remove it and plug K11 in its place. If the 'now' K12
relay operates then obviously the old one is defective. Install
new relay.
5. If fault lamp lights as soon as R-S-R switch is
placed in Run, the fault is in the Overspeed circuit.
Check the Overspeed switch to see if it has stuck
closed or if there is some foreign matter shorting
it out. Check the wire from TB-29 to the
Overspeed; measure continuity to ground,
change or repair wire if continuity is obtained.
6. Proceed to Troubleshooting guide.
The most important thing to remember is to put the
set back on the line in the minimum amount of time.
PREPARATION FOR
TROUBLESHOOTING
LOW OIL PRESSURE SHUTDOWN
CONDITION: A. Starter Will not crank. R-S-R switch
in Remote position. See Figure 32.
This type of malfunction is caused by one of the
following:
1. Low oil quantity resulting in low oil pressure.
2. Engine oil system malfunction.
3. Ground between TB11'-30 and LOP switch.
4. Permanently closed LOP switch.
5. Faulty engine monitor board.
Possible fault location;
Fault in Remote station or circuit to station.
Starter relay not pulling in becausea. Starter relay K13 faulty.
b. A12 printed circuit board faulty.
c. All printed circuit board faulty.
d. Relay K12 faulty.
e. Overspeed switch stuck closed.
f. Short to ground on overspeed switch wire.
'
Starter faulty.
'
1. Switch R-S-R switch to Run. If starter cranks,
problem is in Remote circuitry. Refer to
troubleshooting guide condition B for this
malfunction.
2. If starter does not crank with R-S-R switch in Run,
switch to Stop and check the following:
a. Batteries for condition. Connections for
security.
b. Wiring to starter, and starter solenoid. Secure,
clean, etc.
3. Open control cabinet.
Check wiring to K13 starter solenoid; K12 Ignition relay; A l l Engine Monitor; A12 cranking
cont rot boards.
4. Toggle R-S-R switch between Run and Stop
positions. Action of K12 relay can beobserved if it
is operating, K13 can be felt. Both relays can be
heard.
If the generator set has LOP pre-alarm, then the most
possible reason forshutdown is either low oil quantity
or an engine oil system malfunction. If the latter, refer
t o the engine manufacturer's manual for oil system
troubleshooting guide. A grounded wire or permanently closed switch are unlikely because the prealarm switch has to operate to arm the shutdown
system. However, a double fault is possible and
should never be discounted. When all other
troubleshooting possibilities have' been tried, the
double .fault should be considered.
This could be either1. Grounded wire between TB11-30 and LOP
switch.
2. Grounded wire between TB11-34 and LOP prealarm switch.
3. Permanently closed LOP switch.
4. Permanently closed LOP pre-alarm switch.
5. Faulty engine monitor board.
Initial troubleshooting should start with checking oil
quantity, then a check of the electrical system,
followed by an examination of the engine oil system.
This procedure is detailed in the following
troubleshooting guide.
55
TO TERM485
ON VRI
120 VAC
K12
FIGURE32. CONTROL SCHEMATIC
58
SOLID STATE CONTROL TROUBLESHOOTING
Is this a single fault lamp control? If“yes” see guides A, 6,and C; if “no” see guides D and E.
TROUBLESHOOTING GUIDES
A. CONDITION: Engine fails to crank
R-S-R switch in iun position
- page 59
6. CONDITION: Engine fails to crank
R-S-R switch in remote position - page 60
C. CONDITION: Engine malfunction shutdown
- page 61
Is this a five fault lamp control? If “yes” see guides A, B,D and E; if “no”see guides A thru C above orA
thru G of six fault lamp control.
TROUBLESHOOTING GUIDES
A. CONDITION: Engine fails to crank
R-S-R switch in run position - page 59
B. CONDITION: Engine fails to crank
R-S-R switch in remote position - page 60
D. CONDITION: Engine malfunction shutdown
Overcrank light on - page 63
E. CONDITION: Engine malfunction shutdown
Low oil pressure light on - page 64
SIX FAULT LAMP CONTROL:
TROUBLESHOOTING GUIDES
A. CONDITION: Engine fails to crank
R-S-R switch in the run position - page 67
6. CONDITION: Engine fails to crank
R-S-R switch in the remote position
C. CONDITION: Engine malfunction shutdown
Overcrank light on -page 69
D. CONDITION: Engine malfunction shutdown
High engine temperature - page 69
57
- page 68
E. CONDITION:’rEngine malfunction shutdown
Low oil pressure light on - page 70
F. CONDITION: Engine malfunction shutdown
Overspeed light on - page 71
G. CONDITION: Engine malfunction shutdown
Overvoltage light on - page 71
QUESTION AND ANSWER TROUBLESHOQTING GUIDE
.
For one and five light engine controls
To correct a problem, answer the question "Yes" or"No", then proceed to the next step given in whichever column
the question was answered.
CONDITION: A. ENGINE FAILS TO CRANK
R-S-R- SWITCH IN RUN POSITION
Item
Yes
2
Does fault lamp light?
Position R-S-R switch to Stop/Reset, then .back to Run.
Does fault lamp light?
Does engine crank?
-
Open control cabinet.
Disconnect wire at TB11-29.
Position R-S-R switch to Stop/Reset, then back to Run.
Does fault lamp light?
Does engine crank?
-
4
Replace engine monitor board.
5
Measure resistance between Overspeed switch wire at TB11-29 and
ground. Should be infinity.
Is reading correct?
6
Disconnect overspeed switch. Check continuity of wire to
ground. If continuity is obtained replace or repair wire, if not readjust or
replace overspeed switch.
7
Hold starter solencid K13 and observe K12 ignition relay.
Toggle R-S-R switch between Stop and Run several times.
Does K12 relay operate?
Does K13 starter solenoid operate?
8
9
--No
7
R-S-R
Run
3
Run
4
Run
-
stop
stop
stop
_stop
Unp1u.g K12 Relay.
Measure voltage at K12 receptacle, pin B.
Is 24VDC obtained?
9
13
Check that wire from K12 receptacle, pin A to ground is connected.
If ground circuit is satisfactory, replace K12 Relay.
-
-
Run
-.
10
Apply jumper from TB11-26 to input side of K13 Starter
solenoid coil.
Does relay operate?
11
Check wire and connections between output side of K13 coil
and ground.
Repair, replace,secure as necessary. If wire is good, replace
K13 starter solenoid.,
12
Replace A12 Cranker board.
13
Check that wire and connection between A l l - 7 and K12-B is good.
If so, replace A l l Engine monitor board.
59
12
11
1
Item A. ENGINE FAILS TO CRANK (Continued)
14 "Measure voltage at starter motor connections, with K13 Relay
energ ized.
Does voltmeter read 24VDC at coil (solenoid terminal wired to B+)?
Does voltmeter read 24VDC at motor lead (cable from solenoid
terminal to terminal on top of starter)?
Yes
15
15
tDFX and DFZ units have two starters wired in series.
I
15
I Replace starter.
16
Secure starter to battery connection. Recheck. If starter still
does not crank, replace it.
17
Measure voltage at both sides of contact terminals of K13 starter
solenoid (solenoid energized).
Does voltmeter read 24VDC?
18
Check wiring and connections between K13 and starter.
Repair, replace, secure as necessary.
19
If checks made in item 18 are satisfactory, replace K13
solenoid.
CONDITION: B. ENGINE FAILS TO CRANK
R-S-R SWITCH IN REMOTE POSjTlON
Item
1
Position R-S-R switch to Run.
Does engine crank?
I 18
Yes
Return R-S-R switch to Remote.
Apply jumper across TB12-Remote and TB12-B+.
Does engine crank?
Remove jumper.
At remote stationyapply -jumperacross-Start-terminalson start switch (refer to applicable wiring diagrams).
Does engine crank?
4 Replace remote station Start switch.
5
Measure continuity between Remote terminal of R-S-R switch
and TBl2-RMT.
Is continuitv obtained?
6
Check wire between R-S-R switch and TB12-RMT.
Repair, replace, secure as necessary.
Was reDair required?
7
Refer to applicable wiring diagrams.
8
Measure continuity between TB12-RMT, TBl2-B+ and Remote Station.
Repair, replace or secure open circuit wires where necessary.
No
See
hide
A
Itern
1
5.
4
-
.
.
Single Light System
ZONDITION: C. ENGINE MALFUNCTION SHUTDOWN
Itern
Did engine shut down immediately after start
1
(i.e., within 3 seconds)?
-
I
Yes
No
6
2
~
2
Did engine shut down 10 to 20 seconds after start?
10
3
3
Did engine crank for 75 seconds then shut down
without starting?
17
4
Did engine shut down after running, crank for 75 seconds
then stop without further cranking action?
Fault light O N after cranking cycle complete?
18
5
If none of the above are applicable, refer to High Water
Temperature shut down.
19
4
5
6
7
8
9
~~
Check throttle and governor linkage for freedom of movement.
If set has switch-operated governor control (Woodward)
or rheostat controi (Barber%olrnan), make sure
that control is not at “High RPM” position.
I
After completing above checks has malfunction been
located?
I-
Check position of Overspeed switch.
Is adjustmen t required?
-
Disconnect wire at TB11-29.
Measure continuity to ground.
Is continuity obtained?
9
Check wire from TB11-29 to Overspeed switch for continuity to ground.
Repair, replace as necessary
-
Low Oil Pressure Shutdown.
Check crankcase oil quantity.
Is oil at “Full” mark on dipstick?
11
Disconnect wire at TB11-30 and from oil pressure switch.
Measure resistance to ground. Should be infinity.
Is correct reading obtained?
13
12
Locate ground in wire. Repair or replace as necessary.
-
13
Connect ohmmeter from oil pressure switch to ground.
Start engine.
Observe oil pressure gauge and Ohmmeter.
a. Did oil pressure build up to normal?
b. Did oil pressure switch open?
c. Did engine shut down?
10
11
-
-
16
14
-
Refer to engine manufacturer’s manual for oil system
troubleshootins guide.
61
-
7
8
3-S-R
C. ENGINE MALFUNCTION SHUTDOWN (Continued)
Replace oil pressure switch.
Item
15
I
16
I
Yes
-
l -
Replace A l l engine monitor board.
:I
Overcrank Shutdown.
Refer to engine manufacturer’s manual for non-starting
troubleshooting techniques.
18
Check fuel system. Verify adequate fuel supply and flow
to injector pump or carburetor.
WF and WK only. Check ignition.
High Water Temperature Shutdown.
Check coolant quahtity.
Does coolant need replenishing?
-
City Water cooled sets.
Are solenoid valves open?
21
29
ISfbW valve open?
22
22
:Radiator cooled sets.
Are fan belts tight?
23
19
,
20
I
Is radiator air’fiow unrestricted?
23
24
~
Disconnect High Water Temperature switch.
Measure resistance from terminal to ground.
Should be infihity.
Is correct reading obtained?
25
25
Replace High Water Temperature switch.
-
26
bisconnect wire at TI311-31.
Measure resistance of wire to ground.
Should be infinity.
ts cofrect reading obtained?
28
24
.
27
. Repair or replace wire from f b l l - 3 1 to High Water
Temperature Switch.
IL28-I-Resf- ._
art engine.
Check voltmeter and ammeter readings.
Is.unit overloaded?
.,
29
Remove nbn-eSsential loads.
.
.
I29
-
Five Fault Lamp System.
OVERCRANK LIGHT ON
I tern
1
Yes
7
Did engine fail to start?
No R-S-R
2
3
-
7
-
5
-
Check lines from tank to injector.
Are lines blocked?
-
7
WF and WK sets only.
Check ignition system.
Has K15 relay opened?
Is magneto system functioning?
-
8
9
7
7
Refer to engine manufacturer’s manual for
engine non-start troubleshooting guide.
-
-
8
Check K1 fuel solenoid valve.
Does K1 operate?
-
9
2
3
4
5
6
9
lo
Did engine shut down after running?
Check fuel supply: quantity and quality.
Is day tank supply adequate?
Is main tank supply adequate?
Is float operated pump system functioning
correctly?
Check wiring (refer to appropriate schematic)
to K15 relay, and K1 solenoid valve.
Repair, replace, secure where necessary.
Replace non-functioning item, i.e., stop relay
K15 or fuel solenoid valve K1.
63
-
4
10
-
[ CONDITION: E.
ENGINE MALFUNCTION SHUTDOWN
LOW OIL PRESSURE LIGHT ON
I
~
Item
1
Does control have pre-alarm?
2
Did unit shut down within 16 seconds of start?
3
Check oil quantity.
Does oil need replenishing?
Yes
No
3
2
4. Disconnect wire at TB11-30. Restart engine.
Does engine run satisfactorily?
IS oil pressure at normal value?
5
5
5
With engine still running, measure continuity between
LOP switch and ground.
IS continuity obtained?
=I
Use extreme caution when set 13 running. High
voltages present Wlthilr the control cabinet ddultl
cause Injury or death.
6'
7
Refer fo engine mahufacturer's manual for oil system
troubleshooting guide.
a
Shut down engine. Disconnect wire from LOP switch. Measure
resistance from disconnected wire to ground (Should be ..
infinity).
Is cdrrect resistance obtained?
Replace LOP switch. .
9
Repair or reprace wire.
lo'
Replace A l l Engine Monitor board.
-
,.
64
7
.
I.
i
8
SIX LIGHT ENGINE CONTROL
SYSTEM CHECKOUT PROCEDURE
This procedure is for use with the Engine Control Tester module, Onan part number420-0350. The Engine Control
Tester module is designed to checkout the complete control system for rapid location of faults, or afinal pre-start
system test.
Proceed as follows:
1. Remove front cover of engine module rack.
2. Remove Cycle Cranker module.
3. Insert Engine Control Tester module into Cycle Cranker position.
4. Set rheostat on Tester module full counterclockwise.
5. Place R-S-R switch i n RUN position (engine will not start).
ITEM CHECKOUT
1
Does Tester cranking light go on?
2
YES
6
Turn Tester rheostat to 2300 rpm. Does Overspeed light and LED
illuminate on the tester and control panel?
NO
2
3
4
3
Replace Start Disconnect module. Return to item 1.
-
-
4
Does the Overspeed light illuminate'on tester only?
5
Reset
-
-
I
In 65 - 85 seconds does Overcrank lamp and LED illuminate?
Does the tester light go OFF?
-
7
Replace Engine Monitor module No. 2
-
-
8
Place R-S-R to STOP and depress Reset switch.
Does the Overcrank lamp and LED go OFF.
10
9
Check reset switch.
-
-
14
11
6
9
10
Place R-S-R to RUN. Turn Tester rheostat to 650 rpm.
Does Tester cranking light go OFF?
8.
-
7
.
11
Turn Tester rheostat to 2300 rpm. Does Overspeed light and LED come on?
13
12
12
Replace Overspeed module. Return to item 10.
-
-
13
Replace Start
-
-
14
'
Disconnect module. Return to item 1
I In 10-20 seconds, does Low Oil Pressure light and LED come on?
1
16
1
15
15
Replace Engine Monitor module No. 2. Return to item 8.
-
-
16
Reset. Continue to item 17.
-
-
17
Turn Tester rheostat to 2300 rpm.
Does Tester Overspeed light come ON?
Does the Panel Overspeed light and LED come on?
20
18
19
18
Replace Overspeed Circuit module. Return to item 16.
-
-
19
Replace Engine Shutdown Module. Return to item 16.
-
-
20
Turn rheostat to 400 rpm. Reset. Continue to item,21.
-
-
21
Slowly turn rheostat counterclockwise. Does the Overcrank LED and
light come on below 30 rpm.
23
22
~
1.
ITEM CHECKOUT
22
Replace Start
23
I
24
Disconnect module. Return to item 10.
Ground terminal 31 on TB11
Does the High Engine Temperature light and LED come ON?
Tester cranking light should go OFF if in the shutdown mode, but will
remain ON if in Pre-Alarm mode.
I Replace Engine Monitor No. 1. Return to item 20..
YES
NO
-
-
25
24
1-I-
Place R-S-R switch to REMOTE. Rotate Tester
fully counterclockwise. Jumper B+ to RMT on TB1. Does
Tester Cranking light come on? (0.5-10 second delay will occur if
Time-Delay Start/Stop module is installed)
27
26
26
Replace Time-Delay Start/Stop module
-
-
27
Remove Engine Monitor module No. 2. Remove B+ t o RMT jumper on TB1.
Does tester cranking light go off? (A.5-5 minute delay will occur if Time
Delay Start/Stop module is installed). Reinstall Engine Monitor module
No. 2
.29
28
28
Replace Time Delay Start/Stop module. Return to .ifem 25.
-
29
Remove Tester mo.dule, plug in Cycle Cranker+mo.dule.
Place R-S-R switch ,to R!J.N. Does engine crank?
- .
30
Replace Cy,cle .Cqanker-module. :Relurn l o .item 39.
-
-
25
30
QUESTION AND ANSWER TROUBLESHOOTING GUIDE
For six light engine controls
To correct a problem, answer thequestion “Yes” or“No”, then proceed to the nextstep given in whichevercolumn
the question was answered.
CONDITION: A. ENGINE FAILS TO CRANK R-S-R SWITCH IN TH
YES
2
NO
3
Position R-S-R switch to STOP and back to RUN.
Does engine crank?
-
3
Open control cabinet. Disconnect wire at TB11-30.
Position R-S-R switch to STOP and back .to RUN.
Does engine crank? Replace wire.
4
5
-
-
ITEM
Does Overcrank lamp/LED light.
1
2
3
4
Replace Start Disconnect module.
5
Hold starter solenoid K-13 and observe ignition relay
K-12. Toggle R-S-R switch between STOP and RUN
several times.
Does K-12 operate?
Does K-13 operate?
6
7
,a
9
10
RUh POS rlON
Unplug K-12. Measure voltage at receptacle pin 6.
Is reading 24 VDC?
R-S-R
RUN
RUN
RUN
-
10
6
9
7
8
RUN
Check continuity from K-12 receptacle pin A and ground.
If ground circuit is satisfactory replace K-12,
if not, repair connection.
Check wire and connection from K-128 and P2-11.
If good, replace Engine Monitor module No. 2.
RUN
Check wiring and connections of K-13, including
normally closed 1-7 contacts of K-14. If good,
replace K-13.
‘Measure voltage at starter connections with K-13 energized.
Is voltage at coil 24 VDC (solenoid terminal wired to B+)?
Is voltage at motor lead 24 VDC (cable from solenoid terminal to
terminal on top of starter)?
RUN
11
‘DFX and DFZ units have two starters wired in series.
11
Replace starter.
12
Measure voltage at both sides of K-13 contact
terminals with K-13 energized.
Does voltmeter read 24 VDC?
13
15
13
Check connections between K-13 and starter. Are connections good?
14
-
14
If checks made in item 13 are satisfactory replace K-13.
15
Secure starter to battery connection. Recheck, if starter
still does not crank, replace it.
67
RUN
CONDITION: B. ENGINE FAILS TO CRANK R-S-R SWITCH IN REMOTE POSITION
~
ITEM
1
2
3
YES
NO
Position R-S-R to RUN
Does engine crank?
2
*
Install jumper between B+ and RMT on TB1.
Does engine crank? Remove jumper.
3
4
Remot
A t remote station apply jumper across
Start terminals on start switch.
Does engine crank?
4
Replace remote start switch.
5
Measure continuity between TB1 - RMT, and remote terminal on
R-S-R switch. Is continuity obtained?
6
Check, and make repairs to wiring and connections between
R-S-R and TBl. 'Replace R-S-R if needed.
7
Measure continuity between TB1
start switch. Is there continuity?
a
Measure B+.at TB1-RMT, and at the remote
start switch. Is reading ,24 VDC?
9
Make repairs to wiring .and connections .as necessary.
- RMT, and the ,remote
11
12
Is Time Delay StaMStop Module in the circuit?
Are all required conditions existing to allow engine to start?
5
Remot
4
7
-
-
1-14
I I
I -.I - I
I
10
-
I
12
11
-
Replace Time Delay Stadstop module .if engine did
not crank in item 2. If engine did crank in item 2,
refer to wiring diagrams.
-
-
Reler to wiring diagrams
-
-
* - Se.e .Guide A No. 1
R-S-R
RUN
I
-
CONDITION:
c. ENGINE
MALFUNCTION SHUTDOWN OVERCRANK LIGHTILED
YES
ITEM
Did engine fail to start?
1
7
2
Did engine shutdown after running?
3
Check fuel supply: quantity and quality.
Day tank supply adequate?
Main tank supply adequate?
dNO
.
R-S-R
3
5
4
Is float operated pump system functioning properly?
5
Check fuel lines, are they blocked? Are return linestoo long?
6
Refer to engine manufacturer's manual
7
Check K1, fuel solenoid wiring and connections
Place R-S-R to STOP and back to RUN
Is voltage at K1 24 VDC?
5
-
71
9
-
8
Refer to wiring diagram
9
Does solenoid K1 operate when energized?
10
ON
6
-
Replace K1.
CONDITION: D. ENGINE MALFUNCTIONSHUTDOWN HIGH ENGINETEMPERATURE
ITEM
1
Check coolant.
Avold removing the pressure cap on the radlator until unit
has cooled. i f this is impractical, the system may be opened
while hot i f certain precautions are taken. While wearing rubber insulated gloves
for protection, slowly open the cap allowing the pressure to vent. This is necessary to avoid personal injury from contact with hot coolant or steam.
2
Check belts and belt tensions.
3
Check radiator and remove any restrictions that
may impede air flow.
4
On city water cooled sets, res= engine and adjust
cooling water flow to keep engine operating temperatures .
within their normal values.
5
Reduce load on the generator if excssive.
6
Check cooling system for leaks, clogged filters, etc.
7
If engine is not overheating refer to wiring diagrams.
~
~
~
~~
~
CONDITION: E. ENGINE MALFUNCTION SHUTDOWN
LOW OIL PRESSURE LIGHT/LED ON
Itern
1
Does control have pre-alarm?
2
Did unit shut down within 16 seconds of start?
3
Check oil quantity.
Does oil need replenishing?
4.
Disconnect wire at TB11-30. Restart engine.
Does engine run satisfactorily?
Is oil pressure at normal value?
5
With engine still running, measure continuity between
LOP switch and ground.
Is continuity obtained?
+I+-
?
Use caution when set is running. High voltages
present within the. control cabinet could cause
injury or death.
6
Refer to engine manufacturer's manual for oil system
troubleshooting guide.
Shut down engine. Disconnect wire from LOP switch. Measure
resistance from disconnected wire to ground (should be
infinity),
Is correct resistance obtained?
Replace LOP switch.
9
10
Repair or replace wire.
Replace Engine Monitor Module #2
70
8
1
9
+
- I -
CONDITION: F. ENGINE MALFUNCTION SHUTDOWN OVERSPEED LIGHT/LED ON
YES
3
ITEM
Did engine shutdown immediately after start?
1
2
Did engine overspeed during operation?
3
Check throttle and governor linkage for freedom
of movement. If generator set has remotely
operated governor control ensure switch or rheostat
is not at “High RPM” position. After completing above,
has malfunction been corrected.
NO
R-S-R
2
4
3
4
~~
Fault is in either shutdown or 0verspeed.module.
4
1
CONDITION: G. ENGINE MALFUNCTION SHUTDOWN OVERVOLTAGE LIGHT/LED ON
ITEM
Did an overvoltage condition occur?
1
NO
*
2
-
Replace Engine Monitor module No. 1.
2
YES
I
I
- See Generator Troubleshooting Guide
71
I
7
R-S-R
'
.
300-500 kW
300-500 kW
DESCRIPTION
VOLTAGE REGULATOR VR 1
4x
SPEC 1A
PAGE NO.
.................. 73
.................. 74
625-1344
612-5028
600 kW DWV
600 kW DWV
VOLTAGE REGULATOR VR21
4x
SPEC 1A
332-2031
612-5407
400-750 kW
400 kW DFV
450 kW DFW
500 kW DFY
600 kW DFX
750 kW DFZ
VOLTAGE REGULATOR VR21
SPEC 1H
SPEC 1E
SPEC IB
SPEC 1A
SPEC 1A
.................. 75
..................76
.................. 77
.................. 78
DIAGRAM NO.
305-0455
612-3188
I
6'1223384
612-31'85
612-3720
- 612-3721
300-450 kW
300-450 kW
350 & 400 kW
350 & 400 kW
ENGINE CONTROLS
RELAYS
DIESEL
SPEC 1A
DI.ESEL
SPEC 2697A
NAT. GAS SPEC 1A
NAT. GAS SPEC 2697A
612-4360
300 DFT
350 DFU
400 DFV
450 DFW
500 DFY
300 DFT
350 DFU
400 DFV
450 DFW
500 DFY
350 & 400 kW
350 & 400 kW
600 kW DWV
600 kW DWV
400 kW DFV
450 kW DFW
500 kW DFY
600 kW DFX
750 kW DFZ
SOLID STATE
DIESEL
SPEC 1C
DIESEL
SPEC 1D
DIESEL
SPEC 1E
DIESEL
SPEC 1B
DIESEL
SPEC 1A
DIESEL
SPEC 9222C
DIESEL
SPEC 9222D
DIESEL
SPEC 9222E
DIESEL
SPEC 92228
DIESEL
SPEC 9222A
NAT. GAS SPEC 1B
NAT. GAS SPEC 9222B
DIESEL
SPEC 1A
DIESEL
SPEC 9222A
DIESEL
SPEC 1H
DIESEL
SPEC 1E
DIESEL
SPEC 1B
DIESEL
SPEC 1B
DIESEL
SPEC 1B
._.
612-4366
612-4361
612-4367
612-5029
612-5033
6 12-5406
72
1'LIGHT
5 LIGHT
1 LIGHT
5.LIGHT
...................79
...................80
...................81
.................. 82
1 LIGHT
1 LIGHT
1 LIGHT
1 LIGHT
'1 LIGHT
5 LIGHT
5 LIGHT
5 LIGHT
5 LIGHT
5 LIGHT,
1 LIGHT
5 LIGHT
1 LIGHT
5 LIGHT
6 LIGHT
6 LIGHT
6 LIGHT
6 LIGHT
6 LIGHT
.................: 83
..................84
.................. 85
.................. 86
.................. 87
.................. 88
.................. 89
bt
0
a:
0
a
4-4-
-
a
0
n
(D
a
r
I
f
a
(3
4
n
$
w
I
0
Y,
\
I
i'
g@@-
I
74
.
GEN
WMNG
I
I.
---7NOTES
1. CONNECTIONS:
W1-S SEMI-FREQUENCYSENSITIVE (STD ON 332-1704)
W1-FREQUENCY SENSITIVE (STD ON 332-1981)
W1-N NON-FREQUENCYSENSITIVE
2. ALL PART NUMBERS AND VALUES ARE REFERENCE ONLY
3. ALL RESISTORS112 WATT EXCEPT WHERE NOTED
4. ALL CAPACITOR RATING IN MICROFARADS
5. FOR TYPE AND RATING OF SEMI CONDUCTORSSEE INDIVIDUALASSEMBLY
MATERIALLISTS.
VOLTAGE REGULATOR VR 21
DWV
625-1344
I
7
76
TBI-l
-R9
--
?Mr
\3 K
CRl5
CP3
R5
CRlO
245: ,,c5
R15 '
IOOK
CR9ji
C6
33
C7
.22
I
270
RI1
*
3
F'
4
-
KI
__-;g
R16
330K'
I
c3
.47
F2 d 2
781-4
I
I
CZ
.22
R3
I
I
VOLTAGE REGULATOR VR 21
MODEL NO.
DFVIl H
DFWI1E
DFYIlB
DFXIlA
DFZIlA
332-2031
REAR VIEW OF PANEL I
SCHEMATIC DIAGRAM
CONTROL BOX (INSID_E?_
~,,
I
I
-
7-
T21
VRPI
F
M24
fi
TO TERM 3 5 8 3 6
ON TBll (ENGINE CONT)
w
I
NOTE :
UNLESS OTHERWISE NOTED,
A L L COMPONENTS ARE SHOWN
IN THE DE-ENERGIZED
POSITION
CB21
MODEL NO.
DFVI1H
DFWI1E
DFYIlB
DFX/lA
DFZ/lA
612-5407
6
2
4
4
a
' ,
UIK
C
L
3
!
.
P
L
0
'I L
d
T
I
I
I
I
-
0
u
a
I
-
m
II
I
I
I
m
I
1
.
KI
WIRING DIAGRAM
SCHEMATIC DIAGRAM
I
G2
REMOTE S W I
CLOSE TO RON
OPEN TO STOP
rr~e,f,s
TYPG,~,~
LEFT B A N K
COMaTAURM
DETWEN l2iGND.
LOW OIL PRESS.
REMOTE
SWITCH
*KT
w
TIME DELAY
OIL PRESS.
D
AI
rr
SI2
"
KIS
OS12
4KL
0
I1
COMMON
ALARM
h
U
-
,ij
OP
MODEL No.
DSIZ
WFIlA
WKIlA
1 LIQHT
1 LIQHT
612-3720
KI
WIRING DIAGRAM
SCHEMATIC DIAGRAM
G
GZ
RELYITEKIZ K17 K16 KIS
STO
-RUN
XO
REMOTE SWZ
KK
K15
KII
SI
CLOSE TO RUN
OPEN TU STOP
E
c
TYP2,1,3
rw4,6,5
TYP6,f,5
LEFT B A N K
TI PI,^,^
R I G H T BANK
I(*
TO LOW
24V.DC
OILPRESS.
ALARMS
r-
I I- -IT :
I
:OVERSPEED
HIGH WATER TEMP.
1
1
;
I
l
l
FAILED
'4? T e
14
c
-
m START
I
I
2
TIME DELAY
OIL PRESS.
**
CONNECT 14Y. OC INOIVIOUAL ALARMS
B E W E N DESICNATEO TERMINAL a CNO
CONNECT 24Y. OC COMMON ALARY BETWEEN
TERIINAL 12 I CNO. llTH IERMINALS
12, 2 0 , 21 S, ?? JUYPERED I O C E I H E R .
NUTE
U N L E S OTHERiYlSE NOlED. ALL
COMPONENTS ARE SHOWN IN ME
0E.ENERGIZEO WSITION.
E15
REAR VIEW OF PANEL
FAILED
TO
START
LOWOIL
PRESS.
!
HlGHWATER
TEMR
OKRSPEED
MODEL No.
WFl2697A.
WKl2697A
5 LIGHT
5 LIGHT
612-3721
SCHEMATIC
WIRING DIAGRAM
DIAGRAM
NOTES:
I . REMOTE ALARM C I R C U I T RATED 5 AW
MAX
2
L
-------
4
57
SHUTOOWN L ALARMS
2.1 STO CONTROL
2.1 I SAFETY SHUTDOWN L ALARY ON
OVERCRANK OVERSPEEO H I ENC
TENP L LOW O I L PRESS
2 2 PENN STATE CONTROL
2 2 I SAFETY SHUTDOWN L ALARM
ON OVERCRANK L OYERSPEEU
2 2 2 SAFETY ALARM ON HI ENC
TEMP L LO O I L PRESS
3. 53 OVERSPEEO SWITCH YOUNTEU I N
s3
A
CLNERATOH EN0 BELL
4 UNLESS OTHERWISE NOTED. A L L
29
COMPONENTS ARE SHOWN I N THE
DE-ENERGIZED POSITION
GND
TO
00
w
CMMCN
ALARM
REMOTE
SWITCH
---
TO TERY4BS
ON VRI
I20 WAC
K12
MODEL No.
DFT/l C
DFU/lD
DFVI1E
DFW/1B
DFYIlA
REAR VIEW OF PANEL
Y
1 LIGHT
1 LIGHT
1 LIGHT
1 LIGHT
1 LIGHT
612-4360
I
WIRING DIAGRAM
SCHEMATIC DIAGRAM
NOTES
I . 112 USEO ON STO CONTROL ONLY
2 USEO ON PRE.ALARM CONTROL ONLY
3 REMOTE ALARY C l f i C U l T RATE0 5 U P MAX
E3
$:-&
-1
-------
K2
L
’
v .F
4. SHUTOOWN b AhRMS
4 I STO CONTROL
4 I I SAFETY SHUTOOlN b ALARMS ON OVERCRANK
OVERSPEEO H I ENG TEMP L LOW O I L PRESS
4 I 2 SbFETY A i l k H ONLY ON LO EN: TEMP
4 2 PENN STATE CONTROL
4 2 I SAFEIY SHUTOOWN C ALARMS ON OVERCRANK
C OVERSPEEO
4 2 2 SAFETY ALARMS ON H I ENG TEMP LO O I L
PRESS 6 LO ENG TEMP
4 3 PRE-ALARM CONTROL
4 3 I SAFETY PRE-ALARMS ON H I ENG TEMP 6
LO O I L PRESS
4 3 2 SAFETY SHUTDOWN b A L A R I S ON OVERCRANK.
OVERSPEEO H I fNG TEMP I LO OIL PRESS
4 3 3 SAFETY ALAHY ONLY ON LO ENG TEMP
-- - 5.
SHUTDOWN WE-ALARM
53 OVtHSPEEO SNITCH MOUNTEO I N GENERATOR
iNO B f L i
6 UNLESS OTHERWISE NOTE0 A L L COMPONENTS
ARE SHOWN I N THE OE.ENERGI2ED
Z”V.8C‘Lu
To REMOTE
4’4NlJNCnAMP
OVERCRAW -----?
LOW OIL PRESS -----I
I :
HI ENGTEMP
----I
I I
LO ENG TEMP ---t
I I !
POSITION
UNITS WITHPRE-ALARM I
SHUTDOWN
K2
U
3:
TO TER 4 8 5
ON VVI
120VAC
MODEL No.
DFTl9222C
DFUl9222D
DFVl9222E
DFWl9222B
DFYl9222A
u- REAR ,VIEW OF PINEL
’
5 LIGHT
5 LIGHT
5 LIGHT
5 LIGHT
5LlGHT
*
612-4366
.
WIRING DIAGRAM
SCHEMATIC
NOTES:
0 4
I . REMOTE ALARM C I R C U I T RATE0 5 AMP
MAX
rn
DIAGRAM
3
2 SHUTDOWN 6 ALARMS
2 . 1 STD CONTROL
2.1 .I SAFETY SHUTOOlN 6 ALARM ON
OVERCRANK OVERSPEEO H I ENC
TEMP k LOW O I L PRESS
2 2 PENN STATE CONTROL
2 2 I SAFETY SHUTUONN I ALARM
ON OVERCRANK k OVERSPEEU
2 2 2 SAFETY ALARM ON H I ENG
I M P k LO O I L PRESS
3. S3 OVERSPEEO SNITCH MJUNTEU I N
GLNERITOH E N 0 BELL
4 UNLESS OTHERWISE NOTED A L L
COMPONENTS ARE SHOWN IN THE
OE-ENERGl ZED POSl T l O N
I I
I
I
MODELNO.
WF/1 B
I
REAR VIEW OF PANEL
. WK/lB
1
I
1 LIGHT
1 LIGHT
612-4361
WIRING DIAGRAM
SCHEMATIC DIAGRAM
NOTES
L-m
I 112 USE0 ON STO CONTROL ONLY
?
GND
USE0 ON PRE-ALARM CONTROL BNLY
(
3 REMOTE ALARM C I R C U I T RATED 5 AMP MAX
4 . SHUTOOYN & ALARMS
4 I STU '9NTRDL
4 I I SAFETY SHUTUOWN 6 A L M S ON OVERCRANW
OVERSPLED H I ENG TEMP ILOW O I L PRES
4 1 2 SPFETY A i M ONLY ON LO ENG TEMP
4 2 PENN S l A I E CONTROL
.
4 2 I SAFETY SHUTOOWN IALARMS UN OVERCRANt
OVERSPEEO
6 -7 7- SIFL'TY
- - ALARMS ON H I ENG TEMP LO O I L
PRESS & LO ENG TEMP
4 3 PRE.ALARM CONTROL
4 3 I SIFETY PRE.A?ARMS ON HI ENG TEMP 8
LO O I L PRESS
4 3 2 SAFETY SHUTbOYN 8 ALARMS ON OVERCHANI
OYERSPEtU H I ENG TEMP L LO OIL PALS
4 3 3 SAFETY ALAHM ONLY ON LO ENG TEMP
RTI
Y f
K9
K4
--
.
24V 8 C MA
TO kEMOrE
ANNUNCIATOR
OVERCRANK
5
S3 DVtRSPEEO SWITCH MOUNTED I N GENERATOR
6
UNLESS OTHERWISE NYIEU A L L COMPONENTS
ARE SHOWN I N THE GE.ENERGI2EO POSITION
i N O BELL
I!
ad
30*
I
SHUTDOWN
-----I
.
I ' !
GND
REMOTE
MODEL No.
I
WF/9222B
W K/9222B
REAR VIEW OF PANEL
tul
COMMCU
5 LIGHT
5 LIGHT
612-4367
WIRING DIAGRAM
SCHEMATIC
NOTES:
I . REMOTE ALARM C I R C U I T RATE0 5
MAX
DIAGRAM
3
AMP
2 SHUTOOWN L ALARWS
STO CONTROL
SAFETY SHUTDOWN L ALARY ON
OVERCRANK OVERSPEEO. H I ENG
TEMP 2 LOW O I L PRESS
2 2 PENN STATE CONTROL
2 2 1 SAFETY SHUTDOWN 2 ALARM
ON OVERCRANK L OVERSPEEU
2 2 2 SAFETY ALARY ON H I ENG
TEMP L LO O I L PRESS
2.1
2. I I
3 . 53 OVERSPEEO SWITCH MOUNTEU I N
GENERATOH !NO
4
BELL
UNLESS OTHERWISE NOTED. ALL
COYPONENIS ARE SHOWN I N THE
DE-ENERGIZED POSITION
I
NOTE I
SAME AS NO, 17 TERM.
WMCN
ALAW
REMOTE
SWITCH
00
U
r
\
\ \ \ \
\\\
I
MODEL No.
DWV/lA
1 LIGHT
612-5029
WIRING DIAGRAM
SCHEMATIC DIAGRAM
NOTES:
I . 112 USEO
. .
D
ffl STO CONTROL ONLY
2. USEO ON P R E - A L A R C O N T M L ONLY
3 REMOTE ALAM C l P C U l T R A I E O 5 M I M A X
!6
\,
&+
------ -
L
.
I
4. SHUTOODl L A k S
4 I STO CONTROL
4 I I SAFETY SHUTOOWI L ALARMS ON OVERCRANK
OVERSPEEO H I EN6 TEMP L LOW OIL PRESS
4 I 2 SbFEIY AiLhM ONLY ON LO EN; TEMP
4 2 PEW S I A T E CONTROL
.
4 2 I
SAFETY SHUTOOlN L ALARMS ON OVERCRANK
L OVERSPEtO
4 2 2 SAFETY ALAMS ON H I EN6 TEMP LO O I L
PRESS L LO ERG TEMP
4 3 PRE-ALARM CONTROL
4 3 I SAFETY P R E . I ? A R I S ON H I EN6 TEMP L
LO OIL PRESS
4 3 2 SAFETY SHUTOOlN L A L A l S OH OVERCRANK.
OVERSPEEO HI EN6 IEMP L LO O I L PRESS
4 3 3 SAFETY ALAWM ONLY ON LO EN6 TEMP
5. 53 OVtHiPEEO SWITCH MOUNTEO I N 6ENERATOR,
EN0 BELL
16
24v 80 Lu
TO kEMOTE
ANNUNCUTOR
UNITS WITH
SHUTDOWN
LOWOILPRESS -----n
HI ENG TEMP
UNLESS O I H E R l l S E NOTE0 ALL COMPONENTS
ARE SHOW I N THE OE-ENERCIZEO P O S I T I O N
----I
I
I I
OIS
GENERATING
I
I
GND
TO
NOTE 3
COUMON
ALARM
REYOTE
SWITCH
00
00
MODEL No.
DWV/9222A
5 LIGHT
612-5033
n
REAR VIEW OF DOOR
INSIDE VIEW OF BOX
All
K I 2 : B B S159 54 - 6
4I
514-1
515-2
TEII-34
S14-3
GND
QND
GND
___
K14-1
SI5-4
#
I
TEI
0
0
0
0
0
0
0
0
0
0
0
W a.9 85 83 8.4 86 87 E t ALY RYT GNO
TEI-85
----K13
NOTES:
1. COMPONENTS CONNECTED WITH DASHED LINES ARE
OPTIONAL ITEMS.
2. MAGNETIC SENSOR (E31 MOUNTED IN GEN END BELL.
AIR CAP SETTING .060/.050
3.REMOTE ALARM CIRCUIT RATED 5 AMP MAX
4. START SlUP TD CAN BE ADJUSTED INDEPENDENTLY
Onan Corporation
1400 73rd Avenue N. E.
Minneapolis, MN 55432
612-574-5000
Telex: 275477
Fax: 612-574-8087
Onan is a registered trademark Of Onan Corporation