1
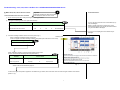
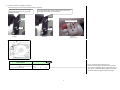
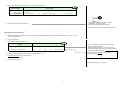
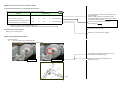
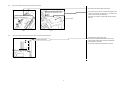
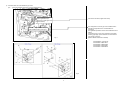
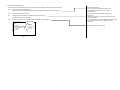
Troubleshooting: C130, 140, 150 or 160 Error for e-STUDIO205L/255/305/355/455 Series
[1] When C130, 140, 150 or 160 error occurs
1. Check the status when then error occurred
<Countermeasures>
Important
Follow this procedure to check the condition
of the equipment when the error occurs.
1) Do not turn the power OFF while performing the following procedures.
2) Did a gear unmeshing sound occur? (ask the end users)
Check
Items to check
Contents
Did a loud high noise sound occur?
Yes
or
No
or
Not remembered
Did a loud low noise sound occur?
Yes
or
No
or
Not remembered
If "Yes", the gear in the drive unit of the drawer tray-up
may be damaged.
Refer to "8.6.25 Upper tray-up motor (M11)" in the
Service Manual (page 8-27 and 28) and check whether
the gear tooth flank is damaged.
If "Yes", the fan-shaped gear in the drawer may be
damaged.
3) Check the message indication area on the touch panel. (Fig. 1)
Checking area
Either of following messages appears in this area.
It does not appear in the alert message indication area (black part of the bottom of the menu).
Check
Message
"READY"
or
"ADD PAPER"
When "Add paper" appears, check the paper feeding section where
the error occurs with the self-diagnosis mode (test mode 3).
Check
Items to check
Contents
Drawer tray-up sensor
Tray at upper limit position
or
Other than upper limit position
Drawer empty sensor
No paper
or
Paper present
Fig. 1
* Refer to the Service Handbook page 2-4.
If "Other than upper limit position" appears for the drawer tray-up sensor, take off the rear cover and check the gear condition in the drawer.
(Refer to 1-4))
1
4) Check the condition of the gear in the drawer.
Take off the rear cover and check the gear condition in the drawer.
If there is a clearance (A) between the gear
and the plate as shown in Fig. 2, the gear
condition is normal.
If the gear and the plate contact as shown below, the error may
occur again and the gear may be damaged.
Gear
Gear
Whitening of the gear
Plate
Plate
Picture 1
Picture 2
Picture 3
Refer to Fig. 3.
Fig. 2
Check
Items to check
Gear conditions
Does the gear contact the plate?
Yes
or
No
Is the gear becoming whitened?
Yes
or
No
If "Yes", replace the gear with the new one.
Moreover, since the gear in the drive unit of the drawer
tray-up may be damaged, refer to "8.6.25 Upper tray-up
motor (M11)" in the Service Manual (page 8-27 and 28)
and check whether the gear tooth flank is damaged.
2
5) Take out the drawer from the equipment and check the paper conditions.
Check
Items to check
Paper conditions
Presence/absence of paper
Paper remaining (height)
Paper present
or
No paper
15 mm or lower
or
approx. 15 mm - 30 mm
or
30 mm or more
Important
If the firmware version is "470-M08" or earlier
, upgrade it to "470-M09" or later.
(Refer to the Service Handbook page 8-1)
6) Check the version of the main firmware.
If the firmware version is "470-M09" or later, go to [3].
2. Reproduction of the phenomenon
1) Pull out the drawer in which the error occurs and check that it has enough paper (the recommended height is approx. 15 mm - 30 mm).
Then insert the drawer.
2) Turn the power ON.
3) Does a gear unmeshing sound occur?
Check
Items to check
Contents
Does a loud high noise sound occur?
Yes
or
No
or
Not remembered
Does a loud low noise sound occur?
Yes
or
No
or
Not remembered
If "Yes", the gear in the drive system of the tray-up
assembly may be damaged.
Refer to "8.6.25 Upper tray-up motor (M11)" in the
Service Manual (page 8-27 and 28) and check whether
the gear tooth flank is damaged.
If "Yes", the fan-shaped gear in the drawer
may be damaged.
4) Check the message indication area on the touch panel. (Refer to 1.-3))
5) Leave the power ON and pull out the drawer.
Then insert the drawer again.
6) Check 3) and 4) again.
If any result for 3) is "Yes", go to [3].
3
[2] When C130, 140, 150 or 160 error has been solved
1. Check the status when the error occurred (ask the end users)
Ask the end users the condition of the equipment when the error occurred.
Check
Items to check
Contents
Did a loud high noise sound occur?
Yes
or
No
or
Not remembered
Did a loud low noise sound occur?
Yes
or
No
or
Not remembered
Did "Add Paper" appear on the touch panel even
if there was enough paper in the drawer? (*1)
Yes
or
No
or
Not remembered
If "Yes", the gear in the drive unit of the drawer tray-up
may be damaged.
Refer to "8.6.25 Upper tray-up motor (M11)" in the
Service Manual (page 8-27 and 28) and check whether
the gear tooth flank is damaged.
If "Yes", the fan-shaped gear in the drawer
may be damaged.
*1: "Add paper" appears in the message indication area.
It does not appear in the alert message indication area (black part of the bottom of the menu).
If any reply is "Yes", go to [3].
2. Reproduction of the phenomenon
Refer to [1]-2. and do the same.
Refer to [1]-1.-3) and check the condition.
[3] Check the equipment and functions
1) Check the drawer
1)-a
Check the condition of the fan-shaped gear.
Check it while the tray in the drawer is at the lowest position.
Check whether the gear fixing screw is loose or not.
If the screw is loose, tighten it firmly.
Normal condition
Check whether the gear is damaged or not by
referring to [1]-1.-4).
May be damaged
Fig. 3
4
1)-b
Check the condition of the tray lift up lever in the drawer.
If the screws are loose, tighten them firmly.
Does the tray lift up lever contact
thoroughly on the bottom of the
drawer?
If the tray lift up lever does not contact thoroughly on the
bottom of the drawer, the screws in Fig. 4 may become
loose or the lever may be deformed.
If the lever is not bent at a right angle, replace it with a
new one.
Are the fixing screws of the tray lift
up lever tightened firmly?
Tray lift up lever
Fig. 4
1)-c
Fig. 5
Check the condition of the gear fixing bracket in the rear side of the drawer.
B
The bracket at a right angle is good.
If the bracket is slanted in the direction of B, it may
contact the fan-shaped gear and become damaged
during the lifting of the tray.
To avoid this, replace the bracket with a new one.
Is the bracket deformed?
Fig. 6
5
2) Check the drive unit of the drawer tray-up motor
2)-a
Check the condition of the tray-up motor installed section.
Are 2 fixing screws of the
motor tightened firmly?
(common for both upper and
lower drawers)
If the screws are loose, tighten them firmly.
The configuration of the tray-up motor installed section
has been changed due to the countermeasure to
unmeshing.
The applicable production lots for each destination are as
follows.
If unmeshing occurs, even if any problem is found after
checking [1] and [2], replace the drive unit of the drawer
tray-up with a new one.
(Refer to BSI No. G09H114 for details)
Check the configuration of the tray-up
motor installed section. (See Fig. 8)
Fig. 7
e-STUDIO205L:CLE910122e-STUDIO255:CNE910418e-STUDIO305:CME910269e-STUDIO355:CPE910686e-STUDIO455:CQE910606-
Fig. 8
6
3) Check the drawer feeding unit
Refer to the Service Manual pages 8-13 to 8-16, and check the following points of the drawer feeding unit.
3)-a
Is the tray-up sensor installed firmly?
Does the sensor operate normally? Perform the self-diagnosis mode (test mode 3) to check it.
3)-b
Is the harness connected firmly?
3)-c
Is the pick up roller assembly installed to the pick up arms firmly?
Do the pick up arms move smoothly?
3)-d
Is the torsion spring in the rear side of the unit installed correctly? (Fig. 9)
Install the sensor firmly.
If the sensor does not operate normally in the
self-diagnosis mode (test mode 3), replace it
with a new one.
Install the pick up roller assembly to the pick up
arms firmly.
If the pick up arms do not move smoothly, check their
installing condition.
If the pick up arms are in fact installed correctly, then they
may be damaged. In this case, replace them with
new ones.
Torsion spring
αバネ
Install the torsion spring correctly.
Fig. 9
7
![2 Appuyez sur la touche [FAX] du tableau de bord.](http://vs1.manualzilla.com/store/data/006377769_1-cb8366605658d2e9e5d72496d9b1e196-150x150.png)