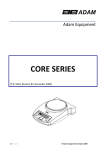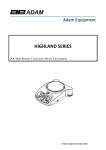
1
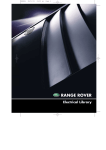
Azure Dynamics Parallel Hybrid Electric Vehicle MAN500721-A
Body Builders Layout Book Supplement
Contents, Figures, Tables
Azure Dynamics Balance™ Parallel Hybrid Electric Vehicle
2009 Ford E-450 Body Builders Layout Book Supplement
Printed versions of this document are not controlled.
Revision Record
Rev
A
CO
2095
DESCRIPTION
INITIAL RELEASE BASED ON
MAN500689
BY
CHECKED
APPROVED
Date
T. STOKER
M. STRANGE
J. MANCUSO
27FEB09
Azure Dynamics BalanceTM Parallel Hybrid Electric Vehicle 2009 Ford E-450 Body Builders Layout Book Supplement
MAN500721-A
ii
Body Builders Layout Book Supplement
Contents, Figures, Tables
Table of Contents
1
FORWARD............................................................................................................................ 1
1.1 About The Company.............................................................................................................2
2
DEFINITIONS....................................................................................................................... 3
2.1 Abbreviations ......................................................................................................................3
3
APPLICABILTY ................................................................................................................... 4
4
ADDED CURB WEIGHT ..................................................................................................... 5
5
ABOUT HYBRID VEHICLES and the BALANCETM HYBRID DRIVE SYSTEMS ........ 6
6
VEHICLE SAFETY .............................................................................................................. 7
6.1 High Voltage System.............................................................................................................7
6.2 Disconnecting the High Voltage System .................................................................................8
6.2.1 Tools .........................................................................................................................8
6.2.2 Disconnection Procedure ...........................................................................................8
6.2.3 Verify No Voltage..................................................................................................... 10
7
COMPONENT LAYOUT ................................................................................................... 12
7.1 Dimensional Data............................................................................................................... 12
7.1.1 2009 Ford E-450 BalanceTM Hybrid Cut Away Chassis, 158” wheelbase ........................ 12
7.1.2 2009 Ford E-450 BalanceTM Hybrid Cut Away Chassis, 176” wheelbase ........................ 13
7.1.3 2009 Ford E-450 BalanceTM Hybrid Stripped Chassis, 158” wheelbase ......................... 14
7.1.4 2009 Ford E-450 BalanceTM Hybrid Stripped Chassis, 176” wheelbase ......................... 15
7.1.5 2009 Ford E-450 BalanceTM Hybrid Cutaway Chassis, Shuttle Bus Prep, 158” wheelbase
16
7.2 Hybrid Wiring Layout.......................................................................................................... 17
7.2.1 Power Train Wiring Harness ..................................................................................... 17
7.2.2 High Voltage Cabling ................................................................................................ 18
7.2.3 Power Distribution Harness ...................................................................................... 19
7.2.4 Cut Away Cab Harness ............................................................................................. 20
7.2.5 Stripped Chassis Cab Harness ................................................................................... 21
8
BODY BUILD PRECAUTIONS, REQUIREMENTS, and SPECIAL PROCEDURES.... 22
8.1 No Step Areas .................................................................................................................... 22
8.2 Welding on the Vehicle....................................................................................................... 23
Azure Dynamics BalanceTM Parallel Hybrid Electric Vehicle 2009 Ford E-450 Body Builders Layout Book Supplement
MAN500721-A
iii
Body Builders Layout Book Supplement
Contents, Figures, Tables
8.3 Air Conditioning Installation................................................................................................ 30
8.4 Dashboard LED and Switch Installation ................................................................................ 33
8.4.1 Hybrid Enabled and Hybrid Service Indicators............................................................ 33
8.4.2 Optional Hybrid Switches and Indicators ................................................................... 34
8.5 Additional 12V Battery Installation ...................................................................................... 36
8.6 Cabin Heater Installation .................................................................................................... 37
8.6.1 Mounting ................................................................................................................ 37
8.6.2 Wiring ..................................................................................................................... 39
8.7 Front End Accessory Drive (FEAD) ....................................................................................... 40
8.8 Undercoating ..................................................................................................................... 41
8.9 Mud Flaps.......................................................................................................................... 41
8.10 Tow Haul Switch............................................................................................................... 41
8.11 Minimum Skirt Requirements ........................................................................................... 41
8.12 Underhood Decals............................................................................................................ 42
8.13 Body Builder Electrical Loads............................................................................................. 43
9
POST BUILD INSPECTION AND VEHICLE SIGN OFF ................................................ 43
9.1 Hybrid Chassis Inspection ................................................................................................... 44
9.2 Body Inspection ................................................................................................................. 44
A.1 APPENDIX 1 POST BUILD INSPECTION AND SIGN OFF ............................................ 45
A.1.1 Hybrid Chassis Inspection ................................................................................................ 46
A.1.2 Body Inspection ............................................................................................................. 51
A.2 IMAGES ................................................................................................................................ 52
Azure Dynamics BalanceTM Parallel Hybrid Electric Vehicle 2009 Ford E-450 Body Builders Layout Book Supplement
MAN500721-A
iv
Body Builders Layout Book Supplement
Contents, Figures, Tables
List of Figures
Figure #
Description
Page
Figure 1: BalanceTM Hybrid Architecture (Cutaway Chassis with Shuttle Bus Prep) .................... 6
Figure 2: Removing Low Voltage Connector from High Voltage Battery Pack............................ 9
Figure 3: Removing High Voltage Disconnect Pin ...................................................................... 10
Figure 4: Measuring Points ........................................................................................................... 11
Figure 5: 158” Wheel Base CA Dimensional Data ...................................................................... 12
Figure 6: 176” Wheel Base CA Dimensional Data ...................................................................... 13
Figure 7: 158” Wheel Base SC Dimensional Data ....................................................................... 14
Figure 8: 176” Wheel Base SC Dimensional Data ....................................................................... 15
Figure 9: 158” Wheel Base SB Dimensional Data ....................................................................... 16
Figure 10: Power Train Wiring Harness Routing (Stripped Chassis)........................................... 17
Figure 11: High Voltage Cable Routing (Stripped Chassis) ......................................................... 18
Figure 12: Power Distribution Routing (Stripped Chassis) .......................................................... 19
Figure 13: Cut Away Cab Harness Routing ................................................................................. 20
Figure 14: Stripped Chassis Cab Harness Routing ....................................................................... 21
Figure 15: Step / No Step Diagram ............................................................................................... 22
Figure 16: VCU Communication Connectors............................................................................... 23
Figure 17: SC 12 V Battery .......................................................................................................... 24
Figure 18: CA 12 V Battery .......................................................................................................... 24
Figure 19: Second 12V Battery (if equipped) ............................................................................... 24
Figure 20: HV Battery Pack Control Connectors ......................................................................... 25
Figure 21: ISG Control Connectors .............................................................................................. 26
Figure 22: Traction Motor Control Connectors ............................................................................ 26
Figure 23: Traction Motor Control Location ............................................................................... 26
Figure 24: EPAS Control Connectors ........................................................................................... 27
Figure 25: DC DC Control Connector .......................................................................................... 27
Figure 26: SC PWM Control Connectors ..................................................................................... 28
Figure 27: SC PWM Location ...................................................................................................... 28
Azure Dynamics BalanceTM Parallel Hybrid Electric Vehicle 2009 Ford E-450 Body Builders Layout Book Supplement
MAN500721-A
v
Body Builders Layout Book Supplement
Contents, Figures, Tables
List of Figures
Figure #
Description
Page
Figure 28: CA PWM Control Connectors .................................................................................... 28
Figure 29: CA PWM Location...................................................................................................... 28
Figure 30: Rear AC Control Connectors ...................................................................................... 29
Figure 31: Rear AC Mounting Location ....................................................................................... 29
Figure 32: C318P Body AC Demand & Power Relay Control .................................................... 30
Figure 33: C318P Body AC Demand & Power Relay Control Location ..................................... 30
Figure 34: C318P Terminal 2 Connection .................................................................................... 31
Figure 35: Rear AC System .......................................................................................................... 32
Figure 36: Hybrid LED Mounting ................................................................................................ 33
Figure 37: Switch and LED Harness ............................................................................................ 35
Figure 38: 2 nd 12V Battery Cable Routing ................................................................................... 36
Figure 39: Engine Coolant Circulation Layout ............................................................................. 37
Figure 40: Coolant Pump, Vertical ............................................................................................... 38
Figure 41: Coolant Pump, Horizontal ........................................................................................... 38
Figure 42: Integrated Starter Generator (ISG) .............................................................................. 40
Figure 43: FEAD Belt Routing ..................................................................................................... 40
Figure 44: Underhood Decal Placement ....................................................................................... 42
Figure 45: Underhood High Current Fuse Panel .......................................................................... 43
Azure Dynamics BalanceTM Parallel Hybrid Electric Vehicle 2009 Ford E-450 Body Builders Layout Book Supplement
MAN500721-A
vi
Body Builders Layout Book Supplement
Contents, Figures, Tables
List of Tables
Table #
Description
Page
Table 1: Vehicle Applicability ........................................................................................................ 4
Table 2: Added Curb Weight due to BalanceTM Hybrid System .................................................... 5
Azure Dynamics BalanceTM Parallel Hybrid Electric Vehicle 2009 Ford E-450 Body Builders Layout Book Supplement
MAN500721-A
vii
Body Builders Layout Book Supplement
Forward, Contact
1
FORWARD
This document is a supplement to the Ford 2009 Body Builder Layout Book. The purpose of this
document is to inform Second Unit Body (SUB) builders of additional components that are
added to Ford E-series stripped chassis and cutaway chassis once hybridized with an Azure
Dynamics model year 2009 BalanceTM Hybrid Electric Drive System.
The information herein is intended to aid SUB manufacturers in the design and installation of
SUB’s onto BalanceTM Hybrid chassis. Specifically, to ensure that SUB manufacturers are aware
of all additional component functionality, location, weights and requirements for the purposes of
designing SUB’s that do not damage or interfere with the BalanceTM Hybrid System.
In General, the following steps must be followed when installing a body or other accessories to
the Hybrid E-450 chassis:
1. Disconnect High Voltage Battery in order to minimize the risk of any inexperienced
assemblers or technicians getting hurt – see section:
6.2 Disconnecting the High Voltage System
2. If welding on the chassis, the hybrid controllers must be disconnected – see section:
8.2 Welding on the Vehicle
3. Install Mud flaps – see section:
8.9 Mud Flaps
4. Install body skirts – see section:
8.11 Minimum Skirt Requirements
5. For Strip Chassis Only:
a. Install Cabin Heater Pump – see section:
8.6 Cabin Heater Installation
b. Install Hybrid Indicator Lights to Dash – see section:
8.4 Dashboard LED and Switch Installation
c. Install Decals to under hood area – see section:
8.12 Underhood Decals
6. For Shuttle Bus Cutaway Chassis Only:
a. Install TM16 Compressor and plumbing to Body A/C system – see section:
8.3 Air Conditioning Installation
This document does not replace any publications by Ford Truck Body Builder Advisory Service;
Ford’s Body Builder Layout Book should be referenced for all Ford specific information. At the
time this document was released, the Ford Body Builder Layout Book for the 2009 E-450 was
found at the following web link:
https://www.fleet.ford.com/truckbbas/topics/2009/eseries_wagonvan.html
Azure Dynamics BalanceTM Parallel Hybrid Electric Vehicle 2009 Ford E-450 Body Builders Layout Book Supplement
MAN500721-A
1
Body Builders Layout Book Supplement
Forward, Contact
1.1 About The Company
Azure Dynamics (AZD) develops hybrid electric and electric drive technology for
commercial trucks and shuttle buses. AZD is a leader in the delivery of electric and hybrid
electric systems, with an accumulation of over 25 million miles of experience.
Azure Dynamics Corporation is a public company trading in Canada (TSX: AZD), in the
United Kingdom (AIM: ADC) and in the US (OTCQX: AZDDF).
Azure Dynamics power trains are protected in the United States under the following patents:
U.S. 6,909,200; 6,879,054; 6,768,621; 6,643,149; 6,555,991;
6,242,873; 5,898,282 and may be the subject of pending patent applications.
Contact Information
Azure Dynamics Inc.
Product Support
Toll Free Number: 1-866-473-1636
Phone: 905-607-3486
Fax: 905-569-0592
Email: [email protected]
Web: http://www.azuredynamics.com
Azure Dynamics BalanceTM Parallel Hybrid Electric Vehicle 2009 Ford E-450 Body Builders Layout Book Supplement
MAN500721-A
2
Body Builders Layout Book Supplement
Definitions
2
DEFINITIONS
Unless otherwise defined, all terms used in this document are consistent with the definitions
found in the Ford 2009 body builder layout book
Some terms used in this document may be followed by an abbreviation that will be used
thereafter within the document.
2.1 Abbreviations
AC:
AZD:
CA:
EPAS:
FEAD:
I/F:
ISG:
TM:
SB:
SC:
SUB:
WB:
Air Conditioning
Azure Dynamics Inc.
Cut Away
Electric Power Assist
Front End Accessory Drive
Interface
Integrated Starter Generator
Traction Motor
Shuttle Bus
Stripped Chassis
Second Unit Body
Wheel Base
Azure Dynamics BalanceTM Parallel Hybrid Electric Vehicle 2009 Ford E-450 Body Builders Layout Book Supplement
MAN500721-A
3
Body Builders Layout Book Supplement
Applicability
3 APPLICABILTY
This supplemental Body Builder Layout Book applies to the following Azure Dynamics
BalanceTM Parallel Hybrid Ford E-450 platforms:
• 2009 E-450 Stripped Chassis (SC), 158 and 176 inch wheelbase
• 2009 E-450 Cutaway (CA) Chassis, 158 and 176 inch wheelbase
• 2009 E-450 Cutaway Chassis, 158 inch wheelbase, Shuttle Bus Prep (SB)
In all cases, the common specifications of the Ford E-450 Chassis are:
DESCRIPTION
Engine
Transmission
GVRW
Rear Axle Ratio
Alternator
2009 Stripped, 158”
& 176” WB
2009 Cutaway, 158”
2009 Cutaway, 158”
& 176” WB
WB, Shuttle Bus Prep
5.4L Triton V8
5R110 Automatic (Torqueshift), with tow haul and without PTO
14,050 lbs
4.56:1 non limited slip
155 Amp
Table 1: Vehicle Applicability
Azure Dynamics BalanceTM Parallel Hybrid Electric Vehicle 2009 Ford E-450 Body Builders Layout Book Supplement
MAN500721-A
4
Body Builders Layout Book Supplement
Added Curb Weight
4
ADDED CURB WEIGHT
The following table lists the curb weight that is added to the stock Ford E-450 due to the hybrid
system. Note that the Ford Body Builder Layout Book should be referenced for the curb weights
of the stock chassis corresponding to the appropriate Ford Body Code and Wheel Base.
Model
2009 E-450 Stripped
Chassis
2009 E-450 Stripped
Chassis
2009 E-450 Cutaway
Chassis
2009 E-450 Cutaway
Chassis
2009 E-450 Cutaway
Chassis, Shuttle Bus Prep
Added Curb weight due to BalanceTM hybrid
System (lbs) – as measured on Front and Rear
axles
Front
Rear
Total
730
710
1440
Ford
Body
Code
E49
Wheelbase
(inches)
158
E49
176
800
640
1440
E45
158
730
710
1440
E45
176
800
640
1440
E45
158
636
1029
1665
Table 2: Added Curb Weight due to BalanceTM Hybrid System
Azure Dynamics BalanceTM Parallel Hybrid Electric Vehicle 2009 Ford E-450 Body Builders Layout Book Supplement
MAN500721-A
5
Body Builders Layout Book Supplement
Vehicle Safety
5
ABOUT HYBRID VEHICLES and the BALANCETM HYBRID
DRIVE SYSTEMS
BalanceTM Hybrid Electric drive systems are classified as a full parallel hybrid. The major
components are highlighted in Figure 1 below.
Figure 1: BalanceTM Hybrid Architecture (Cutaway Chassis with Shuttle Bus Prep)
The vehicle is propelled by the Traction Motor in addition to the conventional gasoline engine
and automatic transmission. The Traction Motor is used for torque assist during vehicle
acceleration and to capture energy from regenerative braking events in which case the
regenerative energy is stored in the Energy Storage System (ESS).
Azure Dynamics BalanceTM Parallel Hybrid Electric Vehicle 2009 Ford E-450 Body Builders Layout Book Supplement
MAN500721-A
6
Body Builders Layout Book Supplement
Vehicle Safety
When the vehicle comes to a stop (e.g. when a driver stops at a red light), the engine will
typically shut off in order to save fuel. When this happens, the Electric Power Assist System
(EPAS) is enabled to maintain power steering and power brakes and the DC/DC Converter is
also enabled in order to charge the 12 Volt battery.
The vehicle also has an Integrated Starter Generator (ISG) mounted to the front of the engine
which is used to provide quick re-starts of the engine when accelerating from a stationary
position and also to generate power to charge the high voltage ESS. The high voltage system is
self contained and it does not have to be plugged into an external power source for charging.
6 VEHICLE SAFETY
6.1 High Voltage System
All of the components highlighted in Figure 1, except 12V batteries, are high voltage and pose a
shock hazard if handled incorrectly or compromised during SUB installation. The high voltage
cabling is identified by orange cable, orange looming or orange tape around the loom. Only
qualified technicians should touch these high voltage components and cables.
Safety procedures in Azure Dynamics Service Manual (MAN500727) for 2009 Ford E-450
parallel hybrid electric vehicles should be closely followed.
Azure Dynamics BalanceTM Parallel Hybrid Electric Vehicle 2009 Ford E-450 Body Builders Layout Book Supplement
MAN500721-A
7
Body Builders Layout Book Supplement
Vehicle Safety
6.2 Disconnecting the High Voltage System
Warning
Always remember to consult the vehicle safety section before servicing any
hybrid component.
It is recommended that the high voltage battery be disconnected before any hybrid chassis has
any body build operations completed on it. Various components in the hybrid system contain
capacitors that store high voltage charges. Once the battery is disconnected, a multimeter (high
voltage) must be used to verify that there is no voltage present. Follow the proper procedures in
this manual to disconnect the high voltage battery.
Removing the high voltage battery pack involves contact with potential deadly voltages. All
safety procedures MUST be followed to prevent the possibility of an electrical shock.
When working on the battery pack, the keys to the vehicle should be in the possession of the
technician. Keys should not be in the ignition.
6.2.1 Tools
•
•
•
•
•
Multimeter (Rated for a working voltage of at least 500 V DC)
Electrical safety gloves (Rated for a working voltage of at least 500 V, i.e. ASTM class
00 or better)
6.2.2 Disconnection Procedure
Turn the ignition key OFF and remove the key from the ignition
Clean the front area of the battery pack to remove dirt and debris
Remove the low voltage connector C053S from the front of the battery pack by turning
counter clockwise approximately ¼ turn (Figure 2)
Azure Dynamics BalanceTM Parallel Hybrid Electric Vehicle 2009 Ford E-450 Body Builders Layout Book Supplement
MAN500721-A
8
Body Builders Layout Book Supplement
Vehicle Safety
Figure 2: Removing Low Voltage Connector from High Voltage Battery Pack
•
•
Remove the service disconnect cover from the front of the battery pack. (Figure 3)
Remove the high voltage service disconnect pin from the battery. While wearing
insulated gloves, push the Service Disconnect Pin in, turn it ¼ turn counter clockwise,
and then pull it out. (Figure 3)
WARNING
•
Removing the high voltage service disconnect pin cuts off high
voltage from the vehicle, but the individual cells inside the battery
pack will remain charged.
•
Do not cut into the high voltage battery case or penetrate the
battery in anyway.
•
Always assume the battery may still be electrically active, until it
is verified that there is no voltage.
Azure Dynamics BalanceTM Parallel Hybrid Electric Vehicle 2009 Ford E-450 Body Builders Layout Book Supplement
MAN500721-A
9
Body Builders Layout Book Supplement
Vehicle Safety
Figure 3: Removing High Voltage Disconnect Pin
•
Remove the high voltage cover from the front of the battery pack. (Figure 3)
6.2.3 Verify No Voltage
While wearing insulated gloves, use a multimeter to verify there is zero (or < 1)V across the
following points (Figure 4) before handling or disconnecting any high voltage cables.
•
positive terminal to negative terminal
•
positive terminal to chassis
•
negative terminal to chassis
•
positive side (right) of fuse to negative terminal
•
positive side (right) of fuse to chassis
Azure Dynamics BalanceTM Parallel Hybrid Electric Vehicle 2009 Ford E-450 Body Builders Layout Book Supplement
MAN500721-A
10
Body Builders Layout Book Supplement
Vehicle Safety
Figure 4: Measuring Points
The meter should show < 1 volt. If the voltage is higher wait five minutes and repeat
procedure. Contact Azure Dynamics if the voltage does not drop to <1 volt.
Azure Dynamics BalanceTM Parallel Hybrid Electric Vehicle 2009 Ford E-450 Body Builders Layout Book Supplement
MAN500721-A
11
Body Builders Layout Book Supplement
Component Layout
7 COMPONENT LAYOUT
7.1 Dimensional Data
7.1.1 2009 Ford E-450 BalanceTM Hybrid Cut Away Chassis, 158”
wheelbase
NOTE: All Dimensions in mm
Figure 5: 158” Wheel Base CA Dimensional Data
Azure Dynamics BalanceTM Parallel Hybrid Electric Vehicle 2009 Ford E-450 Body Builders Layout Book Supplement
MAN500721-A
12
Body Builders Layout Book Supplement
Component Layout
7.1.2 2009 Ford E-450 BalanceTM Hybrid Cut Away Chassis, 176”
wheelbase
NOTE: All Dimensions in mm
Figure 6: 176” Wheel Base CA Dimensional Data
Azure Dynamics BalanceTM Parallel Hybrid Electric Vehicle 2009 Ford E-450 Body Builders Layout Book Supplement
MAN500721-A
13
Body Builders Layout Book Supplement
Component Layout
7.1.3 2009 Ford E-450 BalanceTM Hybrid Stripped Chassis, 158”
wheelbase
NOTE: All Dimensions in mm
Figure 7: 158” Wheel Base SC Dimensional Data
Azure Dynamics BalanceTM Parallel Hybrid Electric Vehicle 2009 Ford E-450 Body Builders Layout Book Supplement
MAN500721-A
14
Body Builders Layout Book Supplement
Component Layout
7.1.4 2009 Ford E-450 BalanceTM Hybrid Stripped Chassis, 176”
wheelbase
NOTE: All Dimensions in mm
Figure 8: 176” Wheel Base SC Dimensional Data
Azure Dynamics BalanceTM Parallel Hybrid Electric Vehicle 2009 Ford E-450 Body Builders Layout Book Supplement
MAN500721-A
15
Body Builders Layout Book Supplement
Component Layout
7.1.5 2009 Ford E-450 BalanceTM Hybrid Cutaway Chassis, Shuttle Bus
Prep, 158” wheelbase
NOTE: All Dimensions in mm
Figure 9: 158” Wheel Base SB Dimensional Data
Azure Dynamics BalanceTM Parallel Hybrid Electric Vehicle 2009 Ford E-450 Body Builders Layout Book Supplement
MAN500721-A
16
Body Builders Layout Book Supplement
Component Layout
7.2 Hybrid Wiring Layout
The following subsections provide images of electrical routing on the BalanceTM
Hybrid Chassis. Care should be taken to carefully inspect these layout diagrams and
ensure that no hybrid wiring is moved, cut, pulled, stretched or has chafe points added
to its routing. If any wiring is compromised during the body build contact Product
Support at [email protected].
7.2.1 Power Train Wiring Harness
CAB
HARNESS I/F
FORD
PCM
TRANSMISSION
VCU
ISG MOTOR
CONTROLLER
TM MOTOR
CONTROLLER
PAS MOTOR
CONTROLLER
HV BATTERY
PICTORIAL VIEW
Figure 10: Power Train Wiring Harness Routing (Stripped Chassis)
Azure Dynamics BalanceTM Parallel Hybrid Electric Vehicle 2009 Ford E-450 Body Builders Layout Book Supplement
MAN500721-A
17
Body Builders Layout Book Supplement
Component Layout
7.2.2 High Voltage Cabling
ISG
HV JUNCTION
BOX
ISG MOTOR
CONTROLLER
PAS MOTOR
CONTROLLER
TM MOTOR
CONTROLLER
HV BATTERY
PICTORIAL VIEW
Figure 11: High Voltage Cable Routing (Stripped Chassis)
Azure Dynamics BalanceTM Parallel Hybrid Electric Vehicle 2009 Ford E-450 Body Builders Layout Book Supplement
MAN500721-A
18
Body Builders Layout Book Supplement
Component Layout
7.2.3 Power Distribution Harness
POWER TRAIN
HRNS I/F
HIGH CURRENT
FUSE PANEL
DRIVERS
ISLAND
12V BATTERY
RAD FANS
RELAYS
FORD FUSE BOX
LOW TEMP PUMP
FUSE BOX
PICTORIAL VIEW
Figure 12: Power Distribution Routing (Stripped Chassis)
Azure Dynamics BalanceTM Parallel Hybrid Electric Vehicle 2009 Ford E-450 Body Builders Layout Book Supplement
MAN500721-A
19
Body Builders Layout Book Supplement
Component Layout
7.2.4 Cut Away Cab Harness
LED INDICATORS
INSTRUMENT
CLUSTER
PWM
INCLINOMETER
INERTIA SWITCH
SPDJB
VEHICLE FORWARD
POWERTRAIN HARNESS I/F
PICTORIAL VIEW
Figure 13: Cut Away Cab Harness Routing
Azure Dynamics BalanceTM Parallel Hybrid Electric Vehicle 2009 Ford E-450 Body Builders Layout Book Supplement
MAN500721-A
20
Body Builders Layout Book Supplement
Component Layout
7.2.5 Stripped Chassis Cab Harness
INSTRUMENT CLUSTER
LED INDICATORS
INCLINOMETER
INERTIA SWITCH
SPDJB
PWM
POWERTRAIN
HARNESS I/F
PICTORIAL VIEW
Figure 14: Stripped Chassis Cab Harness Routing
Azure Dynamics BalanceTM Parallel Hybrid Electric Vehicle 2009 Ford E-450 Body Builders Layout Book Supplement
MAN500721-A
21
Body Builders Layout Book Supplement
Precautions, Requirements, Procedures
8
BODY BUILD PRECAUTIONS, REQUIREMENTS, and
SPECIAL PROCEDURES
The following subsections outline precautions, requirements and procedures that are specific to
the BalanceTM Hybrid chassis, and must be closely followed to prevent damage or injury.
8.1 No Step Areas
Many hybrid components are not to be used as a step at any point during the body build. Figure
15 below shows the components that are added to the stock chassis and identifies whether it is
suitable to stand on during the SUB build.
In addition all Hybrid wiring should not be stepped on, refer to section7.2 Hybrid Wiring Layout
for reference to where these cables are routed.
NOTE: PARTICULAR ATTENTION IS TO BE PAID TO AVOIDING THE APPLICATION
OF ANY PRESSURE ON THE VCU. THE VCU IS LOCATED NEAR THE REAR
PASSENGER SIDE OF THE CONVENTIONAL ENGINE. AN IMAGE OF THE VCU CAN
BE FOUND IN Figure 16.
Figure 15: Step / No Step Diagram
Azure Dynamics BalanceTM Parallel Hybrid Electric Vehicle 2009 Ford E-450 Body Builders Layout Book Supplement
MAN500721-A
22
Body Builders Layout Book Supplement
Precautions, Requirements, Procedures
8.2 Welding on the Vehicle
Any electrical welding on the vehicle should be avoided if possible. If electrical welding
must be performed, follow the guidelines in the Ford Service Manual.
In addition to the Ford Service Manual, the following hybrid components must be
disconnected before welding to prevent damage. The appropriate connecter numbers are
listed below the hybrid component.
•
VCU communication connectors
o C308S, C309S, C310S
Front of Vehicle
Figure 16: VCU Communication Connectors
Azure Dynamics BalanceTM Parallel Hybrid Electric Vehicle 2009 Ford E-450 Body Builders Layout Book Supplement
MAN500721-A
23
Body Builders Layout Book Supplement
Precautions, Requirements, Procedures
•
Low Voltage (12 V) Batteries
o Disconnect Battery Terminals
Figure 17: SC 12 V Battery
Figure 18: CA 12 V Battery
Second Battery
Box
Transmission
Output Shaft
Traction Motor
Figure 19: Second 12V Battery (if equipped)
Azure Dynamics BalanceTM Parallel Hybrid Electric Vehicle 2009 Ford E-450 Body Builders Layout Book Supplement
MAN500721-A
24
Body Builders Layout Book Supplement
Precautions, Requirements, Procedures
•
High voltage battery pack control connector
o C053S
Figure 20: HV Battery Pack Control Connectors
Azure Dynamics BalanceTM Parallel Hybrid Electric Vehicle 2009 Ford E-450 Body Builders Layout Book Supplement
MAN500721-A
25
Body Builders Layout Book Supplement
Precautions, Requirements, Procedures
•
Control connectors on the integrated starter generator motor controller
o C251S, C252S and C253S
Figure 21: ISG Control Connectors
•
Control connectors on the traction motor controller
o C153S, C154S, C155S
ISG Motor
Controller
High Voltage
Junction Box
C153S
C154S
C155S
Figure 22: Traction Motor Control
Connectors
Figure 23: Traction Motor Control
Location
Azure Dynamics BalanceTM Parallel Hybrid Electric Vehicle 2009 Ford E-450 Body Builders Layout Book Supplement
MAN500721-A
26
Body Builders Layout Book Supplement
Precautions, Requirements, Procedures
•
Control connectors on the Electrical Power Assist (EPAS) motor controller
o Stripped Chassis and Cut Away Variant - C156S, C158S, C338S
Located as shown in Figure 1
o Shuttle Bus Variant- C350S, C351S, C338S
Located aft of rear axle on passenger side
SC & CA
C156S
C158S
C338S
SB
C350S
C351S
C338S
Figure 24: EPAS Control Connectors
•
DC to DC converter control connector
o C060S
DC DC
Converter
Front of Vehicle
Traction
Motor
C060S
Figure 25: DC DC Control Connector
Azure Dynamics BalanceTM Parallel Hybrid Electric Vehicle 2009 Ford E-450 Body Builders Layout Book Supplement
MAN500721-A
27
Body Builders Layout Book Supplement
Precautions, Requirements, Procedures
•
PWM control connectors
• C147SX, C148SX
• Stripped Chassis Mounting Location
C147S
C148S
Figure 26: SC PWM Control Connectors
•
Cut Away Mounting Location
Figure 27: SC PWM Location
Dog
House
C147SX
C148SX
Figure 28: CA PWM Control
Connectors
Figure 29: CA PWM Location
Azure Dynamics BalanceTM Parallel Hybrid Electric Vehicle 2009 Ford E-450 Body Builders Layout Book Supplement
MAN500721-A
28
Body Builders Layout Book Supplement
Precautions, Requirements, Procedures
Rear Air Conditioning Motor Controller (Shuttle Bus Only)
• NOTE: All three connectors circled in Figure 30 need to be disconnected.
• C259S, C260S, and the unlabeled connector
C259S
C260S
And 1
unlabeled
connector
Figure 30: Rear AC Control
Connectors
Figure 31: Rear AC Mounting Location
Azure Dynamics BalanceTM Parallel Hybrid Electric Vehicle 2009 Ford E-450 Body Builders Layout Book Supplement
MAN500721-A
29
Body Builders Layout Book Supplement
Precautions, Requirements, Procedures
8.3 Air Conditioning Installation
This section only pertains to shuttle bus variants which are to be fitted with a secondary
rear air conditioning unit to condition the passenger cabin.
Shuttle Bus Prep chassis are equipped with connector C318P on the Switch and LED
Harness which is located to the right of the steering column near the bottom of the dash
board. Refer to section 7.2.4 Cut Away Cab Harness for the switch and LED harness
location.
C318P is the connector for Body AC demand signal and Body AC Power Relay Control.
These two signals shall be connected to the body wiring harness for rear AC driver
controls.
Figure 32: C318P Body AC Demand & Power
Relay Control
Figure 33: C318P Body AC Demand & Power
Relay Control Location
C318P terminal 1 should be supplied with a 12V trigger signal when AC is desired.
This signal would be equivalent to the signal used to activate a FEAD AC clutch. C318P
is on wire 4253, the mating connector and terminal that the SUB builder will require are
EPC (Engineering Plastics Components) 2 position unsealed connector P/N: E-3665 and
Yazaki Socket terminal (0.75-1.00sqmm) P/N: 7116-4101-02.
C318P terminal 2 should be connected to the control side of a 12V relay(s) (Figure
34). The other control side of the relay(s) shall be connected to ignition power. The
control side can sink a maximum of 2 Amps. On the switched side of the relay(s) the pole
shall be connected to 12V battery power and the normally open side to the 12V supply
side of the Body AC Fans & Controller. This signal is used to control Body AC if the
vehicle enters a derated mode. The SUB builder will be required to supply Yazaki Socket
terminal (0.75-1.00sqmm) P/N: 7116-4101-02 for terminal 2 of the EPC 2 position
connector and 12V relay(s) equivalent to Tyco P/N: VF4-65F11-S05 for control of the
Body AC Fans & Controller.
Azure Dynamics BalanceTM Parallel Hybrid Electric Vehicle 2009 Ford E-450 Body Builders Layout Book Supplement
MAN500721-A
30
Body Builders Layout Book Supplement
Precautions, Requirements, Procedures
Figure 34: C318P Terminal 2 Connection
Azure Dynamics provides an electric drive system to run the rear AC compressor. Azure
Dynamics also provides a pulley in the Dunnage kit that is to be used on the electric drive
motor. The SUB builder is to provide the compressor and the remainder of the AC system.
The condenser and evaporator must be roof mounted since the packaging space between
the frame rails is consumed by hybrid components.
It is recommended that the SUB builder perform a test to determine the appropriate
refrigerant charge for the selected AC components.
NOTE: BalanceTM hybrid shuttle bus chassis are equipped with an electric rear AC
compressor drive since an additional compressor cannot be mounted as a front end
accessory. The electric compressor drive is mounted between the frame rails, at the rear of
the vehicle behind the fuel tank (Figure 35).
Azure Dynamics BalanceTM Parallel Hybrid Electric Vehicle 2009 Ford E-450 Body Builders Layout Book Supplement
MAN500721-A
31
Body Builders Layout Book Supplement
Precautions, Requirements, Procedures
Front of Vehicle
Figure 35: Rear AC System
The electric drive is mounted to a universal compressor mounting plate (shown in pink in
Figure 35).
• The Universal Compressor mounting plate is designed to accommodate all Seltec
model TM 16 compressors, but the compressor must
o Have a type 2A pulley and appropriate belt
o Have a 12V clutch
o Have a pulley diameter of either 125mm or 135mm
NOTE: Although the electric drive system is designed and optimized for use with a
TM16 compressor, a TM08 or TM21 compressor may also be used. A TM08
compressor can be installed using existing brackets and hardware, whereas a TM21
compressor will require an adapter bracket along with new fasteners. Note the
adapter bracket design and fasteners for a TM21 compressor configuration is the
responsibility of the body builder. Also note that the electric drive system is not
capable of providing enough power to obtain full output from a TM21 compressor.
Compressor mounting must meet the following requirements
• Parallel alignment between the compressor pulley and the drive motor pulley must
be within +/- 1mm
o This can be achieved by adjusting the taper bushing position on the electric
drive motor shaft
Azure Dynamics BalanceTM Parallel Hybrid Electric Vehicle 2009 Ford E-450 Body Builders Layout Book Supplement
MAN500721-A
32
Body Builders Layout Book Supplement
Precautions, Requirements, Procedures
•
Refrigerant supply and return lines to the compressor require between 70cm to
90cm of extra hose length. This additional hose is required to lower the entire
compressor mounting plate during AC servicing
o Hoses must be constrained such that they will not chafe on sharp edges
during operation
8.4 Dashboard LED and Switch Installation
In order to install dashboard LEDs, C348P must be mated with C348S on the passenger
compartment side of the firewall. This connection will connect the Switch and LED
harness to the cab harness.
Detailed wiring diagrams for these circuits can be found in the electrical diagrams section
of the Azure Dynamics 2009 Ford E-450 Parallel Hybrid Electric Vehicle Service Manual
and general layout schematics are shown in the Wiring layout section of this document.
8.4.1 Hybrid Enabled and Hybrid Service Indicators
A green “Hybrid Enabled” and a yellow “Hybrid Service” LED indicator light is
installed in the dashboard of stripped chassis, cutaways and shuttle bus cutaways.
These lights are installed to the right of the steering column. Figure 36 shows the
required orientation of the LED’s.
Figure 36: Hybrid LED Mounting
Azure Dynamics BalanceTM Parallel Hybrid Electric Vehicle 2009 Ford E-450 Body Builders Layout Book Supplement
MAN500721-A
33
Body Builders Layout Book Supplement
Precautions, Requirements, Procedures
Hybrid Service and Hybrid Enabled lights will be installed prior to arrival at the
body builders in most cases. If this is not the case or if these indicators need to be
moved follow these steps:
Prepare a location that meets the following criteria:
• Within reach of the driver while seated
• Clearly visible to the driver while seated
• Installed in such a way to eliminate the possibility of wire chaffing
over time
• Mounted in an esthetically pleasing and flush manner
To install the yellow “Hybrid Service” LED
• Prepare the dashboard mounting location
• Connect C313P on the LED with C313S on the Switch and LED
harness
• Insert the LED into the prepared location
To install the green “Hybrid Enabled” LED
• Prepare the dashboard mounting location
• Connect C314P on the LED with C314S on the Switch and LED
harness
• Insert LED into the prepared location
8.4.2 Optional Hybrid Switches and Indicators
Depending on the application (stripped chassis, cutaways or cutaways for shuttle
buses) optional switches may need to be installed on the vehicle dashboard.
If the optional switches are to be installed, they will be supplied with the chassis.
The switches will be connected and hanging from the Switch and LED harness as
shown in Figure 37. The switches will need to be installed to meet the following
criteria:
•
•
•
•
Within reach of the driver while seated
Clearly visible to the driver while seated
Installed in such a way to eliminate the possibility of wire chaffing
over time
Mounted in an aesthetically pleasing and flush manner
Azure Dynamics BalanceTM Parallel Hybrid Electric Vehicle 2009 Ford E-450 Body Builders Layout Book Supplement
MAN500721-A
34
Body Builders Layout Book Supplement
Precautions, Requirements, Procedures
Switches and LED’s
hanging from Switch
and LED Harness
Figure 37: Switch and LED Harness
To install the switches
• Disconnect the switches from the Switch and LED Harness
• Prepare a suitable mounting location on the dashboard
• Re-Connect the switch leads to the switch and LED Harness, ensuring
the following connection numbers match and are routed through the
mounting location
o C 150S mated with C150P, Regenerative Braking off Switch
o C167S mated with C167P, EV mode Switch
• Insert the switches into the prepared mounting location
Azure Dynamics BalanceTM Parallel Hybrid Electric Vehicle 2009 Ford E-450 Body Builders Layout Book Supplement
MAN500721-A
35
Body Builders Layout Book Supplement
Precautions, Requirements, Procedures
8.5 Additional 12V Battery Installation
If the chassis is equipped with an additional 12V battery, the battery will be mounted on
the inside of the frame rail behind the transmission. The additional battery will be wired
in parallel with the stock 12V battery.
If a battery disconnect switch is required refer to Figure 38 to determine an adequate
location. Figure 38 outlines the routing of the 12V wiring between the 2 batteries.
.
2nd 12V battery
Cable Routing
Top View
2nd 12V
Battery
Vehicle Forward
Figure 38: 2 nd 12V Battery Cable Routing
Azure Dynamics BalanceTM Parallel Hybrid Electric Vehicle 2009 Ford E-450 Body Builders Layout Book Supplement
MAN500721-A
36
Body Builders Layout Book Supplement
Precautions, Requirements, Procedures
8.6 Cabin Heater Installation
This section only pertains to stripped chassis as the cab heater pump is installed on cut
away variants during hybridization.
An electric powered cab heater pump is to be installed in line with the conventional heater
circulation system. The purpose of this additional pump is to circulate engine coolant
through the heater core while the conventional engine is off.
The additional circulation pump will be provided in the dunnage kit and must be installed
after the SUB is built.
• On stripped chassis the pump is to be installed when the cab heater core is
installed
8.6.1 Mounting
The mounting location of the pump is the SUB builder’s discretion; however the
mounting must meet the following criteria.
•
•
•
The pump must be mounted such that it is protected, its mounting hardware
does not compromise any other wire or hose routing, and its hoses and wires
will not chafe over time
The pump must not be mounted on any Azure bracketry without written
consent of Azure Dynamics Inc.
The pump must be located in the position indicated by “ELECTRIC
POWERED CIRCULATION PUMP” in Figure 39, the loop diagram
Figure 39: Engine Coolant Circulation Layout
Azure Dynamics BalanceTM Parallel Hybrid Electric Vehicle 2009 Ford E-450 Body Builders Layout Book Supplement
MAN500721-A
37
Body Builders Layout Book Supplement
Precautions, Requirements, Procedures
The supplied pump is not self priming and should be mounted such that it is always flooded. The
orientation of the pump can be either
o Vertical such that the inlet is above the pump body, see Figure 40.
Inlet
Outlet
Figure 40: Coolant Pump, Vertical
o Horizontally such that the outlet is above the pump body, see Figure 41 which illustrates
the 90° of freedom SUB builders have in outlet fitting orientation.
Figure 41: Coolant Pump, Horizontal
Azure Dynamics BalanceTM Parallel Hybrid Electric Vehicle 2009 Ford E-450 Body Builders Layout Book Supplement
MAN500721-A
38
Body Builders Layout Book Supplement
Precautions, Requirements, Procedures
8.6.2 Wiring
Pump wiring will also be included with the chassis; the wiring includes butt splice
connectors (part # 103743) and a long wire extension with connector C061P on
one end (part # 103875). To wire the heater pump
• Connect C061P to C061S on the power distribution harness located on the
drivers side of the engine bay
• Route the long extension wire from C061P to the heater pump such that
o Wire will not be chafed on sharp edges
o Wire is clear of any moving parts
o The wire is securely clipped and restrained
• Trim the long extension wire to length such that there is enough to connect the
pump lead to the extension wire with the supplied butt splice connectors
• Attach wire 2043AC on the pump lead to wire 2043AB on the wire extension
using the butt splice connectors and heat shrink
• Attach wire 9004AC on the pump lead to 9004A on the extension wire using
the butt splice connectors and heat shrink
• Ensure the wire routing is secured by clipping and will not chafe on sharp
edges.
Azure Dynamics BalanceTM Parallel Hybrid Electric Vehicle 2009 Ford E-450 Body Builders Layout Book Supplement
MAN500721-A
39
Body Builders Layout Book Supplement
Precautions, Requirements, Procedures
8.7 Front End Accessory Drive (FEAD)
The BalanceTM hybrid chassis is equipped with an Integrated Starter Generator (ISG) that
is connected to the engine crankshaft via a 2nd belt / spider bracket assembly. Figure 42
shows the ISG. Figure 43 shows the belt routings for the FEAD.
It is not acceptable to mount any additional front end accessories to this system.
A minimum of 30 mm of clearance is required between the FEAD belts and any other
components mounted in the area.
Figure 42: Integrated Starter Generator (ISG)
Figure 43: FEAD Belt Routing
Azure Dynamics BalanceTM Parallel Hybrid Electric Vehicle 2009 Ford E-450 Body Builders Layout Book Supplement
MAN500721-A
40
Body Builders Layout Book Supplement
Precautions, Requirements, Procedures
8.8 Undercoating
Applying undercoating to any hybrid component or wiring is prohibited due to color
coding and cooling requirements.
If applying undercoating to a Hybrid Chassis the undercoat must be applied to the body
prior to installation on the chassis or all hybrid components and wiring must be masked
off.
8.9 Mud Flaps
In order to eliminate water and other road debris spray from the wheels to the hybrid
components, the following is required:
•
•
Full width mud flaps are required behind the front wheels
Full width mud flaps are required in front of the rear wheels
It is the SUB builder’s option to install mud flaps behind the rear wheels.
Caution should be exercised during the installation of mud flaps to ensure that no hybrid
components or wiring will be damaged.
8.10 Tow Haul Switch
The tow haul switch has been disabled by the hybrid vehicle controller on all BalanceTM
Hybrid Chassis.
8.11 Minimum Skirt Requirements
Minimum skirt requirements are intended to ensure hybrid components are out of reach of
untrained individuals.
The Minimum requirement for the skirt is to be at least 250 mm (9.85 inches) below the
top of the flat portion of the frame rail. This skirt must extend the entire length of the
vehicle.
This is particularly relevant to cut away vehicles outfitted with boxes that generally do not
have skirts.
Azure Dynamics BalanceTM Parallel Hybrid Electric Vehicle 2009 Ford E-450 Body Builders Layout Book Supplement
MAN500721-A
41
Body Builders Layout Book Supplement
Precautions, Requirements, Procedures
8.12 Underhood Decals
This section only pertains to stripped chassis which do not have a hood when delivered to the
SUB builder.
Two decals with part numbers 104407 and 104408 are provided to the SUB builder in the chassis
dunnage kit. The two labels are to be placed under the hood as shown in Figure 44.
Prior to installing the decals the SUB builder must ensure the installation area is:
• Clean of any grime or debris
• Smooth and flat
• Dry
104407
104408
Figure 44: Underhood Decal Placement
Azure Dynamics BalanceTM Parallel Hybrid Electric Vehicle 2009 Ford E-450 Body Builders Layout Book Supplement
MAN500721-A
42
Body Builders Layout Book Supplement
Post Build Inspection
8.13 Body Builder Electrical Loads
The need for additional 12V electrical loads to support customer specific features may be
required. If these additional loads are needed, the following guidelines must be met:
• The 12V battery (1st and 2nd 12V batteries on SB only) and HV ESS shall be
disconnected prior to any electrical work
• 70A continuous is the maximum allowable current to be added to the electrical
12V system
• The appropriately sized Mega fuse is to be located in the AZD high current Fuse
panel as indicated in Figure 45. A buss bar in place of a Mega fuse is not
acceptable.
RAD FANS
BODY
BUILDER
2nd 12V
BATTERY
(if equipped)
DC-DC
CONVERTER
(SC / CA ONLY)
AZD FUSE
PANEL
Figure 45: Underhood High Current Fuse Panel
9 POST BUILD INSPECTION AND VEHICLE SIGN OFF
The following section is to be completed once the SUB is complete. The purpose of this section
is to ensure the system is fully functional and safe to operate prior to delivery to the customer.
This inspection must be completed prior to customer delivery unless the SUB builder has the
signed written consent of Azure Dynamics Inc.
Azure Dynamics BalanceTM Parallel Hybrid Electric Vehicle 2009 Ford E-450 Body Builders Layout Book Supplement
MAN500721-A
43
Body Builders Layout Book Supplement
Post Build Inspection
If the SUB builder completes a post build body check similar to the body check outlined in this
section, please contact Product Support at [email protected] to discuss the
option of deferring the body check section.
9.1 Hybrid Chassis Inspection
Follow the instructions in the Hybrid Chassis Inspection table and record pass or fail
where required. If the item fails record the problem and corrective actions in the
comments field, then re-test to ensure a pass.
To diagnose and repair some problems the BalanceTM Hybrid Diagnostic tool may be
required. To obtain a diagnostic tool and training contact Product Support at
[email protected].
Hybrid Chassis Inspection Table is located in A.1.1 Hybrid Chassis Inspection and it is
required that a copy of this table is printed, completed and signed off for each vehicle.
9.2 Body Inspection
Follow the instructions in the Body Inspection table and record pass or fail where
required. If the item fails record the problem and corrective actions in the comments field
and re-test to ensure a pass.
Body Inspection Table is located in A.1.2 Body Inspection and it is required that a copy
of this table is printed, completed and signed off for each vehicle.
Azure Dynamics BalanceTM Parallel Hybrid Electric Vehicle 2009 Ford E-450 Body Builders Layout Book Supplement
MAN500721-A
44
Body Builders Layout Book Supplement
Appendix
A.1 APPENDIX 1 POST BUILD INSPECTION AND SIGN OFF
The following subsections need to be completed prior to customer delivery.
Azure Dynamics BalanceTM Parallel Hybrid Electric Vehicle 2009 Ford E-450 Body Builders Layout Book Supplement
MAN500721-A
45
Body Builders Layout Book Supplement
Appendix
A.1.1 Hybrid Chassis Inspection
Hybrid Chassis Inspection
Complete the following table. If any item fails, document the failure and corrective action in as much detail as possible in the
comments section and then retest to ensure a pass.
ITEM
DESCRIPTION
1
Engine oil level is sufficient.
2
3
4
Transmission oil level is sufficient.
Power Steering fluid level is sufficient.
Engine coolant level sufficient.
5
Electronics coolant level sufficient.
6
7
TESTED
BY/ DATE
PASS /
FAIL
COMMENTS
Coolant must be 50/50 DexCool (orange) coolant
/ water mixture.
Confirm all hoses and harnesses are routed and
secured to original design.
Confirm all connectors removed for welding are
reconnected
VCU
PAS Motor Controller
ISG Motor Controller
Traction Motor, Motor Controller
AC Motor Controller (Shuttle Bus Only)
PWM to analog converter
Low Voltage (12V) Battery(s)
High Voltage Battery Control Connector
Azure Dynamics BalanceTM Parallel Hybrid Electric Vehicle 2009 Ford E-450 Body Builders Layout Book Supplement
MAN500721-A
46
Body Builders Layout Book Supplement
Appendix
Hybrid Chassis Inspection
Complete the following table. If any item fails, document the failure and corrective action in as much detail as possible in the
comments section and then retest to ensure a pass.
ITEM
8
9
DESCRIPTION
TESTED
BY/ DATE
PASS /
FAIL
COMMENTS
DC to DC Converter(s)
Confirm the yellow "Hybrid Service" and the
green "Hybrid Enabled" LED's are illuminated
temporarily when the ignition key is turned to
position 4.
See key position diagram in appendix A.2
IMAGES.
Confirm that only the green "Hybrid Enabled"
LED is illuminated when the key is momentarily
rotated to position 5. If the yellow “Hybrid
Service” LED is illuminated then this is a fail.
See key position diagram in appendix A.2
IMAGES.
10
11
Caution: The engine may start.
Confirm the engine power steering is functional
by depressing the brake pedal and rotating the
steering wheel from lock to lock while the engine
is idling.
Confirm the engine shuts off once the vehicle has
warmed up, while in park with the key and the
green "Hybrid Enabled" light on.
Azure Dynamics BalanceTM Parallel Hybrid Electric Vehicle 2009 Ford E-450 Body Builders Layout Book Supplement
MAN500721-A
47
Body Builders Layout Book Supplement
Appendix
Hybrid Chassis Inspection
Complete the following table. If any item fails, document the failure and corrective action in as much detail as possible in the
comments section and then retest to ensure a pass.
ITEM
12
13
14
DESCRIPTION
TESTED
BY/ DATE
PASS /
FAIL
COMMENTS
Confirm the electric power steering is functional
by depressing the brake pedal and rotating the
steering wheel from lock to lock while the engine
is off, the “Hybrid Enabled” light is on, and the
shifter is in Neutral.
Return shifter to Park after test.
Confirm the DC-DC converter is functional by
measuring the 12V battery voltage while the
engine is off, the “Hybrid Enabled” light is on,
and the shifter is in Park. The voltage should be
greater than 13.5V.
Confirm the electric cab heater pump is
functional and fluid is circulating by feeling the
electric cab heater pump for vibrations while the
engine is off and the “Hybrid Enabled” light is
on.
Confirm the rear AC system is functional and that
it cycles on and off as demand is requested.
15
Shuttle Bus Only.
Azure Dynamics BalanceTM Parallel Hybrid Electric Vehicle 2009 Ford E-450 Body Builders Layout Book Supplement
MAN500721-A
48
Body Builders Layout Book Supplement
Appendix
Hybrid Chassis Inspection
Complete the following table. If any item fails, document the failure and corrective action in as much detail as possible in the
comments section and then retest to ensure a pass.
ITEM
16
17
18
DESCRIPTION
TESTED
BY/ DATE
PASS /
FAIL
COMMENTS
Perform a road test which
- Is a minimum of 20 km (12 miles)
- Reaches vehicle speed of 100km/h (62 mph)
- Incorporates frequent stops
- Incorporates at least 3 key cycles (Turn off and
on)
- Incorporates forward and reverse motion
- Incorporates at least one 3 point turn
Confirm the yellow "Hybrid Service" light does
not illuminate during the road test (except for its
bulb check).
Confirm the “Check Engine” light (shape of an
engine) or any other warning lights do not
illuminate on the instrument cluster during the
road test (except for their bulb check).
Confirm the drive train does not have abnormal
vibrations at highway speeds.
Confirm there are no power steering system leaks
and the level is sufficient after the road test is
complete.
Confirm there are no engine coolant system leaks
and the level is sufficient after the road test is
complete.
Azure Dynamics BalanceTM Parallel Hybrid Electric Vehicle 2009 Ford E-450 Body Builders Layout Book Supplement
MAN500721-A
49
Body Builders Layout Book Supplement
Appendix
Hybrid Chassis Inspection
Complete the following table. If any item fails, document the failure and corrective action in as much detail as possible in the
comments section and then retest to ensure a pass.
ITEM
19
20
21
22
23
DESCRIPTION
TESTED
BY/ DATE
PASS /
FAIL
COMMENTS
Confirm there are no low temperature coolant
system leaks and the level is sufficient after the
road test is complete.
Ensure there is at least 15mm (5/8 inch) clearance
between the FEAD ISG motor and any cables,
wires or hoses
Ensure there is at least 30mm (1 ¼ inch)
clearance between FEAD belts and any other
parts
7" X 7" Yellow warning label mounted under the
hood.
See A.2 IMAGES.
Ford drive belt routing sticker replaced with
Azure drive belt/ ISG belt routing sticker.
See A.2 IMAGES.
Azure Dynamics BalanceTM Parallel Hybrid Electric Vehicle 2009 Ford E-450 Body Builders Layout Book Supplement
MAN500721-A
50
Body Builders Layout Book Supplement
Appendix
A.1.2 Body Inspection
Body Inspection
Complete the following table. If any item fails, document the failure and corrective action in as much detail as possible in the
comments section and then retest to ensure a pass.
ITEM DESCRIPTION
TESTED
PASS /
COMMENTS
BY/ DATE FAIL
1
Headlights functional - low beams
2
Headlights functional - high beams
3
Turn signals are functional
4
Sidelights / roof lights functional
5
Brake lights functional
6
Reverse lights functional
7
4 way flashers functional with ignition on
8
4 way flashers functional with ignition off
9
Horn functional
10
Windshield wipers functional
11
Windshield washer fluid functional
12
All dash switches and indicators are properly
seated and functional
Azure Dynamics BalanceTM Parallel Hybrid Electric Vehicle 2009 Ford E-450 Body Builders Layout Book Supplement
MAN500721-A
51
Body Builders Layout Book Supplement
Appendix
A.2 IMAGES
ITEM
DESCRIPTION
1
7" X 7" Warning
Label
2
Azure ISG and
Drive Belt Routing
Sticker
IMAGE
Azure Dynamics BalanceTM Parallel Hybrid Electric Vehicle 2009 Ford E-450 Body Builders Layout Book Supplement
MAN500721-A
52
Body Builders Layout Book Supplement
Appendix
ITEM
3
DESCRIPTION
IMAGE
Key Positions
Azure Dynamics BalanceTM Parallel Hybrid Electric Vehicle 2009 Ford E-450 Body Builders Layout Book Supplement
MAN500721-A
53
Body Builders Layout Book Supplement
Appendix
Notes:
Azure Dynamics BalanceTM Parallel Hybrid Electric Vehicle 2009 Ford E-450 Body Builders Layout Book Supplement
MAN500721-A
54
Body Builders Layout Book Supplement
Azure Dynamics BalanceTM Parallel Hybrid Electric Vehicle 2009 Ford E-450 Body Builders Layout Book Supplement
MAN500721-A
55