1
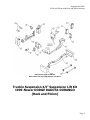
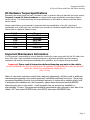
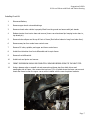
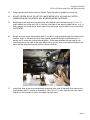
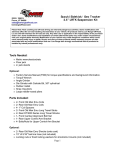
Installation Instructions
Truckin Suspension 4.5” Lift Kit
1999-Newer DODGE DAKOTA-DURANGO
(Rack and Pinion)
Important!
Read all instructions before attempting any work on the vehicle.
DO NOT DISSASSEMBLE ANY PART OF VEHICLE PRIOR TO COMPARING THE DELIVERED PARTS AND THE INCLUDED
PARTS LIST. REPORT ANY DISCREPENCIES IMMEIDATELY TO
(800) 775-7150.
Suspension Lift Kit
99-Newer Dakota with Rack and Pinion Steering
*Tabs are no longer on 6.5” kit.
Parts E and F are now integrated into one piece.
Truckin Suspension 4.5” Suspension Lift Kit
1999-Newer DODGE DAKOTA-DURANGO
(Rack and Pinion)
Page 2
Suspension Lift Kit
99-Newer Dakota with Rack and Pinion Steering
Important! Read all instructions before attempting any work on the vehicle.
DO NOT DISSASSEMBLE ANY PART OF VEHICLE PRIOR TO COMPARING THE DELIVERED PARTS AND THE INCLUDED
PARTS LIST. REPORT ANY DISCREPENCIES IMMEIDATELY TO
(800) 775-7150.
Disclaimer Notice: Installing this suspension system on any vehicle implies that you are in
agreement with the following terms and conditions with respect to that vehicle, the vehicle owner,
and any or all occupants of said vehicle at any time:
• Truckin Suspension is not responsible, and cannot be held responsible for any conditions of said
vehicle including, but not limited to the following: 1) Any and all adverse behavior, premature
failure, or breakage caused by oversized tires and wheels, improper installation, failure to follow
instructions, or any general negligence caused by installer or owner of said vehicle. 2) Any
breakage or premature failure caused by racing or driver negligence. 3) ANY incident determined
to be caused by an increase height in said vehicle’s center of gravity. 4) ANY incident determined
to be caused by improper installation. 5) ANY incident determined to be caused by a failure of
materials.
• Truckin Suspension is to be held harmless by the installer of this lift kit, owner of said vehicle,
ANY occupants of said vehicle, and any parties related directly or indirectly to said vehicle or
owner of said vehicle. Truckin Suspension is to be held harmless by all parties mentioned during
the course of any and all circumstances or incidence resulting from the installation of this lift kit.
• Truckin Suspension offers this kit strictly as a visual improvement of said vehicle over the factory
aesthetics. The fact that the suspension system works and functions well is incidental, and it is
not the intention of Truckin Suspension that said vehicle be modified for use on public highways
sanctioned by the Department of Transportation, or any state or local governing body. Vehicle
owner accepts sole responsibility for ensuring that said vehicle is not in violation of local, state, or
federal laws or vehicle code. Please check local vehicle laws and regulations before modifying
your vehicle.
By Installing This Kit or having this kit installed on your vehicle, you are implying that
you agree to the above terms and conditions. Please do not install this system if you do
not agree.
Page 3
Suspension Lift Kit
99-Newer Dakota with Rack and Pinion Steering
Kit Hardware Torque Specifications
Remember that actual torque may vary if lubricant is used, or extension bars are used with the torque wrench.
Torque all re-used O.E. factory hardware to original vehicle torque specifications according to factory
service manual. If in doubt concerning the torque specification of ANY fastener, always consult the factory
service manual.
Always consult factory service manual for sequence and torque specification of any O.E. parts being
reassembled, such as ball joint nuts, and steering tie rod ends. For hardware supplied with this kit, use the
following list as a guide for fastener torque:
Bolt Size
5/16
3/8
7/16
1/2
9/16
5/8
Torque
12-15 Ft-lbs
30 Ft-lbs
55 Ft-Lbs
70 Ft-lbs
100 Ft-lbs
110 Ft-lbs
Important Maintenance Information
It is the end user’s responsibility to have all fasteners checked for proper torque after the first 200 miles, then
every 3000 miles. Have a qualified professional mechanic or alignment specialist inspect the steering,
suspension and driveline components immediately after installation, and at regular intervals thereafter.
Important! Please read all instructions before attempting any work on the vehicle.
DO NOT DISSASSEMBLE ANY PART OF VEHICLE PRIOR TO COMPARING THE DELIVERED PARTS AND THE INCLUDED
PARTS LIST. REPORT ANY DISCREPENCIES IMMEIDATELY TO
(800) 775-7150.
Failure to read entire instruction packet before beginning disassembly, will likely result in additional
downtime spent acquiring tools, special equipment, and skilled mechanical know-how. We strongly
recommend installation be done by a professional mechanic, in a shop with a suitable vehicle hoist.
If attempting this installation as a do-it-yourselfer, please review this packet carefully BEFORE
attempting any work on the vehicle. A well-equipped shop can perform this installation in
approximately 12 hours. This packet uses standard nomenclature when referring to each side of the
vehicle: LEFT side means DRIVER’S side, while RIGHT side means PASSENGER side.
Page 4
Suspension Lift Kit
99-Newer Dakota with Rack and Pinion Steering
Required Tools and Equipment
Make sure all of these tools and equipment are readily available BEFORE beginning work on the vehicle.
•
•
•
•
•
•
•
•
•
•
•
•
•
•
•
•
•
•
•
•
•
•
•
Good quality safety glasses and ear protection
Professional Quality Floor Jack (or vehicle hoist)
Tall Jack Stands (4)
½ drive Socket set and ratchets with metric, standard and deep sockets
3/8 drive Socket set and ratchets with metric, standard and deep sockets
Hex Sockets (recommended) OR Allen wrench (hex key) set
Compressor w/ impact wrench and air ratchet (recommended)
Air hammer with flat pointed chisel, and shovel tip chisel bits
Pickle fork type tie-rod separator, and ball joint separator
Torsion bar unloading tool (recommended) OR 2 jaw gear puller
Transmission Jack (recommended)
Plasma Torch (recommended) OR Sawzall with metal cutting blades
MIG or equivalent wire feed welder with 75-25 Argon or better
4” grinder (recommended), or chisels and files
½” drill motor and drill index, (½” and ¾” drill bits required)
Dead blow hammer (recommended), OR suitable ball peen hammer
Soft face hammer
Screwdrivers
Pliers and Channel Locks
Side cutter type cutting pliers
Pointed Heel bars (recommended), OR pry bars
Cotter pin assortment
Tie wire and/or plastic zip ties
DO NOT attempt installation unless you have everything on this list or suitable substitutes for the
recommended tools.
Page 5
Suspension Lift Kit
99-Newer Dakota with Rack and Pinion Steering
Parts List
(2) Upper control arm drop down brackets (left
and right)
(1) Steering idler bracket (Welded ¾” heims)
(1) Rear lower control arm cross member
(2) Torsion bar cross member drop down
brackets
(2) Front lower control arm drop brackets
(1) Torsion bar cross member
(1) Front lower control arm cross member (rack
and pinion drop)
(2) Rear sway bar end links
(1) Driver side differential drop bracket
(2) Rear Hangers (NOT FOR DURANGO)
(1) Flip Kit for Durango
(1) Passenger side differential drop bracket
(1) E-brake relocate bracket
(1) Center differential drop bracket
Hardware List
*Pre Installed
(8) Rear sway bar bushings
(4) 3/4 OD x 9/16 ID x 1 1/2 sway bar bushing
sleeves
(2) Pancake bump stops
(2) Big soft cushion bump stops
(1) Set of sway front sway bar bushings with
hardware (Daystar # KU05014BK)
(2) Front sway bar 1" aluminum
(1) Hanger hardware kit
(6) 7/16"-14 x 1 1/4" Grade 8 hex bolt
(8)7/16 washers
(4) 7/16 crimp nuts
(4) 3/8"-16 x 2 1/4" Grade 8 hex bolt
(4) 3/8-16 nyloc nuts
(8)3/8 washers
(2) 1/2"-13 x 1 3/4" Grade 8 hex bolt
(14) 1/2"-13 x 1 1/2" Grade 8 hex bolt
(10) 1/2" -13 x 2 3/4" Grade 8 hex bolt
(4) 1/2"-13 x 4 1/2" Grade 8 hex bolt
(2) 1/2"-13 x 1 3/4 bolt tabs
(64) 1/2" washers
(32) 1/2"-13 crimp nuts
(4) 5/8"-11 x 4" Grade 8 hex bolt
(8)5/8 washers
(4) 5/8-11 nyloc nuts
**Not Included**
(2) 1930LL REAR SHOCKS (4.5)
RETAIN STOCK FRONT SHOCKS
Page 6
Suspension Lift Kit
99-Newer Dakota with Rack and Pinion Steering
Installing Front Kit
1
Disconnect Battery.
2
Remove upper shock nuts and bushings.
3
Remove wheels when vehicle is properly lifted from the ground and secure with jack stands.
4
Release tension from torsion bars and remove (lower a-arm has dowel pin keeping torsion bars in,
tap dowel pin)
5
Remove brake calipers and tie up off front of frame (Don’t allow brakes to hang from brake lines).
6
Remove sway bar from under lower control arms.
7
Remove CV axles, spindles, and upper and lower control arms.
8
Unbolt front driveline from front differential and tie up to frame.
9
Remove front differential.
10
Unbolt rack and pinion and remove.
11
FRONT SUSPENSION SHOULD BE COMPLETELY REMOVED BEFORE GOING TO THE NEXT STEP.
12
Using a plasma cutter or sawzall cut and remove droop/bump stop from both drivers and
passengers side of frame. Also remove the top inner 1/2 in of metal where the lower a arm mount
meets the frame to clear the upper a arms when installed with the new drop down brackets.
Page 7
Suspension Lift Kit
99-Newer Dakota with Rack and Pinion Steering
13
Using a grinder clean area so frame is smooth. Spray with paint or sealant to prevent rust.
14
DO NOT TIGHTEN ANY OF THE LIFT KIT UNLESS NOTED UNTIL YOU HAVE ALL FACTORY
SUSPENSION HUNG, ADJUSTMENT WILL BE NEEDED BEFORE TIGHTENING.
15
Hang upper a-arm drop down brackets along with integrate shock relocaters using (2) ½ x 1 ½
bolts, washers and crimp nuts, drill ½ holes into inner side of rear a-arm pockets and use ½ x1 ½
bolts, washers and crimp nuts to attach a-arm drop bracket ear to inner side of rear a-arm pocket
and TIGHTEN.
..
16
Hang front lower a-arm drop brackets (part C) and drill ½ hole upwards through front frame cross
member, insert ½ bolt tabs into front cross member and down through drop brackets, put ½
washer and ½ crimp nuts on bolt tab and tighten. If the space between the new lower a arm
mounting points is not equal to the stock distance then you will need to add washers between the
frame and the drop down bracket until the holes are lined up.
..
17
Install front lower a-arm cross member/rack and pinion drop (part D) between front lower a-arm
drop brackets (part C) (as seen in illustration), using 7/16 x 1 ¼ bolts, washers and crimp nuts (4
bolts are for the front and 2 are for the middle rear bolt holes)
Page 8
Suspension Lift Kit
99-Newer Dakota with Rack and Pinion Steering
18
Using the 2 aluminum sway bar blocks (part L) and the new sway bar bushings and 3/8 x2 ¼ bolts,
washers and lock nuts install sway bar to rear of front lower a-arm drop down brackets (parts
C)(the aluminum blocks are drilled to go over the 2 rear 7/16 bolts you installed in step 17).
..
19
Install rack and pinion (factory fluid lines may need to be slightly tweaked) using supplied 5/8 bolts,
washers and crimp nuts. ((2) 5/8 bolts are for rack and pinion and the other 2 are for the factory
location to bolt rack/pinion drop (part D))
..
20
Install steering extension at the end of the steering column. Leave the stock u joint on the rack.
Be sure not to turn the steering wheel as you may damage the clock spring.
..
21
Install all front differential drop down brackets (parts I, J, K as they appear in the illustration) and
front differential using ½ x2 ¾ bolts, washers, and crimp nuts.
Page 9
Suspension Lift Kit
99-Newer Dakota with Rack and Pinion Steering
22
Install rear lower a-arm drop down cross member (part H) (install pancake bumpstops to top of
rear cross member and soft cushion bumpstops to lower part of cross member).
23
Install all factory front suspension to factory torque specifications (now you can TIGHTEN all
suspension).
Page 10
Suspension Lift Kit
99-Newer Dakota with Rack and Pinion Steering
24
To install new torsion bar cross member (part N) you will need to draw a straight line from center
of old cross member to bottom of frame, center cross member drop down brackets (parts M) and
drill (2) ½ holes up into lower frame rails, install drop down brackets and new torsion bar cross
member using ½ x 1 ½ bolts, washers and crimp nuts.
Page 11
Suspension Lift Kit
99-Newer Dakota with Rack and Pinion Steering
INSTALLING REAR KIT (The Durango kit will use an axle relocater “Flip Kit,” and no hangers)
1
Remove clips from old brake line bracket located on inside of frame.
2
Remove factory shocks and sway bar end links (DO NOT UNDO WITHOUT REAR END BEING
SUPPORTED)
3
For 4” lift only remove the rear hangers.
4
Bolt on new hangers with 7/16 inch bolts supplied in kit.
5
Remove rear shackle, invert and flip then reinstall with factory hardware to new rear spring
hanger.
6
Mount new e brake bracket to frame with supplied hardware. You must drill 1/2 inch hole in
frame.
7
Loosen but to not remove U bolts holding rear springs to the axle. Retighten. This is to relieve
any bind in the leaf springs.
8
Install sway bar extensions with factory hardware.
Page 12
Suspension Lift Kit
99-Newer Dakota with Rack and Pinion Steering
9
Install new shocks.
10 Install wheels and place vehicle on the ground. Torque lower control arm pivot bolts with the
vehicle resting on the ground. CHECK ALL FLEXIBLE BRAKE LINES making sure they are clear
of moving parts when the suspension cycles up and down. Make preliminary adjustments to
camber and toe-in as needed to get front wheels visually straight. Recheck all fasteners and
components again to make sure everything is tight. REMEMBER TO TORQUE THE LUG NUTS.
Reconnect battery.
11 Test drive vehicle at speed and listen for noises. Drive vehicle in different conditions while
turning in drive and reverse to check tire clearance, and trim plastic bumper valance if
necessary. Engage 4WD in low and high. Have a QUALIFIED ALIGNMENT SPECIALTY SHOP
reset the front-end alignment to correct specification. DO NOT drive vehicle more than 15
miles before having the alignment checked by a qualified shop. Re-torque wheels after 200
miles and recheck all lift kit hardware after 3000 miles.
Page 13