1
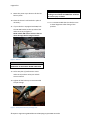
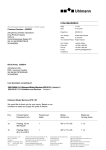
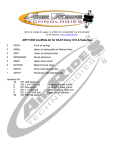
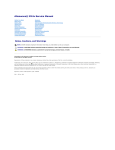
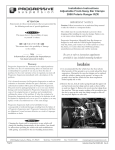
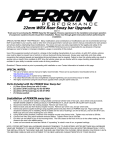
Page 1 of 2
Superior Engineering
Installation Instructions
Part Description: Nissan GQ/GU Super Flex Radius
Arm
Part Nos: SUPRARM*****
499 Uhlmann Rd
Burpengary QLD 4505
Australia
NOTE: Read and understand these Installation Instructions before beginning the installation
process. Retain these installation Instructions for future reference.
It is recommended this item is installed by a Qualified Person.
Kit Includes:
QTY
1
1
2
1
1
2
1
DESCRIPTION
Long Radius Arm
Short Radius Arm
Superflex Adaptor Plates
M14X 100mm Bolt
M14 Nylock Nut
M16 x 100mm Bolts
Crush Bar
mushroom bushes and steel washer’s in
there correct position then loosely fit the
M16 nut. Refer to figure 1 for assembly.
NOTE: working on one side at a time can
make installation easier.
Check shock length after fitting item, as they
may no longer be long enough to suit the
suspension travel.
CAUTION
Please ensure all bolts are tightened to
correct torque setting. Recheck in 500km.
It is Recommended the vehicle be wheel
aligned after fitting this item.
1. Chock wheels front and rear with vehicle
in gear and handbrake on.
2. Remove the tie rod and sway bar as per
vehicle services manual. If fitting the off
road series Superflex Arm the whole sway
bar assembly will need to be removed,
including swaybar mounts.
3. Place jack under the pinion to hold the
diff in position.
Figure 1: Mushroom Bush Assembly
5. Then push the front of the arm up into
the factory mounting spot on the diff
Reuse the OEM M16 x 90mm bolts. NOTE:
that front bolts may not be able to be
fitted, if so just fit either top or bottom
bolt for the moment.
6. Remove passenger side factory radius arm
and fit the new short radius arm following
the same procedure as the driver’s side.
7. While supporting the radius arm in place
fit the Superflex Adapter Plates either side
of the radius arm. The crush bar fits in
between the two plates and the supplied
M16 x 100mm bolts fits in the front.
4. Remove the factory radius arm on the
8. The other supplied M16 x100mm bolt is
driver’s side following the vehicle services
for the top rear passenger hole and the
manual and replace with the long radius
M14 x 100mm bolt fits in the lower rear
arm, Start by fitting the rear of the arm in
hole.
to the factory mounting spot on the
chassis making sure to have the
© Superior Engineering 499 Uhlmann Rd Burpengary QLD 4505 Australia
Page 2 of 2
9. Move the pinion up or down to fit the last
bolts in place.
10. Place the driver’s side last bolt in place if
necessary.
11. If your vehicle in equipped with ABS, bolt
the OE ABS bracket to the top side of the
radius arms as per figure 2.
NOTE: Check ABS sensor lines are free to
move through the full range of travel.
WARNING
Caution should always be taken when
working around brake and ABS lines as failure
can cause injury or death.
14. It is recommended that the vehicle recive
a wheel alignment after fitting of this
product.
Figure 2: ABS lines
NOTE
ABS LINES HOLES DO NOT COME STANDARD
AND MUST BE OPTIONED WHEN ORDERING.
12. Re fit sway bar (if performance series
radius arms) and tie rod as per vehicle
service manual.
13. Tighten all the bolts up to recommended
torque settings
Figure 3: shows plates fitted on passenger side
© Superior Engineering 499 Uhlmann Rd Burpengary QLD 4505 Australia