1
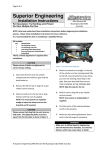
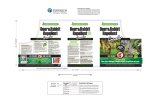
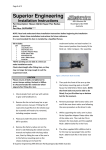
Page 1 of 2
Superior Engineering
Installation Instructions
Part Description: Toyota 80/105# Castor Bushes
Part Nos: LCRCB2DR
499 Uhlmann Rd
Burpengary QLD 4505
Australia
NOTE: Read and understand these Installation Instructions before beginning the
installation process. Retain these installation Instructions for future reference.
It is recommended this item is installed by a Qualified Person.
Kit Includes:
QTY
4
DESCRIPTION
Castor Bushes
6. Using the template on the last page
mark the positioning for the bush.
NOTE: working on one side at a time
can make installation easier.
A shop press is required to install
castor bushes.
WARNING
Check measurements of the template
as different printer setting produce
different size printable area
CAUTION
Please ensure all bolts are tightened to
correct torque setting. Recheck in 500km.
For correct alignment the centres of the
holes should be 185mm apart.
7. Using the shop press and correct dies
and lining the bush up so the inner
sleeve is closest to the marks made in
step 6, press the bushes into the
radius arm.
1. Start with the vehicle on a hoist and
the diff supported.
8. Reinstall the radius arm back into the
vehicle in the reverse as before.
NOTE: The front bolt may not line up
correctly due to the difference in
castor, leave this bolt out for now and
secure all other bolts and nuts
2. Remove the tie rod as per Vehicle
service manual
3. Working on the passenger side
remove factory M16 nut that hold the
radius arm to the chassis.
4. Next remove the two (2) M16 Bolts
that attach the radius arm to the diff,
and remove the radius arm from the
vehicle.
5. Using a shop press and the correct
dies, press the old bushes and
discard.
WARNING
Shop presses can cause substantial
damage to bushes, radius arms and
persons if used incorrectly
9. Once the passenger side is secure
proceed to the driver’s side, the
procedure is the same as the
passenger side from step 3.
10. Once the driver’s side arm is
reinstalled you should be able to fit the
front bolt in the passenger.
11. Reinstall tie rod as per vehicle service
manual.
12. Double check torque setting of all bolts
and nuts.
© Superior Engineering 499 Uhlmann Rd Burpengary QLD 4505 Australia
Page 2 of 2
© Superior Engineering 499 Uhlmann Rd Burpengary QLD 4505 Australia