1
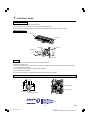
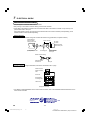
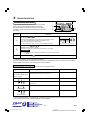
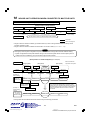
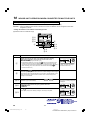
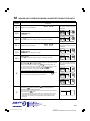
INSTALLATION MANUAL
MANUEL D’INSTALLATION
INSTALLATIONS-HANDBUCH
MANUALE D’INSTALLAZIONE
MANUAL DE INSTALACIÓN
MANUAL DE INSTALAÇÃO
INSTALLATIEHANDLEIDING
ΕΓΧΕΙΡΙ∆ΙΟ ΕΓΚΑΤΑΣΤΑΣΗΣ
AIR CONDITIONER (SPLIT TYPE)
CLIMATISEUR (TYPE SPLIT)
KLIMAGERÄT (SPLIT-SYSTEM)
CONDIZIONATORE D’ARIA (TIPO MULTIAMBIENTI)
APARATO DE AIRE ACONDICIONADO (TIPO SPLIT)
AR CONDICIONADO (TIPO SPLIT)
AIRCONDITIONER (GESPLITST TYPE)
ΚΛΙΜΑΤΙΣΤΙΚΟ ΜΗΧΑΝΗΜΑ (∆ΙΑΙΡΟΎΜΕΝΟΣ ΤΎΠΟΣ)
<High-Wall Type>/<Type mural haut>
<Wandmontierter Typ>/<Tipo a condotto nascosto>
<Modelo de pared>/<Tipo Mural>
<Hoog-Wandtype>/<Τύττος Υψηλού Τοίχου>
Heat Pump Model/Modèle à thermopompe
Geräte mit Heizung/Modello con pompa di riscaldamento
Modelo con bomba de calor/Modelo de bomba térmica
Model met warmtepomp/Μοντέλο µε Αντλία Θερµ*τητας
Indoor Unit/Unité intérieure
Raumeinheit/Unità interna
Unidad interior/Unidade interior
Binnenunit/Εσωτερική Μονάδα
RAV-SM561KRT-E
RAV-SM801KRT-E
3
Please read this Installation Manual carefully before installing the Air Conditioner.
• This Manual describes the installation method of the indoor unit.
• For installation of the outdoor unit, follow the Installation Manual attached to the
outdoor unit.
Veuillez lire attentivement ce Manuel d’installation avant d’installer le climatiseur.
• Ce manuel décrit la procédure d’installation de l’unité intérieure.
• Pour installer l’unité extérieure, reportez-vous au Manuel d’installation fourni avec
l’unité extérieure.
Bitte lesen Sie dieses Handbuch sorgfältig, bevor Sie mit der Installation des Klimagerätes beginnen.
• In diesem Handbuch wird die Installation der Raumeinheit beschrieben.
• Um die Außeneinheit zu installieren, folgen Sie den Anweisungen in dem Handbuch, das der Außeneinheit beiliegt.
Prima di installare il condizionatore d’aria, leggere con attenzione questo manuale d’installazione.
• Questo manuale descrive il metodo d’installazione dell’unità interna.
• Per l’installazione dell’unità esterna, fare riferimento al manuale d’installazione fornito insieme all’unità esterna.
Lea atentamente este Manual de instalación antes de proceder a la instalación del aparato de aire acondicionado.
• Este manual describe el método de instalación de la unidad interior.
• Para la instalación de la unidad exterior, consulte el Manual de instalación que acompaña a la unidad exterior.
Leia atentamente o presente Manual de Instalação antes de instalar o Ar Condicionado.
• O presente manual descreve o método de instalar a unidade interior.
• Para a instalação de uma unidade exterior, siga o Manual de Instalação que acompanha a unidade exterior.
Lees deze installatiehandleiding zorgvuldig door voordat u de airconditioner gaat installeren.
• Deze installatiemethode beschrijft de installatiemethode van de binnenunit.
• Zie voor de installatie van de buitenunit, de installatiehandleiding bij de buitenunit.
Παρακαλώ διαßάστε προσεχτικά το Ενχειρίδιο Ενκατάστασης πριν απ* την ενκατασταση του Κλιµατιστικού.
• Το παρ*ν Ενχειρίδιο περινράφει τη µέθοδο ενκατάστασης της εσωτερικής µονάδας.
• Για την ενκατάσταση της εξωθερικής µονάδας, ακολουθήστε το Ενχειρίδιο Ενκατάστασης που συνοδεύει
την εξωτερική µονάδα.
Toshiba 1074007701_COVER
3
7/16/04, 13:38
TOSHIBA RAV-SM561KRT-E (EN) 1074007701
ADOPTION OF NEW REFRIGERANT
• This Air Conditioner is a new type which adopts a new refrigerant HFC (R410A) instead of the conventional
refrigerant R22 in order to prevent destruction of the ozone layer.
UTILISATION DU NOUVEAU REFRIGERANT
• Ce climatiseur est d’un type inédit qui utilise le nouveau réfrigérant HFC (R410A) au lieu du réfrigérant
traditionnel R22, afin d’éviter la destruction de la couche d’ozone.
EINFÜHRUNG EINES NEUEN KÜHLMITTELS
• Dies ist ein neuartiges Klimagerät. Anstatt des herkömmlichen Kühlmittels R22 verwendet es das neue
ozonschicht-schonende HFC Kühlmittel R410A.
ADOZIONE DI UN NUOVO REFRIGERANTE
• Questo condizionatore d’aria è di un tipo nuovo che adotta un nuovo refrigerate HFC (R410A) al posto del
refrigerante convenzionale R22, per prevenire la distruzione dello strato di ozono dell’atmosfera terrestre.
ADOPCIÓN DE NUEVO REFRIGERANTE
• Este aparato de aire acondicionado es un modelo reciente que incorpora el nuevo refrigerante HFC (R410A) en
lugar del refrigerante convencional R22 para así evitar daños en la capa de ozono.
ADOPÇÃO DO NOVO REFRIGERANTE
• Este ar condicionado é um modelo novo que adopta um novo refrigerante HFC (R410A) em vez do refrigerante
convencional R22 para evitar a destruição da cama de ozono.
TOEPASSING VAN EEN NIEUW KOELMIDDEL
• Deze airconditioner is een nieuwe type dat werkt met een nieuw koelmiddel HFC (R410A) in plaats van met het
conventionele koelmiddel R22, als bijdrage om de aantasting van de ozonlaag te reduceren.
YIOΘETHΣH NEOY ΨYKTIKOY
• To παρv Kλιµατιστικ είναι νέος τύπος που υιοθετεί νέο ψυκτικ HFC (R410A) στη θέση του
συµβατικού ψυκτικού R22 προκειµένου να βοηθήσει στην προστασία του ζοντος.
3
Toshiba 1074007701_TOC
2
7/16/04, 13:38
TOSHIBA RAV-SM561KRT-E (EN) 1074007701
REFRIGERANT PIPING ......................................................... 8
ELECTRICAL WORK ........................................................... 11
TEST RUN ............................................................................ 14
TROUBLESHOOTING .......................................................... 15
INDOOR UNIT OPERATION WHEN
CONNECTED TO MULTIPLE UNITS ................................... 17
EΛΛΗΝΙΚΑ
NEDERLANDS
PORTUGUÊS
ESPAÑOL
ITALIANO
DEUTSCH
FRANÇAIS
6
7
8
9
10
ENGLISH
CONTENTS
Accessory parts and parts to be procured locally .................... 1
1 PRECAUTIONS FOR SAFETY .............................................. 2
2 INSTALLATION PROCEDURE .............................................. 4
3 SELECTION OF INSTALLATION PLACE ............................. 5
4 INSTALLATION OF INDOOR UNIT ....................................... 5
5 DRAIN PIPING WORK ........................................................... 6
3
Toshiba 1074007701_TOC
3
7/16/04, 13:39
TOSHIBA RAV-SM561KRT-E (EN) 1074007701
Accessory parts and parts to be procured locally
❑ Accessory parts
Part
No.
Part name
Q’ty
Part
No.
Shape
Part name
Q’ty
1
Installation plate
1
6
Service contact
address label
1
2
Installation Manual
1
7
Wireless remote
control
1
3
Owner’s Manual
1
8
Remote control
holder
1
4
Mounting screw
∅4 mm x 25 mm
8
9
Screw for remote
control holder
2
5
Pattern paper
1
Shape
Wired remote controller is an optional part sold separately.
❑ Parts to be procured locally
Connecting pipe (Liquid side)
(6.35 mm (diam.), Nominal (diam.) 1/4" thick 0.8 mm)
RAV-SM561KRT-E
Connecting cable
H07RN-F or 245IEC66 (1.5 mm2 or more)
Thermal insulation for refrigerant pipe
(10 mm or more, thermal insulating foam polyethylene)
(9.52 mm (diam.), Nominal (diam.) 3/8" thick 0.8 mm)
RAV-SM801KRT-E
Thermal insulation for drain pipe
(10 mm or more, foam polyethylene)
Connecting pipe (Gas side)
(12.7 mm (diam.), Nominal (diam.) 1/2" thick 0.8 mm)
RAV-SM561KRT-E
Drain pipe (Outer 16 mm (diam.))
Tapes
(15.9 mm (diam.), Nominal (diam.) 5/8" thick 1.0 mm)
RAV-SM801KRT-E
Grounding cable (2.0 mm (diam.) or more)
3
1
EN
Toshiba 1074007701(01EN)_P01-10
2
7/16/04, 13:30
TOSHIBA RAV-SM561KRT-E (EN) 1074007701
PRECAUTIONS FOR SAFETY
ENGLISH
1
•
•
•
•
Ensure that all Local, National and International regulations are satisfied.
Read this “PRECAUTIONS FOR SAFETY” carefully before Installation.
The precautions described below include the important items regarding safety. Observe them without fail.
After the installation work, perform a trial operation to check for any problem.
Follow the Owner’s Manual to explain how to use and maintain the unit to the customer.
• Turn off the main power supply switch (or breaker) before the unit maintenance.
• Ask the customer to keep the Installation Manual together with the Owner’s Manual.
New refrigerant air conditioner installation
CAUTION
• THIS AIR CONDITIONER ADOPTS THE NEW HFC REFRIGERANT (R410A) WHICH DOES NOT DESTROY
OZONE LAYER.
The characteristics of R410A refrigerant are ; easy to absorb water, oxidizing membrane or oil, and its pressure
is approx. 1.6 times higher than that of refrigerant R22. Accompanied with the new refrigerant, refrigerating oil
has also been changed. Therefore, during installation work, be sure that water, dust, former refrigerant, or
refrigerating oil does not enter the refrigerating cycle.
To prevent charging an incorrect refrigerant and refrigerating oil, the sizes of connecting sections of charging
port of the main unit and installation tools are charged from those for the conventional refrigerant.
Accordingly the exclusive tools are required for the new refrigerant (R410A).
For connecting pipes, use new and clean piping designed for R410A, and please care so that water or dust does
not enter. Moreover, do not use the existing piping because there are problems with pressure-resistance force
and impurity in it.
To disconnect the appliance from main power supply
CAUTION
This appliance must be connected to the main power supply by means of a switch with a contact separation of
at least 3 mm.
The installation fuse (25A D type
) must be used for the power supply line of this conditioner.
WARNING
• Ask an authorized dealer or qualified installation professional to install/maintain the air conditioner.
Inappropriate installation may result in water leakage, electric shock or fire.
• Turn off the main power supply switch or breaker before attempting any electrical work.
Make sure all power switches are off. Failure to do so may cause electric shock.
• Connect the connecting cable correctly.
If the connecting cable is connected in a wrong way, electric parts may be damaged.
• When moving the air conditioner for the installation into another place, be very careful not to enter any
gaseous matter other than the specified refrigerant into the refrigeration cycle.
If air or any other gas is mixed in the refrigerant, the gas pressure in the refrigeration cycle becomes
abnormally high and it may resultingly causes pipe burst and injuries on persons.
• Do not modify this unit by removing any of the safety guards or by by-passing any of the safety
interlock switches.
• Exposure of unit to water or other moisture before installation may cause a short-circuit of electrical
parts.
Do not store it in a wet basement or expose to rain or water.
3
2
Toshiba 1074007701(01EN)_P01-10
3
EN
7/16/04, 13:30
TOSHIBA RAV-SM561KRT-E (EN) 1074007701
1
PRECAUTIONS FOR SAFETY
• After unpacking the unit, examine it carefully if there are possible damage.
• Do not install in a place that might increase the vibration of the unit.
• To avoid personal injury (with sharp edges), be careful when handling parts.
• Perform installation work properly according to the Installation Manual.
Inappropriate installation may result in water leakage, electric shock or fire.
• When the air conditioner is installed in a small room, provide appropriate measures to ensure that the
concentration of refrigerant leakage occur in the room does not exceed the critical level.
• Install the air conditioner securely in a location where the base can sustain the weight adequately.
• Perform the specified installation work to guard against an earthquake.
If the air conditioner is not installed appropriately, accidents may occur due to the falling unit.
• If refrigerant gas has leaked during the installation work, ventilate the room immediately.
If the leaked refrigerant gas comes in contact with fire, noxious gas may generate.
• After the installation work, confirm that refrigerant gas does not leak.
If refrigerant gas leaks into the room and flows near a fire source, such as a cooking range,
noxious gas might generate.
• Electrical work must be performed by a qualified electrician in accordance with the Installation Manual.
Make sure the air conditioner uses an exclusive power supply.
An insufficient power supply capacity or inappropriate installation may cause fire.
• Use the specified cables for wiring connect the terminals securely fix. To prevent external forces
applied to the terminals from affecting the terminals.
• Conform to the regulations of the local electric company when wiring the power supply.
Inappropriate grounding may cause electric shock.
• Do not install the air conditioner in a location subject to a risk of exposure to a combustible gas.
If a combustible gas leaks, and stays around the unit, a fire may occur.
3
3
EN
Toshiba 1074007701(01EN)_P01-10
4
7/16/04, 13:30
TOSHIBA RAV-SM561KRT-E (EN) 1074007701
2
INSTALLATION PROCEDURE
Installation diagram of indoor unit
Wall
65 mm or more
For rear left and side pipe exit
170
or m mm
ore
Hook
Insulate the refrigerant pipes
separately with insulation, not
together.
1 Installation
plate
Hook
Insert the cushion between the
indoor unit and wall, and lift indoor
unit to make work easier.
170
or m mm
ore
Min. 6 mm thick heat resisting
polyethylene foam
Do not allow the drain hose to sag.
Air
Cut the piping
hole sloped
slightly
The auxiliary piping can be
connected the left, rear left, rear,
right or bottom.
filte
r
Pipe
insulation
Right
Make sure to run the drain hose
sloped downward.
Rear
Bottom
Mounting screw
Mounting the installation plate
Rear left
55
Left
65
Hook
For installation of the indoor unit,
use the paper template included.
170
120
0
80 100
Installation
plate
180
100mm
100mm
Indoor unit
Hook
Pipe hole
Hook
Indoor unit
Pipe hole
Thread
Weight
Mounting screw
When the installation plate is directly mounted on the wall
1. Securely fix the installation plate to the wall by screwing it through the upper and lower fixing holes.
2. To mount the installation plate on a concrete wall with anchor bolts, utilize the anchor bolt holes as illustrated in
the above figure.
3. Attach the installation plate horizontally to the wall.
CAUTION
When installing the installation plate with mounting screw, do not use the anchor bolt hole.
Otherwise the unit may fall down and result in personal injury and property damage.
∅5 mm hole
Mounting screw
∅4 x 25 mm
Anchor bolt
Projection
15 mm or less
Clip anchor
(local parts)
3
Toshiba 1074007701(01EN)_P01-10
5
4
EN
7/16/04, 13:30
TOSHIBA RAV-SM561KRT-E (EN) 1074007701
3
SELECTION OF INSTALLATION PLACE
WARNING
• Install the air conditioner where there is sufficient strength to withstand the weight of the unit.
If the strength is not sufficient, the unit may fall down resulting in injury.
CAUTION
Upon approval of the customer, install the air conditioner in a place that satisfies the following
conditions.
• Place where the unit can be installed horizontally.
• Place where a sufficient servicing space can be ensured for safe maintenance and check.
• Place where drained water will not cause any problem.
Avoid installing in the following places.
• Place exposed to air with high salt content (seaside area), or place exposed to large quantities of sulfide gas
(hot spring). (Should the unit be used in these places, special protective measures are needed.)
• Place exposed to oil, vapor, oil smoke or corrosive gas.
• Place where organic solvent is used nearby.
• Place close to a machine generating high frequency.
• Place where the discharged air blows directly into the window of the neighboring house. (For outdoor unit)
• Place where noise of the outdoor unit is easy to transmit.
(When installing the air conditioner on the boundary with the neighbor, pay due attention to the level of noise.)
• Place with poor ventilation.
• Where the ceiling height is more than 3 m.
• Where the floor/wall/ceiling structure is unable to support the weight of the unit.
4
INSTALLATION OF INDOOR UNIT
WARNING
• Install the air conditioner certainly at a place to sufficiently withstand the weight.
If the strength is insufficient, the unit may fall down resulting in human injury.
• Perform a specified installation work to guard against an earthquake.
An incomplete installation can cause accidents by the units falling and dropping.
Locate the unit so as to provide uniform circulation of chilled air.
Avoid locating the unit as shown in the bad-marked figures below:
Good location
Evenly hot or cooled
Bad location
Shaded area well hot or cooled
Bad location
Shaded area well hot or cooled
If a good location is not possible, use a fan to circulate the air evenly throughout the room.
Toshiba 1074007701(01EN)_P01-10
3
5
EN
6
7/16/04, 13:30
TOSHIBA RAV-SM561KRT-E (EN) 1074007701
5
DRAIN PIPING WORK
Piping and drain hose installation
In case of right-side exit
• Cut out the knockout portion by the slits with a knife or pair of wire cutters as necessary.
Slit (Body right)
In case of downward pipe exit
• Cut out the knockout portion by the slits with a knife or pair of wire cutters as necessary.
Slit (Body right)
Piping via left-hand connection
Bend the connecting pipe so that it is laid within 43 mm above the wall surface. If the connecting pipe is laid
exceeding 43 mm above the wall surface, the indoor unit could be unstable when set on the wall. When bending the
connecting pipes, always use a suitable bending tool to avoid damaging the pipes.
Bend the connection pipe within a radius of 30 mm.
To connect the pipe after installation of unit (figure)
(To the front of the flare)
465 mm
365 mm
Liquid side
Gas side
43 mm
Outward form of indoor unit
R 30 mm
Use the handle of a screwdriver, etc.
NOTE
If the pipe is bent incorrectly, the indoor unit could be unstable on the wall.
After passing the connecting pipe through the pipe hole, connect the connecting pipe to the auxiliary pipes and
insulate as necessary.
3
6
Toshiba 1074007701(01EN)_P01-10
7
EN
7/16/04, 13:30
TOSHIBA RAV-SM561KRT-E (EN) 1074007701
5
DRAIN PIPING WORK
CAUTION
• Bind the auxiliary pipes (two) and connecting cable with tape tightly. In case of left-side pipe exit and rear-left
exit, bind the auxiliary pipes (two) only with facing tape.
Indoor unit
Connecting cable
Auxiliary pipes
Drain hose
Installation plate
• Carefully arrange pipes so that any pipe does not stick out of the rear plate of the indoor unit.
• Carefully connect the auxiliary pipes and connecting pipes to each other and cut off the insulating tape wound
on the connecting pipe to avoid double-taping at the joint, then seal the joint with vinyl tape, etc.
• In order to reduce the possibility of condensed water being produced within the indoor unit, make sure to
insulate both the connecting pipes.
(Use a suitable form of insulation material specifically design designed for refrigeration pipe work.)
• When bending a pipe, ensure care is taken to prevent pipe damage.
Drainage
1. Run the drain hose sloped downwards.
Do not rise the
drain hose.
Do not form the drain hose
into the waved shape.
50 mm
or more
Do not put the drain hose
end into the drainage ditch.
Do not put the drain
hose end into water.
2. It is not possible to add water to the drain pan to confirm correct drainage. To do this, the unit must be operated
in the COOL mode.
3. When connecting extension drain hose, insulate the connecting part of extension drain hose with pipe insulation.
Pipe insulation
Drain hose
Inside the room
Extension drain hose
CAUTION
Arrange the drain pipe to allow proper drainage from the unit. Incorrect drainage can result in condensation
problems.
This structure of this air conditioner is designed
condensed water, which may form on the back of the
indoor unit, into the drain pan.
Therefore, do not store the power cables and other
parts within the drain guide.
Wall
Drain guide
Space for pipes
3
7
EN
Toshiba 1074007701(01EN)_P01-10
8
7/16/04, 13:30
TOSHIBA RAV-SM561KRT-E (EN) 1074007701
6
REFRIGERANT PIPING
Refrigerant piping
1. Use copper pipe with 0.8 mm or more thickness.
(In case pipe size is Ø15.9, with 1.0 mm or more.)
2. Flare nut and flare works are also different from those of the conventional refrigerant.
Take out the flare nut attached to the main unit of the air conditioner, and use it.
CAUTION
IMPORTANT 4 POINTS FOR PIPING WORK
1. Remove dust and moisture from the inside of the connecting pipes.
2. Tight connection (between pipes and unit)
3. Evacuate the air in the connecting pipes using VACUUM PUMP.
4. Check the gas leakage. (Connected points)
Permissible piping length and head
They vary according to the outdoor unit. For details, refer to the Installation Manual attached to the outdoor unit.
Flaring
Insert a flare nut into the pipe, and flare the pipe.
As the flaring sizes of R410A differ from those of refrigerant R22, the flare tools newly
manufactured for R410A are recommended.
However, the conventional tools can be used by adjusting projection margin of the
copper pipe.
B
• Projection margin in flaring : B (Unit : mm)
Rigid (Clutch type)
R410A tool used
Outer diam. of copper pipe
6.4 to 15.9
Conventional tool used
R410A
R22
R410A
R22
0 to 0.5
(Same as left)
1.0 to 1.5
0.5 to 1.0
Imperial (Wing nut type)
Outer diam. of copper pipe
R410A
R22
6.4 or 9.5
1.5 to 2.0
1.0 to 1.5
12.7 or 15.9
2.0 to 2.5
1.5 to 2.0
• Flaring diam. meter size : A (Unit : mm)
A +– 00.4
Outer diam. of copper pipe
R410A
R22
6.4
9.1
9.0
9.5
13.2
13.0
12.7
16.6
16.2
15.9
19.7
19.2
* In case of flaring for R410A with the conventional flare tool, pull it out approx. 0.5 mm
more than that for R22 to adjust to the specified flare size.
The copper pipe gauge is useful for adjusting projection margin size.
3
Toshiba 1074007701(01EN)_P01-10
8
9
A
EN
7/16/04, 13:30
TOSHIBA RAV-SM561KRT-E (EN) 1074007701
6
REFRIGERANT PIPING
Tightening connection
CAUTION
• Do not apply excessive torque. Otherwise, the nut may crack depending on the conditions.
(Unit : N•m)
Outer diam. of copper pipe
Tightening torque
6.4 mm (diam.)
14 to 18 (1.4 to 1.8 kgf•m)
9.5 mm (diam.)
33 to 42 (3.3 to 4.2 kgf•m)
12.7 mm (diam.)
50 to 62 (5.0 to 6.2 kgf•m)
15.9 mm (diam.)
68 to 82 (6.8 to 8.2 kgf•m)
• Tightening torque of flare pipe connections
Pressure of R410A is higher than that of R22. (Approx. 1.6 times) Therefore, using a torque wrench, tighten the
flare pipe connecting sections which connect the indoor and outdoor units of the specified tightening torque.
Incorrect connections may cause not only a gas leak, but also a trouble of the refrigeration cycle.
Flare at indoor unit side
Flare at outdoor unit side
Align the centers of the connecting pipes and tighten the flare nut as far as possible with your fingers. Then tighten
the nut with a spanner and torque wrench as shown in the figure.
Half union
Flare nut
Externally
threaded side
Internally
threaded side
Use a wrench to secure.
Use a torque wrench to tighten.
3
9
EN
Toshiba 1074007701(01EN)_P01-10
10
7/16/04, 13:30
TOSHIBA RAV-SM561KRT-E (EN) 1074007701
6
REFRIGERANT PIPING
Piping with outdoor unit
• Shape of valve differs according to the outdoor unit.
For details of installation, refer to the Installation Manual of the outdoor unit.
Air purge
Using a vacuum pump, perform vacuuming from the charge port of valve of the outdoor unit.
For details, follow to the Installation Manual attached to the outdoor unit.
• Never use the refrigerant sealed in the outdoor unit for air purge.
REQUIREMENT
For the tools such as charge hose, etc., use those manufactured exclusively for R410A.
Refrigerant amount to be added
For addition of the refrigerant, add refrigerant “R410A” referring to the attached Installation Manual of outdoor unit.
Be sure to use a scale to charge the refrigerant of specified amount.
REQUIREMENT
• Charging an excessive or too little amount of refrigerant causes a trouble of the compressor.
Be sure to charge the refrigerant of specified amount.
• A personnel who charged the refrigerant should write down the pipe length and the added refrigerant amount
in the nameplate attached to the service panel of the outdoor unit. It is necessary to troubleshoot the
compressor and refrigeration cycle malfunction.
Open the valve fully
Open the valve of the outdoor unit fully. A 4 mm hexagonal wrench is required for opening the valve.
For details, refer to the Installation Manual attached to the outdoor unit.
Gas leak check
Check with a leak detector or soap water whether gas leaks or not, from the pipe connecting section or cap of the
valve.
REQUIREMENT
Use a leak detector manufactured exclusively for HFC refrigerant (R410A, R134a, etc.).
Thermal insulation process
Apply thermal insulation for the pipes separately at liquid side and gas side.
For the thermal insulation to the pipes at gas side, be sure to use the material with heat-resisting temperature
120°C or higher.
Using the attached thermal insulation material, apply the thermal insulation to the pipe connecting section of the
indoor unit securely without gap.
REQUIREMENT
Apply the thermal insulation to the pipe connecting section of the indoor unit securely up to the root without
exposure of the pipe. (The pipe exposed to the outside causes water leak.)
3
10
Toshiba 1074007701(01EN)_P01-10
11
EN
7/16/04, 13:30
TOSHIBA RAV-SM561KRT-E (EN) 1074007701
7
ELECTRICAL WORK
WARNING
1. Using the specified cables, ensure to connect the wires, and fix wires securely so that the external
tension to the cables do not affect the connecting part of the terminals.
Incomplete connection or fixation may cause a fire, etc.
2. Be sure to connect earth wire. (Grounding work)
Do not connect the earth wire to gas pipe, city water pipe, lightning rod, or the earth wire of telephone.
Incomplete grounding causes an electric shock.
3. For electric work, strictly follow the Local Regulation in each country and the Installation Manual, and
use an exclusive circuit.
Capacity shortage of power circuit or incomplete installation may cause an electric shock or a fire.
CAUTION
• This indoor unit has no power cord.
• If incorrect/incomplete wiring is carried out, it will cause an electrical fire or smoke.
• Be sure to install an earth leakage breaker that is not tripped by shock waves.
If an earth leakage breaker is not installed, an electric shock may be caused.
• Be sure to use the cord clamps attached to the product.
• Do not damage or scratch the conductive core and inner insulator of power and inter-connecting cables when
peeling them.
• Be sure to comply with local regulations on running the wire from outdoor unit to indoor unit (size of wire and
wiring method etc.)
• Use the power cord and Inter-connecting cable of specified thickness, type, and protective devices required.
REQUIREMENT
• For power supply wiring, strictly conform to the Local Regulation in each country.
• For wiring of power supply of the outdoor units, follow the Installation Manual of each outdoor unit.
• Never connect 220 – 240V power to the terminal blocks (A, B, etc.) for control wiring.
(Otherwise, the system will fail.)
• Perform the electric wiring so that it does not come to contact with the high-temperature part of the pipe.
The coating may melt resulting in an accident.
• After connecting cables to the terminal blocks, provide a trap and fix cables with the cable clamp.
• Run the refrigerant piping line and control wiring line in the same line.
• Do not turn on the power of the indoor unit until vacuuming of the refrigerant pipes completes.
How to wire
1. Connect the connecting cable to the terminal as identified with their respective numbers on the terminal block
of indoor and outdoor unit. H07RN-F or 245IEC66 (1.5 mm2 or more)
2. Mount a leakage breaker.
3. Insulate the unsheathed redundant cords (conductors) with tape.
4. For inter-unit wiring, do not use a wire jointed to another on the way.
5. Fix the cable with cord clamp.
3
11
EN
Toshiba 1074007701(01EN)_P11-22
12
7/16/04, 13:31
TOSHIBA RAV-SM561KRT-E (EN) 1074007701
7
ELECTRICAL WORK
Wiring between units
1. Connect the wires between the units correctly.
Errors made in the connections can result in the unit malfunctioning.
2. Connect the control wires between the outdoor unit and indoor unit as shown in the figure below :
Wiring connections
Air inlet grille
Front panel
2
1
Cord clamp
Earth line
Terminal cover
Screw
Screw
Connecting cable
Cabling
1. Remove a screw and then remove cover of the electric parts box.
2. Strip wire ends (10 mm).
3. Match wire colors with terminal numbers on indoor and outdoor units’ terminal blocks and firmly screw wires to
the corresponding terminals.
4. Connect the ground wires to the corresponding terminals.
5. Fix the cable with cord clamp.
6. Fix cover of the parts box and the terminal block surely with the fixing screws.
Make a loop on the cable for margin of the length so that the electric parts box can be taken out during servicing.
10
10
1 2 3
40
Grounding cable
30
Connecting cable
Earth line
Connecting cable
3
12
Toshiba 1074007701(01EN)_P11-22
13
EN
7/16/04, 13:31
TOSHIBA RAV-SM561KRT-E (EN) 1074007701
7
ELECTRICAL WORK
Wired remote controller cabling
• Strip off approx. 14 mm the cable to be connected.
• Non polarity, 2 core cable is used for cabling of the remote controller.
• Twist cable of the remote controller to be connected with cable of the remote controller unit (or sensor), and
press-fit them with a wire joint.
Wire joints (White: 2 pieces) are included in the attachments to the remote controller (sold separately) or the
wireless remote control kit (sold separately).
Cabling diagram
Never touch remote controller wiring with another 200–240V wiring. (Otherwise, the system will fail.)
Terminal block for
remote controller
cabling of indoor unit
Approx. 200 mm
W : White
B : Black
A
B
W
B
Remote controller cable
(Local procure)
Connecting part
Remote controller
unit or sensor part
Remote controller
unit or cable from
sensor part
Remote controller cabling
Cable from remote
controller unit
Wire joint
Wiring diagram
This wiring diagram is single combination, about twin combination see 17 page.
Remote controller
Remote controller
cable
A
B
1
2
3
1
2
3
L
N
Indoor side
Indoor/Outdoor
connecting cable
Outdoor side
(Single phase 220–240V)
• For details of cabling/installation of the wired remote controller, refer to the Installation Manual attached to in the
wired remote controller.
3
13
EN
Toshiba 1074007701(01EN)_P11-22
14
7/16/04, 13:31
TOSHIBA RAV-SM561KRT-E (EN) 1074007701
8
TEST RUN
Before test run
• Before turning on the power supply, carry out the following procedure.
1) Using 500V-megger, check 1MΩ or more exists between the terminal block 1 to 3 and the earth.
If 1MΩ or less is detected, do not run the unit. Do not apply to the remote controller circuit.
2) Check the valve of the outdoor unit being opened fully.
• To protect the compressor at activation time, leave power-ON for 12 hours or more be for operating.
How to execute a test run
Using the remote controller, operate the unit as usual.
For the procedure of the operation, refer to the attached Owner’s Manual.
A forced test run can be executed in the following procedure if the operation stops by thermo.-OFF.
(This method is limited to when wired remote controller is installed.)
In order to prevent a serial operation, the forced test run is released after 60 minutes have passed and returns to
the usual operation.
CAUTION
When the remote controller is used for the first time, it accepts an operation approx. 5 minutes after the power
supply has been turned on.
It is not a trouble, but is because the setup of the remote controller is being checked.
For the second power-ON time and after, approx. 1 minute is required to start the operation by the remote
controller.
NOTE
Do not use the forced test run for cases other than the test run because it applies an excessive load to the
devices.
3
14
Toshiba 1074007701(01EN)_P11-22
15
EN
7/16/04, 13:31
TOSHIBA RAV-SM561KRT-E (EN) 1074007701
8
TEST RUN
In case of wired remote controller
2, 4
3
1, 5
UNIT
SET
CL
Procedure
1
2
Description
Keep
button pushed for 4 seconds or more. [TEST] is displayed on the
display part and the selection of mode in the test mode is permitted.
TEST
Push
button.
At this time, all indoor unit’s displays flash.
Using
button, select the operation mode, [COOL] or [HEAT].
3
• Do not run the air conditioner in a mode other than [COOL] or [HEAT].
• The temperature controlling function does not work during test run.
• The detection of error is performed as usual.
4
(Wired remote controller display part is same as procedure 1.)
At this time, all indoor unit’s displays turn off.
5
([TEST] disappears on the display and the status returns to a normal.)
After the test run, push
Push
9
button to stop a test run.
check button to cancel (release from) the test run mode.
TROUBLESHOOTING
Incase of wired remote controller
Confirmation and check
When a trouble occurred in the air conditioner, the
check code and the indoor unit No. appear on the
display part of the remote controller.
The check code is only displayed during the operation.
If the display disappears, operate the air conditioner
according to the following “Confirmation of error history”
for confirmation.
CODE No.
UNIT No.
R.C.
Check code
3
Indoor unit No.
in which an error
occurred
15
EN
Toshiba 1074007701(01EN)_P11-22
No.
16
7/16/04, 13:31
TOSHIBA RAV-SM561KRT-E (EN) 1074007701
9
TROUBLESHOOTING
Confirmation of error history
When a trouble occurred on the air conditioner, the trouble
history can be confirmed with the following procedure.
(The trouble history is stored in memory up to 4 troubles.)
The history can be confirmed from both operating status and
stop status.
Procedure
3
UNIT
1
SET
2
CL
Description
When pushing SET and
buttons at the same time for 4 seconds or more,
the following display appears.
1
Every pushing of [
displayed in order.
2
CODE No.
If [Service check] is displayed, the mode enters in the trouble history mode.
• [01 : Order of trouble history] is displayed in CODE No. window.
• [Check code] is displayed in CHECK window.
• [Indoor unit address in which an error occurred] is displayed in UNIT No.
/
UNIT No.
R.C.
No.
] button used to set temperature, the trouble history stored in memory is
The numbers in CODE No. indicate CODE No. [01] (latest) → [04] (oldest).
REQUIREMENT
Do not push CL button because all the trouble history of the indoor unit will be deleted.
3
After confirmation, push
button to return to the usual display.
1. Check the troubles according to the above procedure.
2. Ask an authorized dealer or qualified service (maintenance) professional to repair or maintain the air conditioner.
3. More details of the service code are explained in Service Manual.
Incase of wireless remote control
Check the indication of the display panel on the main unit. (Typical example)
Lamp indication
Cause
Measures
Check cable connection and correct it.
Power supply is not turned on.
Miscabling between sensor unit and indoor unit
No indication even if the remote
control is operated.
Defective connection between sensor unit and indoor unit
Miscabling or defective connection between indoor unit and
outdoor units
Protective device of outdoor unit works.
Check outdoor unit.
Protective device of indoor unit works.
Check indoor unit.
Flashes alternatively
Flashes alternatively
1. Ask an authorized dealer or qualified service (maintenance) professional to repair or maintain the air conditioner.
2. More details of the service code are explained in Service Manual.
3
Toshiba 1074007701(01EN)_P11-22
16
17
EN
7/16/04, 13:31
TOSHIBA RAV-SM561KRT-E (EN) 1074007701
10
INDOOR UNIT OPERATION WHEN
CONNECTED TO MULTIPLE UNITS
Twin combination
Two indoor units can be operated with single outdoor unit.
(However, each indoor unit cannot be operated individually).
• Use RBC-TWP30E and 50E of branch pipe kit (optional) for twin combination.
• For piping connection, refer to this manual and the installation manual of outdoor branch pipe kit.
Wiring diagram for twin combination
Wiring of each indoor unit should be H07RN-F or 245IEC66 (1.5 mm or more).
Wiring of remote controller should be VTCF: 0.5 mm2 - 2.0 mm2.
Address can be set automatically. (Address setting will be executed for 5 minutes after the power is turned on.)
There is no need to change the address setting. (The main unit is indoor unit that receives START/STOP signal
from the wireless remote control.)
Remote Controller
A
B
Main Indoor Unit
A B
Sub Indoor Unit
1
2
3
1
3
1
2
3
2
Indoor unit connecting line
Outdoor Unit
Control line
N
L
Other connecting line
Power supply
CAUTION
Make sure to check the wiring before turning on the power.
When connecting by twin combination, make sure that no wiring is made to No.3 terminal block of sub unit.
(Air conditioner may not work after the power is turned on.)
Group combination
When executing group control on multiple unit system
Group control of up to 8 units is available with single remote controller.
Use wired remote controller for group control.
• For wiring and wiring procedures for individual system (using the same refrigerant), refer to the installation
manual of each combination.
• Wiring between systems should be done by the following procedures:
Connect the remote-controller terminal plate (A, B) on the indoor unit, to which the remote controller is
connected, to the terminal plate (A, B) on each of other indoor units by linking them with each other with remote
controller wiring.
• Automatic address setting commences when the power is turned on. After 3 minutes, “Setting” will be indicated on
the display panel to show that the address is being set.
Toshiba 1074007701(01EN)_P11-22
3
17
EN
18
7/16/04, 13:31
TOSHIBA RAV-SM561KRT-E (EN) 1074007701
10
INDOOR UNIT OPERATION WHEN CONNECTED TO MULTIPLE UNITS
Automatic address setting takes approximately 5 minutes until completion.
(Group Control of Single System)
Outdoor unit
Outdoor unit
Outdoor unit
Outdoor unit
Indoor unit
Indoor unit
Indoor unit
Indoor unit
Outdoor unit
Indoor unit
Ln
L
L1
L2
L3
(up to 8 units)
After the power is turned on, address setting will be completed
Remote controller
Control line
Other connecting line
• Length of wires for remote controller (L) should be 200 m (in case of using wireless remote receiver), 300 m
(another controller) or less.
• Length of wires for remote controller should be 200 m or shorter in total (i.e., L1 + L2 +…. Ln).
NOTE
Some group control system configuration requires manual address change after automatic address setting.
• System configuration that requires address change is the combined system where twin and triple system of
multiple units are controlled by group control with single remote controller.
(Group Control on Combined System) (For example)
System
(Single system)
Unit No.
(Twin system)
(Twin system)
Outdoor unit
Outdoor unit
Sample
procedure
Outdoor unit
Indoor unit
Indoor unit
Indoor unit
Indoor unit
(Example of
random setting)
Block of dotted lines
represents each system.
Indoor unit
Remote controller
Unit on which
automatic
address is set
Address : 1-1-1
System address
(Remote controller
indicated "R.C.")
(Example of
address setting
change)
Address : 2-1-2
Address : 3-3-1
Address : 1-1-1
Address : 2-1-2
Address : 2-2-2
When the power is turned on, the above addresses
are set by automatic address setting. However, system
address and indoor unit address are randomly set and thus
the address setting should be changed by manual address
setting so that system address and indoor unit address
are matched.
Group address
Indoor address
After changed
by manual
address setting
Address : 3-1-2
Address : 2-2-2
Address : 3-1-2
Address : 3-2-2
• Change and check of address should be carried out by the following procedures.
3
Toshiba 1074007701(01EN)_P11-22
18
19
EN
7/16/04, 13:31
TOSHIBA RAV-SM561KRT-E (EN) 1074007701
10
INDOOR UNIT OPERATION WHEN CONNECTED TO MULTIPLE UNITS
To change all the indoor addresses from an arbitrary wired remote controller
(When the setup operation with automatic address has finished, this change is available.)
Contents : Using an arbitrary wired remote controller, the indoor unit address can be changed for each same
refrigerant cycle line.
* Change the address in the address check/change mode.
(Operation while air conditioner stops)
CODE No.
SET DATA
UNIT No.
3-2
4-2
5-2
1
SETTING
R.C. No.
2
UNIT
SET
3-1
4-1
5-1
CL
3-3
4-3
5-3
Procedure
Description
Display panel will flash as shown on the drawing below when pushing
buttons at the same time for 4 seconds or more.
SET + CL +
1
CODE No.
SET DATA
UNIT No.
Make sure that the displayed CODE No. is [10].
• If the displayed CODE No. is not [10], push
button to erase the display and
perform the setting again from the beginning. (The commands from the remote
controller cannot be received for approximately 1 minute after pushing
button.)
(When executing group control, the indoor unit numbers that is displayed first
becomes the main unit.)
SETTING
R.C. No.
(* Display may differ depending on
the model of indoor unit.)
Every pushing UNIT button, the indoor unit numbers in the group control are
successively displayed. Select the indoor unit of which setting is to be changed.
2
At this time, the fan of the selected indoor unit is turned on and LED indicator on the
indoor unit will light up and the locations of indoor units, of which setting is to be
changed, can be checked.
Specify the CODE No. [12] with the temperature [
/
3-1
(CODE No. [12] : System address)
3-2
Change the system address from [3] to [2] with the timer time
[
/
] button.
] button.
Indoor unit numbers which had been
given prior to the setting change will
be displayed.
CODE No.
SET DATA
UNIT No.
R.C. No.
Push SET button.
CODE No.
If the display changes from flashing to being lit, the setting is completed.
SET DATA
3-3
UNIT No.
R.C. No.
3
19
EN
Toshiba 1074007701(01EN)_P11-22
20
7/16/04, 13:31
TOSHIBA RAV-SM561KRT-E (EN) 1074007701
10
INDOOR UNIT OPERATION WHEN CONNECTED TO MULTIPLE UNITS
Procedure
Description
Specify the CODE No. [13] with the temperature [
4-1
/
] button.
(CODE No. [13] : Indoor address).
Indoor unit numbers which had been
given prior to the setting change will
be displayed.
CODE No.
SET DATA
4-2
Change the indoor address from [3] to [2] with the timer time
[
/
] button.
UNIT No.
R.C. No.
CODE No.
SET DATA
Push SET button.
UNIT No.
4-3
If the display changes from flashing to being lit, the setting is completed.
5-1
(CODE No. [14] : Group address)
Specify the CODE No. [14] with the temperature [
R.C. No.
/
] button.
Indoor unit numbers which had been
given prior to the setting change will
be displayed.
CODE No.
SET DATA
5-2
Change the set data from [0001] to [0002] with the timer time
[
/
] button.
UNIT No.
R.C. No.
(Set data : [Main unit: 0001] [Sub unit: 0002])
CODE No.
SET DATA
Push SET button.
5-3
UNIT No.
If the display changes from flashing to being lit, the setting is completed.
R.C. No.
If there are some other indoor units of which setting is to be changed, repeat
the procedure 2 – 5 to change the setting.
After the above setting is completed, push UNIT button to select indoor unit
No. which had been given prior to the setting change, and then specify the CODE
No. [12], [13] and [14] with the temperature [
/
] button
successively to confirm the changes made.
Indoor unit numbers which had been
given prior to the setting change will
be displayed.
CODE No.
SET DATA
UNIT No.
R.C. No.
Check of address change Prior to the change [3-3-1] → After the change [2-2-2]
6
The setting change which has been made can be cleared by pushing
(In this case, perform the setting again from Procedure 2.)
CL
button.
CODE No.
SET DATA
UNIT No.
R.C. No.
CODE No.
SET DATA
UNIT No.
R.C. No.
After checking the changes made, push
button (the changes will be
confirmed). If
button is pushed, the display will disappear and air
conditioner will be in ordinary stop state.
7
(The commands from the remote controller cannot be received for approximately 1
minute after pushing
button.)
• If the commands from the remote controller is not received even after 1 minute
has elapsed, the address setting may be incorrect. In this case, perform the
setting again from Procedure 1 as the automatic address setting has been
made again.
3
Toshiba 1074007701(01EN)_P11-22
20
21
EN
7/16/04, 13:31
TOSHIBA RAV-SM561KRT-E (EN) 1074007701
10
INDOOR UNIT OPERATION WHEN CONNECTED TO MULTIPLE UNITS
When you want to know position of the indoor unit using the address
To confirm the unit numbers in a group control
(Operation while the air conditioner stops)
The indoor unit numbers in a group control are successively displayed, and the corresponding indoor fan is turned
on.
Procedure
Description
Push
1
+
buttons simultaneously for 4 seconds or more.
• Unit No.
is displayed.
• The fans of all the indoor units in a group control are turned on.
CODE No.
SET DATA
UNIT No.
2
3
Every pushing UNIT button, the indoor unit numbers in the group control are
successively displayed.
• The firstly displayed unit numbers indicates the address of the main unit.
• Only fan of the selected indoor unit is turned on.
Push
R.C. No.
2
3
1
UNIT
SET
CL
button to finish the procedure.
All the indoor units in group control stop.
To confirm all the unit numbers from an arbitrary wired remote controller
(Operation while the air conditioner stops)
The indoor unit numbers and position in the same refrigerant cycle line can be confirmed. An outdoor unit is
selected, the indoor unit numbers in the same refrigerant cycle line are successively displayed, and then its indoor
unit fan is turned on.
Procedure
1
2
Description
Push the timer time
+
Firstly, the line 1, item code
(Select outdoor unit.)
Using
UNIT
+
buttons simultaneously for 4 seconds or more.
(Address Change) is displayed.
buttons, select the line address.
Using SET button, determine the selected line address.
CODE No.
SET DATA
UNIT No.
3
4
• The indoor unit address, which is connected to the refrigerant cycle line of the
selected outdoor unit is displayed and the fan is turned on and all display of indoor
unit turned on.
R.C. No.
4
2
6
Every pushing UNIT button, the indoor unit numbers in the same refrigerant
line are successively displayed.
1
• Only fan of the selected indoor unit operates.
3
UNIT
SET
CL
5
To select another line address
5
Push CL button to return to procedure 2.
• The indoor address of another line can be successively confirmed.
6
Push
button to finish the procedure.
3
21
EN
Toshiba 1074007701(01EN)_P11-22
22
7/16/04, 13:31
TOSHIBA RAV-SM561KRT-E (EN) 1074007701
MEMO
3
EN
Toshiba 1074007701(01EN)_P11-22
23
7/16/04, 13:31
TOSHIBA RAV-SM561KRT-E (EN) 1074007701
3
1074007701
Toshiba 1074007701_COVER
2
7/16/04, 13:38
TOSHIBA RAV-SM561KRT-E (EN) 1074007701