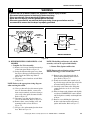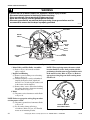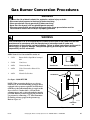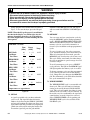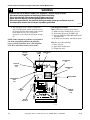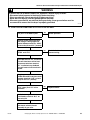
1
Service Home Laundry Dryers “AE”, “AG”, “AEE”, “AGE”, “AEM”, “AGM”, “NE and "NG" Series Refer to Page 6 for Model Numbers www.comlaundry.com Part No. 62310R1 February 2002 Table of Contents Section 1 – Safety Information Locating an Authorized Servicer ............................4 Section 2 – Introduction Customer Service ....................................................5 Nameplate Location ................................................5 Model Identification ................................................6 How Your Dryer Works ..........................................7 Section 3 – Troubleshooting 1. Motor Does Not Run ........................................9 2. Motor Overload Protector Cycles Repeatedly ......................................................10 3. Motor Runs But Cylinder Does Not Turn ......10 4. Motor Does Not Stop .....................................10 5. Heater Assembly Does Not Heat Or Burner Does Not Ignite ..............................................11 6. Igniter Does Not Glow (Gas Supply Sufficient) — Gas Models ...............................................12 7. Burner Ignites And Goes Out Repeatedly — Gas Models ...............................................12 8. Igniter Glows But Burner Does Not Ignite — Gas Models ...............................................12 9. Heater Assembly Or Burner Shuts Off Prematurely ....................................................13 10. Heater Assembly Or Burner Repeatedly Cycles Off On Limit Thermostat ...............................13 11. Heater Assembly Or Burner Does Not Shut Off ..........................................................14 12. Clothes Do Not Dry .......................................14 13. Timer Does Not Advance in Automatic Cycle (Mechanical Timer Models Only) ..................15 14. Clothes Are Too Hot When Removed From Dryer ..............................................................15 Section 4 – Grounding 15. Motor Mounting Bracket To Motor ...............17 16. Neutral At Terminal Block To Terminal Block Bracket And From Terminal Bracket To Control Housing (Electric Models Only) ....................17 17. Power Cord To Terminal Block Bracket And From Terminal Block Bracket To Control Housing. Wall Receptacle Polarity Check (Gas Models Only) .........................................18 18. From Terminal Block Bracket to Timer Mounting Bracket to Dryer Cabinet Top. Timer Mounting Bracket to Graphics Panel (Mechanical Timer Models Dryers) ...............19 19. From Terminal Block Bracket to Dryer Cabinet Top to Electronic Control to Graphics Panel (Electronic Control Models Dryers) ..............19 Section 5 – Service Procedures 20. 21. 22. 23. 24. 25. 26. 27. 28. 29. 30. 31. 32. 33. 34. 35. 36. 37. 38. 39. 40. 41. 42. 43. 44. 45. 46. 47. 48. 49. 50. 51. 52. 53. Control Hood Assembly ................................21 Electronic Control ..........................................21 Timer ..............................................................21 Temperature Switch .......................................26 Signal Control ................................................26 Start Switch ....................................................26 Graphics Panel ...............................................26 Lint Filter .......................................................27 Loading Door .................................................27 Inner and Outer Door Panels and Door Handle ...................................................28 Door Striker ...................................................28 Door Seal .......................................................28 Front Panel and Panel Seal ............................29 Door Switch ...................................................29 Striker Catch ..................................................30 Door Hinge ....................................................30 Hold-Down Clips and Guide Lugs ................30 Burner System Operation (Gas Models) ........30 Ignition System Features (Gas Models) .........31 Burner System Components – Gas Models ...33 Burner Housing and Heat Shroud ..................35 Limit Thermostat ...........................................36 Heater Assembly ............................................37 Thermistor or Thermostat or Thermostat and Heater .............................................................38 Front Air Duct ................................................39 Exhaust Duct ..................................................39 Motor and Exhaust Assembly ........................39 Cylinder Light ................................................43 Cylinder Light Receptacle .............................43 Cabinet top .....................................................43 Front Bulkhead Assembly .............................44 Cylinder Belt ..................................................45 Cylinder Assembly ........................................46 Rear Seal ........................................................47 © Copyright 2002, Alliance Laundry Systems LLC All rights reserved. No part of the contents of this book may be reproduced or transmitted in any form or by any means without the expressed written consent of the publisher. 62310 © Copyright, Alliance Laundry Systems LLC – DO NOT COPY or TRANSMIT 1 54. 55. 56. 57. 58. 59. Cylinder Rollers .............................................47 Rear Bulkhead and Heater Box Assemblies ..48 Rear Bulkhead and Heater Box Assemblies ..49 Terminal Block or Power Cord ......................50 Cabinet ...........................................................51 Base ................................................................53 Section 6 – Adjustments 60. Leveling Legs .................................................55 61. Burner Flame (Gas Models) ...........................56 Section 7 – Gas Burner Conversion Procedures 62. Installing the No. 401P3 Kit ..........................58 63. Installing the No. 402P3 Kit ..........................62 Section 8 – Service Procedures Unique to Electronic Control Model Dryers 64. 65. 66. 67. 68. 69. 70. 71. 72. 73. 74. 75. 76. Dryer Operation .............................................66 Status Lights ...................................................66 Go, Stop and Reset .........................................66 Automatic Cycles ...........................................66 No-Heat Cycle ...............................................66 Customizing Programmed Cycles ..................67 Time Drying ...................................................67 Signal .............................................................68 Memory ..........................................................68 Wrinkle Free ..................................................68 Electrical Service (Electric Dryers) ...............69 Electrical Requirements (Gas Dryers) ...........74 Service Procedures for Troubleshooting Electronic Control ..........................................75 77. Diagnostic Cycle ............................................75 78. Symptom: Failure Symptom ..........................78 Troubleshooting ....................................................78 79. Symptom: Flashing Display ...........................79 80. Symptom: Blown Fuse Or Tripped Circuit Breaker ...........................................................80 81. Symptom: Control Will Not Wake Up (No LED’S Light) After Select Pad Is Pressed .....81 82. Symptom: Control Wakes Up (When SELECT Pad is Pressed) But Motor Does Not Start Properly ..........................................................82 83. Symptom: Heater Does Not Turn On Or No Heat ..........................................................83 84. Symptom: Improper Heat Or Drying Times ..84 85. Symptom: “oP” appears in Time display .......85 86. Symptom: “SH” appears in time Display ......86 87. Control Replacement .....................................87 2 Section 9 – Internal Wiring of Dryer Motor Switch .....................................................................89 Section 10 – Wiring Diagrams Models AG9439, NG8839, AGE959 and AGE939 .................................................................92 Models AE9433, NE8833, AEE953 and AEE933..................................................................93 Models NG6819 and AG5419 ...............................94 Models NE6813 and AE5413 ................................95 Models AGM659 and AGM639 ............................96 Models AEM653 and AEM633 .............................97 Models NG4819, AG4419, AGM459 and AGM439 ................................................................98 Models NE4813, AE4413, AEM453 and AEM433.................................................................99 Models AG3419, AGM359 and AGM339 ..........100 Models AE3413, AEM353 and AEM333............101 © Copyright, Alliance Laundry Systems LLC – DO NOT COPY or TRANSMIT 62310 Section 1 Safety Information Throughout this manual and on machine decals, you will find precautionary statements (“CAUTION,” “WARNING,” and “DANGER”) followed by specific instructions. These precautions are intended for the personal safety of the operator, user, servicer, and those maintaining the machine. a DANGER Danger indicates the presence of a hazard that will cause severe personal injury, death, or substantial property damage if the danger is ignored. a WARNING Warning indicates the presence of a hazard that can cause severe personal injury, death, or substantial property damage if the warning is ignored. a CAUTION Caution indicates the presence of a hazard that will or can cause minor personal injury or property damage if the caution is ignored. Additional precautionary statements (“IMPORTANT” and “NOTE”) are followed by specific instructions. IMPORTANT The word “IMPORTANT” is used to inform the reader of specific procedures where minor machine damage will occur if the procedure is not followed. NOTE The word “NOTE” is used to communicate installation, operation, maintenance or servicing information that is important but not hazard related. In the interest of safety, some general precautions relating to the operation of this machine follow. WARNING • Failure to install, maintain and/or operate this product according to the manufacturer’s instructions may result in conditions which can produce serious injury, death and/or property damage. • Do not repair or replace any part of the product or attempt any servicing unless specifically recommended or published in this Service Manual and that you understand and have the skills to carry out. • Whenever ground wires are removed during servicing, these ground wires must be reconnected to ensure that the product is properly grounded and to reduce the risk of fire, electric shock, serious injury or death. W006R1 62310 © Copyright, Alliance Laundry Systems LLC – DO NOT COPY or TRANSMIT 3 Section 1 Safety Information WARNING To reduce the risk of electric shock, fire, explosion, serious injury or death: • Disconnect electric power to the dryer(s) before servicing. • Close gas shut-off valve to gas dryer(s) before servicing. • Never start the dryer(s) with any guards/panels removed. • Whenever ground wires are removed during servicing, these ground wires must be reconnected to ensure that the dryer is properly grounded. W001R1 WARNING Repairs that are made to your products by unqualified persons can result in hazards due to improper assembly or adjustments subjecting you, or the inexperienced person making such repairs, to the risk of serious injury, electrical shock or death. W007 WARNING If you or an unqualified person perform service on your product, you must assume the responsibility for any personal injury or property damage which may result. The manufacturer will not be responsible for any injury or property damage arising from improper service and/or service procedures. W008 NOTE: The WARNINGS and IMPORTANT INSTRUCTIONS appearing in this manual are not meant to cover all possible conditions and situations that may occur. Common sense, caution and care must be exercised when installing, maintaining or operating the dryer. Always contact your dealer, distributor, service agent or the manufacturer about any problems or conditions you do not understand. Locating an Authorized Servicer Alliance Laundry Systems is not responsible for personal injury or property damage resulting from improper service. Review all service information before beginning repairs. Warranty service must be performed by an authorized technician, using authorized factory parts. If service is required after the warranty expires, Alliance Laundry Systems also recommends contacting an authorized technician and using authorized factory parts. 4 © Copyright, Alliance Laundry Systems LLC – DO NOT COPY or TRANSMIT 62310 Section 2 Introduction Customer Service If literature or replacement parts are required, contact the source from whom the machine was purchased or contact Alliance Laundry Systems at (920) 748-3950 for the name and address of the nearest authorized parts distributor. For technical assistance, call (920) 748-3121. Nameplate Location When calling or writing about your product, be sure to mention model and serial numbers. Model and serial numbers are located on nameplate(s) as shown. 62310 © Copyright, Alliance Laundry Systems LLC – DO NOT COPY or TRANSMIT 5 Section 2 Introduction Model Identification Information in this manual is applicable to these dryers. Electric AE9433 NE8833 NE6813 AE5413 NE4813 6 AE4413 AE3413 AEE953 AEE933 AEM653 Gas AEM633 AEM453 AEM433 AEM353 AEM333 AG9439 NG8839 NG6819 AG5419 NG4819 AG4419 AG3419 AGE959 AGE939 AGM659 © Copyright, Alliance Laundry Systems LLC – DO NOT COPY or TRANSMIT AGM639 AGM459 AGM439 AGM359 AGM339 62310 Section 2 Introduction How Your Dryer Works CYLINDER LINT FILTER EXHAUST FAN HEATER DUCT DRY14S The dryer uses heated air to dry loads of laundry. When the motor is started, the exhaust fan pulls air in through louvers at the rear of the dryer and over the heat source (burner flame for gas and heating element for electric). The heated air moves through the heater duct and into the cylinder, where it circulates through the wet load. The air then passes through the lint filter, air duct, and exhaust fan, where it is vented to the outdoors. 62310 © Copyright, Alliance Laundry Systems LLC – DO NOT COPY or TRANSMIT 7 Section 3 Troubleshooting WARNING To reduce the risk of electric shock, fire, explosion, serious injury or death: • Disconnect electric power to the dryer(s) before servicing. • Close gas shut-off valve to gas dryer(s) before servicing. • Never start the dryer(s) with any guards/panels removed. • Whenever ground wires are removed during servicing, these ground wires must be reconnected to ensure that the dryer is properly grounded. W001R1 IMPORTANT: Refer to appropriate model wiring diagram for aid in testing dryer components. 1. MOTOR DOES NOT RUN POSSIBLE CAUSE TO CORRECT Electrical power off, fuse blown, or power cord not • A 240 Volt dryer has two fuses – check both fuses. plugged in. Loading door not closed or inoperative door switch. • Close door or test switch and replace if inoperative. Motor overload protector has cycled. • Wait two or three minutes for overload protector to reset. If protector cycles repeatedly. Refer to Paragraph 2. *Timer improperly set. • Reset timer, or try another cycle. Inoperative motor switch. • Test switch and replace if inoperative. *Start circuit not completed. • Press or rotate start switch button, or test switch or timer and replace if inoperative. Inoperative motor. • Test motor and replace if inoperative. *Inoperative timer. • Test timer and replace if inoperative. Broken, loose, or incorrect wiring. • Refer to appropriate wiring diagram. Power cord is miswired. • Refer to appropriate wiring diagram for the correct wiring. Motor centrifugal switch sticky or plugged with • Remove dust or lint and spray with “SLYDE”, No. 131P4, lint. to clean and lubricate. †Inoperative electronic control. • Refer to Section 8 to check out the electronic control operation. * Mechanical Timer Models only. † Electronic Control Models only. 62310 © Copyright, Alliance Laundry Systems LLC – DO NOT COPY or TRANSMIT 9 Section 3 Troubleshooting WARNING To reduce the risk of electric shock, fire, explosion, serious injury or death: • Disconnect electric power to the dryer(s) before servicing. • Close gas shut-off valve to gas dryer(s) before servicing. • Never start the dryer(s) with any guards/panels removed. • Whenever ground wires are removed during servicing, these ground wires must be reconnected to ensure that the dryer is properly grounded. W001R1 2. MOTOR OVERLOAD PROTECTOR CYCLES REPEATEDLY POSSIBLE CAUSE TO CORRECT Incorrect Voltage. • Refer to Installation Instructions (supplied with dryer) for electrical requirements. • Remove part of load. A normal washer load is a normal dryer load. Maximum load: Dryer cylinder one half full of wet clothes. • Check cylinder for binding and “out of round” condition. Also check front and rear bulkheads for warping. Check support rollers for binding. Check cylinder seals and glides for wear or damage. • Replace drive motor. Clothes load too large. Clothes cylinder is binding. Inoperative motor overload protector. 3. MOTOR RUNS BUT CYLINDER DOES NOT TURN POSSIBLE CAUSE TO CORRECT Motor drive pulley loose. Belt not installed on pulley. Broken cylinder belt. Clothes cylinder is binding. • • • • Broken or disconnected idler lever spring. Tighten setscrew. Refer to Figure 26. Install belt. Replace belt. Check cylinder for binding and “out of round” condition. Also check front and rear bulkheads for warping. Check cylinder rollers for binding. Check cylinder seals and glides for wear or damage. • Replace or reconnect spring. Refer to Figure 26. 4. MOTOR DOES NOT STOP POSSIBLE CAUSE TO CORRECT Incorrect wiring. Motor centrifugal switch sticky or plugged with lint. Inoperative door switch. *Inoperative timer. †Inoperative electronic control. • Refer to appropriate wiring diagram. • Remove dust or lint and spray with “SLYDE”, No. 131P4, to clean and lubricate. • Test switch and replace if inoperative. • Test timer and replace if inoperative. • Refer to Section 8 to check out the electronic control operation. * Mechanical Timer Models only. † Electronic Control Models only. 10 © Copyright, Alliance Laundry Systems LLC – DO NOT COPY or TRANSMIT 62310 Section 3 Troubleshooting WARNING To reduce the risk of electric shock, fire, explosion, serious injury or death: • Disconnect electric power to the dryer(s) before servicing. • Close gas shut-off valve to gas dryer(s) before servicing. • Never start the dryer(s) with any guards/panels removed. • Whenever ground wires are removed during servicing, these ground wires must be reconnected to ensure that the dryer is properly grounded. W001R1 5. HEATER ASSEMBLY DOES NOT HEAT OR BURNER DOES NOT IGNITE POSSIBLE CAUSE TO CORRECT Blown house fuse or tripped circuit breaker. • Check fuses or circuit breakers. A 240 Volt dryer has two fuses — make sure both fuses are good. • Reset switch, or test switch and replace if inoperative. *Temperature selector switch set at FLUFF, or inoperative. *Timer improperly set. Set in a cool-down period, or a no heat cycle. Inoperative limit thermostat. Electric Models: Inoperative heater assembly. Gas Models: Insufficient gas supply. Inoperative drive motor switch. Gas Models: Inoperative gas valve coils. Gas Models: Inoperative sensor. Gas Models: Inoperative igniter. Electric Models: Inoperative thermal fuse. *Inoperative cycling thermostat. *Inoperative timer. †Inoperative electronic control. †Read-out on electronic control indicates “SH”. †Read-out on electronic control indicates “OP”. Broken, loose, or incorrect wiring. • Reset timer. Try another cycle. • Test thermostat and replace if inoperative. • Test heater assembly. Replace heater assembly if cold Ohms do not read between 8 and 10.5 Ohms. • Check gas shut-off valve in dryer and main gas line valve. Open partially closed gas shut-off valve, or correct low gas pressure. • Test switch and replace if inoperative. • Test coils and replace if inoperative. • Test sensor and replace if inoperative. • Test igniter and replace if inoperative. • Test thermal fuse and replace if inoperative. • Test thermostat and replace if inoperative. • Test timer and replace if inoperative. • Refer to Section 8 to check out the electronic control operation. • Thermistor is shorted, replace thermistor. • Thermistor is open, replace thermistor. • Refer to appropriate wiring diagram. * Mechanical Timer Models only. † Electronic Control Models only. 62310 © Copyright, Alliance Laundry Systems LLC – DO NOT COPY or TRANSMIT 11 Section 3 Troubleshooting WARNING To reduce the risk of electric shock, fire, explosion, serious injury or death: • Disconnect electric power to the dryer(s) before servicing. • Close gas shut-off valve to gas dryer(s) before servicing. • Never start the dryer(s) with any guards/panels removed. • Whenever ground wires are removed during servicing, these ground wires must be reconnected to ensure that the dryer is properly grounded. W001R1 6. IGNITER DOES NOT GLOW (Gas Supply Sufficient) — GAS MODELS POSSIBLE CAUSE TO CORRECT *No power to power leads on valve. • Check timer, selector switch, thermostats, motor switch, and wiring. • Replace sensor. • Replace igniter. • Refer to Section 8 to check out the electronic control operation. Sensor failed with contacts open. Igniter broken or open. †Inoperative electronic control. 7. BURNER IGNITES AND GOES OUT REPEATEDLY — GAS MODELS POSSIBLE CAUSE TO CORRECT Improper or inadequate exhaust system. Weather hood flapper restricted. Burner heat not holding sensor contacts open. Insufficient gas supply. • See Installation Instructions (supplied with dryer) for exhaust requirements. • Replace sensor, or correct gas supply problem. • Check gas supply and pressure. Is gas shut-off valve turned on? • Replace igniter and bracket. • Check and replace appropriate coil. Cracked igniter. Inoperative or intermittent gas valve coils. 8. IGNITER GLOWS BUT BURNER DOES NOT IGNITE — GAS MODELS POSSIBLE CAUSE TO CORRECT Sensor failed in closed position. Open secondary coil or holding and booster coil. • Replace sensor. • Replace gas valve (in-warranty), or replace coils (out-ofwarranty). • Check gas supply and pressure. Is gas shut-off valve turned on? • Loosen screw and properly position igniter and bracket on burner tube assembly. • Loosen screw and properly position the sensor on the burner housing. Insufficient gas supply. Igniter and bracket installed improperly on burner tube assembly. Sensor installed improperly on burner housing. * Mechanical Timer Models only. † Electronic Control Models only. 12 © Copyright, Alliance Laundry Systems LLC – DO NOT COPY or TRANSMIT 62310 Section 3 Troubleshooting WARNING To reduce the risk of electric shock, fire, explosion, serious injury or death: • Disconnect electric power to the dryer(s) before servicing. • Close gas shut-off valve to gas dryer(s) before servicing. • Never start the dryer(s) with any guards/panels removed. • Whenever ground wires are removed during servicing, these ground wires must be reconnected to ensure that the dryer is properly grounded. W001R1 9. HEATER ASSEMBLY OR BURNER SHUTS OFF PREMATURELY POSSIBLE CAUSE TO CORRECT Improper or inadequate exhaust system. Weather hood flapper restricted. Gas Models: Insufficient gas supply. • See Installation Instructions (supplied with dryer) for exhaust requirements. • Check gas shut-off valve in dryer and main gas line valve. Open partially closed gas shut-off valve, or correct low pressure. • Refer to Section 7, “Gas Burner Conversion Procedures” in this manual to convert burner. • Adjust flame. Refer to Paragraph 61. • Momentarily connect a jumper wire across thermostat terminals. If heater element heats or burner ignites when jumper wire is connected. Refer to Paragraph 10. • Replace sensor or adjust burner flame. Refer to Paragraph 61. • Test thermostat and replace if inoperative. • Test timer and replace if inoperative. • Refer to appropriate wiring diagram. • Refer to Section 8 to check out the electronic control operation. Gas Models: Dryer not properly equipped for type of gas used. Gas Models: Improperly adjusted burner flame. Cycling off on limit thermostat. Gas models: Sensor contact closing prematurely. Burner flame improperly adjusted. *Inoperative cycling thermostat. *Inoperative timer. Broken, loose, or incorrect wiring. †Inoperative electronic control. 10. HEATER ASSEMBLY OR BURNER REPEATEDLY CYCLES OFF ON LIMIT THERMOSTAT POSSIBLE CAUSE TO CORRECT External exhaust system longer than recommended. • Refer to Installation Instructions (supplied with dryer) for exhaust system requirements. Clogged lint filter. • Remove and clean lint filter. Lint in internal dryer ductwork. • Disassemble dryer ductwork and clean. Lint in external exhaust system. • Disassemble exhaust system and clean. Hinged damper on exhaust system weather hood • Free hinged damper or replace weather hood. not free to open. *Limit thermostat cycling at too low a temperature. • Replace thermostat. Refer to Paragraph 41. Air leak around loading door. (Door not sealing due • Replace seal or catch. to damaged seal or inoperative door catch.) †Inoperative thermistor. • Test thermistor and replace if inoperative. Air leak at blower seal. • Check and replace seal if necessary. * Mechanical Timer Models only. † Electronic Control Models only. 62310 © Copyright, Alliance Laundry Systems LLC – DO NOT COPY or TRANSMIT 13 Section 3 Troubleshooting WARNING To reduce the risk of electric shock, fire, explosion, serious injury or death: • Disconnect electric power to the dryer(s) before servicing. • Close gas shut-off valve to gas dryer(s) before servicing. • Never start the dryer(s) with any guards/panels removed. • Whenever ground wires are removed during servicing, these ground wires must be reconnected to ensure that the dryer is properly grounded. W001R1 11. HEATER ASSEMBLY OR BURNER DOES NOT SHUT OFF POSSIBLE CAUSE TO CORRECT Improper motor switch. (Timer must be in a heat setting.) Motor does not stop. Incorrect wiring. Heater assembly shorted. • Test switch and replace if inoperative. • Refer to Paragraph 4. • Refer to appropriate wiring diagram. • Remove heater assembly and check for short. 12. CLOTHES DO NOT DRY POSSIBLE CAUSE TO CORRECT Heater assembly does not heat or burner does not ignite. Too much water in articles being dried. Clothes load too large. • Refer to Paragraph 5. Excessive lint on lint filter. Load too small. Automatic cycle. Three position heat selector switch or timer set on FLUFF or inoperative Improper or inadequate exhaust system. Heater assembly or burner shuts off prematurely. Gas Models: Gas line pressure too high or too low. 14 • Remove excess water. • Remove part of load. A normal washer load is normal dryer load. Maximum load: Dryer cylinder one half full of wet clothes. • Clean lint filter. • Add one or two bath towels to load. • Adjust to more dry setting. • Reset switch or timer, or test and replace the switch or timer if inoperative. • See Installation Instructions (supplied with dryer) for exhaust requirements. • Refer to Paragraph 9. • If Natural Gas line pressure to dryer exceeds 8 inch water column pressure, or is lower than 4 inch water column, ask Gas Company to correct. © Copyright, Alliance Laundry Systems LLC – DO NOT COPY or TRANSMIT 62310 Section 3 Troubleshooting WARNING To reduce the risk of electric shock, fire, explosion, serious injury or death: • Disconnect electric power to the dryer(s) before servicing. • Close gas shut-off valve to gas dryer(s) before servicing. • Never start the dryer(s) with any guards/panels removed. • Whenever ground wires are removed during servicing, these ground wires must be reconnected to ensure that the dryer is properly grounded. W001R1 13. TIMER DOES NOT ADVANCE IN AUTOMATIC CYCLE (Mechanical Timer Models Only) POSSIBLE CAUSE TO CORRECT Inoperative high or low thermostat. Heater assembly does not heat or burner does not ignite. Heater assembly or burner cycles off prematurely. Improper or inadequate exhaust system. • Test thermostat and replace if inoperative. • Refer to Paragraph 5. *Drying large load. Broken, loose or incorrect wiring. • Refer to Paragraph 9. • Refer to Installation Instructions (supplied with dryer) for exhaust requirements. • Timer will not advance until the load is almost dry. • Refer to appropriate wiring diagram. 14. CLOTHES ARE TOO HOT WHEN REMOVED FROM DRYER POSSIBLE CAUSE TO CORRECT Clothes are removed from dryer before cycle has completed. Inoperative cycling thermostat. Inoperative thermostat heater on the DELICATE setting. Inoperative timer (not allowing cool-down). Improper or inadequate exhaust system. • Allow the dryer to complete the cycle through the cooldown to the OFF position. • Test cycling thermostat or thermostat heater and replace if inoperative. • Test timer and replace if inoperative. • Refer to Installation Instructions (supplied with dryer) for exhaust requirements. * Mechanical Timer Models only. † Electronic Control Models only. 62310 © Copyright, Alliance Laundry Systems LLC – DO NOT COPY or TRANSMIT 15 Section 4 Grounding WARNING To reduce the risk of electric shock, fire, explosion, serious injury or death: • Disconnect electric power to the dryer(s) before servicing. • Close gas shut-off valve to gas dryer(s) before servicing. • Never start the dryer(s) with any guards/panels removed. • Whenever ground wires are removed during servicing, these ground wires must be reconnected to ensure that the dryer is properly grounded. W001R1 15. MOTOR MOUNTING BRACKET TO MOTOR Refer to Figure 1 16. NEUTRAL AT TERMINAL BLOCK TO TERMINAL BLOCK BRACKET AND FROM TERMINAL BRACKET TO CONTROL HOUSING (Electric Models Only) Refer to Figure 2 GROUND WIRE DRY832S GROUND WIRE Figure 1 DRY1051S Figure 2 62310 © Copyright, Alliance Laundry Systems LLC – DO NOT COPY or TRANSMIT 17 Section 4 Grounding WARNING To reduce the risk of electric shock, fire, explosion, serious injury or death: • Disconnect electric power to the dryer(s) before servicing. • Close gas shut-off valve to gas dryer(s) before servicing. • Never start the dryer(s) with any guards/panels removed. • Whenever ground wires are removed during servicing, these ground wires must be reconnected to ensure that the dryer is properly grounded. W001R1 17. POWER CORD TO TERMINAL BLOCK BRACKET AND FROM TERMINAL BLOCK BRACKET TO CONTROL HOUSING. WALL RECEPTACLE POLARITY CHECK (Gas Models Only) Refer to Figure 3 NOTE: For determining the correct polarity of a wall receptacle. GROUND WIRE GROUND L1 NEUTRAL NEUTRAL SIDE 0 V.A.C. 120 V.A.C. GROUND WIRE 120 V.A.C. DRY1052S Figure 3 18 © Copyright, Alliance Laundry Systems LLC – DO NOT COPY or TRANSMIT 62310 Section 4 Grounding WARNING To reduce the risk of electric shock, fire, explosion, serious injury or death: • Disconnect electric power to the dryer(s) before servicing. • Close gas shut-off valve to gas dryer(s) before servicing. • Never start the dryer(s) with any guards/panels removed. • Whenever ground wires are removed during servicing, these ground wires must be reconnected to ensure that the dryer is properly grounded. W001R1 18. FROM TERMINAL BLOCK BRACKET TO TIMER MOUNTING BRACKET TO DRYER CABINET TOP. TIMER MOUNTING BRACKET TO GRAPHICS PANEL (Mechanical Timer Models Dryers) Refer to Figure 4 19. FROM TERMINAL BLOCK BRACKET TO DRYER CABINET TOP TO ELECTRONIC CONTROL TO GRAPHICS PANEL (Electronic Control Models Dryers) Refer toFigure 4 GROUND WIRES GROUND WIRES DRY1054S DRY1053S MECHANICAL ELECTRONIC Figure 4 62310 © Copyright, Alliance Laundry Systems LLC – DO NOT COPY or TRANSMIT 19 Section 5 Service Procedures WARNING To reduce the risk of electric shock, fire, explosion, serious injury or death: • Disconnect electric power to the dryer(s) before servicing. • Close gas shut-off valve to gas dryer(s) before servicing. • Never start the dryer(s) with any guards/panels removed. • Whenever ground wires are removed during servicing, these ground wires must be reconnected to ensure that the dryer is properly grounded. W001R1 TO REMOVE CONTROL HOOD END CAPS Remove end caps by carefully prying caps out of slots in ends of hood. Refer to Figures 5, 6, 7, 8 or 9. IMPORTANT: When reference to direction (right or left) is made in this manual, it is from the operator’s position facing the front of the dryer. 20. CONTROL HOOD ASSEMBLY Refer to Figures 5, 6, 7, 8 or 9 a. Remove screws (three top and three bottom holding the hood assembly to the control hood rear panel and cabinet top. b. Disconnect the wires from the component parts and carefully remove the components from the control hood assembly. NOTE: Refer to the appropriate wiring diagram when rewiring the component parts. 21. ELECTRONIC CONTROL Refer to Figure 5 for control removal. IMPORTANT: When removing or installing an electronic control, handle the control by the edges, or the control could become damaged. NOTE: Refer to the appropriate wiring diagram when rewiring the electronic control. 22. TIMER Refer to Figure 6, 7, 8 or 9 for timer removal. NOTE: Refer to the appropriate wiring diagram when rewiring the timer. END CAP (Left) SCREW SCREW TRIM STRIP ELECTRONIC CONTROL END CAP (Right) GRAPHICS PANEL SCREW DRY1071S GRAPHICS PANEL, CONTROL HOOD AND CONTROLS (Models AG9439, AE9433, NG8839, NE8833, AGE959, AEE953, AGE939 and AEE933) Figure 5 62310 © Copyright, Alliance Laundry Systems LLC – DO NOT COPY or TRANSMIT 21 Section 5 Service Procedures SCREW CONTROL HOOD ASSEMBLY TEMPERATURE SWITCH END CAP (Left) SCREW SIGNAL CONTROL SCREW GRAPHICS PANEL TIMER END CAP (Right) SCREW CLIP TRIM STRIP TIMER KNOB DRY1072S CONTROL KNOB ASSEMBLY GRAPHICS PANEL, CONTROL HOOD AND CONTROLS (Models AGM659, AEM653, AGM639 and AEM633) Figure 6 22 © Copyright, Alliance Laundry Systems LLC – DO NOT COPY or TRANSMIT 62310 Section 5 Service Procedures SCREW END CAP (Left) CONTROL HOOD ASSEMBLY SIGNAL CONTROL SCREW START SWITCH SCREW SCREW GRAPHICS PANEL TIMER END CAP (Right) CLIP SCREW DRY1073S TIMER KNOB ASSEMBLY CONTROL KNOB ASSEMBLY GRAPHICS PANEL, CONTROL HOOD AND CONTROLS (Models NG6819, NE6813, AG5419 and AE5413) Figure 7 62310 © Copyright, Alliance Laundry Systems LLC – DO NOT COPY or TRANSMIT 23 Section 5 Service Procedures SCREW CONTROL HOOD ASSEMBLY NUT SWITCH BRACKET SCREW TEMPERATURE SWITCH END CAP (Left) START SWITCH GRAPHICS PANEL SCREW TIMER END CAP (Right) SCREW DRY1074S CONTROL KNOB ASSEMBLY CLIP TIMER KNOB ASSEMBLY SCREW TRIM STRIP GRAPHICS PANEL, CONTROL HOOD AD CONTROLS (Models NG4819, NE4813, AG4419, AE4413, AGM459, AEM453, AGM439 and AEM433) Figure 8 24 © Copyright, Alliance Laundry Systems LLC – DO NOT COPY or TRANSMIT 62310 Section 5 Service Procedures WARNING To reduce the risk of electric shock, fire, explosion, serious injury or death: • Disconnect electric power to the dryer(s) before servicing. • Close gas shut-off valve to gas dryer(s) before servicing. • Never start the dryer(s) with any guards/panels removed. • Whenever ground wires are removed during servicing, these ground wires must be reconnected to ensure that the dryer is properly grounded. W001R1 To Test Timer Contact Points 1. Remove six screws (three on top and three at lower front) holding the hood assembly to the control hood rear panel and to the cabinet top. Refer to Figure 6, 7, 8 or 9. 2. Disconnect wires from timer. NOTE: Refer to appropriate wiring diagram when rewiring timer. Circuit to be Tested Timer Motor Signal Control Motor Heat High Temperature Heat Low Temperature Heat (Delicate) Push-to-Start 3. Set test meter to read OHMS and put meter probes to terminals indicated in table below. 4. Starting with timer knob indicator in OFF position at top of timer, slowly turn timer knob clockwise until indicator is again pointing toward OFF position at top of timer. Meter should register “zero” reading when circuit being tested is completed by timer. Refer to appropriate wiring diagram for Timer Cycle Chart showing when circuit is made. Timer No. 59418 Timer No. 59421 Timer No. 59497 Timer No. 61402 L1 and M L2 and T B and P L1 and M L2 and H L2 and T B and B L1 and M L2 and H L2 and T P and B L1 and M L1 and M L1 and H L2 and H2 L2 and H1 and H2 SCREW END CAP (Left) CONTROL HOOD ASSEMBLY PUSH-TO-START BUTTON ASSEMBLY SCREW START SWITCH CLIP TIMER GRAPHICS PANEL END CAP (Right) TIMER KNOB ASSEMBLY SCREW DRY1075S GRAPHICS PANEL, CONTROL HOOD AND CONTROLS (Models AG3419, AE3413, AGM359, AEM353, AGM339 and AEM333) Figure 9 62310 © Copyright, Alliance Laundry Systems LLC – DO NOT COPY or TRANSMIT 25 Section 5 Service Procedures WARNING To reduce the risk of electric shock, fire, explosion, serious injury or death: • Disconnect electric power to the dryer(s) before servicing. • Close gas shut-off valve to gas dryer(s) before servicing. • Never start the dryer(s) with any guards/panels removed. • Whenever ground wires are removed during servicing, these ground wires must be reconnected to ensure that the dryer is properly grounded. W001R1 23. TEMPERATURE SWITCH Refer to Figure 6 or 8 for switch removal. 25. START SWITCH Refer to Figures 7, 8 or 9 for switch removal. NOTE: Refer to the appropriate wiring diagram when rewiring the switch. NOTE: Refer to the appropriate wiring diagram when rewiring the switch. To Test Temperature Switch 1. Remove six screws (three on top and three at lower front) holding the hood assembly to the control hood rear panel and to the cabinet top. Refer to Figures 6 or 8. 2. Disconnect all wires from switch. To Test Start Switch (Push or Rotary Type) 1. Remove six screws (three on top and three at lower front) holding the hood assembly to the control hood rear panel and to the cabinet top. Refer to Figures 7, 8 or 9. 2. Set voltometer to Ohms scale and “zero” at appropriate scale. 3. Unplug dryer from electrical supply and disconnect wires from switch terminals. 4. Place meter probes on switch terminals. You should see an “infinite” reading on the meter. 5. With probes attached to switch, proceed as follows: Push Type Switch – Press the start switch button. You should read “0” zero Ohms. Rotary Type Switch – Rotate the switch knob to the right (clockwise). You should read “0” zero Ohms. NOTE: Refer to appropriate wiring diagram when rewiring switch. 3. Set test meter to read OHMS and apply meter leads to the switch terminals: a. Three Position Heat Switch – Follow the appropriate wiring diagram for your models dryer. Refer to Section 10 of this manual. b. Infinite Heat Switch – Meter should rear 10 Ohms (maximum) with the switch in the DELICATE setting. Turn switch full CLOCKWISE direction, meter should read 10,000 Ohms (minimum). 24. SIGNAL CONTROL Refer to Figures 6 or 7 for signal control removal. NOTE: Refer to the appropriate wiring diagram when rewiring the signal control. To Test Signal Control 1. Remove six screws (three on top and three at lower front) holding the hood assembly to the control hood rear panel and to the cabinet top. Refer to Figures 6 or 7. 2. Disconnect wires from signal control. 3. Set meter to read Ohms and apply probes to terminals of signal control. Meter should rear approximately 1,000 Ohms at all times. 26 26. GRAPHICS PANEL Refer to Figures 5, 6, 7, 8 or 9 a. Remove screws (three top and three bottom holding the hood assembly to the control hood rear panel and cabinet top. b. Disconnect the wires from the component parts and carefully remove the components from the control hood assembly. NOTE: Refer to the appropriate wiring diagram when rewiring the component parts. c. Bend the tabs on the graphic panel (located inside of control hood) straight out toward rear of hood. d. Carefully remove the graphics panel off the front of the control hood. © Copyright, Alliance Laundry Systems LLC – DO NOT COPY or TRANSMIT 62310 Section 5 Service Procedures WARNING To reduce the risk of electric shock, fire, explosion, serious injury or death: • Disconnect electric power to the dryer(s) before servicing. • Close gas shut-off valve to gas dryer(s) before servicing. • Never start the dryer(s) with any guards/panels removed. • Whenever ground wires are removed during servicing, these ground wires must be reconnected to ensure that the dryer is properly grounded. W001R1 27. LINT FILTER Refer to Figure 10 Open loading door and lift filter out of air duct. IMPORTANT: When installing the filter, be sure to plate the filter into the air duct with the word “Front” facing the front of the dryer. 28. LOADING DOOR Remove four screws holding hinges to door. Refer to Figure 10. HINGE SCREWS DRY1055S LINT FILTER FRONT AIR DUCT Figure 10 62310 © Copyright, Alliance Laundry Systems LLC – DO NOT COPY or TRANSMIT 27 Section 5 Service Procedures WARNING To reduce the risk of electric shock, fire, explosion, serious injury or death: • Disconnect electric power to the dryer(s) before servicing. • Close gas shut-off valve to gas dryer(s) before servicing. • Never start the dryer(s) with any guards/panels removed. • Whenever ground wires are removed during servicing, these ground wires must be reconnected to ensure that the dryer is properly grounded. W001R1 29. INNER AND OUTER DOOR PANELS AND DOOR HANDLE a. Remove four screws holding hinges to door. Refer to Figure 10. b. Remove screws holding handle to door and separate panels. Refer to Figure 11. IMPORTANT: Do not over-tighten screws when reinstalling door handle and avoid scratching inner door panel. 30. DOOR STRIKER Refer to Figure 11 a. Remove two screws holding handle to door. b. Spread door panels just far enough to depress tabs on top and bottom of striker and push out of inner panel. 31. DOOR SEAL Open loading door and remove seal from inner door panel. NOTE: When replacing seal, be sure seal is not stretched or distorted. Use a heat resistant adhesive (such as Krazy Glue) to adhere door seal to inner door panel. HEX HEAD SCREW DOOR STRIKER DOOR SEAL INNER DOOR PANEL DOOR ASSEMBLY DOOR HANDLE SPEED NUT PHILLIPS HEAD SCREW OUTER DOOR PANEL PHILLIPS HEAD SCREW DOOR HINGE DRY850S Figure 11 28 © Copyright, Alliance Laundry Systems LLC – DO NOT COPY or TRANSMIT 62310 Section 5 Service Procedures WARNING To reduce the risk of electric shock, fire, explosion, serious injury or death: • Disconnect electric power to the dryer(s) before servicing. • Close gas shut-off valve to gas dryer(s) before servicing. • Never start the dryer(s) with any guards/panels removed. • Whenever ground wires are removed during servicing, these ground wires must be reconnected to ensure that the dryer is properly grounded. W001R1 32. FRONT PANEL AND PANEL SEAL Refer to Figure 12 a. Remove two screws from the bottom edge of the front panel. b. Swing the bottom of the panel away from the dryer to disengage hold-down clips and guide lugs from cabinet top. c. Disconnect wires from door switch. Refer to Figure 13. NOTE: Refer to the appropriate wiring diagram when rewiring the switch. d. Remove front panel seal from flange around inside of door opening. 33. DOOR SWITCH a. Remove two screws from the bottom edge of the front panel. Refer to Figure 12. b. Swing the bottom of the panel away from the dryer to disengage hold-down clips and guide lugs from cabinet top. Refer to Figure 12. c. Disconnect wires from door switch. Refer to Figure 13. NOTE: Refer to the appropriate wiring diagram when rewiring the switch. d. Depress tabs on top and bottom of switch and push out of front panel. Refer to Figure 13. NOTE: Be sure seal is properly positioned when installing on front panel. HOLD-DOWN CLIP GUIDE LUG DOOR SWITCH STRIKER CATCH FRONT PANEL SEAL DOOR SWITCH TABS LOCKNUT DRY1056S ACCESS DOOR SCREW Figure 13 DRY1057P SCREW DOOR HINGE Figure 12 62310 © Copyright, Alliance Laundry Systems LLC – DO NOT COPY or TRANSMIT 29 Section 5 Service Procedures WARNING To reduce the risk of electric shock, fire, explosion, serious injury or death: • Disconnect electric power to the dryer(s) before servicing. • Close gas shut-off valve to gas dryer(s) before servicing. • Never start the dryer(s) with any guards/panels removed. • Whenever ground wires are removed during servicing, these ground wires must be reconnected to ensure that the dryer is properly grounded. W001R1 To Test Door Switch 1. Disconnect wires from door switch. Refer to Figure 13. NOTE: Refer to appropriate wiring diagram when rewiring switch. 2. Set meter or read Ohms and apply meter probes on switch terminals 1 and 3 with door closed. You should get “zero” reading. 3. Apply probes to terminals 1 and 2 with door closed. The meter should read “infinite”. 4. Open door. Meter should read “infinite” between 1 and 3 and “zero” between 1 and 2. 34. STRIKER CATCH a. Remove two screws from the bottom edge of the front panel. Refer to Figure 12. b. Swing the bottom of the panel away from the dryer to disengage hold-down clips and guide lugs from cabinet top. Refer to Figure 12. c. Disconnect wires from door switch. Refer to Figure 13. NOTE: Refer to the appropriate wiring diagram when rewiring the switch. d. Depress tabs on top and bottom of catch and push out of front panel. Refer to Figure 12. 35. DOOR HINGE a. Remove two screws from the bottom edge of the front panel. Refer to Figure 12. b. Swing the bottom of the panel away from the dryer to disengage hold-down clips and guide lugs from cabinet top. Refer to Figure 12. c. Disconnect wires from door switch. Refer to Figure 13. NOTE: Refer to the appropriate wiring diagram when rewiring the switch. d. Remove four screws and locknuts holding hinges to front panel. Refer to Figure 12. 30 36. HOLD-DOWN CLIPS AND GUIDE LUGS a. Remove two screws from the bottom edge of the front panel. Refer to Figure 12. b. Swing the bottom of the panel away from the dryer to disengage hold-down clips and guide lugs from cabinet top. Refer to Figure 12. c. Disconnect wires from door switch. Refer to Figure 13. NOTE: Refer to the appropriate wiring diagram when rewiring the switch. d. Compress hold-down clips and remove from slot in top flange of front panel. Refer to Figure 12. e. Remove four screws holding four guide lugs to front panel. Refer to Figure 12. 37. BURNER SYSTEM OPERATION (Gas Models) Refer to Figure 15 a. Components This burner has four basic components: A silicon carbide (glow bar) igniter, burner tube, sensor, and a two-stage gas valve consisting of a split-coil valve and a secondary coil valve. The split-coil valve is opened when the dryer thermostat calls for heat, while the secondary valve does not open until the igniter has attained ignition temperature. b. Pre-Ignition Circuits When the dryer thermostat calls for heat, circuits are completed through the holding coil, sensor, booster coil and igniter. Both coils must be energized to open split-coil valve. Once opened, the holding coil can hold the valve open without assistance from the booster coil. The current shunted around the secondary coil by the sensor, passes through the igniter causing it to get hot. c. Burner Circuit In approximately 30 seconds, the igniter attains ignition temperature and the sensor (located on burner housing beside the igniter) contacts open. A circuit is then completed through the secondary valve coil, opening the valve and allowing gas to flow. Ignition is made and the © Copyright, Alliance Laundry Systems LLC – DO NOT COPY or TRANSMIT 62310 Section 5 Service Procedures WARNING To reduce the risk of electric shock, fire, explosion, serious injury or death: • Disconnect electric power to the dryer(s) before servicing. • Close gas shut-off valve to gas dryer(s) before servicing. • Never start the dryer(s) with any guards/panels removed. • Whenever ground wires are removed during servicing, these ground wires must be reconnected to ensure that the dryer is properly grounded. W001R1 GAS VALVE COILS QUICK DISCONNECT BLOCKS IGNITER QUICK DISCONNECT BLOCK AIR SHUTTER GAS VALVE HANDLE (Shown in the closed position) BURNER TUBE BURNER HOUSING BURNER TUBE SCREW UNION NUT BURNER HOUSING ATTACHING SCREWS GAS VALVE MOUNTING BRACKET ATTACHING SCREWS D399S D399S Figure 14 heat from the burner flame causes the sensor contacts to remain open. 38. IGNITION SYSTEM FEATURES (Gas Models) Refer to Figure 15 a. Momentary Power Interruption Upon resumption of power, sensor contacts will still be open, permitting secondary valve to open. However, with the secondary coil in the circuit, the booster coil cannot draw enough current to open the split-coil valve. When sensor contacts do reclose, the secondary valve will close, and the burner system will be in the normal pre-ignition circuit. b. Flame Failure In case of flame failure, the sensor contacts will reclose in about 45 seconds. This will close the secondary valve and the burner system will be in the normal pre-ignition circuit. 62310 c. Ignition Failure If flame is not established as sensor contacts open, secondary valve will remain open until sensor contacts reclose. Sensor will continue to recycle the igniter and secondary valve (about once per minute) until ignition is made or dryer is turned off. © Copyright, Alliance Laundry Systems LLC – DO NOT COPY or TRANSMIT 31 Section 5 Service Procedures WARNING To reduce the risk of electric shock, fire, explosion, serious injury or death: • Disconnect electric power to the dryer(s) before servicing. • Close gas shut-off valve to gas dryer(s) before servicing. • Never start the dryer(s) with any guards/panels removed. • Whenever ground wires are removed during servicing, these ground wires must be reconnected to ensure that the dryer is properly grounded. W001R1 CARBORANDUM IGNITER AND BRACKET ATTACHING SCREW IGNITER AND BRACKET ATTACHING SCREW To Test Gas Valve Coils (Gas Models) 1. Remove disconnect blocks from gas valve coils. Refer to Figure 15. 2. Set test meter to read OHMS and put meter probes to terminals as follows: a. Holding Coil (Refer to Figure 16) – Terminals 1 and 2 - Meter should read 1365 ± 25 Ohms. b. Booster Coil (Refer to Figure 16) – Terminals 1 and 3 - Meter should read 560 ± 25 Ohms. c. Secondary Coil (Refer to Figure 16) – Terminals 4 and 5 - Meter should read 1220 ± 50 Ohms. NOTE: If meter registers any readings other than that listed above, the respective coil should be replaced. NORTON IGNITER AND BRACKET DRY952S NOTE: Test procedure can be performed on workbench if gas valve, igniter, burner tube and burner housing have been removed from dryer. Figure 15 To Test Electrical Circuit To Ignition System (Gas Models) 1. Remove valve wire harness disconnect block from the holding and booster coil. Refer to Figure 15. 2. Plug dryer power cord into wall receptacle, start the dryer in a heat setting (refer to the Operating Instructions supplied with dryer). 3. Set test meter to read AC voltage and apply meter probes into terminals on the dryer harness that would correspond to terminals “1” and “2” on the coil. Refer to Figure 15. Meter should register line voltage in all Fabric settings, except FLUFF which should read “zero” VAC. 4. If meter does not read line voltage in step “3”, check motor switch, thermostat, thermistor, temperature switch or timer. 32 © Copyright, Alliance Laundry Systems LLC – DO NOT COPY or TRANSMIT 62310 Section 5 Service Procedures WARNING To reduce the risk of electric shock, fire, explosion, serious injury or death: • Disconnect electric power to the dryer(s) before servicing. • Close gas shut-off valve to gas dryer(s) before servicing. • Never start the dryer(s) with any guards/panels removed. • Whenever ground wires are removed during servicing, these ground wires must be reconnected to ensure that the dryer is properly grounded. W001R1 4 SECONDARY COIL 5 1 2 3 HOLDING AND BOOSTER COIL SECONDARY COIL SENSOR HOLDING COIL BOOSTER COIL IGNITOR D268S D267S WIRING SCHEMATIC Figure 16 39. BURNER SYSTEM COMPONENTS – GAS MODELS a. Complete Gas Valve Assembly (1) Remove two screws from the bottom edge of the front panel. Refer to Figure 12. (2) Swing the bottom of the panel away from the dryer to disengage hold-down clips and guide lugs from cabinet top. Refer to Figure 12. (3) Disconnect wires from door switch. Refer to Figure 13. NOTE: Refer to the appropriate wiring diagram when rewiring the switch. (4) Close gas shut-off valve, disconnect igniter wires at disconnect blocks, sensor wires from sensor terminals, and wires from gas valve coils at the quick disconnect blocks. Refer to Figure 14. (5) Disconnect gas shut-off valve from gas valve at the union nut. Refer to Figure 14. (6) Remove three screws holding valve and mounting bracket to base. Refer to Figure 14. (7) Lift gas valve and mounting bracket from base. Refer to Figure 14. 62310 NOTE: The holding and booster coil, and the secondary coil can be replaced individually. b. Burner Tube, Igniter and Bracket NOTE: Burner tube and igniter can be removed without removing gas valve and bracket. (1) Remove one screw from right side of burner housing holding burner tube in place. Refer to Figure 14. (2) Gently move burner tube toward rear of dryer to disengage tab from slot on left side of burner housing. Refer to Figure 18. (3) Carefully rotate burner tube and igniter counterclockwise so tab is at 8 o’clock position. (4) Move air shutter end of burner tube slightly to right and CAREFULLY remove burner tube and igniter assembly out through front of dryer. (5) Remove screw holding the igniter and bracket to the burner tube and remove igniter and bracket. Refer to Figure 17. © Copyright, Alliance Laundry Systems LLC – DO NOT COPY or TRANSMIT 33 Section 5 Service Procedures WARNING To reduce the risk of electric shock, fire, explosion, serious injury or death: • Disconnect electric power to the dryer(s) before servicing. • Close gas shut-off valve to gas dryer(s) before servicing. • Never start the dryer(s) with any guards/panels removed. • Whenever ground wires are removed during servicing, these ground wires must be reconnected to ensure that the dryer is properly grounded. W001R1 To Test Igniter (Gas Models) 1. Disconnect igniter wires at disconnect block. Refer to Figure 47. 2. Set test meter to read OHMS and put meter probes on terminals of igniter wires. 3. Meter should register an Ohm reading of at least 40 Ohms. If meter does not register any Ohms or less than 40 Ohms, replace the igniter. TOP VIEW OF GAS VALVE SECONDARY COIL 4 4 5 5 1 1 - 3 IMPORTANT: Always examine all wires, terminals and connectors to be sure wiring is proper before replacing any components. 2 3 HOLDING AND BOOSTER COIL D270S Figure 17 IMPORTANT: Use care in removal so as not to damage or break igniter as it is very fragile. IMPORTANT: Handle igniter by grasping the white ceramic portion or bracket only. DO NOT handle silicon carbide portion of igniter with hands or allow any oil, grease or other foreign material to contaminate it. Oil, grease and other impurities or hairline cracks will cause the igniter to burn out. To Test Sensor (Gas Models) 1. Remove wires from sensor terminals. Refer to Figure 18. 2. Set test meter to read OHMS and put meter probes on sensor terminals. Meter should read “zero” Ohms. If meter registers an Ohm reading of any amount, replace sensor. NOTE: Test procedure can be performed on workbench if gas valve, igniter, burner tube and burner housing have been removed from dryer. c. Sensor (1) Remove two screws from the bottom edge of the front panel. Refer to Figure 12. (2) Swing the bottom of the panel away from the dryer to disengage hold-down clips and guide lugs from cabinet top. Refer to Figure 12. (3) Disconnect wires from door switch. Refer to Figure 13. NOTE: Refer to the appropriate wiring diagram when rewiring the switch. (4) Remove wires from sensor terminals. Refer to Figure 18. (5) Remove screw holding sensor to burner housing. Refer to Figure 18. NOTE: Test procedure can be performed on workbench if gas valve, igniter, burner tube and burner housing have been removed from dryer. 34 © Copyright, Alliance Laundry Systems LLC – DO NOT COPY or TRANSMIT 62310 Section 5 Service Procedures WARNING To reduce the risk of electric shock, fire, explosion, serious injury or death: • Disconnect electric power to the dryer(s) before servicing. • Close gas shut-off valve to gas dryer(s) before servicing. • Never start the dryer(s) with any guards/panels removed. • Whenever ground wires are removed during servicing, these ground wires must be reconnected to ensure that the dryer is properly grounded. W001R1 HEAT SHROUD SCREW BURNER HOUSING SENSOR ATTACHING SCREW BURNER TUBE SCREW UNION NUT SENSOR TAB VALVE (Shown in the off position) D241S Figure 18 40. BURNER HOUSING AND HEAT SHROUD a. Remove two screws from the bottom edge of the front panel. Refer to Figure 12. b. Swing the bottom of the panel away from the dryer to disengage hold-down clips and guide lugs from cabinet top. Refer to Figure 12. c. Disconnect wires from door switch. Refer to Figure 13. NOTE: Refer to the appropriate wiring diagram when rewiring the switch. d. Disconnect igniter wires at disconnect blocks, sensor wires from sensor terminals, and wires from gas valve coils at the quick disconnect blocks. Refer to Figure 14. e. Remove screw from right side of burner housing, holding burner tube in place. Refer to Figure 14. 62310 f. Gently move burner tube toward rear of dryer to disengage tab from slot on left side of burner housing. Refer to Figure 14. g. Carefully rotate burner tube and igniter counterclockwise so tab is at 8 o’clock position. h. Move air shutter end of burner tube slightly to right and CAREFULY remove burner tube and igniter assembly out through front of door. IMPORTANT: The igniter is very fragile. Be careful not to damage it during removal. i. Remove screws holding burner housing to heat shroud. Refer to Figure 18. j. Remove screw holding front of burner housing to dryer base and remove housing out through front of dryer. Refer to Figure 14. k. Remove two screws holding shroud to heater box and remove shroud out through front of dryer. © Copyright, Alliance Laundry Systems LLC – DO NOT COPY or TRANSMIT 35 Section 5 Service Procedures WARNING To reduce the risk of electric shock, fire, explosion, serious injury or death: • Disconnect electric power to the dryer(s) before servicing. • Close gas shut-off valve to gas dryer(s) before servicing. • Never start the dryer(s) with any guards/panels removed. • Whenever ground wires are removed during servicing, these ground wires must be reconnected to ensure that the dryer is properly grounded. W001R1 41. LIMIT THERMOSTAT a. Remove two screws from the bottom edge of the front panel. Refer to Figure 12. b. Swing the bottom of the panel away from the dryer to disengage hold-down clips and guide lugs from cabinet top. Refer to Figure 12. c. Disconnect wires from door switch. Refer to Figure 13. NOTE: Refer to the appropriate wiring diagram when rewiring the switch. d. Disconnect wires and remove screws attaching limit thermostat to heater assembly or burner housing. Refer to Figure 19. 36 To Test Cycling or Limit Thermostat 1. Disconnect wires from thermostat or thermistor. NOTE: Refer to appropriate wiring diagram when rewiring thermostat or thermistor. 2. Cycling Thermostat (S.P.S.T.) or Limit Thermostat or Thermistor a. Set meter to read Ohms. b. Apply meter probes to the thermostat or thermistor terminals. c. Meter should read “infinite”. 3. Cycling Thermostat (S.P.D.T.) a. Set meter to read Ohms. b. Apply meter probes to terminals 1 and 3. Meter should read “infinite” and “zero” between terminals 1 and 2. c. Remove screws holding thermostat to exhaust fan cover. d. Heat thermostat with a small flame until a distinct “click” is heard, then immediately apply meter probes to terminals 1 and 3; meter should read “zero”. e. While thermostat is still hot, apply meter probes to thermostat terminals 1 and 2; meter should read “infinite” until thermostat cools at which time the meter should read “zero.” © Copyright, Alliance Laundry Systems LLC – DO NOT COPY or TRANSMIT 62310 Section 5 Service Procedures WARNING To reduce the risk of electric shock, fire, explosion, serious injury or death: • Disconnect electric power to the dryer(s) before servicing. • Close gas shut-off valve to gas dryer(s) before servicing. • Never start the dryer(s) with any guards/panels removed. • Whenever ground wires are removed during servicing, these ground wires must be reconnected to ensure that the dryer is properly grounded. W001R1 42. HEATER ASSEMBLY a. Remove two screws from the bottom edge of the front panel. Refer to Figure 12. b. Swing the bottom of the panel away from the dryer to disengage hold-down clips and guide lugs from cabinet top. Refer to Figure 12. c. Disconnect wires from door switch. Refer to Figure 13. NOTE: Refer to the appropriate wiring diagram when rewiring the switch. LIMIT THERMOSTAT d. Remove two screws holding heater assembly to heater box and pull heater assembly down and away from heater box. e. Disconnect wires from heater assembly. f. Remove screws holding limit thermostat and the thermal fuse to the heater assembly. Refer to Figure 19. NOTE: When reassembling, be sure all wire connectors are tight on thermal fuse and limit thermostat. AIR SHUTTER LOCKSCREW HEATER ASSEMBLY BURNER TUBE LIMIT THERMOSTAT GAS VALVE HANDLE BURNER TUBE SCREW D244S BASE BURNER HOUSING D243S THERMAL FUSE AIR SHUTTER HEATER ATTACHING SCREW HEX HEAD SCREW Figure 19 62310 © Copyright, Alliance Laundry Systems LLC – DO NOT COPY or TRANSMIT 37 Section 5 Service Procedures WARNING To reduce the risk of electric shock, fire, explosion, serious injury or death: • Disconnect electric power to the dryer(s) before servicing. • Close gas shut-off valve to gas dryer(s) before servicing. • Never start the dryer(s) with any guards/panels removed. • Whenever ground wires are removed during servicing, these ground wires must be reconnected to ensure that the dryer is properly grounded. W001R1 43. THERMISTOR OR THERMOSTAT OR THERMOSTAT AND HEATER a. Remove two screws from the bottom edge of the front panel. Refer to Figure 12. b. Swing the bottom of the panel away from the dryer to disengage hold-down clips and guide lugs from cabinet top. Refer to Figure 12. c. Disconnect wires from door switch. Refer to Figure 13. To Test Thermostat Heater 1. Disconnect wires from thermostat heater. NOTE: Refer to appropriate wiring diagram when rewiring thermostat heater. 2. Set meter to read Ohms. Apply meter probes to the thermostat heater terminals. Meter should read 2,400 Ohms ± 240 Ohms cold. NOTE: Refer to the appropriate wiring diagram when rewiring the switch. d. Refer to Figure 20 for thermistor or thermostat or thermostat and heater removal. FELT SEAL THERMISTOR OR THERMOSTAT OR THERMOSTAT AND HEATER To Test Thermal Fuse (Electric Models) 1. Disconnect wires from thermal fuse. NOTE: Refer to appropriate wiring diagram when rewiring thermal fuse. 2. Set meter to read Ohms. Apply meter probes to thermal fuse terminals. Meter should read “infinite”. If meter does not register any Ohms, replace both the thermal fuse and the limit thermostat. To Test Heater Assembly (Electric Models) 1. Disconnect wires from heater assembly. NOTE: Refer to appropriate wiring diagram when rewiring heater assembly. DRY1058S Figure 20 38 2. Set meter to read Ohms. Apply meter probes to the heater assembly terminals. Meter should read 10.4 Ohms ± .30 Ohms cold. © Copyright, Alliance Laundry Systems LLC – DO NOT COPY or TRANSMIT 62310 Section 5 Service Procedures WARNING To reduce the risk of electric shock, fire, explosion, serious injury or death: • Disconnect electric power to the dryer(s) before servicing. • Close gas shut-off valve to gas dryer(s) before servicing. • Never start the dryer(s) with any guards/panels removed. • Whenever ground wires are removed during servicing, these ground wires must be reconnected to ensure that the dryer is properly grounded. W001R1 44. FRONT AIR DUCT a. Remove two screws from the bottom edge of the front panel. Refer to Figure 12. b. Swing the bottom of the panel away from the dryer to disengage hold-down clips and guide lugs from cabinet top. Refer to Figure 12. c. Disconnect wires from door switch. Refer to Figure 13. 45. EXHAUST DUCT a. Disconnect electric power, vent (and gas line if necessary) and move unit to gain access to rear of dryer. b. Remove screw holding bracket on exhaust duct to rear of cabinet. Refer to Figure 22. c. Pull duct out through rear of cabinet. NOTE: Refer to the appropriate wiring diagram when rewiring the switch. d. Remove lint filter. Refer to Figure 10. e. Remove four screws holding duct to front bulkhead and remove air duct. Refer to Figure 21. NOTE: When reassembling, be sure felt seal on exhaust fan cover makes air tight seal on flange of duct. Refer to Figure 20. ACCESS PLATE MOUNTING BRACKET ATTACHING SCREWS GROUND SCREW PHILLIPS HEAD SCREWS EXHAUST DUCT SCREW HEX HEAD SCREWS HEX HEAD SCREWS DRY1059S Figure 22 SLOT AIR DUCT DRY858S DRY858S CABINET ATTACHING SCREWS Figure 21 62310 46. MOTOR AND EXHAUST ASSEMBLY a. Remove two screws from the bottom edge of the front panel. Refer to Figure 12. b. Swing the bottom of the panel away from the dryer to disengage hold-down clips and guide lugs from cabinet top. Refer to Figure 12. c. Disconnect wires from door switch. Refer to Figure 13. NOTE: Refer to the appropriate wiring diagram when rewiring the switch. © Copyright, Alliance Laundry Systems LLC – DO NOT COPY or TRANSMIT 39 Section 5 Service Procedures WARNING To reduce the risk of electric shock, fire, explosion, serious injury or death: • Disconnect electric power to the dryer(s) before servicing. • Close gas shut-off valve to gas dryer(s) before servicing. • Never start the dryer(s) with any guards/panels removed. • Whenever ground wires are removed during servicing, these ground wires must be reconnected to ensure that the dryer is properly grounded. W001R1 d. Remove lint filter. Refer to Figure 10. e. Remove screws holding air duct to front bulkhead and remove air duct. Refer to Figure 21. NOTE: When reassembling, be sure felt seal on exhaust fan cover makes air tight seal on flange of air duct. Refer to Figure 20. along dryer base (between motor mounting bracket and right side of cabinet). Refer to Figure 23. Tab on rear of motor mounting bracket must be slid into slot in dryer base. Be sure the belt has been installed on the correct side of the idler lever. Refer to Figure 24. CORRECT WAY BELT f. Disconnect wires from thermistor, thermostat or thermostat and heater. Refer to Figure 20. IDLER PULLEY NOTE: Refer to appropriate wiring diagram when rewiring thermistor or thermostat or thermostat and heater. COVER ATTACHING SCREWS EXHAUST FAN COVER IDLER LEVER MOTOR PULLEY DRY862S INCORRECT WAY BELT IDLER PULLEY MOTOR MOUNT ATTACHING SCREWS DRY1058S MOTOR PULLEY Figure 23 g. Remove cylinder belt from idler and motor pulleys. Refer to Figure 24. h. Remove two screws holding motor mounting bracket to dryer base. Refer to Figure 23. Then pull complete assembly out through front of dryer. IMPORTANT: When reinstalling motor and exhaust assembly, be sure wire harness on right side is clipped to motor mounting bracket and is routed 40 IDLER LEVER D248S Figure 24 © Copyright, Alliance Laundry Systems LLC – DO NOT COPY or TRANSMIT 62310 Section 5 Service Procedures WARNING To reduce the risk of electric shock, fire, explosion, serious injury or death: • Disconnect electric power to the dryer(s) before servicing. • Close gas shut-off valve to gas dryer(s) before servicing. • Never start the dryer(s) with any guards/panels removed. • Whenever ground wires are removed during servicing, these ground wires must be reconnected to ensure that the dryer is properly grounded. W001R1 To Test Drive Motor: Refer to Figure 25 1. Remove motor and exhaust assembly. 2. Disconnect motor wire harness at motor connection block. NOTE: Refer to appropriate wiring diagram when rewiring motor switch. 3. Put test meter probes on terminals 4 and 5. Meter should read approximately one on Ohm scale. 4. Put test meter probes on terminal 4 and motor frame. Meter should register “no reading” or infinite. 2 2 5. Put test meter probes on terminal 5 and motor frame. Meter should register “no reading or infinite. 6. Put test meter probes on terminals 4 and 6. Meter should register “no reading” or infinite. Manually flex the centrifugal switch in motor, meter should read approximately two on Ohm scale. 7. Put test meter probes on terminals 1 and 2. Meter should register “no reading.” Manually flex the centrifugal switch in motor, meter should read “zero” Ohms. 1 1 6 6 5 5 4 4 DRY956S Figure 25 62310 © Copyright, Alliance Laundry Systems LLC – DO NOT COPY or TRANSMIT 41 Section 5 Service Procedures WARNING To reduce the risk of electric shock, fire, explosion, serious injury or death: • Disconnect electric power to the dryer(s) before servicing. • Close gas shut-off valve to gas dryer(s) before servicing. • Never start the dryer(s) with any guards/panels removed. • Whenever ground wires are removed during servicing, these ground wires must be reconnected to ensure that the dryer is properly grounded. W001R1 SETSCREW MOTOR SWITCH MOTOR PULLEY TRU-ARC RING MOTOR CLAMP IDLER PULLEY IDLER SPRING GROUND WIRE DRY860S Figure 26 i. Motor Pulley and Idler Pulley Assemblies (1) Refer to Figure 26 for motor and idler pulley removal. j. Impeller and Housing (1) Remove screws holding cover to housing. Refer to Figure 23. (2) Hold motor pulley securely and unthread impeller from motor shaft (right hand thread). Use a 7/8 inch, 6 point socket to aid in the removal of the impeller. (3) Remove three screws and washers holding the exhaust housing to the motor mounting bracket. Refer to Figure 27. k. Motor (1) Disconnect wires from motor switch. Refer to Figure 26. NOTE: When replacing motor, the motor switch location should be at 10 o’clock position with the positioning tab on the motor engaged with the notch in the motor bracket. Refer to Figure 26. Refer to appropriate wiring diagram when rewiring motor switch leads. NOTE: Refer to appropriate wiring diagram when rewiring motor switch. (2) Disconnect ground wires from motor. Refer to Figure 26. (3) Pry two motor clamps off using a screwdriver. Refer to Figure 26. Then lift motor out of mounting bracket. 42 D402S EXHAUST HOUSING ATTACHING SCREWS Figure 27 © Copyright, Alliance Laundry Systems LLC – DO NOT COPY or TRANSMIT 62310 Section 5 Service Procedures WARNING To reduce the risk of electric shock, fire, explosion, serious injury or death: • Disconnect electric power to the dryer(s) before servicing. • Close gas shut-off valve to gas dryer(s) before servicing. • Never start the dryer(s) with any guards/panels removed. • Whenever ground wires are removed during servicing, these ground wires must be reconnected to ensure that the dryer is properly grounded. W001R1 47. CYLINDER LIGHT Open loading door and remove bulb through top opening in the front bulkhead by turning bulb to the left. Refer to Figure 28. CYLINDER LIGHT 49. CABINET TOP a. Remove two screws from the bottom edge of the front panel. Refer to Figure 12. b. Swing the bottom of the panel away from the dryer to disengage hold-down clips and guide lugs from cabinet top. Refer to Figure 12. c. Disconnect wires from door switch. Refer to Figure 13. NOTE: Refer to the appropriate wiring diagram when rewiring the switch. d. Remove six screws (three top and three bottom) holding the hood assembly to the control hood rear panel and cabinet top. e. Disconnect the wires from the component parts and carefully remove the components from the control hood assembly. SCREWS NOTE: Refer to the appropriate wiring diagram when rewiring the components parts. DRY852S Figure 28 48. CYLINDER LIGHT RECEPTACLE a. Remove two screws from the bottom edge of the front panel. Refer to Figure 12. b. Swing the bottom of the panel away from the dryer to disengage hold-down clips and guide lugs from cabinet top. Refer to Figure 12. c. Disconnect wires from door switch. Refer to Figure 13. f. Disconnect wire harness from all components and ground wire in control hood, and screw holding ground wire to top. Push harness down through opening in cabinet top. (Replace control hood or set aside to prevent damage.) NOTE: Refer to appropriate wiring diagram when rewiring components. g. Remove two cabinet top hold-down screws. Refer to Figure 30. h. Lift front of cabinet top and disengage from hinges on rear of cabinet. Refer to Figure 29. i. Remove control hood rear panel when replacing cabinet top. NOTE: Refer to the appropriate wiring diagram when rewiring the switch. d. Disconnect wires from the light receptacle terminals. e. Remove two screws holding receptacle to front bulkhead. Refer to Figure 28. 62310 © Copyright, Alliance Laundry Systems LLC – DO NOT COPY or TRANSMIT 43 Section 5 Service Procedures WARNING To reduce the risk of electric shock, fire, explosion, serious injury or death: • Disconnect electric power to the dryer(s) before servicing. • Close gas shut-off valve to gas dryer(s) before servicing. • Never start the dryer(s) with any guards/panels removed. • Whenever ground wires are removed during servicing, these ground wires must be reconnected to ensure that the dryer is properly grounded. W001R1 NOTE: When servicing, cabinet top may be raised and hinged on the rear hold-down brackets, or supported against wall behind dryer. e. If present, disconnect cylinder light wires from the light receptacle terminals. f. Remove four screws holding bulkhead to front flange of cabinet and lift complete bulkhead assembly out of slots in cabinet. Refer to Figure 30. CABINET TOP HINGES SCREWS SLOT SCREWS AIR DUCT DRY1060S DRY858S DRY858S Figure 29 50. FRONT BULKHEAD ASSEMBLY a. Remove two screws from the bottom edge of the front panel. Refer to Figure 12. b. Swing the bottom of the panel away from the dryer to disengage hold-down clips and guide lugs from cabinet top. Refer to Figure 12. c. Disconnect wires from door switch. Refer to Figure 13. NOTE: Refer to the appropriate wiring diagram when rewiring the switch. d. Disengage belt from motor and idler pulleys. Refer to Figure 24 44 CABINET ATTACHING SCREWS Figure 30 NOTE: During reinstallation of front bulkhead, be sure that air duct is properly positioned with the flange inside of the felt seal on the exhaust fan cover. g. Cylinder Glide (Refer to Figure 31) (1) Remove two screws holding glide to each glide bracket. h. Front Cylinder Seal (Refer to Figure 31) © Copyright, Alliance Laundry Systems LLC – DO NOT COPY or TRANSMIT 62310 Section 5 Service Procedures WARNING To reduce the risk of electric shock, fire, explosion, serious injury or death: • Disconnect electric power to the dryer(s) before servicing. • Close gas shut-off valve to gas dryer(s) before servicing. • Never start the dryer(s) with any guards/panels removed. • Whenever ground wires are removed during servicing, these ground wires must be reconnected to ensure that the dryer is properly grounded. W001R1 51. CYLINDER BELT a. Remove two screws from the bottom edge of the front panel. Refer to Figure 12. b. Swing the bottom of the panel away from the dryer to disengage hold-down clips and guide lugs from cabinet top. Refer to Figure 12. c. Disconnect wires from door switch. Refer to Figure 13. FELT SEAL SEAL STRAP (Installed with cupped surface against seal) SPRING BULKHEAD SEAL MUST BE POSITIONED UNDER FLANGED EDGE CYLINDER GLIDE ATTACHING SCREWS DRY861S Figure 31 (1) Pull front cylinder seal from under flanged edge of bulkhead. (2) Carefully unhook spring from seal strap. IMPORTANT: The seal can be adhered to the bulkhead using 3M-1300 Sealant (obtain locally). This is accomplished by applying a bead of 3M-1300 Sealant around the entire flanged area where the felt seal contacts the bulkhead. Strap must be installed with cupped surface down against the seal to hold the felt seal more firmly in place on the bulkhead. Seal must be held securely under strap and folded under flanged edge around entire bulkhead. 62310 NOTE: Refer to the appropriate wiring diagram when rewiring the switch. d. Disengage belt from motor and idler pulleys. Refer to Figure 24. e. If present, disconnect cylinder light wires from the light receptacle terminals. f. Remove four screws holding bulkhead to front flange of cabinet. Lift complete bulkhead assembly out of slots in cabinet. Refer to Figure 30. IMPORTANT: During reinstallation of front bulkhead, be sure that air duct is properly positioned with the flange inside of the felt seal on the exhaust fan cover. g. While supporting cylinder carefully remove belt off cylinder. NOTE: When installing belt, be sure belt is properly installed on motor and idler pulleys, and is on the correct side of the idler lever. Refer to Figure 24. Belt must be positioned around cylinder between center and rear baffle screws with the ribbed surface against the cylinder. After installing belt, rotate cylinder manually to check that belt is properly aligned. © Copyright, Alliance Laundry Systems LLC – DO NOT COPY or TRANSMIT 45 Section 5 Service Procedures WARNING To reduce the risk of electric shock, fire, explosion, serious injury or death: • Disconnect electric power to the dryer(s) before servicing. • Close gas shut-off valve to gas dryer(s) before servicing. • Never start the dryer(s) with any guards/panels removed. • Whenever ground wires are removed during servicing, these ground wires must be reconnected to ensure that the dryer is properly grounded. W001R1 52. CYLINDER ASSEMBLY a. Remove two screws from the bottom edge of the front panel. Refer to Figure 12. b. Swing the bottom of the panel away from the dryer to disengage hold-down clips and guide lugs from cabinet top. Refer to Figure 12. c. Disconnect wires from door switch. Refer to Figure 13. i. Baffle (1) Remove screws holding baffles to cylinder. Refer to Figure 32. IMPORTANT: The elongated baffle must be installed to cover the cylinder seam weld. Refer to Figure 32. BAFFLE NOTE: Refer to the appropriate wiring diagram when rewiring the switch. d. Disengage belt from motor and idler pulleys. Refer to Figure 24. NOTE: When installing belt, be sure belt is properly installed on motor and idler pulleys, and is on the correct side of the idler lever. Refer to Figure 24. Belt must be positioned around cylinder between center and rear baffle screws with the ribbed surface against the cylinder. After installing belt, rotate cylinder manually to check that belt is properly aligned. CYLINDER HEX HEAD SCREW e. If present, disconnect cylinder light wires from the light receptacle terminals. f. Remove four screws holding bulkhead to front flange of cabinet. Lift complete bulkhead assembly out of slots in cabinet. Refer to Figure 30. IMPORTANT: During reinstallation of front bulkhead, be sure that air duct is properly positioned with the flange inside of the felt seal on the exhaust fan cover. HEX HEAD SCREW SEAM WELD g. Loosen two cabinet top hold-down screws. Refer to Figure 30. h. Manually rotate cylinder until one of the baffles is at the 6 o’clock position and carefully remove cylinder out through front of dryer. NOTE: The cylinder must be installed with the arrow pointing toward the front of the dryer. DRY954S ELONGATED BAFFLE Figure 32 46 © Copyright, Alliance Laundry Systems LLC – DO NOT COPY or TRANSMIT 62310 Section 5 Service Procedures WARNING To reduce the risk of electric shock, fire, explosion, serious injury or death: • Disconnect electric power to the dryer(s) before servicing. • Close gas shut-off valve to gas dryer(s) before servicing. • Never start the dryer(s) with any guards/panels removed. • Whenever ground wires are removed during servicing, these ground wires must be reconnected to ensure that the dryer is properly grounded. W001R1 53. REAR SEAL a. Remove two screws from the bottom edge of the front panel. Refer to Figure 12. b. Swing the bottom of the panel away from the dryer to disengage hold-down clips and guide lugs from cabinet top. Refer to Figure 12. c. Disconnect wires from door switch. Refer to Figure 13. NOTE: Refer to the appropriate wiring diagram when rewiring the switch. d. Remove two cabinet top hold-down screws. Refer to Figure 30. e. Raise front of cabinet top, hinging it on the rear hold-down brackets. Refer to Figure 29. NOTE: When servicing, cabinet top may be raised and hinged on the rear hold-down brackets, or supported against the wall behind the dryer. f. Disengage belt from motor and idler pulleys. Refer to Figure 24. NOTE: When installing belt, be sure belt is properly installed on motor and idler pulleys, and is on the correct side of the idler lever. Refer to Figure 24. Belt must be positioned around cylinder between center and rear baffle screws with the ribbed surface against the cylinder. After installing belt, rotate cylinder manually to check that belt is properly aligned. g. If present, disconnect cylinder light wires from light receptacle terminals. h. Remove four screws holding bulkhead to front flange of cabinet. Lift complete bulkhead assembly out of slots in cabinet. Refer to Figure 30. IMPORTANT: During reinstallation of front bulkhead, be sure that air duct is properly positioned with the flange inside of the felt seal on the exhaust fan cover. NOTE: The cylinder must be installed with the arrow pointing toward the front of the dryer. j. Pull rear cylinder seal from under flanged edge of bulkhead. Refer to Figure 31. k. Carefully unhook spring from the seal strap. Refer to Figure 31. IMPORTANT: Seal can be adhered to the bulkhead using 3M-1300 Sealant (obtain locally). This is accomplished by applying a bead of 3M-1300 Sealant around the entire flanged area where the felt seal contacts the bulkhead. Strap must be installed with cupped surface down against the seal to hold the felt seal more firmly in place on the bulkhead. Seal must be held securely under strap and folded under flanged edge around entire bulkhead. 54. CYLINDER ROLLERS a. Remove two screws from the bottom edge of the front panel. Refer to Figure 12. b. Swing the bottom of the panel away from the dryer to disengage hold-down clips and guide lugs from cabinet top. Refer to Figure 12. c. Disconnect wires from door switch. Refer to Figure 13. NOTE: Refer to the appropriate wiring diagram when rewiring the switch. d. Remove belt from motor and idler pulleys. Refer to Figure 24. e. If present, disconnect the cylinder light wires from light receptacle terminals. f. Remove four screws holding bulkhead to front flange of cabinet. Lift complete bulkhead assembly out of slots in cabinet. Refer to Figure 30. IMPORTANT: During reinstallation of front bulkhead, be sure that air duct is properly positioned with the flange inside of the felt seal on the exhaust fan cover. i. Manually rotate cylinder until one of the baffles is at the 6 o’clock position and carefully remove cylinder out through front of dryer. 62310 © Copyright, Alliance Laundry Systems LLC – DO NOT COPY or TRANSMIT 47 Section 5 Service Procedures WARNING To reduce the risk of electric shock, fire, explosion, serious injury or death: • Disconnect electric power to the dryer(s) before servicing. • Close gas shut-off valve to gas dryer(s) before servicing. • Never start the dryer(s) with any guards/panels removed. • Whenever ground wires are removed during servicing, these ground wires must be reconnected to ensure that the dryer is properly grounded. W001R1 g. Pull cylinder forward, allowing rear of cylinder to drop down, exposing rollers. Refer to Figure 33. h. Refer to Figure 33 for removal of roller from roller shaft. i. To remove roller shaft, remove two screws holding roller bracket to rear bulkhead, then remove locknut holding shaft to bracket. 55. REAR BULKHEAD AND HEATER BOX ASSEMBLIES a. Remove two screws from the bottom edge of the front panel. Refer to Figure 12. b. Swing the bottom of the panel away from the dryer to disengage hold-down clips and guide lugs from cabinet top. Refer to Figure 12. c. Disconnect wires from door switch. Refer to Figure 13. NOTE: Refer to the appropriate wiring diagram when rewiring the switch. d. Disengage belt from motor and idler pulleys. Refer to Figure 24. e. If present, disconnect the cylinder light wires from light receptacle terminals. f. Remove four screws holding bulkhead to front flange of cabinet. Lift complete bulkhead assembly out of slots in cabinet. Refer to Figure 30. WASHER LOCKNUT IMPORTANT: During reinstallation of front bulkhead, be sure that air duct is properly positioned with the flange inside of the felt seal on the exhaust fan cover. g. Pull cylinder forward, allowing rear of cylinder to drop down, exposing rollers. Refer to Figure 33. h. Refer to Figure 33 for removal of roller from roller shaft. i. To remove roller shaft, remove two screws holding roller bracket to rear bulkhead, then remove locknut holding shaft to bracket. DRY1061S SHAFT RETAINER RING CYLINDER ROLLER THRUST WASHER Figure 33 48 © Copyright, Alliance Laundry Systems LLC – DO NOT COPY or TRANSMIT 62310 Section 5 Service Procedures WARNING To reduce the risk of electric shock, fire, explosion, serious injury or death: • Disconnect electric power to the dryer(s) before servicing. • Close gas shut-off valve to gas dryer(s) before servicing. • Never start the dryer(s) with any guards/panels removed. • Whenever ground wires are removed during servicing, these ground wires must be reconnected to ensure that the dryer is properly grounded. W001R1 d. Disengage belt from motor and idler pulleys. Refer to Figure 24. REAR BULKHEAD MOUNTING BRACKET MOUNTING BRACKET ¢¢¢¢¢¢¢¢¢ @@@@@@@@@ ÀÀÀÀÀÀÀÀÀ ;;;;;;;;; QQQQQQQQQ @@@@@@@@@ ÀÀÀÀÀÀÀÀÀ ;;;;;;;;; QQQQQQQQQ ¢¢¢¢¢¢¢¢¢ @@@@@@@@@ ÀÀÀÀÀÀÀÀÀ ;;;;;;;;; QQQQQQQQQ ¢¢¢¢¢¢¢¢¢ @@@@@@@@@ ÀÀÀÀÀÀÀÀÀ ;;;;;;;;; QQQQQQQQQ ¢¢¢¢¢¢¢¢¢ @@@@@@@@@ ÀÀÀÀÀÀÀÀÀ ;;;;;;;;; QQQQQQQQQ ¢¢¢¢¢¢¢¢¢ @@@@@@@@@ ÀÀÀÀÀÀÀÀÀ ;;;;;;;;; QQQQQQQQQ ¢¢¢¢¢¢¢¢¢ ;; QQ ¢¢ @@ ÀÀ @@@@@@@@@ ÀÀÀÀÀÀÀÀÀ ;;;;;;;;; QQQQQQQQQ ¢¢¢¢¢¢¢¢¢ ÀÀ ;; QQ ¢¢ @@ @@@@@@@@@ ÀÀÀÀÀÀÀÀÀ ;;;;;;;;; QQQQQQQQQ ¢¢¢¢¢¢¢¢¢ QQ ¢¢ @@ ÀÀ ;; @@@@@@@@@ ÀÀÀÀÀÀÀÀÀ ;;;;;;;;; QQQQQQQQQ ¢¢¢¢¢¢¢¢¢ ÀÀ ;; QQ ¢¢ @@ @@@@@@@@@ ÀÀÀÀÀÀÀÀÀ ;;;;;;;;; QQQQQQQQQ ¢¢¢¢¢¢¢¢¢ e. If present, disconnect cylinder light wires from light receptacle terminals. f. Remove four screws holding bulkhead to front flange of cabinet. Lift complete bulkhead assembly out of slots in cabinet. Refer to Figure 30. SCREWS SEAL STRAP SPRING DRY864S HEAT SHIELD SCREWS HEATER BOX Figure 34 56. REAR BULKHEAD AND HEATER BOX ASSEMBLIES a. Remove two screws from the bottom edge of the front panel. Refer to Figure 12. b. Swing the bottom of the panel away from the dryer to disengage hold-down clips and guide lugs from cabinet top. Refer to Figure 12. c. Disconnect wires from door switch. Refer to Figure 13. NOTE: Refer to the appropriate wiring diagram when rewiring the switch. 62310 NOTE: When reinstalling belt, be sure belt is properly installed on motor and idler pulleys, and is on the correct side of the idler lever. Refer to Figure 24. Belt must be positioned around cylinder between center and rear baffle screws with the ribbed surface against the cylinder. After installing belt, rotate cylinder manually to check that belt is properly aligned. IMPORTANT: During reinstallation of front bulkhead, be sure that air duct is properly positioned with the flange inside of the felt seal on the exhaust fan cover. g. Loosen two cabinet top hold-down screws. Refer to Figure 30. h. Manually rotate cylinder until one of the baffles is at the 6 o’clock position and carefully remove cylinder out through front of dryer. i. Gas Models (1) Disconnect igniter wires at disconnect blocks, sensor wires from sensor terminals, and wires from gas valve coils at the quick disconnect blocks. Refer to Figure 14. (2) Remove screw from right side of burner housing, holding burner tube in place. Refer to Figure 14. (3) Gently move burner tube toward rear of dryer to disengage tab from slot on left side of burner housing. Refer to Figure 18. (4) Carefully rotate burner tube and igniter counterclockwise so tab is at 8 o’clock position. (5) Move air shutter end of burner tube slightly to right and CAREFULLY remove burner tube and igniter assembly out through front of dryer. © Copyright, Alliance Laundry Systems LLC – DO NOT COPY or TRANSMIT 49 Section 5 Service Procedures WARNING To reduce the risk of electric shock, fire, explosion, serious injury or death: • Disconnect electric power to the dryer(s) before servicing. • Close gas shut-off valve to gas dryer(s) before servicing. • Never start the dryer(s) with any guards/panels removed. • Whenever ground wires are removed during servicing, these ground wires must be reconnected to ensure that the dryer is properly grounded. W001R1 IMPORTANT: The igniter is very fragile. Be careful not to damage it during removal. j. k. l. m. n. o. (6) Remove screw holding burner housing to heat shroud. Refer to Figure 18. (7) Remove screw holding front of burner housing to dryer base and remove housing out through front of dryer. Refer to Figure 14. (8) Remove four screws holding shroud to heater box and remove shroud out through front of dryer. Refer to Figure 18. Electric Models (1) Remove two screws holding heater assembly to heater box, then pull heater assembly down and away from heater box. Refer to Figure 19. Remove screw holding heat shield to dryer base. Refer to Figure 34. Remove one screw holding rear bulkhead to terminal block bracket. While supporting bulkhead, remove the four screws holding rear bulkhead to mounting brackets, then lift complete assembly out of dryer. Refer to Figure 34. To remove heat shield from heater box: (1) Remove two screws holding heat shield to heater box. Refer to Figure 34. To remove heater box from rear bulkhead: (1) Refer to Figure 35 for removal. Rear Mounting Brackets: (1) Remove five screws holding rear mounting brackets to rear of dryer cabinet. Refer to Figure 22. REAR BULKHEAD HEATER BOX ATTACHING SCREWS HEATER BOX DRY866S Figure 35 57. TERMINAL BLOCK OR POWER CORD a. Terminal Block – Electric Models (1) Remove two screws from the bottom edge of the front panel. Refer to Figure 12. (2) Swing the bottom of the panel away from the dryer to disengage hold-down clips and guide lugs from cabinet top. Refer to Figure 12. (3) Disconnect wires from door switch. Refer to Figure 13. NOTE: Refer to appropriate wiring diagram when rewiring switch. (4) Remove two cabinet hold-down screws. Refer to Figure 30. (5) Raise front of cabinet top hinging on rear hold-down brackets. Refer to Figure 36. 50 © Copyright, Alliance Laundry Systems LLC – DO NOT COPY or TRANSMIT 62310 Section 5 Service Procedures WARNING To reduce the risk of electric shock, fire, explosion, serious injury or death: • Disconnect electric power to the dryer(s) before servicing. • Close gas shut-off valve to gas dryer(s) before servicing. • Never start the dryer(s) with any guards/panels removed. • Whenever ground wires are removed during servicing, these ground wires must be reconnected to ensure that the dryer is properly grounded. W001R1 NOTE: When servicing, cabinet top may be raised and hinged on the rear hold-down brackets, or supported against wall behind the dryer. NOTE: Reconnect ground wire into same hole in bracket when reinstalling power cord. (4) Disconnect molex plug and remove power cord from rear of dryer cabinet. 58. CABINET a. Remove six screws (three top and three bottom) holding the hood assembly to the control hood rear panel and cabinet top. b. Disconnect the wires from the component parts. NOTE: Refer to the appropriate wiring diagram when rewiring the component parts. CABINET TOP HINGES c. Set control hood assembly out of the way. d. Remove two screws from the bottom edge of the front panel. Refer to Figure 12. e. Swing the bottom of the panel away from the dryer to disengage hold-down clips and guide lugs from cabinet top. Refer to Figure 12. f. Disconnect wires from door switch. Refer to Figure 13. TERMINAL BLOCK INSULATION TERMINAL BLOCK BRACKET TERMINAL BLOCK ATTACHING SCREW NOTE: Refer to appropriate wiring diagram when rewiring switch. DRY1062S Figure 36 (6) Remove all wires from terminal block. NOTE: Refer to appropriate wiring diagram when rewiring terminal block. (7) Remove screw holding terminal block to bracket. Refer to Figure 36. NOTE: Do not let terminal block insulation drop when removing the block. Insulation must be in place when reinstalling block. b. Power Cord – Gas Models (1) Remove access plate on rear of cabinet. (2) Remove strain relief. (3) Remove screw holding power cord ground wire to terminal block bracket. 62310 g. Remove two cabinet top hold-down screws. Refer to Figure 30. h. Lift cabinet top to a vertical position by hinging it on the rear hold-down brackets. Refer to Figure 36. NOTE: When servicing, cabinet top may be raised and hinged on the rear hold-down brackets or supported against wall behind the dryer. i. Carefully withdraw wire harness through hole in cabinet top and lift the cabinet top assembly off the hold-down brackets and set to the side. Refer to Figure 36. j. Disengage belt from motor and idler pulleys. Refer to Figure 24. © Copyright, Alliance Laundry Systems LLC – DO NOT COPY or TRANSMIT 51 Section 5 Service Procedures WARNING To reduce the risk of electric shock, fire, explosion, serious injury or death: • Disconnect electric power to the dryer(s) before servicing. • Close gas shut-off valve to gas dryer(s) before servicing. • Never start the dryer(s) with any guards/panels removed. • Whenever ground wires are removed during servicing, these ground wires must be reconnected to ensure that the dryer is properly grounded. W001R1 NOTE: When reinstalling belt, be sure belt is properly installed on motor and idler pulleys, and is on the correct side of the idler lever, Figure 24. Belt must be positioned around cylinder between center and rear baffle screws with the ribbed surface against the cylinder. After installing belt, rotate cylinder manually to check that belt is properly aligned. k. If present, disconnect the cylinder light wires from the light receptacle terminals. l. Remove four screws holding bulkhead to front flange of cabinet. Lift complete bulkhead assembly out of slots in cabinet. Refer to Figure 30. IMPORTANT: During reinstallation of front bulkhead, be sure that air duct is properly positioned with the flange inside of the felt seal on the exhaust fan cover. IMPORTANT: The igniter is very fragile. Be careful not to damage it during removal. o. p. q. m. Manually rotate cylinder until one of the baffles is at the 6 o’clock position and carefully remove cylinder out through front of dryer. NOTE: The cylinder must be installed with the arrow pointing toward the front of the dryer. n. Gas Models (1) Disconnect igniter wires at disconnect blocks, sensor wires from sensor terminals, and wires from gas valve coils at the quick disconnect blocks. Refer to Figure 14. (2) Remove screw from right side of burner housing, holding burner tube in place. Refer to Figure 21. (3) Gently move burner tube toward rear of dryer to disengage tab from slot on left side of burner housing. Refer to Figure 18. (4) Carefully rotate burner tube and igniter counterclockwise so tab is at 8 o’clock position. (5) Move air shutter end of burner tube slightly to right and CAREFULLY remove burner tube and igniter assembly out through front of dryer. 52 r. s. t. u. v. w. x. (6) Remove screw holding burner housing to heat shroud. Refer to Figure 18. (7) Remove screw holding front of burner housing to dryer base and remove housing out through front of dryer. Refer to Figure 14. (8) Remove four screws holding shroud to heater box and remove shroud out through front of dryer. Refer to Figure 18. Electric Models (1) Remove two screws holding heater assembly to heater box, then pull heater assembly down and away from heater box. Refer to Figure 19. Remove screw holding heat shield to dryer base. Refer to Figure 34. Remove one screw holding rear bulkhead to terminal block bracket. While supporting bulkhead, remove five screws holding rear mounting brackets to rear of dryer cabinet and remove the assembly out of the dryer. Refer to Figure 34. Remove screw holding bracket on exhaust duct to rear of dryer cabinet and pull duct out through rear of cabinet. Refer to Figure 22. Remove two screws from each rear cabinet top hold-down bracket (hinges). Refer to Figure 36. Remove screw holding access plate and remove plate. Refer to Figure 22. Remove two screws holding terminal block bracket to cabinet. Refer to Figure 36. Remove wire harness clips. Remove guide lugs and screws. Remove two screws from front edge at each side of cabinet. Refer to Figure 30. Then remove remaining screws from around the bottom of cabinet and lift cabinet off base. © Copyright, Alliance Laundry Systems LLC – DO NOT COPY or TRANSMIT 62310 Section 5 Service Procedures WARNING To reduce the risk of electric shock, fire, explosion, serious injury or death: • Disconnect electric power to the dryer(s) before servicing. • Close gas shut-off valve to gas dryer(s) before servicing. • Never start the dryer(s) with any guards/panels removed. • Whenever ground wires are removed during servicing, these ground wires must be reconnected to ensure that the dryer is properly grounded. W001R1 59. BASE a. Remove two screws from the bottom edge of the front panel. Refer to Figure 12. b. Swing the bottom of the panel away from the dryer to disengage hold-down clips and guide lugs from cabinet top. Refer to Figure 12. c. Disconnect wires from door switch. Refer to Figure 13. NOTE: Refer to appropriate wiring diagram when rewiring switch. d. Gas Models (1) Disconnect igniter wires at disconnect blocks, sensor wires from sensor terminals, and wires from gas valve coils at the quick disconnect blocks. Refer to Figure 14. (2) Close main gas shut-off valve and gas shutoff valve inside of dryer. Refer to Figure 14. (3) Disconnect gas line to dryer. (4) Remove three screws holding gas valve bracket to base and remove valve with leadin pipe attached. Refer to Figure 18. (5) Remove screw from right side of burner housing, holding burner tube in place. Refer to Figure 14. (6) Gently move burner tube toward rear of dryer to disengage tab from slot on left side of burner housing. Refer to Figure 18. (7) Carefully rotate burner tube and igniter counterclockwise so tab is at 8 o’clock position and CAREFULLY remove burner tube and igniter assembly out through front of dryer. IMPORTANT: The igniter is very fragile. Be careful not to damage it during removal. (8) Remove screw holding front of burner housing to dryer base. Refer to Figure 19. (9) Remove four screws holding shroud to heater box and remove shroud and burner housing out through front of dryer. Refer to Figure 18. 62310 e. Electric Models (1) Remove two screws holding heater assembly to heater box, then pull heater assembly down and away from heater box. Refer to Figure 19. (2) Disconnect wire harness from limit thermostat nd thermal fuse. Refer to Figure 19. f. Remove screw holding heat shield to dryer base. Refer to Figure 34. g. Remove lint filter. Refer to Figure 10. h. Remove screws holding air duct to front bulkhead and remove air duct. Refer to Figure 21. NOTE: When reassembling, be sure felt seal on exhaust fan cover makes air tight seal on flange of air duct. Refer to Figure 20. i. Disconnect wires from thermistor and/or thermostat or thermostat and heater. Refer to Figure 20. NOTE: Refer to appropriate wiring diagram when rewiring thermistor and/or thermostat or thermostat and heater. j. Remove cylinder belt from idler and motor pulleys. Refer to Figure 24. k. Remove two screws holding motor mounting bracket to dryer base. Refer to Figure 23. Then pull complete assembly out through front of dryer. l. Disconnect wires from motor switch and remove harness clip from motor bracket. Then, set motor and exhaust assembly off to the side. Refer to Figure 26. m. Remove screw holding bracket on exhaust duct to rear of cabinet and pull duct out through rear of cabinet. Refer to Figure 22. © Copyright, Alliance Laundry Systems LLC – DO NOT COPY or TRANSMIT 53 Section 5 Service Procedures WARNING To reduce the risk of electric shock, fire, explosion, serious injury or death: • Disconnect electric power to the dryer(s) before servicing. • Close gas shut-off valve to gas dryer(s) before servicing. • Never start the dryer(s) with any guards/panels removed. • Whenever ground wires are removed during servicing, these ground wires must be reconnected to ensure that the dryer is properly grounded. W001R1 IMPORTANT: When reinstalling motor and exhaust assembly, be sure wire harness on right side is clipped to motor mounting bracket and is routed along dryer base (between motor mounting bracket and right side of cabinet). Refer to Figure 23. Tab on rear of motor mounting bracket must be slid into slot in dryer base. n. Remove two screws from front edge at each side of cabinet. Refer to Figure 30. Then remove remaining screws from around bottom of cabinet and lift cabinet off base. o. Remove leveling legs and locknuts from base and reinstall on new base. 54 © Copyright, Alliance Laundry Systems LLC – DO NOT COPY or TRANSMIT 62310 Section 6 Adjustments WARNING To reduce the risk of electric shock, fire, explosion, serious injury or death: • Disconnect electric power to the dryer(s) before servicing. • Close gas shut-off valve to gas dryer(s) before servicing. • Never start the dryer(s) with any guards/panels removed. • Whenever ground wires are removed during servicing, these ground wires must be reconnected to ensure that the dryer is properly grounded. W001R1 60. LEVELING LEGS Refer to Figure 37 NOTE: Dryer should be installed on a solid and level floor. DO NOT install the dryer on a weak or spongy floor. IMPORTANT: DO NOT move the dryer at any time unless the locknuts are securely tightened an the dryer is completely assembled. DO NOT slide the dryer across the floor once the leveling legs have been extended as the legs and base could become damaged. a. Loosen locknuts and adjust the legs until dryer is level. b. Keep dryer as close to the floor as possible. All four legs must rest firmly on the floor so weight of the dryer is evenly distributed. The dryer MUST NOT rock. c. After the dyer has been leveled, tighten the locknuts securely against the bottom of the dryer base. DRYER BASE NOTE: If these locknuts are not tight, the dryer will not stay level during operation. DRY868S LEVELING LEG RUBBER CUP LOCKNUT Figure 37 62310 © Copyright, Alliance Laundry Systems LLC – DO NOT COPY or TRANSMIT 55 Section 6 Adjustments WARNING To reduce the risk of electric shock, fire, explosion, serious injury or death: • Disconnect electric power to the dryer(s) before servicing. • Close gas shut-off valve to gas dryer(s) before servicing. • Never start the dryer(s) with any guards/panels removed. • Whenever ground wires are removed during servicing, these ground wires must be reconnected to ensure that the dryer is properly grounded. W001R1 61. BURNER FLAME (Gas Models) a. Close the loading door, start the dryer in a heat setting (refer to Operating Instructions supplied with the dryer); the dryer will start, the igniter will glow red and the main burner will ignite. b. Allow the dryer to operate for approximately five minutes, open the access door and loosen the air shutter lockscrew. c. Turn the air shutter to the right or left to obtain a soft, uniform blue flame. (A lazy, orangetipped flame indicates lack of air. A harsh, roaring, very blue flame indicates too much air.) d. After proper flame is obtained, tighten air shutter lockscrew securely. e. Be sure and observe at least two complete ignition and burn cycles before reinstalling the access door. f. Reinstall the access door. AIR SHUTTER LOCKSCREW D399S AIR SHUTTER WARNING For personal safety, the access door must be in place during normal operation. 56 Figure 38 © Copyright, Alliance Laundry Systems LLC – DO NOT COPY or TRANSMIT 62310 Section 7 Gas Burner Conversion Procedures WARNING To reduce the risk of electric shock, fire, explosion, serious injury or death: • Disconnect electric power to the dryer(s) before servicing. • Close gas shut-off valve to gas dryer(s) before servicing. • Never start the dryer(s) with any guards/panels removed. • Whenever ground wires are removed during servicing, these ground wires must be reconnected to ensure that the dryer is properly grounded. W001R1 WARNING This conversion kit is to be installed by AUTHORIZED DEALERS or DISTRIBUTORS on their premises and in accordance with the manufacturer’s instructions and all codes and requirements of the authority having jurisdiction. Failure to follow instructions could result in serious injury or property damage. The qualified agency performing this work assumes responsibility for this conversion. W312 1 - 58754 Block - Open Plug 1 - 58755 Burner Orifice Spud (Metal stamped #55) 1 - 60515 Conversion Plate 1 - 60517 Valve Converted to L.P. Gas Sticker 2 - 60520 L.P. Gas Stickers Gas Input - 20,000 BTU/HR 55" 401P3 L.P. Gas Conversion Kit consists of: DRY962S Block Open Plug Burner Orifice Spud 10 ± 1.5 INCHES MANOMETER NOTE: When converting the dryer gas valve to L.P. gas, be sure the incoming gas supply line is equipped with a pressure regulator (located ahead of the dryer) that will maintain the gas supply to the dryer at 10 ± 1.5 inches (25.4 ± 3.81 cm) water column pressure and a vent to the outdoors must be provided. Remove pressure tap pipe plug and check gas pressure by connecting a “U” tube manometer (or similar pressure gauge) to the pressure tap. Refer to Figure 39. DRY961S PRESSURE TAP Figure 39 62310 © Copyright, Alliance Laundry Systems LLC – DO NOT COPY or TRANSMIT 57 Section 7 Gas Burner Conversion Procedures WARNING To reduce the risk of electric shock, fire, explosion, serious injury or death: • Disconnect electric power to the dryer(s) before servicing. • Close gas shut-off valve to gas dryer(s) before servicing. • Never start the dryer(s) with any guards/panels removed. • Whenever ground wires are removed during servicing, these ground wires must be reconnected to ensure that the dryer is properly grounded. W001R1 62. INSTALLING THE NO. 401P3 KIT WARNING To reduce the risk of electrical shock, disconnect electrical power to the dryer before servicing the dryer. a. Apply thumb pressure to the right side of access door. Refer to Figure 40. When door opens, move door to the left to disengage from door supports. WASHER PHILLIPS HEAD SCREW APPLY PRESSURE HERE SUPPORT DRY951S ACCESS DOOR Figure 40 WARNING To reduce the risk of fire and explosion, reach in through access door opening and turn the gas line shut-off valve handle to the closed position. Refer to Figure 41. 58 b. Disconnect igniter wires at quick disconnect blocks. Refer to Figure 41. c. Remove hex head screw holding burner tube and igniter in place. Refer to Figure 41. d. Carefully move burner tube toward rear of dryer, far enough to permit removal of burner orifice spud from gas valve. NOTE: Tab on burner tube may have to be removed from slot in burner housing to obtain enough clearance. e. Turn burner orifice spud out of gas valve and install No. 58755 L.P. Burner Orifice Spud (metal stamped #55). Torque new burner orifice spud to 30 inch-pounds (3.4 N-m). f. Reinstall burner tube, tighten hex head screw firmly and reconnect igniter leads. g. Remove vent screw and install No. 58754 Block-Open Plug. Refer to Figure 41. h. Install No. 60517 “Valve Converted to L.P. Gas” Sticker to top side of gas valve so it covers the gas valve part number. Refer to Figure 41. i. Sign and date each of the two No. 60520 L.P. Gas Stickers. Install one of the No. 60520 L.P. Gas Stickers over the top three lines of the old sticker on rear of cabinet. Refer to Figure 42. Then place the second sticker over the top three lines of the old sticker located on backside of access door. Refer to Figure 40. j. Apply the No. 60515 Conversion Plate to the inside of the loading door opening above the nameplate. Refer to Figure 43. k. Turn the gas line shut-off valve handle to the open position and connect electrical service. Refer to Figure 41. l. Check gas valve pressure as follows: (1) Remove pressure tap pipe plug. Refer to Figure 41. (2) Connect a “U” tube manometer (or similar pressure gauge) to the pressure tap. Refer to Figure 44. (3) Start dryer, pressure should be 10 ± 1.5 inches (25.4, ± 3.8 cm). Refer to Figure 41. © Copyright, Alliance Laundry Systems LLC – DO NOT COPY or TRANSMIT 62310 Section 7 Gas Burner Conversion Procedures WARNING To reduce the risk of electric shock, fire, explosion, serious injury or death: • Disconnect electric power to the dryer(s) before servicing. • Close gas shut-off valve to gas dryer(s) before servicing. • Never start the dryer(s) with any guards/panels removed. • Whenever ground wires are removed during servicing, these ground wires must be reconnected to ensure that the dryer is properly grounded. W001R1 SHUT-OFF VALVE HANDLE CLOSED POSITION TOP VIEW OF GAS VALVE IGNITER QUICK DISCONNECT BLOCKS BURNER TUBE VENT SCREW OPEN POSITION BURNER ORIFICE VENT SPUD SCREW 4 5 HEX HEAD SCREW 1 - 3 AIR SHUTTER BURNER HOUSING PRESSURE TAP PIPE PLUG APPLY NO. 60517 VALVE CONVERTED STICKER HERE DR016-SV-1 DRY963S Figure 41 APPLY NO. 60520 L.P. GAS STICKER HERE DANGER To reduce the risk of an explosion or fire, do not use an open flame to check for gas leaks! DRY964S Figure 42 (4) Stop dryer and remove “U” tube and reinstall the pressure tap pipe plug. Refer to Figure 41. m. Check the gas line connection for gas leaks with a soapy solution. 62310 n. Make sure the dryer conversion has been completed. Recheck the following: (1) Installed correct orifice spud (#55), see step “e”. (2) Installed block-open plug, see step “g”. (3) Gas valve pressure must be 10 ± 1.5 inches (25.4 ± 3.8 cm), see step “l”. (4) Installed four stickers, see steps “h”, “i”, and “j”. o. Start dryer and observe burner flame. Adjust air shutter to obtain a soft, uniform flame. (A lazy, orange tipped flame indicates lack of air. A harsh, roaring, very blue flame indicates too much air.) Adjust air shutter to obtain a soft uniform blue flame as follows: © Copyright, Alliance Laundry Systems LLC – DO NOT COPY or TRANSMIT 59 Section 7 Gas Burner Conversion Procedures WARNING To reduce the risk of electric shock, fire, explosion, serious injury or death: • Disconnect electric power to the dryer(s) before servicing. • Close gas shut-off valve to gas dryer(s) before servicing. • Never start the dryer(s) with any guards/panels removed. • Whenever ground wires are removed during servicing, these ground wires must be reconnected to ensure that the dryer is properly grounded. W001R1 MANOMETER 10 ± 1.5 INCHES AIR SHUTTER LOCKSCREW APPLY NO. 60515 CONVERSION PLATE HERE NAMEPLATE Figure 43 (1) Loosen air shutter lockscrew. Refer to Figure 44. (2) Turn air shutter to the right or left as necessary to obtain proper flame intensity. Refer to Figure 44. (3) After air shutter is adjusted for proper flame, tighten air shutter lockscrew firmly. p. Be sure and observe at least two complete ignition and burn cycles before reinstalling access door. q. Reinstall the access door and screw. DRY965S AIR SHUTTER GAS VALVE PRESSURE TAP Figure 44 WARNING For personal safety, access door must be in place during normal operation. 60 © Copyright, Alliance Laundry Systems LLC – DO NOT COPY or TRANSMIT 62310 Gas Burner Conversion Procedures WARNING To reduce the risk of electric shock, fire, explosion, serious injury or death: • Disconnect electric power to the dryer(s) before servicing. • Close gas shut-off valve to gas dryer(s) before servicing. • Never start the dryer(s) with any guards/panels removed. • Whenever ground wires are removed during servicing, these ground wires must be reconnected to ensure that the dryer is properly grounded. W001R1 WARNING This conversion kit is to be installed by AUTHORIZED DEALERS or DISTRIBUTORS on their premises and in accordance with the manufacturer’s instructions and all codes and requirements of the authority having jurisdiction. Failure to follow instructions could result in serious injury or property damage. The qualified agency performing this work assumes responsibility for this conversion. W312 1 - 58719 Burner Orifice Spud Metal stamped #44 1 - 58768 Vent Screw 1 - 60514 Conversion Plate 1 - 60516 Valve Converted to Natural Gas Sticker 2 - 60521 Natural Gas Stickers 55" 402P3 Natural Gas Conversion Kit consists of: DRY966S Vent Screw Burner Orifice Spud 6.5 ± 1.5 INCHES MANOMETER Gas Input - 20,000 BTU/HR NOTE: When converting the dryer gas valve to Natural Gas, be sure the incoming gas supply line is equipped with a pressure regulator (located ahead of the dryer) that will maintain the gas supply to the dryer at 6.5 ± 1.5 inches (16.5 ± 3.81 cm) water column pressure and a vent to the outdoors must be provided. Remove pressure tap pipe plug and check gas pressure by connecting a “U” tube manometer (or similar pressure gauge) to the pressure tap. Refer to Figure 45. DRY961S PRESSURE TAP Figure 45 62310 © Copyright, Alliance Laundry Systems LLC – DO NOT COPY or TRANSMIT 61 Section 7 Gas Burner Conversion Procedures WARNING To reduce the risk of electric shock, fire, explosion, serious injury or death: • Disconnect electric power to the dryer(s) before servicing. • Close gas shut-off valve to gas dryer(s) before servicing. • Never start the dryer(s) with any guards/panels removed. • Whenever ground wires are removed during servicing, these ground wires must be reconnected to ensure that the dryer is properly grounded. W001R1 WARNING To reduce the risk of electrical shock, disconnect electrical power to the dryer before servicing the dryer. a. Apply thumb pressure to the right side of access door. Refer to Figure 46. When door opens, move door to the left to disengage from door supports. c. Remove hex head screw holding burner tube and igniter in place. Refer to Figure 47. d. Carefully move burner tube toward rear of dryer, far enough to permit removal of burner orifice spud from gas valve. NOTE: Tab on burner tube may have to be removed from slot in burner housing to obtain enough clearance. APPLY NO. 60516 VALVE CONVERTED STICKER HERE BURNER ORIFICE SPUD BLOCK OPEN PLUG 4 63. INSTALLING THE NO. 402P3 KIT 5 1 3 CLOSED POSITION SHUT-OFF VALVE HANDLE APPLY PRESSURE HERE SUPPORT TOP VIEW OF GAS VALVE IGNITER QUICK DISCONNECT BLOCKS OPEN POSITION DRY951S ACCESS DOOR Figure 46 WARNING To reduce the risk of fire and explosion, reach in through access door opening and turn the gas line shut-off valve handle to the closed position. Refer to Figure 41. b. Disconnect igniter wires at quick disconnect blocks. Refer to Figure 47. 62 HEX HEAD SCREW BLOCK OPEN PLUG BURNER TUBE PRESSURE TAP PIPE PLUG DRY967S Figure 47 © Copyright, Alliance Laundry Systems LLC – DO NOT COPY or TRANSMIT 62310 Section 7 Gas Burner Conversion Procedures WARNING To reduce the risk of electric shock, fire, explosion, serious injury or death: • Disconnect electric power to the dryer(s) before servicing. • Close gas shut-off valve to gas dryer(s) before servicing. • Never start the dryer(s) with any guards/panels removed. • Whenever ground wires are removed during servicing, these ground wires must be reconnected to ensure that the dryer is properly grounded. W001R1 e. Turn burner orifice spud out of gas valve and install No. 58719 Natural Gas Burner Orifice Spud (metal stamped #44). Torque new burner orifice spud to 30 inch-pounds (3.4 N-m). f. Reinstall burner tube, tighten hex head screw firmly and reconnect igniter leads. g. Remove the block open plug and install No. 58768 Vent Screw. Refer to Figure 47. h. Install No. 60516 “Valve Converted to Natural Gas” Sticker to top side of gas valve so it covers the gas valve part number. Refer to Figure 47. i. Sign and date each of the two No. 60521 Natural Gas Stickers. Install one of the No. 60521 Natural Gas Stickers over the top three lines of the old sticker on rear of cabinet. Refer to Figure 48. Then place the second sticker over the top three lines of the old sticker located on backside of access door. Refer to Figure 46. APPLY NO. 60518 or 60519 GAS STICKER HERE (Depending on type of gas) j. Apply the No. 60514 Conversion Plate to the inside of the loading door opening above the nameplate. Refer to Figure 49. APPLY NO. 60515 CONVERSION PLATE HERE NAMEPLATE Figure 49 DRY964S Figure 48 62310 k. Turn the gas line shut-off valve handle to the open position and connect electrical service. Refer to Figure 47. l. Check gas valve pressure as follows: (1) Remove pressure tap pipe plug. Refer to Figure 47. (2) Connect a “U” tube manometer (or similar pressure gauge) to the pressure tap. Refer to Figure 50. (3) Start dryer, pressure should be 3.5 ± .2 inches (8.89 ± .508 cm). Refer to Figure 50. © Copyright, Alliance Laundry Systems LLC – DO NOT COPY or TRANSMIT 63 Section 7 Gas Burner Conversion Procedures WARNING To reduce the risk of electric shock, fire, explosion, serious injury or death: • Disconnect electric power to the dryer(s) before servicing. • Close gas shut-off valve to gas dryer(s) before servicing. • Never start the dryer(s) with any guards/panels removed. • Whenever ground wires are removed during servicing, these ground wires must be reconnected to ensure that the dryer is properly grounded. W001R1 (4) Stop dryer and remove “U” tube and reinstall the pressure tap pipe plug. Refer to Figure 47. MANOMETER 3.5 ± .2 INCHES AIR SHUTTER LOCKSCREW DRY965S AIR SHUTTER GAS VALVE PRESSURE TAP (4) Installed four stickers, see steps “h”, “i”, and “j”. o. Start dryer and observe burner flame. Adjust air shutter to obtain a soft, uniform flame. (A lazy, orange tipped flame indicates lack of air. A harsh, roaring, very blue flame indicates too much air.) Adjust air shutter to obtain a soft uniform blue flame as follows: (1) Loosen air shutter lockscrew. Refer to Figure 50. (2) Turn air shutter to the right or left as necessary to obtain proper flame intensity. Refer to Figure 50. (3) After air shutter is adjusted for proper flame, tighten air shutter lockscrew firmly. p. Be sure and observe at least two complete ignition and burn cycles before reinstalling access door. q. Reinstall the access door and screw. WARNING For personal safety, access door must be in place during normal operation. Figure 50 m. Check the gas line connection for gas leaks with a soapy solution. DANGER To reduce the risk of an explosion or fire, do not use an open flame to check for gas leaks! n. Make sure the dryer conversion has been completed. Recheck the following: (1) Installed correct orifice spud (#44), see step “e”. (2) Installed the vent screw, see step “g”. (3) Gas valve pressure must be 3.5 ± .2 inches (8.89 ± .508 cm), see step “l”. 64 © Copyright, Alliance Laundry Systems LLC – DO NOT COPY or TRANSMIT 62310 Section 8 Service Procedures Unique to Electronic Control Model Dryers WARNING To reduce the risk of electric shock, fire, explosion, serious injury or death: • Disconnect electric power to the dryer(s) before servicing. • Close gas shut-off valve to gas dryer(s) before servicing. • Never start the dryer(s) with any guards/panels removed. • Whenever ground wires are removed during servicing, these ground wires must be reconnected to ensure that the dryer is properly grounded. W001R1 REGULAR MOST DRY MORE EXTRA DRY SELECT CLEAN FILTER PERM PRESS DELICATES KNITS GO STOP NO HEAT DRYING DRY COOL DOWN RESET WRINKLE FREE LESS DAMP SIGNAL VOLUME MEMORY WRINKLE FREE DRY1077S Model 62310 Level Part No. AG9439, AE9433, NG8839, NE8833 1 59608 AGE959, AEE953 1 62147 AGE939, AEE933 1 62243 © Copyright, Alliance Laundry Systems LLC – DO NOT COPY or TRANSMIT 65 Section 8 Service Procedures Unique to Electronic Control Model Dryers WARNING To reduce the risk of electric shock, fire, explosion, serious injury or death: • Disconnect electric power to the dryer(s) before servicing. • Close gas shut-off valve to gas dryer(s) before servicing. • Never start the dryer(s) with any guards/panels removed. • Whenever ground wires are removed during servicing, these ground wires must be reconnected to ensure that the dryer is properly grounded. W001R1 64. DRYER OPERATION Press one of the SELECT pads to select a cycle which is appropriate for the type of fabric being dried. REGULAR, PERM PRESS, DELICATES, KNITS and NO HEAT. These are automatic, preprogrammed cycles. A light to the left of the pad lights up to show pad has been activated. 66. GO, STOP AND RESET GO Press the GO pad to start the dryer. The dryer will not run until the GO pad is pressed. Press the GO pad. The dryer will start immediately and stop automatically when the cycle has completed. Dryer will not start until the GO pad is pressed. STOP Press the STOP pad to stop the dryer at any point in the cycle. The dryer will remain at that portion of the cycle until the GO pad is again pressed. At that time, the cycle will continue where it left off. Pressing the STOP pad two times in succession will completely turn the control off. NOTE: When you have selected an automatic cycle, you will see the letter “AU” appear in the display area. RESET Press the RESET pad two times in succession to cancel any cycle or completely turn the dryer off. TO STOP THE DRYER AT ANY TIME – Open dryer door or press the STOP pad. TO RESTART DRYER – Close door, select a cycle if necessary and press the GO pad. The dryer will not operate if the dryer door is open. 65. STATUS LIGHTS The STATUS lights illuminate to show you at a glance what is happening inside your dryer. Clean Filter 66 Will flash before each cycle. Clean the dryer’s lint filter before each load. A clean lint filter promotes faster drying and energy savings. Drying Remains lit while clothes are drying. CoolDown Lights up during the cool-down portion of the cycle. WrinkleFree (available on some models) Lights up during the wrinkle-free portion of the cycle when the wrinklefree option has been selected. Clothes may be removed from the dryer at any time during the wrinkle-free portion. 67. AUTOMATIC CYCLES Depending on the model of dryer you have, it may or may not have all of the following cycles and features. By pressing REGULAR, PERM PRESS, DELICATES or KNITS, the Normal Automatic Dryness Level will be selected. With the correct cycle chosen, the dryer will determine the exact length of drying time. When the clothes are dry, the dryer will go into the cool-down portion of the cycle. The length of cool-down will vary according to which cycle is chosen. 68. NO-HEAT CYCLE This is a no-heat cycle that tumbles and circulates room temperature air through the load. Use for any items that should not be dried with heat. A preprogrammed 20-minute cycle is automatically chosen for you. Time can be added or subtracted by using the MORE or LESS pads. © Copyright, Alliance Laundry Systems LLC – DO NOT COPY or TRANSMIT 62310 Section 8 Service Procedures Unique to Electronic Control Model Dryers WARNING To reduce the risk of electric shock, fire, explosion, serious injury or death: • Disconnect electric power to the dryer(s) before servicing. • Close gas shut-off valve to gas dryer(s) before servicing. • Never start the dryer(s) with any guards/panels removed. • Whenever ground wires are removed during servicing, these ground wires must be reconnected to ensure that the dryer is properly grounded. W001R1 AUTOMATIC CYCLES REGULAR Options Temp Cool-down PERM PRESS Temp DELICATES Cool-down Temp Cool-down KNITS Temp Cool-down Most Dry 150°F 3 min. 144°F 8 min. — — 145°F 8 min. Extra Dry 150°F 6 min. 144°F 10 min. 120°F 6 min. 145°F 10 min. Dry 144°F 6 min. 144°F 10 min. 115°F 6 min. 140°F 10 min. Damp 135°F 3 min. 120°F 8 min. 110°F 3 min. 130°F 8 min. Figure 51 69. CUSTOMIZING PROGRAMMED CYCLES All automatic cycles can be customized to fit your laundering needs. First select a cycle by pressing a SELECT pad. Then, make changes in the preprogrammed cycle by using the pads to the right of the STATUS lights. The degree of dryness of the load at the end of an automatic cycle is controlled by the MOST DRY, EXTRA DRY, DRY and DAMP pads. Use the MOST DRY selection when you want items extremely dry. Select EXTRA DRY for extra heavy, bulky items (like blue jeans or towels) that tend to hold more water than the average load. Unless another selection is made, the DRY level will automatically be used. Select DAMP for items that you want to iron or finish drying by hanging them up. Refer to Figure 51. The SELECT and DRYNESS level pads work together to provide you with up to nine different drying temperatures. 70. TIME DRYING NOTE: The DRYNESS level pads will not work in the TIME drying cycle. If you prefer, you can set your dryer to dry the load for a specific period of time. The dryer will dry with heat for the number of minutes you have selected, then tumble the load with room temperature air for an additional period of cooldown time. To TIME DRY the load, first press one of the SELECT pads. When the TIME DRY cycles are used, the SELECT pad controls the drying temperature to match the selection with the type of load you are drying. Then, press the SELECT pad.You will see numbers replace the AU in the display area. This tells you how many minutes of heat have been selected. The number which automatically appears is a drying guideline for the type of fabric that would usually be dried at that particular time cycle setting. This time can be increased or decreased by pressing the MORE or LESS pads. Press MORE to add drying time to the cycle. Press LESS to subtract drying time from the cycle. One press of the pad will change the time in one-minute intervals. Pressing and holding the pad down will 62310 © Copyright, Alliance Laundry Systems LLC – DO NOT COPY or TRANSMIT 67 Section 8 Service Procedures Unique to Electronic Control Model Dryers WARNING To reduce the risk of electric shock, fire, explosion, serious injury or death: • Disconnect electric power to the dryer(s) before servicing. • Close gas shut-off valve to gas dryer(s) before servicing. • Never start the dryer(s) with any guards/panels removed. • Whenever ground wires are removed during servicing, these ground wires must be reconnected to ensure that the dryer is properly grounded. W001R1 change the time in five-minute intervals. Refer to Figure 52. To start the dryer, press the GO pad. NOTE: When the GO pad is pressed, you will notice the time in the display area will increase 6 to 10 minutes, depending upon the cycle. This indicates the entire length of the cycle time including the cooldown period. TIME DRY CYCLES Time (Min.) Range (Min.) 40 6 1 – 93 6 Total Time 46 7 – 99 PERM PRESS Cool-Down 30 10 1 – 89 10 Total Time 40 11– 99 DELICATES Cool-Down 20 6 1 – 93 6 Total Time 26 7 – 99 40 10 1 – 89 10 50 11 – 99 20 1 – 99 20 1 – 99 REGULAR Cool-Down KNITS Cool-Down Total Time NO HEAT Total Time Temp. 144°F 144°F 115°F 140°F Ambient Temperatures are approximate. Figure 52 71. SIGNAL A signal is provided to let you know when the cycle is over. The signal has three distinctive loudness levels.Pressing the SIGNAL VOLUME pad once will produce the softest tone. Press pad again and the tone will get louder. Pressing the pad a third time will result in setting the loudest tone. To turn the signal off, press the pad until the 68 SIGNAL VOLUME light goes out. The signal will not sound if the SIGNAL VOLUME light is off. 72. MEMORY You can create and save your favorite cycles by using the MEMORY option. Each programmed cycle —REGULAR, PERM PRES, DELICATES, KNITS and NO HEAT can have one additional memory cycle for a total of five memories or favorite cycles in addition to the preprogrammed cycles. To save a favorite cycle, first select a program cycle, then make changes you want for that cycle. When all selections have been made, press the MEMORY pad. Your favorite cycle is now saved. This cycle will be stored until you either change the cycle or until there is a power outage of several seconds or longer. To recall your memory cycle, press a SELECT cycle pad twice. The light on the MEMORY pad will light up when the memory cycle is recalled. To change a memory cycle, press the programmed cycle selection pad twice to recall the memory cycle. Change the cycle, then press the MEMORY pad. The old memory cycle will be deleted and the new cycle memorized in its place. 73. WRINKLE FREE The WRINKLE FREE cycle is an extended cooldown cycle. This cycle will run for 99 minutes starting at the end of the initial COOL DOWN cycle. This cycle will tumble the clothes in room ambient air for 30 seconds, every five minutes. At the end of every 30-second tumble, the signal will sound for three seconds if signal was selected. Select WRINKLE FREE cycle by pushing pad. WRINKLE FREE cycle is not available in the NO-HEAT cycle. © Copyright, Alliance Laundry Systems LLC – DO NOT COPY or TRANSMIT 62310 Section 8 Service Procedures Unique to Electronic Control Model Dryers WARNING To reduce the risk of electric shock, fire, explosion, serious injury or death: • Disconnect electric power to the dryer(s) before servicing. • Close gas shut-off valve to gas dryer(s) before servicing. • Never start the dryer(s) with any guards/panels removed. • Whenever ground wires are removed during servicing, these ground wires must be reconnected to ensure that the dryer is properly grounded. W001R1 a. Grounding and Wiring Instructions • The dryer must be connected to a grounded metal, permanent wiring system; or an equipment-grounding conductor must be run with the circuit conductors and connected to the equipment-grounding terminal or lead on the dryer. • The dryer has its own terminal block that must be connected to a separate branch, 60 Hertz, single phase, AC (alternating current) circuit fused at 30 amperes (the circuit must be fused on both sides of the line). ELECTRICAL SERVICE FOR DRYER SHOULD BE OF MAXIMUM RATED VOLTAGE LISTED ON NAMEPLATE. DO NOT CONNECT DRYER TO 110, 115 OR 120 VOLT CIRCUIT. Heating elements are available for field installation in dryers which are to be connected to electrical service of different voltage than that listed on nameplate, such as 208. 74. ELECTRICAL SERVICE (Electric Dryers) 120/240 Volt, 60 Hertz, 3-Wire Installation 120/208 Volt, 60 Hertz, 3-Wire Installation NOTE: The wiring diagram is located inside the control hood. WARNING To reduce the risk of fire, electric shock or personal injury, all wiring and grounding MUST conform with the latest edition of the National Electrical Code ANSI/NFPA 70 or the Canadian Electrical Code, CSA C22.1, and such local regulations as might apply. It is the customer’s responsibility to have the wiring and fuses checked by a qualified electrician to make sure the laundry room has adequate electrical power to operate the dryer. W035 POWER SUPPLY POWER SUPPLY 3-WIRE GROUNDED NEUTRAL 120/240 VOLT, 60 HERTZ, A.C. 1 PHASE SERVICE ENTRANCE SWITCH BOX (See note below) A Typical 30-Amp Receptacle NEMA Type 10-30R 30 AMPERE FUSES OR CIRCUIT BREAKER NEUTRAL WIRE INTERMEDIATE FUSE BOX (May be omitted if service entrance box is fused.) METALLIC OR NON-METALLIC SHEATHED CABLE (Copper conductor only) INTERMEDIATE SHUT-OFF BOX (May or may not be used.) PIGTAIL TO DRYER WALL RECEPTACLE NEUTRAL TERMINAL BLOCK IN DRYER NOTE: Connect the dryer to the power supply with the MAXIMUM RATED VOLTAGE listed on the nameplate. DRY1063S PIGTAIL CONNECTION DIRECT CONNECTION Figure 53 62310 © Copyright, Alliance Laundry Systems LLC – DO NOT COPY or TRANSMIT 69 Section 8 Service Procedures Unique to Electronic Control Model Dryers WARNING To reduce the risk of electric shock, fire, explosion, serious injury or death: • Disconnect electric power to the dryer(s) before servicing. • Close gas shut-off valve to gas dryer(s) before servicing. • Never start the dryer(s) with any guards/panels removed. • Whenever ground wires are removed during servicing, these ground wires must be reconnected to ensure that the dryer is properly grounded. W001R1 • If branch circuit to dryer is 15 feet (4.50m) or less in length, use U.L. (Underwriters Laboratories) listed No. 10 A.W.G. wire (copper wire only), or as required by local codes. If over 15 feet (4.50m), use U.L. (Underwriters Laboratories) listed No. 8 A.W.G. wire (copper wire only), or as required by local codes. Allow sufficient slack in wiring so dryer can be moved from its normal location when necessary. • The power cord (pigtail) connection between wall receptacle and dryer terminal block is NOT supplied with dryer. Type of pigtail and gauge of wire must conform to local codes and with instructions mentioned in previous paragraph. • The method of wiring the dryer is optional and subject to local code requirements. Refer to Figure 53. b. Electrical Connection (Three-Wire) IMPORTANT: This dryer is grounded to neutral conductor at the terminal block. If the dryer is installed in a mobile home, or if local codes do not permit grounding through the neutral, proceed as shown on Pages 76 and 77. WARNING (1) Remove the screw and terminal block access cover from the rear of dryer cabinet. (2) Insert ends of wires through power supply hole (containing proper strain relief) in rear of dryer cabinet,. Refer to page 75. Connect the power cord, or direct wiring, to the appropriate terminal block terminals using the three-wire binding (10-32x3/8") screws from the accessories pack in the envelope shipped inside the dryer cylinder. (3) If the dryer had previously been connected with a four-wire power cord, remove the four-wire cord by reversing procedures under four-wire power cord. Refer to pages 76 and 77. IMPORTANT: Use only a U.L. listed No. 10 (copper wire only) three conductor power supply cord kit rated 240 Volts (minimum) 30 Amperes and labeled as suitable for use in a clothes dryer. (4) Tighten these wire-binding screws firmly. IMPORTANT: Failure to tighten these screws firmly may result in wire failure at the terminal block. (5) Secure the strain relief to the power cord, or wires, where they enter the dryer cabinet. (6) Reinstall access cover and screw. To reduce the risk of electric shock, disconnect the electrical service to the dryer before proceeding. W135 70 © Copyright, Alliance Laundry Systems LLC – DO NOT COPY or TRANSMIT 62310 Section 8 Service Procedures Unique to Electronic Control Model Dryers GROUND TO NEUTRAL WIRE (Green) ACCESS COVER (See WARNING below) NEUTRAL TERMINAL GROUND WIRE (Green) TERMINAL BRACKET GROUND SCREW TERMINAL BLOCK “L1” TERMINAL “L2” TERMINAL TERMINAL BRACKET SLOTTED HEX HEAD SCREWS (Shipped inside the dryer) DIRECT WIRING WIRE CONNECTION DETAIL POWER CORD WIRING NEUTRAL (White or Center Wire) STRAIN RELIEF (Not supplied with the dryer POWER CORD OR DIRECT WIRE DRY1064S GROUND SCREW Figure 54 WARNING Dryer is shown with the access cover removed for illustration purposes only. To reduce the risk of an electric shock, NEVER operate the dryer with the access cover removed. W136 62310 © Copyright, Alliance Laundry Systems LLC – DO NOT COPY or TRANSMIT 71 Section 8 Service Procedures Unique to Electronic Control Model Dryers WARNING To reduce the risk of electric shock, fire, explosion, serious injury or death: • Disconnect electric power to the dryer(s) before servicing. • Close gas shut-off valve to gas dryer(s) before servicing. • Never start the dryer(s) with any guards/panels removed. • Whenever ground wires are removed during servicing, these ground wires must be reconnected to ensure that the dryer is properly grounded. W001R1 c. Four-Wire Power Cord IMPORTANT: Use only a U.L. listed No. 10 A.W.G. (copper wire only) four conductor power supply cord kit rated 240 Volts (minimum) 30 Amperes and labeled as suitable for use in a clothes dryer. POWER CORD (Four-Wire) STRAIN RELIEF NUT TYPICAL FOUR-WIRE RECEPTACLE STRAIN RELIEF DRY1065S Figure 55 NOTE: The power cord is not supplied with the dryer when the dryer is shipped from the factory, therefore, disregard Steps 2 and 3 below when connecting a four-wire power cord to a NEW dryer. If the dryer has a three-wire cord attached, then complete Steps 1 through 11. WARNING To reduce the risk of electric shock, disconnect the electrical service to the dryer before proceeding. W135 (1) Remove the screw holding the access plate to the rear of dryer cabinet. (2) Remove three screws holding the three wires to terminal block terminals. Save these screws. (3) Loosen the strain relief screw and pull the cord or wires out through the rear of the dryer. (4) Remove the terminal bracket ground screw holding the green ground wire to the 72 terminal block mounting bracket. Save the screw. NOTE: ON NEW DRYERS – This is the green ground wire that goes from the neutral (center) terminal on the terminal block to the mounting bracket. Install Four-Wire Power Cord (5) Route the end of the four-wire power cord through the strain relief. DO NOT tighten the strain relief screws at this time. (6) Insert the end of the power cord and strain relief through the hole in the rear of dryer cabinet. Refer to Figure 56. Install the strain relief nut from the inside of the cabinet and tighten firmly. (7) Attach the green ground wire (from the four-wire power cord) to the terminal block mounting bracket using the hex head screw removed in Step 4. Tighten the screw firmly. (8) Using the three wire-binding (10-32x3/8") screws from the accessories envelope (located inside the cylinder, unless the screws were previously removed in Step 2), attach the power cord wires to the terminal block terminals as follows: (a) Red to Red (b) Black to Black (c) White to White (see NOTE below) NOTE: When installing the white wire, loop the free eyelet end of the green ground wire (from Step 4) and place it together with the white wire. Attach both wires to the neutral (center) terminal on the terminal block. Refer to Figure 56. IMPORTANT: Failure to tighten the screws firmly on the terminal block may result in terminal block failure. (9) Tighten the two strain relief screws to secure the power cord. (10) Recheck all screws to be sure they are tight. (11) Reinstall the access plate and screw to the rear of the dryer cabinet. © Copyright, Alliance Laundry Systems LLC – DO NOT COPY or TRANSMIT 62310 Section 8 Service Procedures Unique to Electronic Control Model Dryers GROUND TO NEUTRAL WIRE (Green) ACCESS COVER (See WARNING below) NEUTRAL TERMINAL GROUND WIRE (Green) TERMINAL BRACKET GROUND SCREW TERMINAL BLOCK “L1” TERMINAL “L2” TERMINAL TERMINAL BRACKET SLOTTED HEX HEAD SCREWS (Shipped inside the dryer) DIRECT WIRING WIRE CONNECTION DETAIL POWER CORD WIRING NEUTRAL (White or Center Wire) STRAIN RELIEF (Not supplied with the dryer POWER CORD OR DIRECT WIRE DRY1064S GROUND SCREW Figure 56 WARNING Dryer is shown with the access cover removed for illustration purposes only. To reduce the risk of an electric shock, NEVER operate the dryer with the access cover removed. W136 62310 © Copyright, Alliance Laundry Systems LLC – DO NOT COPY or TRANSMIT 73 Section 8 Service Procedures Unique to Electronic Control Model Dryers WARNING To reduce the risk of electric shock, fire, explosion, serious injury or death: • Disconnect electric power to the dryer(s) before servicing. • Close gas shut-off valve to gas dryer(s) before servicing. • Never start the dryer(s) with any guards/panels removed. • Whenever ground wires are removed during servicing, these ground wires must be reconnected to ensure that the dryer is properly grounded. W001R1 NOTE: The wiring diagram is located inside the control hood. 75. ELECTRICAL REQUIREMENTS (Gas Dryers) 120 Volt, 60 Hertz, with 3-Prong Grounding Plug WARNING To reduce the risk of fire, electric shock or personal injury, all wiring and grounding MUST conform with the latest edition of the National Electrical Code ANSI/NFPA 70 or the Canadian Electrical Code, CSA C22.1, and such local regulations as might apply. It is the customer’s responsibility to have the wiring and fuses checked by a qualified electrician to make sure the laundry room has adequate electrical power to operate the dryer. a. The dryer is designed to be operated on a separate branch, polarized, three-wire, effectively grounded, 120 Volt, 60 Hertz, AC (alternating current), circuit protected by a 15 ampere fuse, equivalent fusetron or circuit breaker. b. The three-prong grounding plug on the power cord should be plugged directly into a polarized three-slot effectively grounded receptacle rated 110/120 Volts AC (alternating current) 15 Amps. Refer to Figure 57 for determining correct polarity of the wall receptacle. c. DO NOT OPERATE OTHER APPLIANCES ON THE SAME CIRCUIT. DO NOT OVERLOAD CIRCUITS! Refer to Figure 58. W035 WARNING STANDARD 120 VOLT, 60 HERTZ, 3-WIRE EFFECTIVELY GROUNDED CIRCUIT GROUND L1 NEUTRAL To reduce the risk of an electric shock or fire, DO NOT use an extension cord or an adapter to connect the dryer to the electrical power source. W037 0 V.A.C. 115±12 V.A.C. DO NOT OVERLOAD CIRCUITS NEUTRAL SIDE 115±12 V.A.C. ROUND GROUNDING PRONG DRY1067S NOTE: A qualified electrician should check the polarity of the wall receptacle. If a voltage reading is measured other than that illustrated, the qualified electician should correct the problem. Figure 58 Figure 57 74 © Copyright, Alliance Laundry Systems LLC – DO NOT COPY or TRANSMIT 62310 Section 8 Service Procedures Unique to Electronic Control Model Dryers WARNING To reduce the risk of electric shock, fire, explosion, serious injury or death: • Disconnect electric power to the dryer(s) before servicing. • Close gas shut-off valve to gas dryer(s) before servicing. • Never start the dryer(s) with any guards/panels removed. • Whenever ground wires are removed during servicing, these ground wires must be reconnected to ensure that the dryer is properly grounded. W001R1 d. Grounding and Wiring Instructions • The dryer must be grounded. In the event of malfunction or breakdown, grounding will reduce the risk of electric shock by providing a path of least resistance for electric current. The dryer is equipped with a cord having an equipment-grounding conductor and a threeprong grounding plug. The plug must be plugged into an appropriate outlet that is properly installed and grounded in accordance with all local cords and ordinances. e. Gas Dryers Equipped with Electronic Control • After connecting the dryer to the electrical supply, start the dryer (refer to the Operating Instructions supplied with the dryer). If the electronic control flashes (with the dryer door closed) it could mean the polarity or grounding of the outlet is incorrect. Have a qualified electrician check out the polarity and grounding and correct the problem. Refer to Page 78. 76. SERVICE PROCEDURES FOR TROUBLESHOOTING ELECTRONIC CONTROL WARNING Improper connection of the equipmentgrounding conductor can result in a risk of electric shock. Check with a qualified electrician or service person if you are in doubt as to whether the dryer is properly grounded. WARNING For safety reasons, disconnect electrical service to dyer, and close valve in gas supply line to gas dryer before servicing W038 • DO NOT modify the plug provided with the dryer —if it will not fit the outlet, have a proper outlet installed by a qualified electrician. • If a positive ground cannot be established through the power cord and if local code permits its use, connect an external ground wire (18 gauge minimum, available at your local hardware store). Connect one end of the wire under the ground screw (located at the rear of the dryer) and the other end to a known effective electrical ground. • If your home’s electrical supply does not meet the above specifications and/or if you are not sure your home has an effective ground, have a qualified electrician or your local electrical utility company check it and correct any problems. 62310 Never energize the electrical power to the dryer with any of the panels removed. IMPORTANT: These procedures are intended to be used as an aid in diagnosing potential problems with the electronic control. Refer to Section VII (Service Helps) for diagnosing problems with components other than the electronic control. Refer to Figure 59 for terminal numbers, connections and color coding. 77. DIAGNOSTIC CYCLE a. A diagnostic cycle is built into the electronic control to detect internal problems on the printed circuit board of the control. IMPORTANT: The diagnostic cycle is not intended to diagnose any components built into the control (i.e. relays, transformer, capacitors, etc.). © Copyright, Alliance Laundry Systems LLC – DO NOT COPY or TRANSMIT 75 Section 8 Service Procedures Unique to Electronic Control Model Dryers WARNING To reduce the risk of electric shock, fire, explosion, serious injury or death: • Disconnect electric power to the dryer(s) before servicing. • Close gas shut-off valve to gas dryer(s) before servicing. • Never start the dryer(s) with any guards/panels removed. • Whenever ground wires are removed during servicing, these ground wires must be reconnected to ensure that the dryer is properly grounded. W001R1 c. Self-Diagnostic Routine Entry: Follow the sequence given below. (1) Make sure dryer loading door is closed. (2) Start in the idle mode (all LED’s off). (3) Press the SIGNAL VOLUME and GO pads simultaneously. (4) If unable to start routine, check door switch. b. The diagnostic cycle is used in conjunction with a self-diagnostic routine chart located on the wiring diagram sticker inside of the control hood. Refer to Figure 60. To begin the diagnostic cycle, follow the flow chart on Page 82. NOTE: If the symptom or problems corresponds to one of the symptoms detailed on the following pages, proceed to that flow chart. (The diagnostic cycle chart check does not have to be made.) HEATER ORANGE (NO) L1, RED (COM) Exit: Do any of the following. (1) Press any pad. (2) Open dryer loading door. (3) Unplug the dryer. HEAT RELAY K2 THERMISTOR (P6) NEUTRAL WHITE (P3) THERMISTOR (P5) TRANSFORMER DOOR SWITCH GRAY (P2) FAN BROWN (P1) GROUND GREEN (P4) MOTOR RELAY K1 DRY1068S Figure 59 76 © Copyright, Alliance Laundry Systems LLC – DO NOT COPY or TRANSMIT 62310 Section 8 Service Procedures Unique to Electronic Control Model Dryers WARNING To reduce the risk of electric shock, fire, explosion, serious injury or death: • Disconnect electric power to the dryer(s) before servicing. • Close gas shut-off valve to gas dryer(s) before servicing. • Never start the dryer(s) with any guards/panels removed. • Whenever ground wires are removed during servicing, these ground wires must be reconnected to ensure that the dryer is properly grounded. W001R1 LED Display Illuminated LED Motor Relay Heat Relay Signal Volume 99 None (All Off) On Off Off 88 Wrinkle Free Status Off Off Off 77 Cool Down Off Off Off 66 Drying Off Off Off 55 Clean Filter Off Off Off 44 Memory Off Off Off 33 Damp Off Off Off 22 Dry Off Off Off 11 Extra Dry Off Off Off 00 Most Dry Off Off Off 99 None (All Off) Off Off Softest 88 None (All Off) Off Off Medium 77 None (All Off) Off Off Loudest 77 Signal Volume Off Off Off 55 Wrinkle Free Select Off Off Off 44 No Heat Off Off Off 33 Knits Off Off Off 22 Delicates Off Off Off 11 Perm Press Off Off Off 00 Regular Off Off Off 99 None (All Off) Off On Off 88 None (All Off) On On Off Figure 60 NOTE: 1. This test routine will only light in the LED’s pertaining to the hardware model selected. 2. When the last step in the table is finished, the routine sequence will repeat. 3. East output is on for two seconds. 62310 © Copyright, Alliance Laundry Systems LLC – DO NOT COPY or TRANSMIT 77 Section 8 Service Procedures Unique to Electronic Control Model Dryers WARNING To reduce the risk of electric shock, fire, explosion, serious injury or death: • Disconnect electric power to the dryer(s) before servicing. • Close gas shut-off valve to gas dryer(s) before servicing. • Never start the dryer(s) with any guards/panels removed. • Whenever ground wires are removed during servicing, these ground wires must be reconnected to ensure that the dryer is properly grounded. W001R1 78. SYMPTOM: FAILURE SYMPTOM Diagnostic Cycle. Dryer plugged in. All LED’s should be off. Press and hold SIGNAL VOLUME, then press GO. Do all numbers appearing in the display window correspond with the appropriate LED’s listed in Figure 60, Self-Diagnostic Routine? NO Broken, loose or incorrect wiring? NO Replace control. YES YES Correct wiring. Proceed to the appropriate flow charts for the “SYMPTOM.” NOTE: The DIAGNOSTIC cycle follows the Diagnostic Routine located behind the control hood. All numbers should match with the correct LED’s. Refer to Figure 60. Troubleshooting NOTE: Refer to Figure 59. If the symptom or problem corresponds to one of the symptoms detailed on the following pages, proceed to that flow chart. (The diagnostic cycle check does not have to be made.) 78 © Copyright, Alliance Laundry Systems LLC – DO NOT COPY or TRANSMIT 62310 Section 8 Service Procedures Unique to Electronic Control Model Dryers WARNING To reduce the risk of electric shock, fire, explosion, serious injury or death: • Disconnect electric power to the dryer(s) before servicing. • Close gas shut-off valve to gas dryer(s) before servicing. • Never start the dryer(s) with any guards/panels removed. • Whenever ground wires are removed during servicing, these ground wires must be reconnected to ensure that the dryer is properly grounded. W001R1 79. SYMPTOM: FLASHING DISPLAY NOTE: Refer to Figure 59 to aid in this Troubleshooting section. Was door open or was the STOP pad pressed after dryer was running? YES Normal operation. Refer to Operating Instructions. NO Unplug power cord and check Place meter between outlet test for proper polarity and terminals “P2” (door) grounding. Refer to . and “P3” (neutral) on control. NO Polarity and grounding okay? NO Contact electrician. YES Remove control hood and check for loose or incorrect wiring to terminals “P2” and “P3” on the control. Place test meter between terminals “P2” (door) and “P3” (neutral) on control. Approximately 120 Volts between “P2” and “P3” when door is closed and “0” Volts when door is open? NO Check door switch and wiring from door switch to the control. YES Recheck from beginning. If problem persists, replace control. 62310 © Copyright, Alliance Laundry Systems LLC – DO NOT COPY or TRANSMIT 79 Section 8 Service Procedures Unique to Electronic Control Model Dryers WARNING To reduce the risk of electric shock, fire, explosion, serious injury or death: • Disconnect electric power to the dryer(s) before servicing. • Close gas shut-off valve to gas dryer(s) before servicing. • Never start the dryer(s) with any guards/panels removed. • Whenever ground wires are removed during servicing, these ground wires must be reconnected to ensure that the dryer is properly grounded. W001R1 80. SYMPTOM: BLOWN FUSE OR TRIPPED CIRCUIT BREAKER Fuse blown or tripped breaker? Reset breaker or replace fuse. YES Does fuse or breaker blow immediately upon plugging in power cord? Unplug power cord and disconnect wires from terminals “P3” and “COM”. Take resistance reading between terminals. *166 Ohms ± 30% between “P3” and “COM” terminals. NO Does fuse or breaker blow immediately after motor starts? YES NO NO Replace control. NO Correct wiring. Check motor and motor switch. YES Check for broken, loose or incorrect wiring. Wiring okay? YES Recheck from beginning. If problem persists, replace control. Does fuse or breaker blow 15 seconds after motor starts? NO Recheck from beginning. YES Check heater circuit for shorted, broken, loose or incorrect wiring. 80 © Copyright, Alliance Laundry Systems LLC – DO NOT COPY or TRANSMIT 62310 Section 8 Service Procedures Unique to Electronic Control Model Dryers WARNING To reduce the risk of electric shock, fire, explosion, serious injury or death: • Disconnect electric power to the dryer(s) before servicing. • Close gas shut-off valve to gas dryer(s) before servicing. • Never start the dryer(s) with any guards/panels removed. • Whenever ground wires are removed during servicing, these ground wires must be reconnected to ensure that the dryer is properly grounded. W001R1 81. SYMPTOM: CONTROL WILL NOT WAKE UP (No LED’S Light) AFTER SELECT PAD IS PRESSED Power cord plugged in? NO Plug in. YES Proper voltage, polarity and grounding at outlet? Refer to Figure 57. NO Go to "Symptom: Blown Fuse Or Tripped Circuit Breaker", Paragraph 80. YES Check to see that voltage is being applied to control. Approximately 120 Volts between terminals “P3” (neutral) and “COM” on heat relay K2? NO Check for broken, loose or incorrect wiring from outlet to control. YES Unplug power cord and disconnect wires from terminals “P3” and “COM”. Take resistance reading through transformer. *166 Ohms ± 30% between “P3” and “COM” terminals. NO Replace control. YES Recheck from beginning. If problem exists, after checking for loose, broken or incorrect wiring, replace control. 62310 © Copyright, Alliance Laundry Systems LLC – DO NOT COPY or TRANSMIT 81 Section 8 Service Procedures Unique to Electronic Control Model Dryers WARNING To reduce the risk of electric shock, fire, explosion, serious injury or death: • Disconnect electric power to the dryer(s) before servicing. • Close gas shut-off valve to gas dryer(s) before servicing. • Never start the dryer(s) with any guards/panels removed. • Whenever ground wires are removed during servicing, these ground wires must be reconnected to ensure that the dryer is properly grounded. W001R1 82. SYMPTOM: CONTROL WAKES UP (When SELECT Pad is Pressed) BUT MOTOR DOES NOT START PROPERLY After door was opened, motor starts when door is closed without pressing GO? YES Check outlet for proper polarity and grounding. Refer to Figure 57. NO Polarity and grounding okay? With door closed, motor does not start after GO is pressed? NO Contact electrician. YES YES Recheck from beginning. If problem persists, replace control. Check outlet for proper polarity and grounding. Refer to Figure 57. Polarity and grounding okay? NO Contact electrician. YES Remove control hood and see if grey wire from door switch is connected to terminal “P2” (door). Approximately 120 Volts between terminals “P2” (door) and “P3” (neutral) when door is closed and “0” Volts when door is open? NO Inspect wiring from control to door switch, and door switch. YES With door closed, press REGULAR and GO to check motor relay K1. Did you hear relay click and do you read approximately 120 Volts between terminals “P1” (fan) and “P3” (neutral)? NO Replace control. YES Check motor overload protector, motor and motor switch. 82 © Copyright, Alliance Laundry Systems LLC – DO NOT COPY or TRANSMIT 62310 Section 8 Service Procedures Unique to Electronic Control Model Dryers WARNING To reduce the risk of electric shock, fire, explosion, serious injury or death: • Disconnect electric power to the dryer(s) before servicing. • Close gas shut-off valve to gas dryer(s) before servicing. • Never start the dryer(s) with any guards/panels removed. • Whenever ground wires are removed during servicing, these ground wires must be reconnected to ensure that the dryer is properly grounded. W001R1 83. SYMPTOM: HEATER DOES NOT TURN ON OR NO HEAT Are you in a NO HEAT cycle? YES Normal operation. NO Remove control hood and verify that voltage is being applied to control between terminals “COM” on heat relay K2 and “P3” (neutral). Approximately 120 Volts between “COM” and “P3”? NO Check for broken, loose or incorrect wiring. YES Unplug power cord. Disconnect wire from terminal “P5” on control. This will simulate a call for heat. Disconnect wire from terminal “P1” to eliminate any feedback through heater circuit on electric dryers. Plug in power cord. Press REGULAR and GO and place meter between terminals “N.O.” on heat relay K2 and “P3” (neutral). Approximately 120 Volts between “N.O.” (door) and “P3” in five seconds? NO Replace control. YES Verify that orange wire is connected to terminal “N.O.” on heat relay K2. Check motor switch, limit thermostat, exhaust, heater assembly or gas valve. 62310 © Copyright, Alliance Laundry Systems LLC – DO NOT COPY or TRANSMIT 83 Section 8 Service Procedures Unique to Electronic Control Model Dryers WARNING To reduce the risk of electric shock, fire, explosion, serious injury or death: • Disconnect electric power to the dryer(s) before servicing. • Close gas shut-off valve to gas dryer(s) before servicing. • Never start the dryer(s) with any guards/panels removed. • Whenever ground wires are removed during servicing, these ground wires must be reconnected to ensure that the dryer is properly grounded. W001R1 84. SYMPTOM: IMPROPER HEAT OR DRYING TIMES Unplug power cord. Disconnect wires from terminals “P5” and “P6” on control (thermistor). Plug in power cord and press the REGULAR PAD. Does “SH” appear in time display, verifying that control is reading signal from thermistor circuit correctly? YES Replace control. NO Open loading door. Note the temperature reading inside the dryer. Unplug power cord and reconnect wires to “P5” and “P6”. Remove wires from the “COM” and “N.O.” terminals on heat relay K2. Zero Ohms between “COM” and “N.O.” terminals. Take resistance reading through thermistor by measuring resistance through wires leading to terminals “P5” and “P6” on control. This resistance reading MUST BE taken within three minutes after pressing the GO pad. YES Replace control. Do temperature and resistance readings approximately match thermistor chart? Refer to Figure 61. Replace thermistor. YES NO Infinite Ohms between “COM” and “N.O.” terminals. NO Replace control. YES Reconnect wires to “COM” and “N.O.” terminals on heat relay K2. Open loading door. Tape temperature probe or thermometer on the inside of the dryer’s front bulkhead. Close loading door. Unplug power cord. Disconnect wires from terminals “P5” and “P6” control (thermistor). Plug in power cord and press the REGULAR and GO PADS. 84 NO Reconnect wires to control and check for broken, loose or incorrect wiring between control and thermistor. Wiring okay? NO Refer to wiring diagram and correct. YES Problem probably not due to electronic control or thermistor. After all checks have been performed and a heat problem still exists, always replace the thermistor before replacing the control. © Copyright, Alliance Laundry Systems LLC – DO NOT COPY or TRANSMIT 62310 Section 8 Service Procedures Unique to Electronic Control Model Dryers WARNING To reduce the risk of electric shock, fire, explosion, serious injury or death: • Disconnect electric power to the dryer(s) before servicing. • Close gas shut-off valve to gas dryer(s) before servicing. • Never start the dryer(s) with any guards/panels removed. • Whenever ground wires are removed during servicing, these ground wires must be reconnected to ensure that the dryer is properly grounded. W001R1 85. SYMPTOM: “oP” APPEARS IN TIME DISPLAY Unplug power cord, remove front panel and check for broken, loose or incorrect wiring between thermistor and control. Wiring between terminals “P5” and “P6” on control and the thermistor terminals okay? NO Refer to wiring diagram and correct. YES Remove wires from thermistor and take resistance reading across the thermistor terminals. Did you read infinite Ohms? YES Replace thermistor. NO Was temperature near thermistor below 30°F? For safety purposes, the control will go into the “oP” condition if the temperature near the thermistor falls below 30° F. NO Replace thermistor. YES Reconnect wires to thermistor and plug in power cord. Press REGULAR and GO pads to start dryer. The dryer will heat for three minutes to raise the temperature above 30° F. Did “oP” appear in display after three minutes. NO Normal operation. YES Recheck from beginning. If problem persists, always replace thermistor before replacing the control. 62310 © Copyright, Alliance Laundry Systems LLC – DO NOT COPY or TRANSMIT 85 Section 8 Service Procedures Unique to Electronic Control Model Dryers WARNING To reduce the risk of electric shock, fire, explosion, serious injury or death: • Disconnect electric power to the dryer(s) before servicing. • Close gas shut-off valve to gas dryer(s) before servicing. • Never start the dryer(s) with any guards/panels removed. • Whenever ground wires are removed during servicing, these ground wires must be reconnected to ensure that the dryer is properly grounded. W001R1 86. SYMPTOM: “SH” APPEARS IN TIME DISPLAY Unplug power cord, remove front panel and control hood. Check shorted wiring between terminals “P5” and “P6” on control and thermistor. Wiring between control and thermistor okay? NO Refer to wiring diagram and correct. YES Remove wires from thermistor and take a resistance reading across thermistor terminals. YES Is zero Ohms read? Replace thermistor. NO Was temperature near thermistor above 175° F when control went into “SH” condition? For safety purposes, the control will go into the “SH” condition if the temperature near thermistor is above 175° F. NO Replace thermistor and if problem persists, replace control. YES Cool thermistor down and go to "Symptom: Improper Heat Or Drying Times", Paragraph 84. 86 © Copyright, Alliance Laundry Systems LLC – DO NOT COPY or TRANSMIT 62310 Section 8 Service Procedures Unique to Electronic Control Model Dryers WARNING To reduce the risk of electric shock, fire, explosion, serious injury or death: • Disconnect electric power to the dryer(s) before servicing. • Close gas shut-off valve to gas dryer(s) before servicing. • Never start the dryer(s) with any guards/panels removed. • Whenever ground wires are removed during servicing, these ground wires must be reconnected to ensure that the dryer is properly grounded. W001R1 Temp. °F –20 –15 –10 – 5 0 5 10 15 20 25 30 35 40 45 50 Resistance Ohms 826000 697000 590500 501500 427000 364800 312500 268400 231200 199600 172800 150000 130500 113800 99500 Thermistor Chart Resistance Temp. °F Ohms 55 87200 60 76600 65 67350 70 59400 75 52500 77 50000 80 46500 85 41300 90 36700 95 32700 100 29100 150 26100 110 23300 115 20900 120 18800 Temp. °F 125 130 135 140 145 150 155 160 165 170 175 180 185 190 195 Resistance Ohms 16900 15200 13800 12400 11300 10200 9300 8400 7700 7000 6400 5900 5400 4900 4500 Figure 61 NOTE: As temperature decreases, resistance increases. As temperature increases, resistance decreases. 87. CONTROL REPLACEMENT When a problem with the electronic control is detected during the diagnostic cycle, or while making the electrical tests we have discussed, the control is replaced as a complete unit. Due to the sensitivity of the electronic control, careful handling is required. As a precautionary measure, we recommend the use of a grounded wrist strap when handling the electronic controls. The wrist strap, cord and alligator clip are designed to carry away any electrostatic charge from your body and to direct the charge to an available ground. By using this static protection device, potential electrostatic discharge problems associated with the handling of the electronic control will be minimized. Always handle the electronic control by the metal edges. If a wrist strap is not available, touch the washer while it is plugged in before handling the control to dissipate any charge. To replace the control, first unplug the washer. Remove all of the wires connected to the control and take out the four screws securing the control to the control hood. When removing wires from 62310 the control, hold down on the board near the appropriate terminal, and disconnect the wires using a pliers. Do not pull on wires. The new control is supplied in a special anti-static wrapping, and protected by anti-static foam. While holding the metal edges, remove the control from the foam and the wrapping. Lift the inoperative control off the mounting bracket and place it on the anti-static wrapping. Before positioning the new control in the control hood, peel off the protective plastic coating from the front side of the control, then fasten the control down with the four screws. Following the wiring diagram, reconnect the wires to the new control, then replace the control hood. It is important to take care when handling the original control. It must be carefully laced in the anti-static wrapping and the anti-static foam which was removed from the new control. A copy of the replacement report, must be completely filled out and returned with the control. Warranty credit will not be issued if the control is not wrapped properly. © Copyright, Alliance Laundry Systems LLC – DO NOT COPY or TRANSMIT 87 Section 9 Internal Wiring of Dryer Motor Switch WARNING To reduce the risk of electric shock, fire, explosion, serious injury or death: • Disconnect electric power to the dryer(s) before servicing. • Close gas shut-off valve to gas dryer(s) before servicing. • Never start the dryer(s) with any guards/panels removed. • Whenever ground wires are removed during servicing, these ground wires must be reconnected to ensure that the dryer is properly grounded. 9 8 4PS BLACK BLUE ORANGE O.L. 4PM RED W001R1 7 5 6 4 5 3 1 6 1 2 DRY1070S General Electric Motor with Internal Switch MAIN WINDING BLU START WINDING OVERLOAD PROTECTOR BLK ORG 4 3 5 S S R R 4 1 2 6 5 DRY869S General Electric Motor with External Switch MAIN WINDING YEL START WINDING OVERLOAD PROTECTOR BLK BRN 4 BLU 7 BLK S S R R 4 1 5 YEL 2 6 5 DRY869S Emerson Motor with External Switch 62310 © Copyright, Alliance Laundry Systems LLC – DO NOT COPY or TRANSMIT 89 Section 10 Wiring Diagrams WARNING Failure to install, maintain, and/or operate this machine according to the manufacturer's instructions may result in conditions which can produce bodily injury and/or property damage. W030 WIRING DIAGRAMS AND SCHEMATICS FOUND ON THE FOLLOWING PAGES ARE FOR MODELS COVERED IN THIS MANUAL. 62310 © Copyright, Alliance Laundry Systems LLC – DO NOT COPY or TRANSMIT 91 Section 10 Wiring Diagrams WARNING Failure to install, maintain, and/or operate this machine according to the manufacturer's instructions may result in conditions which can produce bodily injury and/or property damage. W030 MODELS AG9439, NG8839, AGE959 AND AGE939 92 © Copyright, Alliance Laundry Systems LLC – DO NOT COPY or TRANSMIT 62310 Section 10 Wiring Diagrams WARNING Failure to install, maintain, and/or operate this machine according to the manufacturer's instructions may result in conditions which can produce bodily injury and/or property damage. W030 MODELS AE9433, NE8833, AEE953 AND AEE933 62310 © Copyright, Alliance Laundry Systems LLC – DO NOT COPY or TRANSMIT 93 Section 10 Wiring Diagrams WARNING Failure to install, maintain, and/or operate this machine according to the manufacturer's instructions may result in conditions which can produce bodily injury and/or property damage. W030 MODELS NG6819 AND AG5419 94 © Copyright, Alliance Laundry Systems LLC – DO NOT COPY or TRANSMIT 62310 Section 10 Wiring Diagrams WARNING Failure to install, maintain, and/or operate this machine according to the manufacturer's instructions may result in conditions which can produce bodily injury and/or property damage. W030 MODELS NE6813 AND AE5413 62310 © Copyright, Alliance Laundry Systems LLC – DO NOT COPY or TRANSMIT 95 Section 10 Wiring Diagrams WARNING Failure to install, maintain, and/or operate this machine according to the manufacturer's instructions may result in conditions which can produce bodily injury and/or property damage. W030 MODELS AGM659 AND AGM639 96 © Copyright, Alliance Laundry Systems LLC – DO NOT COPY or TRANSMIT 62310 Section 10 Wiring Diagrams WARNING Failure to install, maintain, and/or operate this machine according to the manufacturer's instructions may result in conditions which can produce bodily injury and/or property damage. W030 MODELS AEM653 AND AEM633 62310 © Copyright, Alliance Laundry Systems LLC – DO NOT COPY or TRANSMIT 97 Section 10 Wiring Diagrams WARNING Failure to install, maintain, and/or operate this machine according to the manufacturer's instructions may result in conditions which can produce bodily injury and/or property damage. W030 MODELS NG4819, AG4419, AGM459 AND AGM439 98 © Copyright, Alliance Laundry Systems LLC – DO NOT COPY or TRANSMIT 62310 Section 10 Wiring Diagrams WARNING Failure to install, maintain, and/or operate this machine according to the manufacturer's instructions may result in conditions which can produce bodily injury and/or property damage. W030 MODELS NE4813, AE4413, AEM453 AND AEM433 62310 © Copyright, Alliance Laundry Systems LLC – DO NOT COPY or TRANSMIT 99 Section 10 Wiring Diagrams WARNING Failure to install, maintain, and/or operate this machine according to the manufacturer's instructions may result in conditions which can produce bodily injury and/or property damage. W030 MODELS AG3419, AGM359 AND AGM339 100 © Copyright, Alliance Laundry Systems LLC – DO NOT COPY or TRANSMIT 62310 Section 10 Wiring Diagrams WARNING Failure to install, maintain, and/or operate this machine according to the manufacturer's instructions may result in conditions which can produce bodily injury and/or property damage. W030 MODELS AE3413, AEM353 AND AEM333 62310 © Copyright, Alliance Laundry Systems LLC – DO NOT COPY or TRANSMIT 101