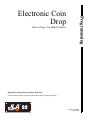
1
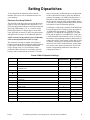
Programming
Electronic Coin
Drop
Refer to Page 3 for Model Numbers
Keep These Instructions for Future Reference.
(If this machine changes ownership, this manual must accompany machine.)
Part No. 513448R1
October 2010
WARNING
Failure to install, maintain, and/or operate
this machine according to the
manufacturer's instructions may result in
conditions which can produce bodily injury
and/or property damage.
W030
513448
NOTE: The WARNING and IMPORTANT
instructions appearing in this manual are not meant
to cover all possible conditions and situations that
may occur. It must be understood that common
sense, caution, and carefulness are factors which
cannot be built into these machines. These factors
MUST BE supplied by the person(s) installing,
maintaining, or operating the machines.
Always contact the distributor, service agent, or the
manufacturer about any problems or conditions you do
not understand.
© Published by permission of the copyright owner – DO NOT COPY or TRANSMIT
1
Table of
Contents
Model Identification ...........................................................................
3
Applying Overlay and Coin Label ....................................................
4
Setting Dipswitches.............................................................................
Teachmode............................................................................................
5
6
Troubleshooting and Cleaning Coin Drop .......................................
Troubleshooting Coin Drop..................................................................
Cleaning Coin Drop..............................................................................
7
7
7
© Published by permission of the copyright owner.
2
© Published by permission of the copyright owner – DO NOT COPY or TRANSMIT
513448
Model Identification
Information in this manual is applicable to these models:
JDEBEFGW301EW01
JDGBEFGW301EW01
JF3LEFSP411EW01
513448
JFNLEFSG301EW01
JFNLEFSP301EW01
JSEBEFGW301EW01
JSGBEFGW301EW01
JT1DEFSP411EW01
JT2DEFSP411EW01
JTEDEFSP301EW01
JTGDEFSP301EW01
© Published by permission of the copyright owner – DO NOT COPY or TRANSMIT
3
Applying Overlay and Coin Label
To add overlay and coin drop denomination label
(supplied in accessories bag), perform the following
steps:
1. Remove coin drop label and insert sheet from
accessories bag.
2. Cut out appropriate label or create a label with
appropriate coins if desired label is not available
on 38725 insert sheet.
3. Slide appropriate label into window of adhesive
backed overlay.
4. Remove paper backing from adhesive backed
coin drop overlay.
5. Align and apply overlay to front of metercase (or
control cabinet for front control dryers, stacked
dryers and front control frontload washers).
NOTE: Angle the overlay so that the bottom edge
aligns and slides into the space between the
metercase and the protective guard.
For stacked dryers and stacked washers and
dryers, this procedure must be followed for BOTH
the upper and lower pockets.
4
© Published by permission of the copyright owner – DO NOT COPY or TRANSMIT
513448
Setting Dipswitches
To set a dipswitch to determine which coins the
machine will accept, refer to information below for
your coin drop.
Electronic Coin Drop 70294112
The electronic coin drop comes preset from the factory
ready to accept Great Britain coins (dipswitch 15 in
OFF [Accept] position) and preset to block tokens and
Euro coins (dipswitches 9, 10, 11, 12 and 16 in ON
[Blocked] position). To change drop to accept Euro
coins, dipswitch 16 must be in OFF (Accept) position
and dipswitch 15 must be in ON (Blocked) position.
NOTE: Switch is in up position when ON (Blocked)
and is in down position when OFF (Accept).
The electronic coin drop is capable of accepting or
blocking coins based on the electronic signal generated
by the coins. If the drop is accepting invalid coins
(slugs, foreign coins, etc.), the tolerances can be
narrowed (valid coins may be occasionally rejected,
but they will be returned to the customer). To set the
drop to accept only medium tolerances, the dipswitch
for the wide tolerance must be in the ON (Blocked)
position. For instance, 0.10 GBP wide (dipswitch 1)
should be in ON (Blocked) position. To completely
block a specific coin, the wide, medium and/or narrow
(1.00 GBP, for example) tolerance dipswitches for that
coin must be in the ON (Blocked) position.
Coin Output 1 of the drop is used for Great Britain and
Euro coins listed below. The drop gives one signal for
.10 GBP/EUR, two signals for .20 GBP/EUR, five
signals for .50 GBP/EUR, ten signals for 1.00 GBP/
EUR, and 20 signals for 2.00 GBP/EUR. (Coin Value
1 on the electronic control must be set for .10. Refer to
the control’s Programming manual for instructions on
setting coin values.) Coin Output 2 of the drop is used
for tokens. The drop gives one signal for each token
entered. (Coin Value 2 on the electronic control must
be set to the value desired for the token. Refer to the
control’s Programming manual for instructions on
setting token values.)
Preset 70294112 Dipswitch Settings
Dipswitch
Coin/Token Type
Blocked
(ON position)
Accept
(OFF position)
X
1
0.10 GBP/0.20 GBP/0.20 EUR/*0.10 GBP2010 wide
2
0.10 GBP/0.20 GBP/0.20 EUR/*0.10 GBP2010 medium
3
4
0.50 GBP/0.50 EUR/1.00 GBP/1.00 EUR/2.00 GBP/
2.00 EUR wide
0.50 EUR/1.00 EUR/2.00 EUR medium
X
5
0.50 GBP medium/0.50 EUR narrow
X
6
1.00 GBP medium/1.00 EUR narrow
X
7
2.00 GBP medium/2.00 EUR narrow
X
8
Teachmode
X
9
Token 07 BZ
X
10
Token 52 MS
X
11
Token 51 BZ
X
12
Token 56 MS
X
13
Teachmode 15
X
14
Teachmode 16
X
15
Great Britain currency
X
X
X
X
Euro currency
16
*This currency setting is available starting coin drop Serial No. 110251 and date code 37/10.
513448
© Published by permission of the copyright owner – DO NOT COPY or TRANSMIT
5
Setting Dipswitches
Teachmode
The Teachmode option allows the owner to program
the coin drop to accept coins or tokens that differ from
those shown in tables above. Refer to the following
steps to set the coin selector to accept the new coins or
tokens.
NOTE: The steps for setting Teachmode must be
followed in the exact order shown below for the
Teachmode to work properly.
1. Set dipswitch 8 to ON (Blocked) position.
2. Set dipswitch 13 OR dipswitch 14 to ON
(Blocked) position (only dipswitches 13 and 14
are available for new coins or tokens).
When the teaching procedure has been completed, the
coin drop magnet will operate briefly one time to
indicate the Teachmode was successful.
If the coin or token used for the Teachmode has a
signal that overlaps the signal of an already
programmed coin, the coin selector magnet will
operate twice briefly, indicating the new coin or token
is not stored in the drop.
Coins or tokens programmed using the Teachmode
will use coin output 2 of the drop and will give one
signal for each coin or token entered into the drop.
(Coin Value 2 on the electronic control must be set to
the value desired for the coin or token. Refer to the
control’s Programming manual for instructions on
setting coin values.)
IMPORTANT: DO NOT set both dipswitches 13
and 14 to ON (Blocked) position at same time.
3. Insert at least 10 different coins or tokens into the
coin drop to program the coin selector.
4. Set dipswitch selected in step 2 to OFF (Accept)
position.
NOTE: A click should be heard after setting
dipswitch to OFF (Accept) position. If no click is
heard, repeat steps 2-4.
5. Set dipswitch 8 to OFF (Accept) position.
6. Wait 15 seconds before testing meter with coins
or tokens.
NOTE: When setting control to accept two (2)
coins, repeat steps 1-6 for second coin.
6
© Published by permission of the copyright owner – DO NOT COPY or TRANSMIT
513448
Troubleshooting and Cleaning Coin Drop
When a coin is placed into coin slot, the coin should
roll down drop and be heard dropping into coin vault.
If coin does not fall into coin vault or if coin drop
sensor does not register that coin has been entered,
follow troubleshooting instructions below.
Coin Drops with Old-Style Spring
(Refer to Figure 1)
Troubleshooting Coin Drop
Is proper electrical power supplied to coin drop?
Incorrect electrical connection may prevent coins from
registering in coin drop. Refer to wiring diagram and
service manual for proper connections.
Is machine level? Machines that are not level may
prevent coins from following through required check
stages of drop. Refer to Installation Instructions for
instructions on leveling machine.
Is coin drop clean? Residue or lint build-up may
prevent coins from following through required check
stages of drop. Refer to Cleaning Coin Drop
instructions below.
IMPORTANT: Never use oil to correct coin drop
problems. Oil residue will prevent coins from
rolling properly.
IMPORTANT: Do not bend or damage mechanical
parts within coin drop.
DRY2088N
1
DRY2088N
1
Spring
Figure 1
a. Move spring downward until cover catch is
free. Refer to Figure 2.
NOTE: Do not lift or overbend the spring in any
direction.
Cleaning Coin Drop
The electronic coin drop should be cleaned once a
year. Clean the drop more often if it is exposed to high
levels of residue or lint build-up. Follow the
instructions below for cleaning the coin drop.
1. Disconnect electrical power to machine and drop.
2. Remove coin drop from machine.
3. Open cover of coin drop. Refer to instructions for
your coin drop below.
DRY2088N
1
DRY2088N
1
Catch
Figure 2
513448
© Published by permission of the copyright owner – DO NOT COPY or TRANSMIT
7
Troubleshooting and Cleaning Coin Drop
b. Open cover for coin drop. Refer to Figure 3.
1
1
DRY2408N
DRY2408N
1
Spring
Figure 5
4. Clean the coin path with a soft brush and wipe
exposed surfaces with an alcohol moistened
cloth. Refer to Figure 6 and Figure 7.
DRY2089N
1
Cover
.
Figure 3
Coin Drops with New-Style Spring
(Refer to Figure 4)
1
DRY2090N
OLD-STYLE SPRING COIN DROP
DRY2090N
Figure 6
DRY2404N
DRY2404N
1
Spring
Figure 4
a. Open cover of coin drop. Refer to Figure 5.
NOTE: Do not overbend the spring by opening
cover too far.
8
DRY2405N
NEW-STYLE SPRING COIN DROP
DRY2405N
Figure 7
© Published by permission of the copyright owner – DO NOT COPY or TRANSMIT
513448
Troubleshooting and Cleaning Coin Drop
5. Clean residue from coin rail with an alcohol
moistened cloth. Refer to Figure 8.
6. Clean light sensors with a soft brush or air spray
duster. Refer to Figure 9.
1
1
DRY2407N
1
Light Sensors
1
Figure 9
DRY2406N
1
Alcohol Moistened Cloth
Figure 8
7. Close cover for coin drop.
8. Coin Drops with OLD-Style Spring – Move
spring back over cover catch.
9. Reinstall coin drop into machine.
10. Reconnect electrical power to machine and drop.
11. Add a coin to drop to verify that coin drop is
operating properly and that electrical connection
is working properly.
513448
© Published by permission of the copyright owner – DO NOT COPY or TRANSMIT
9