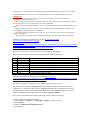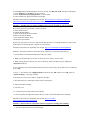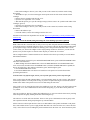
1
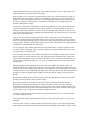
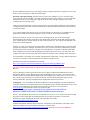
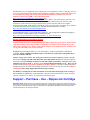
FAQ for Canon’s Cartridge
Q1) How to test the page yield for Canon?
A1) It require a standard format for all brands therefore ISO is the current international standard. For
people to be able to compare page yields between different printers, models, brands and/or manufacturers,
there is one industry-wide testing methodology. Canon, HP, Epson, Lexmark and other industry leading
manufacturers have worked closely with the International Standards Organization (ISO) to establish this
standard. It is called “ISO/IEC 24711“.
Q2) What does the ISO standard specify?
ISO/IEC 24711 outlines the following:
- The test methodology that manufacturers should use to determine ink cartridge yields
- The way manufacturers should declare yield values from these test results
- The appropriate method of describing the yield of cartridge in documentation supplied to the consumer
Test methodology
The quoted page yields are based on an average of three printers of a kind, each continuously printing a
standard ISO sample document (ISO/IEC 24712) until the ink runs out („end of life‟). This is done three
times per printer, using a new set of cartridges each time.
The „end of life‟ is then determined when either of two phenomena occurs:
- Fade, caused by depletion of ink in the cartridge, or
- Automatic printing stop, caused by an Ink Out detection function.
To determine page yields, a set of standard sample documents is used (ISO/IEC 24712). These are designed
to represent the documents printed by a typical user.
Information extracted on 30 October 20078 from the Canon web URL:
http://www.canon.co.uk/ink/Yield/Methodology/index.asp
Q3) User complaint and feedback that ink leaks when orange Cap removed that dirty their hands?
A3) It depends on how User hold the cartridge when the orange cap been removed. The correct position is
to hold the side of the cartridge before removing the orange cap. Majority of the User hold and pressed on
the ink cartridge when removing the orange cap, result in ink been leaked upon cap removal. Thus User
feedback it the cartridge design faulty. This is not true as it the User error and mistake. Below is the picture
and explanation by Original Canon‟s Service Center on such problem encountered. Example message
extracted from one of the URL stated in item 5 (Quote) –
5. Prepare the replacement tank.
(1) Remove the new ink tank from its packaging, then pull the orange tape in the direction of the arrow (B)
so that the protective film does not remain on the air hole (C). Then remove the film completely (D).
IMPORTANT
Make sure that all the orange tape (equivalent to Nippon-ink Yellow Label) has been peeled off along the
perforation. If part of the orange tape is remaining, ink may leak out when you remove the protective cap
and may not eject properly when printing.
(2) Remove the orange protective cap from the bottom of the ink tank. Discard the cap once it is removed.
(E) Carefully hold the protective cap when removing it to prevent the ink from staining your fingers.
IMPORTANT
* Do not touch the electrical contacts (F) on the ink tank. Doing so can cause the machine to
malfunction or become unable to print.
* Be sure to remove the clear film from the ink tank in the exact order shown above, as failure to follow
this step may cause the ink to leak and stain your clothes and hands.
* Do not squeeze the side of ink tanks as this may cause the ink to leak out and stain your clothes and
hands.
* Do not reattach the protective cap once you have removed it. Discard it according to the local laws
and regulations regarding disposal of consumables.
* Do not touch the open ink port once the protective cap is removed, as this may prevent the ink from
being ejected properly.
* Be careful not to stain your clothes and hands with ink on the removed protective cap. (Unquote)
Information extracted on 20 September 2010 at URL: http://support-ph.canonasia.com/contents/PH/EN/8200114700.html
http://www.canoneurope.com/Support/Consumer_Products/products/printers/InkJet/PIXMA_iP_series/iP3600.aspx?faqtcmur
i=tcm:13-610272&page=1&type=faq
http://support-au.canon.com.au/contents/AU/EN/8200542500.html
Q4) Need to know Canon‟s Code Error number and it Meaning or representation?
A4) For Canon‟s Error Code number and it Meaning or Representation are as follow:
S/No
Code Number
U041
U043
U071
U072
U130
U140
UI50
U163
It Meaning & Representation
Ink might run out need to replace or install properly.
Ink cartridge cannot be detected and/or recognized.
Suspect more than one ink tank of the following color is installed.
Some Ink Tank not properly installed or fitted.
Remaining Ink level cannot be correctly detected.
Ink cartridge cannot be detected and/or recognized
Ink cartridge cannot be detected and/or recognized
Ink run out need to replace ink tank.
Information extracted on 20 September 2010 at URL: http://www.canoneurope.com/Support/Consumer_Products/products/Fax__Multifunctionals/InkJet/PIXMA_MX_series/MX8
50.aspx?faqtcmuri=tcm:13-605728&page=1&type=faq
Q5) How to default Canon’s printer after refilling the Ink Cartridges for reuse?
A5) Attached were information highlighted base on the model as example for your reference and selfexplanatory. User can press the Reset/ Stop or Start Button and hold it for 10 seconds before releasing it.
This might help to reset the error message and/or ink level as required. If nothing happen try using the
different methods as stated and specified below examples - Quoted – Method 1 Here is how to reset MX330 Ink Cartridge (210 model) Counter in Win Vista System:
1. Refill cartridge and install back to printer.
2. Open Properties in "Printers" from "Start Bar"-"Settings" on left lower corner.
3. Open "Advance".
4. Uncheck "Enable advanced printing features".
5. Apply and close.
6. Hold "Stop" button on MX330 printer for 10-20 seconds. The "Ran out of ink" message will disappear.
7. Open "Properties" in "Printers" again as in Step 2.
8. Check "Enable advance printing features" to reset counter.
9. Printer should work again with refilled ink cartridge.
Information extracted on 14 September 2010 at URL: http://forums.steves-digicams.com/photoinkjet/155728-canon-mx330-not-sure-how-reset-ink-cartridge-printer-meter-manual-refill.html
Method 2 - Assuming that your printer (iP4600 series) is already installed on your PC (Quoted).
Reset can be done once your printer is on Service Mode:
a. Switch Off the Printer
b. Hold the Resume Button
c. Switch On and Hold the Power Button
d. Release the Resume Button
e. Press the Resume Button Twice
f. Release the Power Button
By this time your printer is in service mode already. Run the Service Tool Program (Resetter). Select ASA
as the Region (for ASIA PACIFIC - depends on your location)
Information extracted on 20 September 2010 at URL: http://www.multiupload.com/D79Z6MF212
Method 3 - Someone post this for Canon MX 300 (its supposed to works for the MX 328 too):
1- Switch off the Canon MX300 and disconnect the power cable.
2- While press and hold the power button, Connect the power cable to electric socket.
3- While pressing the power button, press the “Cancel/Stop” button (red button). (press TWICE the
“Stop\Cancel” button)
4- Now release the power button and the printer turns into a kind of factory mode. Wait for 10 seconds until
it says “idle”.
5- Press “>” (next button) once “Shipping Mode 3? Then Press the “OK” button. Press “OK” again for
“without cleaning”. A test page will print.
6- Open the cover, like you are about to change the cartridges.
7- Disconnect the power cable again without switch off the printer.
8- Take out the both cartridges.
9- Close the cover.
10- Connect the power cable and turn on the printer.
11- Now just put the cartridges back and the ink level in the canon Pixma MX300 have full again.
Information extracted on 20 September 2010 at URL: http://www.niftystuff.com/forum/viewtopic.php?id=5000
Method 4 - What should I do if the printer will not recognise the cartridge after refilling?
* Turn on the printer and remove both cartridges
* Place both cartridges in front of you so that you can see the contact foil, with the nozzles facing
downwards
* With adhesive tape, cover the FOUR upper contact points on the far left contact column of both
cartridges
* Reinsert the two cartridges and close the cover
* Open the cover again after 2 or 3 seconds
* Wait until the printer gives you the cartridge carriage (If there seems to be a problem with either of the
cartridges, ignore it)
* Open the cover and remove the two cartridges
* Place both cartridges in front of you so that you can see the contact foil, with the nozzles facing
downwards
* Remove the adhesive tape
* Clean the contacts, reinsert the cartridges and close the cover..
Information extracted on 20 September 2010 at URL: http://www.printcountry.com/faq-troubleshootingrefill-kits.asp
Method 5 – Reset the default setting and change the waste discharge procedure. (Quoted)
What Canon calls the "waste ink tank" is really several very thick felt pads stacked on each other. Cleaning
cycles pump ink out of the heads and a hose sprays it in a pad so it soaks into the felt pads from the bottom
up. The printer simply counts the number of cleaning cycles it has performed and when it hits a certain
count it warns you, when it hits a higher count it stops printing. Good news, bad news: you can reset the
printer, but if you don't replace or clean the waste ink pad you run the risk of overflow.
This is straight from the CANON Australia service manual. Follow the steps carefully to reset the Waste
Ink Pad Full condition.
1. With the printer powered off, press and hold the RESUME button, press and hold the POWER button.
The buzzer will sound once.
2. While holding down the POWER button, release the RESUME button. Press the RESUME button
twice in succession, and then release the POWER button. (Each time the RESUME button is pushed, the
buzzer will sound once.) The indicator will blink in green, and then light in green.
3. Press the RESUME button 3 times.
4. Press the POWER button. The buzzer will sound once. The printer will switch off itself after
performing the function.
Note that when I say left and right, I mean -your- left and right, not the printer's left and right.
After you have done this and confirmed that it is reset and printing again, it's time to remove and clean the
waste ink pad, and the rest of the printer as long as you have it open. Following are instructions based on
the BJC-6000. Most Canon printer cases seem to be built along the same lines.
First, get the cover off. You'll need to remove the parallel port cover first. There's a slot at the bottom of the
parallel port cover, stick a flatbladed screwdriver in there and gently pry it out. Most Canon printers are
very similar.
There are 4 Lights! Er, there are 4 plastic tabs holding the top on. You can reach the front ones by reaching
inside the printer and gently bending them back while lifting the top.
The other two are on the sides near the back. There are slots, press a flat bladed screwdriver gently in the
slot to push the tab back while gently lifting the top. DO NOT PRY!
All the Canons I've taken apart then have four screws that hold the entire printer mechanism on the plastic
base. Some models do have a power supply module that slides out of the rear of the case, remove this first.
-Only- remove the four screws holding the printer mechanism onto the lower case. Some models may have
more screws, but becareful not to remove any other screws! It just lifts off. Set it up on a couple of boxes or
chunks of wood under the tabs so the mechanism is reasonably level.
Now is a good time to take it outside and use dry canned air to blow out the paper dust in the back of the
printer. Do -not-, repeat NOT use an air compressor! It is too much pressure, and air from a compressor or
air tank is full of moisture and oil. And stay away, AWAY from the print head and the park pad and
cleaning pump under it. Stay away from the paper path under the print head groove. If you don't, you can
end up blowing ink sludge around the printer or blow air into the heads or inadvertently create a suction
that pulls ink out the heads and blows it around the printer.
If you aren't wearing rubber gloves by this point, put them on now. The waste ink pad can hold an incredible- amount of ink, partially dried so it is a lot more color than it looks. Do -not- do this in your
bathroom sink! If your porcelain is worn at all or has any invisible mineral deposits, the ink can
permanently stain it. Open a couple of windows and set up a fan as you'll be working with ammonia and
alcohol. I know from experience that the fumes can sneak up on you.
Mix up a liter of cleaning solution in a clearly labeled, resealable container:
* 1 part nonsudsing household ammonia (clear, no perfumes)
* 4 parts 50% Isopropyl Alcohol (aka Isopropanol) (clear, no perfumes)
* 5 parts filtered or distilled water (-not- purified)
Take the waste ink pads out and lay them down on some newspapers by the sink. Chances are, it is no more
than 50% color, as the waste ink warning is conservative so you don't end up with ink running out on your
table.
Take the bottom printer case and run hot water over it to wash the ink out. You don't need to get it like new,
just get the big blobs of goopy ink out. Pour some of the cleaning mixture in to help break it up. Dry it out
with an old towel or paper towels and set it aside to dry.
Set the waste ink pads in the sink. Pour some of the cleaning mixture into them to dissolve the ink, then
gently run hot water through to rinse it out. It will never look clean, don't try, just get it so there is little ink
left in the wash water. It is a rather fragile felt-like substance so if you try too hard, you can end up
destroying it.
Squeeze out as much water as you can. Do -not- twist it like a towel! You'll have to let it dry for several
days. Put it over a heat vent if you have central air heating, or just in a sunny window. If you don't put it
somewhere warm or with some air flowing, it will stay damp a long, long time. You can even lean it up
against a box fan on low. I caution -against- putting it in front of an electric heat fan because of the fire
hazard.
I have considered running a tube out from the park pad's waste tube to a bottle outside the printer.
However, if you do this you run the risk of the bottle getting knocked over or leaking.
Look over the printer mechanism. You'll see some areas of ink build-up. Ink and paper dust mix to make a
viscous mud that stays wet for a long time. I use cotton ear buds (aka Q-Tips or cotton swabs) to pick up
the blobs, it is better if you can get some of the absorbant foam swabs. Then a premoistened window wipe
to wipe off the rest.
Note: Don't use paper towels! Paper towels are horrible things that shed little bits all over. Any little bits
that get on the bottom of the head, or on the park pad will cause ink to wick out or block a nozzle. Test the
premoistened window wipes you intend on using; tear one in half. If it looks a bit like you tore a sheet of
paper it's good; ie, a ragged but basically clean tear. If it looks like a cotton ball exploded it's bad! IE,
threads or filaments everywhere.
I use Coralite brand window wipes. Ironically, cheap is better. No lemony scents, no vinegar wipes. Just
plain old ammonia based premoistened window wipes.
After everything is dry, reassemble everything but the top of the case. Locate the lid detector switch, it is
usually somewhere near the hinge of the lid. Use something like a small piece of vinyl electrical tape to
hold it down so the printer thinks the lid is shut. After confirming that everything is back in place (except
the top case), plug it in. Turn the printer on, confirm that everything moves as it should on power-up
(basically nothing sticks or bangs).
Take the tape off the switch so it thinks the lid is open, this should cause it to move the print heads to the
Cartridge Change position. Unplug the printer! This is important, so it doesn't suddenly decide you are
taking too long and move the heads. If you have a holder for the print heads, take them out and put it in it.
If not, set the print heads on top of a folded up premoistened window wipe. Ink will wick out, so you don't
want to leave it too long this way.
Using several of your lint-free premoistened window wipes, carefully wipe up around the park pads.
Careful! The park pads "float" in their holder and if you are not gentle you will knock it out of it's mount
and it won't seal to the print heads properly. You may use a cotton swab moistened with cleaning solution
to get the clumps, but don't touch the foam inside the park pad with it. That foam is really a hard plastic and
will grab bits of cotton fiber and cause ink wicking.
Use an eyedropper to put cleaning solution into the park pad foam until it is visibly wet and wick it back
out with a window wipe. Repeat. Again, you aren't going for spic-and-span, just the bulk of the ink. Put a
few drops back in so it just looks wet.
There is a rubber and felt wiper just to the left of the park pads. It is probably retracted (towards you) but
don't try and force it out. If it slides out easily, fine, again get the blobs off with dry swabs. Then wet the
swabs with cleaning solution to get most of the ink off, and to get some of the ink out of the felt that is on
one side of the wiper blade. Be gentle! It is very easy to accidentally knock this off of its mount or pull it
out all together.
Without flipping the print heads upside down, wipe off the excess blobby ink around the edges. It is
imperative that you do not touch the heads anywhere with cotton swabs, cotton cloth, or paper towels! Use
the lint-free premoistened window wipes, and do -not- press against the bottom of the heads at all. I fold up
a window wipe into sort of a cushion and wipe gently across the bottom. Do this only after cleaning around
the edges or you'll just wipe that ink/paper sludge across the print nozzles. Again, it does not have to be
spotless.
Reinstall the print heads, put the tape back on the lid switch. Plug the printer in, turn it on, let it finish it's
cleaning cycles and gyrations. Turn the printer off again.
On my BJC-6000 and several models, you can get it to print a nozzle check by holding down the
Resume/Paper Feed button while turning it on. It beeps once when you turn it on, let go of the Power
button but keep holding the Resume button. If you let go after one beep, it does a quick head clean, if you
let go after two beeps it prints a nozzle check and alignment check. Three and it just feeds a sheet of paper.
Or just connect it to your computer and use the driver Maintenance menu.
Confirm everything is printing correctly again, power off and reinstall the top case. Your Canon should
now work for many more years.
If the printheads are badly clogged and the printer driver cleaning cycles aren't fixing it, you may try the
following:
First effort: put a few drops of cleaning solution onto the park pad "sponge". This is that sponge-looking
thing (actually a hard plastic foam) where the head sits when not printing. Just do whatever it takes on that
printer to unpark the heads as if you were going to change cartridges, then close it up and let it sit for a day
before you run a cleaning cycle and nozzle check again.
Extremely Thorough Cleaning: Take the head out, remove the cartridges. If you've saved the orange
seals, tape them onto the cartridges, if not then wrap black electrical tape around so it covers the ink outlet
and the little air inlet on top. Only pull it snug across the ink outlet, not tight, and fairly loose on the
cartridge body to prevent tape creep.
I then just stick the head under a stream of hot tap water. I use a soft plastic eyedropper to squirt the above
cleaning fluid into the ink inlet meshes on the head and to flush ink off the bottom of the head. Careful not
to touch the nozzles!
As you squirt cleaning fluid into the screen, a lot will rush back out, that is fine as it is flushing ink and
gunk back out rather than forcing it through the nozzles, which are far finer than a human hair.
When you see little or no more color in the water or cleaning solution, force some of the straight
filtered/distilled water into the screens. Rinse the outside of the print head with straight isopropyl alcohol
(99% is better than 50% for this) and pat dry with a clean cotton towel (-not- paper towels) and again, DO
NOT TOUCH THE NOZZLES.
Patience is a virtue. I've bought a lot of Canon printers in thrift stores with full cartridges because the heads
clogged, they bought new cartridges, that didn't fix it so they tossed it at Goodwill. I clean them up and for
$12.95 I get $45 worth of brand new cartridges and a backup printer. I only had two heads be unsaveable,
those would print on all nozzles but had sprung internal leaks between two colors, cyan and yellow. The
symptom was yellow nozzle checks print green, and the ink inside the yellow cartridge slowly turns green.
If you would like to encourage me to continue writing tutorials of this nature, you may donate an amount of
your choice via PayPal. Credit Card donations don't require a PayPal account.
Information extracted on 20 September 2010 at URL:
http://www.polyphoto.com/tutorials/PrintHeadCleaning/CanonCleaningAndReset.html
Q6) Can Canon’s Original claim to void the User’s Warranty for using Nippon-ink and it Refill Ink
Kit Set?
The User Warranty Contract Agreement is between User (Buyer) and the Printer Manufacturer and it
Distributors, Dealers, Agents, Representatives and/or independent party etc (Seller). User need to aware
that all consumer items (international standard) like ink cartridges, toners, drum, roller etc are not cover by
any warranty in the printer due to wear and tear situation. Since the Seller intentional tying it into the
warranty indicated it expressly and implied action might breach the warranty contract.
In Singapore – User can feedback the problem to Ministry of Trade and Industries (known as MTI) and
CASE for clarification, investigation and action to remedy and rectify it through compensation if any. It fall
under the Anti-Competition Acts 2004, Division 2 Section 34 Clause 1 to 5 as specified in
www.mti.gov.sg such information can be view under the URL:
http://statutes.agc.gov.sg/non_version/cgi-bin/cgi_legdisp.pl?actno=2004-ACT-46N&doctitle=COMPETITION%20ACT%202004%0A&date=latest&method=part
In USA - The Magnuson-Moss Warranty Act (Public Law 93-637) is a U.S. Federal law that states that
warrantors can not require that only brand name parts be used with any product, as some printer
manufacturers imply. Information extracted on 20 September 2010 at URL:
http://en.wikipedia.org/wiki/Inkjet_printer
MAGNUSON-MOSS; Warranty Improvement Act; United States Code Annotated; United States Code
Annotated; Chapter 50 Consumer Product Warranties 15 Section 2302;
http://www.ftc.gov/bcp/conline/pubs/buspubs/warranty.htm (Quoted) U.S. law also prohibits the
manufacturers of your equipment from requiring the use of OEM ink or toner or charging extra fees
if you use products other than OEM products with their equipment. Those requirements and/or fees
are in violation of existing anti-trust acts. The Sherman and Clayton Antitrust Acts (see also:
Supreme Court decision: IBM vs. The United States 1936)
http://www.usdoj.gov/atr/public/div_stats/1638.htm and
http://www.ftc.gov/bcp/edu/pubs/business/adv/bus01.shtm ; IBM vs. The United States (Quoted) - The
Supreme Court (IBM vs. The United States) held that IBM could not threaten customers with
termination of their data processing equipment leases just because they did not use supplies
manufactured by IBM. Such practice constituted a tying agreement and was found to be in violation
of the Sherman and Clayton Antitrust Law. Information extracted from the web URL:
http://www.apexinktoner.com/compatiblesupplies.html
In United Kingdom (UK) – The Acts fall under Chapter IV – The Competition Commission and Appeal
under Section 45. Such information can be extracted from URL:
http://www.opsi.gov.uk/acts/acts1998/ukpga_19980041_en_2#pt1-ch2-pb2-l1g18
General Information to Consumers & Users
Print Head Clog due to dirt accumulated from Paper Media confirmed by Nozzle Check. Printer design
using Ink Cartridge to purge dirt, cartridge less than 50% is not effective due to insufficient pressure.
False Alarm, cartridge is not “Faulty”. Printer Driver Program set by Original ink level standard as the
cut off point (Threshold Level) for Ink Cartridge.
Refillable Ink Cartridges (DIY) for use on Brother’s, Canon’s and Epson’s Model are
available. Do not refill Ink to maximum and/or exceed the level result in poor print quality due to
poor air circulation and flow.
Number of pages base on ISO / IEC FCD 24711 and 24712 Test Suit comparison criteria. Cartridge
that consist of Sponge type will retain about 40% of the Ink Output although more Ink Input Capacity
been loaded. Example Ink Input is 18 ml the Usable Ink Output is (18 X 60%) = 10.8 ml compare those
without sponge type of 15 ml. i.e. Sponge type has less Ink Output performance of (15 – 10.8) = 4.2 ml.
Another reason is printer program cut off point by the Drive Software is already set and predetermines.
Example program set at 12 ml. when cartridge was filled at 16 ml. User can only use 12 ml. the balance is
still unusable unless using Nippon-ink Auto Reset Chip cartridge.
For Brother’s cartridge NP-LC 38/67 and NP-LC 37/57 is the same model, Nippon-ink cartridge is
LC 67 and LC 57 respectively. Original Brother cannot be used and the difference is the ink-input
capacity is half of LC 67 and LC 57 respectively with cheaper price.
Support – Purchase – Use – Nippon-ink Cartridge
Disclaimer Clause: All brand name, logo, trademark, picture, part number, patent, design, news report and technology
belong to the respective owners. It uses for description, illustration, comparison and explanation purpose only. Nippon-ink
does not belong, associated, related, support nor endorsed by any OEM brands like Brother, Canon, Dell, Epson, HP,
Lexmark, Samsung etc. All other rights reserved.