1
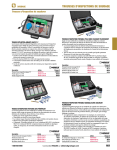
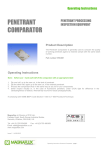
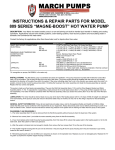
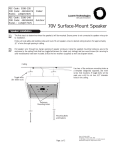
PENETRANT Kit
OPERATING
INSTRUCTIONS
HOW TO USE YOUR ZYGLO® KIT
Smooth surfaces such as those produced by clean cutting tools give best
results. These include ground, machined, and sand blasted surfaces. Shot
blasting, polishing, etc., which tend to smear over and close up surface
openings, can give finishes that can cause poor results. Zyglo is an extremely sensitive fluorescent penetrant inspection method that reveals cracks and
other surface discontinuities in virtually any non-porous material.
Surfaces should be free of foreign materials and paint that would prevent
penetration of defects or hold unwanted penetrant. Grease, oils, etc. prevent penetration and should be removed by precleaning. Scale, sand, dirt,
etc. trap penetrant and hinder removal, therefore wire brushing or similar
precleaning is necessary. For most reliable results, paint should be removed
from areas to be tested.
Just before starting the test, plug the black light into a 115 Volt A.C.
supply. Allow the light to warm up to maximum brilliance, in 5 or 10
minutes. Leave the light on throughout the tests. If turned off, it must cool
before it will relight. This Zyglo kit is not recommended for the
inspection of plastic materials, as it may stain, soften, or even
dissolve the plastic material under test.
1. Cleaning—For precleaning, spray the part
or section to be inspected with SKC-S. Allow
SKC-S to remain on part long enough to dissolve dirt or film. Wipe dry with a clean rag.
A check with black light will show any oils
remaining, by their fluorescence. Repeat if
necessary. After final clean wiping, allow time
to dry before using ZYGLO® Penetrant.
1. Cleaning
2. Apply Penetrant—Spray the part or section to be inspected so that the surface is covered with ZYGLO® Penetrant. Allow Penetrant
to remain on the part for a period of time.
Generally a 10 minute dwell time is sufficient
on clean castings and welds.
______________________________________
3. Remove Penetrant—When sufficient penetration time has been allowed, wipe the surface clean with a clean towel or cloth. Repeat
if necessary. Some surfaces will require only
wiping. In general, however, remove excess
surface penetrant with clean cloths premoistened with SKC-S. Do not flush surface
with SKC-S because this will impair
sensitivity. Repeat this procedure with additional wiping until residual surface penetrant
has been removed.
______________________________________
4. Develop—Shake the can vigorously until
agitators rattle inside. Spray the part or section
with developer, enough to wet the part thinly
and evenly, no more. Proper thickness will dry
to a thin white layer. Too much developer will
mask indications; too little will not develop the
indication sufficiently. Apply to 6-8 inch sections at a time. Allow developer to dry. Large
cracks show up immediately. Minute cracks
may take a few minutes to develop.
2. Apply Penetrant
3. Remove Penetrant
4. Develop
______________________________________
5. Inspect—Defects will be marked by a
bright indication when viewed with the portable black light. A glowing line marks a crack,
lap, forging burst, or cold shut. If wide and
deep, the indication will grow and spread.
Porosity, shrinkage, lack of bond, and leaks
will appear as dots or bright areas under the
black light. These, too, will grow and spread
if the defect is large or extensive.
3624 West Lake Avenue • Glenview, IL 60026
(847) 657-5300 fax (847) 657-5388
www.magnaflux.com
5. Inspect