1
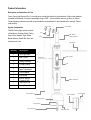
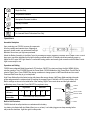
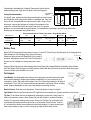
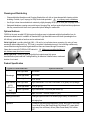
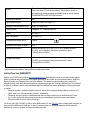
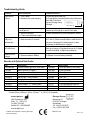
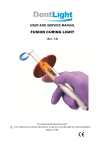
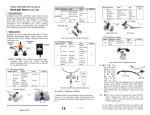
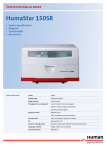
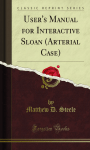
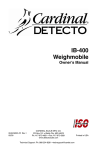
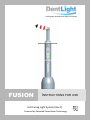
Setting New Standards through Innovation
FUSION
INSTRUCTIONS FOR USE
LED Curing Light System (Rev 3)
Powered by Patented Focus Beam Technology
Product Information
Description and Indications for Use
Fusion Curing light System (Rev 3) is a high power curing light device for polymerization of light-cured materials
by dental professionals. It cures the wavelength range of 420 – 490 nm with the option to go down to 390nm.
These operating instructions provide recommendations and guidelines for the intended use of the light. Please
read carefully.
Curing Caps
System Components
FUSION Curing Light System consists
of Handpiece, Charging Stand, Curing
Caps, Power Adapter, Light Shield,
Barrier Sleeves, Stand Stick Pad, and
Instructions for Use.
Quantity
Lens Module
3mm
13mm
360o Swivel
9mm
LED Light Head
Light Shield
Description
1
LED Light Head
1
Main Control
1
Battery Assembly
1
Charging Stand
3
Curing Caps (3mm,
9mm, 13mm/each)
1
Power Adapter
1
Light shield
1
Barrier Sleeves
(1 pack of 100)
1
Stand Stick Pad
1
Instructions for Use
Handpiece
Main Control
LCD
Battery Assembly
Barrier Sleeves
Power Adapter
Charging Stand
Plug Receptor
DC Power Plug
Stand Stick Pad
Country Blade
Product Safety Warnings and Cautions
Prior to installation and activation of the light, please read these instructions carefully and follow safety
procedures as well as the specific safety comments and recommendations presented throughout the
instructions for use. The manufacturer accepts no liability for any damage resulting from the improper use of
this unit and/or any purpose other than those covered by these instructions.
1.
CAUTION! FUSION produces high intensity light. Prolonged exposure to the skin, oral mucosa, or pulp
can result in irritation or injury.
- Do not place light in direct contact with unprotected gingival, oral mucous membrane or skin.
- Do not place light directly on the same tooth segment for more than 10 seconds in High Power Mode.
- If long exposure cannot be avoided, direct a stream of air over the tooth surface from an air syringe or
high-speed vacuum tip, adjust to Half Power Mode or adjust curing distance.
2.
CAUTION! Do not look directly at light emitted from the device. Do not use FUSION without suitable eye
protection for the operator, assistant and patient. Use Light Shield, Protective Goggle, and/or Curing Cap.
Exposure must be restricted to the area of the oral cavity in which the clinical treatment is intended.
3.
CAUTION! FUSION must be used with “Single Use” barrier sleeves to avoid cross contamination.
Replace barrier sleeve after each patient treatment is completed. This sleeve also prevents composite material
from adhering to the surface of the lens and degrading the curing performance.
4.
Products marked “Single Use” on the labeling are intended for single use only. Discard properly after each use.
5.
DO NOT operate the unit in the proximity of flammable mixtures; FUSION is not suitable for uses in the
presence of a flammable anesthetic mixture with air or nitrous oxide. Use in well-ventilated area.
6.
Keep solvents, flammable liquids, and sources of intense heat away from FUSION as they may damage internal
and external parts, the seals or the buttons on the control panel.
7.
DO NOT autoclave or immerse unit in any kind of ultrasonic bath, disinfectant, cleaning solution or any kind of
liquid. Do not spray liquids directly onto the light and prevent liquids from entering FUSION open area such like
Keypad, Charging Stand and its connectors as this may damage or short-circuit the device and can cause
potential hazard for operator and/or patient.
Glossary of Symbols
A number of symbols are used on the device, accessories and throughout this manual, it is important that the
user/operator of FUSION understand the meaning of each symbol to avoid possible injury to the operator or/and
patient.
Please read before using this device. Symbol is used to alert you to potential personal injuries and
hazard. Understand all safety messages that follow this symbol to avoid injury to the operator and/or
patient.
Type BF Applied Medical Equipment
Waste Electrical and Electronics Equipment (WEEE)
Manufacturer
European Authorized Representative
Date of Manufacturing
Single Use Only
Temperature Limitation
Atmospheric Pressure Limitation
Humidity Limitation
Keep Dry
For Licensed Dental Professional Use Only!
Operations
Assemble Handpiece
Upon receiving your FUSION, remove all components
from the package and examine them. If damage is
apparent, please contact your authorized DentLight
distributor from whom your light was purchased.
Attach the Battery Assembly to the Main Control by screwing the Battery Assembly clockwise into the Main Control. A short
beep upon connection indicates that the light is battery powered and the LCD display should automatically power on.
Adjust the 360º swivel LED Light Head to a comfortable curing position and ensure good connection with the Main Control.
Light is now ready for use.
Operation and Setting
FUSION uses advanced Metal Keypad and LCD interface. ON/OFF Key starts and stops the light. MENU (M) Key
sets the operation Time. POWER Key sets the Power Mode. FUSION defaults in High Power Mode. Press M Key to
select a Digital Timer. Press POWER Key during countdown to change power to Half Power Mode and vice versa.
Press and hold Power Key to go to sleep mode.
High Power Mode allows the fastest curing with plasma-like energy dosage. Half Power Mode maintains the peak
power and generates the minimum heat by lowering the average power in half with a 50/50 on and off duty cycle.
Built-in settings are shown in the table below. After starting, Digital Timer counts down and the light makes an
audible beep every 5 seconds. Press ON/OFF Key anytime to stop.
MODE
Digital Timer
(seconds)
To Change
Power Mode
High Power
5
10
POWER
Half Power
20
5
10
Metal Keypad
20
MODE
DIGITAL TIMER
BATTERY BARS
Press POWER Key during count down
Built-in Self-Protection
ON/OFF
CHARGE
INDICATOR
MENU
FUSION has built in self-protection on overheats and low battery.
Low battery is indicated with low Battery Bars (one or no bars). Low battery triggers one beep warning before
self-protection shutdown. Light then goes to sleep mode.
Overheating is indicated with a flashing Thermometer Symbol and an
audible warning beep. Light shuts off when Overheat is triggered.
Temperature Overheat
Battery Protection
Allow cool down
Check connection
Replace battery
Thermometer
Symbol
Curing Recommendation
For specific resin, sealants and bonding materials perform a timed curing
test outside the mouth using a 3mm washer or hardness disk. Cure from
the top for the recommended time, and reverse the disk. Using a sharp
instrument, compare the hardness of the disk to the hardness of the
composite - it should feel exactly the same if well cured. For general
guidance, use recommended curing times below. For reduced heat or shrinkage, use Half Power Mode while
doubling the recommended curing times below.
Recommended Cure Times (seconds) - High Power Mode
Manufacturer
3M
Resin Brand
Filtek Supreme Plus
Ivoclar
Color/Shade
Heliomolar
Tetric EvoCeram
Dentsply
Kerr
TPH3
XRV Herculite
A3E
C6D
A3
A2
A3
DY
A3
Cure
Per layer
5
15
5
5
5
5
5
YB
5
Times
Final layer
10
Two 10
10
10
10
10
10
10
Battery Care
Keep FUSION charged at all times when not in use. Connect DC Power Plug to Plug Receptor on the Charging Base.
Place Handpiece onto Charging Stand. Secure Charging
DC Power Plug
Stand on a table counter with Stand Stick Pad for ease of
operation. Alternatively connect DC Power Plug directly to
the back end of Handpiece to charge and power on the
unit.
Charge Indicator lights green while charging and turns off when fully charged. Battery Bar displays three full bars
when the battery is fully charged. In normal operation, Battery Bar drops from three to two bars while running and
returns to full bar upon completion of a cycle.
Techniques
Lens Module: Use disposable barrier sleeves and curing caps to protect lenses from liquid
and composite damages. Replace lens module immediately if it: a) has cured resin; b) is
scratched or cloudy. Align and lock flat edge of Lens Tool (optional accessary) to flat edge of
Lens Module. Turn Lens Tool counter-clockwise and unscrew Lens Module. Clean mounting
thread. Replace damaged lens with a new Lens Module by reversing the step.
Barrier Sleeves: Slide sleeve into Handpiece. Twist body relative to sleeve for tight fit.
Light Shield: Slide in Light Shield from the LED Light Head to the Handpiece in a proper position for best access.
Tip Size: Tip and beam size can be adjusted by selecting the proper size Curing Caps. For
small cavity treatment, snap on 9mm Curing Cap and anchor light on occlusal or bonding
surface. For temporary bonding, snap on 3mm Curing Cap (Tacking Tip) at the end of the
Lens Module and apply pressure at the center of crown/veneer for best contact. Tack for 1
to 2 seconds then remove excess adhesives before final bonding. For veneer bonding and
molar cavity treatment, snap on 13mm curing cap and place light in direct contact.
Tacking Tip
Cleaning and Disinfecting
− Clean and disinfect Handpiece and Charging Stand with a soft cloth or tissue damped with cleaning solution
including: Cavicide, Lysol, Isopropyl or Ethyl alcohol and equivalent.
Do not spray, soak, or autoclave.
− Use Q-tips to clean lens and electrical contacts by slightly damping the tip (do not soak) with Isopropyl alcohol.
− Safeguard Handpiece opening area, metal keypad, charging Plug, and lens against liquid and sharp objects as
this may cause electrical short-circuit, permanent optical damage or malfunction.
Optional Add-ons
FUSION is the most versatile LED light system that allows users to implement multiple functionalities from its
advanced modular base kit. In addition to Standard LED Light Head that comes with the kit (wavelengths from
420-490nm), optional add-on functions can be achieved with:
Violet Light Head - providing violet light (390 – 430 nm) for (a) oral lesion/cancer screening; (b) curing of lower
wavelength initiator adhesives (e.g. TPO) and (c) composite visualization/removal. Oral screening enables early
cancer detection using fluorescence generated from tissue and viewed through Fluorescence
Viewer that comes with FUSION-to-DOE starter kit.
Make sure to position the light 1-3
inch distance away from tissue in exam.
White Light Head - offering an exam probe light that outputs super high power
transillumination (best used with Tacking/Exam tip) for detection of dental caries, cracks and
location of root canal.
Product Specification
Type of information
Wavelength
Light Intensity
(±20%;
mW/cm2 or
lux)*
Specifications
LED Light Head
420-490nm
Violet Light Head
390-430nm
White Light Head
5000- 6500K
LED Light Head
High Power Mode: 2700; Half Power Mode: 2700 (peak);1300 (average)
Violet Light Head
1000 (at light tip)
White Light Head
High Power Mode: 110,000 lux (with Exam Tip)
Power Adapter
Input: 100-240V - 50/60Hz; Output: 5V (DC)
Battery performance
Total light exposure time 35-45 minutes (High Power); 90 minutes full
recharging time.
Operation
Continuous operation patient application, curing: duty cycle 10 sec (High
Power Mode) 20sec (Half Power Mode) ON/1minute OFF; exam (place
1inch away from soft tissue): 60sec (Pulse Power Mode) ON/1 minute
OFF.
Shutoff
Timer auto shutoff; User shut off anytime by pressing ON/OFF Key; Low
battery auto shutoff; Overheat auto shutoff. Self-protection shutoff is
accompanied by warning backlight and audible beep as well as flashing
THERMOMETER or BATTERY BAR symbols.
Overcurrent Protection
Auto
Light Dimension (mm)
Length: 200; Width: 22; Height: 22
Charging Dock Dimensions (mm)
Height: 45; Diameter:44
Weight (grams):
Handpiece: 111; Charging Stand: 89
Safety
IEC 60601-1
EMC Compliance
IEC 60601-1-2
Protection from Electric shock
Type BF
Protection from ingress of liquids
IPX0
Operating environment
Ambient temperature: 50F to 86F (10ºC to 30ºC) Relative humidity:
10%-80%, non-condensing, Atmospheric pressure:0.5-atm to
1.0-atm(500hPa-1060hPa)
Storage environment
Ambient temperature: 14F to 104F (-10ºC to 40ºC) Relative humidity:
10%-80%, non-condensing, Atmospheric pressure:0.5-atm to
1.0-atm(500hPa-1060hPa)
* Measured absolute irradiance using calibrated optical spectrometer.
Limited Two-Year WARRANTY
Register your FUSION curing light at http://www.dentlight.com/. DentLight Inc. extends a two-year warranty against
defects in material and workmanship to the original purchaser of this product from an Authorized dealer, except the
Battery Assembly and Charging Stand (one-year warranty). This warranty is valid providing factory inspection
indicates that any such defect was developed during normal and proper use. DentLight shall under no circumstances
be liable for incidental, special, consequential damages and damage from misuse including the following expressed
or implied:
−
−
−
−
−
Improper operation, accident or neglect, misuse or abuse, such as physical damage (dents, scratches, etc.);
Liquid, water, rain, extreme humidity, ultrasonic, autoclaving;
Tampering, improper repairs or modifications that have not been carried out by a certified Service Center;
Use of other spare parts and accessories than from the manufacturer such as incorrect power adapter;
Other acts which are not the faults of DentLight.
For service, call 1-800-763-6901 (in US) to obtain RMA number. Fill out RMA form online, carriage paid, and return as
instructed in the RMA form to DentLight. In case of a warranty claim, the complete apparatus must be returned.
Alternatively, contact your dealer for service handling and return.
Troubleshooting Guide
Problem
Error Indication
Light will not
turn on
Light does not
stay on for
desired time
Possible Solutions
1. LCD is blank.
2. Buzzing noise when charging.
1) Press and hold Power Key.
2) Charge Battery Assembly directly alone (disconnect
from Main Control and
bypass Charging Stand)
overnight.
DC Power Plug
Handpiece is overheated. LED Light
Head gets hot.
1. Key is not working.
2. Timer counts down but no light.
1. One or no Battery Bars.
2. Bad connection or contacts.
Direct an air stream from an air syringe or high-speed
vacuum tip to the light tip, or wait for cool down.
Contact manufacturer or your local dealer for service.
Light generates
too much heat
Patient feeling discomfort
Battery will not
charge
1. Broken pins in Charging Stand.
2. Electronic defect in Battery.
1) Charge Handpiece directly (bypass Charging Stand)
for 1 hour. 2) Check connection pins to make sure that
they are not damaged. If problems persist, contact
your dealer or Manufacturer for Service.
1) Cure ≤10 seconds per layer. 2) Direct an air stream
from an air syringe or high-speed vacuum tip. 3) Adjust
to Half Power Mode; 4) Adjust curing distance.
1. Bypass, replace or service Charging Stand.
2. Replace or service Battery Assembly.
Reorder and Optional Item Codes
PN
Description
PN
Description
7500082
7500081
7500081B
7500081C
7500083X
7600084-08X
7500085Y
7500050X
7500092
Barrier Sleeves (100/pack)
Curing Caps – 9mm (50/pack)
Curing Caps – 13mm (50/pack)
Curing Caps – 3mm (20/pack)
Charging Stand (X: color code)*
Battery Assembly (X: color code)*
Power Adapter (Y: country code)**
Main Control (X: color code)*
Light Shield
7500060U
7500060W
7500093
7500095
7500071
7511010
7511011
7500102
7700012
Violet Light Head
White Light Head
Lens Module (Focus)
Lens Tool
Dental Unit Charge Holder Kit
Full-arch Bleaching Attachment
FUSION Bleaching Starter Kit
FUSION-DOE Starter Kit
FUSION-DOE Kit
7500080-08X
FUSION Curing Light Kit (X: color code)*
7500060X
LED Light Head (X: color code)*
* X: blank (Silver), B (Blue), P (Pink), G (Gold); ** Y: US, EU, AU (Australia)
DentLight Inc.
1825 Summit Ave. #210
Plano, TX 75074, US
Tel: (800) 763 6901
Outside US: 1-972-889-8857
www.dentlight.com
FUSION is a trademark owned by DentLight.
©2013 DentLight
Emergo Group
Molenstraat 15
2513 BH The Hague
Netherlands
Tel: +31(0)70 345 8570
Fax: +31(0)70 346 7299
Made in U.S.A.
8/2013, v3.0