1
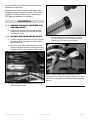
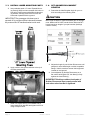
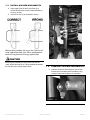
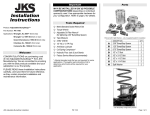
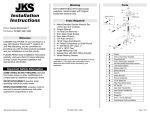
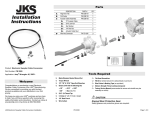
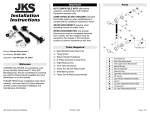
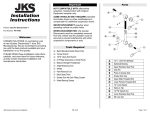
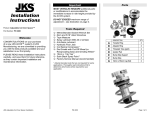
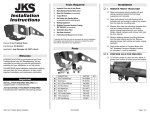
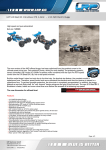
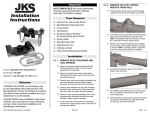
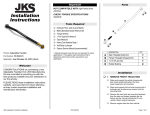
Product: Quicker Disconnects™ Part Number: JKS2030 - JKS2034 INSTALLATION INSTRUCTIONS Applications: Wrangler JK, 2007+ 517-278-1226 • [email protected] • www.jksmfg.com 491 W. Garfield Avenue, Coldwater, MI 49036 Welcome Parts CONGRATULATIONS on purchasing a set of new Quicker Disconnects™ from JKS Manufacturing. We are committed to providing you with the best products available and your satisfaction is our first priority. PLEASE READ these Installation Instructions carefully, and save them for future reference, as they contain important installation and maintenance information. Tools Required Metric/Standard Socket Wrench Set Torque Wrench Medium Strength Threadlocker #1 Philips Screwdriver or Small Punch Angle Measuring Tool 15/16” Open-End Wrench 18mm & 19mm Open-End Wrenches * Grease Gun with Zerk Fitting Coupler Wheel Bearing Grease Factory Service Manual (recommended) * Asterisk denotes tools that are not required for some applications. Thoroughly read instructions first to determine which tools will be required for your application. JKS Quicker Disconect Installation A B C D E F G H I J K L M JKS2030 - JKS2034 1/2" Nylock Nut Offset Polyurethane Spacer 1/2" Upper Tapered Mounting Post (Long) Spherical Bushing Press-In Grease Zerk Grease Zerk Cap Upper Male Threaded End Assembly 5/8” Jam Nut Lower Female Threaded End Assembly Click Pin 1/2” Lower Tapered Mounting Post (Drv Side - Short) 1/2” Nylock Nut 1/2” Lower Flat Mounting Post (Pass Side) Page 1 To reduce risk of serious injury and accident: Important Product Safety Information ÂÂ Choose modifications that balance your actual highway & off-road use. For your safety and the safety of others, please read all instructions and warnings in this pamphlet and your Jeep® owner’s manual and off road driving supplement before attempting installation. Within these instructions the following signal words refer to important product safety information: WARNING ÂÂ Avoid sharp turns, abrupt maneuvers or steep side-cambers. ÂÂ Avoid other maneuvering conditions which may cause the vehicle to trip, roll, lose traction or compromise your ability to safely brake in an emergency. ÂÂ Routinely inspect your vehicle components for unusual wear or off-road damage. Repair or Replace any unserviceable components before use. ÂÂ Do not modify or combine body lifts with other mechanical lifts contrary to manufacturers’ or Jeep® recommendations & warnings. Indicates hazards or unsafe situations which could result in severe personal injury or death. ÂÂ Acquaint any other drivers with your vehicle modifications and handling. CAUTION Indicates hazards or unsafe situations which could result in property damage or minor to moderate personal injury. NOTICE Careful attention is required to this operation that generally does not relate to personal injury, although damage to your JKS product or other property may result if you fail to follow instructions. ÂÂ Always wear seat belts and/or appropriate off-road restraints, reduce your speed, Tread Lightly©. Important NOT COMPATIBLE WITH aftermarket swaybars. Install product with Original Equipment swaybar only. SOME VEHICLES MAY REQUIRE extended front brake hoses or other modifications to compensate for additional suspension travel. NEVER DISCONNECT swaybar when operating vehicle on public roads. WARNING Higher Rollover Risk WHEN DISCONNECTED, the Quicker Disconnects must be completely removed from vehicle, and the swaybar must be secured to the chassis in the horizontal position to prevent interference with tires. WARNING Modifying your Jeep® to improve off-road performance may result in vehicle handling different than as factory equipped, including increased ride-height and/ or chassis articulation; reduced lateral stability and higher risk of roll-over or other accident. Also, owner’s choice of larger tire and wheel combinations may require additional braking force or increased stopping distances. Page A Stay Connected On-Road On-highway safety is enhanced by controlling body roll. Never disconnect swaybar when operating on public roads. WARNING To assure intended performance JKS® Quicker Disconnects™ are NOT COMPATIBLE with aftermarket Swaybars. Install ONLY with Jeep® factory sway bar. On-highway safety is enhanced by controlling body roll. Never disconnect swaybar when operating on public roads. When disconnected off-road, swaybar JKS2030 - JKS2034 JKS Quicker Disconect Installation must be secured to prevent interference with other suspension components. Brakelines must be secured and retain some slack throughout range of suspension travel. Check after installation of Quicker Disconnects™ & use longer DOT approved brakelines if necessary. Installation 1. REMOVE ORIGINAL EQUIPMEN (OE) SWAYBAR LINKS Remove front swaybar drop links and mounting hardware per the factory service manual instructions for your vehicle. 2. INSTALL UPPER MOUNTING POSTS Locate the long stainless steel 1/2" Upper Tapered Mounting Posts (C) with attached Offset Polyurethane Spacers (B). Secure mounting posts to swaybar by installing 1/2" Nylock Nuts (A) from the inboard side and tighten to 65 ft-lb. using a torque wrench. Mount the Upper Tapered Mounting Posts (C) on outboard side of the swaybar, ensuring small Click Pin holes are horizontal or parallel with the ground. HINT: A small Philips head screwdriver or punch inserted into the Click Pin hole will enable you to prevent the mounting post from rotating when tightening the nut. Apply medium strength threadlocker to the tip of mounting post threads. JKS Quicker Disconect Installation JKS2030 - JKS2034 Page 3 3. INSTALL LOWER MOUNTING POSTS Insert stainless steel 1/2” Lower Tapered Mounting Posts (K & M) into lower swaybar link holes on front axle. Position posts with tapered ends pointing inboard, ensuring small Click Pin holes are horizontal or parallel with the ground. IMPORTANT: The passenger side lower post is squared off to provide sufficient clearance between the post and the OE trackbar bracket on the axle. Apply medium strength threadlocker to the tip of mounting post threads. 4. SET QUICKER DISCONNECT LENGTHS Determine the Ideal Swaybar Angle for your vehicle according to the following chart. CAUTION Max. length is based on required thread & jam nut engagement. Measure & DO NOT extend Quicker Disconnects™ beyond maximum length of your part number (bushings center to center). Adjust the length of your Quicker Disconnects until swaybar is at the Ideal Angle or within Acceptable Range. Vehicle must be at normal ride height and located on level ground. Once adjusted, lay Quicker Disconnects on a flat surface and tighten 5/8” Jam Nuts (H) firmly against the Lower Ends (I). IMPORTANT: Bushing cradles at both ends of Quicker Disconnect must remain parallel with each other when Jam Nut is tightened. Install 1/2” Nylock Nuts (L) on outboard side of lower swaybar link brackets and tighten to 65 ft-lb. using a torque wrench. Page A JKS2030 - JKS2034 JKS Quicker Disconect Installation 5. INSTALL QUICKER DISCONNECTS Slide Upper Ends (G) and Lower Ends (I) of Quicker Disconnects onto the Tapered Mounting Posts (C, K & M). Insert Click Pins (J) as illustrated to secure. When properly installed, the ring on the Click Pin will “snap” against the shaft of pin. When installed backwards, the ring does not fit snugly against shaft. CAUTION When properly installed, the ring on the Click Pin will “snap” against the shaft of pin. When installed backwards, the ring does not fit snugly against shaft. 6. LUBRICATE QUICKER DISCONNECTS Lubricate all Grease Zerk fittings on the Quicker Disconnects immediately after installation using common wheel bearing grease or equivalent. JKS Quicker Disconect Installation JKS2030 - JKS2034 Page 5 7. CORRECT OPERATION OF QUICKER DISCONNECTS Remove the Click Pins (J) from the Upper and Lower Tapered Mounting Posts (C, K & M). Completely remove Quicker Disconnects from vehicle and store safely inside vehicle. HINT: To avoid losing Click Pins, reinstall them on mounting posts while Quicker Disconnects are removed. Using JKS lanyards (JKS2039), plastic wire ties, bungee cord or equivalent, secure the swaybar to the chassis in the horizontal position. IMPORTANT: When disconnected, the swaybar must be secured in the horizontal position to prevent interference with the tires. Failure to secure the swaybar correctly can lead to severe tire damage. To reconnect, remove Click Pins (J) from mounting posts and rotate swaybar down. Slide Quicker Disconnects back onto mounting posts and reinstall Click Pins. HINT: Install passenger side Quicker Disconnect first for easiest reinstallation. JKS Technical Support Phone 517-278-1226 E-Mail [email protected] Troubleshooting If swaybar does not rotate freely, remove from vehicle, clean and apply rubber lubricant to chassis-mounted bushings, and reinstall. Maintenance It is important to lubricate Quicker Disconnects frequently for the first three (3) months after installation to evacuate contaminants that may build up during break-in period. After break-in period, Quicker Disconnects should be lubricated regularly as part of vehicle maintenance schedule. Regular cleaning with pressurized water is recommended to maximize ease of operation and reliability. Always lubricate afterwards to evacuate any moisture. ©2014 JKS Manufacturing, Inc & Aftermarketing, LLC Revision Date 11/18/2014 Page A JKS2030 - JKS2034 JKS Quicker Disconect Installation