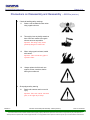
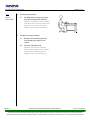
1
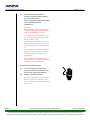
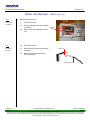
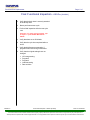
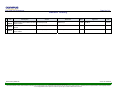
 OER-Pro Biomed Print Head
Unit Replacement
TRAINING REPAIR MANUAL
OER0091V01
CN1001103 17FS030 R03
THIS IS A CONTROLLED DOCUMENT - PROPRIETARY INFORMATION - FOR INTERNAL USE ONLY
Copyright © 2010 by Olympus America Inc.
This document and the contents contained herewith remain the property of Olympus America Inc. Reproduction of this document or any part thereof by any means (electronic or
otherwise) without the expressed written consent of Olympus America Inc. is strictly prohibited. Printed copies are for reference only and may not contain the latest document revisions.
Print Head Unit Replacement
Page 2 of 14
Table of Contents
Precautions on Disassembly and Reassembly – OER-Pro [3010G.01] . . . . . . . . . . . . . . . . . . . . . . . . . . . 4
Printer Unit Removal – OER-Pro [3011J.01] . . . . . . . . . . . . . . . . . . . . . . . . . . . . . . . . . . . . . . . . . . . . . . . . 9
Printer Unit Installation – OER-Pro [3011J.03] . . . . . . . . . . . . . . . . . . . . . . . . . . . . . . . . . . . . . . . . . . . . . 10
Final Functional Inspection – OER-Pro [3010G.03] . . . . . . . . . . . . . . . . . . . . . . . . . . . . . . . . . . . . . . . . . . 11
Electrical Safety Test – OER-Pro [3010H.05] . . . . . . . . . . . . . . . . . . . . . . . . . . . . . . . . . . . . . . . . . . . . . . 12
Inspection Results Reporting – OER-Pro [3010H.06] . . . . . . . . . . . . . . . . . . . . . . . . . . . . . . . . . . . . . . . . 13
Revision History. . . . . . . . . . . . . . . . . . . . . . . . . . . . . . . . . . . . . . . . . . . . . . . . . . . . . . . . . . . . . . . . . . . . . 14
OER0091V01
CN1001103 17FS030 R03
THIS IS A CONTROLLED DOCUMENT - PROPRIETARY INFORMATION - FOR INTERNAL USE ONLY
Copyright © 2010 by Olympus America Inc.
This document and the contents contained herewith remain the property of Olympus America Inc. Reproduction of this document or any part thereof by any means (electronic or
otherwise) without the expressed written consent of Olympus America Inc. is strictly prohibited. Printed copies are for reference only and may not contain the latest document revisions.
Print Head Unit Replacement
Page 3 of 14
Equipment, Material and Tool Requirements
No. 1 torque bit
E
ESD mat
ESD wrist strap
S
Sony bond (part# OT-9622)
N
T
No. 1 Phillips screwdriver
Torque driver
OER0091V01
CN1001103 17FS030 R03
THIS IS A CONTROLLED DOCUMENT - PROPRIETARY INFORMATION - FOR INTERNAL USE ONLY
Copyright © 2010 by Olympus America Inc.
This document and the contents contained herewith remain the property of Olympus America Inc. Reproduction of this document or any part thereof by any means (electronic or
otherwise) without the expressed written consent of Olympus America Inc. is strictly prohibited. Printed copies are for reference only and may not contain the latest document revisions.
Print Head Unit Replacement
Page 4 of 14
Precautions on Disassembly and Reassembly
– OER-Pro [3010G.01]
1.0
Chemical handling safety warnings
1.1
Select a well-ventilated location when
using organic solvents.
1.2
Thoroughly rinse any bodily areas that
have come into contact with organic
solvents as soon as possible.
Important: Not doing so may lead to
potentially dangerous health risks.
1.3
When using organic solvents, handle
with caution.
Important: These solvents may ignite if
exposed to flame.
1.4
Always replace the lids back onto
organic solvent containers before
leaving the workbench.
2.0
Sharp edges safety warning
2.1
Repair with extreme caution to avoid
injury.
Important: Take extra caution with metal
parts, as the edges may be sharp.
OER0091V01
Precautions on Disassembly and Reassembly – OER-Pro [3010G.01]
CN1001103 17FS030 R03
THIS IS A CONTROLLED DOCUMENT - PROPRIETARY INFORMATION - FOR INTERNAL USE ONLY
Copyright © 2010 by Olympus America Inc.
This document and the contents contained herewith remain the property of Olympus America Inc. Reproduction of this document or any part thereof by any means (electronic or
otherwise) without the expressed written consent of Olympus America Inc. is strictly prohibited. Printed copies are for reference only and may not contain the latest document revisions.
Print Head Unit Replacement
Page 5 of 14
3.0
Tools:
Protecting the equipment
3.1
ESD mat
ESD wrist strap
Use ESD safety equipment to protect
the product against static electricity.
Important: A conductive mat or wristband
to discharge static electricity must be used
whenever it is necessary to touch the
boards or other electrical components.
4.0
Precautions for parts handling
4.1
Be aware of all assembly parts and
avoid dropping any parts into the
chassis.
4.2
Pick up any dropped parts.
Important: Take care not to drop the
screws, toothed washers, nuts or washers
into the chassis. Should any parts be
dropped, be sure to pick the parts up.
OER0091V01
Precautions on Disassembly and Reassembly – OER-Pro [3010G.01]
CN1001103 17FS030 R03
THIS IS A CONTROLLED DOCUMENT - PROPRIETARY INFORMATION - FOR INTERNAL USE ONLY
Copyright © 2010 by Olympus America Inc.
This document and the contents contained herewith remain the property of Olympus America Inc. Reproduction of this document or any part thereof by any means (electronic or
otherwise) without the expressed written consent of Olympus America Inc. is strictly prohibited. Printed copies are for reference only and may not contain the latest document revisions.
Print Head Unit Replacement
Page 6 of 14
4.3
Avoid causing damage to the cables or
harnesses during disassembly and
assembly.
4.4
Inspect the connector to verify if a lock
is present on the connector.
4.5
Release the lock on the connector
before pulling the connector harness
out.
Important:
Use extreme care when disconnecting the
cable connectors. If a lock is present on
the connector, the lock must be released
before pulling out the connector.
At the time of reassembly, insert the connectors or flexible cables firmly until the
contact points are seated all the way.
Do not forget to fasten the lock.
Do not pinch cable parts when the cover or
shield is assembled.
4.6
Hold the PC boards carefully to avoid
causing damage to the boards.
Important:
Do not scratch the boards or cables with
tools such as screwdriver.
When the board is disassembled, the board
must be held properly so that excessive
force will not be applied to the board and
warping caused by stress will not occur.
5.0
Precautions for handling disinfectant solutions
5.1
Preview this manual to determine if
draining the LCG is required.
Consider replacing the internal water
filter and performing a Water System
Piping Disinfection prior to draining
LCG.
5.2
Read all precautions carefully before
handling the disinfectant solution.
5.3
Use disinfectant solution only as
instructed.
Important: It is especially important to
know what to do if disinfectant solution
comes in contact with skin.
OER0091V01
Precautions on Disassembly and Reassembly – OER-Pro [3010G.01]
CN1001103 17FS030 R03
THIS IS A CONTROLLED DOCUMENT - PROPRIETARY INFORMATION - FOR INTERNAL USE ONLY
Copyright © 2010 by Olympus America Inc.
This document and the contents contained herewith remain the property of Olympus America Inc. Reproduction of this document or any part thereof by any means (electronic or
otherwise) without the expressed written consent of Olympus America Inc. is strictly prohibited. Printed copies are for reference only and may not contain the latest document revisions.
Print Head Unit Replacement
Page 7 of 14
5.4
Wear the appropriate personal
protective equipment when handling
the disinfectant solution.
Refer to the safety information provided
by the disinfectant solution
manufacturer.
Important:
Wearing personal protective equipment
will prevent skin contact with disinfectant
solution and inhalation of vapors.
To avoid adverse physical effects, be careful not to touch the disinfectant solution
directly or inhale vapors.
If any disinfectant solution gets into eyes,
rinse immediately with large amounts of
fresh water and consult a medical specialist.
Personal protective equipment should fit
properly. Chemical resistant gloves must
be long enough to ensure there is no
exposed skin.
Personal protective equipment must be
inspected before use, and replaced periodically before it becomes damaged.
6.0
Electrical shock safety warnings
6.1
Turn off the power and unplug the
power cord before removing the cover
of the unit to avoid electrical shock.
6.2
Beware of residual voltages.
Important: The unit may contain residual
charges in capacitor components. Take
care to avoid electric shock when opening
the top cover.
OER0091V01
Precautions on Disassembly and Reassembly – OER-Pro [3010G.01]
CN1001103 17FS030 R03
THIS IS A CONTROLLED DOCUMENT - PROPRIETARY INFORMATION - FOR INTERNAL USE ONLY
Copyright © 2010 by Olympus America Inc.
This document and the contents contained herewith remain the property of Olympus America Inc. Reproduction of this document or any part thereof by any means (electronic or
otherwise) without the expressed written consent of Olympus America Inc. is strictly prohibited. Printed copies are for reference only and may not contain the latest document revisions.
Print Head Unit Replacement
Page 8 of 14
7.0
Recording the equipment settings
7.1
Connect the software maintenance tool
and download all parameters before
performing maintenance.
7.2
Document all functional and operational
parameters manually if the software
maintenance tool is not available.
7.3
Reassemble parts according to the
original configuration. This regards the
following items especially:
Parts
Special considerations
Insulators
Such as insulating tubes and mylar sheets
Cables
Which are clamped to avoid coming in contact with heat originating
from high voltage parts
Cover screws with
toothed washers
Which suppress the emitted noise
Binders
Which are used for clamping cables or harnesses.
Important: Failure to attach parts in the
original configurations poses the risk of
noise radiation and reduced electrical
safety, even if product functions are not
impaired.
8.0
Other precautions
8.1
Verify only the specified parts are used.
Important:
The parts and components of this product
are designed to operate under certain
anticipated vibration, heat, chemical exposure and voltage conditions.
Always replace parts with those specified
in the parts list.
8.2
Verify only the specified jigs and tools
are used.
Important: The use of any unspecified jigs
or tools may damage the system or the
components under repair. This will prevent the product from functioning properly or performing optimally.
8.3
OER0091V01
Comply with the torque rated values if
they are in the manual.
Precautions on Disassembly and Reassembly – OER-Pro [3010G.01]
CN1001103 17FS030 R03
THIS IS A CONTROLLED DOCUMENT - PROPRIETARY INFORMATION - FOR INTERNAL USE ONLY
Copyright © 2010 by Olympus America Inc.
This document and the contents contained herewith remain the property of Olympus America Inc. Reproduction of this document or any part thereof by any means (electronic or
otherwise) without the expressed written consent of Olympus America Inc. is strictly prohibited. Printed copies are for reference only and may not contain the latest document revisions.
Print Head Unit Replacement
Page 9 of 14
Printer Unit Removal
– OER-Pro [3011J.01]
1.0
Tools:
Removing the printer unit
No. 1 Phillips
screwdriver
1.1
Turn off the power.
1.2
Remove the paper role with the paper
role holder.
Remove
screws
1.3
Remove 4 screws holding the printer
unit.
1.4
Pull printer unit out.
Remove the Sony bond on the printer
connector.
Printer unit
Tools:
Screwdriver,
flat-head
1.5
1.6
Disconnect PR harness unit from
printer connector.
PR harness unit
OER0091V01
Printer Unit Removal – OER-Pro [3011J.01]
CN1001103 17FS030 R03
THIS IS A CONTROLLED DOCUMENT - PROPRIETARY INFORMATION - FOR INTERNAL USE ONLY
Copyright © 2010 by Olympus Medical Equipment Services of America Inc.
This document and the contents contained herewith remain the property of Olympus Medical Equipment Services of America Inc. Reproduction of this document or any part thereof by
any means (electronic or otherwise) without the expressed written consent of Olympus Medical Equipment Services is strictly prohibited. Black and white printed copies are considered
uncontrolled and may not contain the latest document revisions.
Page 10 of
Print Head Unit Replacement
Printer Unit Installation – OER-Pro [3011J.03]
1.0
Tools:
Installing the printer unit
Sony bond
(part# OT-9622)
1.1
Insert the PR harness unit into the
connector part of the printer unit.
1.2
Apply Sony bonding glue around and
underneath the PR harness unit.
Printer unit
PR Harness Unit
1.3
Tools:
No. 1 Phillips
screwdriver
Torque driver
No. 1 torque bit
Secure the 4 screws (CUKSB2x6UO)
holding the printer unit at
0.08 +0.01 Nm torque.
Attach screws
1.4
Mount the paper role to the printer unit.
1.5
Mount the paper holder to the printer
unit.
1.6
Verify that the release lever is in the
down position.
1.7
Turn on the power.
1.8
OER0091V01
Test the print function.
Printer Unit Installation – OER-Pro [3011J.03]
CN1001103 17FS030 R03
THIS IS A CONTROLLED DOCUMENT - PROPRIETARY INFORMATION - FOR INTERNAL USE ONLY
Copyright © 2010 by Olympus America Inc.
This document and the contents contained herewith remain the property of Olympus America Inc. Reproduction of this document or any part thereof by any means (electronic or
otherwise) without the expressed written consent of Olympus America Inc. is strictly prohibited. Printed copies are for reference only and may not contain the latest document revisions.
Page 11 of
Print Head Unit Replacement
Final Functional Inspection – OER-Pro [3010G.03]
1.0
Verify that the drain hose is securely attached
to the facility drain.
2.0
Start a performance test cycle.
3.0
Perform final inspection while the test cycle
runs.
Important: For final inspection details, refer
to chapter 6 of the OER-Pro Biomed Service
Manual.
4.0
Verify that there are no fluid leaks.
5.0
Verify that the cycle has completed without
errors.
6.0
Verify the disinfectant concentration, if
program B was used during maintenance.
7.0
Verify that the original settings have not
changed.
•
•
•
•
•
OER0091V01
LCG usage setting
Program2
Program3
Leak test setting
Date and time
Final Functional Inspection – OER-Pro [3010G.03]
CN1001103 17FS030 R03
THIS IS A CONTROLLED DOCUMENT - PROPRIETARY INFORMATION - FOR INTERNAL USE ONLY
Copyright © 2010 by Olympus America Inc.
This document and the contents contained herewith remain the property of Olympus America Inc. Reproduction of this document or any part thereof by any means (electronic or
otherwise) without the expressed written consent of Olympus America Inc. is strictly prohibited. Printed copies are for reference only and may not contain the latest document revisions.
Page 12 of
Print Head Unit Replacement
Electrical Safety Test
– OER-Pro [3010H.05]
Tools:
1.0
Performing the electrical safety test
1.1
Perform the electrical safety test.
Important: For final inspection details,
refer to chapter 6 of the OER-Pro Biomed
Service Manual.
OER0091V01
Electrical Safety Test – OER-Pro [3010H.05]
CN1001103 17FS030 R03
THIS IS A CONTROLLED DOCUMENT - PROPRIETARY INFORMATION - FOR INTERNAL USE ONLY
Copyright © 2010 by Olympus America Inc.
This document and the contents contained herewith remain the property of Olympus America Inc. Reproduction of this document or any part thereof by any means (electronic or
otherwise) without the expressed written consent of Olympus America Inc. is strictly prohibited. Printed copies are for reference only and may not contain the latest document revisions.
Page 13 of
Print Head Unit Replacement
Inspection Results Reporting – OER-Pro [3010H.06]
1.0
Reporting the inspection results (Used only by Olympus FSEs)
1.1
Report the inspection results via mobile
tech link.
Important: Report any parts of the inspection that failed.
OER0091V01
Inspection Results Reporting – OER-Pro [3010H.06]
CN1001103 17FS030 R03
THIS IS A CONTROLLED DOCUMENT - PROPRIETARY INFORMATION - FOR INTERNAL USE ONLY
Copyright © 2010 by Olympus America Inc.
This document and the contents contained herewith remain the property of Olympus America Inc. Reproduction of this document or any part thereof by any means (electronic or
otherwise) without the expressed written consent of Olympus America Inc. is strictly prohibited. Printed copies are for reference only and may not contain the latest document revisions.
Print Head Unit Replacement
Page 14 of 14
Revision History
R
1 2 3 CN
Description
Author
Reviewer
Date
Approver
Date
1000380
Initial Document Creation OERPro Print Head David Moriyama (CB)
Replace 17FS030
William Arroyo
12/18/09
Joel Munar
01/19/10
1000680
Revise OERPro Octennial PM Updates
17FS021
David Moriyama (CB)
William Arroyo
04/30/10
Joel Munar
05/13/10
1001103
OT Mod 142p2032 OESPro Artwork Screw
Torque 17FS020
David Moriyama (GK)
William Arroyo
09/23/10
Joel Munar
09/28/10
Revision History OER0091V01
CN1001103 17FS030 R03
THIS IS A CONTROLLED DOCUMENT - PROPRIETARY INFORMATION - FOR INTERNAL USE ONLY
Copyright © 2010 by Olympus America Inc.
This document and the contents contained herewith remain the property of Olympus America Inc. Reproduction of this document or any part thereof by any means (electronic or otherwise) without the expressed written consent of Olympus America
Inc. is strictly prohibited. Printed copies are for reference only and may not contain the latest document revisions.