1
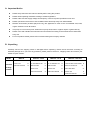
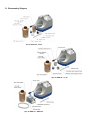
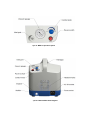
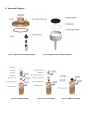
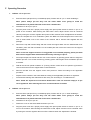
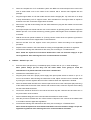
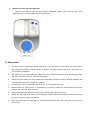
Poratble Bio-suction System 34liter
BSU-34 Series
Service Manual
PLEASE READ THIS MANUAL CAREFULLY BEFORE OPERATION
3, Hagavish st. Israel 58817 Tel: 972 3 5595252, Fax: 972 3 5594529 [email protected]
MRC.VER.01-2.13
A. Important Notice
Please study this instruction manual carefully before using this product.
Please discard packing material according to related regulations.
Please make sure the supply voltage and frequency conform to power specified on main unit.
Please operate the instrument in well ventilated areas and keep away from inflammables.
Filtration accessories (include spill-proof buoy) are applicable to most of low concentrated acid, base,
organic solution but not all solution.
This pump is not corrosion-proof. Please do not pump acid, base or organic vapors or gases directly.
Please clean and maintain the instrument and accessories according to the maintenance method after
every use.
For more product details, please refer our latest catalog and company website.
B. Unpacking
Carefully check if the shipping carton is damaged before unpacking. Please check the items according to
standard package list. If you have any questions, please preserve serial no., shipping carton and contact your
dealer for quick solution.
Model
Standard
Package
Includes:
BSU-34
BSU-34 - LF 30
BSU-34 - LF 32
BSU-34 – SUC-KIT
BSU-34 suction unit
x1
BSU-34 suction unit
x1
BSU-34 suction unit
x1
BSU-34 suction unit
x1
Power cord
x1
LF 30 Filtration Set
x1
LF 32 Filtration Set
x1
1200 ml PES suction bottle
x1
Instruction Manual
x1
Silicone tube
x1
Silicone tube
x1
SUC-KIT suction kit
Power cord
x1
Power cord
x1
PTFE Disc filter
x1
Instruction Manual
x1
Instruction Manual
x1
Power cord
x1
Instruction Manual
x1
x1
C. Combined Filtration System Diagram
<pic 1> (a) BSU-34
(c) BSU-34 - LF 32
(b) BSU-34 - LF 30
(d) BSU-34 – SUC-KIT
D. Disassembly Diagram
<pic 2> BSU-34 - LF 30
<pic 3> BSU-34 - LF 32
<pic 4> BSU-34 – SUC-KIT
<pic 5> BSU-34 operation panel
<pic 6> BSU-34 Main Part Diagram
E. Assembly Diagram
<pic 7> Spill-proof assembly diagram
<pic 9> LF 30 Assembly
<pic 8> Support base assembly diagram
<pic 10> LF 32 Assembly
<pic 11> PES waste bottle
F. Operating Procedure
1.
BSU-34 - LF 30 <pic 1-b>
a.
Ensure that the spill-proof buoy is installed properly. Please refer to <pic 7> when installing it.
Note: please always put the buoy into the waste bottle cover gently to avoid the
deformation of its plastic tube that could cause a malfunction.
b.
Assemble LF 30 as per <pic 9>.
c.
Plug the power cord into a proper power supply then press power switch as shown in <pic 5> to
power on the machine. After blocking the outlet with a hand, adjust vacuum level to a desired
value by turning the vacuum regulator then power off the machine when the adjustment is finished.
d.
Place the complete set of LF 30 filtration system into BSU-34’s reserved space then connect the
inlet of waste bottle cover to the outlet of the machine with a silicone tube supplied with the
package.
e.
Remove the cap with suction fitting and then screw the support base onto the waste bottle cover
clockwise; place the filter membrane on the middle part then screw the funnel into the support
base clockwise.
Note: in case the support screen or O-ring gasket is not installed properly, please put them
back into the support base with downward force by referring to <pic 8>.
f.
Pour liquid sample into funnel and then turn on the machine by pressing power switch to begin the
filtration process. Turn off the machine by pressing power switch again when the filtration process
is finished.
g.
Wait till the vacuum pointer indicates “0” (Turning vacuum control knob can speed it up) and then
remove the funnel from the support base counterclockwise.
h.
Remove the filter from the support screen and process it further according to the applicable
procedure.
i.
Dispose of the contents in the waste bottle according to the applicable procedure or regulation.
j.
Proceed with cleaning and maintenance after every use according to <G. Maintenance>.
Note: Check the liquid level of the waste bottle before each use and then empty it as per
local regulations after removing the cover counterclockwise if needed.
2.
BSU-34 - LF 32 <pic 1-c>
a.
Ensure that the spill-proof buoy is installed properly. Please refer to <pic 7> when installing it.
Note: please always put the buoy into the waste bottle cover gently to avoid the
deformation of its plastic tube that could cause a malfunction.
b.
Assemble LF 32 as per <pic 10>.
c.
Fasten the cover on the waste bottle clockwise <pic 10>.
d.
Plug the power cord into a proper power supply then press power switch as shown in <pic 5> to
turn on the machine. After blocking the outlet with a hand, adjust vacuum level to a desired value
by turning the vacuum regulator then turn off the machine when the adjustment is finished.
e.
Place the complete set of LF 32 filtration system into BSU-34’s reserved space then connect the
inlet of waste bottle cover to the outlet of the machine with a silicone tube supplied with the
package.
f.
Plug the support base of S.S. filter holder into the silicone stopper (No. 16) more than 5 cm deep
to keep well-sealed; put S.S. support screen, filter membrane on the support base in sequence
and then screw S.S. funnel into support base clockwise.
g.
Remove the cap with suction fitting from the waste bottle then plug the filter holder into the waste
bottle tightly.
h.
Pour liquid sample into funnel and then turn on the machine by pressing power switch to begin the
filtration process. Turn off the machine by pressing power switch again when the filtration process
is finished.
i.
Wait till the vacuum pointer indicates “0” (Turning vacuum control knob can speed it up) and then
remove the funnel from the support base counterclockwise.
j.
Remove the filter from the support screen and process it further according to the applicable
procedure.
k.
Dispose of the contents in the waste bottle according to the applicable procedure or regulation.
l.
Proceed with cleaning and maintenance after every use according to <G. Maintenance>.
Note: Check the liquid level of the waste bottle before each use and then empty it as per
local regulations after removing the cover counterclockwise if needed.
3.
BSU-34 – SUC-KIT <pic 1-d>
a.
Ensure that the spill-proof buoy is installed properly. Please refer to <pic 7> when installing it.
Note: please always put the buoy into the waste bottle cover gently to avoid the
deformation of its plastic tube that could cause a malfunction.
b.
Assemble the waste bottle <pic 11>.
c.
Plug the power cord into a proper power supply then press power switch as shown in <pic 5> to
turn on the machine. After blocking the outlet with a hand, adjust vacuum level to a desired value
by turning the vacuum regulator then turn off the machine when the adjustment is finished.
d.
Place the waste bottle into BSU-34’s reserved space and connect the outlet (with spill-proof buoy)
of the waste bottle to the inlet of the machine with a silicone tube; screw the cap with suction fitting
into the waste bottle clockwise.
e.
Connect the handle of SUC-KIT to the inlet of the black cap with a silicone tube and then turn on
the power switch of the machine.
f.
Select a desired fitting part to be connected with the handle for waste suction.
g.
After the process is finished then turn off the machine. Dispose of the contents in the waste bottle
in accordance with the applicable regulations.
h.
Proceed with cleaning and maintenance after every use according to <G. Maintenance>.
Note: Check the liquid level of the waste bottle before each use and then empty it as per the
applicable regulations after removing the cover counterclockwise if needed.
4.
BSU-34 with other filtration apparatus
Before using BSU-34 with any other filtration apparatus, please ensure that the size of the
apparatus can be accommodated in the reserved space.
G. Maintenance
1.
Funnel lid, funnel, support base, waste bottle cover, cap, spill-proof buoy and waste bottle are made of
high temperature resistant material. Please rinse them with water and wipe with a dry cloth after every
use. Autoclave is available.
2.
S.S. funnel and S.S. support base are made of SUS 316 material. Please rinse them with water and wipe
with a dry cloth after every use. Autoclave is available.
3.
Silicone tube and sealing ring can resistant high temperature. Please rinse them with water and wipe with
a dry cloth after every use. Autoclave is available.
4.
For autoclave, you are suggested to set up at 121 ℃ for 30 minutes at least.
5.
BSU-34 built-in an oil free pump, no maintenance is necessary. Please turn off the switch and wipe the
platform with a dry cloth after every use.
6.
Please maintain the accessories of suction kit by following our instruction manual.
7.
Muffler, disc filter and silicone tube are consumables. Please replace these parts at least every half year
to make sure the flow rate is not affected.
8.
When the fuse need to be replaced, you can get the backup fuse (110V: use 2.5A; 220V: use 1.5A) from
the fuse box
H. Troubleshooting
Symptoms
Possible causes and Solution
1.
Check the power supply conform to power specified on
main unit
Device fails to start
2.
Blown fuse replace fuse if it is burnt out
3.
Check if the power switch is in the ON position
4.
Vacuum still exists in system release vacuum and
restart
Vacuum fails to adjust
5.
Defective switch contact your distributor for repair
1.
Faulty gauge contact your distributor for repair
2.
Loose regulator tighten the regulator by yourself or
contact your distributor for repair
3.
Faulty regulator contact your distributor for repair
1.
Regulator improperly set set regulator vacuum level
following instruction manual
Reduced /low vacuum
2.
Clogged muffler check if the muffler is clogged
3.
Air leak Check the tubing and connected accessories for
possible leaks.
1.
(Attach, tighten or replace)
Regulator improperly set set regulator vacuum level
following instruction manual
Low filtration speed
2.
Air leak Check the tubing and connected accessories for
possible leaks.
(Attach, tighten or replace)
3.
Check if the suction bottle is overflowing
4.
Check if the specification of membrane filter is correct
I. Ordering Information
197400-11/22
BSU-34, Vacuum filtration unit, AC110V/AC220V
197401-11/22
BSU-34 - LF 30, Vacuum filtration system, AC110V / AC220V
197402-11/22
BSU-34 - LF 32, Vacuum filtration system , AC110V / AC220V
197403-11/22
BSU-34 – SUC-KIT, Vacuum filtration system , AC110V / AC220V
199100-00
SUC-KIT -LB, Suction kit, light blue
199110-00
SUC-KIT -DB, Suction kit, deep blue
199120-00
SUC-KIT -P, Suction kit, pink
199130-00
SUC-KIT-G, Suction kit, green
197010-30
LF 30, 300ml PES filtration set
197010-50
LF 50, 500 ml PES filtration set
197010-32
LF 32, 100 ml Stainless steel filtration set
197010-33
LF 33, 300 ml Stainless steel filtration set
197000-01
LF 3, 300 ml PES filter holder (include funnel lid)
167103-10
100 ml Stainless steel filter holder
167103-30
300 ml Stainless steel filter holder
197000-36
PP funnel lid
197000-35
PES support base, 47mm
197000-11
PES waste bottle (1200 ml)
197000-39
Spill-proof buoy
197400-45
PE Muffler (1/8 PT,port size:20 µm,length:26 mm)
167200-35
PTFE disc filter