1
Miscellaneous Carb Questions FAQ
Miscellaneous Carb Questions FAQ
compiled & edited by Kristian #562
Please read the Disclaimer before attempting any work in this FAQ.
If you are looking for performance-related carb information See the Rejetting Spreadsheet
accessed via. this link Performance Mods Section
●
Carbs for Dummies
●
Pulling the Carbs
●
Puking Petrol
●
All About Floats
●
Proper Choke Use
●
Do I need a Carburettor Adjustment for High Altitude
●
Do I need to Synchronise the Carbs
●
Fast Idle Problems
●
What is the Effect of Dropping the Needles
●
Flat spot in carburetion?
●
What are the Holes in the Bottom of the Slides for
●
Slide (Barrel) Wear
●
Carb Alternatives
●
Alternative Carb Parts
●
Water in Float Bowls? How do I drain them?
●
Fuel Line Replacement
Straight to the Carb Clean FAQ
For Aftermarket Fuel Filter Q's and the OEM In-line Fuel Filter.
For Petcock Q's.
For Idle Q's
For Canister Q's
Carb Primer
by Flash #412
Please read the Disclaimer before attempting any work in this FAQ.
October '01
This is a carb primer for those with little or no understanding of this device. If you're carburettor literate,
move on. If you're carburettor ignorant, you might like this... "Carburettor is NOT Latin for 'don't mess
with it.'"
http://faq.f650.com/FAQS/CarbMiscFAQ.htm (1 of 23) [18-02-2007 12:29:59]
Miscellaneous Carb Questions FAQ
Fuel and air need to be mixed in the proper proportions in order for your engine to run. The device that
atomises the fuel is your carburettor (unless your motor is fuel injected). Due to the relationship
between the volume of a sphere and it's surface area (spherical surface area is about 12.6 r^2 while
spherical volume is about 4.2 r^3), smaller drops ignite better by a factor of three times the difference
in the radii. Producing these small drops at idle as well as wide open (WFO) requires more than one
method of atomisation. Hence, your carb has three distinct fuel circuits. The simplified view has one
single air circuit.
If you look at a carb, you'll see that it is a fancy, glorified pipe through which air passes. When you
twist the throttle, a slide raises in the carb throat. This may or may not happen with the engine NOT
running due to differences in design. But anyway, this slide controls the amount of air allowed to go
into the intake manifold. The intake manifold is whatever is between the carb and the hole in the head
containing the intake valve(s).
The float chamber is an area inside your carb filled with gasoline, whose level is more or less carefully
controlled. There is a float in there, sorta like in the back of your toilet. You access the float by
removing the float bowl. The float is either solid or filled with air. In any case, it floats in gasoline and is
made of material impermeable to that solvent. When the fuel level rises, so does the float. At a certain
level, the float pushes a conically shaped round thing (float needle) into a conically shaped hole (seat)
and shuts off the flow of gas. This "needle and seat" is the valve that controls gas flow into the bowl.
Float level is important and so is a good seal here. If the level is too low, the carb won't get as much
gas as it should (lean). Too high and it can run rich or leak.
The idle circuit is made by drilling some holes from the float bowl to the area on the *motor* side of the
throttle slide. There is ambient air pressure on the air-filter side of the carb. There is vacuum on the
motor side. This vacuum is used to draw fuel through this little hole, the diameter of which is normally
controlled by an orifice, or pilot jet, installed in that hole. More vacuum at wider throttle opening draws
more fuel. This is from idle, through off-idle to about 1/8 throttle. Normally idle SPEED is set by a screw
that opens the slide a little more or a little less. Idle MIX is set by a screw that sticks a pointy tip into the
little fuel passage (or a similar air passage used to draw the fuel).
At about 1/8 throttle, the effect of the next circuit swamps out the effects of the idle circuit. There is a
bigger hole that goes straight up from the float chamber into the bottom of the carb throat. This hole
has two precision fittings, one at either end, both removable. The one at the bowl end is the main jet.
More on that later. The one at the top is the needle jet. Hanging off the bottom of the slide is the jet
needle. The jet needle is a tapered needle that moves in and out of the needle jet. Normally, both the
needle jet and jet needle can be changed. Needle jets have different size holes in them. Jet needles
have different lengths and tapers. Usually, they are suspended from the slide in a manner that allows
one to change how far they hang down, by moving a clip to a different notch. You can imagine a
tapered needle withdrawing from a hole... the further out it is, the more surface area of the hole is
available to flow fuel. This circuit works up to about 3/4 throttle, when the jet needle is completely
withdrawn from the needle jet. At that point, the limiting factor becomes the main jet.
The main jet is used at wide full open (WFO) throttle. How much fuel does the engine NEED when it is
breathing as fast as it can? That is *THE* limiting factor for your motor for any given combination of
exhaust system, Airbox/filter setup, temperature, altitude or barometric pressure.
http://faq.f650.com/FAQS/CarbMiscFAQ.htm (2 of 23) [18-02-2007 12:29:59]
Miscellaneous Carb Questions FAQ
Tuners tune first to get the bike to start and run (idle circuit), then make power on the mains, THEN be
"streetable" between idle and WFO. *HOW* to go about tuning is a different subject, maybe for a
different day. Many whole books have been written on the subject.
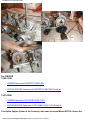
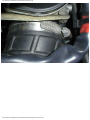
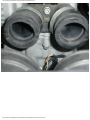
PULLING THE CARBS
by Flash #412
October '01
1.
2.
3.
4.
5.
6.
7.
8.
9.
10.
11.
12.
13.
14.
15.
Remove the seat.
Remove the side covers.
Remove all the screws that secure the gas tank to the fairing.
Remove the left and right engine covers.
Remove the big bolt at the back of the tank. Pull the fuel line off the petcock.
Pull the tank upward and note that there are a couple of vent hoses.
If you have removed your canister, one hose is short and plugged. If you haven't, you should.
The other hose has a connector inline where you can "break" it.
Remove the tank and set it aside on top of something so that it doesn't hurt the petcock/nipple.
Remove the tank support bracket from the frame. Loosen the hose clamps which clamp BOTH
the rubber carb boots and the Air Intake Boots.
You might want to use a flat screwdriver to sort of pop the lip of the boot up and spray some
Armour All (tm) or Son of A Gun (tm) or other rubber treatment/lubricant in there to get the
rubber unstuck from the metal and lubricated all around the lip.
Repeat for all the rest.
Wiggle the rubber, pull on the carbs and cuss a lot until they are free.
Pull them out.
"Install in reverse order."
For more details about removing the Gas Tank see the Gas Tank Removal FAQ.
Feedback:
●
In trying to get the carbs out, without removing the airbox/exhaust/etc, the sharp edge of the
carby intake opening sliced its way into the air box rubber while I was wiggling/pulling the
carbys out. Its not a really deep cut, and hopefully the hose clamp will hold the cut together
when the carbs go back in place, but can anyone provide me with the BMW part number for the
airbox rubber ? Also, what is the BMW part number for the engine rubber ? My engine rubber
had a lot of fine racks in it which were especially noticeable when pushed/bent around to the
extremes possible during a carby install/removal. The engine rubber is pretty thick so I'm not too
worried yet. I have since filed/wet'n'dried the sharp edges off the carby intake/output openings
to avoid any further wear and tear on the rubbers. car0tene
●
Here are the Part No's:
Intake manifold 11 61 2 343 131 (I think this is the Engine side)
●
http://faq.f650.com/FAQS/CarbMiscFAQ.htm (3 of 23) [18-02-2007 12:29:59]
Miscellaneous Carb Questions FAQ
●
●
●
Rubber grommet 11 61 2 345 007 (I think this is the Airbox side)
About the small cracks: You could use some RTV silicone to seal it. Just put a thin layer over it
and let it dry over the night.
About the cut: As long as it is at the airbox side it shouldn't make to much difference (unless it is
that big so that dust can enter). It is more serious (for the performance and the engine) if it is
leaking at the engine side, because that would lean out the fuel mix. Spakur #1117, Icelander in
Malmö, Sweden, 1995 Classic Red F650 with 60.000+ KM.
PUKING PETROL
by Flash #412
October '01
Last night I stopped and filled up 0.8 miles from home. I was careful not to overfill. NO gas escaped
into the "well" below the metal cap. I parked the bike in the garage. At about 4AM my wife woke me up
because she smelled gas. There was a large puddle below my bike. I put a coffee can under the hose
and mopped up the puddle. Thinking to improve the situation, I put the bike on the centerstand. When I
did, another table spoon or more poured out. In the morning, there was almost an INCH of gas in the
coffee can. I pulled the bike outside and parked it on the centerstand while I drank my coffee. When I
went to leave, a half hour later, there was about a two foot diameter wet spot on the concrete under the
bike. It was hard as hell to start. I stalled it at the bottom of the driveway. I happened to look back and
see a trail of drips from the big wet to where I was. I rode it about eight miles and stopped just to check
things out. No more drip.
I've smelled gas in the garage every night this week, even when parked with more than 100 miles on
the tank. The temps lately have not been extreme. I think there was not such a great differential
between the temp of gas in an underground tank and the temp last night. If anything, the air was
cooler.
So what causes it.....Pukin' Petrol (The Answer!)
1. When you remove the float bowl, there is a plastic assembly which consists of the floats and a
2.
3.
4.
5.
6.
7.
holder.
The float needle clips on to the floats. There is an o-ring on holder.
This o-ring had a positive feel to it when I removed and reinstalled the holder.
With the assembly removed, there is a bronze piece which is (or contains) the SEAT.
This bronze piece also has an o-ring. However, BOTH of the seats just plain fell out when I
turned the carbs upside down.
I figured that if the o-ring did not have enough interference to hold the thing in, then it would not
do much of a job keeping gas from getting by.
I replaced the o-rings with some slightly larger (non-metric) standard ones I had in an o-ring
assortment box which fit better than the ones I took out.
After putting it all back together, it started right up like it's supposed to, full choke & zero throttle. I rode
around the block. When I got back, I put it on the sidestand and a few drops of gas came out one of
the hoses on the opposite side from where it HAD been leaking. Being an optimist, I put a coffee can
http://faq.f650.com/FAQS/CarbMiscFAQ.htm (4 of 23) [18-02-2007 12:29:59]
Miscellaneous Carb Questions FAQ
under there, turned the petcock off and left it overnight. All was well this morning.
BTW, I also installed the fuel filter while I was at it. There are four carb screws, which I replaced with
Allen's. They are 5M0.8 x 12. But if you try to use ones that are too long, they won't go in the front
holes, only the rear ones. See the Carb Cleaning FAQ for details and pictures of the Carbs.
Q. What are the Symptoms:
●
My bike, a '95 F, came to a halt as if I had run out of fuel, I will add that I hadn't. Anyway the
bike came to a stop and I found the pipe running from out of the top of the carb was pumping
petrol out and onto the engine. It will turn over with no problem but doesn't want to know about
catching. I know this isn't a huge amount of info but until Monday when I'm off I can't give you
any more. Any ideas as too what could have gone wrong. The bike has 70K on it and normally
runs well with no major problems other than a bit of oil in the airbox.
●
It MUST be a float or FUEL VALVE problem. The fuel is gravity fed from the gas tank to the
carbs. The carbs is design to work with a certain "height" of fuel inside. If this level is a bit too
height it is like running with the choke on, and if it is far too high it will overflow by the small pipe
(s). The device to keep this level right is called a float and resides in the float chamber at the
bottom of carbs. It works like the device that you might find in your toilet bowl. When it drops a
bit it opens a valve to let more fuel in and when the fuel raises it it will close the valve. If the
valve gets stuck partly open (by some small impurity in the fuel) or the float does not rise due to
it being punctured or stuck, the fuel level will rise until it overflows. Haakon#626 (Norway,121999- F650GS)
●
Read the FAQ on how to get the carbs out. Take them out. Take the float bowl off. Remove the
floats. Spray some carb cleaner through where the fuel normally goes IN to knock out any
impurities. You should probably change the little fuel filter in the "T" while you have them out. If
you don't have an inline filter installed between the petcock and the T, you'd be advised to add
one. Flash 412 (CO)
Q. Can (not should) you still drive with "Puking Petrol" syndrome.
●
You should try to shut the fuel off 1/4 mile or so BEFORE you shut it off. That way, you have
partially drained the fuel line & carbs, just in case (fuel expands when heated...and may find its
way out when it does). If the gasoline fills up the cylinder (is that even possible on the F650?),
you may get hydraulic lock (and bent connecting rod or other parts) when starting. Fuel dilution
of the oil may give you MUCH lower oil viscosity, and the higher wear that goes with it. Also, be
aware that the F650 petcocks have been known to fail. Running the bike should not present a
problem, unless possibly during an extended period of "gridlock." YMMV. Marty #436-Chicago97 F650F
All about Floats
by A Watson
http://faq.f650.com/FAQS/CarbMiscFAQ.htm (5 of 23) [18-02-2007 12:29:59]
Miscellaneous Carb Questions FAQ
12/12/01
Floats serve 2 purposes: First, they keep the carb bowl from overflowing by floating up against the float
valve and shutting off the (gravity feed) flow of fuel. Second, properly adjusted, they maintain the fuel
level in the bowl at the right height. This is important because the height of the fuel in the bowl
determines how much fuel gets sucked up through the main jet for a given RPM, which in turn has a
direct affect (along with needle size and adjustment) on the air-fuel mixture that reaches the cylinder.
All the wisdom I've heard is that floats, which are made of plastic (they appear to resemble extruded closed cell - styrofoam), can over time absorb fuel and become less buoyant. (The way older ones and
some newer ones may be made of copper, but that's another story.) Floats that are less buoyant will
allow the fuel level in the bowl to become too high before they shut off the flow, even if they are
properly adjusted. This in turn will permit more fuel to be sucked up, which will enrich the air/fuel
mixture, which will affect fuel economy.
Floats are cheap and relatively easy to replace. As someone said, it makes sense to replace them now
and then. 13 years seems a long time to me.
The post about weighing the floats was very interesting and this should permit a very precise
determination of their condition/buoyancy. However, a visual examination can also help. If they're
heavily stained, porous-looking or just plain cruddy, change 'em.
See also:
●
http://www.airheads.org/contrib/fuel.html
●
http://justkdx.dirtrider.net/floatlevel.html
Proper Choke Use
Q. Ok here is my question. Is the choke supposed to move by itself? I have found that when the bike
is cold and I have the choke fully on and I ride aggressively (read rev to 7000 then shift then wide open
again) the choke closes and often time the bike will stall going down the off ramp when I declutch. Is it
supposed to move like this? If I pull the choke back it runs fine again. It can be a pain staling like that. Is
this indicative of another problem? I do know you are supposed to let it warm up a bit before opening up
but it seems to be warming up slower. Is that a symptom of some other problem and if so what? Thanks
for all your help.
A. No, this is not normal. When the choke is off it is supposed to stay off. It should have a spring near the
choke mechanism on the carbs that must be overcome to activate the choke. It this spring missing? The
reverse problem is more typical, with the choke refusing to stay on because the tension is too loose at the
choke lever on the handlebar. Usually it is not too hard to increase the friction of the plastic choke lever by
placing some heavy grease or rubber cement between the choke lever and the adjacent housing. If that
doesn't work, try using a small plastic shim between the choke lever ring and the mirror/clutch handle
mount to provide some additional drag on the ring. Looking at my bike, I don't believe that there is a screw
http://faq.f650.com/FAQS/CarbMiscFAQ.htm (6 of 23) [18-02-2007 12:29:59]
Miscellaneous Carb Questions FAQ
to tighten. I would just loosen the mirror/lever mount and move it over closer to the choke ring and see if
you can put a little more friction on the ring. I don't have an answer about your idle, just turn it up to 1400
rpm and see what happens. Richard #230, Pacifica, CA.
●
I thought it was a design "feature". Maybe it is... If I ride with respect until the engine is warm then
the choke is fully off when it needs to be. This is fine with me :-). J@mes
●
I had/have this problem too. The choke closes on its own (i.e. the lever moves away from me). I'm
going to try Richard's suggestion re: the screw. In my case my bike was stalling unless I kept the
choke on, even when the bike was warm...but I've adjusted the idle and it runs fine now. (Idle is
1300+/- 100 rpm and can be adjusted with the brass knob on the left hand side of the bike just
above the foot peg. It hangs loose from a cable; you can't miss it. Hope this helps. Johnny Canada
# 1088 '98F.
Q. Which way is the Choke on?
A. The Choke is on when the Lever is BACK toward you. It often goes off by itself, rotating AWAY from
you (when you are sitting one the bike).
Q. How long should I leave the Choke On?
A. Do not leave it on TOO LONG. You will foul your plugs, carbon your cylinder and head and and stuff
up your fuel economy. Most folks can switch it off after half a mile to a mile, depending on the weather.
●
Same as Wamer. I use the choke only to start it when it's completely cold. Turn it off
immediately and drive away. Mason #631 - 97ST in PA.
●
I am curious how long people run before they turn the choke completely off. Even on a 80
degree day I am still at 1/2 choke when I get to work, any less and it stalls. I have a 15 minute
commute much of which I do at 80. I have also noticed very poor fuel mileage ~33 mpg. I am
wondering if maybe my thermostat is stuck open. Any way to test this without taking it out of the
bike and putting it in a pan of hot water? I am going to go through the poor mileage faq and take
off the lowering kit since I got my other bike running. I am going to check the plugs and gap et
all. my impression is that something is wrong. Don Don - Rochester
●
As soon as I get to a road where I can run for more than two blocks without a stoplight, I turn it
off, less than a mile. Yes, I have to turn it on when the temperature is in the 80's if the motor is
stone cold. Flash #412 (CO).
●
It also only takes me a couple blocks before I can turn the choke off. Robert #959 in TX - '97
F650.
●
I need the choke to start easily even when hot, but it goes off within 1 mile and then the bike
idles normally. With the oil at 40 centigrade plus the choke goes on half the engine fires (with no
throttle) and the choke goes straight off. With cold oil on a normal UK day (10-15 centigrade)
half choke for 1 mile. On a cold winter day (minus 2-3) I need full choke to start, then half for 1-2
miles. With a warm engine and choke on after the engine fires, you get the trick where the
engine stalls as soon as the throttle is opened. I am guessing that the passage in the carb is a
bit on the big size and the rest of the carb setup might be critical. Having the choke part on
when the carb was set might give the result Don describes. A plug chop test after a longish run
would seem to be the order of the day to see if the choke is set to start even when the lever is
http://faq.f650.com/FAQS/CarbMiscFAQ.htm (7 of 23) [18-02-2007 12:29:59]
Miscellaneous Carb Questions FAQ
set to off. Andy Leeds UK #982.
●
I fire it up and ride off immediately. It will not idle correctly without choke _ever_ if I do not ride
it. But if I ride off and kill choke ASAP, it will idle fine within moments (say, at the next stop
light). kinda weird, but that's how it works. NormJ #473 Seattle.
●
The phenomenon you see is that the lever actually operates an enrichener, not a choke, which
is why I do not use the terms open and closed as most people get confused. Your problem is
likely that your idle is adjusted incorrectly. And it's too low. Before you do ANY other
adjustments, get the bike fully warmed up to regular running temperature with a good ride with
reasonably fresh gasoline. Then adjust the idle to 1400 rpm (real easy to do, takes 10 seconds).
Run it a while and confirm that (when fully hot) your idle is stable around 1400 rpm. Yes, it's a
bit fast, but that's the way it was designed. Now you can see how your cold idle and "choke"
works the next time you ride. Do NOT adjust the idle cold while operating the choke lever. Vary
the choke lever instead. This will likely solve your idle problem if nothing else is wrong with the
engine. Todd #389.
●
The choke changes the air-to-fuel ratio by either supplying more fuel than normal or limit, choke
(hence the name) the air-supply. Your bike will consume more fuel on choke, sometimes it will
also run badly on low revs and probably pollute more. Not having to remember the choke is one
of the nice things about fuel injection. I know of a guy that misunderstood the choke on his
veteran bike and was starting without it and when the engine got warm he applied full choke. He
did this for several years... :-). Pelle, Sweden, '02 GSDA.
●
The choke is not a choke (air restriction) its an enricher jet control (more fuel), hence it runs the
engine rich (carbons up plugs etc.) and uses more fuel. If you run the cold starting device for
long enough, the plugs will foul, the carbs will maybe overflow and the engine will flood and stall
at idle. If you don't have a temp gauge you should maybe get one, the screw in type tells you
when to close the choke. Imagine setting up the bike with the choke on full. You get the idle at
1100 rpm by moving the idle screw in or out so the air and fuel match up and burn. You then
move the choke to the normal run position, the engine will stall. However, run until the engine is
hot and then move the choke lever. The engine is so hot, it'll burn pretty much anything, lean,
rich whatever at least for a time and with the right throttle setting. However, the plugs will show
what the mixture was like. I've had this on the dreaded Ural. The Ural choke opens an additional
fuel jet. With the crappy sponge cake seals the Russians use, the choke is always letting some
fuel in. You set up the carbs like this and get idle and some sort of balance. You actually close
up the main chamber a bit to allow for the extra fuel that's sneaking in via the choke. On a Ural,
the seals then leak gunk into the carb by reacting with the petrol and give a proper seal and/or
block the start jet. The engine runs lean and hot. You then retune and all is well until the main
jets block and you hit them with carb cleaner. The choke jet seal de-gunks and its sooty plugs
time again. At this point you sell the bike and buy one with FI if you have any sense! The F carb
doesn't have this exact problem because the rubber bits are petrol proof, but I am wondering if
something similar is possible. I guess you've already checked the choke cable for tightness?
Andy Leeds UK #982
●
(Less air in mixture than usual). This results in the engine running a little hotter, which is never a
great thing. I normally ride to the second stop street with my choke on about 2/3 (Classic). By
this stage the engine is warm enough to tick over smoothly by itself. I do, however, frequently
check my choke, turn signal and low beam switches while I ride (just a habit really). Bernard.
http://faq.f650.com/FAQS/CarbMiscFAQ.htm (8 of 23) [18-02-2007 12:29:59]
Miscellaneous Carb Questions FAQ
●
Make sure the choke is off (check at the carb, not the bar lever).......are you sure your choke
goes completely off? With the "choke" circuit on these carbs, it usually runs really bad with a
partially-on choke. I've seen the choke cable get hung up halfway, which leads to no running/
stalling/no idle with choke seemingly "off" but will run fine but horribly rich with it full-on. Never
leave mine ('99 Classic) on choke for more than a few minutes, if it's above 10'C (50'F), all I
need is the choke to start, after starting, it'll run fine with no choke (totally stock 'cept for silly
K&N). Shank NYC USA.
●
Turned up the idle and this seemed to fix the problem. The whole bike seems to run a bit better
but it is probably just my imagination. Don.
●
Apart from theoretical problems, has anyone noticed actual ill effects on the classic F650 from
either driving with the choke partially open for miles (forgetting to shut if off promptly) or not
closing the fuel petcock after riding? I'm not guilty of the second, but I am the first now and then.
Think there's enough extra fuel on the cylinder walls to effect ring lubrication? Johnny #862.
●
Don't know about theoretical, but gas mileage is a little worse when you ride with the choke on,
but not much. that I know from experience. have never noticed any other problems (never
fouled a spark plug). I think it's a throttle advance, not an actual "choke" (i.e. air restriction). I
never shut off the fuel except when transporting the bike on a trailer. Haven't noticed any ill
effects from that either. mark #403
●
The small amount of extra fuel, when the throttle is open, is not likely to cause a ring oiling
problem. However it might shorten the life of the spark plugs and the catalytic converter (if you
still have the stock muffler), through fouling, over a long period of time. Richard #230, Pacifica,
CA
●
My bike peed gasoline all over the garage floor cuz the petcock was left on and there were
some tired o-rings in the carbs. Since then, I prefer to avoid the fire hazard and turn it off. This
isn't common. But I am not the only one it happened to. See "Pukin' Petrol" in the FAQ. Flash
#412 (CO).
●
The fuel enrichment circuit of Mikuni carbs starts to work only when the cable is pulled about
half way. And I think that if you whack the throttle open it basically defeats the vacuum that the
enrichment circuit relies upon, so I don't think riding with a partially open "choke" would result in
any damage, if it were open further, the bike would just run poor, lots of smoke and over the
long term, catcon damage, maybe. Shank NYC USA.
●
THIS is how much mpgs can drop with choke on. Ok, it's not a choke but fuel enrichment
device wouldn't fit in the subject line. Over the last 3 fills, I go 150-155 miles before getting
fuel starvation symptoms (which calculated out to 50-55 mpg at the fill ups). During this last
tankful, I left the fuel enrichment device (aka choke) on for about 10 miles on one trip. My
mileage to reserve dropped to 125 miles (I don't know yet the gas mileage on this fill up--I had
to go to reserve to get home)--however, it looks like about a drop to around 40 mpg. This is a
97 F650 ST with 26K on it. So, if your mileage is down, make sure it's not just due to leaving
the FED (choke) on too long. Nate 97 F650ST, Maryland.
Choke Stuck?
http://faq.f650.com/FAQS/CarbMiscFAQ.htm (9 of 23) [18-02-2007 12:29:59]
Miscellaneous Carb Questions FAQ
If it is idling high, just Check the Cables. BOTH Choke Cable and Throttle cables.
●
If you don't normally use the choke fully when the weather is warmer, I suspect that the cable
isn't running freely and it's not going back all the way to the closed position. In that situation I
would lubricate the choke cable with a very light oil and if you can just keep opening and closing
it to work the oil along the length of the cable. When the lever is closed is the end piece on the
cable sat nicely in its socket or is there a pit of play there? If there is a bit of play or you can see
a small bit of the inner cable then it just needs that lubricant to get it working again. Trevor 999
UK 01 GS
Do I need a Carburettor Adjustment for High Altitude ?
by Kristian #562, Dick #420, Mark #403, HsN, Richard #230 & Unknown
●
Generally, the F650 (Classic) can cope with MOST Altitude changes, with no changes to the
Carbs. Any Changes should normally only constitute MINOR adjustments to the idle mix screws.
●
The F650 CV carb provides crisp throttle response and lessens jetting sensitivity to temperature
and altitude changes.
●
All constant velocity (CV) carburettors are designed to compensate for changes in altitude and
barometric pressure. From http://www.floheadworks.com/Products/keihin_carburetors.htm
●
The FI should have no problem at all, as it has lots of sensors and copes better with Altitude/Air
temperature.
●
What does constant velocity mean.? When you open the throttle the engine draws more air
through the carb. A large quantity of air must move faster being drawn through the same
diameter Venturi than a smaller quantity of air does. In a non-CV carb the air would be speeding
up and slowing down in the Venturi depending on the demand of the engine. In a constant
velocity carb the Venturi automatically gets smaller when the engine isn't drawing much air and
gets larger when the engine draws more air, this keeps the velocity (speed) of the air close to
the same at all throttle openings and provides a more consistent metering of fuel in the Venturi.
It is "supposed" to give better fuel economy, cleaner emissions and adjust itself to altitude
changes. Most tuners dislike constant velocity carbs and use round or flat slide carbs in which
the slide is raised directly by the throttle cable instead of indirectly by airflow as in a CV carb.
From: http://www.sonic.net/~blaineh/xs11carb.html
Going from Low to High Altitude:
Possible Symptoms:
You may experience rich running, stalling, hard starting and irregular idling at slow engine rpms at high
altitude. The bike will also run rich at full throttle, because too much fuel will flow through the main jet.
So do I need to adjust it:?
●
Yes & No. The carb vacuum diaphragm will adjust the mixture for you when running on the
throttle.
http://faq.f650.com/FAQS/CarbMiscFAQ.htm (10 of 23) [18-02-2007 12:29:59]
Miscellaneous Carb Questions FAQ
●
(CV carbs tend to be self-compensating at high altitudes, the flat slide carb does not.) From
http://www.chuckhawks.com/super_glide_sport.htm
●
Carbs are tuned to provide a certain A/F ratio based upon the ambient atmospheric pressure. If
the pressure changes, so does the A/F ratio. But, if you are actually measuring the A/F ratio, the
carb is more immune to pressure variance. What does that mean? It means a CV doesn't go
rich at altitude the way a fixed jet carb does. It is altitude compensating. So at 10,000 feet, a CV
equipped bike only looses power from the loss of available air pressure, while a fixed jet carb
will loose power from less air and lower combustion temp from being overly rich. From http://
●
www.easternillinoisabate.org/tech_talk.htm
If you were moving to altitude, you might consider the following: (Try ONE at a time, depending
on the Altitude).
●
Screw in the idle air screws and/or
●
Lower the needle position and/or
●
Possibly, reduce the size of the main jet. Refer http://www.nightrider.com/biketech/
main_jet_correction.htm for Jet Multiplication Factors for Temperature/Altitude.
●
For a trip over a BIG MOUNTAIN, just keep your hand on the throttle, in case the bike starts to
die at idle.
●
FI systems have an advantage here, as they do a pretty good job at adjusting the mixture for
changes of altitude.
●
Less air means less power and a richer mixture. A K-bike gets better mileage above 4,000 feet
because the injection system switches to a leaner program to compensate for the altitude. The
vacuum carbs can adjust to an extent, but not anywhere near as well.
Going from High to Low Altitude:
Possible Symptoms:
You may experience popping on throttle slowdowns. i.e. popping/minor backfiring during compression
braking/deceleration. BUT check your carbs are adjusted correctly, not worn and also check the
Backfiring FAQ, Exhaust Gasket Replacement FAQ and Strange Noises FAQ. So do I need to adjust
it?
●
The idle mixture screws are not self-compensating, as they (as well as the throttle-cutaway) are
not affected by the constant-vacuum feature of the carbs. They need to be manually adjusted.
●
In the Manual there are no instructions related to re-jetting or adjusting the high speed mixture,
http://faq.f650.com/FAQS/CarbMiscFAQ.htm (11 of 23) [18-02-2007 12:29:59]
Miscellaneous Carb Questions FAQ
only adjustments are for idle mixture and idle speed.
●
Most people have no difficulty changing altitude.
●
Re-examine the Backfiring FAQ FIRST for minor adjustment of your idle mix screws, or possibly
a leaking exhaust gasket.
If you fixed the Pukin' Petrol Syndrome and you were leaking gas before, you were running rich,
and likely would not have the lean idle mixture backfiring. By fixing that rich condition, you have
leaned out the fuel mixture, and now have the minor popping due to the lean mixture. Adjust
your Idle Mix Screws as per the Carb Clean FAQ.
1/2 to 1 full turn richer may stop the backfiring. Try that first before doing more complicated
things, That should also compensate for any altitude change, however be aware you should
isolate it to ensure you do not have another problem, like blown Exhaust Gaskets or Worn
Needles etc. Or it simply may have not been set properly in the first place.
Enrich the idle mix. Now that you've got more air, your idle mix is lean, which causes the
backfire. Turn them all the way in (not tight), and then back them out 3.5 turns each. If that
doesn't solve the problem completely, turn them out another quarter to half turn. Unless you
have a new exhaust leak, I can almost guarantee this will cure 95% of the popping.
●
●
●
Feedback:
●
The elevation of Phoenix is 1112 feet. Yep- 10k is a pretty big gain. Pack light over the passesI think the loss of power will be very noticeable but it won't stop you- it IS a motorcycle. Going
down a tooth on the front sprocket is an option but it harms your gas mileage and maximum
potential cruising speed. I say don't change anything and tough it out. Stick in the lower gears
up the hills and prepare for a significant drop in gas mileage. Aurora, CO. chppdlvvr
●
It is a common misconception that a trip to the mountains requires that you to rejet the
carburettors. There will be a slight loss of power, nothing more. The time you spend at 11,000
feet will probably be about an hour. What you really need to do is make sure the engine is tuned
up and running properly before leaving. A climb to altitude will expose any flaws in the engine,
and when people have trouble with their vehicles on a trip to the mountains, that's why they
have trouble. So forget about rejetting the engine. F650GS Dakar, Camden, New Jersey. echo
●
A clean air filter is pretty important if you're not going to rejet for altitude. If you're only going to
be at altitude for a few days, you probably shouldn't worry about rejetting. If you are comfortable
removing your carbs, going one size smaller on the main jet is a good idea. BMW dealers will
be useless when it comes to supplying alternate jets. But the jets are the same as run of the mill
Japanese-bike Mikuni carbs (Mikuni BST B316 CV carbs, to be exact), available wherever
Japanese bikes or parts are sold. According to the FAQ, your stock mains should be 132.5. I
believe the next smaller size in that numbering scheme is 130. If you plan to change main jets,
get two, one for each carb. See Performance Mods Flash 412 (CO)
●
In the good old days, in order to lean out the mixture for a few hours of high altitude operation,
we would remove the air filter and pull any removable baffling out of the muffler(s) when the
bike started to slow down. With CV carbs, you will likely not have a problem, except that your
idle may be "lumpy" and slow. If things get too bad, you may want to turn your idle-mixture
http://faq.f650.com/FAQS/CarbMiscFAQ.htm (12 of 23) [18-02-2007 12:29:59]
Miscellaneous Carb Questions FAQ
screws in a turn. Just remember to turn them back out to 3.5-4 turns out, when you get below
5000 feet. Richard #230
●
I would (and did) do nothing.. you will lose some power but hey its not a race anyway. Lance,
#1303, '01 F650GS, '96 G650ST. y_kiwi
●
I live at 1400 feet. I have had two different experiences in Colorado and Utah at elevation: 1998
Triumph Sprint. Three Keihin Carbs. Factory stock (probably a little lean). Ran SMOOTH and
perfect all the way to over 12,100 feet on the road to Fall River Pass. Noticeable loss in power
over 9,000 feet. Smooth and comfortable at 12,000 feet, but way down on power. Really a non
issue. I was loaded for a solo 10-day trip and had a blast. Didn't use sixth gear much...1996
Moto Guzzi Sport 1100. Two Del Ortos with accelerator pumps. Aftermarket exhaust and jetting
mods (probably runs a little rich). Ran like shite at anything over 6,000 feet. Had to keep it at
5000rpm or more the whole friggin' way from Colorado Springs to Park City (the long way). Had
it rejetted and dyno'd at Salt Lake City with some improvement. Ran good up to 9,000/10,000
after that, but still coughed and spit and was problem child. Although it ran poorly at lower rpm
and slower speeds, it wasn't enough to make me want to cut-short my 2,000 mile trip. I'd say
don't change anything, worst case, you'll run a little rough and get poor fuel mileage. It'll be a
blast. I'm taking my new DAKAR to Colorado next week. I'm hoping Fall River Pass is open so I
can see how this fancy fuel injection works at 12,000+ feet ! guzzimike
●
I have ridden my 01 GS two up around the same areas you are talking about and was fine. Sure
there was power loss but like it was said before, it is not a race. Besides power loss means
slower speeds = more time to take in the amazing scenery! Have fun and ride safe. facito, 2001
F650GSA, Las Vegas, Nevada.
Do I need to Synchronise the Carbs
Randy#748
Synchronization is possible with anything more than one carb. Two, as in F650's case can be synched
and may not be noticeable to rider, other than less HP. I am assuming a bit here, because the 650
carbs may have no adjustment ability (I've not looked), individually, but my experience with other bikes
has always been that the individual carbs can be adjusted separately. Usually a screw on the actuating
bar, for each carb. Factory set, these are rarely off, but possible. Most Japanese bikes with multiple
carbs have single cable, bar actuating all four as unit and they are synch'd as a regular service item.
Single cylinder has no input here, except acting as a single, the input to rider will be less obvious in
rough running vs. less HP. The domes on F650 carbs do have access ports. Two 33mm throats feed
the 650 and less than two equally opened butterflies, will mean less HP. I imagine the settings are very
close to perfect from factory. Comparison; My R100 only has two 32mm carbs! The 650 has 4mm
more feeding power than the 1000cc bike! A lot going through a 650 and thus the 48HP it delivers and
the somewhat equal mpg to the R100. The R100/7 delivers 58-60HP, as I recall, but with one more
cylinder and very close to same carb size (total). The 650 breathes better with 4 valves, which creates
more power, where the old boxer has two valves per hole. Anyhow, the 650 rams a lot through one
cylinder, with two 33's behind the intake and I imagine without water cooling, high tech metallurgy, etc.
the engine would burn up. One fun bike!
Fast Idle Problems ?
http://faq.f650.com/FAQS/CarbMiscFAQ.htm (13 of 23) [18-02-2007 12:29:59]
Miscellaneous Carb Questions FAQ
Bob #550
October '01
This is to share a possible fix for your pre-fuel injection F if the idle suddenly or unexpectedly refuses
to drop down to normal.
Tonight I took the tank off my '99 F650 to see what was causing the throttle to hang up. What I found
was that one of the electrical wire connectors located near the left carb had worked its way down to
where it was rubbing against the throttle cable and had snagged the spring-loaded linkage at the carb
body. I moved the connector back and away from the carb, and all was well...until I decided to check
the diaphragms that control the needles in the carbs.
I took the top off the right carb first, and checked things out. The rubber diaphragm was just fine, and
everything looked in order. Then I tried to refit the diaphragm and its top cover back in place. No go.
After an hour of failed attempts, I finally smeared a little engine oil on the edge of the diaphragm,
thinking that may help it slip into place. It did, and I was finally able to close everything up.
What is the Effect of Dropping the Needles.
Flash #412
December ‘01
Effect of Dropping the Needles: Flash vs. Matthew
Flash:
CV carbs (sometimes called Constant Velocity or sometimes called Constant Vacuum) use the
pressure differential between the two sides of a diaphragm to raise the slide. The needle is attached to
the slide. By removing the snorkle, you lower the "effort" required by the motor side to raise the slide.
You have effectively "raised" the outside air pressure by removing the snorkle. In other words, for a
given manifold vacuum, the slide now rises higher than it did before you removed the snorkle. This
means that the needle is allowing more fuel in for the same throttle-plate opening than it was before.
To counteract this effect, you need to drop the needle, physically, one notch. You do this by putting the
clip in the next higher notch, physically.
Matthew:
CV carbs operate of the velocity of the air passing through them. Removing the snorkel or opening up
an airbox will slow the speed the slide raises. It will have no effect on the distance the slide rises.
Can anyone enlighten us on Practical Observation vs. the Theory.? (ed)
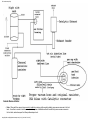
What are the Holes in the Bottom of the Slides for ?
Curt Martin
October '01
http://faq.f650.com/FAQS/CarbMiscFAQ.htm (14 of 23) [18-02-2007 12:29:59]
Miscellaneous Carb Questions FAQ
While I'm not even close to being a guru, I'll take a crack at answering your question. The vent holes
bleed off vacuum that operates the needle slides. Ok, you probably figured that out already. So why
change the hole diameter? To change the ratio of vacuum to slide position. You've had your carbs
apart, so you have seen the slide return springs and know that the slides carry the needles as they
move.
With that in mind, the chamber & diaphragm at the top of the slides gets a supply of intake vacuum, fed
through the little hole at the lip of the cover. The vacuum pulls the slides up, exposing more of the
needle. That vacuum is pulling against the return spring, and also being bled off by the vent hole at
the other end of the chamber.
If that makes sense so far, then you'll realize that there are three ways to alter the needle position vs.
engine load (vacuum):
1.) Change the diameter of the vent hole. A larger will bleed the vacuum off quicker, smaller
will bleed the vac off slower.
2.) Change the rate the return spring. A heavier spring will have the same effect as a larger
vent hole.
3.) Change the position and shape of the needle.
You can use any combination you wish, provided it produces the results that you (or should I say, the
engine) wants.
I've seen it done all three ways by different shops and kits. I know one successful race shop that
prefers to use the stock needles (straight taper) and slides. He only changes spring rates and jet
sizes. Others, Dyno-Jet kits included, use custom needles (stepped taper/adjustable position) and
larger vent holes in combination with stock spring rates. And some just alter the needle shape while
leaving the vent and springs alone.
The results are all that matter. (btw, this is usually a mid-range adjustment. Low range is still governed
primarily by the pilot jets & float height, and top end by the jet size.)
Flat spot in carburetion?
Refer the Canisterectomy FAQ, Idle Mix Screws FAQ, Poor Mileage FAQ, Carb Clean FAQ.
The following responses are for PRIMARILY from people with Stock setup. If you know or
suspect you have a Jet Kit, please also refer the Performance Modifications FAQ.
●
I figured out what the problem was. On the air filter side at the bottom of the Venturi there are
two orifices a small one and slightly larger one. The smaller one was clogged big time used
carb cleaner and a piece of stiff wire and finally got it cleared. Took about 20 min. Put them
back together and the bike runs like a charm. Thanks again for all your help and everyone here.
JAMES.
http://faq.f650.com/FAQS/CarbMiscFAQ.htm (15 of 23) [18-02-2007 12:29:59]
Miscellaneous Carb Questions FAQ
●
Oh yes I was talking about the float mount. The left one slides over and seats on a brass tube
and the end of the float mount has a restrictor. The tube I am referring to is connected to the
choke the left float o-ring side slides over this tube. I noted that the left float has a restrictor built
into it therefore there is a different float assembly for left and right carbs. I am not too familiar
with carbs dealt mostly with FI. On the right carb there is a drilling with a hole for a tube but
compressed air will not flow through it I am assuming it is a blind and not used. I wonder why
there is a restrictor on the left float and not on the right unless the float assemblies were
switched at some point I am baffled at this point the only reason I got into this mess was
because Dyno jet sold me a jet kit that does not work on the 1998 F650. I continuously fouled
plugs and called and they told me this kit was not for the 1998. So I went back to stock. And
could not adjust the right carb. Bottomed out or 5 turns out no difference. So then I decided to
look at float height. This is when I discovered these differences. Again thanks to all. JAMES.
●
The parts in my kit are stock needles (5 clip settings #5E94), stock main jets (132.5), Dyno
stage II jets (138) a set of springs (anyone know how to tell stock springs from DynoJet springs
- Refer the Jet Kit FAQ). Two black rubber plugs (Idle Mix Screw covers). Two small/tiny needle
jet washers. So this is my plan. Buy a "packing kit/o-rings, pull carbs, change main jets to stock
(132.5), change to stock needles four slots down from the top (anyone think I should use a
washer on each clip ?), switch to stock springs (again not sure how to tell the difference), check/
replace all rubber and double check diaphragm. Set the idle mixture screw to stock setting 3.5
turns out from lightly seated. Double check floats and float heights. Now for the big question,
When my lovely wife and I purchased her 97' F650 (which has the jet kit) I was really impressed
with the 5000 rpm and up power and throttle response. Shortly after that I bought a 99' F650
without a jet kit but with a 15 tooth sprocket. Her bike has a noticeable amount of power above
5 grand rpm's. It also lurches and bucks in lower RPM's (she is also a noob, but member
#A6501188) Is that the trade off = power for drivability ? If that is the case then back to stock
and the jet kit can gather dust. Is the factory pro kit any better or is it a lot of playing around and
compromise between power vs. drivability ? Both of our bikes have the snorkel yet should we
pull those ? XtreemLEE.
Slide Barrel Wear
Morgan Seim has a solution for the G's carb crappiness. Not for the F650 but interesting all the
same.
“This letter is the culmination of many hours of trouble and tinkering with Ellen's 1100G's carbs. Riding
my new 1200 Bandit back to back with her 1100G really highlighted the gross carb troubles her bike
had with the original carbs. You may have read my earlier "fixes" on the Worship page, little did I know
how wrong I actually was. My "fixes" were more of a band-aid that made the bike run better, but didn't
cure the root cause. A letter sent in to the November 2000 issue of Cycle World magazine's Service
section by Sasha Shapiro of New Paltz, New York, describing the exact symptoms I had experienced
prompted me to finally get hot on the problem. I must note that Cycle World's response was way off
target! ( I will be sending them a letter regarding the true cause of her troubles. I contacted her, and
she eventually replaced her carbs, curing the bike.) I finally got fed up enough to do some serious
research, and I found a letter on the Web from a guy in England that said he had noted emulsion tube
wear on his 1200 Bandit, and after replacing them, it cured his low speed mixture problem. I reasoned
http://faq.f650.com/FAQS/CarbMiscFAQ.htm (16 of 23) [18-02-2007 12:29:59]
Miscellaneous Carb Questions FAQ
that with 56K on our bike, we must have this problem as well. I rushed out and bought new needles,
emulsion tubes, and slides, confident that I had solved the problem at last. Wrong! The bike ran no
differently, which prompted me to completely tear down the carbs for some direct inspection of my
own. After getting the carbs apart and taking some careful measurements, I finally found the true
problem, which is the plastic pieces that the slide mates with. This piece eventually develops an
uneven mating surface with the slide, which leads to needle and emulsion tube wear, and inaccurate
air and fuel metering at idle and low speeds. I also noted that the problem can cause sticking of the
slide if the wear is severe enough, since the wear results in such a misalignment of the needle and the
emulsion tube that the side load on the slide from intake vacuum binds the needle in the emulsion
tube. The original needles I removed from Ellen's bike had two steps worn into them, causing the
slides to not fully lower as well. I had always thought the Bandit carbs would work on the 1100G, so I
called American Suzuki, and one of their reps said he had both a Bandit and an 1100G, and had put
Bandit carbs on the 1100G. He said I needed the Bandit intake boots, and I had to use pod type air
filters. It turns out he was incorrect, it's a direct bolt-on. The used carbs I put on Ellen's bike
supposedly had about 4K on them, and they looked like that was accurate mileage. There is always
the unconscious expectation when you work on your bike that it will run better since you have just
expended so much effort, and I think this can sometimes create false expectations. Before putting the
used carbs on her bike, I opened up the mixture screws a bit, and raised the needles about .040".
After getting her bike all buttoned up, I
anxiously started it, and it idled perfectly. I was so relieved I was nearly beside myself with disbelief.
Of course, when buying anything used, you are at the mercy of the guy at the junkyard, who usually
has a different perspective. To him, if the donor bike was in good shape, it must be low mileage, but
fortunately, these carbs actually were. I suspect the wear problem with the plastic pieces starts to
affect carburetion around the 15-20K point. I think not everybody notices how bad their bike has
begun to run, since it is a very gradual degradation, and some people are not as particular about their
vehicles as I am. Here's the arrangement with the carbs and why I haven't had any luck getting
the parts I need. Suzuki buys the carbs from Mikuni Japan, and in order to get the part that wears out,
you have to buy the entire carb body for approximately $350, and of course you need four of them.
Dealer reps told me to contact Mikuni, so I did, and it turns out that Mikuni Japan is separate from
Mikuni America, and Mikuni America said they couldn't help me. So far, Suzuki of North America,
Mikuni America, and all the dealers I have talked to have said they can't help me. Their stance is that
the part is available, you just have to spend $1500 for four carb bodies, that's all.
No, I haven't contacted Mikuni of Japan, and at this point I don't expect a different answer from them
either. Since the supply of good used carbs is finite, I have developed an inexpensive way to correct
the worn plastic pieces by re-facing it with brass, and at this writing, I will have the first prototypes
installed in a bike in about two weeks. It is a rather labour intensive undertaking, but it sure beats
$1500 for some plastic pieces that should cost $10 each. So far, I have found about seven different
types of bikes that use carbs with this same configuration, mainly big Suzuki’s and the fix is applicable
to all of them as well .(Pretty much any bike with 36-38mm Mikuni's.) Please post this ASAP, I
welcome correspondence from other Worshippers. Happy Trails, Morgan."
Carb Alternatives (Complete)
by Mtbiero (Cugino Pegaso)
http://faq.f650.com/FAQS/CarbMiscFAQ.htm (17 of 23) [18-02-2007 12:29:59]
Miscellaneous Carb Questions FAQ
I found a pair of 39mm Keihins here: http://www.rotax.net/BMW_F650.htm for $760:
and more cheaply here: http://www.pro-flo.com/proflo_keihin_fcr_carb_kits.htm#BMW for $625
However I think dual 39's is best for all out racers, and feel the dual 36mm Mikunis offered here:
http://www.team-pami.de/ENGLISCH/index.htm for 448 euros ($392) would work best.
Since the F650 and Pegaso share dual Mikuni BST33's, I think the F650 carbs would work on my
Pegaso.
Info I got from Team Pami:
●
The Mikuni flat slides have both 36mm diameter - both open together, the carbs have an
acceleration pump.
●
The stock cable doesn't fit - you have to make a cable(!!).
●
Yes the stock choke cable fits and works!
●
Minimum 2-3hp more and the throttle response you can't compare - this all with stock cams.
Gottfried - Team Pami
PAMI Performance Kits
by Mtbiero (Cugino Pegaso)
I don't have the entire kit (won't work with my Pegaso) but I do have a set of team Pami 36mm Mikuni
radial slide race carbs for a F650 on my Pegaso. Just the carbs alone gave me a very noticeable
power boost, more top end, and allows me to cruise the bike at the 2000 to 3000 rpm range without
any lurchiness...
When I first put them in, I used my stock airbox, when I finally removed it and went to Uni filters, the
bike really woke up. Right now I'm still trying to get the idle right, I messed up, I assumed the idle mix
screws should have been at 2 turns out nominally. finally got a tuning manual from mikuni.com, that
says unlike every other carb Mikuni makes, the RS idle mix screws range is 1/8 to 1/2 turns MAX!
Been wrongly going to leaner idle jets to compensate, and causing other issues. I'm back on track and
expect to have them idling perfect after about one or two more iterations. The nice thing about
removing the airbox is I can have the carb out and on the bench in 6 minutes as opposed to 1 hour
before!
Alternative Carb Parts:
OEM Parts List:
OEM Carb is a Dual Mikuni BST33-B316 CV carb
http://faq.f650.com/FAQS/CarbMiscFAQ.htm (18 of 23) [18-02-2007 12:29:59]
Miscellaneous Carb Questions FAQ
●
FCarbParts1
●
FCarbPartsList1
●
FCarbParts2
●
FCarbPartsList2
●
FCarbParts3
●
FCarbPartsList2
For the diaphragm try one from a Suzuki GS500, part number 13507-17c01. I don't know if the other
parts are the same or not. Charlie #070 from Pennsylvania.
Some parts are exactly the same parts as a Suzuki GS500E. Note the GS500E uses Mikuni
BST33 x 2 Carbs.
●
The Suzuki '98 DR350SE uses a MIKUNI Carburettor BST33 (BST33SS CA. Model) Single.
●
The Suzuki DR350 EU model 1994 uses Mikuni Type BST33SS but US Model 1990 Mikuni
uses TM33SS.
●
The Suzuki DR750S and 800S Specs also show a MIKUNI BST33, twin.
●
The Suzuki 1996 GSX600FT also show a MIKUNI BST33, four.
●
The Suzuki GSF 400 Bandit has MIKUNI BST33, four.
These are from a Suzuki GS500E
http://faq.f650.com/FAQS/CarbMiscFAQ.htm (19 of 23) [18-02-2007 12:29:59]
Miscellaneous Carb Questions FAQ
For GS500E
1989~1996
●
GS500ECarburetorKLMNPRST-1989-1996
●
SUZUKI-GS500E-Carburetor-KLMNPRST-1989-1996-PartsList
1997~2000
●
GS500ECarburetorV(97)-W(98)-X(99)-Y(00)
●
SUZUKI-GS500E-Carburetor-V(97)-W(98)-X(99)-Y(00)-PartsList
The Aprilia Pegaso (Sister of the Funduro), also uses the same Mikuni BST33 Carb as the
http://faq.f650.com/FAQS/CarbMiscFAQ.htm (20 of 23) [18-02-2007 12:29:59]
Miscellaneous Carb Questions FAQ
Funduro.
Notes:
●
Note there MAY be a Yamaha that also uses a Mikuni BST33-B316 carb? Might be worth some
odd digging to see.
●
Note the 1994 Triumph Daytona 1200 has Mikunis BST 36mm CV carbs but the 36m is the
horizontal opening size and Diaphragms MAY be the same as the F650.
●
You CAN get some Carb parts from Sudco, at www.sudco.com, but they do not list our carb. I
got my Pilot Jets from them.
●
Ron Wood offers dual 39mm flatslides for the F650 for $760, you can get them at www.pro-flo.
com for $625. mtiberio.
●
Dave #365 (Thank you Dave !) got this precious Gem:
Dear Sir,
We checked your question. Your F650's BST33-B316 original slide springs are the following
compatible part No's. Please order Yamaha or Suzuki your local dealers. It is faster than
delivery when you order to BMW or Rotax (engine maker).
❍
❍
Suzuki genuine part no. 13417-12D00
Yamaha genuine part no. 3LN-14933-00
Yours faithfully,
Mikuni Corp.
International Dept
●
Next.
How do I get Water in the Float Bowls?
Q. How did I get water into my float bowls?
I emptied the fuel tank, I replaced the green gasket under the filler cap but somehow I still get water
into my float bowls. Also, I don't have a cannister. Are there any other ''suspicious" passages for
water? The problem arises only in wet weather (under rain) and cold. Then, the bike drops its idle and
stalls or surges as if it runs out of gas.
http://faq.f650.com/FAQS/CarbMiscFAQ.htm (21 of 23) [18-02-2007 12:29:59]
Miscellaneous Carb Questions FAQ
●
This is a common problem on the classic F. The water goes in through the air filter. You can
empty the water of the carbs by unscrewing for a few seconds (2 or 3 are generally enough) the
two screws located below the carbs, in horizontal position, taking care you have the gasoline
pass key in the off position. Then the water, first, and gasoline, after the water, go out. You can
see the width of the water flow line is a bit wider than the width of the gasoline flow line. Better if
you put some rag or paper below the carbs, avoiding the gasoline spreading. Fede
●
You might also make sure you keep the gas tank full. When it is less than full, condensation
forms in the tank in cold weather (and probably also in wet weather). If you don't have cold
weather where you are then Fede's answer applies more. Find a way to keep water out of the
airbox. Colorado Bob.
●
If the Gas Filler Cap Leaks, it gets first into the Gas Tank, then into the Carbs
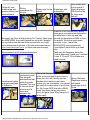
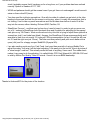
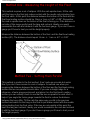
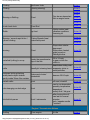
Q. How can I drain water from my float bowls?
●
Here: Float Bowl Drain Screw Locations
●
The Screws Circled RED are the Float Bowl Drain Screws, for emptying Crud/Water out of the
Carbs. The screws circled Green are explained here: Idle Mix Screw.
Fuel Line Replacement
by Chris in Santa Cruz, CA
It is possible to replace the fuel line without removing the carbs. You must have long fingers. You
remove the rear shock preload adjuster (this ones an Ohlins, but the location is the same), grease the
hose a little, and do without the clamp. I will take the carbs out at some later date to reinstall the clamp.
Meanwhile I will inspect the connection for a while. I used 6mm Gates PVC fuel line.
This MAY allow you to remove the OEM In-line Fuel Filter. Maybe. If anyone can confirm this, great.
The inline fuel filter is in the brown T-Piece connector between the Carbs. Refer the Carb Cleaning
FAQ for more Details.
Fuel Lines:
●
Believe it or not, the BEST fuel line is BMW fuel line, from the dealer. It is rubber, covered with
cloth weave. Some dealers sell it by the meter, some by the yard. Some can make the
conversion, some cannot. The hose that came on the bike ... was Italian. Flash #412
●
I had nothing but problems with the fabric covered line. I don't know exactly what ate it up but it
just started cracking and leaking. The hose that came on the bike was not the fabric covered
line but a single walled line with no internal reinforcement. This stuff just got really hard and
inflexible. The Gates line is double walled with a woven fabric reinforcement sandwiched in it.
Beefy. Chris in Santa Cruz, CA
●
You can usually buy "clear" fuel line (sometimes in designer colors or black) at the nearest Jap
http://faq.f650.com/FAQS/CarbMiscFAQ.htm (22 of 23) [18-02-2007 12:29:59]
Miscellaneous Carb Questions FAQ
bike dealer. 6mm is closest to US equivalent 1/4", although 5/16" is also available. I had some
of the old BMW cloth covered stuff in stock, it works fine (so far). Marty #436-Chicago-97 F650F
http://faq.f650.com/FAQS/CarbMiscFAQ.htm (23 of 23) [18-02-2007 12:29:59]
Disclaimer
Disclaimer
When you have read the following, please continue with your visit to the FAQ section of the Chain Gang
website.
The FAQs, like much of the rest of the Chain Gang website is made up of contributions from many
people. Some are Chain Gang members; some are not. The Chain Gang is an open forum that allows
individuals to post information that are open to discussion. In such a forum, The Chain Gang Staff does
not endorse or advocate for any particular side or any issue. The Chain Gang promotes safe,
responsible motorcycling and charitable works involving children's issues.
The information offered in the FAQ section often involves ideas concerning "wrenching" - or doing
mechanical work on the F650 as well as information of a technical nature and riding tips. The Chain
Gang in no way advocates modifications to the F650 which go against the policy of safe motorcycling.
Further, The Chain Gang cautions anyone doing mechanical work on the F650 does so at their own risk.
Anyone who does not have the proper training or background in "wrenching" should not undertake any
mechanical project without proper supervision and instruction.
Each piece in the FAQ section is a description of what has been done by another. If a reader is not
completely familiar with the processes involved in these descriptions, the project should not be
undertaken.
Keep in mind:
1. The Chain Gang does not advocate unsafe "wrenching."
2. The Chain Gang does not advocate any modifications to any motorcycle which are unsafe to
proper motorcycle operation or maintenance.
3. The Chain Gang does not advocate any modifications to any motorcycle which will negate any
vehicle warranty.
4. The Chain Gang cautions and reminds visitors and readers that each is responsible for their own
actions.
5. The Chain Gang urges anyone having any doubts or concerns about any of the presentations in
the FAQ section to consult a qualified mechanic.
6. The presentations offered in the FAQ section are by individuals, not by The Chain Gang.
7. No responsibility or liability is accepted by The Chain Gang for incorrect part numbers, torque
values, riding tips, or any other information in the FAQs. It is advised that any information
presented should be verified with official or expert sources.
I have read this information, understand the intent, agree with the principles as stated, and wish to
http://faq.f650.com/ (1 of 2) [18-02-2007 12:30:00]
Disclaimer
continue to the FAQs. (there is also an unofficial framed version)
http://faq.f650.com/ (2 of 2) [18-02-2007 12:30:00]
Miscellaneous Carb Questions FAQ
Miscellaneous Carb Questions FAQ
compiled & edited by Kristian #562
Please read the Disclaimer before attempting any work in this FAQ.
If you are looking for performance-related carb information See the Rejetting Spreadsheet
accessed via. this link Performance Mods Section
●
Carbs for Dummies
●
Pulling the Carbs
●
Puking Petrol
●
All About Floats
●
Proper Choke Use
●
Do I need a Carburettor Adjustment for High Altitude
●
Do I need to Synchronise the Carbs
●
Fast Idle Problems
●
What is the Effect of Dropping the Needles
●
Flat spot in carburetion?
●
What are the Holes in the Bottom of the Slides for
●
Slide (Barrel) Wear
●
Carb Alternatives
●
Alternative Carb Parts
●
Water in Float Bowls? How do I drain them?
●
Fuel Line Replacement
Straight to the Carb Clean FAQ
For Aftermarket Fuel Filter Q's and the OEM In-line Fuel Filter.
For Petcock Q's.
For Idle Q's
For Canister Q's
Carb Primer
by Flash #412
Please read the Disclaimer before attempting any work in this FAQ.
October '01
This is a carb primer for those with little or no understanding of this device. If you're carburettor literate,
move on. If you're carburettor ignorant, you might like this... "Carburettor is NOT Latin for 'don't mess
with it.'"
http://faq.f650.com/FAQS/CarbMiscFAQ.htm (1 of 23) [18-02-2007 12:30:06]
Miscellaneous Carb Questions FAQ
Fuel and air need to be mixed in the proper proportions in order for your engine to run. The device that
atomises the fuel is your carburettor (unless your motor is fuel injected). Due to the relationship
between the volume of a sphere and it's surface area (spherical surface area is about 12.6 r^2 while
spherical volume is about 4.2 r^3), smaller drops ignite better by a factor of three times the difference
in the radii. Producing these small drops at idle as well as wide open (WFO) requires more than one
method of atomisation. Hence, your carb has three distinct fuel circuits. The simplified view has one
single air circuit.
If you look at a carb, you'll see that it is a fancy, glorified pipe through which air passes. When you
twist the throttle, a slide raises in the carb throat. This may or may not happen with the engine NOT
running due to differences in design. But anyway, this slide controls the amount of air allowed to go
into the intake manifold. The intake manifold is whatever is between the carb and the hole in the head
containing the intake valve(s).
The float chamber is an area inside your carb filled with gasoline, whose level is more or less carefully
controlled. There is a float in there, sorta like in the back of your toilet. You access the float by
removing the float bowl. The float is either solid or filled with air. In any case, it floats in gasoline and is
made of material impermeable to that solvent. When the fuel level rises, so does the float. At a certain
level, the float pushes a conically shaped round thing (float needle) into a conically shaped hole (seat)
and shuts off the flow of gas. This "needle and seat" is the valve that controls gas flow into the bowl.
Float level is important and so is a good seal here. If the level is too low, the carb won't get as much
gas as it should (lean). Too high and it can run rich or leak.
The idle circuit is made by drilling some holes from the float bowl to the area on the *motor* side of the
throttle slide. There is ambient air pressure on the air-filter side of the carb. There is vacuum on the
motor side. This vacuum is used to draw fuel through this little hole, the diameter of which is normally
controlled by an orifice, or pilot jet, installed in that hole. More vacuum at wider throttle opening draws
more fuel. This is from idle, through off-idle to about 1/8 throttle. Normally idle SPEED is set by a screw
that opens the slide a little more or a little less. Idle MIX is set by a screw that sticks a pointy tip into the
little fuel passage (or a similar air passage used to draw the fuel).
At about 1/8 throttle, the effect of the next circuit swamps out the effects of the idle circuit. There is a
bigger hole that goes straight up from the float chamber into the bottom of the carb throat. This hole
has two precision fittings, one at either end, both removable. The one at the bowl end is the main jet.
More on that later. The one at the top is the needle jet. Hanging off the bottom of the slide is the jet
needle. The jet needle is a tapered needle that moves in and out of the needle jet. Normally, both the
needle jet and jet needle can be changed. Needle jets have different size holes in them. Jet needles
have different lengths and tapers. Usually, they are suspended from the slide in a manner that allows
one to change how far they hang down, by moving a clip to a different notch. You can imagine a
tapered needle withdrawing from a hole... the further out it is, the more surface area of the hole is
available to flow fuel. This circuit works up to about 3/4 throttle, when the jet needle is completely
withdrawn from the needle jet. At that point, the limiting factor becomes the main jet.
The main jet is used at wide full open (WFO) throttle. How much fuel does the engine NEED when it is
breathing as fast as it can? That is *THE* limiting factor for your motor for any given combination of
exhaust system, Airbox/filter setup, temperature, altitude or barometric pressure.
http://faq.f650.com/FAQS/CarbMiscFAQ.htm (2 of 23) [18-02-2007 12:30:06]
Miscellaneous Carb Questions FAQ
Tuners tune first to get the bike to start and run (idle circuit), then make power on the mains, THEN be
"streetable" between idle and WFO. *HOW* to go about tuning is a different subject, maybe for a
different day. Many whole books have been written on the subject.
PULLING THE CARBS
by Flash #412
October '01
1.
2.
3.
4.
5.
6.
7.
8.
9.
10.
11.
12.
13.
14.
15.
Remove the seat.
Remove the side covers.
Remove all the screws that secure the gas tank to the fairing.
Remove the left and right engine covers.
Remove the big bolt at the back of the tank. Pull the fuel line off the petcock.
Pull the tank upward and note that there are a couple of vent hoses.
If you have removed your canister, one hose is short and plugged. If you haven't, you should.
The other hose has a connector inline where you can "break" it.
Remove the tank and set it aside on top of something so that it doesn't hurt the petcock/nipple.
Remove the tank support bracket from the frame. Loosen the hose clamps which clamp BOTH
the rubber carb boots and the Air Intake Boots.
You might want to use a flat screwdriver to sort of pop the lip of the boot up and spray some
Armour All (tm) or Son of A Gun (tm) or other rubber treatment/lubricant in there to get the
rubber unstuck from the metal and lubricated all around the lip.
Repeat for all the rest.
Wiggle the rubber, pull on the carbs and cuss a lot until they are free.
Pull them out.
"Install in reverse order."
For more details about removing the Gas Tank see the Gas Tank Removal FAQ.
Feedback:
●
In trying to get the carbs out, without removing the airbox/exhaust/etc, the sharp edge of the
carby intake opening sliced its way into the air box rubber while I was wiggling/pulling the
carbys out. Its not a really deep cut, and hopefully the hose clamp will hold the cut together
when the carbs go back in place, but can anyone provide me with the BMW part number for the
airbox rubber ? Also, what is the BMW part number for the engine rubber ? My engine rubber
had a lot of fine racks in it which were especially noticeable when pushed/bent around to the
extremes possible during a carby install/removal. The engine rubber is pretty thick so I'm not too
worried yet. I have since filed/wet'n'dried the sharp edges off the carby intake/output openings
to avoid any further wear and tear on the rubbers. car0tene
●
Here are the Part No's:
Intake manifold 11 61 2 343 131 (I think this is the Engine side)
●
http://faq.f650.com/FAQS/CarbMiscFAQ.htm (3 of 23) [18-02-2007 12:30:06]
Miscellaneous Carb Questions FAQ
●
●
●
Rubber grommet 11 61 2 345 007 (I think this is the Airbox side)
About the small cracks: You could use some RTV silicone to seal it. Just put a thin layer over it
and let it dry over the night.
About the cut: As long as it is at the airbox side it shouldn't make to much difference (unless it is
that big so that dust can enter). It is more serious (for the performance and the engine) if it is
leaking at the engine side, because that would lean out the fuel mix. Spakur #1117, Icelander in
Malmö, Sweden, 1995 Classic Red F650 with 60.000+ KM.
PUKING PETROL
by Flash #412
October '01
Last night I stopped and filled up 0.8 miles from home. I was careful not to overfill. NO gas escaped
into the "well" below the metal cap. I parked the bike in the garage. At about 4AM my wife woke me up
because she smelled gas. There was a large puddle below my bike. I put a coffee can under the hose
and mopped up the puddle. Thinking to improve the situation, I put the bike on the centerstand. When I
did, another table spoon or more poured out. In the morning, there was almost an INCH of gas in the
coffee can. I pulled the bike outside and parked it on the centerstand while I drank my coffee. When I
went to leave, a half hour later, there was about a two foot diameter wet spot on the concrete under the
bike. It was hard as hell to start. I stalled it at the bottom of the driveway. I happened to look back and
see a trail of drips from the big wet to where I was. I rode it about eight miles and stopped just to check
things out. No more drip.
I've smelled gas in the garage every night this week, even when parked with more than 100 miles on
the tank. The temps lately have not been extreme. I think there was not such a great differential
between the temp of gas in an underground tank and the temp last night. If anything, the air was
cooler.
So what causes it.....Pukin' Petrol (The Answer!)
1. When you remove the float bowl, there is a plastic assembly which consists of the floats and a
2.
3.
4.
5.
6.
7.
holder.
The float needle clips on to the floats. There is an o-ring on holder.
This o-ring had a positive feel to it when I removed and reinstalled the holder.
With the assembly removed, there is a bronze piece which is (or contains) the SEAT.
This bronze piece also has an o-ring. However, BOTH of the seats just plain fell out when I
turned the carbs upside down.
I figured that if the o-ring did not have enough interference to hold the thing in, then it would not
do much of a job keeping gas from getting by.
I replaced the o-rings with some slightly larger (non-metric) standard ones I had in an o-ring
assortment box which fit better than the ones I took out.
After putting it all back together, it started right up like it's supposed to, full choke & zero throttle. I rode
around the block. When I got back, I put it on the sidestand and a few drops of gas came out one of
the hoses on the opposite side from where it HAD been leaking. Being an optimist, I put a coffee can
http://faq.f650.com/FAQS/CarbMiscFAQ.htm (4 of 23) [18-02-2007 12:30:06]
Miscellaneous Carb Questions FAQ
under there, turned the petcock off and left it overnight. All was well this morning.
BTW, I also installed the fuel filter while I was at it. There are four carb screws, which I replaced with
Allen's. They are 5M0.8 x 12. But if you try to use ones that are too long, they won't go in the front
holes, only the rear ones. See the Carb Cleaning FAQ for details and pictures of the Carbs.
Q. What are the Symptoms:
●
My bike, a '95 F, came to a halt as if I had run out of fuel, I will add that I hadn't. Anyway the
bike came to a stop and I found the pipe running from out of the top of the carb was pumping
petrol out and onto the engine. It will turn over with no problem but doesn't want to know about
catching. I know this isn't a huge amount of info but until Monday when I'm off I can't give you
any more. Any ideas as too what could have gone wrong. The bike has 70K on it and normally
runs well with no major problems other than a bit of oil in the airbox.
●
It MUST be a float or FUEL VALVE problem. The fuel is gravity fed from the gas tank to the
carbs. The carbs is design to work with a certain "height" of fuel inside. If this level is a bit too
height it is like running with the choke on, and if it is far too high it will overflow by the small pipe
(s). The device to keep this level right is called a float and resides in the float chamber at the
bottom of carbs. It works like the device that you might find in your toilet bowl. When it drops a
bit it opens a valve to let more fuel in and when the fuel raises it it will close the valve. If the
valve gets stuck partly open (by some small impurity in the fuel) or the float does not rise due to
it being punctured or stuck, the fuel level will rise until it overflows. Haakon#626 (Norway,121999- F650GS)
●
Read the FAQ on how to get the carbs out. Take them out. Take the float bowl off. Remove the
floats. Spray some carb cleaner through where the fuel normally goes IN to knock out any
impurities. You should probably change the little fuel filter in the "T" while you have them out. If
you don't have an inline filter installed between the petcock and the T, you'd be advised to add
one. Flash 412 (CO)
Q. Can (not should) you still drive with "Puking Petrol" syndrome.
●
You should try to shut the fuel off 1/4 mile or so BEFORE you shut it off. That way, you have
partially drained the fuel line & carbs, just in case (fuel expands when heated...and may find its
way out when it does). If the gasoline fills up the cylinder (is that even possible on the F650?),
you may get hydraulic lock (and bent connecting rod or other parts) when starting. Fuel dilution
of the oil may give you MUCH lower oil viscosity, and the higher wear that goes with it. Also, be
aware that the F650 petcocks have been known to fail. Running the bike should not present a
problem, unless possibly during an extended period of "gridlock." YMMV. Marty #436-Chicago97 F650F
All about Floats
by A Watson
http://faq.f650.com/FAQS/CarbMiscFAQ.htm (5 of 23) [18-02-2007 12:30:06]
Miscellaneous Carb Questions FAQ
12/12/01
Floats serve 2 purposes: First, they keep the carb bowl from overflowing by floating up against the float
valve and shutting off the (gravity feed) flow of fuel. Second, properly adjusted, they maintain the fuel
level in the bowl at the right height. This is important because the height of the fuel in the bowl
determines how much fuel gets sucked up through the main jet for a given RPM, which in turn has a
direct affect (along with needle size and adjustment) on the air-fuel mixture that reaches the cylinder.
All the wisdom I've heard is that floats, which are made of plastic (they appear to resemble extruded closed cell - styrofoam), can over time absorb fuel and become less buoyant. (The way older ones and
some newer ones may be made of copper, but that's another story.) Floats that are less buoyant will
allow the fuel level in the bowl to become too high before they shut off the flow, even if they are
properly adjusted. This in turn will permit more fuel to be sucked up, which will enrich the air/fuel
mixture, which will affect fuel economy.
Floats are cheap and relatively easy to replace. As someone said, it makes sense to replace them now
and then. 13 years seems a long time to me.
The post about weighing the floats was very interesting and this should permit a very precise
determination of their condition/buoyancy. However, a visual examination can also help. If they're
heavily stained, porous-looking or just plain cruddy, change 'em.
See also:
●
http://www.airheads.org/contrib/fuel.html
●
http://justkdx.dirtrider.net/floatlevel.html
Proper Choke Use
Q. Ok here is my question. Is the choke supposed to move by itself? I have found that when the bike
is cold and I have the choke fully on and I ride aggressively (read rev to 7000 then shift then wide open
again) the choke closes and often time the bike will stall going down the off ramp when I declutch. Is it
supposed to move like this? If I pull the choke back it runs fine again. It can be a pain staling like that. Is
this indicative of another problem? I do know you are supposed to let it warm up a bit before opening up
but it seems to be warming up slower. Is that a symptom of some other problem and if so what? Thanks
for all your help.
A. No, this is not normal. When the choke is off it is supposed to stay off. It should have a spring near the
choke mechanism on the carbs that must be overcome to activate the choke. It this spring missing? The
reverse problem is more typical, with the choke refusing to stay on because the tension is too loose at the
choke lever on the handlebar. Usually it is not too hard to increase the friction of the plastic choke lever by
placing some heavy grease or rubber cement between the choke lever and the adjacent housing. If that
doesn't work, try using a small plastic shim between the choke lever ring and the mirror/clutch handle
mount to provide some additional drag on the ring. Looking at my bike, I don't believe that there is a screw
http://faq.f650.com/FAQS/CarbMiscFAQ.htm (6 of 23) [18-02-2007 12:30:06]
Miscellaneous Carb Questions FAQ
to tighten. I would just loosen the mirror/lever mount and move it over closer to the choke ring and see if
you can put a little more friction on the ring. I don't have an answer about your idle, just turn it up to 1400
rpm and see what happens. Richard #230, Pacifica, CA.
●
I thought it was a design "feature". Maybe it is... If I ride with respect until the engine is warm then
the choke is fully off when it needs to be. This is fine with me :-). J@mes
●
I had/have this problem too. The choke closes on its own (i.e. the lever moves away from me). I'm
going to try Richard's suggestion re: the screw. In my case my bike was stalling unless I kept the
choke on, even when the bike was warm...but I've adjusted the idle and it runs fine now. (Idle is
1300+/- 100 rpm and can be adjusted with the brass knob on the left hand side of the bike just
above the foot peg. It hangs loose from a cable; you can't miss it. Hope this helps. Johnny Canada
# 1088 '98F.
Q. Which way is the Choke on?
A. The Choke is on when the Lever is BACK toward you. It often goes off by itself, rotating AWAY from
you (when you are sitting one the bike).
Q. How long should I leave the Choke On?
A. Do not leave it on TOO LONG. You will foul your plugs, carbon your cylinder and head and and stuff
up your fuel economy. Most folks can switch it off after half a mile to a mile, depending on the weather.
●
Same as Wamer. I use the choke only to start it when it's completely cold. Turn it off
immediately and drive away. Mason #631 - 97ST in PA.
●
I am curious how long people run before they turn the choke completely off. Even on a 80
degree day I am still at 1/2 choke when I get to work, any less and it stalls. I have a 15 minute
commute much of which I do at 80. I have also noticed very poor fuel mileage ~33 mpg. I am
wondering if maybe my thermostat is stuck open. Any way to test this without taking it out of the
bike and putting it in a pan of hot water? I am going to go through the poor mileage faq and take
off the lowering kit since I got my other bike running. I am going to check the plugs and gap et
all. my impression is that something is wrong. Don Don - Rochester
●
As soon as I get to a road where I can run for more than two blocks without a stoplight, I turn it
off, less than a mile. Yes, I have to turn it on when the temperature is in the 80's if the motor is
stone cold. Flash #412 (CO).
●
It also only takes me a couple blocks before I can turn the choke off. Robert #959 in TX - '97
F650.
●
I need the choke to start easily even when hot, but it goes off within 1 mile and then the bike
idles normally. With the oil at 40 centigrade plus the choke goes on half the engine fires (with no
throttle) and the choke goes straight off. With cold oil on a normal UK day (10-15 centigrade)
half choke for 1 mile. On a cold winter day (minus 2-3) I need full choke to start, then half for 1-2
miles. With a warm engine and choke on after the engine fires, you get the trick where the
engine stalls as soon as the throttle is opened. I am guessing that the passage in the carb is a
bit on the big size and the rest of the carb setup might be critical. Having the choke part on
when the carb was set might give the result Don describes. A plug chop test after a longish run
would seem to be the order of the day to see if the choke is set to start even when the lever is
http://faq.f650.com/FAQS/CarbMiscFAQ.htm (7 of 23) [18-02-2007 12:30:06]
Miscellaneous Carb Questions FAQ
set to off. Andy Leeds UK #982.
●
I fire it up and ride off immediately. It will not idle correctly without choke _ever_ if I do not ride
it. But if I ride off and kill choke ASAP, it will idle fine within moments (say, at the next stop
light). kinda weird, but that's how it works. NormJ #473 Seattle.
●
The phenomenon you see is that the lever actually operates an enrichener, not a choke, which
is why I do not use the terms open and closed as most people get confused. Your problem is
likely that your idle is adjusted incorrectly. And it's too low. Before you do ANY other
adjustments, get the bike fully warmed up to regular running temperature with a good ride with
reasonably fresh gasoline. Then adjust the idle to 1400 rpm (real easy to do, takes 10 seconds).
Run it a while and confirm that (when fully hot) your idle is stable around 1400 rpm. Yes, it's a
bit fast, but that's the way it was designed. Now you can see how your cold idle and "choke"
works the next time you ride. Do NOT adjust the idle cold while operating the choke lever. Vary
the choke lever instead. This will likely solve your idle problem if nothing else is wrong with the
engine. Todd #389.
●
The choke changes the air-to-fuel ratio by either supplying more fuel than normal or limit, choke
(hence the name) the air-supply. Your bike will consume more fuel on choke, sometimes it will
also run badly on low revs and probably pollute more. Not having to remember the choke is one
of the nice things about fuel injection. I know of a guy that misunderstood the choke on his
veteran bike and was starting without it and when the engine got warm he applied full choke. He
did this for several years... :-). Pelle, Sweden, '02 GSDA.
●
The choke is not a choke (air restriction) its an enricher jet control (more fuel), hence it runs the
engine rich (carbons up plugs etc.) and uses more fuel. If you run the cold starting device for
long enough, the plugs will foul, the carbs will maybe overflow and the engine will flood and stall
at idle. If you don't have a temp gauge you should maybe get one, the screw in type tells you
when to close the choke. Imagine setting up the bike with the choke on full. You get the idle at
1100 rpm by moving the idle screw in or out so the air and fuel match up and burn. You then
move the choke to the normal run position, the engine will stall. However, run until the engine is
hot and then move the choke lever. The engine is so hot, it'll burn pretty much anything, lean,
rich whatever at least for a time and with the right throttle setting. However, the plugs will show
what the mixture was like. I've had this on the dreaded Ural. The Ural choke opens an additional
fuel jet. With the crappy sponge cake seals the Russians use, the choke is always letting some
fuel in. You set up the carbs like this and get idle and some sort of balance. You actually close
up the main chamber a bit to allow for the extra fuel that's sneaking in via the choke. On a Ural,
the seals then leak gunk into the carb by reacting with the petrol and give a proper seal and/or
block the start jet. The engine runs lean and hot. You then retune and all is well until the main
jets block and you hit them with carb cleaner. The choke jet seal de-gunks and its sooty plugs
time again. At this point you sell the bike and buy one with FI if you have any sense! The F carb
doesn't have this exact problem because the rubber bits are petrol proof, but I am wondering if
something similar is possible. I guess you've already checked the choke cable for tightness?
Andy Leeds UK #982
●
(Less air in mixture than usual). This results in the engine running a little hotter, which is never a
great thing. I normally ride to the second stop street with my choke on about 2/3 (Classic). By
this stage the engine is warm enough to tick over smoothly by itself. I do, however, frequently
check my choke, turn signal and low beam switches while I ride (just a habit really). Bernard.
http://faq.f650.com/FAQS/CarbMiscFAQ.htm (8 of 23) [18-02-2007 12:30:06]
Miscellaneous Carb Questions FAQ
●
Make sure the choke is off (check at the carb, not the bar lever).......are you sure your choke
goes completely off? With the "choke" circuit on these carbs, it usually runs really bad with a
partially-on choke. I've seen the choke cable get hung up halfway, which leads to no running/
stalling/no idle with choke seemingly "off" but will run fine but horribly rich with it full-on. Never
leave mine ('99 Classic) on choke for more than a few minutes, if it's above 10'C (50'F), all I
need is the choke to start, after starting, it'll run fine with no choke (totally stock 'cept for silly
K&N). Shank NYC USA.
●
Turned up the idle and this seemed to fix the problem. The whole bike seems to run a bit better
but it is probably just my imagination. Don.
●
Apart from theoretical problems, has anyone noticed actual ill effects on the classic F650 from
either driving with the choke partially open for miles (forgetting to shut if off promptly) or not
closing the fuel petcock after riding? I'm not guilty of the second, but I am the first now and then.
Think there's enough extra fuel on the cylinder walls to effect ring lubrication? Johnny #862.
●
Don't know about theoretical, but gas mileage is a little worse when you ride with the choke on,
but not much. that I know from experience. have never noticed any other problems (never
fouled a spark plug). I think it's a throttle advance, not an actual "choke" (i.e. air restriction). I
never shut off the fuel except when transporting the bike on a trailer. Haven't noticed any ill
effects from that either. mark #403
●
The small amount of extra fuel, when the throttle is open, is not likely to cause a ring oiling
problem. However it might shorten the life of the spark plugs and the catalytic converter (if you
still have the stock muffler), through fouling, over a long period of time. Richard #230, Pacifica,
CA
●
My bike peed gasoline all over the garage floor cuz the petcock was left on and there were
some tired o-rings in the carbs. Since then, I prefer to avoid the fire hazard and turn it off. This
isn't common. But I am not the only one it happened to. See "Pukin' Petrol" in the FAQ. Flash
#412 (CO).
●
The fuel enrichment circuit of Mikuni carbs starts to work only when the cable is pulled about
half way. And I think that if you whack the throttle open it basically defeats the vacuum that the
enrichment circuit relies upon, so I don't think riding with a partially open "choke" would result in
any damage, if it were open further, the bike would just run poor, lots of smoke and over the
long term, catcon damage, maybe. Shank NYC USA.
●
THIS is how much mpgs can drop with choke on. Ok, it's not a choke but fuel enrichment
device wouldn't fit in the subject line. Over the last 3 fills, I go 150-155 miles before getting
fuel starvation symptoms (which calculated out to 50-55 mpg at the fill ups). During this last
tankful, I left the fuel enrichment device (aka choke) on for about 10 miles on one trip. My
mileage to reserve dropped to 125 miles (I don't know yet the gas mileage on this fill up--I had
to go to reserve to get home)--however, it looks like about a drop to around 40 mpg. This is a
97 F650 ST with 26K on it. So, if your mileage is down, make sure it's not just due to leaving
the FED (choke) on too long. Nate 97 F650ST, Maryland.
Choke Stuck?
http://faq.f650.com/FAQS/CarbMiscFAQ.htm (9 of 23) [18-02-2007 12:30:06]
Miscellaneous Carb Questions FAQ
If it is idling high, just Check the Cables. BOTH Choke Cable and Throttle cables.
●
If you don't normally use the choke fully when the weather is warmer, I suspect that the cable
isn't running freely and it's not going back all the way to the closed position. In that situation I
would lubricate the choke cable with a very light oil and if you can just keep opening and closing
it to work the oil along the length of the cable. When the lever is closed is the end piece on the
cable sat nicely in its socket or is there a pit of play there? If there is a bit of play or you can see
a small bit of the inner cable then it just needs that lubricant to get it working again. Trevor 999
UK 01 GS
Do I need a Carburettor Adjustment for High Altitude ?
by Kristian #562, Dick #420, Mark #403, HsN, Richard #230 & Unknown
●
Generally, the F650 (Classic) can cope with MOST Altitude changes, with no changes to the
Carbs. Any Changes should normally only constitute MINOR adjustments to the idle mix screws.
●
The F650 CV carb provides crisp throttle response and lessens jetting sensitivity to temperature
and altitude changes.
●
All constant velocity (CV) carburettors are designed to compensate for changes in altitude and
barometric pressure. From http://www.floheadworks.com/Products/keihin_carburetors.htm
●
The FI should have no problem at all, as it has lots of sensors and copes better with Altitude/Air
temperature.
●
What does constant velocity mean.? When you open the throttle the engine draws more air
through the carb. A large quantity of air must move faster being drawn through the same
diameter Venturi than a smaller quantity of air does. In a non-CV carb the air would be speeding
up and slowing down in the Venturi depending on the demand of the engine. In a constant
velocity carb the Venturi automatically gets smaller when the engine isn't drawing much air and
gets larger when the engine draws more air, this keeps the velocity (speed) of the air close to
the same at all throttle openings and provides a more consistent metering of fuel in the Venturi.
It is "supposed" to give better fuel economy, cleaner emissions and adjust itself to altitude
changes. Most tuners dislike constant velocity carbs and use round or flat slide carbs in which
the slide is raised directly by the throttle cable instead of indirectly by airflow as in a CV carb.
From: http://www.sonic.net/~blaineh/xs11carb.html
Going from Low to High Altitude:
Possible Symptoms:
You may experience rich running, stalling, hard starting and irregular idling at slow engine rpms at high
altitude. The bike will also run rich at full throttle, because too much fuel will flow through the main jet.
So do I need to adjust it:?
●
Yes & No. The carb vacuum diaphragm will adjust the mixture for you when running on the
throttle.
http://faq.f650.com/FAQS/CarbMiscFAQ.htm (10 of 23) [18-02-2007 12:30:06]
Miscellaneous Carb Questions FAQ
●
(CV carbs tend to be self-compensating at high altitudes, the flat slide carb does not.) From
http://www.chuckhawks.com/super_glide_sport.htm
●
Carbs are tuned to provide a certain A/F ratio based upon the ambient atmospheric pressure. If
the pressure changes, so does the A/F ratio. But, if you are actually measuring the A/F ratio, the
carb is more immune to pressure variance. What does that mean? It means a CV doesn't go
rich at altitude the way a fixed jet carb does. It is altitude compensating. So at 10,000 feet, a CV
equipped bike only looses power from the loss of available air pressure, while a fixed jet carb
will loose power from less air and lower combustion temp from being overly rich. From http://
●
www.easternillinoisabate.org/tech_talk.htm
If you were moving to altitude, you might consider the following: (Try ONE at a time, depending
on the Altitude).
●
Screw in the idle air screws and/or
●
Lower the needle position and/or
●
Possibly, reduce the size of the main jet. Refer http://www.nightrider.com/biketech/
main_jet_correction.htm for Jet Multiplication Factors for Temperature/Altitude.
●
For a trip over a BIG MOUNTAIN, just keep your hand on the throttle, in case the bike starts to
die at idle.
●
FI systems have an advantage here, as they do a pretty good job at adjusting the mixture for
changes of altitude.
●
Less air means less power and a richer mixture. A K-bike gets better mileage above 4,000 feet
because the injection system switches to a leaner program to compensate for the altitude. The
vacuum carbs can adjust to an extent, but not anywhere near as well.
Going from High to Low Altitude:
Possible Symptoms:
You may experience popping on throttle slowdowns. i.e. popping/minor backfiring during compression
braking/deceleration. BUT check your carbs are adjusted correctly, not worn and also check the
Backfiring FAQ, Exhaust Gasket Replacement FAQ and Strange Noises FAQ. So do I need to adjust
it?
●
The idle mixture screws are not self-compensating, as they (as well as the throttle-cutaway) are
not affected by the constant-vacuum feature of the carbs. They need to be manually adjusted.
●
In the Manual there are no instructions related to re-jetting or adjusting the high speed mixture,
http://faq.f650.com/FAQS/CarbMiscFAQ.htm (11 of 23) [18-02-2007 12:30:06]
Miscellaneous Carb Questions FAQ
only adjustments are for idle mixture and idle speed.
●
Most people have no difficulty changing altitude.
●
Re-examine the Backfiring FAQ FIRST for minor adjustment of your idle mix screws, or possibly
a leaking exhaust gasket.
If you fixed the Pukin' Petrol Syndrome and you were leaking gas before, you were running rich,
and likely would not have the lean idle mixture backfiring. By fixing that rich condition, you have
leaned out the fuel mixture, and now have the minor popping due to the lean mixture. Adjust
your Idle Mix Screws as per the Carb Clean FAQ.
1/2 to 1 full turn richer may stop the backfiring. Try that first before doing more complicated
things, That should also compensate for any altitude change, however be aware you should
isolate it to ensure you do not have another problem, like blown Exhaust Gaskets or Worn
Needles etc. Or it simply may have not been set properly in the first place.
Enrich the idle mix. Now that you've got more air, your idle mix is lean, which causes the
backfire. Turn them all the way in (not tight), and then back them out 3.5 turns each. If that
doesn't solve the problem completely, turn them out another quarter to half turn. Unless you
have a new exhaust leak, I can almost guarantee this will cure 95% of the popping.
●
●
●
Feedback:
●
The elevation of Phoenix is 1112 feet. Yep- 10k is a pretty big gain. Pack light over the passesI think the loss of power will be very noticeable but it won't stop you- it IS a motorcycle. Going
down a tooth on the front sprocket is an option but it harms your gas mileage and maximum
potential cruising speed. I say don't change anything and tough it out. Stick in the lower gears
up the hills and prepare for a significant drop in gas mileage. Aurora, CO. chppdlvvr
●
It is a common misconception that a trip to the mountains requires that you to rejet the
carburettors. There will be a slight loss of power, nothing more. The time you spend at 11,000
feet will probably be about an hour. What you really need to do is make sure the engine is tuned
up and running properly before leaving. A climb to altitude will expose any flaws in the engine,
and when people have trouble with their vehicles on a trip to the mountains, that's why they
have trouble. So forget about rejetting the engine. F650GS Dakar, Camden, New Jersey. echo
●
A clean air filter is pretty important if you're not going to rejet for altitude. If you're only going to
be at altitude for a few days, you probably shouldn't worry about rejetting. If you are comfortable
removing your carbs, going one size smaller on the main jet is a good idea. BMW dealers will
be useless when it comes to supplying alternate jets. But the jets are the same as run of the mill
Japanese-bike Mikuni carbs (Mikuni BST B316 CV carbs, to be exact), available wherever
Japanese bikes or parts are sold. According to the FAQ, your stock mains should be 132.5. I
believe the next smaller size in that numbering scheme is 130. If you plan to change main jets,
get two, one for each carb. See Performance Mods Flash 412 (CO)
●
In the good old days, in order to lean out the mixture for a few hours of high altitude operation,
we would remove the air filter and pull any removable baffling out of the muffler(s) when the
bike started to slow down. With CV carbs, you will likely not have a problem, except that your
idle may be "lumpy" and slow. If things get too bad, you may want to turn your idle-mixture
http://faq.f650.com/FAQS/CarbMiscFAQ.htm (12 of 23) [18-02-2007 12:30:06]
Miscellaneous Carb Questions FAQ
screws in a turn. Just remember to turn them back out to 3.5-4 turns out, when you get below
5000 feet. Richard #230
●
I would (and did) do nothing.. you will lose some power but hey its not a race anyway. Lance,
#1303, '01 F650GS, '96 G650ST. y_kiwi
●
I live at 1400 feet. I have had two different experiences in Colorado and Utah at elevation: 1998
Triumph Sprint. Three Keihin Carbs. Factory stock (probably a little lean). Ran SMOOTH and
perfect all the way to over 12,100 feet on the road to Fall River Pass. Noticeable loss in power
over 9,000 feet. Smooth and comfortable at 12,000 feet, but way down on power. Really a non
issue. I was loaded for a solo 10-day trip and had a blast. Didn't use sixth gear much...1996
Moto Guzzi Sport 1100. Two Del Ortos with accelerator pumps. Aftermarket exhaust and jetting
mods (probably runs a little rich). Ran like shite at anything over 6,000 feet. Had to keep it at
5000rpm or more the whole friggin' way from Colorado Springs to Park City (the long way). Had
it rejetted and dyno'd at Salt Lake City with some improvement. Ran good up to 9,000/10,000
after that, but still coughed and spit and was problem child. Although it ran poorly at lower rpm
and slower speeds, it wasn't enough to make me want to cut-short my 2,000 mile trip. I'd say
don't change anything, worst case, you'll run a little rough and get poor fuel mileage. It'll be a
blast. I'm taking my new DAKAR to Colorado next week. I'm hoping Fall River Pass is open so I
can see how this fancy fuel injection works at 12,000+ feet ! guzzimike
●
I have ridden my 01 GS two up around the same areas you are talking about and was fine. Sure
there was power loss but like it was said before, it is not a race. Besides power loss means
slower speeds = more time to take in the amazing scenery! Have fun and ride safe. facito, 2001
F650GSA, Las Vegas, Nevada.
Do I need to Synchronise the Carbs
Randy#748
Synchronization is possible with anything more than one carb. Two, as in F650's case can be synched
and may not be noticeable to rider, other than less HP. I am assuming a bit here, because the 650
carbs may have no adjustment ability (I've not looked), individually, but my experience with other bikes
has always been that the individual carbs can be adjusted separately. Usually a screw on the actuating
bar, for each carb. Factory set, these are rarely off, but possible. Most Japanese bikes with multiple
carbs have single cable, bar actuating all four as unit and they are synch'd as a regular service item.
Single cylinder has no input here, except acting as a single, the input to rider will be less obvious in
rough running vs. less HP. The domes on F650 carbs do have access ports. Two 33mm throats feed
the 650 and less than two equally opened butterflies, will mean less HP. I imagine the settings are very
close to perfect from factory. Comparison; My R100 only has two 32mm carbs! The 650 has 4mm
more feeding power than the 1000cc bike! A lot going through a 650 and thus the 48HP it delivers and
the somewhat equal mpg to the R100. The R100/7 delivers 58-60HP, as I recall, but with one more
cylinder and very close to same carb size (total). The 650 breathes better with 4 valves, which creates
more power, where the old boxer has two valves per hole. Anyhow, the 650 rams a lot through one
cylinder, with two 33's behind the intake and I imagine without water cooling, high tech metallurgy, etc.
the engine would burn up. One fun bike!
Fast Idle Problems ?
http://faq.f650.com/FAQS/CarbMiscFAQ.htm (13 of 23) [18-02-2007 12:30:06]
Miscellaneous Carb Questions FAQ
Bob #550
October '01
This is to share a possible fix for your pre-fuel injection F if the idle suddenly or unexpectedly refuses
to drop down to normal.
Tonight I took the tank off my '99 F650 to see what was causing the throttle to hang up. What I found
was that one of the electrical wire connectors located near the left carb had worked its way down to
where it was rubbing against the throttle cable and had snagged the spring-loaded linkage at the carb
body. I moved the connector back and away from the carb, and all was well...until I decided to check
the diaphragms that control the needles in the carbs.
I took the top off the right carb first, and checked things out. The rubber diaphragm was just fine, and
everything looked in order. Then I tried to refit the diaphragm and its top cover back in place. No go.
After an hour of failed attempts, I finally smeared a little engine oil on the edge of the diaphragm,
thinking that may help it slip into place. It did, and I was finally able to close everything up.
What is the Effect of Dropping the Needles.
Flash #412
December ‘01
Effect of Dropping the Needles: Flash vs. Matthew
Flash:
CV carbs (sometimes called Constant Velocity or sometimes called Constant Vacuum) use the
pressure differential between the two sides of a diaphragm to raise the slide. The needle is attached to
the slide. By removing the snorkle, you lower the "effort" required by the motor side to raise the slide.
You have effectively "raised" the outside air pressure by removing the snorkle. In other words, for a
given manifold vacuum, the slide now rises higher than it did before you removed the snorkle. This
means that the needle is allowing more fuel in for the same throttle-plate opening than it was before.
To counteract this effect, you need to drop the needle, physically, one notch. You do this by putting the
clip in the next higher notch, physically.
Matthew:
CV carbs operate of the velocity of the air passing through them. Removing the snorkel or opening up
an airbox will slow the speed the slide raises. It will have no effect on the distance the slide rises.
Can anyone enlighten us on Practical Observation vs. the Theory.? (ed)
What are the Holes in the Bottom of the Slides for ?
Curt Martin
October '01
http://faq.f650.com/FAQS/CarbMiscFAQ.htm (14 of 23) [18-02-2007 12:30:06]
Miscellaneous Carb Questions FAQ
While I'm not even close to being a guru, I'll take a crack at answering your question. The vent holes
bleed off vacuum that operates the needle slides. Ok, you probably figured that out already. So why
change the hole diameter? To change the ratio of vacuum to slide position. You've had your carbs
apart, so you have seen the slide return springs and know that the slides carry the needles as they
move.
With that in mind, the chamber & diaphragm at the top of the slides gets a supply of intake vacuum, fed
through the little hole at the lip of the cover. The vacuum pulls the slides up, exposing more of the
needle. That vacuum is pulling against the return spring, and also being bled off by the vent hole at
the other end of the chamber.
If that makes sense so far, then you'll realize that there are three ways to alter the needle position vs.
engine load (vacuum):
1.) Change the diameter of the vent hole. A larger will bleed the vacuum off quicker, smaller
will bleed the vac off slower.
2.) Change the rate the return spring. A heavier spring will have the same effect as a larger
vent hole.
3.) Change the position and shape of the needle.
You can use any combination you wish, provided it produces the results that you (or should I say, the
engine) wants.
I've seen it done all three ways by different shops and kits. I know one successful race shop that
prefers to use the stock needles (straight taper) and slides. He only changes spring rates and jet
sizes. Others, Dyno-Jet kits included, use custom needles (stepped taper/adjustable position) and
larger vent holes in combination with stock spring rates. And some just alter the needle shape while
leaving the vent and springs alone.
The results are all that matter. (btw, this is usually a mid-range adjustment. Low range is still governed
primarily by the pilot jets & float height, and top end by the jet size.)
Flat spot in carburetion?
Refer the Canisterectomy FAQ, Idle Mix Screws FAQ, Poor Mileage FAQ, Carb Clean FAQ.
The following responses are for PRIMARILY from people with Stock setup. If you know or
suspect you have a Jet Kit, please also refer the Performance Modifications FAQ.
●
I figured out what the problem was. On the air filter side at the bottom of the Venturi there are
two orifices a small one and slightly larger one. The smaller one was clogged big time used
carb cleaner and a piece of stiff wire and finally got it cleared. Took about 20 min. Put them
back together and the bike runs like a charm. Thanks again for all your help and everyone here.
JAMES.
http://faq.f650.com/FAQS/CarbMiscFAQ.htm (15 of 23) [18-02-2007 12:30:06]
Miscellaneous Carb Questions FAQ
●
Oh yes I was talking about the float mount. The left one slides over and seats on a brass tube
and the end of the float mount has a restrictor. The tube I am referring to is connected to the
choke the left float o-ring side slides over this tube. I noted that the left float has a restrictor built
into it therefore there is a different float assembly for left and right carbs. I am not too familiar
with carbs dealt mostly with FI. On the right carb there is a drilling with a hole for a tube but
compressed air will not flow through it I am assuming it is a blind and not used. I wonder why
there is a restrictor on the left float and not on the right unless the float assemblies were
switched at some point I am baffled at this point the only reason I got into this mess was
because Dyno jet sold me a jet kit that does not work on the 1998 F650. I continuously fouled
plugs and called and they told me this kit was not for the 1998. So I went back to stock. And
could not adjust the right carb. Bottomed out or 5 turns out no difference. So then I decided to
look at float height. This is when I discovered these differences. Again thanks to all. JAMES.
●
The parts in my kit are stock needles (5 clip settings #5E94), stock main jets (132.5), Dyno
stage II jets (138) a set of springs (anyone know how to tell stock springs from DynoJet springs
- Refer the Jet Kit FAQ). Two black rubber plugs (Idle Mix Screw covers). Two small/tiny needle
jet washers. So this is my plan. Buy a "packing kit/o-rings, pull carbs, change main jets to stock
(132.5), change to stock needles four slots down from the top (anyone think I should use a
washer on each clip ?), switch to stock springs (again not sure how to tell the difference), check/
replace all rubber and double check diaphragm. Set the idle mixture screw to stock setting 3.5
turns out from lightly seated. Double check floats and float heights. Now for the big question,
When my lovely wife and I purchased her 97' F650 (which has the jet kit) I was really impressed
with the 5000 rpm and up power and throttle response. Shortly after that I bought a 99' F650
without a jet kit but with a 15 tooth sprocket. Her bike has a noticeable amount of power above
5 grand rpm's. It also lurches and bucks in lower RPM's (she is also a noob, but member
#A6501188) Is that the trade off = power for drivability ? If that is the case then back to stock
and the jet kit can gather dust. Is the factory pro kit any better or is it a lot of playing around and
compromise between power vs. drivability ? Both of our bikes have the snorkel yet should we
pull those ? XtreemLEE.
Slide Barrel Wear
Morgan Seim has a solution for the G's carb crappiness. Not for the F650 but interesting all the
same.
“This letter is the culmination of many hours of trouble and tinkering with Ellen's 1100G's carbs. Riding
my new 1200 Bandit back to back with her 1100G really highlighted the gross carb troubles her bike
had with the original carbs. You may have read my earlier "fixes" on the Worship page, little did I know
how wrong I actually was. My "fixes" were more of a band-aid that made the bike run better, but didn't
cure the root cause. A letter sent in to the November 2000 issue of Cycle World magazine's Service
section by Sasha Shapiro of New Paltz, New York, describing the exact symptoms I had experienced
prompted me to finally get hot on the problem. I must note that Cycle World's response was way off
target! ( I will be sending them a letter regarding the true cause of her troubles. I contacted her, and
she eventually replaced her carbs, curing the bike.) I finally got fed up enough to do some serious
research, and I found a letter on the Web from a guy in England that said he had noted emulsion tube
wear on his 1200 Bandit, and after replacing them, it cured his low speed mixture problem. I reasoned
http://faq.f650.com/FAQS/CarbMiscFAQ.htm (16 of 23) [18-02-2007 12:30:06]
Miscellaneous Carb Questions FAQ
that with 56K on our bike, we must have this problem as well. I rushed out and bought new needles,
emulsion tubes, and slides, confident that I had solved the problem at last. Wrong! The bike ran no
differently, which prompted me to completely tear down the carbs for some direct inspection of my
own. After getting the carbs apart and taking some careful measurements, I finally found the true
problem, which is the plastic pieces that the slide mates with. This piece eventually develops an
uneven mating surface with the slide, which leads to needle and emulsion tube wear, and inaccurate
air and fuel metering at idle and low speeds. I also noted that the problem can cause sticking of the
slide if the wear is severe enough, since the wear results in such a misalignment of the needle and the
emulsion tube that the side load on the slide from intake vacuum binds the needle in the emulsion
tube. The original needles I removed from Ellen's bike had two steps worn into them, causing the
slides to not fully lower as well. I had always thought the Bandit carbs would work on the 1100G, so I
called American Suzuki, and one of their reps said he had both a Bandit and an 1100G, and had put
Bandit carbs on the 1100G. He said I needed the Bandit intake boots, and I had to use pod type air
filters. It turns out he was incorrect, it's a direct bolt-on. The used carbs I put on Ellen's bike
supposedly had about 4K on them, and they looked like that was accurate mileage. There is always
the unconscious expectation when you work on your bike that it will run better since you have just
expended so much effort, and I think this can sometimes create false expectations. Before putting the
used carbs on her bike, I opened up the mixture screws a bit, and raised the needles about .040".
After getting her bike all buttoned up, I
anxiously started it, and it idled perfectly. I was so relieved I was nearly beside myself with disbelief.
Of course, when buying anything used, you are at the mercy of the guy at the junkyard, who usually
has a different perspective. To him, if the donor bike was in good shape, it must be low mileage, but
fortunately, these carbs actually were. I suspect the wear problem with the plastic pieces starts to
affect carburetion around the 15-20K point. I think not everybody notices how bad their bike has
begun to run, since it is a very gradual degradation, and some people are not as particular about their
vehicles as I am. Here's the arrangement with the carbs and why I haven't had any luck getting
the parts I need. Suzuki buys the carbs from Mikuni Japan, and in order to get the part that wears out,
you have to buy the entire carb body for approximately $350, and of course you need four of them.
Dealer reps told me to contact Mikuni, so I did, and it turns out that Mikuni Japan is separate from
Mikuni America, and Mikuni America said they couldn't help me. So far, Suzuki of North America,
Mikuni America, and all the dealers I have talked to have said they can't help me. Their stance is that
the part is available, you just have to spend $1500 for four carb bodies, that's all.
No, I haven't contacted Mikuni of Japan, and at this point I don't expect a different answer from them
either. Since the supply of good used carbs is finite, I have developed an inexpensive way to correct
the worn plastic pieces by re-facing it with brass, and at this writing, I will have the first prototypes
installed in a bike in about two weeks. It is a rather labour intensive undertaking, but it sure beats
$1500 for some plastic pieces that should cost $10 each. So far, I have found about seven different
types of bikes that use carbs with this same configuration, mainly big Suzuki’s and the fix is applicable
to all of them as well .(Pretty much any bike with 36-38mm Mikuni's.) Please post this ASAP, I
welcome correspondence from other Worshippers. Happy Trails, Morgan."
Carb Alternatives (Complete)
by Mtbiero (Cugino Pegaso)
http://faq.f650.com/FAQS/CarbMiscFAQ.htm (17 of 23) [18-02-2007 12:30:06]
Miscellaneous Carb Questions FAQ
I found a pair of 39mm Keihins here: http://www.rotax.net/BMW_F650.htm for $760:
and more cheaply here: http://www.pro-flo.com/proflo_keihin_fcr_carb_kits.htm#BMW for $625
However I think dual 39's is best for all out racers, and feel the dual 36mm Mikunis offered here:
http://www.team-pami.de/ENGLISCH/index.htm for 448 euros ($392) would work best.
Since the F650 and Pegaso share dual Mikuni BST33's, I think the F650 carbs would work on my
Pegaso.
Info I got from Team Pami:
●
The Mikuni flat slides have both 36mm diameter - both open together, the carbs have an
acceleration pump.
●
The stock cable doesn't fit - you have to make a cable(!!).
●
Yes the stock choke cable fits and works!
●
Minimum 2-3hp more and the throttle response you can't compare - this all with stock cams.
Gottfried - Team Pami
PAMI Performance Kits
by Mtbiero (Cugino Pegaso)
I don't have the entire kit (won't work with my Pegaso) but I do have a set of team Pami 36mm Mikuni
radial slide race carbs for a F650 on my Pegaso. Just the carbs alone gave me a very noticeable
power boost, more top end, and allows me to cruise the bike at the 2000 to 3000 rpm range without
any lurchiness...
When I first put them in, I used my stock airbox, when I finally removed it and went to Uni filters, the
bike really woke up. Right now I'm still trying to get the idle right, I messed up, I assumed the idle mix
screws should have been at 2 turns out nominally. finally got a tuning manual from mikuni.com, that
says unlike every other carb Mikuni makes, the RS idle mix screws range is 1/8 to 1/2 turns MAX!
Been wrongly going to leaner idle jets to compensate, and causing other issues. I'm back on track and
expect to have them idling perfect after about one or two more iterations. The nice thing about
removing the airbox is I can have the carb out and on the bench in 6 minutes as opposed to 1 hour
before!
Alternative Carb Parts:
OEM Parts List:
OEM Carb is a Dual Mikuni BST33-B316 CV carb
http://faq.f650.com/FAQS/CarbMiscFAQ.htm (18 of 23) [18-02-2007 12:30:06]
Miscellaneous Carb Questions FAQ
●
FCarbParts1
●
FCarbPartsList1
●
FCarbParts2
●
FCarbPartsList2
●
FCarbParts3
●
FCarbPartsList2
For the diaphragm try one from a Suzuki GS500, part number 13507-17c01. I don't know if the other
parts are the same or not. Charlie #070 from Pennsylvania.
Some parts are exactly the same parts as a Suzuki GS500E. Note the GS500E uses Mikuni
BST33 x 2 Carbs.
●
The Suzuki '98 DR350SE uses a MIKUNI Carburettor BST33 (BST33SS CA. Model) Single.
●
The Suzuki DR350 EU model 1994 uses Mikuni Type BST33SS but US Model 1990 Mikuni
uses TM33SS.
●
The Suzuki DR750S and 800S Specs also show a MIKUNI BST33, twin.
●
The Suzuki 1996 GSX600FT also show a MIKUNI BST33, four.
●
The Suzuki GSF 400 Bandit has MIKUNI BST33, four.
These are from a Suzuki GS500E
http://faq.f650.com/FAQS/CarbMiscFAQ.htm (19 of 23) [18-02-2007 12:30:06]
Miscellaneous Carb Questions FAQ
For GS500E
1989~1996
●
GS500ECarburetorKLMNPRST-1989-1996
●
SUZUKI-GS500E-Carburetor-KLMNPRST-1989-1996-PartsList
1997~2000
●
GS500ECarburetorV(97)-W(98)-X(99)-Y(00)
●
SUZUKI-GS500E-Carburetor-V(97)-W(98)-X(99)-Y(00)-PartsList
The Aprilia Pegaso (Sister of the Funduro), also uses the same Mikuni BST33 Carb as the
http://faq.f650.com/FAQS/CarbMiscFAQ.htm (20 of 23) [18-02-2007 12:30:06]
Miscellaneous Carb Questions FAQ
Funduro.
Notes:
●
Note there MAY be a Yamaha that also uses a Mikuni BST33-B316 carb? Might be worth some
odd digging to see.
●
Note the 1994 Triumph Daytona 1200 has Mikunis BST 36mm CV carbs but the 36m is the
horizontal opening size and Diaphragms MAY be the same as the F650.
●
You CAN get some Carb parts from Sudco, at www.sudco.com, but they do not list our carb. I
got my Pilot Jets from them.
●
Ron Wood offers dual 39mm flatslides for the F650 for $760, you can get them at www.pro-flo.
com for $625. mtiberio.
●
Dave #365 (Thank you Dave !) got this precious Gem:
Dear Sir,
We checked your question. Your F650's BST33-B316 original slide springs are the following
compatible part No's. Please order Yamaha or Suzuki your local dealers. It is faster than
delivery when you order to BMW or Rotax (engine maker).
❍
❍
Suzuki genuine part no. 13417-12D00
Yamaha genuine part no. 3LN-14933-00
Yours faithfully,
Mikuni Corp.
International Dept
●
Next.
How do I get Water in the Float Bowls?
Q. How did I get water into my float bowls?
I emptied the fuel tank, I replaced the green gasket under the filler cap but somehow I still get water
into my float bowls. Also, I don't have a cannister. Are there any other ''suspicious" passages for
water? The problem arises only in wet weather (under rain) and cold. Then, the bike drops its idle and
stalls or surges as if it runs out of gas.
http://faq.f650.com/FAQS/CarbMiscFAQ.htm (21 of 23) [18-02-2007 12:30:06]
Miscellaneous Carb Questions FAQ
●
This is a common problem on the classic F. The water goes in through the air filter. You can
empty the water of the carbs by unscrewing for a few seconds (2 or 3 are generally enough) the
two screws located below the carbs, in horizontal position, taking care you have the gasoline
pass key in the off position. Then the water, first, and gasoline, after the water, go out. You can
see the width of the water flow line is a bit wider than the width of the gasoline flow line. Better if
you put some rag or paper below the carbs, avoiding the gasoline spreading. Fede
●
You might also make sure you keep the gas tank full. When it is less than full, condensation
forms in the tank in cold weather (and probably also in wet weather). If you don't have cold
weather where you are then Fede's answer applies more. Find a way to keep water out of the
airbox. Colorado Bob.
●
If the Gas Filler Cap Leaks, it gets first into the Gas Tank, then into the Carbs
Q. How can I drain water from my float bowls?
●
Here: Float Bowl Drain Screw Locations
●
The Screws Circled RED are the Float Bowl Drain Screws, for emptying Crud/Water out of the
Carbs. The screws circled Green are explained here: Idle Mix Screw.
Fuel Line Replacement
by Chris in Santa Cruz, CA
It is possible to replace the fuel line without removing the carbs. You must have long fingers. You
remove the rear shock preload adjuster (this ones an Ohlins, but the location is the same), grease the
hose a little, and do without the clamp. I will take the carbs out at some later date to reinstall the clamp.
Meanwhile I will inspect the connection for a while. I used 6mm Gates PVC fuel line.
This MAY allow you to remove the OEM In-line Fuel Filter. Maybe. If anyone can confirm this, great.
The inline fuel filter is in the brown T-Piece connector between the Carbs. Refer the Carb Cleaning
FAQ for more Details.
Fuel Lines:
●
Believe it or not, the BEST fuel line is BMW fuel line, from the dealer. It is rubber, covered with
cloth weave. Some dealers sell it by the meter, some by the yard. Some can make the
conversion, some cannot. The hose that came on the bike ... was Italian. Flash #412
●
I had nothing but problems with the fabric covered line. I don't know exactly what ate it up but it
just started cracking and leaking. The hose that came on the bike was not the fabric covered
line but a single walled line with no internal reinforcement. This stuff just got really hard and
inflexible. The Gates line is double walled with a woven fabric reinforcement sandwiched in it.
Beefy. Chris in Santa Cruz, CA
●
You can usually buy "clear" fuel line (sometimes in designer colors or black) at the nearest Jap
http://faq.f650.com/FAQS/CarbMiscFAQ.htm (22 of 23) [18-02-2007 12:30:06]
Miscellaneous Carb Questions FAQ
bike dealer. 6mm is closest to US equivalent 1/4", although 5/16" is also available. I had some
of the old BMW cloth covered stuff in stock, it works fine (so far). Marty #436-Chicago-97 F650F
http://faq.f650.com/FAQS/CarbMiscFAQ.htm (23 of 23) [18-02-2007 12:30:06]
Carburettor Cleaning FAQ
Carburettor Cleaning FAQ
by Kristian #562
Please read the Disclaimer before attempting any work in this FAQ.
●
●
●
●
●
●
●
●
●
●
●
●
Carb Nomenclature
Why should I clean out/re-condition my Carburettor:
General FAQ’s about the F650 Carbs
So how do I get the Carb Out
Enough of the Preamble, How do I actually Clean & Replace Carb Parts.
How Do I Replace the Carbs.
Inline Filter
Carburettor LINKS
Checking the Float Height with the Carbs ON the bike?
Opinions (On Carb Cleaning/Particular Parts Replacement).
Detailed Feedback on Carb Reconditioning
Identifying a Float Valve Problem
Looking for the OEM Inline Filter ? or the Aftermarket Fuel Filter?
Please Note that this FAQ only deals with the resetting of your Carb to the STOCK configuration. ReJetting, Needle Changes and Modifying Float Heights are covered to some extent in the ExhaustRejetting Spreadsheet. Have a look there if this is the kind of information you need. Nor is this a
treatise on how a Carb Works. There are lots of references about that on the Web. I will try and add
some links I think are worthwhile references, at a later date, as I come across them. Perhaps you
might like to suggest some too. Dynojet has pretty good simple one here: Dynojet’s Carb Theory. I
need to refine some parts of the pictures and circle some specific parts of the photos, and I need a few
additional pictures. Write to me and tell me what you think would make it better.
●
Refer the Carbs Misc. FAQ for other information on Carbs.
Refer also the General Performance Modifications Guidelines & Tips, Dynojet Settings, Snorkel,
●
Organ Pipes, Alternative Carbs & Carb Parts.
Refer the JetKit FAQ for information on Length of Carb Springs etc, if you're not sure your bike
●
has part of, or an entire Jet Kit.
Refer the Idle Mix Screw FAQ for where it is and Tips on Adjustment.
●
Carb Nomenclature:
Note that Slide is also often called Slide Piston (or Piston) or Slide Barrel. The Slide Carrier is often
just referred to as the Carrier.
http://faq.f650.com/FAQS/Carb_Clean.htm (1 of 25) [18-02-2007 12:30:16]
Carburettor Cleaning FAQ
Why should I clean out/re-condition my Carburettor?
A.
1. If you've read the Hard Starting FAQ and the Poor Mileage FAQs and nothing helps.
2. When the bike has been standing a long time and it sputters and stalls and pops and
3.
4.
5.
6.
7.
wheezes (but try some carb cleaner in a tankful of gas first! ) and you’re worried (or you
know) the rubber O-Rings have deteriorated.
When the bike falls victim to the Pukin’ Petrol Syndrome and you have to take it out
anyway for that reason.
When the bike “bogs down” at anything above just past idle, a sign of a Split Diaphragm
and you KNOW it’s not your Voltage Rectifier or Plugs or Plug-Caps.
When you are getting Poor Gas Mileage.
When you are Rejetting (Warning, Rejetting is a long slow process and you may NEVER
be satisfied with the results).
When your bike seems to Surge or Stumble (even if it is NOT an F650GS) and you
KNOW it’s not your Chain/Sprockets or a dirty Air Filter.
General FAQ’s about the F650 Carbs
●
Reduction in mileage?
●
Gas mileage?
●
Who makes the F650 Carb?
●
Another bike with the same carb?
●
Another supplier?
●
Synchronise?
●
STOCK Carb Settings?
●
Carb Parts Numbers?
●
Websites to tell me how to tune my Carb?
●
What Parts of the Carb get worn?
●
What about alternative Sources for the O-Rings?
●
Adjust the Idle MIX Screws
Q. At what mileage can I expect to get a reduction in mileage due to worn Carb parts?
A. This is an extremely difficult question to answer, it depends on whether you ride in dirt, road or at
cruise revs or high revs. Some inmates have noted a decrease in Gas Mileage around the 20,000
miles mark.
Q. So what gas mileage should I expect to get?
A. Again this is an extremely difficult question to answer, it depends on whether you ride in dirt, road or
at cruise revs or high revs. Some inmates get 45-50, some 50-55, some 55-60. If you get less than 4550 with a stock bike, normal around town riding on the road, and you have a high mileage bike, it’s
http://faq.f650.com/FAQS/Carb_Clean.htm (2 of 25) [18-02-2007 12:30:16]
Carburettor Cleaning FAQ
probably time to check the Carbs. Same goes if you get less than about 50-55 on the open road. Refer
the Poor Mileage FAQ for more details/feedback.
Q. Who makes the F650 Carb?
A. Mikuni. They are 2 x 36mm Mikuni BST B316 CV (Constant Velocity) Carburettors. There are two
on the F650, side by side.
Q. Is there another bike with the same carb. from which I can scavenge cheap Bike Parts.
A. Yes, the Aprilia Pegaso, a 5-Valve Aprilia version of the bike, made in the same factory in Italy. It’s
not identical though. You can also get SOME parts from the Suzuki GS500E Carb, which is very
similar. Refer Alternative Carbs & Carb Parts for details.
Q. Is there another supplier that supplies parts?
A. If it’s just Main and Pilot Jets you are after you can probably get them from your local Bike Shop.
Ask for Mikuni Jets and show them your old ones, as there are several different head Styles. I know
you can get them from to Sudco-Mikuni in the U.S. however Sudco do NOT supply the needles. They
say they were a special run for BMW and I’ve found the only supplier to be BMW or a BMW Agent.
However Dave #365 (Thank you Dave !) got this precious Gem:
Dear Sir,
We checked your question. Your F650's BST33-B316 original slide springs are the following
compatible part No's. Please order Yamaha or Suzuki your local dealers.
It is faster than delivery when you order to BMW or Rotax (engine maker).
●
●
Suzuki genuine part no. 13417-12D00
Yamaha genuine part no. 3LN-14933-00
Yours faithfully,
Mikuni Corp.
International Dept
See also Alternative Carbs & Carb Parts for details.
Q. Do I need to “Balance” (Synchronise) the Carbs.
A. You have probably read somewhere about needing to “balance” the Carbs. This really applies to
multi-cylinder engines where individual Carbs feed individual Cylinders. You do NOT need to “Balance”
the carbs on the F650 if you set the “Settings” (Needle, Float/Jet Size/Mix Screw) the same, for each
Carb. It’s a single cylinder engine. For more information refer The Carb Misc FAQ.
Q. What are the STOCK Carb Settings?
A. The Stock Carb Settings are:
http://faq.f650.com/FAQS/Carb_Clean.htm (3 of 25) [18-02-2007 12:30:16]
Carburettor Cleaning FAQ
●
●
●
●
●
●
●
●
1996 Onward Models:
Main Fuel Jets #132.5
Pilot Jets #41.3 (Idle Air Jets)
Needles 5E94, 4th Clip from Top (Blunt End)
Carb Venturi (Emulsion Tube) 584□□-2. The first "□" stands for a rectangle with a small square
inside, the second "□" stands for a small rectangle. Thanks to Marty #436)
Float Height 14.6mm from the Gasket Surface
Idle Mix Screws backed out 3.5 turns from LIGHTLY seated (all the way in).
The Stock "Organ Pipe's are sealed so if yours are open someone has probably re-jetted your
bike.
1993-1995 Models: Thanks to Spakur & Fede
●
●
●
●
●
●
●
●
●
Main Fuel Jets #140
Main Air Jet 0.6
Pilot Jets #41.3 (Idle Fuel Jets)
Idle Air Jet 1.5
Needles 5E94, 4th Clip from Top (Blunt End)
Carb Venturi 584#0-2
Float Height 14.6mm from the Gasket Surface.
Idle Mix Screws backed out 3.5 turns from LIGHTLY seated (all the way in).
The Stock "Organ Pipe's are open so if yours are plugged someone has probably re-jetted your
bike. Here's a picture of a 1995 with the holes ALREADY open, from the factory: Factory
Airbox.
Q. What are the Carb Parts Numbers?
A. Steve#417 supplied these: (Thanks Steve)
●
13112343398 Valve Assembly
13112343379 Diaphragm
13112343397 Needle
13112343395 Venturi Jet
13112343318 Idle Jet
13112343412 O-ring (idle mixture)
13112343404 Bracket Float (with O-ring)
Here is the OEM Parts List:
●
●
●
●
FCarbParts1
FCarbPartsList1
FCarbParts2
FCarbPartsList2
http://faq.f650.com/FAQS/Carb_Clean.htm (4 of 25) [18-02-2007 12:30:16]
Carburettor Cleaning FAQ
●
●
FCarbParts3
FCarbPartsList2
Refer also the Carb Alternatives
Q. Are there any Websites to tell me how to tune my Carb?
A. Well the best thing you can do if you have a Stock Setup or even Stock Carb with an aftermarket
exhaust is to Check for and Replace all the worn parts discussed above and set the Carburettor Floats/
Idle Screw/Clip Location to the specified Stock Settings. Otherwise:
●
●
●
●
●
Factory’s is pretty good: Factory Pro's CV Tuning FAQ. Their approach is to tune the
Carburettor from the Main Jet size and work DOWN through the Needle Clip Setting,
Float Bowl Height, (SOMETIMES Pilot jet) and then the Idle Mixture Screw.
Sudco have a Manual, called the Sudco-Mikuni Manual which I cannot give you
because it is copyrighted, however they work UP from the Idle Mixture Screw , Pilot Jet,
Needle Clip Settings, Float Bowl Height to the Main Jet size and claim that each of the
Carburettor Circuits are additive. See Sudco Carbs 1 & Sudco Carbs 2.
Dynojet gives you the Needle and the Main Jets and says THESE are the settings, if it
doesn’t work , try the needle one clip either way, then adjust the Float Bowl Height. Do
NOT change the Pilot Jet.
These last three you SHOULD only need if you rejet, which can be a REAL Trial. (PITA)
There is also a good list at the Bottom of the Page.
Q. What Parts of the Carb get worn?
A. Pretty much all the moving parts or parts against which moving parts work, like any mechanical
device. However there are some parts which don’t move that deteriorate with age, some to a greater
extent than others. The parts that most often wear or deteriorate are the Carb-O-Rings, Needles
(shown are the Stock (L) vs. Dynojet (R) needles), Diaphragm Rubbers (shown on top of the Slide),
Slide Carrier (Grey Plastic Block) and the Slide (Black barrel with two Side Fins). The jets (Main Jet,
Pilot Jet) do not really wear, except for the so-called Carb Venturis or “Needle Jets”, due to the action
of the needle vibrating within in it. Here's a link to an Oblong Venturi Jet, on Factory Pro's Website, to
give you some idea of the wear that can occur in the needle jet. It is this wear, along with the
corresponding rubbing/scratching of the needle. See Worn Needles, also on Factory’s Site. However if
the gas is dirty the Main or Pilot Jets can also get blocked (fairly common) and the hole CAN wear
bigger, although this is not that common. The Float Valve Tips and or Springs can also wear, but take
a bit longer than other parts.
AND.... Don't forget to check the rubber intake manifold for cracks as well as the rubber Air-intake
boot.!
One thing you might also want to watch out for. If you've been using Coolant with Silicates in it, (which
you should NOT as it will destroy your water pump), you might accidentally spill some into the intake
snorkel when you fill your coolant and the fine Silicates that may pass through the Air Filter will quickly
http://faq.f650.com/FAQS/Carb_Clean.htm (5 of 25) [18-02-2007 12:30:16]
Carburettor Cleaning FAQ
wear your Carb Venturis and Needles.
The sizes of the Four Replaceable O-Rings, (4 in EACH Carb i.e. Total 8) available from any bearing
shop are, Smallest to Largest:
●
●
●
●
●
●
●
●
Idle-Mix Screw O-ring: 1 x 2.5 (or 1 x 3). I found that the 1 x 3mm O-ring was the closest fit for
the idle mix screw (vs. the 2.5 in the FAQ). Actually, the 1 x 2.5 is closer on the ID, and the 1 x
3 is exact for the OD. Marty #436) . Idle-Mix Screw O-ring: 1 x 2.5 (BMW Part # 13 11 234 3
412)
Float Frame O-ring: 1.5 x 5
Float Valve Seat O-ring: 1.5 x 7
Slide O-ring: 1.5 x 10
Where the first number is the O-Ring thickness and the second is the internal diameter, both in
mm.
Buy at least two of each, but get even more, say 4 of each, as they are really cheap and you
might even break or lose one putting them back.
Seriously Consider buying Allen Screws (or Socket Head Cap Screws - SHCS) for the Float
Bowls (and also possibly for the Diaphragm Cover Cap Screws, though not as likely to be
stripped).
You MIGHT strip one of those float bowl screws trying to get it out. e.g. Simon in Ireland notes: I
found the float bowl screws difficult to budge - solution = get an impact driver!
Q. What about alternative Sources for the O-Rings?
A.
●
●
●
●
Either but generic as noted above or try a Suzuki Dealer for the "O" rings. Viton 5.7X1.3 Part #
8-4602 fits the tiny 1X2.5mm one for the float bowl assembly.
The 1.5X5mm one is #13374-35C00 from Suzuki. That seals the float seat. These two should
cure your "drips".
Now beware. These stupid "o" rings can cost $2-4 each. That's silly but much better than the
parts with "O" rings from BMW. I think the seat, needle and "O" ring alone for one side is about
$32 plus tax and jar of Vaseline. Then you have to buy a complete new float assembly and
that's more ridiculous.
Don't break your float bowl gaskets. They are $37 each from BMW. Don't know what they are if
you run then down from some Jap dealer. (Mal)
Q. How do I adjust the Idle/Adjust the Idle MIX Screws ON the bike. (Note they ARE different).
A. Refer the Idle Mix Screw FAQ.
So how do I get the Carb Out ?
A1.
Complete Carb Removal
1. DON’T SMOKE.
2. Remove the Seat.
3. Remove the Tank See the Gas Tank Removal-Replacement FAQ.
4. Remove the Seating Plate at the Rear of the Tank, held in Place by two 10mm Bolts.
http://faq.f650.com/FAQS/Carb_Clean.htm (6 of 25) [18-02-2007 12:30:16]
Carburettor Cleaning FAQ
5. Undo the 2 Hose-Pipe Clips on the Air Intake Side (Rear of Carb) and the 2 on the Cylinder
Head Side (Front of Carb) and Remove the Carbs.
6. For Carb Removal, see Flash’s FAQ. This is a bit hard on the rubbers and you might think
you’re doing some serious damage, but if you do it right and don’t use a sharp screwdriver, it’s
fine. The alternative is to remove the exhaust pipe and take out the Airbox, which is VERY time
consuming and a Royal PITA. When you do it, in addition to Flash’s great comments I’d
recommend pushing each of the Clamps back away from the Carb as you can and also to wear
thick cotton gloves for your hands as the Metal edges, specially the Airbox Side are a bit Sharp.
Lift the Air-Intake Side up first and get them past the thinner and more pliable Air-intake
rubbers, by pushing the rubbers down past the Carb, while simultaneously pulling the Carbs up
and out.
7. Unlatch the Throttle Cable. To do this first twist the throttle (at the Carb) against the spring, then
with the cable now slack pull the little steel bend out of the socket in the side of the Carb. With
the wire now slack, but still attached to the throttle at the Carb, just rotate the cable in its holder
at the throttle-mounting until the cylindrical head and the wire come free.
8. Unscrew the Plastic 12mm Nut to the Choke Cable and pull it out gently. You can only use an
open ended spanner. Do NOT turn it the wrong way and screw it up tight now (or later) it’s just a
PLASTIC Nut and will Break.! Give the Choke Cable Barrel a bit of clean with some “Jif” or
some other polishing fluid. If you want to lubricate the choke cable, this is a good time to do it.
Recommendations for lubricating cables run from (a). It’s not required because it’s ion a plastic
Sheath (I subscribe to this notion, especially for Choke Cable) to (b) Tape a SMALL STRONG
plastic bag of cable lubricant around the cable then hang it up higher than your handlebars,
leaving it overnight.
9. The Carb is now free for you to work with in a nice warm comfortable and CLEAN environment,
all of which are highly recommended.
10. Bear in mind the Carb Bowls are still full of GAS, so undo the Float Bowl Screws (Circled Red)
a few turns and rotate the Carbs around until all the GAS you can get out of it comes out.
DON’T SMOKE.
A2.
1.
2.
3.
4.
5.
Removal of the Diaphragm Cap only (on the Bike):
DON’T SMOKE.
Remove the Seat.
Remove the Tank See the Gas Tank Removal-Replacement FAQ.
Remove the Seating Plate at the Rear of the Tank, held in Place by two 10mm Bolts.
You now have access to the Diaphragm Caps, which after removal allow you to check and
replace: The Diaphragm, Slides (But NOT the Slide Carriers), The Needles, Springs, Needle EClips, Needle Spacer and Washer. This also allows you to change the E-Clip position or add a
small thin washer, for an equivalent ½ E-clip position change, all without removing the carb from
the Bike. Great for fine-tuning Rejetting. Not so good if it’s snowing outside and your bike lives
outside.
Q. Should I run the carbs dry by turning off the petcock and running the engine until it dies, before I
http://faq.f650.com/FAQS/Carb_Clean.htm (7 of 25) [18-02-2007 12:30:16]
Carburettor Cleaning FAQ
remove the tank? Or, when you remove the tank and drain the fuel hose going from the petcock to the
carbs, do the carbs drain too? If not, is there a reason this is not mentioned in the FAQs? (Perhaps work
on the carburettors is easier/better with their "bellies full")?
A. No. You don't need to run the carbs dry. After you turn off the Petcock, if you are REALLY paranoid,
you CAN empty the bowls using the drain screws if you really want to. (The Drain Screws are here Float
Bowl Drain Screws (Circled Red). Wind them out a few turns, either on the bike beforehand (or after
you get the Carb's out and rotate the Carbs around until all the GAS you can get out of it comes out).
DON’T SMOKE.
Enough of the Preamble, How do I actually Clean & Replace Carb Parts.
●
Tools:
1. You should get hold of a can of Carb Cleaner (any Motorbike Shop should have one, or
simply use Petrol) and a few small brushes, with soft (non-metallic) bristles that are not
affected by Solvents e.g. Carb Cleaner, Petrol.). Do NOT use wire brushes or bristles
from wire brushes to clean the jets, you will damage them.
2. You need a Large Thick and Fairly wide Flat-Blade Screwdriver (for removing the Main
Jets).
3. You need a Small thin Flat-Blade screwdriver (for removing the Pilot Jets).
4. You need a Medium-Sized fairly Blunt Phillips Screwdriver (for removing the Float Bowl
and Diaphragm Cover Screws).
5. The Tools should be fairly new, should NOT be worn and must FIT properly or you will
damage the Screws or the Jets, especially the soft Metal of the Jets.
6. If you want to measure the Float Bowl Height which is very tricky but important
nevertheless, a pair of callipers is recommended as a minimum. Factory Pro make a
Float Bowl Height Measuring Tool, which in my opinion is not very well made and not
worth the money, but is useful. If you can make one yourself, go for it.
7. Rags, Fire Extinguisher in case you have an accident.
8. Patience. But don’t open it up and then leave it lying around for weeks, the O-Rings and
Gaskets can become dry and brittle and you might lose some of your parts or forget
where they go. But you may use the pictures here as a mnemonic if you wish. J.
Q. How do I undo those Float Bowl Screws!
A. This is a good place to discuss the 2 Screws holding on each Float Bowl.
❍
❍
The Phillips head screws holding the bowls were INCREDIBLY difficult to remove on my 97. I
ended up borrowing a friends cordless impact driver to remove them. Use anti-seize on the
threads when reassembling or at least a little grease. Chris in Santa Cruz, CA #782
Better yet, replace them with Allen's (aka Socket Head Cap Screws = SHCS). Flash #412 (CO).
On with the Cleaning.
http://faq.f650.com/FAQS/Carb_Clean.htm (8 of 25) [18-02-2007 12:30:16]
Carburettor Cleaning FAQ
●
Outside of Carb Body. First off give the outside of the Carb a good clean with your brush and
Petrol, including the springs and all the nooks and crannies. Clean it and rub it dry with a Rag.
Not only will it look good when you put it back, it will stop getting dirt everywhere inside the Carb
and it will stop it being a slippery sucker when you work on it.
●
Orientation. For purposes of orientation, in this picture, Intake Side, the Black Dome at the
TOP Left is the Diaphragm Cap, held in place by two Philips Screws. One of the Float Bowls,
the Jets, the Float Frame, the Slides, Slide Carrier and the Diaphragm Caps have already been
removed in this picture (RHS). You can see the back of the Slide through the left Carb, and you
can see through the right Carb because the Slide has been removed. I recommend you work on
ONE Carb at a time, clean it thoroughly, adjust and replace what you need to and then button it
back up again. This way you won’t damage any parts in the adjoining Carb, nor will you lose
any.
●
Access TOP: When you take the Diaphragm Cap off you have access to the Slide Springs, the
Diaphragm, the Needles (Complete with E-Clips and Spacers) the Slides and also (but ONLY
when you have unscrewed the MAIN JET INSIDE THE FLOAT BOWL), the Slide Carrier, Slide
O-Ring and the Carb Venturi. All these parts come out the TOP of the Carb. The sealing gasket
for the Diaphragm Cap is also the Diaphragm itself.
●
Access BOTTOM: The Silver Bowl at the bottom left of the Intake Side picture is the Float Bowl
also held in place by two Philips Screws. Once removed you have access to the Float Frame,
Floats, Float Frame O-ring, Float Valve, Float Valve Seat, Float Valve Seat O-Ring, Float Bowl
Gasket,. Main Jet and the Pilot Jet. As mentioned above, you will NOT be able to disassemble
the Slide Carrier (out the Top) nor gain access to the Venturi, without first removing the Main
Jet.
●
Inline Filter. When you pull the Carbs out the Fuel Line to the Petcock come with it. So it
doesn’t get in the way while you are Cleaning the rest of your Carbs, undo the spring clip to
where the Fuel Line meets the Carbs, in between the Two Carbs. When you pull off the Fuel
Line (Do it gently the T-Piece is only Plastic) there is a brown T-Piece which holds the In-line
Fuel Filter. Gently pull out this filter by hand and clean it with a little petrol, blowing on the
outside to dislodge any particles on the INSIDE. Then put it back in again so it doesn’t get lost
or squashed. When you reinsert it try and line it up so that each of the two flat sides faces the
direction of each Carb Bowl. This way when goes go in it goes directly into the filter and out
through the netting fabric to each carb.
●
Butterfly Valves. When you first get the carb out you will see this, on one side: This is the
Engine Side of the Carb. The two Brass circular Discs are the Butterfly Valves, which rotate
about a Central Pivot and open when you open your throttle. The more you open your throttle,
the more and (faster) air passes through and creates a vacuum, sucking up the Petrol from the
Float Bowl, through the Carb Venturis. These parts hardly ever need removal or replacement
and should be left alone, unless they are obviously “sticking”. i.e. when you manually turn the
throttle against the return spring, you can feel they “Jam” for a moment before they open. If
there is any dirt stuck in the pivot, give it a bit of a squirt with carb cleaner and clean it with a
brush.
●
Inspecting the Carb Needles. Take the Carbs and stand them up in your work bench, Float
http://faq.f650.com/FAQS/Carb_Clean.htm (9 of 25) [18-02-2007 12:30:16]
Carburettor Cleaning FAQ
Bowls down. Try to let the Idle Adjustment screw hang over one edge of the bench so you don’t
bend it. On one of the Carb Diaphragm Caps, undo the two Philips head screws and remove
the Diaphragm Cap. They can be pretty tight, so use some good downward pressure so you
don’t mangle the screws. You may even need to gently tap the end of the screwdriver or get to
work with a bit of WD-40. I recommend once you’ve undone one of the two screws, to hold the
cap down with your thumb while you undo the other, otherwise the slide springs will try and
push the Cap up and skew it, making it more difficult to undo the other screw. Lift the Cap off
and gently extract the Spring, putting both to one side. You do not generally ever need to
replace the springs. Now gently pinching the Black Rubber Diaphragm with thumb & forefinger,
and working your way around the edge lift it up off the Carb Seat, out of the little Groove in
which it’s in.. Then, using two hands, again thumb and forefinger, extract the Diaphragm
vertically upwards. It will come out with the Black Plastic Slide attached and the Needle hanging
out the bottom. When it’s free, grab the Plastic Slide and tip it over, pouring the Plastic Washer,
Needle with E-Clip and Lower White Spacer all into your hand. The needle/E-Clips/Lower
Spacer (Upper Left of Picture) should all come out as one unit, the upper washer separately. If
you don’t know whether your bike needles have been altered, they should stamped 5E94 and
the clip should be in the 4th groove from the TOP (Blunt End) of the Needle. The Stock
Needles are on the Left of this Needle Picture, Dynojet Needles on the Right. Check the needle
for wear, score marks or an easily rotating e-clip in accordance with Factory’s Worn Needles
guide. If all is O.K. Put them all in a little box for safekeeping.
●
Inspecting the Rubber Diaphragm. NOTE: Do NOT spray the Rubber Diaphragm or indeed
any Rubber Parts you wish to re-use with strong solvent. Some Carb Cleaners contain strong
Solvents. Use a gentle soap like Dishwashing Liquid. After you’ve cleaned it, (you can leave it
attached to the barrel), with your thumb holding the bottom lip of the Diaphragm, hold the
Rubber of the Diaphragm up to strong light and stretch it by pulling upwards. It can take a fair
amount of pulling. Work your way around the full circle of the rubber. If there are any splits or
holes you should be able to see these fairly quickly and the Diaphragms should be replaced.
●
Inspecting the Slides. If the Air Filter lets any gunk through or somehow dirt gets trapped in
the Carb, the Carb Barrels can wear at the front (curved) face and at the Wings on the side,
which results in their becoming scored, so check for scoring on these surfaces. They are fairly
robust, (mine are actually quite scored but still function adequately), so you don’t need to
replace them for a bit of scoring. Don’t forget there’s fair amount of Air Pressure against the
back of the Slide, even if it doesn’t go up and down that fast. (It’s rate of rise and fall is
controlled by a mixture of the Airflow through the Butterfly valve, the spring stiffness, the size of
the little hole off-centre in the base oft the Slide and to some extent the friction caused by wear
at the wing and front faces. There is no external mechanical Control on the Slide). That’s all you
can inspect that comes out of the top for now. You won’t be able to get the Slide Carrier or the
Carb Venturis out until after you’ve extracted the Main Jet.
●
Inspecting the Float Bowls. At this point I’d recommend just gently screwing the Diaphragm
Cap BACK on, but without any of the other bits you just took out. The reason is so when you
turn the Carbs over and stand them on the Diaphragm Caps to remove try and remove the Float
Bowl Screws, you have a stable end on which they can stand. The Float Bowl Screws are Very
Tight and again you run the risk of mangling the screws. Again, you may even need to gently
tap the end of the screwdriver or get to work with a bit of WD-40. In despair you can use a pair
of Vice-grips and get some new Screws later. Don’t try heat except as a last resort (EXTREME
http://faq.f650.com/FAQS/Carb_Clean.htm (10 of 25) [18-02-2007 12:30:16]
Carburettor Cleaning FAQ
FIRE HAZARD) and make DAMN sure the Bowls are DRY.! Many people have actually
replaced these Phillips screws with Allen Screws and I’d recommend it if you intend to take your
Carb apart often, for re-jetting or whatever. When you get the Bowls off they look like this on the
inside: Float Bowl. Not much to do there, but give it a little cleaning and inspect the Gasket for
cracks. Again, don’t use Harsh Solvents on the Rubber Gasket.
●
Inspecting the Main Jets. What you should see now is something like this, except in the
middle of this picture Main Jet Removed there is an aluminium stalk with a hole in it where I’ve
already removed the Main Jet. The Main Jet screws through the hole in the Aluminium Stalk
which pokes up through the Float Frame. The Main Jet looks like this, Stock vs. DJ Jets, to the
bottom left is the Stock Jet, to the right is my Dynojet Jet. Using the Large Screwdriver (Make
sure it is good and WIDE so it just fits in the groove), undo the Main Jet and remove it. It should
be stamped “132.5” if it is the stock jet. Check there is nothing blocked in the hole and if so use
a stiff PLASTIC rod or Bristle, NOT a wire Brush Stalk, to dislodge the blockage. Put this aside.
●
Inspecting and replacing the Float Frame O-Rings. When you look down on the Float
Frame, close to the idle mix screw location (Top of picture) you will see a plastic Stalk about
5mm in diameter which connects the Float Frame to the Carb Body. Grasp this stalk as low
down as your fingers will allow and wiggling it a little bit pull it gently vertically upwards. It is
quite tight until the O-ring comes out of the hole. When you pull it out you will also pull out the
Float Valve, which hangs off a Metal Tang by a thin wire. The location of the Metal Tang it
hangs off is marked up in this picture: Metal Tang. It’s O.K. for the Float Valve to fall off the
Tang (and it probably will), when you remove the frame and I don’t think it makes too much
difference which way around the wire goes because it’s centralised over the Float Valve, though
you can make a note of it before you pull out the Float Frame if you wish. WATCH out the Float
Valve doesn’t drop down the drain.!! If it didn’t fall off, tip the frame to one side and take it off
and put it aside. When you get the Frame out you will see something like this: Float Frame. The
Float Valve is still hanging off the Tang in this picture. The O-ring will look this: Float Frame ORing. This is the first of the two culprits of Flash’s Pukin’ Petrol Syndrome. You can easily
replace this O-ring. Get a blunt needle and gently prise it off, then roll on a new one. (Size given
above). The Carb Body minus the Float Frame and Main Jet looks like this. Float Frame Hole
Location. The marked hole is the Float Frame Connection location. Shake the Floats gently to
see if they have any petrol in them, if they do then they are leaking and need to be replaced.
Some Web-Sites reckon if the Floats are discoloured they should be replaced, but I think they
can be discoloured and work just fine.
●
Inspecting and replacing the Float Valve Seat O-Ring. With the Float Frame removed, you
will see the Float Valve Seat, which is where the Float Valve (that you just pulled out with the
Frame) sits into. It is a Dark Brown Brass Cylinder. In the same way you just took out the Float
Frame, Grab the cylinder and wiggle it out. At the bottom you will see the O-Ring, which can
also be replaced. (Size given above). This is the second of the two possible culprits of Flash’s
Pukin’ Petrol Syndrome.
●
Inspecting the Float Valve. The Float Valve itself is tipped with a Rubber Pointy End which
does the sealing into the Float Valve Seat. Inspect the tip to make sure it is not worn with a
severe groove or the tip broken. At the TOP of the float valve, under the wire (which is bent into
a loop) is a small piston. Underneath this piston is a VERY fine spring, which gets compressed
http://faq.f650.com/FAQS/Carb_Clean.htm (11 of 25) [18-02-2007 12:30:16]
Carburettor Cleaning FAQ
when the Fuel Level push the Floats Up. Check, by tapping very, very gently, that this spring
can be compressed and doesn’t “stick”. This piston and spring is discussed in more detail
below, for checking the Float Heights, once you replace the frame. "One member said he fixed
a problem by replacing the little cutoff valves AND the seats, for the Float Valve, as they weren't
shutting properly, which means that even with the floats at the right height, he was getting too
much gas."
●
Removing and inspecting the Pilot Jet. With the Float Frame removed and the Float Valve
Seat removed, all that is left to take out and clean is the Pilot Jet which is the small brass screw
in the well just visible in the photo. (needs RED Circle!). Unscrew this with your small thin
screwdriver, taking extreme care with the soft brass. You can easily ruin Screwdriver Slot. Tip
the Carb over and let it drop out into your hand. It has holes in the sides as well the end and
should be stamped “41.3” if it is the Stock Pilot Jet.. Check you can blow though it and all the
holes are clear. Again use a plastic brush bristle to clear any obstructions, but not one from a
Wire Brush. That’s all the things inside the Carb Bowl that need tending to. Now’s a good time
to put it back in its little hole. One less thing to lose.! Screw it in until it seats then a little more.
Just “FIRMLY”. Use the correct-size screwdriver or you will ruin the slot and burrs from a poor
Screwdriver mangling pieces of the slot, could jam in the holes you just cleaned.
●
Removing and Inspecting the Idle Mix Screw: While it can be done with the Carb Bowl done
up, it is a VERY good idea to check the Idle Mix Screw with the Carb Bowl off and everything
out. The reason is this. As you can see the 3rd (and finest, hence easily broken) replaceable ORing is located on the Mixture Screw. If it wears out or there has been too much vigorous
screwing of the Idle-Mix Screw in and out (sounds horrendous doesn’t it) bits of the broken ORing can get stuck in the little hole that allows fuel from the Carb Bowl, enter directly into the
main Carb Venturi (NOT the Venturi JET) at idle. Unscrew the screw all the way out, check the
condition of the spring, the washer and the tip of the Screw. Replace the O-Ring. (btw the
Washer in this picture, between the Spring and the O-Ring is NOT the original, it is too big, but
the old one was missing at the time I took the Photos). It is hard to find the correct washer,
because it is a very small diameter and not very wide, so try not to lose them. The order shown
is the order it gets installed. You can screw these back in now. Screw them down until they are
LIGHTLY seated. Do NOT screw them up real hard, you will damage the fine tip. Then back
them out 3.5 turns, with a screwdriver. This is the STOCK setting.
●
Removing and Inspecting the Slide Carriers and Carb Venturis. With the innards of the
Carb Bowl out, there’s nothing to break if you turn it over, so turn it back upright and undo the
Diaphragm Cover again. Now that the Main Jet, which actually Screws into the bottom of the
Carb Venturi Jet, is out, you can remove the Slide Carrier and the Venturi. Assuming your
Diaphragm, Slide Barrel and Needles have already been removed, do this by grabbing the Grey
Plastic Frame (Slide Carrier) and simply pulling it upward, out the Top of Carb. Don’t worry
about the 4 Plastic Tabs at the sides they just pull up. If you don’t pull it out too vigorously, they
will be just fine. When you pull it up, the Carb Venturi comes with it, because there is a Flange
at the top of the Venturi, which sits in the bottom of the Slide Carrier. It should look like this:
Slide Carrier, Venturi attached. You can just push the Carb Venturi toward the top of the Slide
Carrier to remove it. Underneath the Slide Carrier is an O-Ring, which gets compressed when
you do up the main jet which pulls the Carb Venturi Down and hence the Slide Carrier O-Ring,
onto the Carb Body. At the bottom of the Slide Carrier you will see the O-Ring, which can be
http://faq.f650.com/FAQS/Carb_Clean.htm (12 of 25) [18-02-2007 12:30:16]
Carburettor Cleaning FAQ
replaced. (Size given above). Now check the Carb Venturi. The main hole, down the middle is
large enough that it should never get blocked. However, on the sides, as you can see in the
picture, are a number of small holes. Clean these in the same way as the other Jets, with a
small NON-Metallic bristle.
●
Replacing the Slide Carrier and Carb Venturis. Note that the Carb Venturi has a Flat Surface
on one side, at the bottom. This flat surface sits against a Pin in the Carb Body, which you can
see if you look down the well that the Venturi came out of. This surface sits against the pin so
that the Venturi doesn’t keep turning when you screw up the Main Jet. Once you’ve cleaned the
Venturi Jet and have replaced the O-Ring, put the Venturi Jet back into the Slide Carrier and
press it into the small wall, so the flange seats. Note also, for Slide Carrier replacement, that the
curved part of the Slide Carrier is at the FRONT or Engine Side of the Carb. Then turn the
Venturi so that the flat surface lines up with the Pin. Smear the O-ring with a little oil and press
the whole Slide Carrier/Venturi combo back into position, so that the 4 Tabs are all the way
down. If the Venturi pin pops-up when you press the Slide Carrier in you haven’t lined it up
properly, so have a look at the pin/flat side arrangement again. It should stay down OK until you
get the Main Jet in position.
●
Replacing the Needles, Springs and Diaphragm :Now’s a good time to put back the Slide +
Diaphragm, Needle, Spring and Diaphragm Cap in that order. See Needle Parts Install
Sequence. Before you start smear a little oil on the Diaphragm Seat and on the Sealing Ring of
the Diaphragm, where the Diaphragm Cap seals it to the Carb Body. I find it easier to install the
Needle (With E-Clip and Spacer Below it, on the Needle), the Upper Washer IN the Slide Barrel,
keep the whole shebang in place with the spring and feed the lot into the Slide Carrier. If the
needle comes up a bit pull the Slide Barrel out a bit and try again, keeping it as vertical as
possible so that the Needle can drop into the Venturi. Thread the Spring onto the little green
“Spring Guide” under the Diaphragm Cap. Press the Diaphragm into the Groove on the Carb
Body and make sure it (more or less) stays in. It might try to pop out, but don’t worry when you
put the Cap on it will slip into the groove, so to speak. So put the Cap on and slide it around a
little bit on the rubber, just to make sure the rubber is down in that groove and you haven’t
pinched it somewhere. Do up one bolt, just seated, then the other. Then Tighten both, nice and
firmly, because they vibrate a bit, although damped by the intake rubbers, but not so tight you
kill the head of the Screws. Now you can turn the Carb over to stand on the Diaphragm Caps
and work on the Floats. For Problems reseating the Diaphragms see Diaphragm Trouble
below.
●
Replacing the Main Jet. This Part’s easy. You will see the needle where the main jet goes, so
Screw the Main Jet into the hole by hand, making sure the Needle stays Central to the Jet.
When it is fully in, Tighten it up firmly with your LARGE WIDE Screwdriver. Do NOT overtighten, it’s soft Brass. Just Firmly, i.e. so it seats and then a little more. Remember you will
initially be compressing the new O-Ring you just put on the Slide Carrier.
●
Replacing the Valve Seat. Again fairly simple, just push it back in place, but put a little oil on
the O-Ring first so you don’t ruin the Dry Rubber against the Metal Sides.
●
Replacing the Float Frame. Replacing the Frame is fairly simple. First, smear the O-Ring with
a little oil. Then, feed the wire loop of the Float Valve over the Metal Tang and position the
frame over the Carb Body, with the Float Valve positioned over the Float Valve Seat and the
Rubber O-Ring on the Plastic Frame Stalk over it’s hole. Push it into position. The Float Valve
http://faq.f650.com/FAQS/Carb_Clean.htm (13 of 25) [18-02-2007 12:30:16]
Carburettor Cleaning FAQ
likes to fall off the Tang during this procedure, so either tip the Carb Body and hence the frame
so it stays on, or use bit of bluetack to temporarily hold it in place. Here's a picture, with all three
parts not yet in the Carb Body, (on it's side) of the Float Valve in the Float Valve Seat and
attached to the Tang on the Float Frame.
●
Checking the Float Height. Checking the float height is like a mixture between Art, Black
Magic, Science, Witchcraft and Acupuncture. i.e. It’s a really, really hard measurement to make.
Even more so without the right tools. Factory’s Site gives a fairly good description of the
measurement plus they sell a Special Tool, also shown on that site. Like I said earlier the tool is
a neat idea, but the workmanship, for the money, is terrible. Read their instructions first, then
read on here. What they do NOT mention, at least on that page, is that the Float Bowl clamps
the frame down and holds it in position (You might have wondered how it worked flopping
around in there) to the Carb Body. It does this by clamping the two little plastic tabs that can be
seen on the side of the Frame, in the front of this picture. Float Tab On. You WILL need to hold
these two down also (firmly), while making the measurement. Use a Bulldog clip, a Wife, a
Girlfriend, a Son, a Dog, whatever. It must be clamped down to make the measurement. Make
sure the Stalk with the O-Ring is also firmly in place. Now what you need to do is tilt the carbs
so the floats swing out far enough that they do NOT compress the Float Valve at all, not even
that little piston at the top I talked about earlier. Then slowly and gently, rotate the carb body
back until the Float JUST touches, but DOES NOT compress that little piston on the Float
Valve. Try it a couple of times until you get the “feel” of it. So now, holding the Carb in this
rather awkward position, with your Special Tool or your ruler or your custom-made gizmo if you
made one, measure from the Carb Gasket Surface (i.e. where the Float Bowl Gasket makes
contact with the Carb Main Body) to the TOP of the HIGHEST Float. With the Tool SET at the
correct measurement, the tool should just graze the top of the float. If it clears it by miles, your
FUEL LEVELS at which the Fuel gets cut off will be too high and may be the reason for the rich
sooty residue on your Spark Plugs. (Remember you are measuring the FLOATS upside-down,
don’t get confused between FLOAT HEIGHTS and FUEL LEVELS. The HIGHER the Float
Height i.e. what you measure, the LOWER the FUEL LEVEL at Fuel cut off!). To RAISE the
Float Heights (Raise the Fuel LEVEL) you need to bend the little Metal Tang, shown in this
Picture Float Tab On DOWN. Do this by hand, using one finger, a small amount at a time.
Conversely if the first measurement you make forces the Float Down, it is too high i.e. the Fuel
gets cut off too quickly (Lean) and you will need to need the Metal Tang UP. Remember small
movements, when bending the Tang. Repeat until the measurement is right. Keep the beers on
ice until after this procedure, you need steady hands.
Notes:
●
1. Flash notes the manual says to put the seam in the float parallel to the joint where the bowl
meets the carb (Gasket Surface). For him, that was WRONG. The float level was too low (once
the carbs were back right side up). It wouldn't sustain a speed over 80 mph. (The manual
doesn't actually say that ed.).
●
2. Float Height. I discussed this with Flash at the time. Setting the float parallel to the Gasket
surface is a rough measurement. From what I understand it's what he interpreted as the
approximately correct setting from the Maint. Manual. I tried to pin him down, but he said he
adjusted it following that approach and when it didn't allow him top speed he took them out
again and bent the tang "a little". When I asked what height he says "I dunno", I bent it "a little".
http://faq.f650.com/FAQS/Carb_Clean.htm (14 of 25) [18-02-2007 12:30:16]
Carburettor Cleaning FAQ
Anyway, there is a correct measurement and a correct WAY of measuring it. If you're like me,
not too comfy with "a little", you measure it the right way. I put mine at 14.6. Several times. It
worked FINE. At the end of the day, what Flash did was right, because he bent it just enough to
get fuel delivery all the way across the board, without flooding at low rpms when the demand
was not too high and with no overflow of gas because it could never shut off, when switched off.
It's a TRICKY measurement, as you seem to know from other bikes. Marty #426 did note he
went back to stock height, his floats WERE going too HIGH to shut off => his must have been
about 12 too I guess. THAT makes sense, if the tang spring weakens due to float pressure, or
the Plastic cage wobbles about. Don't forget when you measure it to HOLD THE PLASTIC TAB
on the CAGE down, so it's firmly fixed. If you replace the O-rings on the cage, seat it properly
first before re-measure. No cats were harmed while rebuilding my carbs ;-)
●
3. My Description vs. Factory Website Description of the Float Bowl Measurement
This FAQ Says:
"Now what you need to do is tilt the carbs so the floats swing out far enough that they do NOT
compress the Float Valve at all, not even that little piston at the top I talked about earlier. Then
slowly and gently, rotate the carb body back until the Float JUST touches, but DOES NOT
compress that little piston on the Float Valve."
Factory says
1. Tilt the carbs so that the floats just flop over towards and into the carb body.
2. Tilt just enough to touch and close the float the float valve, but...
3. Do NOT compress the float valve spring when measuring.
4. With the metal adjustment tang on the float just touching, but not compressing the float valve
spring, place the Setting Gauge over the highest part of the float. If there is a gasket or o-ring
stuck to the carb body, remove it while measuring.
The Factory Website and the FAQ actually say exactly the same thing, however they do not
clarify how sensitive that little piston is. I found it easier (with the floats already flopped over
toward the carb body) to tilt the floats away from that little piston, then tilt the carb so they go
back into the body until the tang just touches that little piston. Performance could be saying
drop them into the body (compressing the piston) then tilt the body so they come out SUCH
THAT the piston is not compressed. However I believe by saying "... floats just flop over..." they
are saying the same as this FAQ.
NO the valve is not open during the measure it is STILL closed. It ONLY opens when that little
wire on the tang pulls the whole valve up. As long as the tang is not pulling up on the valve it is
closed, under it's own weight (gravity...). What you have to remember is that valve is up the
other way, normally, so what the little piston does, because it is spring loaded, is work against
the valve pushing it up to close off the supply to the bowl.
●
Replacing the Float Bowl. Smear a little oil on the Gasket, making sure it is seated properly in
its groove, then replace the Bowl and do up the Float Bowl Screws. Allen-Head screws are a
http://faq.f650.com/FAQS/Carb_Clean.htm (15 of 25) [18-02-2007 12:30:16]
Carburettor Cleaning FAQ
good replacement.
●
Repeat from “Inspecting the Carb Needles” down, for the Second Carburettor.
Diaphragm Trouble
Diaphragms don't go back into place after lifting off the Black Covers?
I lifted the diaphragm covers today in order to check the diaphragms and needles out, as I've been
getting rather few mpg. I have no idea when the insides of the carbs were changed out the last time,
but I guess it's probably been done since the bike's got more than 62,000 kms on it. The needles
looked brand new to my (untrained) eyes though. So did the diaphragms, and thorough checking
revealed no rips or punctures of any size or kind. HOWEVER, I did get a bit puzzled over the fact that
my diaphragms are way too large to fit in the circular indentations they're supposed to settle in before
you screw the covers back on. (They were indeed pinched under the covers by whoever screwed them
back on previously). I've checked the FAQs, but I only found this (from the carb cleaning faq):
"Press the Diaphragm into the Groove on the Carb Body and make sure it (more or less) stays in. It
might try to pop out, but don’t worry when you put the Cap on it will slip into the groove, so to speak.
So put the Cap on and slide it around a little bit on the rubber, just to make sure the rubber is down in
that groove and you haven’t pinched it somewhere. "
My problem is that it is positively impossible to get the entire edge of the diaphragm into said groove.
My diaphragms are at least a couple of millimeters too large (across) to fit, and after 45 minutes of
trying to get the edge to seat in the groove all the way around, I gave up. I had to screw the covers
back on, pinching both diaphragms in the process. Looking from above, either diaphragm would
protrude from under its cover for maybe a fifth of the total circumference.. this can't be good. Has
anyone else experienced this problem? Could it be that whoever replaced the diaphragms before me
got the wrong size? In your experience, is the diaphragm exactly, or at least almost exactly, the same
diameter as the groove it's supposed to sit in? I mean, this was NOT a case of the rubber "trying to pop
out".. I can't see how anyone could have managed to get the entire edge down there, let alone keeping
it down while reaching for the cover. Last question: could this be (part of) the reason why my mpg is
low? I'm imagining that pinched diaphragm edges could be fairly equivalent to rips in the rubber. No,
there was nothing sprayed on them. Also, they were already pinched before I even started unscrewing
the covers, so the previous attempt to get it right apparently failed, too.
I called the dealer today. It appears to be a well-known issue with older diaphragms, they simply grow
larger with age, due to contact with gas fumes. The mechanic I spoke to thought my diaphragms are
the original ones, which would make them almost nine years old. (They are approximately three
millimeters too large, across.) He also said getting older diaphragms back in the slot is a major PITA.
They wanted $18 per diaphragm (must have remembered the price of some other part), so I called the
local Suzuki shop for a quote of the GS500 diaphragms... which were priced at almost $40. So I
ordered them from a BMW car dealership instead, saving $2 compared to the bike shop.. guess I'll use
my savings and buy a snow cone or something :) Emil '94 F650 -- Malmö, Sweden.
●
Sound too big to me. I had the Tank off and the Diaphragms out on my Classic over 20 times to
http://faq.f650.com/FAQS/Carb_Clean.htm (16 of 25) [18-02-2007 12:30:16]
Carburettor Cleaning FAQ
swap needle positions while rejetting. I wrote the above description and it was exactly like that.
It didn't fit EXACTLY, but a little oil, lightly pressing down with the plastic cover and rotating, it
popped back in just fine. Sounds like something amiss there. They may have installed the
diaphragms off a different carb. The Suzuki GS500E ones may fit though, if you need a new
set. What you could do, if you want to check, is to take them out, flip the rubbers over and dab
the oily lip onto a piece of paper (or just take the whole thing) to the dealer and ask to see a
replacement if they have one in stock to measure it. Do the same at the Suzuki Dealer (See
FAQ for Suzi Part No's) and ask both the price. k.
●
If you happened to be spraying carb cleaner (or equivalent) and it got on them, they can swell
up larger (at least the ones on my Airhead did). Let the solvent air out of them for a day or two,
they may shrink back (if they're not already trashed by the forced installation). If not, I agree that
they sound too big. Marty #436-Chicago-97 F650F
●
Secondly as someone else complained, once I came to refit the diaphragms they wouldn't go at least 3mm too big. Don't worry they will still fit. The secret is lots of fine (sewing-machine)
lubricating oil. If you lube the grove on the carb body and the lip of the diaphragm. Working with
both hands from a point on the circumference feed the diaphragm lip into the grove. Then
moving your hands in opposite directions around the circle keep feeding the lip and press each
section lightly back towards your original starting point. The idea is you are compressing the
rubber lip to a smaller circumference. The oil will help the already seated material slide in the
groove. Once I did this my impossibly large diaphragms went back on without any problem. The
oil helps hold them in place whilst you reach for the cover as well. Hope it doesn't rot the rubber!
Simon in Ireland.
Q. How Do I Replace the Carbs.
A. With Difficulty, Patience, Cotton Gloves and Vaseline.
Putting them back can almost feel more gruesome than taking them out. You think your ruining
something, but the rubbers are pretty hardy and with a bit of patience you’ll get there. I suggest you
use some of the lubricants Flash mentions on his removal procedure or coat the inside of the rubbers
(Both Airbox and Engine Side) with Vaseline. Reconnect the Choke Cable BEFORE you start pushing
the Carbs in (You can do it afterward but it’s very hard to get to the plastic nut.) Again, please, do
NOT over-tighten the Nut. It’s just Plastic! The Throttle cable can be reconnected after you get the
Carbs back in, but you can do it now to save yourself the trouble. Affix the Wire-Head to the ThrottlePlate then twist the throttle Plate (or pull the wire) until there is enough slack to get the bend back into
it’s mounting. Work the Carbs down into the cavity, again pulling back the softer Airbox-side rubbers, to
fit the Engine Side first. After you get the Carb ports mounted into the Engine Intake Manifold Rubbers
(They are stiffer and relatively easy), the Airbox side rubbers will probably still be all squished up. Try
and free the bottom first and get them fitted to the Carb, then with a finger or BLUNT instrument (e.g.
Flash notes a Tyre Iron works well), working from the sides towards the top, stretch the rubbers over
the Airbox Side Intake Ports. These Ports are not that wide, only about the width of the Steel HoseClamps, so after you get them in place pull the whole assembly Horizontally BACK toward the Airbox
so you know they are as far on as they can go. THEN do up both sets of clamps, lining the clamp
heads up so they are easy to access with a screwdriver.
Replace the Tank Seating-Plate, making sure the choke and throttle cables drape OVER the top of it
http://faq.f650.com/FAQS/Carb_Clean.htm (17 of 25) [18-02-2007 12:30:16]
Carburettor Cleaning FAQ
and they are free and not caught anywhere between the Carb and the Throttle on the Handlebars.
Replace the Tank as indicated in the Gas Tank Removal-Replacement FAQ.
That’s it.! Sounds long and arduous, but in reality it’s not, I just wrote a lot of detail. I can get
the tank off, whip the Carbs out, change the Jets and Needles, put it back and get the Tank
back on in about 45 minutes, during my lunch hour and still have time for a sandwich. But I’ve
done it way too many times. I’m not suggesting you should hurry through it though, take your
time. A job worth doing is worth doing right. It’s a job you can do in a few hours over the
course of a leisurely day.
Any comments on the FAQ, improvements or suggestions, drop us a line. For all you poor
people with F.I., aren’t Carbs FUN.!
Thanks to Flash and Todd, who always manage to be both entertaining and informative, to Mark for
getting out there and doing it and to Craig, Tom and the other guys who went and are still going crazy
trying to get the jetting right, having pulled their Carbs for the umpteenth time. Big thanks to Mal for his
great close-ups of the Float Valve.
Note.: I have no affiliation with Factory Pro who are mentioned often in this FAQ, though they do have
some very good tips. They didn’t like it when I started asking questions about their jet kits without
buying it, but hey if you can’t ask about something they want to sell ! Others have had a good
experience with them and find them helpful.
Cheers & Rgds
Kristian
Is there any way of Setting/Checking the Float Height with the Carbs ON the
bike?
by Richard #230
The Downtime Files of the April issue of Motorcycle Consumer News has a really great tip for checking
float level height without removing the carbs: Connect a piece of clear tubing to the float bowl drain
tube, bend the tubing up against the outside of the float bowl and turn on the float bowl drain screws.
The gas will rise in the tubing and you can take your measurement by observing the top of the level of
the fuel in the tubing, as it will rise to the same level that is in the inside of the float bowls. The Classic
has bowl drain taps on the bottom of the float bowls that you can hook up a plastic tube to. The only
problem would be finding clear plastic tubing that will fit tightly over the drain nozzles. I think you could
find this tubing in a pet fish store. If the tubing was a bit large, you could use wire wrapped around the
tubing and twisted with pliers to compress it over the nozzles so that the fuel wouldn't leak while you
were checking the float level.
The best way to use the tip is to check your float level when the bike is new, or at least running well.
Place the tube on the float bowl drain and then turn on the bowl drain tap. Wait until the level stabilizes,
then scribe a mark on the bowl for future reference. Then in the future, if you have a carb problem, you
can perform the test again and check it against the mark. If it is higher than the mark, then you might
have a leaking float or bad float needle valve.
http://faq.f650.com/FAQS/Carb_Clean.htm (18 of 25) [18-02-2007 12:30:16]
Carburettor Cleaning FAQ
●
●
●
You know the original Kawasaki Z-1's had a tap on the bottom of the float bowls and you used a
device just as you described to check the float level. I don't know where you would tap the float
bowls on a Classic or if you would have small enough hands to connect it but this is a tried and
true method that has been around for a long time. F650GS Dakar, Oregon. Steve 1130 Or
<<My question is, once you can see the fuel level from the outside of the carbs, how do you
know it's the correct level? Is there a reference mark outside the carb? >> Nope. The only real
way to measure it is from INSIDE, See here: http://faq.f650.com/FAQs/Carb_Clean.htm
Only a few carburettor makers (and then mostly for racing carbs) give fuel level info. The most
common tech info is the height of the bottom of the float(s) relative to the bottom of the carb
body with the carb upside down. BUT- when the float height is absolute right (upside down),
reassemble the carb and take an accurate measurement of the fuel level, hose attached. make
your own mark(s) on the carb body and then you use that marking(s) the next time you want to
check the float height. Whenever "something" (being it a piece of machinery, boy/ girlfriend or
whatever) works near perfection, ALWAYS make a note of ALL information you have and can
get with regard to whatever it is. Motorcycles: Fuel level or pressure, ignition timing or map,
valve timing (valve movement relative to degrees of crank rotation), compression pressure (with
info of battery voltage or rpm of engine), and so on. The more info of the "perfect" machine you
have, the easier it is to find any fault WHEN (it will not be "perfect" forever) you want to restore
it to it’s former state. Haakon#626 (Norway, F650GS)
Carburettor LINKS
Some good resources for Jetting and Plug Reading Information - Not F650 Specific.
FactoryPro
http://www.factorypro.com
http://www.factorypro.com/tech/carbtun.html
http://www.nightrider.com
http://www.nightrider.com/biketech/
carb_jet_ranges.htm
http://www.nightrider.com/biketech/carbadjust.htm
http://www.nightrider.com/biketech/hd_cv_mods.
htm
Tuning CV Carbs: Mikuni-Sudco recommends
tuning the circuit from the Pilot upwards as they
say each circuit is additive. Factory recommend
starting with the main and going DOWN. I cannot
put copies of the information on this Spreadsheet
as Sudco has a copyright on this information. It's
about a 13 US$ Manual from Sudco.
Note: Actually for Harley V-Twin with CV Carbs,
but general information is useful.
On Carb Circuit Ranges
On adjusting the Carbs
On Harley CV Carbs Mods
http://faq.f650.com/FAQS/Carb_Clean.htm (19 of 25) [18-02-2007 12:30:16]
Carburettor Cleaning FAQ
http://www.nightrider.com/biketech/hdcvcarb1.htm
Also on Harley CV Carbs Mods
http://www.nightrider.com/biketech/hdsparkplugs.
htm
On Spark Plugs and Spark Plug Reading
http://www.nightrider.com/biketech/spkplghnbook.
htm
On Reading Spark Plugs, with colours of Plugs
Dynojet
http://www.dynojet.com/motorjet.shtml
Detonation
http://www.factorypipe.com/Technical/
Tech_Articles/Deto/deto.html
On Carb Circuits in general
More Detailed information on Fuel Detonation
Carb Circuits
http://www.speedandsport.com/jet.html
Diagram of Overlapping Carb Circuits - See
Diagram under needles & jets
Opinions (On Carb Cleaning/Particular Parts Replacement).
Some of the comments below might seem to indicate the 14.6mm measurement is no good. But if it is
measured properly, I believe this measurement is fine. At present there is just not enough feedback to say
either way. So set it stock, measuring it right and if it doesn't work for you, (runs outta gas at HIGH rpm/flat
out speeds), LET US KNOW!
●
The 99 model's carburettor is specified to be set with a .56 inch clearance from the float bowl face.
I used those exact specs and had the bike stall from insufficient gas in the carb. after a brief time
the bowl fills enough for another short distance. I've set it down about twenty percent lower than
this spec but has anyone else had trouble with performance attributable to setting the float bowls to
this much of a gap from the measuring surface. Unknown
●
I've been working on my bike since the last posting of my problems (carbon fouled plugs and rough
running). Done so far: 1. Lowered the needles, which made the bike able to run at lower rpm in the
same gear and only a little bit of carbon fouling on the spark plugs. 2. Changed the chain and
sprockets, which made the bike run at a stable speed on a constant throttle position (smooth is the
word). 3. Changed the Spark Plug Caps to OEM 1kOhm (had NGK 5kOhm), this made the bike run
at even lower rpms in the same gear (and perhaps a little bit smoother). I measured the Resistance
before the change to 14kOhm and after to 10kOhm which means that the current is now 40%
higher at the spark plug cap. I took the bike out for a 50 miles spin this afternoon and the bike runs
pretty good now - no rough running, good rpm-range in gears and easier starting. Could it run even
better? - I have no idea since I have no other bike to compare it to. Problem left: The needles are 1
position lower than they are supposed to and the bike is still a little rich - not much though.
Solution: Next thing up is to remove the carbs and change the emulsion tube, and while I'm at it I'll
change the main and idle jets (all parts laying on my desk). I'm going to try to measure the float
height also. If I ain't mistaken mine (Idle mix screws) are set to 3.0 (or somewhere near). I did a
major overhaul of the carbs last spring, which included new Venturis, 135 main jets and new OEM
spark plug caps. Since then the bike is consuming approx. 15% less fuel and the spark plugs are
no longer carbon fouled, actually they look brand new. 60.000 KM F650 1995 Spakur in Sweden
http://faq.f650.com/FAQS/Carb_Clean.htm (20 of 25) [18-02-2007 12:30:16]
Carburettor Cleaning FAQ
#1117, '95F.
●
I was just reading the carb cleaning FAQ, and perhaps you could add to my comments at the
bottom of the FAQ that my float heights were off by ~1.5mm (too low) and that after these changes
the fuel consumption is now 15-20% lower.
●
Woooohoooo!! 55mpg!! How many miles were on the bike/carbs when you did your rebuild?.
28.5k miles. What year "classic"?. 1999. What kind of environment has the bike been stored in
when not in use? Outside but covered, in the mild Seattle climate (i.e., never super hot nor frigid
cold) How often did you or someone ride it? At least weekly, except for last winter when I put it
up for 12 weeks (using proper storage protocols, drain carbs/tank, etc ...) all kinds of use: city
commute, touring, some dirt roads. The precipitous decline in mpg occurred while on my 13k
mile trip this summer. NormJ #473.
●
Here, so far , is the sequence of events.
March '02 - removed Ron Woods "muffler" replaced with stock. No other mods. Bike runs rich,
but otherwise well.
July '02 - inspected carbs for presence of DynoJet kit. There was one, I dropped the needle on
that kit to see if it would lean out my mixture. It did, but not enough.
Aug '02 - replaced all DynoJet bits and bobs with stock carb parts. Also replaced K&N air filter
with stock. Too early to tell if fuel economy has improved (it wasn't all that bad before) but now
that I'm back to stock here's what's happening. Throttle response is better at low RPM (It would
tend to bog if I sat at idle too long and then went to take off - you like at traffic lights). Plugs
aren't fouling any more. I am now going to restrict the airbox so it's as close as I can get it to
stock to see what happens. That's about all guys. I don't know if there's anything there at this
point that merits an addition or change to the FAQ. I will say that moving the hose clamps as far
back on the rubbers as possible makes all the difference as far as insertion and removal. And
clumping cat litter makes a great absorbant for gasoline spills or draining the little hoses. Sean
#1015 Ottawa Canada.
●
FINALLY rebuilt those carbs (@26K). Surprisingly, the needles and emulsion tubes looked good
(replaced anyway, stashed the old ones for spares). Both diaphragms had small tears, both idle
mix screws were only 2.25 turns out, and both floats had to go WAY too high to shut off flow
(float needles were well grooved as well). Here's hoping that the changes back to stock will
improve my gas mileage significantly (running 30-35 MPG at last check, boy did I miss my
Acerbis tank...which is ALSO repaired now). Maybe that 17-tooth front sprocket won't feel so tall
now! Marty #436.
●
Note to all who helped me with advice on returning the carbs to stock (Kristian#562; Todd #389;
Richard #230; Shank NYC; Teddco #1192; JAMES) We did it yesterday (with the exception of
Dyno jet springs) and it runs really great now. No flat spots or roughness in the acceleration
curve. We screwed up on the springs, but we can probably pull the diaphragm cover and switch
out springs without pulling the carbs. Somebody tell me that can be done. Pulling the carbs was
not that hard but certainly not easy. XtreemLEE#1188.
●
Carb removal experiences. I removed the carbs today, using the "mild force" method described
in the carb cleaning FAQ (i.e. no airbox removal). Everything went ok, except that I wasted one
of the float bowl screws. Had to get a screw extractor to fix it. d*mn that screw was hard to
undo... Anyway - when reinstalling the carbs, I ran into a problem. It wasn't that hard to get them
into the engine side rubbers, but then I found the airbox side rubbers were suddenly way too
short... there was a 2 mm gap between rubber and port on the airbox side when the carbs were
http://faq.f650.com/FAQS/Carb_Clean.htm (21 of 25) [18-02-2007 12:30:16]
Carburettor Cleaning FAQ
fully seated in the engine side rubbers. Apparently, the rubbers had been pushed into the airbox
when I struggled with getting the carbs out. It was NOT easy to pry the rubbers back out of the
airbox. Just a small warning and a note to self to take it a bit more easy next time. veggie
deluxe, Sweden.
●
Yep, changed both my diaphragms out last fall (both had failed). Bike exhibited the same
drastic drop in gas mileage. Marty #436-Chicago-97 F650F
●
Numerous problems this month (blown fork seals, poor pick up, worn head races) but all easily
resolved with the help of the Technical FAQ's. God Bless You All.
The poor pick up has been traced to the carb-mounted inline fuel filter but whilst I had the carbs
out I decided to clean them anyway and have the following snippets to add to the FAQ. Firstly
as with many others I found the float bowl screws difficult to budge - solution = get an impact
driver, it does the job! Secondly as someone else complained, once I came to refit the
diaphragms they wouldn't go - at least 3mm too big. Don't worry they will still fit. The secret is
lots of fine (sewing-machine) lubricating oil. If you lube the grove on the carb body and the lip of
the diaphragm. Working with both hands from a point on the circumference feed the diaphragm
lip into the grove. Then moving your hands in opposite directions around the circle keep feeding
the lip and press each section lightly back towards your original starting point. The idea is you
are compressing the rubber lip to a smaller circumference. The oil will help the already seated
material slide in the groove. Once I did this my impossibly large diaphragms went back on
without any problem. The oil helps hold them in place whilst you reach for the cover as well.
Hope it doesn't rot the rubber! Just the new head bearings left to install. My wife hasn't found
the steering stem in the freezer just yet but I am not sure how I will heat the new bearings in our
oven without her noticing! Simon, '98 F650, Ireland.
●
To make a long story short, I am moving and all my tools are packed. I have a 2 month old new
to me 1998 f650 with 22k. It started running poorly, died in the middle of a ride. I dropped it off
at the BMW shop and they immediately want to rejet it as the plugs were fouled. No attempt or
offer at idle mixture, etc. Re-jet was their only offered option. The bike is from the same altitude
as my current town. I admit my ignorance as I have never owned a BMW, and don't really get
this two carb hi/low with the F650. Are those guys trying to pull a fast on me?. Flash "That
sounds like one of two things, you probably have either ripped carb diaphragms or else bad
spark plug caps. Oh... might you have gotten some bad gasoline? Rejetting it is horseshit. You
can check and/or fix either the diaphragms or plug caps yourself by using the FAQ" Sante Fe
BMW treated us well, clogged idle jet was all it took. Chicken little '98 F650, Albuquerque
●
Next
Detailed Feedback: on Carb Reconditioning
●
Feedback#1
Feedback#1
Rejet of the 97 F650 Carb with Tech Tips/Problems/Tools/General Whining
by Langlois
http://faq.f650.com/FAQS/Carb_Clean.htm (22 of 25) [18-02-2007 12:30:16]
Carburettor Cleaning FAQ
First: Get your airbox out...see the F650 Faq, remember to take the muffler off, much easier with it out
of the way. I struggled for a while and could not get the angle right to pop it out without the pipe
removed (the headers stay, the muffler is removed with the cross-over/connector pipe). NOTE: You do
NOT need to remove the Airbox. Just pull the Carbs (ed).
Second: Have a cup of coffee, I am sure you just spent half an hour dicking with this and you will need
your wits about you for the rest of the job!
Now, see photos:
Carbs still hanging
from Throttle Cable
still attached, there
is a little room to
mess with the carbs.
Float Bowl Removal
for difficult screws,
vice grip on
screwdriver......
Plug the intakes
Ideally you will be able to use a Phillips
with paper towel,
Screwdriver drop the float bowls...
Here is what you
keep the nuts/
see to work on the but......sometimes they are frozen...
bolts/washers/
birds from getting jets, the float bowls.
in!
When that does
not work, soak
with your favorite
penetrating oil.
Then latch onto
them with a minivice grip and ruin
them completely.
(see bottom of
page for contact
info on nice new
stainless ones!)
http://faq.f650.com/FAQS/Carb_Clean.htm (23 of 25) [18-02-2007 12:30:16]
Carburettor Cleaning FAQ
Floats off, note
Skinny
bubble wrap and
screwdriver for
genuine factory-tool
the jets
plywood plank.
Stubby one for the Diaphragm with
others
slide spring
Eurosport Jet Kit as sold by Factory Pro Tuning, these guys
are AWESOME, they really helped me out when I bunged
up my float screws and went the extra mile for me to get
some replacements (photos of the jets and screws below).
http://www.factorypro.com/ go there and spend money.
Nicely packed Jet Kit w/decent data sheet.
Installing with gobs
and gobs and gobs
of Antiseize.
Looks purty now!
See the gold
anodized bar that
holds the carbs
together? Be sure
to remove those
screws and hit
them with
antiseize too.
Stainless Carb Screws from Factory,
these guys overnighted me the parts in
the afternoon of one day and they
actually got here before 10AM to finish
the project. While this might seem
common to you, I have had
SOOOOOOO many supposedly
"overnighted" parts show up a week
later...
Tasty new SS fasteners, being the
"coal to Newcastle" kinda guy, I ordered
2 sets. 5*16 and 5*12 for those who
need to know!
This is the flexi-gas spigot that is a pain
in the you-know-what to get a line on
when your old, stiff, factory gas line
decides that it wants a new home.
Unless you are a hampster, you cannot
get under the carbs easily to put it back
on. My fix was NEW line with a REAL
screw type hose clamp (no photos
sorry, but get a close fitting clamp to fit
in this spot)
http://faq.f650.com/FAQS/Carb_Clean.htm (24 of 25) [18-02-2007 12:30:16]
Note needle with
lock ring and 2
plastic bushings
(4th from the top
for those who
asked!)
Sporty Stainless
Diaphragm screws
with liberal
smearings of AntiSeize.
Carburettor Cleaning FAQ
Why can't I get the Airbox rubber intakes to fit over the
carbs after jiggling it for 20 minutes???
Do this (you did remove the snorkel right? you did loosen
the clamps right? you also lubed the rubbers right?)
1: Take hand, remove watch, grab screwdriver/hooktool/
whatever.
My hand and tool is well hidden but I
am pushing up on the left side carb
rubber that is being problematic with my
screwdriver tip...
Below HERE |
2: Insert hand, arm and tool into airbox.
Finally, I cannot recommend the guys at http://www.factorypro.com/ enough, these guys saved my
butt. (the SS screws and jets are nice too!) But, saying that, jets are jets...you can buy them
everywhere (almost) it's the service you need during and after the sale, they most certainly provided
that!
Identifying a Float Valve Problem
See PUKING PETROL
http://faq.f650.com/FAQS/Carb_Clean.htm (25 of 25) [18-02-2007 12:30:16]
HOW-TO Remove the Tank
Fuel Supply FAQs
compiled & edited by Kristian #562
Please read the Disclaimer before attempting any work in this FAQ.
●
●
●
●
●
●
●
●
●
●
●
Gas Tank Removal & Replacement
Fuel Petcock FAQs
●
In-Tank Fuel Filter Cleaning
●
Sticky or Hard-to-turn Petcock Problem
●
Close the Fuel Tap?
Aftermarket Fuel Filter FAQ
●
In-line Fuel Filter
●
Fuel Filter Vapor lock
●
What about Clamps to re-attach the Hoses
Gas Tank Lock
Removing the Gas Tank Restriction for Easier Filling
Where does the "Fuel Cap Drain" Drain to?
Gas Cap Vent Cleaning?
Broken Tank Support Bracket
Water in the Tank?
Removing the COLOURED SKIN off the Tank?
Where's my Reserve?
For Aftermarket Tanks refer the Aftermarket Fuel Tank FAQ Classic or Aftermarket Fuel Tank FAQ
GS
For Mileage Feedback refer the Poor Mileage FAQ
For Carb Issues refer the Carb Misc FAQ
Replacing the Fuel Hose: See the Carb Misc FAQ
GAS TANK REMOVAL & REPLACEMENT
by Kristian #562
01/11/01
Removing the Tank:
To do this you should first turn OFF the GAS petcock. Also remove the SEAT. Preferably done with an
almost empty Gas Tank.
Then:
1. Remove the fuel line at the Petcock. Use a pair of Pliers to slide the Spring Clip back down the
http://faq.f650.com/FAQS/Gas_Tank_Removal-Replacement.htm (1 of 16) [18-02-2007 12:30:23]
HOW-TO Remove the Tank
line, then use a screwdriver to prise off the line. Some excess fuel will drain out of the carbs, but
it’s not excessive, so don’t fret and don’t SMOKE.!
2. On the LHS of the bike Just left of the Carbs there is a small Breather Pipe coming down
between the Skin of the Gas Tank and the Tank, joined together just beside the carbs with two
smaller spring clips. Use small pliers to loosen one then pull the hoses apart. NOTE: On the
USA model bikes there are actually TWO vent lines between the tank and tank cover that must be
disconnected, one on each side.
3. Undo the Large Bolt Just at the rear of the Tank. It’s a 10mm. Use an Open-Ended or Ring
Spanner or Socket.
4. Undo the Small Allen Key Bolts Each Side of the Tank that holding the tank to the front fairing.
You can also remove the bolts holding the side fairings to the tank, but PERSONALLY I leave
these Grey Coloured parts of the side fairing attached & remove the lot. If you do it this way
there are:
Classics up to and including: '96:
- 4# Small Allen Bolts each side on Tank itself (8# Total Small on Tank),
- 1# Small Allen Bolt each side attaching Gray Fairing piece to Tank (2# Total Small Tank/
Fairing)
- 1# Large Allen Bolt each Side (2# Total Large Tank/Frame).
Classics from: '97 on: '96:
- 4# Small Allen Bolts each side on Tank itself (8# Total Small on Tank)
- 2# Small Allen Bolt each side attaching Gray Fairing piece to Tank (4# Total Small Tank/
Fairing)
- 1# Small Allen Bolt each side attaching Gray Fairing piece to Radiator Fairing (2# Total Small
Gray Fairing/Radiator Fairing)
- 1# Large Allen Bolt Each Side (2# Total Large Tank/Frame).
If the clips turn, just stick your hand behind the tank fairing & Hold them.
These Photos are for '97on, Many Thanks to Nate for the Heads-up.
OK That’s all the Bolts. Now if you LEFT the grey fairing bits below the Tank attached, GENTLY
disengage them from the FRONT fairing of the bike, by pulling from the bottom and bending upwards.
Grey Side Fairing Removal Location ('96 Classic Shown). Do not try to lift off the Tank at this stage.
Note that the “Skin” of the Tank remains attached to the Tank. i.e. on My Bike the Red skin on the
http://faq.f650.com/FAQS/Gas_Tank_Removal-Replacement.htm (2 of 16) [18-02-2007 12:30:23]
HOW-TO Remove the Tank
Black Tank. Do not try & prise them apart.!
OK now that the side units are free, you can lift off the tank. Do this by gently pulling the whole thing
back about 5-10mm, then back and upward OFF the Frame. Tank Lifting. Have a Saw-Horse ready or
better still a railing with a cloth over it and place the Entire Tank over that. Temp Tank Storage. Lift with
one hand under the rear of the Tank and one down from the top into one of the fork wells. Tank Lifting
Up.
They are flat Tabs on the Classic, no locking devices. The Tabs on the Tank just push in/pull out, the ones
on the grey side pieces/tank, you have to slightly bend the grey pieces out at the bottom, to disengage the
tab, which has a small kink in it.
With the Tank off it is a good time to Consider a Petcock Filter Clean and free up your Petcock.
Tank Replacement:
1. Holding the tank with one hand under the rear of the Tank and one down from the top into one
of the fork wells recesses, Feed the tank onto the front round rubber Mounts. Feed it on by
lifting the rear of the Tank pushing forward, then gently lowering the rear. Do NOT push it all
the way at this stage. Leave a couple of inches from the from fairing.
2. Now go around the front of the bike and check all three of the plastic locating Tabs on each side
line up with the holes in the front fairing.
3. Check the Breather Pipe on the LHS of the Tanks hasn’t jammed under the Tank. Major PITA
to remove it again just because of that. For US Models do up BOTH Vent Lines.
4. Go round the back again and push it forward until all the Tabs slide into place. If you left the
lower Gray fairing bits attached to the tank lift them out a bit so they go past the front fairing.
5. Push the rear off the tank as far forward as you can, place and tighten by hand then torque the
Tank retaining Bolt.
6. Do up all your Allen Key Bolts (NOT TOO TIGHT, some Blue Loctite these closed, but I remove
my tank quite a lot).
7. Reconnect the Breather pipe & Clamps
8. Reconnect the Fuel Line and Clamps, Turn on the petcock.
FUEL PETCOCK FAQs
●
Sticky or Hard-to-turn Petcock Problem
●
In-Tank Fuel Filter Cleaning
●
Close the Fuel Tap?
Sticky or Hard-to-turn Petcock Problem
by Omnikron
http://faq.f650.com/FAQS/Gas_Tank_Removal-Replacement.htm (3 of 16) [18-02-2007 12:30:23]
HOW-TO Remove the Tank
1. Well for me, my fuel petcock was almost impossible to turn! So I took it outside on a day when I
knew I wouldn't be riding the bike (cause I just knew I was gonna get gas all over the place) and
unfortunately, I had a full tank.
2. Please do this OUTSIDE, in a well-ventilated area and do NOT smoke. Keep the Tank and any
spilt gas away from Naked Flame, sparks and children.
3. So #1 recommendation is to have a near-empty or empty tank. If it's not been "driven" to empty,
you can simply undo the fuel line from the petcock (Pull the clip back after squeezing with a pair of
pliers), drain the GAS into an approved container, and refill it back into the Bike after cleaning, if
your Tank is still a bit full.
4. If you have the Tank OFF the bike, e.g. for a Valve Check, Carb Clean, laying it down on its side
on a wad of cloths with the petcock side UP will also allow you to remove it, even with some gas in
the Tank.
5. Switching the Petcock to OFF won't help you.!
6.
7. Remove the two screws holding the metal casing that surrounds the petcock and slowly and gently
remove the cover and the copper-looking washer. NOTE!!: The metal on the bolts and petcock
housing is very soft and the threads can ruin easily.
8. Now you are looking at the petcock from the cross-view and you can turn it back and forth and
watch it work, but be careful, because the force of the gas pushing against it will most likely push
out the petcock and will spray gas all over the place. Its what happened to me, but I just stuck my
petcock back in where it came out of and it held. After that, I sprayed silicon around the edges and
all over it. I put it back together and it works wonderfully now. Its SO much easier to turn. I'm not
sure if it was the silicon or just the speed of the gas exiting the hole that perhaps cleaned it out but
whatever it was, it works a WHOLE lot better now.
9. You can get Silicone Spray from most auto shops.
10. There is nothing to it. Just put the washer back on, and if it gives you some trouble trying to get
everything to go back properly, just be patient and make sure the washer fits in the groove before
you tighten those screws down.
11. You may need to repeat this at your 10,000kms Service Intervals.
If you happen to strip your petcock screws undoing them, the petcock for the Aprilia Pegaso appears
identical to the Funduro classic's, with one major plus; it has a big plastic handle instead of the lame-o
lever we've got. Costs about a buck more for the pleasure. NormJ #473.
Hard-to-turn Petcock Experiences
●
I'm having a problem with the petcock - fuel flows even when shut off. I know that there is a rebuild
kit for it. Anybody else have this problem? If so, were you able to fix it with a rebuild kit, or did you
have to replace the petcock? Any ideas about the cost of the kit VS a new petcock? I checked the
http://faq.f650.com/FAQS/Gas_Tank_Removal-Replacement.htm (4 of 16) [18-02-2007 12:30:23]
HOW-TO Remove the Tank
FAQ's, but couldn't find much about the petcock. Tom in Tallahassee
●
Is it just me or do any of the rest of youse guys and gals have problems with the fuel petcock? I
mean, mine is so difficult to turn with my big hairy sweaty arthritic hands. And going from "on" to
"reserve" is brutally painful. My fuel petcock is so difficult to move that I'm actually considering
paying the $23 for a new one that my dealer doesn't have in stock. Either that or I'm gonna perform
some surgery and attach a huge honkin' piece of metal (rustified to my specifications) to make it
easier to turn that dang thang.
Yes, I made many sacrifices to the gods of lube and sprayed it profusely with a plethora of sprayon slippery stuff. Nothing has worked. I replaced all the rubber bits inside, the lil' face plate screws
are as loose as they can be without it leaking and still it's difficult. I just wanna know if there are any
other Chain Gang Geezers out there with this same problem and if so, what did you do to fix it or
did you just decide to live with it, did you replace it with a billet unobtanium/carbon fibre one from
Slow-By-Sarducci or did you just stuff a big hose in there and the hell with a reserve or what. I'm
getting desperate here, my left hand hurts and not for the usual obvious reasons. Shank NYC USA
●
Take it apart. Remove and grease the o-rings. Reassemble in reverse order. Gotta do that every
now and again. Consider doing it as part of the 6k interval circus. It sure helps if the tank is empty
OR you remove it as the sidestand is on the left and you have to lean the bike to the right to make
the gas go away. I find that doing it while I have the tank off for something else is easiest. But
others have reported that it IS possible without removing the tank. Flash #412 (CO)
●
So has anybody had a fuel petcock that is REALLY hard to turn? Mine must really need cleaning or
something special. Do I have to take it apart to make it easy to turn? I looked in my BMW manual
and couldn't find anything nor could I find anything on this site! I basically have to stop the bike at
the side of the road and take my glove off to turn it, because I need such a tight grip.
Omnikron.
●
Try using one of those hand-exerciser things. Just kidding ;) I have the same trouble, not quite as
bad. I have taken mine apart, and found that there's nothing you can do (I think). Very minimalist
inside, no opportunities to adjust the tension. An o-ring and a spring washer. You can't lubricate it
(gasoline, right?). When you put it back together with the screws appropriately tightened, it goes to
it's natural state of tension. Bummer. Then again, there might be a narrow sliver around the spring
washer where a little grease could go. Anyway, it's easy to open and put back together, so have a
look. Aleksander.
●
Try silicone spray. It doesn't rot rubber, and it's largely petrol repellent. Pete
●
Managed to strip the threads on the small petcock screw (the one nearest the "on" setting) whilst
taking it apart to free it up (it was very sticky and hard to turn to reserve). It looks like there is not
enough of the very soft metal to go to a wider screw, but perhaps enough to tap another 1/8" or
3/16" deeper on the same hole. I just went to home depot and bought 2 #6 x 1/2" self-drilling hex
heads. Bored right through the soft metal and seated everything well. Not leaking yet. NormJ #473.
●
Ruined my petcock. I've put in a longer screw, can't recall how much longer, and used a tiny lock
washer so I would be less tempted to over tighten. I plan to re-tap the holes with a coarser thread,
if I ever get around to it. Very, very soft material; if I ever have to replace it, I will definitely not get
the BMW OEM part. Aleksander in Dubai 98ST.
●
You probably could go with a longer screw, some sort of self tapping one would probably work. The
good news is, if it doesn't, a new petcock is only about $27.00, I just replaced mine because it
wouldn't shut off. Just to warn you, I found out that the hex screws holding the petcock to the tank
are made out of some incredibly soft piece of sh** metal that my hex key basically destroyed
removing it. Be prepared to go to the hardware store or the dealer for replacements. Tom in
http://faq.f650.com/FAQS/Gas_Tank_Removal-Replacement.htm (5 of 16) [18-02-2007 12:30:23]
HOW-TO Remove the Tank
Tallahassee.
●
My fuel petcock is unreasonably stiff. Almost impossible actually. Not that it matters because even
when I switch to reserve the bike surges, stalls and dies. Once pulled over the engine restarts like
nothing ever happened. Does this happen to anyone else? Thomas Stewart 97 f650st orange.
In-Tank Fuel Filter Cleaning
by NormJ #473
Petcock Removal and Tank Screen Cleaning FAQ.
If you have never removed and cleaned your petcock and in-tank screens, you should. And as I
discovered when doing my own 24k maintenance, none of the 3 previous dealer 6k services had actually
done the work. When I removed the petcock to clean the screens, there was an amazing array of plastic
shavings, sand and unidentifiable particles collected on the reserve screen. My guess is that the plastic
shavings are remnants from the manufacturing process, and sand and other junk blew/fell into the tank
during fueling.
1. This really should be done with the tank removed for the reasons explained in step 5 below. See
the Tank Removal FAQ for details. Also, you should wear rubber/vinyl gloves to prevent
neurological damage from the gasoline.
2. Drain as much fuel from the tank as you can by turning the petcock to reserve and tilting over a
suitable container, such as your oil collection pan. You should theoretically NOT be able to
completely empty the tank; there is a slight sump wherein water can settle and thus not enter the
reserve tube.
3. Turn the tank on its right side and carefully remove the 2 hex head bolts securing the petcock; it
takes a 4mm wrench. I strongly suggest using your high-quality T-handle and taking your time. The
metal on the bolts and petcock housing is soft and threads can ruin easily.
4. Gently remove the petcock by pulling straight out; this would be down if the tank were on the bike.
5. Gently place the petcock on a cloth. Then, work the tank around to slosh out the remaining gas into
your collection pan. You are likely to see more gas than you expected (1/15th or 1/10th of a Litre),
plus maybe some water and more particles than you thought you'd see.
6. Gently clean the gunk from the tubes, screens and the joint where the tubes join the body of the
petcock. A soft toothbrush, a little gas, and med-high pressure air are great tools. The long tube
appears to be removable by simply pulling it free, but it is not necessary for cleaning it well.
http://faq.f650.com/FAQS/Gas_Tank_Removal-Replacement.htm (6 of 16) [18-02-2007 12:30:23]
HOW-TO Remove the Tank
7. If you are having trouble with the lever being sticky or stubborn, CAREFULLY remove the two
small screws holding the plate and lever in place. BEWARE - the petcock body is very soft.
Several inmates have ruined their petcocks by stripping the metal when disassembling or screwing
the plate back on. Clean and reassemble as per the Sticky Petcock FAQ.
8. Gently reinsert the petcock into the tank and re-secure the bolts; be careful, you're screwing
them into plastic. Be Gentle. At this stage you're wondering, should I use a Sealant? Mine and
quite a few others didn't leak, the gasket was just fine, but I guess in case it dribbles, a sealant
is one cure, although a new gasket might be a better solution. If you use a sealant, then find
one one NOT affected by Petroleum.
9. If you have not yet installed an inline fuel filter between the petcock and the carbs, I highly suggest
you do it now. I found several particles in my filter that I cannot understand how got past the
petcock screens.
So can I clean it without removing the TANK?
Classic F650
by Johnny #862
1. Maybe I'm the last one here to figure this out, but the fuel screens can be cleaned (or the petcock
replaced, in my case) without pulling the fuel tank as instructed by the factory manual. It takes a bit
of fidgeting with the Allen wrench, but it can be done. I didn't take the time to do it, but best would
be to weld about a foot of steel rod to the 4mm Allen wrench needed so you could get at the two
securing screws from below the bodywork. As it was I loosened the panel under the fairing at the
front two 3mm screws and that provided room needed to get the wrench in there. The screens
were perfectly clean at 9k miles but there was quite a collection of black plastic shreds at the base
of the screens which were likely left overs from machining the tank. Pretty harmless sitting there.
2. Ah, sorry, yes, it's a '98 classic. I should have mentioned too that I was impulsive enough to take
this on with a full tank. Holidays now so I felt I have the time to do this. I used a manual gas pump
from Griot's to remove several gallons and then pulled the gas line off the petcock and replaced it
with a short piece of tubing to drain the rest (on reserve, of course). I can't tell that there was
anything wrong with the original valve, but I was definitely able to ride for miles with it closed
occasionally. I might have massaged the old valve and got it to work. I did take it apart and could
find nothing obviously wrong, but neither could I explain why at times I could run for miles with the
thing off. The replacement, "Made in Italy" is only about $20 so I just replaced it. This one is much
stiffer to turn!
Feedback:
●
Coincidentally I just came up from the basement where I pulled the petcock apart and put it back
together. I didn't pull it off the tank, just disassembled, cleaned, lubed (a touch of white grease on
the spring washer and "o" ring) and re assembled. Operates much smoother now. As for "able to
ride for miles with it closed occasionally", I have found the bike will go about 3/4 mile on dead
closed. Rand #1111
Close the Fuel Tap?
http://faq.f650.com/FAQS/Gas_Tank_Removal-Replacement.htm (7 of 16) [18-02-2007 12:30:23]
HOW-TO Remove the Tank
Q. In the BMW owners manual, it says to "ALWAYS CLOSE the fuel tap when the engine is
switched off"...I've never heard that... I've only thought to turn the fuel tap off when I'm storing it
long term.
●
Yes. Keeps it loose. Chris in Santa Cruz, CA #782
●
If either carb's float needle fails to seat, possible to drain fuel tank into cylinders (or floor, see
"puking petrol" syndrome), at least on some bikes. Cranking on cylinders full of fuel can damage
engine (bent conn. rods). While not likely, just easier to turn off the tap. Marty #436-Chicago-97.
●
And if you park inside near a fridge, water pump, or heater, you might save your house from
burning down if the carbs leak. Todd #389.
●
I've been riding bikes for 37 years and never turn the gas off unless I am gone for a few days or
more. Never had anything happen. But, as mentioned above, it will probably not hurt to do it
occasionally so the valve doesn't get stuck. Colorado Bob.
●
Pet Cocks revisited. I always turn off the petcock when parking the bike. Don't want the weight of
the fuel on my float pins wearing out the rubber nipples (that's nipples, not niggles). Also, the
petcock is getting easier to turn but then that may be because it's warm out. Very warm. Shank.
Aftermarket Fuel Filter FAQ
by Steve Johnson, F6501, updated by Kristian #562
●
In-line Fuel Filter
●
Fuel Filter Vapor lock
●
What about Clamps to re-attach the Hoses
In-line Fuel Filter
This filter is similar to Prime Line #7-02357 and available at O'Reilly Auto Parts.
One very necessary item that every bike should have is an external fuel filter. A see-thru type is the
best. The rider can see what kind of garbage is collected before it gets to the carb. Easy to install and
cheap, it is the best insurance around. Shut off the gas, cut a short section out of the line, and install
the filter. Be sure to check for correct flow direction, usually indicated by an arrow on the fuel filter. See
photo.
Here's a close up of a couple of Aftermarket Fuel Filters.
http://faq.f650.com/FAQS/Gas_Tank_Removal-Replacement.htm (8 of 16) [18-02-2007 12:30:23]
HOW-TO Remove the Tank
Note the following when buying/installing a fuel filter.
●
There is already an inline fuel filter in the T-Piece connector between the Carbs. Refer the Carb
Cleaning FAQ for Details of where it's at.
●
A LOT of people of have had problems with vapour lock when using the larger see-through
filters, but no problems since switching to the tiny ones. The theory is "the smaller quantity of
fuel in there produces less vapour and cycles through fast enough not to cause a problem.
Smaller within reason....I have heard of tiny ones supplying insufficient fuel flow as they start to
get plugged up (a good reason to get a spare one to carry in the saddlebag). If you get 40 miles
per US gallon at 80 mph, you are flowing 2.0 US gallons per hour, which is 126 cm^3/minute.
You could check your fuel filter's performance by sticking a filter on a piece of fuel line,
attaching it to the petcock of a nearly empty tank, catching the flow in a 12 ounce cup and
timing the exercise 'til the cup is full. 12 fluid ounces is 354 cm^3, so it should take 354/126 354
cm^3/(cm^3/minute) = about two minutes to fill the cup if your burn rate is 40 mpg. MORE time
is Bad. Less time is GOOD. (Because your filter should be able to handle the flow that the
Engine needs) Great, a new field event... Petcock Races. Flash 412 (CO).
●
There are of course people who have two very large in-line filters on the bike and have never
had a vapour lock problem. YMMV.
●
You want to make sure that the final placement of the filter allows you to see it and keeps it
away from the heat of the motor. Start long and trim the hose down until it looks right.
●
Don't install the inline filter until you have completely put the bike back together including the
new fuel line and all body work. You want to make sure that the final placement of the filter
allows you to see it and keeps it away from the heat of the motor. Start long and trim the hose
down until it looks right. Chris #782
●
Also check the DIRECTION of the inline filter........there should be an arrow showing the correct
way of the fuel flow ... it should be pointed toward the carbs (grin)...I remember a thread or a
FAQ that talked about inline filters etc... I use one of the those little Karcoma inline filters I got
from bing when I was rebuilding the carbs for my other bike...it works great....I am sure that
there are others out there as well. Nick #1085
Fuel Filter Vapor lock?
Q. I installed an aftermarket filter on my '97F. It's a glass one with replaceable element from Pep
Boys ($10). I notice that it doesn't usually fill up with fuel. Sometimes it does, but more often it just has
a little in the bottom and you can see it trickle in the top as the bike is running. That's my first question why doesn't it fill up, located under the tank as it is? About 400 miles into my Saturday ride this
weekend, I hit reserve. Pulled off to go to a gas station about ten miles later. Waiting at the stop light,
the bike dies and it won't restart. I push it off to the side, pop the gas cap and shake the bike around to
see if I can hear any fuel in there. I do hear some sloshing, then the filter starts filling up. Then, of
course, the bike started. What was going on?
●
Throw away the glass thing for two reasons. GLASS on a dirt bike is not a good idea. And, as
you have found out, the BIG thing will vapor lock. Buy a $1 throwaway item in any dirtbike shop.
http://faq.f650.com/FAQS/Gas_Tank_Removal-Replacement.htm (9 of 16) [18-02-2007 12:30:23]
HOW-TO Remove the Tank
Flash #412 (CO)
●
and as flash has so eloquently told me before... purge the air from the line... I used a small
plastic Karcoma that would never quite fill all the way up...purged the air from the line...voila ...
works like a charm... for an 'letricul 'ngeneer he does make some good suggestions... Nick
#1085 Glenwood NJ 07418.
●
You know I have been thinking about this one and I remember back when the F650 classic first
arrived at the dealership , we uncreated it , did the PDI and the darn thing would not start.
Happened on most of them and I have seen this happen when they sit for a while. I am a bit
surprised I haven't read more of this problem with the classics. Problem is the gas doesn't flow
on its own. It is like a pump that loses prime. You sometimes have to prime them pump. I
coined the phrase the you need to give it a blow job. You do this by disconnecting the fuel line
from the tank and blow the gas into the float bowls. Taste bad works good. I don't know if this
will fix your problem but it has worked many times for me on classics that have fuel, spark and
compression that still won't start. Good Luck F650GS Dakar, Oregon. Steve 1130.
●
I went to pick up my bike from the shop yesterday (not a BMW dealer) after a major service,
and the bike started up okay. It ran 1-2 minutes, I put it in gear, and it stalled. It would just about
catch, then stall - 2-3 times. I couldn't see any gas in the fuel filter. We added gas to the tank still no gas showing in the fuel filter. The shop had the tank off, cleaned the screen, lubed the
petcock, etc. Any ideas as to why gas apparently isn't getting through? The bike is a '97
Funduro w/48,000 miles, stock. Answer! The shop evidently took the in-line filter off and put it
back on after reinstalling the tank, etc. There was an air pocket in the hose that had to work
out. The bike started right up not long after I left. I guess the lesson is "patience". Plus realize
it may take longer to start. It did take longer to start than when you switch to reserve. Yeah,
the in-line filter was on backwards for a year - the shop discovered it and turned it around. I
guess it worked fine as far as gas flow went, but wasn't filtering anything . . . . details :( Muriel #582
●
Split the problem in two. Unhook the fuel line at the petcock. Put a container under the petcock.
Turn on the petcock...does gasoline come out (at a decent flow rate)? If not, the problem is with
the tank/petcock/filter screen/vent. If so, the problem lies with the in-line fuel filter (OEM and/or
aftermarket), fuel line or carbs/floats/needles. To venture a wild guess (this assumes that the
bike was stored with carbs full of gas, and hadn't run since last year)...I have had the float
needles "stuck" into the off position by varnish as the volatile portion of the fuel evaporates. A
few good raps with the end of a screwdriver handle can sometimes dislodge them and get
things flowing again (YMMV, wield that screwdriver with caution, carbs have been known to
crack). This also assumes that the problem is fuel related. Marty #436-Chicago-97 F650F.
●
Last summer while riding on a rough dirt road at slow speed in high gear the engine died
because of fuel starvation (2000 F Classic with Acerbis tank). The fuel line was empty; the tank
half full. I disconnected the line at the pet cock, filled it from the tank (to let air out), reconnected
the line, and the bike started again immediately. Five minutes later, same thing, and so on. I
opened the filler cap, suspecting vacuum because of a faulty cap. No improvement. I used a
long spare fuel hose to make a bypass outside of the fairing to eliminate high heat from engine
near auxiliary fuel filter. Some improvement, but no total cure. Next day no problem. I put short
hose back, inside fairing. No problem for a few days. A week later, riding slowly in stop-and-go
traffic in city, the same problem. It always seems to happen when tank is half full (or half
empty). I suspect vapor lock because of high heat beside auxiliary fuel filter. Werner #547, '00
http://faq.f650.com/FAQS/Gas_Tank_Removal-Replacement.htm (10 of 16) [18-02-2007 12:30:23]
HOW-TO Remove the Tank
F650 Classic, '91 R100 GSPD, Canada.
What about Clamps to re-attach the Hoses?
●
I did exactly what Gim did with the spring clamps. If your filter has the proper size ends
(nipples), you don't need much of a hose clamp, and the screw type hose clamps for such small
tubing can put excessive stress on the plastic nipple - I have seen several such plastic nipples
crack from over tightening (be careful with clamps on the radiator nipples!) . So I did what Gim
wants to do: Clamp11,9 BMW part #16 11 2 345 077 Actually I stopped in to a Stihl garden
tools dealer, as they use similar (metric) clamps in small gasoline motors like weedwackers.
You can also sometimes find such clamps in packets in assorted automotive hardware displays,
or sometimes in the small drawers of specialty parts in hardware stores. Todd #389.
●
http://www.aboveboardelectronics.com/heyco/Page5-12.htm Gim. Giovanni.
Gas Tank Lock
Q. Does anyone know of an alternative to the BMW for a new lock cylinder?
The key broke off in the lock for the gas cap. Drilling the lock through worked well enough to remove
the cast piece for the cap. Further filling and hammering with a nail set removed the the remaining bits
of the lock. The most frustrating thing has been the dealer. When asked about price for a new cylinder
they quoted me $280 Canadian. After regaining my composure I said all I needed was the lock cylinder
and that couldn't be the right price. In fact that is price of the cast piece that bolts to the tank. They
then looked further and a found a price of $130 for a lock and key. But I must give them my key code.
There must be another source for such a small piece. I seem to remember others inmates mentioning
European car repair shops a possible source. Does any one have specifics on this? That is, a car
model that uses the same lock or better yet an actual part number. Adrian#668, 97 Funduro, 01 Dakar.
A. Nope. Not yet. Sorry.
Removing the Gas Tank Restriction for easier filling.
(NOTE!: Appears to ONLY apply to US Models and WILL VOID your WARRANTY)
Filling a "classic"....from a gas can or at a station is not pleasant. The small hole keeps you from
seeing how much you put in and at the station the spring thing that surrounds the hose nozzle (at least
here in NJ) doesn't fit into the larger opening ; just scratches whatever it contacts. A while back
someone mentioned that they cut off the small hole with a hacksaw thereby eliminating most of the
unpleasant part of filling up. It enables you to see better and the spring thing can be held back so no
contact is made with the tank. I'm sure doing this is easy, but I thought many of us would like to as well
and any additional comments and/or suggestions would be appreciated. It's really a good idea and the
thought of not struggling each time I fill up makes this surgery a "must".
●
I did the same with the F650, except as the filler funnel bit is all one piece of plastic, used a
hacksaw to remove that unwanted section (be sure to leave the part that the gas cap gasket
http://faq.f650.com/FAQS/Gas_Tank_Removal-Replacement.htm (11 of 16) [18-02-2007 12:30:23]
HOW-TO Remove the Tank
seals against, and be sure not to contaminate the tank with plastic "sawdust"). Resulting filler
hole is now larger in diameter and easier to fill while still being able to watch the level. It's been
over 18 months since I did this mod... I remember the six bolts (only half of which have to be
removed, if you know which ones are which). The single one that you talked about was a pain
to remove, and even more so to replace (the spring loaded cap keeps interfering). If I remember
correctly, you may also have to remove the "decorative tank cover" (the painted shell that
covers the stock gas tank) to remove the funnel bit. I also remember a gasket that was finicky to
get lined up just so to realign all the parts (under the funnel?). I know the funnel bit IS
removable, because I distinctly remember hacking away on it while sitting on my front porch (I
touched up the "rough cut" edges with a file). There is a little "vent tube" and/or hole cast into
the funnel, don't mess these up. This was on a 97 Classic, maybe the design changed?
Absolutely keep the funnel away from the gas tank while cutting. I'd also wonder what this
particular BMW part costs if it should NEED to be replaced (EPA regs or something?). Guess
this particular mod was is the brain cells I torched rallying this summer. As always, proceed at
your own judgement and risk, YMMV. Marty 436.
●
Where does the "Fuel Cap Drain" Drain to?
Q. I have a 98 classic, and I seem to remember when I first got it if I spilled some gas when I was
fueling into the little black channel around where the nozzle goes that it would disappear. This is no
longer happening. I went to fill up the other day after a heavy rain and I opened the cap to see all this
liquid running from that channel into the gas tank. This is not a good thing as it was water but the bike
has run ok since anyway just don't want to make a habit of it. My question is is there supposed to be a
drain for this channel and if so where does it go? What do I need to do to check to see if this is
clogged? If anyone has some pictures that would be great.
●
The well the filler cap fits into drains thru a small hole in the LEFT side, thru the left side tank
tubing. The right side tubing is the internal tank vent that goes thru the check valve in the filler
cap. There is a detailed schematic (drawing) of the vent/drain tubes in the FAQ's under
reversed vacuum tubes routing or the Canisterectomy. (Diagram at the bottom). Be careful
when opening the filler cap when it's wet out - the cap tends to collect a teaspoon of water
between the top of the gasket and the filler cap body, which drips into the tank completely unnoticed when you open the cap. Todd #389.
●
Pull the tank and follow the hoses find the right one and give 'er a big blow OR find where ya
pinched the tube last time the tank was off. Mike.
●
That's why there are drain screws at the bottoms of the float bowls, to let out the water that
migrates down there. Flash #412 (CO).
http://faq.f650.com/FAQS/Gas_Tank_Removal-Replacement.htm (12 of 16) [18-02-2007 12:30:23]
HOW-TO Remove the Tank
Gas Cap Vent Cleaning?
by Flash 412 (CO)
Q. I assume I have to take it apart to clean it? Are small pieces and springs or something going to
come flying out? Fairly recently somebody on the site said the check valves in the cap can get plugged
up. In the FAQ it says "If the canister is gone, then the hole in the vent cap may be clogged with dirt" or
some words to that effect.
A. The gas tank vents via a hose, not through the cap. Revisit the Canisterectomy FAQ.
The cap lets pressure past the seal between the cap and the inside of the inner tank to the area
between the cap and the outside of the inner tank. You are not looking for a hole that goes THROUGH
the cap to the outside air. You're looking for the action of the spring-loaded portion of the cap that
contacts the inner tank in order to "vent" properly. The spring loaded thing need withdraw only slightly
to allow it to "burp" to the enclosed area where the hose hole resides. (I'm not even sure that there is
anything to clean or SEE associated with gas tank venting.)
Years ago mc gas caps had a literal hole through them, a vent hole to the air, that became clogged.
This hole was generally under the cap, outside the perimeter of the sealing surface of the tank.
Sometimes it was even on top, in the middle of the gas cap. It ain't like that no more.
Actually, the interior of the cap is much more complex than most would realize, with a couple flap type
check valves. Take it apart some winter just for fun.
Feedback:
●
Acerbis tanks excepted...(mine vents through the keyhole in the lock). Marty #436-Chicago-97
F650F
How "suddenly" should the effects of running low on gas kick in?
Q. Last week, I was riding downhill on a curvy dirt road when my engine sputtered once or twice and then
very quickly shutdown. So fast in fact that my rear wheel locked up and sent me high-side before I could
engage the clutch. Sure enough, when I dusted myself off and picked the bike back up, it was at about
150 miles and wouldn't start back up until I turned the fuel tap to reserve. This is my first carburetted bike
in a while, but I still tend to think I should have a little more warning before running out of fuel. Any advice
would be great.
A. Sudden (engine) death.
●
On flat roads I normally get a good amount of sputtering for 30-45 seconds (guesstimate) before it
dies completely. On a fairly long steep uphill section of Rte. 2 in western Mass. I once had no
warning whatsoever- it just died suddenly in a corner. I attributed that to the fact that the petcock is
at the front of the tank, and going uphill would drain the fuel to the back of the tank, away from the
http://faq.f650.com/FAQS/Gas_Tank_Removal-Replacement.htm (13 of 16) [18-02-2007 12:30:23]
HOW-TO Remove the Tank
petcock. I would think that going downhill would have the opposite effect, but what do I know.
James #523 CT USA '99
●
My 97ST with 53,000 miles will sometime give warning and sometimes die right out. At 150 miles I
start watching my see through gas filter. I have noticed under higher speeds the warning is less
than at lower speeds. Scott#264.
●
Remember that when you're going downhill even with the throttle totally closed against the stop,
some fuel is still going into the cylinder, so it's quite likely if it was a long downhill that the float bowl
would have been *sucked* completely dry. If as you say the wheel locked up, then it seem you
were in a lowish gear using *engine braking* which would leave you with no fuel in the float bowl,
once you tried to open the throttle, hence the lock up. Trevor #999, Bristol, UK, 01GS.
●
While riding along, turn off your petcock to find out how it "dies." Flash #412 (CO).
●
That's typical, you do get SOME warning, a slight loss of power and change in engine tone, about
30-60 seconds. I've had the same happen to me in the middle lane of a three lane freeway. All I
can suggest is watch that mileage :). Pete.
Broken Tank Support Bracket
Not a common Breakage Item!
BRACKET 46 51 2 345 258. Marty #436-Chicago-97 F650F
●
Cracked Fuel Tank Support Bracket - 1996 BMW F650. I took my fuel tank off the other day and
noticed that the metal bracket that bolts to the frame and supports the rear of the fuel tank (a
bolt passes through the tank and a bit of rubber and into the support plate in question) had
cracked around the right frame mounting bolt hole. I have the 27 litre tank. Does anyone know
the BMW part number for this bracket/plate ? Anyone had this problem, I wonder if the extra
weight of the 27 litre tank is a factor ?
(I was replacing the carb o-rings and hence needed to remove the bracket to get the carbs out.)
Thanks, car0tene - 1996 BMW F650 - AUSTRALIA
Water in the Tank?
Q. Filler cap leakage? Is it possible to get water into the fuel tank from my filler cap, even if locked when
for example I wash the bike or under some heavy rain?
A. Yes. It is also possible to get water in the tank from condensation AND from filling up while the truck is
delivering gas to the station. Flash
Removing the COLOURED SKIN off the Tank?
by Flash #412
Q. Is is possible to remove the plastic body panels off of the fuel tank without removing the fuel tank? In
the fuel tank removal section of the FAQ, is says that you aren't supposed to pry them apart, but does that
http://faq.f650.com/FAQS/Gas_Tank_Removal-Replacement.htm (14 of 16) [18-02-2007 12:30:23]
HOW-TO Remove the Tank
mean that it is an unnecessary step, or that it cannot be done? My intention was to remove the plastic so
as to modify (paint) it... I was hoping it would just pop off with minimal hassle. Robert in Texas #959 -Black '97 Classic.
A. You can pull the color part off the tank without removing the tank. Take all the screws out between the
cover and the fairing. Take all the screws out between the cover and
the engine covers. Take the rear bolt out. Removing the CAP is a bit tricky. You need to be especially
careful not to over tighten anything when you reinstall it.
Feedback
●
Leaving the plastic on the tank is just a short cut. I believe that the BMW method of removing the
tank calls for removing the entire plastic fairing and then removing the tank. Richard #230
●
You will STILL need to remove all those fairing bolts/panels, and likely the BIG mounting bolt at the
rear of the tank in order to slide it rearward enough to get the tabs out from underneath the fairing.
You'll still have to unscrew all those screws holding on the gas cap assembly to remove the beauty
cover. You might save having to disconnect the fuel line (and cannister and vent line, if still
applicable). If it's a matter of having a FULL gas tank, perhaps it might make sense to drain it
through the petcock into a large (or several small) gas can(s) first. You could conceivably leave it
resting on the bike but just slid rearward a coupla inches (but very precarious, especially if
unattended with no gas cap!). If you have no need/intention to remove the beauty shell that covers
the tank from the tank, just remove the tank/shell as a unit. (This assumes you're trying to get the
tank out of the way to fill the radiator or something). Just be sure to "block up" and support the
removed tank so the weight of the tank isn't resting on the petcock! Marty #436-Chicago-97 F650F
Where's my Reserve?
Problem: The problem is, it doesn't seem like my bike has a reserve. At about 180 miles (classic F) I
run out of gas. Switching to reserve doesn't help. What does help is leaning the bike over to get that
last little bit out of the right side of the tank. Could my "reserve" inlet be leaking into the "on" inlet? Any
help you can offer will greatly improve my marriage (otherwise known as, my wife is getting sick of
standing around in the middle of nowhere while I go off looking for some dirt bikers with extra gas). '97
F650, #1291.
Solution: Run it out of gas. Lean it over to the right. Remove the petcock. Look at the petcock and see
if there are two tubes of different lengths on it. If not... fish the missing tube(s) out of the tank and
shove it/them back in the hole(s). The LONGER tube is for the ON position. The shorter (or no) tube is
for the reserve position. You can figure out which is which by blowing through the tube(s). Flash #412
If you are losing gas, check the PUKING PETROL FAQ.
Feedback:
http://faq.f650.com/FAQS/Gas_Tank_Removal-Replacement.htm (15 of 16) [18-02-2007 12:30:23]
HOW-TO Remove the Tank
●
Check you aren't mistaking Reserve for the Main Tank. Easily done, and you basically run the
WHOLE tank dry then switch to what you THINK is reserve and it's the main, so of course there's
no Gas there either!
●
Also check that the tubes seat properly and are not warped to the point that fuel can still pass
where they join the petcock.
http://faq.f650.com/FAQS/Gas_Tank_Removal-Replacement.htm (16 of 16) [18-02-2007 12:30:23]
F650 Idle Mix Screw FAQ
F650 Idle Mix Screw FAQ
by Kristian #562, 12 September 2001
Please read the Disclaimer before attempting any work in this FAQ. Last Updated: 13 June 2006, by
Winter #1935
●
Where is the Idle Screw?
●
Where on Earth is the Idle Mix Screw?
Other Related FAQs:
●
Carbs Misc. FAQ
●
Carb Cleaning FAQ
Where is the Idle Screw?
To the LHS of the LH Carb, it is a flexible "Wand" that sticks down, with a spring wound around it, about
2 1/2 inches long and sheathed in rubber (sounds kinky doesn't it), with a knurled knob at the bottom
end. It is nestled close to the Preload knob.
Here, in the red box is the upper art of it. Idle Screw Location (Sorry, no pic of it ON the bike).
The Classic F Idle Speed is 1300-1400 rpm.
Where on earth is the Idle Mix Screw?
Here: Idle Mix Screw Location
The Idle Mix Screw (Circled GREEN) is under the Black Plug (if it's still there), in front of the Carb Float
Bowl and under the Carb body. This is the LHS One and is accessible from the left of the bike. The other
one (of two) is accessible from the RHS of the bike. The Manual says # of turns OUT from LIGHTLY
bottomed out (i.e. screw in clockwise until just seats) is 3.5.
The Screws Circled RED are the Float Bowl Drain Screws, for emptying Crud/Water out of the Carbs.
A SkewDriver or similar tool is highly recommended to access these screws. Let's face it the screws
http://faq.f650.com/FAQS/Idle_Mix_Screw.htm (1 of 3) [18-02-2007 12:30:25]
F650 Idle Mix Screw FAQ
aren't exactly hard to turn just hard to get to. Actually I have the Weekend Pro Model, DSK-1200, (I didn't
buy the 12-Pack btw, just the one...) You really don't need anything else and the little handle thingy
under the SC-1600 just gets in the way and leaves you LESS room in what's already a tight spot.
Especially on my Ohlins Preload Handle Side. The SC-1600 might fit but I'm happy with the Standard
Bevel. 10.95 too, if you can find it a Hardware Store. See SkewDriver.
Alternatives to the SkewDriver/SkewDriver Feedback
●
Another alternative to Spectools is a tool from Harbor Freight. Cost is $8. I haven't used it (haven't
received it yet), but you can see a picture and the contents of the kit at www.harborfreight.com,
enter the number below in the "find item number" box. Part number is: 34273-3VGA. If you order
$50 or more from HF, you get free shipping. Unknown.
●
At a pinch you can use a bent Bobby pin. My rubber plugs are missing, but I found that the
screws weren't stuck. I had used 10 different sizes of small screwdrivers and none of them
worked. Then, in an overnight revelation, I decided to look in the BMW tool kit for a "special" tool
even though adjusting carbs probably isn't considered a routine thing to do. There was a bent
bobby-pin in the kit (I'm sure it wasn't from BMW) and it worked perfectly. Fit right in the hole and
in the slot exactly. Turned the screws with no problem. I think it would be worthwhile to put the
bobby-pin idea in the FAQs. Thanks again for your help. I will look for some rubber plugs so the
screws don't get gummed up in time. William-USA.
●
What's that? Bobby pins were used by women to keep their hair in place. They sort of look like
thin black paper clips. They were sold in 5 & Dime stores for about a penny each and tended to
end up at the bottom of every drawer ever accessed by a woman. I believe that they started
losing favor as hair holding devices in the 1960's. However, I as willing to be corrected by the
actual users of such devices. Richard #230, Pacifica, CA
●
Geez. It's bad enough I admit to using a girlie item, but it's worse when I find out I'm old enough
that hardly anybody knows what I am talking about. Richard got it right. However, the more
expensive, high tech bobby pins were brass in color and stronger than the black ones. Evidently, I
am lucky enough to have the high tech variety. I went by a bike shop today and they had an
Keihin FCR Carb Wrench Kit distributed by Motion Pro Quality Tools and Controls (made in
Taiwan, of course). Model # is MP# 08-0181 for a whopping $13.00 US. It has a carrying case
and 3 adapters that can be inserted into a knob for easier carb adjusting. It only has 1 size of
screw-driver adapter, but I bought it anyway and if it fits at all (I may have to grind it a little) I will
keep it. William-USA.
●
Just took my carbs off to replace cracked inlet manifolds today. Thought I'd follow the advice of
the FAQ and check the idle mix screws, but they won't turn at all. Has anyone else come across
this problem? I'm trying to cure excessive backfiring and have already tried increasing idle speed
but to no effect. I know the idle mix screws are supposed to be 3 1/2 turns out from closed, but I
can't check this. Does anyone know the depth the screw should be in the threaded recess? Not
sure whether to just refit the carbs and see if the inlet manifolds have cured the problem. Ed UK
●
I don't now the depth, but last year I couldn't turn one of the screws either. After trying myself I left
it to a MC garage who worked on the screw for 30 minutes before it came out....bought a new one
and installed it. Nowadays I try to work them out once in a while (every 3 months or so). If its
http://faq.f650.com/FAQS/Idle_Mix_Screw.htm (2 of 3) [18-02-2007 12:30:25]
F650 Idle Mix Screw FAQ
stuck it probably means that it has been so for a long time, so if your problem has been noticed
recently. Spakur in Sweden #1117, '95F.
●
WD40 and patience should get the screws loose if you get them out undamaged I would use antiseize on them mike410 (Iowa).
●
You also need the right size screwdriver. One with too wide of a shank can get stuck in the tube
leading to the screw and feel like the screw is not turning, when it is really the screwdriver that is
not turning. I had to take my small screwdriver and file its sides down before it would fit all the
way into the recess, without binding. Richard #230, Pacifica, CA
●
SkewDriver Forever! ...and that may be how long I need to keep it in order to get any more use
out of it. I ordered a SkewDriver from Spectools.com and it's perfect for adjusting the low speed
carb jets on my '99 Classic. What convinced me to buy this tool is trying to adjust these jets with a
screwdriver (well, I am kinda ham-fisted). Anyway, the SkewDriver fit these screws perfectly and I
was able to back 'em out exactly 3.5 turns per FAQ recommendation (in fact I turned the left one
out 3.5 and the right one just 3 turns). The bike now idles perfectly and pulls much better at low
rpms (<4k) and I'm a happy camper. Bob#550 (Olympia WA).
●
I am also sending a picture of my Carb Tools. Last year there was talk of using a Bobby Pin to
adjust the carbs. Just snip it off and start adjusting. It fits easily into the tool kit. Also is a picture of
a "store-bought" carb tool. This actually works the best of anything I have used. The rubber knob
makes it very easy to do the adjusting. It is called Keihin FCR Carb Wrench Kit, MP# 08-0181 and
is sold by Motion Pro Quality Tools & Controls. I found it at a non-BMW dealership.
Thanks to Andrew #870 for the piccie of the location.
http://faq.f650.com/FAQS/Idle_Mix_Screw.htm (3 of 3) [18-02-2007 12:30:25]
The Canisterectomy FAQ
Canisterectomy & Vacuum Line FAQ (a.k.a. "I can't be out of GAS.!")
compiled & edited by Kristian #562
Please read the Disclaimer before attempting any work in this FAQ.
by Flash #412, Bob #550, Hombre sin Nombre et al
May '01
●
●
●
●
●
●
●
●
●
Symptoms:
So which way around SHOULD the vacuum lines go.?
So why Does the Bike feel like it is out of Gas ?
What to do if your Canister "mysteriously" falls off:
I don't have a Canister and still have "I can't be Outta Gas Symptoms".
What is the Stock Configuration for these hoses.?
Canister Removal Notes
Canister Feedback
Has anyone fitted a Container where the Canister WAS?
There is a bit of repetition here, for clarity, and because there are more questions than answers. So don't think you're
missing something out.
Symptoms:
Several F650 riders report an engine that dies and that the solution involves poor electrical connections. If your
carburetted bike surges and stalls sometimes, particularly in the rain and it is NOT electrical, it could be your Canister
or your Carburettor Vacuum lines.
●
First check all electrical connections in the ignition system. The connection in the line to the side stand cut-off switch is
one place to check.
●
Another is the fuse box under the seat. There are three fused lines in a rubber mounting. One BMW mechanic
has specifically cited the middle fuse line as the culprit. Wherever there is a slide male/female slide connector there is
a possibility that there is a poor or intermittent contact which can mean that electrical current is not present when it needs
to be.
●
Others have indicated that the vacuum (charcoal) canister is to blame. Check the lines for kinks and bends and that
all connections are tight to the gas tank and carburettor. One owner even suggested checking the drain tubes, that
something may be clogging the tube at the opening and not allowing the vacuum canister to not get sufficient air in or out.
But then again others have cited that the canister has "mysteriously" fallen off while driving, which has fixed their
problem. Please note, the EPA in the United States likes the canisters and if you live in California, make sure it is
securely attached so it won't "mysteriously" fall off.
●
A BMW service bulletin has said most 1999 F650's came with the vacuum hoses on the carburettors installed
backwards. The forward port on the right side of the right carb should have a vacuum hose going into the bottom front
right side of the airbox (air filter housing). The rear carb port vacuum hose should be connected to the vacuum
http://faq.f650.com/FAQS/Canisterectomy.htm (1 of 6) [18-02-2007 12:30:27]
The Canisterectomy FAQ
(charcoal) canister at the top rear fitting. When the hoses are incorrectly reversed there can be excessive suction into
the canister. This can cause problems in wet weather when the vent hose near the RIGHT footpeg sucks up water into
the canister and the carbs. Check with your dealer for more information.
So which way around SHOULD the vacuum lines go.?
●
The US Spec. F650 has two vacuum lines connected to the right side of the right carburettor (looking down from a
seated position). You might have to remove a plastic panel to get to these, but you can see them without removing anything.
●
The front vacuum line should go into the airbox. It operates the vacuum actuated valve for the air injector for the
Catalytic Converter inside the exhaust system. (More on that below in the last section.) The rear vacuum line should go to
the charcoal canister (if you have one), or it may just be plugged with a screw or something if the canister has been
removed. If you have these ports and the vacuum lines have been removed or disconnected, they must be plugged
or capped to close them off for proper operation.
●
The European-spec. bikes do not have an EPA canister.
So why Does the Bike feel like it is out of Gas ?
●
There are two "vent" hoses attached to the gas tank. One is a vent and the other is an overflow drain, connecting to a
small drain hole in the left side of the tank cap filler well (under the gas cap). It's the hose running on the left side of the
gas tank under the tank cover which ends as one of the drain tubes by the left hand footpeg . When you overfill your tank,
it drains straight out the overflow onto the ground. Note that when you close the gas cap, the space this hose reaches
is SEALED OFF from the interior of the tank. The OTHER hose on the right side of the gas tank under the tank cover is
the vent hose. This vent hose connects to the interior of the gas tank thru a series of check valves contained inside the
filler cap. The other end of this vent hose runs to the charcoal canister at its center rear fitting. The front (lower) fitting on
the canister goes to a drain hose which ends by the right footpeg.
●
This can cause problems in wet weather when the canister drain hose near the RIGHT footpeg sucks up water into the carbs.
●
The vent hose goes to a (stupid) charcoal canister. There are two other hoses connected to this canister. When the
tank develops overpressure, the liquid/fumes go into the canister and are collected by the charcoal. There is a big hose
that leaves the canister and goes to the air, by your right footpeg. This is for fresh air INPUT to the canister. The little
tiny hose goes to the carb. The carb draws a vacuum, which sucks on the little hose, which sucks all the nasty
hydrocarbons out of the canister, to be replaced by fresh air, in a limited quantity. If it got too much fresh air, the bike
would run too lean. When the carb vacuum hoses are reversed there is too much vacuum from the carb into the canister.
Instead of very gently sucking gas fumes that have collected in the charcoal canister, too much air is sucked thru the canister
and up the drain. This can cause problems in wet weather when the canister drain hose near the right footpeg sucks up water
into the carbs. Then canister can fill with water or dirt and clog, or eventually suck water into the carb, or clog one of the
smaller vacuum tubes. So instead of getting too much fresh air... it sucks on the tank, creating a vacuum, which makes
the bike act like it is out of gas.
What to do if your Canister "mysteriously" falls off:
i. You take the little hose from the carb and plug it up. The best place is to cap or plug the (rear) port on the carb. One
http://faq.f650.com/FAQS/Canisterectomy.htm (2 of 6) [18-02-2007 12:30:27]
The Canisterectomy FAQ
handy place is the junction on top of the airbox, just behind the tank, under the seat. You take the long hose from the tank
to the canister and reroute it to the place where the hose that used to go from the canister to the footpeg went.
ii. In this configuration, the carb doesn't suck on the inside of your tank. And the tank can "breathe" fresh air if it wants to.
iii. I have a canister, in a box in my garage.
●
●
●
●
NOTE: In the event that the canister has "fallen off", the rear carb port must be capped or it will affect proper idle and
starting, not to mention sucking dirt and water directly into the carb. The vent hose to the gas tank, which was
previously attached to the Canister, is now used as a drain vent, and is routed to the hose bundle by either footpeg. (I
used the same side as the carb, the right footpeg hose bundle.)
There is a brass orifice in the rear carb vacuum line going to the canister. It is actually a pinhole restrictive orifice which
can clog. It should be replaced or the tank may experience vacuum problems. Some people replace it with the smallest
size plastic fuel filters, some people use a similar plastic nylon connector (which is not restricted) that is leftover from
the removal of the other canister hoses.
Removing the CANISTER will not affect the catalytic converter. Removing or plugging the AIR INJECTOR will kill the cat.
The canister is NOT the same thing as the air injection system. The canister is an over-glorified, poorly engineered gas
tank vent. The air injector is used to inject fresh air into the exhaust stream, with good success for over twenty years.
Some Euro bikes ('95-'96) may have the catalytic converter, but not the vacuum actuated valve and the air injector system for
the cat. These bikes MAY not have ANY vacuum ports on the right carb, nor any connecting hoses there.
Stock Configuration
http://faq.f650.com/FAQS/Canisterectomy.htm (3 of 6) [18-02-2007 12:30:27]
The Canisterectomy FAQ
Canister Removal Notes:
●
Note:.! Even with the vacuum lines correctly installed, a missing orifice would probably cause excess vacuum in the fuel
tank - the orifice is meant to limit the vacuum in the system. Installation without it would likely cause excess vacuum in
the fuel tank, and subsequent fuel flow problems/vapor lock.
http://faq.f650.com/FAQS/Canisterectomy.htm (4 of 6) [18-02-2007 12:30:27]
The Canisterectomy FAQ
●
With regards to the Brass Orifice, there is no contradiction in the above description, as we are looking at 2 different
cases. The FAQ deals with two items, (A) Canister Removal & (B) Vacuum Line Re-Routing, as the Title Suggests.
The "Outta Gas Symptoms" could be (A) or (B) as per the first line in the symptoms section.
Case 1: If you DO REMOVE your Canister, you should take out the Brass Restriction and "Some people replace it with
the smallest size plastic fuel filters, some people use a similar plastic nylon connector (which is not restricted) that is
leftover from the removal of the other canister hoses. "
●
Case 2: If you DIDN'T REMOVE the Canister but are Routing the Vacuum Lines, you should NOT remove the orifice
as .... "Note:.! Even with the vacuum lines correctly installed, a missing orifice would probably cause excess vacuum in
the fuel tank - the orifice is meant to limit the vacuum in the system. Installation without it would likely cause excess
vacuum in the fuel tank, and subsequent fuel flow problems/vapor lock."
If you're considering venting under the seat, the only problem with venting high under the seat instead of the footpeg, if
you ever lay the bike down or slightly upside down, or if you overfill the tank, there's a possibility that raw gas will
discharge from the end of that hose. There's a good reason why the emissions canister drain was originally located at
the footpeg.
Canister Feedback
●
●
●
My canister created a vacuum in my tank from the first day that I owned my bike. My dealer then retrofitted my tank
vacuum line with a new and improved restrictor, which did nothing to improve the venting of my tank. When I removed
my canister, I plugged the line to the carb and removed the restrictor that I found on the vent line near the rear of the
tank. Now the only restrictor that I have on my tank vent line is a small gas filter that I installed where the restrictor
was located, which is attached to a hose that I routed to the rear of the bike and stuck through a hole in the black
plastic cover, near the former location of the canister. My tank has been venting just fine for almost 5 years, now.
Richard #230.
This worked perfectly for me (and should be all you need to do):
1- Remove canister from the bracket.
2- Unhook all three hoses from the canister. One drains by the right foot peg, one goes to the carb, and one goes to the
gas tank.
3- Discard the canister and hose that drains by the footpeg. Bye bye.
4- Plug the hose going to the carb. I plugged mine with one of the bracket bolts from the canister.
5- Reroute the hose from the gas tank to where the old drain hose was (by right foot peg). Cut it to an acceptable length.
6- Done. Grady (Aus TX) - 13-Aug-02
I also found a metal restrictor in the vacuum line running from the rear connection on the carb to the cannister. I
simply removed it (and the rest of the line running back to the cannister) and screwed a suitable sized bolt into the
remaining vacuum line to plug it.
The other (vent) tube running from the tank to the cannister I just tucked up under the seat behind the latch
mechanism. Instead of a filter, I covered the end of this tube with a small swatch of cotton cut from an old t-shirt and held
in place by the stock spring clamp. Works just fine, and keeps out the bugs.
When I was performing the Canisterectomy, I noticed that the vent line from the tank had an accumulation of oily gunk in
it. There was enough so that when I blew through it, it gurgled and dribbled out the other end. I wonder if this caused some
of the problems we've heard about? I plan to periodically check this tube to make sure it's clear and free-breathing.
http://faq.f650.com/FAQS/Canisterectomy.htm (5 of 6) [18-02-2007 12:30:27]
The Canisterectomy FAQ
●
●
●
Bob#550 (Olympia WA).
We have no cannisters in Canada and the two tubes come together at a "T" junction on the left hand side of the tank
bracket just under the seat (or at least they do on my bike). So all you have to do is make one disconnection at the T. Just
to be sure you don't have a cannister look for a big ugly black thing at the back of the bike near your coolant reservoir.
It looks about the size and shape of a small can of baked beans. Sean #1015 Ottawa Canada.
Wet weather problems. Since they're '99 models, checking the vacuum lines from the carbs would be my
first recommendation. Mine (also a '99) were reversed from the factory. Simply connecting the high vacuum one (nearer
the engine) to the airbox and the low vacuum one (furthest from the engine) to the cannister made it run much better. I left
my cannister on for the first 16000 miles with no problems, even in the rain. At the 18000 service (in my own garage) it
finally "fell" off! Bob#550 (Olympia WA)
Wet weather problems. Side stand kill switch, Canisterectomy and Vacuum lines.
Has anyone fitted a Container where the Canister WAS?
●
Ron #304 from Texas has this set up on his bike. The PVC pipe mounts where the canister was. He used a cap on one
end of the PVC pipe and a screw on cap on the other. It was big enough to fit his tool kit. Seth #972 Springfield, MO.
http://faq.f650.com/FAQS/Canisterectomy.htm (6 of 6) [18-02-2007 12:30:27]
http://faq.f650.com/FAQS/Photos/CarbnJetPhotos/CarbOutScrews.jpg
http://faq.f650.com/FAQS/Photos/CarbnJetPhotos/CarbOutScrews.jpg [18-02-2007 12:30:28]
http://faq.f650.com/FAQS/Photos/CarbnJetPhotos/CarbIntakeRubbers.jpg
http://faq.f650.com/FAQS/Photos/CarbnJetPhotos/CarbIntakeRubbers.jpg [18-02-2007 12:30:29]
Float Level Adjustment
Float Level Adjustment
By: Canadian Dave
Before you consider rejetting your carburetor you need to insure you don't have
any mechanical problems that are mimicking poor jetting. Float level problems
are common so checking the float bowl fuel level is a great place to start. You
might suspect that the fuel level is out a whack but wouldn't it be great to be
able to confirm it before making any adjustment. A fuel level gauge can be
installed on the carburetor and the fuel level visually checked. You can order a
fuel level gauge from Kawasaki. The part number for 1989 to 2000
KDX200/220s is M18 x 1.0: 5701-122. The factory service manual does a good
job of explaining how to use it. If you need some help just post your question on
the JustKDX Forum .
Before we go any further remember that gasoline is
extremely flammable and explosive. Make sure the area
you’re working in is well ventilated and that there are no
sources of ignition like open flames etc.
There are two common methods used to set the float height. I’ll go through
both. They both work well so the choice of which one to use is yours.
Getting Started
Step One -Turn the fuel tap to the off position and remove the carburetor. That’s
an overly long word so from now on lets just call it the carb. Drain the fuel from
the carb hold it upside down and remove the float bowl. Just remove the four
Phillips head screws and that step is done. A word of caution, you’ll be playing
with some fairly small parts so I would strongly suggest doing this job over a
clean work surface so if some thing does fall you’ll have a hope of finding it and
so it doesn’t get all dirty. A smart trick is to use a couple layers of paper
toweling or a clean rag on the surface. That way if some thing does fall it won’t
jump away and hide.
Step Two - The second step is common to both methods. Before setting the fuel
level you first need to confirm that the plastic tip of the float valve needle is in
good condition. Both procedures assume it is. Over time the tip of the needle
http://justkdx.dirtrider.net/floatlevel.html (1 of 4) [18-02-2007 12:30:31]
Float Level Adjustment
wears, doesn’t seat properly and alters the fuel level. That’s normally why your
fuel level is out of whack. To get at the needle you first need to remove the
float’s pivot pin. Before you do take a look at the carb open in front of you.
There aren’t a lot of parts there but they need to be reassembled the same way
they came out. You see the metal tang just in front on the pivot? That’s where
you’re going to make your adjustment. Also note that there is a small metal clip
that attaches the needle to the metal tang. Be gentle removing the floats so you
don’t damage it. OK, remove the pivot pin and then the floats. Pull the needle
from it seat and have a look at the tip. It should be smooth with out any
deformation, grooves, scratches etc. If there are replace it with a new one. Now
that you have inspected the needle you can reassemble it all again but don’t
reinstall the float bowl.
Float Valve Assembly
Needle Inspection
As a side note, if you’re disassembling the carb now would be a great time to
clean the internals, especially if your KDX is more than a couple years old. It is
an easy job all you’ll need is a can of carb cleaner and a couple more tools.
You’ll want to remove the pilot jet using a bladed screwdriver and the main jet
using a 6mm socket. Spray carb cleaner through both jets and through the rest
of the carb. Follow the instructions and warning on the can. Allow the carb to
dry, visually check that there is nothing obstructing the jets and reinstall them.
Click Here For Exploded View >>>>>>
http://justkdx.dirtrider.net/floatlevel.html (2 of 4) [18-02-2007 12:30:31]
Float Level Adjustment
Method One - Measuring the Height of the Float
This method requires a set of calipers. With the carb upside down, tilt the carb
until the tang on the float just makes contact with the needle rod protruding from
the float valve. At this point the distance between the bottom of the float and the
float bowl mating surface should be 16mm ± 1mm or 0.63" ± 0.08". Remember
the carb is upside down so the bottom of the float is facing you. If the distance is
out side of this range gently bend the tang and recheck. Ideally you would
reassemble the carb and recheck it with the fuel level gauge. If you don’t have a
gauge you’ll have to trust you set the height properly.
Measure the distance between the bottom of the float and the float bowl mating
surface (#1). The distance should equal 16 mm +/- 1 mm or .63" +/- 0.08"
Method Two - Setting them Parallel
This method is similar to the first method. It isn’t quite as accurate but works
fine if you don’t have access to a set of calipers. In method one when you
measure the distance between the bottom of the float and the float bowl mating
surface the two are parallel to each other. If you use a straight edge for a
reference, a feeler gauge works well, and place it on the float bowl’s mating
surface you can visually check to see that the two are parallel to each other. It
helps if you angle the feeler gauge towards the float to reduce the distance
between the two a little. Tilt the carb the same way you did in the previous
method and watch for the tang on the float to just make contact with the needle
rod protruding from the float valve. If the two are not parallel at this point the
bend the tang and recheck. Ideally you would reassemble the carb and recheck
it with the fuel level gauge. If you don’t have a gauge you’ll have to trust you set
the height properly.
http://justkdx.dirtrider.net/floatlevel.html (3 of 4) [18-02-2007 12:30:31]
Float Level Adjustment
David
If you have any comments or suggestions smack the e-mail icon and send
them my way or visit the JustKDX Forum.
David
http://justkdx.dirtrider.net/floatlevel.html (4 of 4) [18-02-2007 12:30:31]
Keihin Carburetors
FLO Headworks:
Harley-Davidson
Performance Specialists
Home
Tech Tip
Articles
Fun to
Ride
Guide
Custom
Engine
Analysis
Custom
Engine
Building
Other
Products
and
Services
Perry's
Bio
Blueprinting Keihin
Carburetors
After much time and testing, FLO Headworks
is pleased to announce to Harley-Davidson
owners everywhere a new service: to blueprint
your 1989-to-present-day 40 and 44 mm CV
Carburetors with accelerator pump.
We have designed a computer program that
enables us to blueprint the Keihin CV
carburetor on the bench to the requirements of
your specific engine. The result is greater
power, smoother running and better gas
mileage.
All constant velocity (CV) carburetors are
designed to compensate for changes in
altitude and barometric pressure. But even a
slight modification to increase engine
performance will require retuning of your CV
carburetor.
Hi-Flow Air Filter Kit for
Keihin Carbs
We are pleased to offer the highest-flow air
filter kit ever manufactured for HarleyDavidson motorcycles.
K&N has been helpful in the development of a
filter element that effectively cleans incoming
air, but will flow in excess of 700 CFM. This is
a must for big-inch engines, because they
need a lot of air.
Maintained properly, this filter has a lifetime
guarantee. The air filter backing plate is made
of .125 inch thick steel with welded mounting
fixtures for all Harley-Davidson V-Twin models
from 1937 to present, including the Twin Cam
88.
Our blueprinting process harmonizes your
carb perfectly with your engineÃ-s type and
modification level.
The High Flow Air Filter Kit comes complete
with all required mounting hardware for your
Hog, including a radius venturi ring. Detailed
installation instructions with photos are
supplied with the kit to make this upgrade the
easiest youÃ-ve ever done.
When ordering our blueprinting process, be
sure to ask for the accompanying High Flow
Air Filter Kit for your Keihin CV carbs. It gives
the increased air flow your big-inch V-twin
needs.
Our work and products are guaranteed for one
year. For an estimate on your particular
application contact us directly by telephone at
805-481-6300. You can e-mail us. We also
offer a 24-hour fax line at 805-481-6341.
Friends
Catalog
http://www.floheadworks.com/Products/keihin_carburetors.htm (1 of 2) [18-02-2007 12:30:44]
Keihin Carburetors
Request
Order
Links
Keihin Hi-Flow Air Filter Kit
Keihin CV Carb with Hi-Flow Air Filter
Related Articles
Carburetor Tuning Tips
Fun to Ride Guide
© 2000-2003, FLO Headworks. Contact Perry Kime at 805-481-6300 or via e-mail.
FLO Headworks, 1150 Pike Lane, #2, Oceano, CA, 93445.
All rights reserved. All prices subject to change without notice.
This site has no affiliation with Harley Davidson. Trademarks and model names are the property of the trademark holders.
http://www.floheadworks.com/Products/keihin_carburetors.htm (2 of 2) [18-02-2007 12:30:44]
HARLEY-DAVIDSON SUPER GLIDE SPORT
THE Y2K HARLEY-DAVIDSON SUPER GLIDE SPORT
By Chuck Hawks
Harley calls it a sport model, motorcycle magazines call it a sport-cruiser, and I call it
a big standard. Whatever you call it, the FXDX (which is H-D's shorthand
designation for the Dyna Super Glide Sport) is a very versatile motorcycle. It can
carve a pretty mean canyon road, take a friend for a ride, negotiate city traffic with
aplomb, fly down the highway for hours on end, and even look pretty good cruising
down main street. Like all Harleys, it is very easy to personalize, very easy to hopup, and retains its value better than any other brand of motorcycle. It may not be the
best bike in the world for any single purpose, but it would be hard to find a better
big, general-purpose, motorcycle.
Ergonomics
The basic ergonomics of the bike are moderate and comfortable. The wide, black, 1"
diameter handlebars have a normal rise and bend, the forks are raked at a standard
28 degrees, and the footpegs are located comfortably beneath the riders thighs,
neither "forward" nor "rearset." All controls fall easily to hand (or foot), and the tach
and speedo are mounted on the handlebars facing the rider, where they are most
easily seen. The black, rectangular mirrors give the rider a decent view astern. All in
all a comfortable, standard, riding position.
Clearly this motorcycle was designed to be ridden, fast and for long distances if
http://www.chuckhawks.com/super_glide_sport.htm (1 of 12) [18-02-2007 12:30:48]
HARLEY-DAVIDSON SUPER GLIDE SPORT
desired. Ergonomically, the only flaw is the seat, which looks good but positions the
rider too close to the tank, and in any case is poorly shaped and inadequately
padded. It is even worse for a passenger than for the rider. I suggest replacing the
stock seat with whichever of the many available H-D accessory seats that best fits
the owners needs.
Features and specifications
I have sung the praises of Harley's Dyna Glide line in my reviews of the Wide Glide
and Convertible, so I will merely say that the Dynas are Harley's best performing big
twins, and the Super Glide Sport is the best performing of the Dynas. The 2000
model tested here features a blacked out engine and exhaust system, adjustable
suspension, triple disc brakes with four piston calipers, cast wheels, tubeless
performance tires, and a lot of black (rather than chrome) trim. Almost all the parts
are lovingly plated or painted metal, there is no cheap plastic trim here. The overall
finish and quality of the motorcycle are extremely high; it is clearly meant to be a
lasting investment. If the bike is maintained properly it should run at least 100,000
miles before any major engine work is required. Harley-Davidson has been making
motorcycles longer than any other company in the world, and they clearly have it
down pat.
The Sport comes with a black, ceramic-coated, staggered shorty dual exhaust
system. This system is EPA-legal quiet, but has a nice low-pitched sound (potato,
potato). The mufflers themselves are a little larger than those on other Dyna models,
a little less restrictive, and make a little more horsepower. They are good looking
mufflers, although heavy. Despite this, virtually everyone immediately replaces
them, usually with slash cut Screaming Eagle (SE) slip-ons. These are lighter,
meaner looking, make more power, and have a great sound. They are also
completely illegal for street use (take that, EPA environmental-wacko running
dogs!).
Instruments include a speedometer/odometer/trip-odometer, tachometer, and fuel
gauge. There are indicator lights for (in order from left to right) left turn, high beam,
neutral, oil circulation (the lack of), and right turn. Simultaneously depressing and
holding down the right and left turn signal buttons activates the 4-way hazard flasher.
Nice features shared with other Dyna models include an attractive teardrop gas tank
with a vacuum operated fuel supply valve, rubber mounted engine (to isolate
vibration), electronic ignition, self-canceling turn signals, halogen headlight,
maintenance-free battery, and belt final drive. There is also a spring loaded throttle
friction adjustment screw (manual "cruise control"), fork lock, Harley's superbly
shaped clutch and brake levers, and a side stand that locks in the down position
when the weight of the bike is on it. The latter is a good thing, as no center stand is
http://www.chuckhawks.com/super_glide_sport.htm (2 of 12) [18-02-2007 12:30:48]
HARLEY-DAVIDSON SUPER GLIDE SPORT
provided.
The ignition switch is located on the right side, just below the seat, between the
battery and the upper rear shock mount. This location takes some getting used to,
and is almost impossible to reach with a passenger on the bike.
The following specifications are taken from the 2000 Harley-Davidson Dyna Owners
Manual, the Harley-Davidson Motorcycles Model Year 2000 brochure, and the
Standard & Sport Cruiser Comparison Chart, which can be found on my Motorcycle
web page.
Wheelbase: 63.88 inches
Rake/trail: 28 degrees/4.1 inches
Overall length: 92.88 inches
Overall width: 33 inches
Road clearance: 5.75 inches
Overall height: 51.25 inches
Seat height: 27 inches
Dry weight: 619 pounds
Wet weight: 651 pounds
GVWR: 1085 pounds
Fuel Tank: 4.9 U.S. gallons (inc. 1.1 gal. reserve)
Engine type: 4-cycle, air-cooled, 45 degree V-twin
Displacement: 88 cu. in. (1450cc)
Bore: 3.75 inches
Stroke: 4 inches
Compression ratio: 9.0 to 1
Carburetor: 40mm constant velocity (CV) type
Torque: 82 ft-lbs. at 3500 rpm (at the crankshaft)
Transmission: constant mesh, 5-speed
Frame: steel double cradle
Front forks: 39mm diameter, 3-way adjustable, cartridge type
Rear shocks: gas charged, adj. for preload and compression damping
Front tire: 100/90V-19 H-D/Dunlop K 591 sport
Rear tire: 150/90V-16 H-D/Dunlop K 591 sport
Wheels: 13 spoke, black, cast aluminum alloy
Front brake: dual 11.5 inch (292mm) discs with 4-piston calipers
Rear brake: single 11.5 inch (292mm) disc with 4-piston caliper
Lean angles (right/left): 33.5/34.5 degrees
Miles per gallon (EPA): 50 hwy, 42 city
1/4 mile: 13.54 seconds at 96.48 mph
Top speed: 115 mph (approximate).
http://www.chuckhawks.com/super_glide_sport.htm (3 of 12) [18-02-2007 12:30:48]
HARLEY-DAVIDSON SUPER GLIDE SPORT
The quarter mile time above was reported in Motorcyclist magazine. The top speed
was estimated by the WinPEP Dynojet Performance Program from an early dyno
test, when the test bike's engine was still reasonably close to stock.
Touring accessories
The first requirement for a touring bike is a decent touring seat. H-D offers a good
one for Dyna models, the Sundowner deep bucket seat (#51540-01).
For the long distance rider, I also recommend one of Harley's excellent windshields.
The detachable touring windshield (#58570-96) gives maximum protection and can
be removed when desired.
Saddlebags are another necessity for the touring rider. H-D leather "Big
Bags" (#90300-98) fit the bike well and provide decent capacity and quick opening
buckles. An alternative would be the injection-molded, color matched, Dyna hard
saddlebags (#90126-XXXX) which are available for some 1999 and 2001 Super
Glide Sports. If you are interested in these bags, check to see if your particular year
and color are available.
A small fork bag (#91744-87T) adds space for small frequently used items like
sunglasses and a tire gauge. Heavier small items like tools and a fork lock fit nicely
in the leather toolbox (#64245-97) that mounts neatly in the space in front of the rear
shock on the right side of the bike.
A black low sissy bar upright (#52426-99) and matching sideplates (#52418-99) are
necessary to attach the black sport rack (#53852-00). A wide touring backrest pad
(#51667-98) mounted to the low sissy bar upright complements the Sundowner seat
and makes life more comfortable for passengers. Choose the standard size topstitched backrest pad (#52612-95) if you plan to use the sissy bar mount Ultra Bags
mentioned below.
The easily removed nylon Ultra Overnight Bag (#94736-98) or Ultra Touring Bag
(#94744-98) slip over a low sissy bar with a standard size backrest pad and rest on
the rack. They strap to the motorcycle with quick release buckles, and take only a
minute to attach or remove. Both provide useful storage space for light items like
clothes.
A crash bar (#49007-90) makes it easier to right a heavy bike that falls off its side
stand, and is also a convenient place to mount Halogen fog lamps (#68913-98).
Additional lighting is very nice at night, and can be used to dramatically increase
conspicuity in daytime.
http://www.chuckhawks.com/super_glide_sport.htm (4 of 12) [18-02-2007 12:30:48]
HARLEY-DAVIDSON SUPER GLIDE SPORT
Forward mounted "highway" footpegs (#49019-95) work with the engine guards and
give the rider an alternative foot position on long rides. The new Dyna passenger
footboard kit (#50877-01) replaces the standard passenger footpegs and can
increase passenger comfort. So equipped, an FXDX can take a couple for a
weekend jaunt or across the country.
Commuting accessories
The Dyna Custom Pillow-Look seat (#52159-96A) is comfortable and works well for
commuting and weekend rides. The somewhat more expensive Sundowner touring
seat mentioned above is also good.
The low sissy bar and sideplate kit (above), with a standard size backrest pad
(#52545-84 matches the pillow look seat), and sport rack (above) make a
convenient place to mount a nylon "Brief Sac" briefcase (#94797-00) or Overnight
Bag (#94719-98). Both bags are also available in leather.
H-D's Low Profile, detachable compact smoked windshield (#58112-96) combines
adequate protection and good visibility. It can be removed or replaced in seconds.
Dyna Slant-style leather saddlebags are available with several trim options. All Slantstyle leather saddlebags accept easily removable, water-resistant bag liners that
make it easy to take whatever is inside with you.
Other useful accessories include an engine guard (#49007-90) to protect your bike
in case of a low speed tip-over. Halogen fog lights (#68913-98) attach to the engine
guard and can be used to increase conspicuity in daytime, as well as augment
nighttime lighting.
A Dyna fan kit (#91551-00) will keep your V-twin cool when you are stuck in traffic
jams. It reportedly lowers the engine oil temperature by over 20 degrees.
Sporting accessories
While the stock seat would be an adequate sport seat for a rider who found it
comfortable, not many do. Most riders will be more comfortable and better
positioned on the Dyna Sport Seat (#52999-99). Compared to the stock seat, this
seat offers the rider a better seating position that moves the hips farther from the
gas tank, 1/2-inch more width, and a little more padding. For the occasional
passenger it incorporates a better-shaped seating area with thicker padding, while
maintaining the 5-inch width of the stock seat. This seat's carbon fiber inspired
graphics look kind of trick.
The Screaming Eagle fork brace (#46192-99) makes a nice addition to the front end
http://www.chuckhawks.com/super_glide_sport.htm (5 of 12) [18-02-2007 12:30:48]
HARLEY-DAVIDSON SUPER GLIDE SPORT
of a Sport destined to be ridden hard. Also for the front of the bike, stainless steel
front brake lines (#45287-99) are attractive, and can firm up front brake lever feel.
The sleek color matched quarter fairing (#57070-XX) and chin spoiler (58593-XX)
add protection and a performance appearance.
Orange SE performance spark plug wires (#319-44) deliver maximum spark voltage
and look trick. When you get your performance ignition system, be sure to get the
matching orange high performance coils.
Lighter than stock Thunderstar black alloy wheels (front #43772-00, rear #43780-00)
reduce unsprung weight and look great. These are also available in chrome finish.
An oil cooler (#62871-99) can help keep a hard working engine cool in hot climates.
The oil dipstick with digital temperature readout (#62938-00) lets you monitor oil
tank temperature.
Appearance/cruising accessories
There is an awful lot of black on a stock Super Glide Sport. Personally, I think it
needs to be brightened by the addition of some chrome parts. On the other hand, I
didn't want to chrome the entire engine so that it looks identical to the motor in a
Low Rider. (Harley offers a chrome engine kit to do just that.) I wanted to retain the
basic black heads, cases, and exhaust system, but add some chrome to brighten up
the overall look of the bike. I didn't want to add a lot of weight to the bike, so most of
the parts listed below are merely replacements for stock parts of equal weight.
Here are the chrome engine/transmission parts I ordered to replace identical stock
(black) parts on the test bike: chrome V-Wing derby cover (#25335-99), chrome VWing timer cover (#32665-99), chrome transmission side cover (#37105-99),
chrome primary chain inspection cover (#60529-90A), chrome transmission top
cover (#34469-99B), chrome air cleaner cover (#29350-99), chrome starter end
cover (#31535-91), chrome horn cover (#69102-93A), chrome coil cover (#3164499), and chrome electrical cover (#66333-99). Whenever I have the engine oil and
oil filter changed, I specify the chrome finish oil filter. The result is what I call a
"Holstein" engine, chrome and black.
I thought a few other areas on the test bike could use some help, so I also added
the following chrome trim parts: chrome tank trim panel (#67221-97), chrome battery
top cover (#66368-97), and chrome battery side cover (#66375-97). The photo at
the top of this article shows the result.
Highway pegs are a convenience on long rides, and usually fitted to cruisers. The
standard Dyna chrome highway pegs are #40919-95. These require purchasing the
http://www.chuckhawks.com/super_glide_sport.htm (6 of 12) [18-02-2007 12:30:48]
HARLEY-DAVIDSON SUPER GLIDE SPORT
actual footpegs separately, and I chose the cushion footpegs (#91821-85), which
have chrome end caps with bar and shield logos. These same footpegs can also be
used to replace the stock rider and passenger footpegs for a matched look.
Because the test bike was to wear saddlebags, I didn't add chrome parts that would
have been largely covered by them. To dress up the rear end on a bike without
bags, I would add a chrome sprocket cover with holes (#91346-00) and a chrome
belt guard (#60293-00).
For a complete list of modifications and accessories added to the test bike, click
here to see the H-D Super Glide Sport Accessory List.
The Twin Cam 88 engine
Like all Harley big twins, the Super Glide Sport is powered by the redoubtable Twin
Cam 88 engine. This modern air cooled, OHV, 45 degree V-twin has hydraulically
adjusted valves that never need attention. The factory rates this engine as
producing a peak of 86 ft-lbs. of torque at 3500 RPM (at the crankshaft).
Independent dynamometer tests usually show 71 to 73 ft-lbs. of torque and 57 to 60
horsepower at the rear wheel for stock engines.
This is sufficient power to give the Super Glide Sport good street performance, and
more than adequate highway passing power, even riding double. In fact, stock
performance is better than just about everything in its class except the dedicated
"power cruisers."
Modifying the TC 88 engine
For those of us who want more power (virtually 100% of Harley owners), almost all
dealers suggest replacing the stock air cleaner and mufflers with Screaming Eagle
replacements, and re-jetting the carburetor. These simple changes add the 5-10
horsepower stolen by the EPA. Many owners have these changes made before their
new bike leaves the dealership; others have them done the first time the motorcycle
is serviced. Almost every Super Glide Sport you see on the street will have had at
least these modest engine modifications, which noticeably enhance throttle
response and performance.
Many owners go farther with performance enhancements. In addition to the SE air
cleaner/breather kit and mufflers mentioned above, Harley's "Stage I" 1450cc
engine adds a SE/Mikuni 42mm flatside carburetor (replacing the stock 40mm CV
carb) and a SE 6200 rpm performance ignition system (module plus coils) to the
above performance enhancements. According to Harley's dyno tests, a Stage I
motor produces about 81 ft-lbs. of torque and 71 hp at the rear wheel. The test bike
was taken to Stage I equivalent specification before it left the dealership.
http://www.chuckhawks.com/super_glide_sport.htm (7 of 12) [18-02-2007 12:30:48]
HARLEY-DAVIDSON SUPER GLIDE SPORT
Farther down the performance trail is the 1450cc Stage II engine. This adds
Screaming Eagle SE-203 cams and adjustable pushrods to the Stage I motor, and
the result is about 88 ft-lbs. of torque and 73 hp at the rear wheel.
Beyond this level, it makes sense to take advantage of H-D's big bore 95 cu. in.
(1550cc) pistons and cylinders. These are designed to work with the stock cylinder
heads and valve train. Otherwise identical to the Stage II 1450cc engine above, a
Stage II 1550cc engine with SE standard compression ratio (9.0:1) flat top cast
pistons produces about 97 ft-lbs. of torque and 80 horsepower at the rear wheel.
The 1550cc Stage III engine is basically like the Stage II version, but uses SE high
compression cast pistons (10.25:1) and a SE race (high compression) 6200 RPM
ignition kit. This is good for about 100 ft-lbs. of torque and 81 horsepower at the rear
wheel. There is no difference in the price of the pistons or ignition module, so it is
purely up to the owner's discretion whether to build to Stage II or Stage III. Stage III
requires the best grade of gasoline available, of course, usually 92 octane Super
Unleaded. But then, Harley owners usually buy "Super" anyway.
Note that all of the modifications above are essentially progressive, and none are
particularly difficult. There is no machining or cylinder head work required.
The test bike's modified TC 88 engine
Of course, there is no prohibition against departing from the factory recommended
modifications if desired. The FXDX that is the test bike for this review has essentially
a Stage III engine with the usual SE air cleaner and breather kit, SE 1550cc big bore
cylinders, and SE high compression cast pistons (10.25:1). But there are some
significant differences.
The SE 44mm CV carb and intake manifold were substituted for the SE/Mikuni
42mm flat slide carb usually recommended. This was done primarily to enhance
high altitude performance, since it was envisioned that this bike would be used for
occasional trips across the Cascade and Rocky Mountains. (CV carbs tend to be
self-compensating at high altitudes, the flat slide carb does not.)
Somewhat more radical Andrews TW-50 cams (specifically designed for high
compression Harley motors) were chosen on the advice of Hein Vandenberg, owner
of HVR Dyno Service in Union Bay, B.C. The TW-50 cams allow use of the stock
pushrods, which Hein also recommended. The stock pushrods are both lighter and
stronger than the SE adjustable pushrods required to install the SE-203 cams used
in H-D's Stage II and Stage III engines.
Harley-Davidson #80313-99 black, baloney cut, slip fit mufflers with the baffles
http://www.chuckhawks.com/super_glide_sport.htm (8 of 12) [18-02-2007 12:30:48]
HARLEY-DAVIDSON SUPER GLIDE SPORT
completely removed had previously been installed on the test bike. It was found that
these mufflers produced slightly higher horsepower and torque figures on the
dynamometer, and a flatter torque curve, than the (visually almost identical) SE II
mufflers usually recommended. This was determined by dyno testing both types,
one after the other. A decision was made to stay with the modified #80313-99
mufflers.
A SE performance 6200 rpm ignition module and coils (#31710-99) had previously
been installed on the test bike before the big bore kit and cams were installed, and
Hein said that they would work fine, which they have. Note, however, that the
#31710-99 performance ignition system used in this engine is not the preferred high
compression race ignition system (#31775-00) Harley recommends for engines with
cams, raised compression, and added displacement.
Screaming Eagle spark plugs (#32321-91) and plug wires (#31944-99), and SE
performance exhaust gasket kit (#17048-98) complete the engine modifications as
tested for this review.
The result, as noted above, is very similar to Harley's Stage III kit. On the Dynojet
dynamometer at Doyle's Harley-Davidson in Eugene, Oregon, this engine produced
86.6 horsepower at 5250 RPM, and 96.4 ft-lbs. of torque at about 4000 RPM,
measured at the rear wheel. Remember that all dynamometers differ, and Doyle's
dyno is generally a little stingier than the one used at the Harley-Davidson test
center.
Performance
A stock Super Glide Sport has a top speed of approximately 115 mph. Motorcyclist
magazine ran their stock FXDX test bike through the quarter mile in 13.54 seconds
at a terminal speed of 96.48 mph. H-D says the Sport's triple disc brakes will bring a
bike at maximum loaded vehicle weight traveling 60 mph to a dead stop in 155 feet.
Gas mileage is good, even when ridden fairly hard a stock Sport will get about 42
miles per gallon. This is good all-around performance, all that most owners will
actually ever need.
This test bike's modified engine is reliable, tractable, starts easily, and runs well. In
these respects it seems no different than a stock engine. It sounds like a high
performance engine, with an obvious lope from its cam at idle and loud mufflers. It
runs very strong at all rpm's, and is excellent for accelerating out of corners or
passing slower vehicles on the highway, which were the principle design
requirements. Average mileage is reduced to approximately 39.5 mpg.
The WinPEP Dynojet Performance Program, based on the dyno results from Doyle's
http://www.chuckhawks.com/super_glide_sport.htm (9 of 12) [18-02-2007 12:30:48]
HARLEY-DAVIDSON SUPER GLIDE SPORT
Dynojet dynamometer as quoted above, predicts a best 0 to 60 mph acceleration
time of 2.6 seconds, and a top speed of approximately 140 mph! (This I doubt, and I
have made no attempt to verify these figures.) However, Hein Vandenberg told me
he has ridden his 1999 FXDX, which has a motor very similar to the one tested here,
to speeds well in excess of 120 mph.
He feels that this motor will propel the FXDX to speeds its chassis and suspension
are not designed to cope with. As a result he has added a fork brace and a steering
damper, and rebuilt the front forks of his 1999 FXDX (fully adjustable forks did not
became standard until 2000 and later models). He also replaced the wheels, rear
shocks, and swingarm with very high performance after-market units. The 1999
FXDX came with single piston calipers for its twin front discs, and Hein replaced
these with six piston calipers. His FXDX is a very impressive, well-balanced, high
performance motorcycle. I have not found these modifications to be necessary
because I simply don't ride as fast or as hard as Hein does.
Riding the Super Glide Sport
When you swing a leg over the Sport you appreciate its low seat height and the
narrow design of the engine. It is an easy bike to straddle and balance despite its
considerable weight. Its low center of gravity makes it relatively easy to "paddle"
around with the engine off, or maneuver at low speed under power. The locking side
stand is very secure, the best around.
To start the bike when the motor is cold it is necessary to first pull out the enrichener
knob (located beneath the left side of the gas tank). Then twist the throttle all the
way on, slowly, about three times (this primes the carburetor). Press the starter
button on the right handlebar housing, and the TC-88 engine will come to life,
shaking and spitting beneath you. It will soon warm up, settling into its characteristic
loping idle.
With the enrichener pulled all the way out the cold engine will idle at about 1500
RPM. As the engine warms the idle speed will increase. As this happens, push the
enrichener knob part way in. I like to keep the engine idling between 1200-1500
RPM as it warms up. (When fully warm it should idle at 900-1000 RPM with the
enrichener off.) You can ride the bike about 30 seconds after starting the motor, but
I like to let the engine warm up with no load, until it will idle with the enrichener off,
or only slightly out. If you start to ride with the enrichener pulled out, don't forget to
push it all the way in once the engine is at normal operating temperature. Use of the
enrichener when the motor is fully warm will cause poor fuel economy and may foul
the spark plugs.
When you ride any Dyna Glide you will find that it requires more effort to pull in the
http://www.chuckhawks.com/super_glide_sport.htm (10 of 12) [18-02-2007 12:30:48]
HARLEY-DAVIDSON SUPER GLIDE SPORT
clutch lever than is typical today, and the transmission has an industrial strength
feel, shifting with a slight "clunk," especially into first. It does not shift as smoothly as
most modern Japanese and British bikes. But you will find that the transmission is
very positive--missed shifts are rare and there are no false neutrals.
The whole bike feels solid, unperturbed by the vagaries of life on the road. Vibration
from the big V-twin rumbling beneath you is quite noticeable at idle when you are
not accustomed to it, but the frequency is low and not uncomfortable. As you
accelerate the vibration diminishes. The rubber engine mounts and other rubbermounted parts, and the Sport's chassis tuning, effectively isolates the rider from
intrusive engine vibration. At cruising speed the bike is surprisingly smooth, less
tiring than many of the multi-cylinder bikes I have ridden.
The weight and steering geometry of the FXDX lets its rider ignore wind blast from
trucks and crosswinds that would upset lesser bikes. The supple suspension soaks
up road irregularities with ease. It takes a substantial pothole to get the rider's
attention.
The engine's monster torque allows you to pass slower vehicles with a twist of the
wrist; throw in a downshift and it's like they went into reverse. The test bike's
modified V-twin engine has quite a bit more roll-on acceleration at cruising speed
than many sport bikes, especially fours. You must be careful not to run them down
from behind when passing cars if you are riding in a mixed group.
Handling
The Super Glide Sport is one nice handling motorcycle. Static stability is good; it will
run straight and true "hands off." The tubeless H-D/Dunlop 591 sport compound
tires do a good job of sticking to the road under hard cornering or breaking forces.
The Sport's good manners and ability to attack corners belies its size and weight.
For reasons I don't fully understand, it feels like a much lighter and shorter
motorcycle. Steering is light and predictable, and it reverses direction (lean) easily.
At speeds below triple digits the bike feels well planted in sweeping turns. (I have no
personal experience at higher speeds.)
I would rather ride an FXDX aggressively than a Sportster, Triumph Thunderbird
Sport, or Kawasaki W650, to name three popular standard style motorcycles, even
though the FXDX is much heavier and has a longer wheelbase than those
middleweights. Anyone needing a motorcycle sportier than an FXDX should
probably buy a sport bike rather than a standard motorcycle. As they say, you have
to try it to believe it.
http://www.chuckhawks.com/super_glide_sport.htm (11 of 12) [18-02-2007 12:30:48]
HARLEY-DAVIDSON SUPER GLIDE SPORT
Riding with a passenger
The Sport's long wheelbase, sophisticated suspension, powerful engine, and
comfortable riding position make it a natural for riding double. For those who don't
want to ride "half a car" (i.e.: a full dress touring bike), but enjoy the pleasures of
motorcycling with their spouse or significant other, an FXDX equipped with a decent
dual seat is an excellent choice. Set the rear shocks' preload to the maximum
position, inflate the rear tire to 40 psi, and off you go in comfort and style. The bike
still handles well and looks good. In fact, when riding two-up, performance and
handling are only slightly compromised. You can still have fun on winding back
roads. In fact, you can ride them into the next state, together, if you wish.
Conclusion
The Super Glide Sport is a two wheeled "jack of all trades." A big, smooth, wellmade and versatile motorcycle that can pretty much hold its own in any company. It
is not cheap in any sense, but it delivers excellent value for the price.
Click here to return to Motorcycles & Riding Online.
Copyright 2000, 2005 by Chuck Hawks. All rights reserved.
HOME / PHOTOGRAPHY & ASTRONOMY INFORMATION GUIDE / GUNS & SHOOTING ONLINE /
NAVAL, AVIATION & MILITARY HISTORY / TRAVEL & FISHING INFORMATION GUIDE /
MOTORCYCLES & RIDING ONLINE
http://www.chuckhawks.com/super_glide_sport.htm (12 of 12) [18-02-2007 12:30:48]
Main Jet Correction
Harley
Camshaft
Specification
Tables
HD Twin Cam Engine Builds
TC 128 HP 95 CID
TC 100HP Street Engine
Originals By
Omar
Veypor VR2 performance
data logger with full
instrumentation showing
RPM, MPH, current gear,
acceleration in G's.
DEWEY'S CUSTOM
Rammer Performance Air
Cleaners
TC Performance Heads 100
+HP
Nightrider Nightrider
Performance Garage
Parts
Sale
Unique Parts and
Accessories for
Sale
Used Parts
for Sale
The basics
of Fuel
Injection
explained
Here is the way
for your favorite
lady to share
your passion for
motorcycles.
Advertise on
Nightrider
Reach 60,000
+ bikers a
month
Preferred Links
Custom Motorcycles
Motorcycle Dealer
Choppers
Custom Choppers
1107
Main Jet Correction Chart
Step #1 - Assume Nothing!!! Check your carburetor(s) to verify the jetting installed in the carburetor(s).
Step #2 - Because air density varies with temperature and altitude changes, a main jet correction may be
necessary. This chart was calculated at sea level with an air temperature of 60F.
Step #3 - Apply the multiplication factor shown to the main jet size recommended in the chart at the top of the page.
Step #4 - Your operating conditions will vary by the change of seasons. If your engine experiences performance
difficulties, a review of your jetting may be necessary. Return to step #2.
Step #5 - Humidity is also a variable in determining air density. A high humidity means a lower air density of air to
be consumed by combustion. Because we are generally not equipped with a way of easily reading the % of
humidity present, this can be read in to this chart by adding altitude on high humidity days and subtracting
altitude on in very dry climates.
http://www.nightrider.com/biketech/main_jet_correction.htm (1 of 4) [18-02-2007 12:30:51]
Home
Table of Contents
Search the site
Nightrider COPYRIGHT
Ask us a Question
Modification, Installation,
Maintenance and Tuning
Index will help you find
most of the information you
want on one page.
Main Jet Correction
Veypor VR2 Data Logger
and Instrument Panel
Video Installation and Demo
Purchase VR2
Create you base line jetting for standard conditions.
If your base line tuning was at 86 degrees and a 1500' altitude with a 155 Main Jet
Calculate Base Line: 155 Main Jet / .97 = 160 Base Line Jet or specifically 159.8
To correct for local conditions of 100 degrees and 4500' altitude
Calculate Corrected Jetting: 160 Base Line Jet x .94 = 150 Main jet to use
Altitude - Feet
0'
1500'
3000'
4500'
6000'
-22F
1.04
1.03
1.01
1.00
0.98
-4F
1.03
1.02
1.00
0.99
0.97
14F
1.02
1.01
0.99
0.98
0.96
32F
1.01
1.00
0.98
0.97
0.95
50F
1.00
0.99
0.97
0.96
0.95
59F
1.00
0.99
0.97
0.96
0.94
68F
1.00
0.98
0.97
0.95
0.94
86F
0.99
0.97
0.96
0.94
0.93
104F
0.98
0.96
0.95
0.94
0.92
123F
0.97
0.96
0.94
0.93
0.92
Temperature
Engine Performance
How to Build a
TC96 2007 Engines
TC88 70HP Stage1
TC95 128HP Stage 3
TC95 100HP Street
TC96 2007 Stage 1/2
EVO 64 HP Stage 1
EVO 74 HP Stage 2
EVO 82 HP Stage 3
EVO 95 HP Stage 3
883 to 1200 Upgrade
Shovelhead Modifications
New EFI for EVO and TC
Performance Gallery
Horsepower Gallery
Evolution 80
Shovelhead
Sportster
Twin Cam 88/95
Evolution Unlimited
Sportster Unlimited
Drag Strip Gallery
Land Speed Racing
Gallery
CV Carburetor
Modifying the CV carb
Tuning a CV carb
Camshafts
Selecting a cam
http://www.nightrider.com/biketech/main_jet_correction.htm (2 of 4) [18-02-2007 12:30:51]
Main Jet Correction
Install a TC 88/95 cam
Install a Big Twin cam
Install Sportster cams
Camshaft Specifications
Twin Cam
EVO
Shovel
XL
Exhaust Systems
EVO Exhaust Testing
TC Exhaust Testing
Khrome Werks AR100 test
Making Drag Pipes Work
SHOP TALK
Shop Manual
Carburetor
Carburetor Troubleshooting
Do Crank Vents work?
Exhaust
Ignition
Finding Manifold Leaks
Camshafts
Cylinder Heads
Pistons and Cylinders
Clutch
Belt Drive
Shop Manual Appendix
$20 Bike Lift
Plug Wires
Spark Plugs
Engine Tuning
Nitrous Oxide
Motor Oil
Stutter Box
General Information
WEB Links
Buy Books and Manuals
Miscellaneous
Performance Calculations
http://www.nightrider.com/biketech/main_jet_correction.htm (3 of 4) [18-02-2007 12:30:51]
Main Jet Correction
Estimate Horsepower
Estimate 1/4 Mile Time
Estimate Top Speed
Engine Displacement
Exhaust Length
Gear Ratios
MPH at RPM
Air Density
The Nightrider
Diaries
The ramblings of a genius a, a
madman and something in
between.
Where is Sifton Cams?
Autocom Active-7 tested
Harley-Davidson EFI
-EFI basics explained
-EFI modifications
explained
183 HP, 2 carbs, 2680cc
Copyright 1997-2006 Stephen Mullen, Oldsmar, FL -+-
http://www.nightrider.com/biketech/main_jet_correction.htm (4 of 4) [18-02-2007 12:30:51]
The Backfiring FAQ
THE BACKFIRING FAQ
compiled & edited by Kristian #562
Please read the Disclaimer before attempting any work in this FAQ.
Mike in SC, BCWill, Flash #412, HsN, Randy #748, Lyndon, Kristian #562
22/11/01
There are quite a number of different causes for backfiring. What this FAQ will try and do is to help you
isolate the cause of it. There are a number of solutions for the Classic F which cannot be used on the GS/
Dakar, simply because the GS/Dakar doesn’t HAVE a carburettor.
So that means if you have a GS/Dakar you’re lucky, because there are fewer causes. It doesn’t mean it’ll
be any cheaper to fix though.
What causes Backfiring
●
“Deceleration Backfiring” is the most common backfiring that occurs when you change down and
throttle off. This extract from the Virago Site explains it succinctly.
“In general, backfiring on deceleration (as opposed to acceleration) is generally caused by a lean
condition in the pilot circuit. What happens is that the mixture leans out enough to where is fails to
ignite consistently. This, in turn allows some un-burnt fuel to get into the exhaust pipes. Then when
the engine does fire, these un-burnt gasses are ignited in the exhaust pipe, causing the backfire.
Newer Virago carbs have an 'enricher circuit' which cuts in on deceleration to help this problem.
Earlier carbs do not have this. I would say check the pilot circuits, and set them a bit richer. It is
hard to do this right without some equipment to test where you are. Aftermarket pipes often
increase backfiring, probably because they may the bike run leaner.”
A more detailed explanation can be found below.
●
Some riders have also experienced Backfiring on Up-shifting. An exhaust gasket (item #3 below) is
the most likely culprit, rather than items 1-2 or 4-5.
So how do I fix it ?
1. Idle Screw – Can be Adjusted – Classic F only
Some folks cure backfiring by turning up the idle slightly. This is the brass knob on the end of the black
flexible thing hanging out the bottom of the carb set. If you just have mild backfiring, you can try this. Many
bikes never run at the low end of the recommended 1200-1400 Idle rpm range in BMWs Manual. Refer the
Idle Mix Screw FAQ.
2. Idle Mixture – Can be Adjusted – Classic F only
No this is NOT the same thing as the IDLE. The Idle Screw just limits the minimum throttle when you take
your hand off the throttle. The Idle Mix Screws, and there are TWO of them, one for each Carb, actually
controls the Gas/Air Mixture at Idle. Obviously this is not applicable to the GS. For the location of the Idle
http://faq.f650.com/FAQS/BackfiringFAQ.htm (1 of 4) [18-02-2007 12:30:52]
The Backfiring FAQ
Mix Screws and useful tools to turn them, see This FAQ.
Most riders find that enriching the idle mixture by backing off the screws by 1/8 to 1/2 a turn will
eliminate the popping. Enrichen as little as necessary, work in small increments, and test the results
before backing out the screws another 1/8 turn.
For more information on the Idle Mix Screws the Carb Cleaning FAQ.
3. Exhaust Gaskets – Can be Replaced Classic F and GS/Dakar
These seem to be one of the most frequent cause of Backfiring Problems and an item that has been seen
to fail quite often.
”Recently went to replace gasket where header pipe meets cylinder head. After pulling left header pipe I
found culprit of noise, blown out header pipe to collector gasket. This was a corrugated sleeve that failed
under the clamp. Replacement gasket is no longer corrugated. Added bonus was the commonly reported
backfiring problem, I thought I had to live with, is now completely gone. Try this $11.00 fix if your bike is
backfiring.”
There are actually FOUR Exhaust Gaskets on the Stock Exhaust Pipe”
●
●
●
One on each of the Exhaust manifold connections to the Cylinder Head, which look like this. This is
a close-up of one of them. It is the Silver Ring, which is very soft (crushable) metal sandwiching a
Gasket Material.
One where one of the Exhaust Manifold pipes meets the Collector pipe to Cylinder Head, which
look like this.
One where the Exhaust Collector Pipe meets the Exhaust Proper, i.e. at the crossover pipe.
VERY often you can fix the problem by simply tightening the Exhaust Header/Cylinder Clamp Nuts. Here
is the RHS Upper One, RHS Lower one, LHS Lower One. You can also try tightening the Exhaust/
Collector Clamp.
Testing:
You can check these with a bit of smoke (like from a cigarette) in a still area, wafting around the joints.
Headers also crack and split sometimes. Watch for the smoke being blown away by leaking exhaust
gases.
For Exhaust Gasket Replacement see that FAQ.
4. Has your bike been rejetted/New Pipe/Open Airfilter? Poor jetting can ruin a well-running bike.
●
I just went through this. I agree loose the DynoJet. I went back to stock and have a Staintune
exhaust. Check the orifices on the lower edge of the Airfilter side Venturi on both carbs make
sure they're clean. My bike runs great. I also got rid of the pipe from the header to the air
cleaner. No more backfire on Decel. James.
http://faq.f650.com/FAQS/BackfiringFAQ.htm (2 of 4) [18-02-2007 12:30:52]
The Backfiring FAQ
If you want to rejet, see the Performance Modifications FAQ for details of how others got on.
5. Carb Intake Rubbers – Can be Replaced – Classic F only
Testing:
For the carb intake rubbers, you can an unlit propane torch, just barely cracked open, and see if the idle
changes when the gas gets sucked in. Don't get carried away or you will flame the bike. Less messy than
using WD-40. See the Carb Cleaning FAQ for details on removing your carbs. The extra air from the split
boot will cause the popping.
6. The Airbox to Exhaust Header Line – Can be “Fixed” Permanently – Classic F only
Remove the line from the bottom of your airbox to the right exhaust header. This is the steel/rubber/steel
piece that follows the right header pipe rearward. Plug the airbox (better yet, pull the air filter and pull out
the exhaust re-circulation valve), cut the pipe behind the exhaust end connection, and replace it on the
threaded piece it came off of with a 3/8" ball bearing inside it. That ended my backfiring.
Check your Air Injection Hose Routing if you've done a Canisterectomy.
The mis-connected carb vacuum hoses can also encourage backfiring - the right side carb is sucking
too much air thru the canister and up the drain tube, right? That means the carb fuel mixture is also
slightly leaner, more prone to backfiring. Putting the hoses back correctly may help with the backfiring
without having to adjust the idle mixture screws richer. The mis-connected hoses can also degrade low
end response slightly.
Hang on a minute, all but one those fixes are for the Classic F ?
Sorry, if you have checked your Exhaust Gaskets and NOT modified anything else like your Intake Snorkel
or your Exhaust Pipe, you’ll have to ask your Dealer for a Newer Version of the FI Software to fix your
bike. There are no idle mix screws or idle adjustment knobs on the GS/Dakar.
More Details on Carb-Related Backfiring
By Ted Harris. From the Virago Site.
“When it comes to machinery I am a perfectionist. A machine, must be carefully maintained and
assembled in order to perform to its full design potential. I own a 1983 Virago XV920K with which I had an
annoying and persistent backfire every time I decelerated. Other motorcyclists and mechanics with whom I
spoke were most sympathetic when discussing this problem but invariably dismissed the problem as
something to be expected when using low restriction, after-market pipes.
Now, an engine is not supposed to backfire and, when it is persistent, I am not convinced it is harmless to
the engine. If there is an explosion in the exhaust pipe when the cylinder is trying to exhaust its spent
combustion products a back pressure is created which interferes with the next cycle. This could result in
incomplete extraction, irregular charging with the fresh mixture, and overheating. In addition valves are not
designed to seal against pressure from their backsides and a broken valve head rattling around in the
http://faq.f650.com/FAQS/BackfiringFAQ.htm (3 of 4) [18-02-2007 12:30:52]
The Backfiring FAQ
combustion chamber at 7000rpm engine speed is not something I am desirous of experiencing. As a side
note, I got a real appreciation for the forces involved in the internal combustion process one day when I
had removed one of the spark plugs in order to clear raw gas from the cylinder. I had forgotten to
disconnect the igniter and, to my very great surprise the engine started and began to run! WOW!!! the
forces involved can only be described as awesome. And remember the open cylinder was not even firing.
The force of the exhaust pressure alone, at idle speed, was responsible for this incredible display. I am still
disquieted by the act of straddling this beast.
A man named Daniel Bernoulli (1700-1782) was the first one to describe the effects of a Venturi. Basically
stated it is this. As the speed of a fluid increases its pressure decreases. And, a fluid (exhaust gas is a
fluid) when forced through a restricting orifice/Venturi (an exhaust pipe is a restricting orifice) increases its
speed and creates a vacuum.
This principle has a dramatic demonstration any one can perform. Grasp an ordinary sheet of paper by
two contiguous corners and let it droop down in front of your mouth. Now blow across the top of the paper
and the paper will rise toward the vacuum created. This effect is what makes airplanes fly and motorcycles
backfire. It application is truly profound and if you have the time I highly recommend a reading of the
Bernoulli family biography. No slackers in the brains department these people.
Its not the after market pipes causing the backfire you see. Its the air leaks caused when the gaskets
weren’t replaced and other leaks sealed when they were installed. Fresh air is drawn in through those tiny
holes and provides sufficient oxygen to ignite the unburnt gases inside.
Recently I removed the rear wheel from my motorcycle and had to exert pressure on the front pipe in order
to extract the axle bolt. Upon reassembly the backfire had returned, though not to the outrageous extent
as before. Attempting to deny that my old problem was incurable after all.
I tried to convince myself it was due to a heightened sensitivity on my part.
Yesterday I received the new shock assembly I had ordered and the rear wheel was removed again. Upon
close inspection the evidence was unmistakable. Soot marks were present not At the front exhaust flange
but on the #1 (rear) cylinder downpipe where the slot is cut for the pinch bolt. Taking great care in the
reassembly I removed the old gaskets and sealed the slot with a paste made for the purpose and
obtainable at any well stocked automobile parts store. The backfire problem is cured and there is not the
slightest bit of doubt in my mind that the cause was as I have explained. One caveat is in order here, Do
not waste time trying to listen for a leak in the exhaust pipe with the engine running, You won't hear it. It’s
too small. If the exhaust pipes have ever been removed or replaced of if the exhaust gaskets have been
stressed in any way, replace the gaskets.”
http://faq.f650.com/FAQS/BackfiringFAQ.htm (4 of 4) [18-02-2007 12:30:52]
Exhaust Gasket Replacement FAQ
Exhaust Gasket/Exhaust Nuts Replacement FAQ.
Compiled by Kristian #562. Pictures by Kristian #562.
Please read the Disclaimer before attempting any work in this FAQ.
●
●
●
●
Classic Exhaust Gaskets
What about the GS Exhaust Gasket?
What about those Rusty Exhaust Nuts/Studs?
Alternative Gasket Sources?
Note. This might sound really dumb, but do please wait for the bike to cool completely before replacing
any Gaskets.!
Classic Exhaust Gaskets
●
●
●
Where are all these Gaskets ?
Gasket Replacement at the Cylinder Head
Gasket Replacement at the Collector/Header Pipe Junction
Where are all these Gaskets ?
There are actually a total of FOUR Exhaust Gaskets on the Stock Exhaust Pipe, (Only three for a
Staintune) however the most common ones that fail are the two at the Engine/Header pipe connection.
They are:
●
●
●
One on each (total of 2#) of the Exhaust manifold connections to the Cylinder Head, which look
like this. This is a close-up of one of them. It is the Silver Ring, which is very soft (crushable)
metal sandwiching a Gasket Material.
One (1#) where one of the Exhaust Manifold U-pipes meets the collector pipe (that goes to the
other exhaust port in the cylinder head. This is a photo of where it goes Refer to Exhaust Pipe
to Collector Gasket, below for details.
One (1) where the exhaust collector meets the exhaust pipe that goes to the muffler, just before
the crossover pipe.
If the leak is right at the exhaust header, where it connects to the engine, the leak could cause valve
damage over a period of time, if it is anywhere else further down the exhaust system, it will just make
noise.
Gaskets Replacement at the Cylinder Head
By Shank, Flash #412
December ‘01
http://faq.f650.com/FAQS/ExhaustGasketReplacementFAQ.htm (1 of 8) [18-02-2007 12:30:55]
Exhaust Gasket Replacement FAQ
What to check First: Before you go replacing the Gasket, try first tightening the nuts that clamp the
Exhaust Headers to the Engine Ports. The location of these nuts is shown below. Replacing the gaskets
should give you far less flatulence (wish I could say the same for me), will be quieter and may give you
more power. Check also you actually have the nuts, as sometimes they can come off.
A. Symptoms of a Failed Exhaust Gasket:
As you increase revs you may get popping and perhaps in a darkened garage or at night a blue
flame shooting out of a pipe on the front of the engine around the exhaust pipes. The flame if any
will come from around the clamp. It may not have been assembled correctly at the Factory, or it
might just have got tired.
NOTE:
1. It can also make it LOOK like a weeping head gasket, because of the spooge that comes out, so
don’t go replacing your head Gasket Until you’re sure.!
2. Also, this junction is right below the temp sensor that turns on the fan. The hot air blowing out of
there Can heat up the thermostat and fan sensor, turning the fan on prematurely. And when the fan
comes on, it will blow the hot exhaust gasses on your leg.
3. My 98 F650 appears to display defective behavior. The symptoms are as fallows: an unusual,
gargle sound after downshifting (after clutch release), rapid acceleration or rapid deceleration, the
sound appears to originate and/or surface in the exhaust. I have also noticed a slight decrease in
overall power performance. Jacek.
Refer also the Backfiring FAQ and the Strange Noises FAQ for more Symptoms of a Failed
Exhaust Gasket.
B. Where are the Clamp Nuts:
VERY often you can fix the problem by simply tightening the Exhaust Header/Cylinder Clamp Nuts.
Do not overtighten! The nuts are as soft as cheese. Here is the RHS Upper One, RHS Lower one,
LHS Lower One. You can also try tightening the Exhaust/Collector Clamp. If you need to replace
the studs, refer What about those Rusty Exhaust Nuts below.
C. So how do I test if they are leaking:
You can check these with a bit of smoke (like from a cigarette) in a still area, wafting around the
joints. Headers also crack and split sometimes. Watch for the smoke being blown away by leaking
exhaust gases.
or:
Take an old, tired dollar bill (which is very flexible) and wave it around in the vicinity of ALL of the
Exhaust Joints to check for leaks.
Is there a Temporary Fix so I don’t wake up the Neighbours coming Home.?
http://faq.f650.com/FAQS/ExhaustGasketReplacementFAQ.htm (2 of 8) [18-02-2007 12:30:55]
Exhaust Gasket Replacement FAQ
Stuff the offending hole with aluminium foil and lo, the whole thing will be quieter, fart less (wish I
could do the same) and the fan won’t come on as often.
D. So how do I fix it properly.?
OK, lets do a little naming, for clarity. Assuming:
Lex = Left Exhaust
Rex = Right Exhaust
#8 = Exhaust Gaskets at the Head. This has been reported as a corrugated sleeve that fails under
the clamp. The Replacement gasket is no longer corrugated.
#5 = Gasket between Tail pipe and Mid-pipe
#7 = Gasket between Lex head pipe and mid-pipe
The numbers will make sense if you have le partsfiche a l'i'clair.
(That’s the Parts gif, for Details refer Documentation). (or Shh, don't tell BMW. Exhaust gif)
Note: You can get sockets on Rex. You CANNOT get sockets on Lex.
●
Remove the LEFT sidecover.
●
Remove the black plastic panels that cover both sides of the motor.
●
Remove both screws from the FRONT of the belly pan and just loosen the rear ones a turn
or three. The belly pan just needs to drop down a couple or three inches in the front to
make your life a little easier.
●
Loosen the Allen screw on the clamp that holds the u-pipe into the collector.
●
Loosen the Allen screw on the clamp that holds the collector to the muffler.
●
Get a 13mm box end wrench. A socket won't work. An open end won't work. Get a BOX
end wrench. An open end will round off the corners of the cream cheese material used to
make the fasteners. The stock stud nuts are made of cream cheese and extraordinarily
cheesy. You may want to replace them with some Japanese exhaust nuts that you have
lying around. Perhaps slather everything with Aunti Sieze (she didn't mind). (That’s AntiSieze to non-native English Speakers)
●
You NEED a box end wrench. That is the one that is NOT in the Official BMW (POS) Tool
Kit.
●
Loosen all four 13mm nuts at the header clamps until you can remove the nuts with your
fingers.
●
When removing the Lex pipe, I suggest removing the frame bolt just below it to make it
easier.
●
If a stud wants to come out of the head give it some Vice-Grippian persuasion to make it
stay in the head.
●
It is much easier if the radiator has been removed and if you have four arms.
●
Remove them, and then remove the clamps that hold the headers in.
●
Pull the headers out.
●
There is some wiggling that needs to be done to get the headers out at the same time
you're removing the u-pipe.
●
You might need to pull the collector out of the muffler at the same time. Make sure you hold
your mouth just so.
●
Replace your vaporized gasket. Pull out or lever out the Old Gaskets with a Screwdriver.
●
The Exhaust Gaskets are slightly larger than the opening and very soft metal, so it is
http://faq.f650.com/FAQS/ExhaustGasketReplacementFAQ.htm (3 of 8) [18-02-2007 12:30:55]
Exhaust Gasket Replacement FAQ
difficult to get it in there, so some persuasion with a screwdriver and hammer may be
necessary, and of course, the radiator is in the way. Getting the Gaskets in place and not
mangling it can be very difficult.
E. Gasp.! I'm sure there is no gasket there.!
There is. Stick your finger in the port. Feel for the EDGE of the gasket as your draw your finger out.
You might need to feel in several places (3 o'clock, 6, 9 and 12 for instance). If you go ahead and
put a new Gasket in on top of your old one i.e. TWO gaskets in, your exhaust system is more liable
to leak and won't fit exactly right. Besides that, the nuts won't run down as far.
The gasket where the U-pipe joins the collector is just asbestos (or some sort of impregnated
carbon) as is the gasket where the collector joins the muffler. With NO metal, these can disappear
gradually. The gaskets where the pipes enter the heads have METAL in them. They cannot
disappear. When I first took my header pipes off, I thought those gaskets were missing, too. Keep
looking.
F. Gasp#2. I think I was given the wrong-sized Exhaust Header Gaskets
Sound Familiar? Does the F650 have different size gaskets to go between the exhaust pipes and
head? (I'm thinking of certain models of BMW Airheads that had different sized exhaust pipes)
Reason I am asking is that I was installing new ones to replace the old ones (OK at 25K miles)
while the muffler was off...and the new ones were 1-2 mm too big in diameter to fit into the bores in
the head. As they are soft "crushable" material, I "made them fit", but as they are calling for snow
this week (and likely the season's first de-icing salt), I probably won't know until next spring if they
actually seal or not. Marty #436.
Actually I had the same problem. Kristian #562. I MADE them fit, which is why in this close-up of
one of them, it looks all squashed. Don't know WHY BMW do that. But it looks like it's normal. You
might have more luck with a set of Gaskets from Aprilia (The Pegaso Gaskets will fit the Classic).
G. If you need to replace the studs, refer What about those Rusty Exhaust Nuts below, otherwise.
H. Reassemble: In reverse order.
It REALLY helps to have someone over on the left side, feeding the left pipe into the head while
you're dealing with the other three joints all at once on the right side.
Tighten it all up. Torques are in the Torque Table.
Fire it up.
Test again as above.
I. Notes: Justin843, Flash #412.
i. There is no way to get socket wrench or torque wrench on the main exhaust pipe nuts without
removing the radiator. The tool to use is a 13mm box end wrench. You won't have to mess with the
radiator and it works quite well.
ii. Get the collector pipe flare pieces to open up to accept the new gasket is not easy with all the other
hardware getting in the way. You have to pull the pipe flares open with a pair of pliers, but getting a
bead on it is tough. I just pulled the lowest one open as much as possible because there were no
http://faq.f650.com/FAQS/ExhaustGasketReplacementFAQ.htm (4 of 8) [18-02-2007 12:30:55]
Exhaust Gasket Replacement FAQ
obstructions. Another method is to stick a long screwdriver in the slot between the "ears," angled
from the inside of the hole, as close to the open end as you can get it and then smack it with a
hammer.
iii. If your think your main exhaust gaskets have disappeared... you will swear on your mother's grave
you have no exhaust gaskets. They are there, really.
iv. Collector gasket = $11 clams. They wear out quickly They wear out quickly WHEN THEY START
TO GO. But if the clamp is tight, that isn't a problem. This is NOT a normal wear item.
v. Exhaust gasket= $1.50 - that's a BMW shock! They are durable. I think you can probably get the
same gasket at lots of other motorcycle stores for half as much. But I do not KNOW this.
Gasket Replacement at the Collector/Header Pipe Junction
by Francois
December ‘01
My exhaust collector/header pipe gasket (end of the U tube) went (99F650, 26,000km) and was leaking
gas.
I am not happy about the lifespan of this piece which is way too short, and I am especially unhappy about
BMW’s explanation that it was destroyed by an excess of heat! I thought this piece would be designed for
this.
The Symptoms were:
●
●
●
Increased backfiring
A Loss of power
A Louder Exhaust Note
Part Number
●
●
●
The BMW part number is 18 11 2345 037, cost: 10$.
The gasket is asymmetric, and the rolled edge should be inserted facing backward i.e. toward the
rear of the bike.
The new gasket looks like a section of tube made by rolling up a piece of metallic paper, with one
section slightly biased.
The Gasket Dimensions are:
●
●
●
●
External diameter: 35 mm
Internal diameter: 30mm
Thickness: 2.5 mm
Length: 20 mm
Replacement:
http://faq.f650.com/FAQS/ExhaustGasketReplacementFAQ.htm (5 of 8) [18-02-2007 12:30:55]
Exhaust Gasket Replacement FAQ
Removal of the old Gasket is fairly easy:
●
●
●
●
●
●
●
●
●
Take off both side fairing panels (the long pieces)
Unbolt the Gasket Connection (Allen Key)
Unbolt the U pipe at the Head (These 13mm nuts come undone pretty easily),
The interior of the exhaust was dark, leaving a thin black powder on the finger
Remove the remaining parts of the old gasket.
Insert the New Gasket
You may need to use pliers to widen a bit of the end of the external exhaust pipe, which is
factory notched, because the clamp narrows it and the new gasket may not fit in.
Put the U pipe in place and re-fasten the two nuts at the Head.
Torque the collector bolt.
As advised by the mechanic, I left about 2 mm from maximum tightening of the clamp.
Testing:
Start the engine and check for leaks, as per the procedure for the Gaskets at the Cylinder Head.
●
●
●
●
Some sort of vapour may come out from the collector but not under any pressure, and possibly
some WD40 burning, if you used that to loosen your nuts/bolts.
Some pulses of air may come out from the new gasket.
Tighten the clamp a little bit if this happens.
Check the air-tightness over the next few days. The new gasket is supposed to heat and shrink a
bit so retighten if necessary.
The whole thing is quite easy and takes less than an hour, you just need two Allen keys from the bike
tool-set, pliers and a 13mm wrench.
The bike now sounds fine, power is back and there is no backfiring.
Mechanic’s advice:
Do not tighten the gasket fully straight off. Ride about 150 km, (the gasket will shrink a bit), then do a final
tighten.
The clamp is specially designed so that it can’t be tightened to less than a certain minimum diameter.
On-the-road Alternatives:
●
Take it off and head to an auto supply shop to look for a suitable-ish temporary replacement?
When we blew an exhaust gasket on our off-road buggy in the middle of Baja we went to a shop in
Geurro Negro and got the closest match we could find...worked long enough to finish our trip and
save our hearing and the valve. Cold air being sucked onto a hot exhaust valve is bad. One trick
you might use (we did) is to use a pair of shears to cut away sections at the bolt hole locations so
you can simply slip the gasket between the manifold and header without having to take the header
completely off. then clamp it down. not the best solution, but as I said, it worked...when you don't
http://faq.f650.com/FAQS/ExhaustGasketReplacementFAQ.htm (6 of 8) [18-02-2007 12:30:55]
Exhaust Gasket Replacement FAQ
have a lot of options, you make do. Mark #403
What about the GS Exhaust Gasket?
Unlike the Classic, the GS has only ONE, Large Exhaust Gasket. At the present time there is no
procedure to follow for its replacement, but is likely to be very similar to the Classic.
Meanwhile here is some feedback:
●
I found out the exhaust manifold on my F650GS was loose, caused by two loose exhaust pipe
nuts. I tried to fasten the nuts but decided to take everything off to see if the gasket was all right.
The gasket is/are the two thin metal parts right? Now the strange part: I measured the stud length
with the nuts fastened and found out the space is to big to tighten the manifold. The end of the
studs were damaged by the (cap) nuts because they were turned on the studs to far. The studs are
not loose. I have driven the bike 6000mls now, never had any trouble. Recently the dealer installed
a Remus exhaust and 1000mls later this. Does anyone have any experience with this? Maarten
What about those Rusty Exhaust Nuts/Studs?
by Flash et al.
Q. I have a F650ST and I am concerned at the state of the exhaust studs that hold the exhaust to the
cylinder head. They are looking a bit corroded. I am concerned that if I need to remove the exhaust in the
future I might have some difficulty. Any advice on how to get around this problem would be appreciated.
Skidmark.
A. Replace the studs now. Use ant-seize.
Q. Can you please advise how to remove the studs.
A. Pull whatever it is you need to pull to have access to the area. (See above). Remove the nuts. A clamp
plate will pull out of the way. Shoot a little Liquid Wrench® around the base of the studs and follow the
instructions on the container. Use Vise Grips® to twist the studs out. If you need to pull the headers to do
the job, so be it. The absolute worst case is that you will break one (or more) off in the head and need to
drill it to remove it. There is no point in using any Loc-Tite® on reassembly because of the temperature
where the studs live. To screw in the new studs, put two exhaust nuts on one stud and jamb them together
using two spanners. Then put the wrench on the outboard nut to "drive" the stud home in the head. Yes, hitemp anti-seize on the threads where the nuts go, just before you install the nuts.
Preventative Maintenance:
1) Soak with WD-40
http://faq.f650.com/FAQS/ExhaustGasketReplacementFAQ.htm (7 of 8) [18-02-2007 12:30:55]
Exhaust Gasket Replacement FAQ
2) Remove one at a time. Clean with wire brush. Glop on anti-seize. Retorque.
Unless they look like the corrosion is more than surface, I wouldn't try to remove them unless they come
out while trying to take the nut off. If one breaks, then what could have been a clean-up and re-lube job
becomes a nightmare.
Alternative Gasket Sources?
●
●
Ring Gaskets
Sleeve Gasket
Ring Gaskets
by Flash
You might have more luck with a set of Gaskets from Aprilia. (The Aprilia Pegaso Gaskets will fit the
Classic).
Sleeve Gasket
by Steve F650001
I was in Eastern Oklahoma when things started getting loud. As I neared Queen Wilhemina State Park the
loud got louder, and when I backed off the throttle the engine backfired. That may sound cool when you
are 17 years old and driving your dad's vehicle, but not when you are the owner who has to pay for
repairs. The gasket, a cylindrical woven "sleeve" that fits on the end of the left side exhaust pipe just
before it enters the "Y," had disappeared, leaving quite a gap for exhaust gases. The closer a leak of that
type is to the exhaust port the greater the chances for a burned valve. The connection is about 12 inches
from the exhaust port.
At first I thought it to be the ring gasket, which fits inside the port and several Inmates helped by calling
dealerships in their hometowns. We planned to contact another Inmate who would be coming to the rally
and could pick up the part and bring it to the rally. Meanwhile I drove to Mena looking for replacement
parts. Closer inspection showed that the ring gasket was not the problem it was the exhaust pipe gasket.
[See photo]. I raced back and forth across town in desperate haste. Finally, I tried the Yamaha shop. With
the short section of exhaust I my hand, the wonderful woman behind the counter came to my rescue. The
$20 part was just what I needed. Yamaha #4DN-14714-01; also indicated 863066.
http://faq.f650.com/FAQS/ExhaustGasketReplacementFAQ.htm (8 of 8) [18-02-2007 12:30:55]
The Very Strange Noises FAQ
The Very Strange Noises FAQ
by Kristian #562 (20/10/01)
Please read the Disclaimer before attempting any work in this FAQ.
Last Updated: 18 Feb 2007, by Winter #1935
●
My Bike seems to make a Strange Noise. How can I fix it?
●
Do you have a short list to help me?
●
So what does it sound like and where does it come from? (list of noises)
●
Other Comments / Hints - to help you find the noise
●
What Should I Mention in the Forums? (So we can help you)
●
What is the Mechanics Stethoscope?
For other helpful FAQs:
●
Hard Starting / Poor Running FAQ
●
Troubleshooting FAQ
My Bike seems to make a Strange Noise. How can I fix it?
There a number of common sources of Noise on the F650. If you're looking for Vibrations see this FAQ.
Do you have a short list to guide me in the right direction?
The table below should help guide you to your noise. However if you can not find it based on the table,
read through all the noises.
Keywords
Perceived Location
Other Attributes
"Front" Noises (Instruments, Forks, Battery)
http://faq.f650.com/FAQS/StrangeNoises.htm (1 of 23) [18-02-2007 12:31:03]
Which Noise?
The Very Strange Noises FAQ
Clicking
mid-lower forks
Noise 1
Clicking
(turning steering)
Noise 2
Buzzing or Rattling
Front
Noise 5
Noise 7
Noise 12
Noise 13
Noise 15
clunk clunk clunk
Front End
Rattle
up front
Buzzing / several rapid clicks /
rythmic clicking
Fairing/Speedo Area/
instrument panel
Can be rev dependant
Not an engine noise
Noise 18
Under certain load /
vibration conditions
Lowering kit
Noise 19
Noise 21
Noise 27
Noise 52
buzzing
Front
Stops when starter
depressed
Stops when heated
grips turned on
Headlight dims
metal ball (rolling) in a cup
under the speedometer
top of the fork
30 to 35 mph
in gear or with the
clutch in
rattle
heard when riding over
headlight / steering head expansion joints or
small potholes
Noise 40
keyboard clicking/clacking
small plastic object shaken
gently inside 35mm film canister
instrument cluster/
windshield
beween 30-50 mph
Noise 44
metalic rattle
front
off-road, downhill
Noise 49
front
can be rev dependant
possibly temperature
dependant
mainly 2nd / 3rd gear
Noise 50
front / instruments
after turning bike off
can last for several
minutes
tach / speedo needle
"twitches"
Noise 51
ruler twanging on desk edge
tick-tick-tick pause
Noise 33
Noise 38
Engine / Transmission Noises
Rattling
From engine
http://faq.f650.com/FAQS/StrangeNoises.htm (2 of 23) [18-02-2007 12:31:03]
At idle
Noise 3
The Very Strange Noises FAQ
Plink Plink
Engine
Trailing throttle / blip at
idle
Noise 6
Farting and a loud popping
Front
(not backfiring)
Noise 9
When Shifting, mainly
3rd to 4th
Noise 17
Popping
Rattle ("jingling" keys)
Transmission
While moving
Noise 20
Bizzar buzzing
Engine somewhere
Rear wheel not
spinning in gear
Noise 56
Engine
2500-3500 in 3rd
upwards
hard the noise reduces
Noise 22
Gets Faster as Idle
Raised
when in neutral, clutch
engaged
Noise 24
metallic rattle
Knocking
loud knock
Engine
doesn't go away off-idle Noise 25
scraping
Engine
When engine cold
Once per second
Noise 29
tick-tick-tick-tick
Engine
drowned out @
3000rpm
Noise 30
Khat-Khat-Khat
LHS Engine / Engine
When engine cold
Noise 34
Noise 54
engine knock, chain rattle, keys
in the cylinder
4200-4500 RPMs in 4th
and 5th gear
occaisionally when I
Noise 35
decelerate
more noise after
warming up
increasingly loud
Around 3000kms
mic the cylinder bore
(out of spec)
Noise 37
something releasing tension / big
From the starter?
CLICK
Sometimes when
turning off
Noise 42
lightning storm
cylinder
At very low rpm
On start-up without
enough choke
Noise 43
grinding noise
Transmission
starting in 1st gear with
Noise 53
a bit of a load
and starting up a slope.
Engine
http://faq.f650.com/FAQS/StrangeNoises.htm (3 of 23) [18-02-2007 12:31:03]
The Very Strange Noises FAQ
(GS) rattle
transmission
While on sidestand
Goes away when clutch Noise 55
pulled in
"Rear" Noises
Rattling
Chain area
Noise 11
Rattle
LHS Rear
Noise 14
Noise 16
after downshifting (after
clutch release)
Noise 23
rapid acceleration or
rapid deceleration
gargle sound
exhaust
plastic rattle
rear / exhaust
Noise 36
Other Noises
Squeal
Brakes
Noise 4
Tic Tic Tic
Solenoid, near battery
Noise 8
weird "wooo"
When compressing rear
shock
Noise 10
humming / feline purring
Under load
Lower rpms, upward
slopes
"on" for half a second,
"off" for another half
second
Noise 26
scraping / dragging
Factory lowered model
Under heavy load
Noise 31
crunch crunch
Under load @ low rpm
Noise 32
loud grinding squeal
starting after stalled
shifting down coming to Noise 39
stop
engine
playing card clothespinned to my
wheel
right side
knocking sounds from bottom
end
slows down as I slow
down
sporadic grating
lasting for a few minutes
follows engine RPMs
more at lower speeds
Noise 45
Sometimes gets 3x
loud for 10 seconds
then subsides
the tranny on the RHS
http://faq.f650.com/FAQS/StrangeNoises.htm (4 of 23) [18-02-2007 12:31:03]
Noise 41
The Very Strange Noises FAQ
noise engine
engine
from idle to about
2000rpm
after 2000rpm it fades
to normal piston noise
replaced cam chain
tensioner, noise
reduced
moderately-pitched (MP) clunk
valve/cylinder area
when turning off bike
(engine running)
Noise 47
persistent but
inconsistent
Noise 48
Whirring of gears (hum)
something electromechanical
shutting off /
electrical antenna going down
injector's area
Noise 46
Noise 27
Noise 28
So what does it sound like and where does it come from?
For Engine Noises: To help you identify WHERE it is coming from, grab a good solid screwdriver,
put the tip on the Engine where you THINK the noise is coming from and the handle against your
ear, like stethoscope. Move the tip around until you determine the source location.
●
Noise 1 - Clicking from mid-lower Front Forks - As yet unidentified. When replacing the fork
gaskets you have to remove the spring in the fork. And you can put in the spring "upside" down,
one end of it is thicker than the other and this end has to be up (into direction of the upper fork
bridge or better: the driver). Maybe someone didn't know that fact (even the man who assembled
it somewhere in Italy).
●
Noise 2 - Clicking when Steering Turned see the Steering Head Bearings FAQ or Handlebar
Clamps BUT try first tightening the Tighten Steering Head Nut (in Middle) or Handlebar Riser
Mount Bolts.
❍
❍
Feedback #1 I had the same problem two years ago. I too thought that it was the steering
bearings. It turned out to be loose mounting bolts under the upper triple clamps which
fasten the handlebar mounts to the clamp. When they loosen, in addition to letting the bars
wiggle a bit too much, they can make a clicking noise when you brake to a stop. There are
two bolts, a jam bolt and a tightening bolt. They are hard to reach without a deep socket or
using a tool that is not supposed to be used on bolts. The torque value is low, only about
14 NM I think, to keep the rubber mounts from compressing too much.
Feedback #2. Check the main nut for the head bearing shaft. It is on top of the triple
clamp and under the handle bars. I put up with this "sound" for months after the dealer
adjusted the steering head. Although I couldn't move the nut with my hands, as soon as I
put a socket (1 1/8" [26mm]) on it I could turn it with my hand. After tightening the nut with
lots of force on a 1/2" drive socket wrench the "sound" went away. It was loose.
http://faq.f650.com/FAQS/StrangeNoises.htm (5 of 23) [18-02-2007 12:31:03]
The Very Strange Noises FAQ
❍
Feedback #3 I also put up with the clicking for a while until I tightened the steering head
lock nut. On my '97 the nut is 30mm. I was told to torque it down to 30ft-lb but it loosened
up again, so went for 50 ft-lb and that seems to have done the trick.
●
Noise 3 - Rattling from Engine at Idle Possibly Compression Releaser Turn up your idle a notch.
If its occurs at low rpm, especially when not fully warmed up, it is the centrifugal de-compressor.
It's a fairly regular click - means it's about to engage because the engine is turning over too
slowly. If it is happening above 1500 rpm, there's a problem. If it's just the de-compressor,
assuming it's had basic maintenance and oil changes, unless you are going to get the valve
clearances checked while you are in there, don't bother to open up the engine at all. If it's an OLD
Bike, Could be Cam Chain Rattle, most probably caused by a fragged chain tensioner, rather
than a worn timing chain. Refer the Cam Chain FAQ.
●
Noise 4 - Brake Squeal See the Brake Squeal FAQ.
●
Noise 5 - Buzzing sound from the front of bike (1997 F). The ignition and cable guide assembly
maybe loose and missing one of the two bolts that attaches it to the under side of the triple clamp
(upper). Check that your ignition switch assembly isn't loose. Makes a really annoying rev.
dependent rattle that sounds like something loose in the valve train. Pete. Ignition Switch FAQ.
●
Noise 6 - A very noisy cam chain will be the sound of the "plink plink" of the chain smacking it's
housing during trailing throttle and after throttle blips while idling. But the F has a hydraulically
tensioned cam chain, it would be very unlikely for it to be loose.
●
Noise 7 - Ignition Mount/Cable Guide "Just got back from lunch about a mile away. On the way
there I heard a buzzing sound from the front of bike (1997 F). When I stopped to look around I
found that the ignition and cable guide assembly was loose and missing one of the two bolts that
attaches it to the under side of the triple clamp (upper). I tightened the remaining bolt and now
need to get a new bolt. You might want to add this to your list of things to check occasionally."
Ignition Switch FAQ.
●
Noise 8 - When I try to start my bike there is a "Tic Tic Tic" sound coming from the Solenoid,
(Large Round Object just Rear of the Battery on the Airfilter Cover with two big red wires coming
out of it). What is that?. See the Battery FAQ for details. Read it carefully. Your battery may just
need water, if you caught it in time, but you might already have ruined it running it dry, so first try
and refill it with distilled water, push start your bike and ride it for a good 20min-1/2 hour to
recharge it. If it is still dead after that your battery is probably fried. On these bikes (esp. the
Classics), you need to check the battery water OFTEN. The Starter solenoid clicks when it
doesn't have enough power to turn the engine over OR if your Airbox fills with enough Gas or Oil,
that it can leak down into the cylinder and stop the engine turning over. Your battery MAY also
have died due to the charging system overcharging. See the VR FAQ for more info. Note:
Attempting to start your bike with a low or failing battery is a really bad idea because there is a
real risk of the starter solenoid contacts welding closed due to low voltage arcing. If this happens
you will have to disconnect the battery (because the permanently closed solenoid contacts will
crank your battery dry) and either replace or repair the starter solenoid.
●
Noise 9 - Farting and a loud popping from the front of the bike. Possibly Blown Exhaust Gaskets.
http://faq.f650.com/FAQS/StrangeNoises.htm (6 of 23) [18-02-2007 12:31:03]
The Very Strange Noises FAQ
Recently went to replace gasket where header pipe meets cylinder head. After pulling left header
pipe I found culprit of noise, blown out header pipe to collector gasket. This was a corrugated
sleeve that failed under the clamp. Replacement gasket is no longer corrugated. Added bonus
was the commonly reported backfiring problem, I thought I had to live with, is now completely
gone. Try this $11.00 fix if your bike is backfiring. See the Exhaust Gasket Replacement FAQ for
details.
●
Noise 10 - Making weird "wooo" noise when compressing the rear shock. Culprit: Humming rear
brake calliper (wheel moves slightly when compressing the rear shock).
❍
Solution: Stop compressing the rear shock and listening for silly noises, perhaps a little
anti-seize on the back of the pads.
●
Noise 11 - Rattling from the Chain Area. This could be poor Chain Tension, a Loose c/s Sprocket
or a Chain Roller. See the Chain Sprockets FAQ. My missing chain tension roller caused a sort of
rattling. This was on a '01 though. Sean-STL
●
Noise 12 - Rattling from the Front of the Bike. I've had a rattle from the from end of my F for the
past couple of months. Very annoying and I couldn't locate the source. I went for a ride this
morning, on the way back, stopped to fill up the bike. Stop, put bike in neutral, reach forward to
turn the ignition off .... That's odd, I could have sworn there was an ignition switch there when I
started the ride. *grin* Well, at least I found my rattle. The switch assembly hadn't fallen very far,
and no damage was done. $1.20 and a couple of new Allen screws and it was all back together.
Pete
●
Noise 13 - Front of Bike Rattle - For six weeks I rode half leaning out of the seat, because it really
sounded as though the rattle was coming from under me. Poked around everywhere. Then finally
one day getting on it I turned the handlebars while they were still locked, and noticed the whole
ignition assembly jump around. Looked underneath, only one bolt left of two, and it was just about
out as well. Six weeks for new bolts, still waiting. Likewise a grin, because I felt silly spending all
the time looking completely the wrong place. Aleksander in Dubai
●
Noise 14 - LHS Side Rear Rattle - At one point the aluminum foil under the left rear plastic
piece---it protects against heat from the muffler--it was loose and made a little noise as it moved
around. Bill No.391. See Exhausts Heatshield.
●
Noise 15 - Front of Bike Rattle - The large nut under the handle bars. Loosen the top pinch bolts
on the fork tubes and re-torque the Steering Head Nut (in Middle). Mine has come loose a couple
times. Re-torque the pinch bolts to 25nm. Steve#417. See the section Triple Tree & Handlebar
Clamp Replacement in the Steering Head Bearing Replacement FAQ for how to do it up.
●
Noise 16 - Rear LHS Rattle. Check the bolt that secures the muffler to the frame. Above muffler,
below seat. Rear Exhaust Bolt Location Marty #436
●
Noise 17 - Update on Popping when shifting. I posted a message about 3-4 weeks ago about our
97 F650ST popping when shifting from 3rd to 4th. My 97 F650ST has gotten a popping noise the
last 1500 miles sometimes when shifting from 3rd to 4th. It happens about 1 of 4 times or so. It
has happened a few times from 2nd to 3rd. It happens when the clutch lever is in all the way
(disengaged) and after the shift lever is shifted just before letting out the clutch. I checked the
http://faq.f650.com/FAQS/StrangeNoises.htm (7 of 23) [18-02-2007 12:31:03]
The Very Strange Noises FAQ
front sprocket and it seems fine. I've adjusted the chain and lubed it. Still is there at times. Bike
has 13,000 miles and I looked in the FAQ and couldn't find anything similar. There is not a
vibration when this happens but the sound seems to be coming from the front of the bike in the
area of the front sprocket (maybe) or maybe a little further back, not from rear of chain. Chain is
original. Any ideas anyone. Thanks. UPDATE: Kristian guessed that maybe the chain was hitting
from the slack being taken out in a hurry. I think that is what it was, as we just replaced the chain
and sprockets (See the Chain Sprockets FAQ) and the popping is gone. Thanks, Kristian.
DaveJ#888(Hannibal,MO)
●
Noise 18 - 01 Dakar 650 clunk clunk clunk Front end noise? I have developed a front end noise
@ about 4k mostly offroad miles it sounds like my whole headlight assembly is about to fall off but
nothing I can find is loose. Could this be from the forks themselves?. Try checking for play in the
steering head bearings. Also, are you running an ABS machine? People describe the ABS
activation/reset as a "clunk". Maybe you're hearing that. Advrider
●
Noise 19 - A while back I posted about this rattle that I had. It seemed to be up front and only at
certain load/vibration conditions. This sound went away when I slid the front forks down and took
off the lowering kit. I did not notice any bolts that were loose when I did this but the sound none
the less is gone. Don - Rochester, NY
●
Noise 20 - Transmission rattle, 2001F650GS Dakar, 4500 miles. It sounds like there is a lose set
of "jingling" keys in my transmission. The is very subtle, and only occurs when I am in gear and
moving. Anyone have any ideas? At first I thought the front disc or caliper was lose, but that was
not it. Michael 1045 (Cause Unknown).
●
Noise 21 - Buzzing From around the Fairing/Speedo Area. Electrical/Speedo Problem? GS/
Dakar Only- Q. I do most of the work on my bikes but the electrical systems are not my bag. I
recently replaced the battery on my 01 GSA (Which I purchased used) positive first then negative
and when I connected the new battery the Tach made several rapid clicks for about 5 seconds.
After that, the speedo made four short clicks every 15 seconds for about 5 minutes. You can just
barely tell that the speedo and Tach are moving during the clicking. Is this normal? I'm guessing
not. The bike seems to run fine. Any thoughts? Thanks for any feedback.
❍
●
Answer: It's quite Normal. See the Speedo ABS Sensor FAQ
Noise 22 - Feedback #1 When I'm pulling from 2500-3500 in 3rd upwards I have a strange
metallic rattle from the engine. Any ideas anyone HELP. It seems that if I open it hard the noise
reduces. It is when I am trying to be frugal with the fuel and just have low throttle twist. It could be
mix but it sounds very loud (please forgive me as I have only just returned to bikes so everything
seems loud, GREAT but loud). The noise does not happen when revved at stand still only under
load. It seems to come from the front of the engine as far as I can tell. Sounds almost like the
piston is rattling under load and as the revs increase and the bike speed picks up the noise stops.
I have no clue :-). UKRider
❍
Feedback #2 I have (I think) the same symptoms as you describe on my 1995. On my
bike it is evident in most gears (at least 2-4), but most often in third gear (at ~50km/h). It
always happens in low rpm (like 2500-3500 or so) under acceleration (especially slow
acceleration) and disappears after a few seconds. The sound also goes away as soon as
http://faq.f650.com/FAQS/StrangeNoises.htm (8 of 23) [18-02-2007 12:31:03]
The Very Strange Noises FAQ
you engage the clutch (pull it in). The sound looks like it is coming from beneath the
engine, so first I thought it was one of the stands that was vibrating. The problem has
been there since last summer (about 7-8000Km ago). I started to notice it when I was
travelling offroad in Iceland. I have not yet figured out what the problem is. I have done the
60.000Km service this autumn (after the trip to Iceland) and I couldn't find the source to
the problem then. I am starting to think that it could have something to do with the chain,
since I changed my chain in the beginning of last summer and the chain has some really
tight spots and some which are very loose spots (bad chain or perhaps to much gravel has
killed it?). If you find out what it is I'd be very interested in knowing what it was. When I get
back home (later this month) I'll take a look at the problem again, and checking all the
reasons listed in the Strange Noise FAQ. Another thought that struck me was that it could
perhaps be the cam chain, but there is no problem at idle, where the cam chain problem (I
think) is most often noticed. Spakur
❍
❍
Answer 1: My 97 F650 had a mechanical noise at low rpm from the time it was new. The
noise was a sort of rattling, and seemed to quiet as rpms increased. I wrote it off as a
characteristic of the engine. The first time I had to replace a valve ship (at 20,000 miles), I
found that the spacer in the cam spring lightener was installed backwards from what was
shown in the service manual. When I installed the spacer as shown in the manual the
noise disappeared...My theory is that the shape of the spacer results in slightly more cam
chain slack if it's installed backwards. Traverse City John Refer the Cam Chain FAQ. (It
was the Cam Chain Tensioner).
Answer 2: Check that your ignition switch assembly isn't loose. Makes a really annoying
rev. dependent rattle that sounds like something loose in the valve train. Pete
●
Noise 23: Unusual sound. My 98 F650 appears to display defective behavior. The symptoms are
as fallows: an unusual, gargle sound after downshifting (after clutch release), rapid acceleration
or rapid deceleration, the sound appears to originate and/or surface in the exhaust. I have also
noticed a slight decrease in overall power performance. Jacek. See the Exhaust Gasket
Replacement FAQ.
●
Noise 24: Knocking when in neutral, clutch engaged. Gets Faster as Idle Raised. Actual cause
unknown, but it could be the Compression Releaser Turn up your idle a notch or the Cam Chain;
Refer the Cam Chain FAQ. It might be Valves; See also Engine FAQ ;-).
●
Noise 25: Engine Knock. A loud knock that doesn't go away off-idle is quite likely the big-end rod
bearing. If your bike is still under warranty and the dealer doesn't want to do anything about the
knock, INSIST that he give you written, DATED, documentation about the complaint and that his
"solution" was to "wait and see." As Shank sez, when it comes to problems and the dealer sez,
"Wait and see." what that really means is, "Let's WAIT until your warranty expires and then SEE
how much you'll pay to get this fixed." Flash #412
●
Noise 26: My bike makes a humming sound when under load. It sounds like a domestic feline
purring, then silence, then purring again. Frequency: 1-2 Hz. I've never heard it when riding solo
(so far), or when idling. It's not noticeable in 1st or 2nd gear while 2-up, but you can almost tell it's
there in 3rd, with a bit of imagination. 4th and 5th, while riding 2-up, especially at lower rpms and
in upward slopes, it's definitely there. As soon as the engine is under a lot of load. I haven't been
able to tell whether the frequency of the sound is related to engine speed or road speed. It does
http://faq.f650.com/FAQS/StrangeNoises.htm (9 of 23) [18-02-2007 12:31:03]
The Very Strange Noises FAQ
not go over 2 Hz, though, even when riding FAST. It's "on" for half a second, "off" for another half
second, "on" ag ain, etc. While it's "on", it sounds like a friendly cat. I've tried adjusting and lubing
the chain. Didn't help, but afaict it's pretty worn so it might get better if I get a new one (along with
new sprockets). I haven't checked the front tire, but the rear doesn't have any foreign objects
stuck to it (checked while lubing chain). veggie_deluxe
❍
Answer: Maybe your chain has streched unevenly. balam (See the Chain and Sprockets
FAQ)
More Details: I'm pretty sure it has. I'm going to replace it (along with the sprockets) as
soon as my economy allows me to. But would an unevenly stretched chain really cause
such a low rate of change to the noise? I mean, in 4th and 5th gear I'm going >70 kph. I'm
not going to do any mathematical calculations here, that would just give me an even worse
headache, but I'm guessing the chain would rotate quite quickly at that speed. Perhaps it's
a combination of unevenly worn sprockets and unevenly stretched chain.
❍
●
Noise 27: After the valve job, my bike is acting really weird. Now when the key switch is turned to
off, I can hear a rythmic clicking sound coming from the instrument panel!!!! I am still experiencing
great difficulty in starting the bike cold. When I turn the key switch to on and then to off, after a
second, I can hear a strange sound comming from the injector's area (not the familiar sound
comming from the rear when you turn the key on). The sound is like something electromechanical
shutting off. I don't remember hearing this sound before. (see also Noise 28) balam
❍
❍
❍
●
Answer: I agree. And here's why... if you assume that a 17" rim has a TIRE diameter of
about 20" then multiplying by Pi gets you 62.8" which is 5.24 feet. A mile is 5280 feet. Let's
just assume that the circumference of the tire is 5.28 feet or 1/1000 mile. At 60 mph,
you're going one mile per minute, or 1000 revolutions of the rear wheel per minute. Divide
by 60 to get about 17 revs per second. If you have a hairlipped link getting caught in a
combination of front and rear sprocket wear spots every 8 rotations, that gives about a
2Hz repetition of SOMETHING. Flash #412
Feedback 1: The clicking could also be the Starter Solenoid (Next to the battery). What
causes that is a Low Battery. Check your Terminals and check the battery once more. You
did refill it only with distilled water right? Kristian #562 (See the Battery FAQ
Feedback 2: actually, it doesn't have to be a weak battery. If, for some reason, the engine
just won't crank (in my case it was a cylinder-full of gas), you'll get the same symptom.
veggie_deluxe
Answer: The engine has automatic decompression lever on one of the valves, that opens
the valve when the engine is stopped.Sometimes the lever does not fall into place and all
the valves are closed, that causes the lockup during cranking, or when the starter has to
overcome the compression, you get too much current draw, and the voltage drops below
normal, thus resetting the computer.That will cause clicking, ABS noise, hard starting...
Just make sure your battery is always charged up, and clean connections. Pooshkin
Noise 28: OK, thanks. Now that takes care of the clicking, but what about the other sound? The
one that I can hear at the injection module? I sounds a second after I turn off the key and the way
I'd describe it is like an electrical antenna going down in a car after you turn off the stereo... I
http://faq.f650.com/FAQS/StrangeNoises.htm (10 of 23) [18-02-2007 12:31:03]
The Very Strange Noises FAQ
know there is no antenna in there it just sounds a bit like that to me... balam
❍
●
Noise 29: Sometimes I hear a noise, which I believe comes from the engine. I haven't dug any
deeper into the location of the sound yet, but I have found this: The noise is a scraping mid
frequent noise, and has about one evolution per second when the bike is idling. The noise is only
audible sometimes when I start the bike (1 of 5-10 times) and it always disappears when the
engine gets hot (after a few minutes that is). The noise is audible when I start the bike in neutral.
It also accelerates along with the engine when I put the bike in gear and ride off. The noise has
been there for the last 6 months and 3-4000km or so. The problem was evident before the last
time I changed the oil and at that time I didn't find anything strange in the drain plug. The noise
only appears once in a while and then only for a minute or two before the bike gets hot. spakur
#1117
❍
❍
●
❍
Answer: Unknown / not provided.
Answer 1: Thanks for the advice. Guide rail tensioner was the official verdict from the
garage. oldben [ed: See also the Cam Chain FAQ
Answer 2: It could just be a fragged tensioner. Flash 412 (CO)
Noise 31: Between us - we are around 330 pounds - my 210 driving and his 120 as GIB (Guy In
Back). We went through a left hand traffic circle (15 MPH) and something in the front scraped. A
little while later turning left from a dead stop at a traffic signal another scraping sound from the
front tire area. Both turns were accompanied by a slight amount of suspension travel but not a lot
and the turns were very mild. The sound seemed as if it came from the upper right side of the
front wheel but this is very speculative. I have not experienced this when driving solo and I could
see nothing impinging on the front wheel. A2Trak
❍
●
Feedback: cam-chain or it's tensioner (Trevor #999), Starter sprague clutch (Flash #412),
automatic decompressor (Richard #230).
Noise 30: My 4 year old 16,000 mile F650 GS has suddenly and inexplicably started making an
odd noise: a 'tick-tick-tick-tick' that's louder than the engine at tickover but gets drowned out at
around 3000rpm. My friendly local bike courier says it's the tappets [ed: the F650 has shims, not
tappets], which makes vague sense to me. oldben
❍
●
Feedback: I went out in the garage and turned the key on and then off. About a second
after turning off the key mine makes the " antenna going down" sound also. I had never
really noticed it before. Maybe you just have a case of -I worked on my bike and now I'm
nervous i did something wrong. Best cure is to just go for a ride. The bike will let ya know if
it's happy or not. Tom McCallum
Answer: I'm with Motoplaner - especially if you have a factory lowered model. There's a
service bulletin to explain how to fix the dragging side/centerstand (for the lowered model).
Marty #436 [Ed: See also the Classic Lowering Kit FAQ or the GS Lowering Kit FAQ. For
the service bulletin, see page 1 and page 2]
Noise 32: when your bike stalls, does it make a loud noise? Where does it originate from. Is it the
decompression release? I stalled mine in a mud hole with a passenger and that noise was much
louder than normal. Now it makes kind of a crunch crunch sound when under load and @ a low
http://faq.f650.com/FAQS/StrangeNoises.htm (11 of 23) [18-02-2007 12:31:03]
The Very Strange Noises FAQ
rpm. (starting from a stop). I went over all of the external parts of the bike and found nothing
loose, except the retaining clip for the sidestand, but that wasn't the origination of the noise. Hard
for me to narrow down where the noise is coming from because I need to be moving to here it.
gsatlanta
❍
❍
❍
●
❍
Solution 3: Take a look at wheel bearings and the rear chain (sprocket) carrier bearing(s).
They can definitely make crunch-crunch noises - probably louder crunches the more
weight that is on them. You DON'T want to wait until they fail completely...
Answer 1: If your battery is carked, this can cause all sorts of possible things, including
buzzing noises etc from relays. First of all you must eliminate the battery problem. jack
Answer 2: Well, off to buy a new battery. Tested battery with key off, 12V no problem.
With key on dropped to 4V. With started pressed it dropped to 3V. Could have sworn I
tested it with key on last night and got 11.9V but it was late.... apostate #1618 [Ed. See
also the Hard Starting and Poor Running FAQ]
Noise 34: The symptoms (see Noise 3: Rattling from Engine at Idle) are similar in that there is no
noise above 1500 rpm and when the engine is warm. When the engine is cold and while it idles
itself to warmth and 1500 rpm there is "Khat-Khat-Khat" sound than a "click". Once warm I don't
hear anything abnormal. In a way it does sound like a solenoid/heavy relay. Seems to be coming
from left side(gear lever side) of the engine. The engines done about 2000 miles. I've not known
the bike to have been raced. arun
❍
●
Solution 2: I'd wager it's the compression release. I trigger mine a lot off road, even with
the 15/49 sprog set. Definitely before a stall. dlearl #476
Noise 33: ...hit the ignition and all the lights dimmed but it did try to turn over almost started (only
had the starter button depressed for about 5-10 seconds which is usually plenty of time for it to
fire). Released the button gave it a couple of seconds and tried again and got nothing at all when
I pushed the starter. Also noticed that there was a buzzing coming from the front of the bike.
Turned the key off, no buzzing, turn it back on without touching anything and it is back. Push the
starter button and the buzzing stops and the lights dim. [ed: battery on recharger for 10hours]. If I
turn the heated grips on the buzzing goes away as well (though I can see the lights dim a bit).
This seems similar to Noise 8 though the noise goes away when I actually try to start it. The noise
is coming from in front of and below the battery. apostate #1618
❍
●
Solution 1: Oops, it was a very sloppily adjusted chain. Last time I adjusted, the lightbulb
in the garage was out. gsatlanta
Answer: That "rattle-rattle-click" IS the compression release. If it does it at 1500 rpm,
maybe your chain tensioner is bad or going bad. Maybe the plastic chain rails are worn.
Maybe the oil is too thin. 3000 feet is nothing. Before you start messing with the carbs,
give the bike a thorough service. Without a GOOD baseline, you can end up "adjusting"
the thing into a horrible state. Flash #412
Noise 35: My 97 F650ST makes a VERY strange noise when I pull through 4200-4500 RPMs in
4th and 5th gear. It also makes the noise occaisionally when I decelerate from about 65 mph to
60 mph. I'm running the highest octane I can find (BP gas). It seems to make the noise more
http://faq.f650.com/FAQS/StrangeNoises.htm (12 of 23) [18-02-2007 12:31:03]
The Very Strange Noises FAQ
AFTER it is warmed up. It does not make the noise when you rev in nuetral through those RPM's.
The sound is something like a engine knock, chain rattle, keys in the cylinder sound. kraberry2
❍
●
Noise 36: Starting about 100kms after oil change I have had what sounds to be a "plastic" type
rattle (note: Temperatures today when rattle started were about 8C colder than yesterday when
bike was fine). Sound may have been there longer since I tend to stick to > 4000rpm when riding,
but I have not noticed it. The rattle has the same beat as the engine (ie 1 rattle for 1 rev from
what I can guess). It occurs in lower gears from what I can tell (1st through 4th). It happens with
clutch engaged, or dis-engaged, happens while in neutral. Always between about 3500rpm and
4500rpm. Occurs equally going up and down hill, accel or decel. [ed: Oil changed second time,
rattle returned] Winter
❍
●
Answer: The new improved tail latch / door (04 / 05 model GS) was causing the rattle. It
just so happened I had put my drink down on the door, and that stopped it from rattling.
Just to be sure I put everything back on the bike and took it out for a spin - sound was
there. Removed the tail latch / door... sound gone. Used some foam. Winter
Noise 37: Just like you I did an oil change. It was a fairly new bike with only 3000Km on the clock
and was the second oil change since new. All was well for about 500km then I started to notice
that the engine was making a bit more noise than usual. In my case it was loudest from about
2500rpm through to 5000rpm. Slowly, over the next 500km the noise increased in intensity and
sounded a little bit like bad bottom end bearings. I did another oil change, just to satisfy myself
that all was OK. Opened up the filter and it seemed pretty much normal for a new bike with only
4000km on it. Nothing improved with the new oil change. Over the next 200km the noise got even
louder and was the worst when the engine was cold. My dealer guessed at the cam chain
tensioner and replaced it. It actually did seem better when I picked it up but the noise was back
the next day. Probably it was just really well warmed up when I got it back and the noise was less
pronounced. The next morning it was real cold and real loud. Dealer took it back yet again and
this time they open the engine to hunt down the problem. It took most of the day as all looked OK
at first. Then on a whim the tech decided to actually mic the bores as well as the pistons and
rings. PROBLEM FOUND!! Bario
❍
●
Feedback: First, DO NO USE HI-TEST FUEL. Run regular gas. Next, remove your cam
chain tensioner. If it comes out in more than one piece, it is broken. Flash #412
Answer: The cylinder bore was well outside the maximum spec! Not by premature wear,
the bore was quite nice. It was simply not right from day one at the factory. Although it was
news to me the tech told me there is actually an "A" cylinder and rings and a "B" cylinder
and rings, and mine were mismatched. I was surprised by this but the tech allowed me to
view the parts in question and there was no doubt that the bore was too big for the piston/
ring combo in my case. It was tight enough to go unnoticed when brand new but as it wore
in a bit and loosend up the eror became apparent. Bario
Noise 38: I have noticed on my last few months that a strange noise occurs from the front of the
bike when I am at 30 to 35 mph. Best way to describe it is like this. If you put a metal ball in a cup
and then shake it so the ball goes round and round. That is what it sounds like. I recently had my
6000 check and it happened before that. I forgot to mention it but I figured the mechanic would
catch it. I am a little concerned. It sounds like it might be coming from under the speedometer or
top of the fork. It makes the same sound whether in gear or with the clutch in. Bobcatou #1157
http://faq.f650.com/FAQS/StrangeNoises.htm (13 of 23) [18-02-2007 12:31:03]
The Very Strange Noises FAQ
❍
❍
●
❍
Feedback: make sure it's got oil and water (coolant), Check your rear caliper/brake
assembly
Answer: (unknown, not included)
Noise 40: When riding (01 F650GS) 2k miles. I have a rattle coming from the front area around
the headlight or steering head. Rattle is only heard when riding over expansion joints or small
potholes. Have checked various things but cannot find source of rattle. Just afraid something is
going to fall off the bike. dgriffin #1696
❍
❍
●
Answer: (Unknown, not listed)
Noise 39: I've experienced two occasions where it sounds like the engine (I'm assuming it's the
engine - it may not be) is making a loud "grinding squeal" - that's the best way I can describe it. It
happened once after attempting to start the bike after it stalled and happened again when I was
actually riding on the highway and I was shifting down about to come to a stop. The bike is
relatively new with only 250 miles on it so far. I know the manual says not to "slip the clutch" - I'm
assuming that this means not to use the "friction zone". cheri
❍
●
Feedback: Wheel bearings (jack up the bike, spin front wheel and listen), front wheel
balance, check torque on the brake caliper mounting bolts, plastic / bodywork, cam chain
tensioner, loose rocks on top side of bash plate...
Solution 1: [ed: someone else with similar noise found it was the windshield] I replaced
the Dakar windscreen with one that does not use the normal mounting points. Riding
offroad a few weeks ago in the Mojave National Preserve I could hear a noise like china
plates banging around. Taking the front end apart I found the problem, there is a wing
shaped piece of sheet metal that was no longer being anchored by the Dakar screen
mounting screws. This part was bouncing around on top of the headlight. Jerrya
Answer: A while back I posted asking what could be rattling around up front on the bike? I
received many answers, but none fixed the problem. I believe that the biggest problem
was the fact that my bash plate and engine guard bolts were loose and after changing the
oil in the bike I got all those bolts tight like they should be. dgriffin #1696
Noise 41: So I'm leaving work yesterday and it sounds like a playing card is clothespinned to my
wheel. The sound goes away by the time I get home. Last night I was heading out to eat and
strange knocking sounds started coming from the bottom end. The knocking slows down as I slow
down. Bangs a couple of more times when I stop. Seems to be from low on the right side.
Generator? Clutch? Crank? Water pump? Fuel pump? I guess I'll find out soon enough. It's a '01
Dakar with 21,000 miles. I have noticed a buzzing noise lately as I pass a wall or something close
on my right side. Almost a chain sound. Troutrider
❍
Answer: I got to work this morning and sat down on the curb and took off the sprocket
cover. While checking everything out I noticed that the chain roller was clunky and
grooves were appearing on it. I've got 10,000 miles on the gold DID chain and it looks
decent. I ordered a new roller assembly. Troutrider
http://faq.f650.com/FAQS/StrangeNoises.htm (14 of 23) [18-02-2007 12:31:03]
The Very Strange Noises FAQ
●
Noise 42: When I shut off my 01 GSthere is a noise sometimes. It kind of sounds like its coming
from the starter. Its like something is releasing tension and it makes a big CLICK. Doesnt always
do it though. Anybody know what that would be? echo
❍
●
Noise 43: Is it just my bike or can anyone else audibly hear the dual spark ignition firing at idle? I
only notice it on start up if I'm not using enough choke. It's sounds like there is a lightning storm
going on the cylinder until I add some more fuel to the mixture via additional choke. It must be too
lean of a mixture combined with a cold combustion chamber? I can honestly audibly hear the
snaps, crackle and pops going on. I have never heard this before on any other vehicle. Yes, I
have brand new plugs NGK D8EA. Yes they are gapped properly. Yes the caps look great with
no carbon buildup. Yes, the wires are even new. Yes, I have premium 91 octane fuel in the tank
too. Yes, I would say the idle is quite low (probably under 1,000 RPM) when I hear this. The noise
I'm hearing certainly doesn't sound mechanical. It really sounds like electrical arcing going on. I
would think the compression relase would be more of a "mechanical" sound? Powder Blue
❍
❍
●
Answer: MAYBE it is the sprague clutch on the back of the flywheel. The starter spins the
flywheel to start the motor. There is no mechanical solenoid to engage the starter with the
flywheel. Instead, the gear on the "back" of the flywheel is "attached" with a one-way drive.
The starter can spin the flywheel, but once the bike is running, that gear remains
stationary as does the starter. Perhaps when your motor stops, sometimes it "stops" as it
comes up on compression and then counter-rotates for a bit. If it did that, the motor
WOULD be driving the starter for a quarter turn or so (at the crank). Flash #412
Feedback: Is the idle speed really low when you're not using enough choke? I think you're
hearing the compression release lever whacking around in the head. It's quite
disconcerting to hear this thing. As for hearing the spark, I'd have to hear it myself to
believe it. [ed...] Idle should be around 1300-1400 anything lower is NOT GOOD for the
engine. Yep, the compression release has a resounding "smack" to it, could sound
electrical and it occurs at less than 1000rpm. Either way, get the idle up and try not to do
stupid things to your engine. Shank
Answer: I rode in the frost again this morning and started to hear the noise as I reduced
the amount of choke. I think the first respondant was right and it probably is the
decompressor. Powder Blue
Noise 44: the persistance of what I can only describe as a "mystery rattle" noise coming from
somewhere in the front end of the motorcycle at speeds beween 30-50 mph. Regardless of
whether I'm accelerating hard or just moseying on up the road, starting at right around 30 mph I
start to hear what sounds like some sort of mechanically-induced, fairly consistent, rattling noise
which seems to emmanate from somewhere within the instrument cluster/ windshield area. It's
sorta hard to describe the noise accurately, as I'm always hearing it through my full coverage
helmet and dealing with the wind noise generated at 30 mph. It almost sounds similar to the
clicking/clacking noise made by a standard computer keyboard, or somewhat like a small plastic
object being shaken gently inside of a 35mm film canister. The noise doesn't seem to be coming
from anything in the suspension, as uneven road surfaces, potholes, etc. don't seem to affect it.
timagination
❍
Feedback 1: Don't know how the Dakar is set up in this regard, but check your headlight
adjustment screw. On my '03 CS I had a rattle up front and it turned out that the adjusting
http://faq.f650.com/FAQS/StrangeNoises.htm (15 of 23) [18-02-2007 12:31:03]
The Very Strange Noises FAQ
mechanism had failed. Zeke BBG#26
❍
❍
❍
❍
❍
❍
❍
❍
●
Feedback 2: I get the cluster rattle from my garage door opener as well as the windshield
mounts (ceebaileys) The windshield noise comes and goes, and the GD opener goes in
the pocket on long hauls. gsatlanta
Feedback 3: [ed: Similar rattle] So, the first time, I took the entire front of the bike apart,
searched for the culprit, found nothing, and put it all back together. Rattle gone. Sa-weet...
Then it started happening again... I took it all back apart again, but this time I put black
weather stripping in places where I assume the rattling could have been originating. Once
I got it all weather stripped, I put it all back together again. This was about 3000 miles ago
and no more rattle. billmallin #1629
Feedback 4: I have a similar rattle. It is a small piece of glass inside the headlight. The
Headlights isn't FULLY busted, but a stone hit it just so that it whacked a chip of glass off
the INSIDE of the Headlight Glass... Kristian #562
Feedback 5: Check to make sure space does in fact exist between ABS wheel speed
sensor and wheel disc. Prop the front wheel up and spin it. Use a flashligh as I believe
that .001" is the minimum space allowed. Then shim out appropriately. There exists a bolt
and nut in the center of the frame just above the crash bars. I don't really know what this
thing is supposed to do, but I found it loose and retorqued it. Make sure your or any
chainguard hardware is securely attached. I'm missing a bolt on mine and it does rattle a
bit. jetdocs550 #1546
Feedback 6: [similar noise] I have suspected it's a loose connector or wire flapping
around due to the turbulence from backdraft, or maybe stray road wind coming up from
underneath. Sadlsor #1444
Feedback 7: Upon further investigation I found that my headlight / dash pod assembly
was being held on by two threads left on the one of two bolts that should have been
holding it all together. New fastners from HD, lockwashers and locktite and all is quiet.
damalden #1598
Feedback 8: My rattle was the ignition key switch held by two allen head bolts in the
upper triple clamp. One bolt had fallen out the other was loose. (See also Noise 5, Noise
7, Noise 12, Noise 13, Noise 15) Chris in Santa Cruz, CA #782
Answer: tonight I was poking around the front end, re-inspecting everything I could see.....
the headlight adjusting screw (which I never before realized existed) wasn't loose.....no
unauthorized parts bouncing around inside of the headlamp.........but I noticed that the
front brake line and the accompanying ABS sensor wire are free to rattle against the after
part of the front fender. Tapping these two against the hard plastic part actually produced
a sound much like that which has been driving me nuts. I taped the two cables to the
fender and drove a few miles. At first....no rattle (at least I'm pretty sure). The rattle did
reappear, but after dismounting I realized that the tape had come undone. timagination
Noise 45: I have a sporadic grating noise coming from what seems like the tranny on the right
side. It comes and goes lasting for a few minutes then kicking off as fast as it kicked on. The
http://faq.f650.com/FAQS/StrangeNoises.htm (16 of 23) [18-02-2007 12:31:03]
The Very Strange Noises FAQ
sound follows the engine RPMs and does not change if pulling in the clutch. The bike is running
very strong and whatever the noise is, it does not affect performance yet. Unfortunately, it is
getting louder. ...the BMW dealer here in Istanbul changed the generator bearings and put in a
new starter for no effect. The problem does seem to occur when running at lower speeds but that
could be at higher speeds I can't hear it over the rumble from my ultra cool Adventure pipe. The
noise follows the RPMs. As I rev the motor with the clutch engaged or disengaged, the grating
noise increases with the spin. It happens moving or standing still--when the motor is cold, warm
and more at lower speeds. But it will also disappear for awhile only to return. Sometimes it gets
triple loud for ten seconds then subsides. When it happens it clicks on like a compressor when
flipping on the AC in a car and stops the same way. strikingviking
❍
❍
❍
❍
●
Feedback 1: Of course you've eliminated the chain, sprockets and chain roller as possible
suspects, right? Mine did that. Also, although it's on the left side, the cam chain tensioner
and guides can allow the cam chain to make the same kind of noise when they wear out.
SScratch #1082
Feedback 2: Remove the front sprocket cover and see if the chain has been rubbing on
the inside of it. I once heard a ticking/grating sound, and it turned out the drive chain was
too loose. Scott #1244
Feedback 3: I'm betting the countershaft sprocket nut is loose - and the front sprocket
sliding in/out on the shaft. YMMV. Marty #436
Answer: None provided
Noise 46: I plan to replace my timing chain and guides in a few weeks when I do a valve
clearance check. At the same time I was hoping to do something about my decompression
mechanism. It makes the engine sound very average from idle to about 2000rpm. About a month
or so ago I replaced the cam chain tensioner and it certainly reduced the noise. The noise I have
now is not nearly as loud as prior to the change. When I replaced it I checked the travel of the
tensioner and it was right on the 9mm limit. This is why I am going to replace the cam chain. I
know the 9mm limit may be reached because of worn guides but since the bike was probably
ridden for a while with the tensioner problem by me and possibly the previous owner, I figure the
chain could be worn so I don't want to take any chances. Anyway the engine is still distinctly noisy
up to 2000rpm. Even thought the 9mm tensioner limit of effectiveness is almost used up, I figure it
should still be doing its job. Around 2000rpm the noise fades until it disappears and you just have
normal piston noise. Perhaps it is just a worn timing chain, but the decompression mechanism
makes sense to me. dnd
❍
❍
Feedback 1: My suggestion (and this is coverered in the FAQs) is take a good long hard
look at the Hydraulically Operated Chain tensioner and replace that. Chances are it is your
noise culprit, not the Decompression lever. Either that or the idle is too low, but on the FI
you cannot "really" change it yourself (although someone reckon's he tried) unless a s/w
upgrade lowered it somewhat. On mine and (others classic, when I had one) that noise
would disappear at the correct idle. Seems odd I must say, about the noise. Have you
compared it to another's GS? I wonder if you have gunk in your Oil feed which is stuffing
up the Hydraulic Tensioner...? Kristian #562
Feedback 2: IMHO, unless your bike has 60,000 plus miles AND is running crappy, it
http://faq.f650.com/FAQS/StrangeNoises.htm (17 of 23) [18-02-2007 12:31:03]
The Very Strange Noises FAQ
think you're wasting time and money replacing your timing chain. Your decompression
release is SUPPOSED to make noise below 1000 RPM. dlearl #476
❍
❍
●
❍
❍
❍
Feedback 2: Sometimes I hear the decompression device clunk just as the engine stops
rotating. If that's it, no worries. mark1305 #1495
Answer: I think you're describing what I'm hearing. The moderately-pitched clunk sound I
hear is just as the engine stops rotating (the clunk is the last sound the bike makes before
the engine stops). That's the only time the MP clunk happens. meribona
Feedback 1: Are you sure it's based on engine speed and not wheel rotation? My new
chain whizzed(not peed) for awhile after I changed sprockets and chain. It would most
likely be the actual timing chain-but it's a little soon for that to die. justin843
Feedback 2: Oil pump/water pump drive gears going south? (Doubt you could hear that
WITHOUT the earplugs, as they're plastic). Marty #436
Noise 49: On rough dirt every now and again at different rpms, different speeds I would end up
with a strange rattle. Not a regular sound, and only happened going down hill on some dirt
roads... Turns out every now and again I had a rock that was somehow bouncing up under the
engine in bouncing around on the engine guard / bash plate. Winter
❍
●
Feedback 1: Hmm might be what mine did. I assumed it was something to do with the
starter. If so its nothing to worry about. echo
Noise 48: Whirring of gears...or at least that's what it sounds like. It's not a knocking noise, more
of a hum. My engine developed this noise, it's persistent but inconsistent, happens at idle and at
speed. I thought maybe it was the cam chain tensioner gone bad, allowing the chain to rub
against the case, but I replaced that with no seeming affect. Earplugs have helped, but haven't
totally eliminated it. Got any idears? SScratch #1082
❍
●
Answer: None provided
Noise 47: When turning off my 2002 GS, I hear a moderately-pitched (MP) clunk sound. It
sounds like its coming from the valve/cylinder area. Its not as high as a ping or as low as the
clunk you get when you shift from Neutral into 1st. Whatever it is, it's probably not healthy and the
bike would be better off without it. I can sometimes get rid of the MP clunk sound by turning the
bike off in Neutral or with the clutch pulled in, but there's not a consistent correlation. I checked
the Strange Noise FAQ and something in me says that it has to do with the Compression
Releaser. (Either that or its something I'm doing...) meribona
❍
●
Feedback 3: I'd pull the valve cover, rotate the engine until the DR has a little play and
wiggle it. If it's EXTREMELY loose, I'd worry about it, if it isn't, I wouldn't. With your
mileage, I seriously doubt there's anything seriously wrong with your engine unless it's
been horribly abused by a previous owner. dlearl #476
Solution: Not sure, may be add the additional aftermarket guard and hope it fixes the
problem. Winter
Noise 50: This one has been a puzzle for the last 1000+kms. Between 4500 and 5000 rpm
http://faq.f650.com/FAQS/StrangeNoises.htm (18 of 23) [18-02-2007 12:31:03]
The Very Strange Noises FAQ
usually in 2nd and 3rd gear I had a rattle. Was not metallic, sounded like the fairing (on my old
ZZR 250 I would have to replace one of the grommits regularly because the fairing would begin to
rattle). After much investigation, applying pressure to certain parts of the faux tank, I kinda gave
up. Could not find anything that was loose, and it did not sound like the engine. This morning I
found it - on the diagnostic connector was a small sticker that would flap (like a ruler when you
"twang" it on a bench). That flapping did not normally cause any noise, but between 4500 and
5000rpm it was probably synchronised with the engine speed or something - result noise. Winter
❍
●
Solution: Turn sticker / cable around so sticker is pinned down, or cut the sticker off.
Winter
Noise 51: When I turn OFF the key, there are three tick, tick, ticks then a one second pause then
it starts over again. It is very faint but I can hear it with my helmut off. It does this for a minute or
so then stops. I took the cluster back off and reinstalled, still there. Bike seems fine, nothing
weird. Anyone have a clue to what it is? Or if I need to stay 50 feet back for that first minute after
parking? heymarz
❍
❍
Solution 1: Is the tach or speedo needle twitching with the tick? Totally normal. Don't fret.
you are probably overly sensitve to instrument cluster anomolies right now. I notice mine
doing it from time to time right after shutdown. jetdocs #1546
Solution 2: This is normal, it's the gage needles resetting to zero. If you were to rotate a
needle it will stay in the incorrect position until you turn off the key. At that point, it will tick
back to a park position and reset itself to zero. roamer
●
Noise 52: Every time I turn the bike on my tach rattles / makes a buzzing sound like it does when
you reconnect the battery after servicing the bike (it only lasts for a few seconds). However I can
not get it to stop buzzing. How do I stop it? Winter #1935
❍ Solution: Have you recently removed fuses from the bike? In what order did you put the
fuses back in? The solution is to remove the 10A fuse ONLY, wait 15mins or so, then reinsert the fuse. I also did the twist the throttle three times, but have no idea if this is part of
the solution. Winter #1935
●
Noise 53: My new to me F650GS with 65,000km has a grinding noise from the gearbox region,
although that's hard to tell for sure when you are riding, that you can only hear when starting off in
1st gear with a bit of a load aboard and starting up a slope. Any ideas on where to start, or is this
fairly normal? My '94 F650 has been a trouble free up to it's current 140,000km and I was hoping
this new one would be as reliable. DancesWithPoultry (Nigel in NZ)
❍ The clutch on my second F650GS made exactly the same noise in exactly the same
circumstances. I realised it was bathed in oil (it sounded dry ... like a coffe-grinder) so I
ignored it. I'm never sure if it ever went away, 'cos I ignored it Trevor #999
❍ Thanks Trevor and all who replied. That makes sense to me. It did used to be a hire bike,
so it was likely to have been hammered in the clutch region. DancesWithPoultry
●
Noise 54: Is this a bad thing when I can here their slight "click a click" when the engine is cold?
[Ed: On a CS] TexasArmadillo CG#1930 BBG#93
❍ What RPM? Are you sure it's not just the compression release thingy going on and off, if
you're idling around 1k rpm or so? dinskeep
❍ It's most noticable at idle (1400 rpm) but I can still hear it up to 3000+rpm while it's
http://faq.f650.com/FAQS/StrangeNoises.htm (19 of 23) [18-02-2007 12:31:03]
The Very Strange Noises FAQ
❍
❍
❍
❍
❍
warming up. TexasArmadillo
Have you checked the valve clearances lately? Flash 412 (CO)
Oh, boy, here comes the beating... They should have at the BMW dealer (in Plano, TX)
when I had the 6000mi. It's at 8750mi now. And I didn't really notice much of a clicking
before I took it in then. It was noticable only after I got it back. I immediately asked them
what I was hearing and the mechanic said that was normal. ...but I wonder.
TexasArmadillo
You won't know how far your valves are out of adjustment until YOU check. Either that or
else something silly is going on, like your cam chain tensioner in backwards or summat.
Flash 412 (CO)
I have 24k km on my 2004 GS. I have found on cold mornings (for the first 1000km after
an oil change) I sometimes get the compression release mechanism clicking (listen for the
sound when you kill the engine, sometimes you will hear it). It sometimes lasts 5-10
seconds as the engine comes up to speed and the oil starts warming up. Each time I have
checked the valve clearances I have also checked the compression release is okay, and
there appears to be no other strange behaviour. Winter #1935
Cold oil. 5 to 10 seconds? That would seem to fit my symptoms. Lately, as the weather
has gotten warmer, I don't here it so much. TexasArmadillo
●
Noise 55: BMW Service Bulletin 23-001-06 (061) from October 2006, identifies a possible
gearbox/transmission rattle. With the engine running, in neutral, place the bike on the sidestand.
If there is a rattle on the sidestand, but not on the center stand, then it is likely you have this
problem. The other check is to engage (pull in) the clutch while the bike is on the sidestand. If the
noise goes away, then this service bulletin applies to you. Please check the Service Bulletins for
relevant VINs, and contact your local dealer to have the work performed.
●
Noise 56: I have a 2001 F650Gs with 34,000 miles...After a bizarre buzzing sound from what I
can only assume was in the engine somewhere, the bike just stopped propelling foward. The
engine is fine and turns right over and hums just fine, but kicking it into gear does absolutely
nothing. Up and down the gears I go and not one gear engages except neutral (the neutral light
even comes on). I adjusted the clutch, and just can't for the life of me figure out what the problem
is. The clutch is obviously no engaging, but why? A sensor maybe? OreSka #1874
❍ Answer: Did your chain fall off? Are your sprockets so worn that the chain cannot grab
them? If your chain and sprockets are in good shape, then your clutch is probably worn
out. THAT is well covered in the FAQ and the DVDs.
Other Comments / Hints
These are some of the questions you might get asked, or some of the things to think about to identify
and fix the noise:
http://faq.f650.com/FAQS/StrangeNoises.htm (20 of 23) [18-02-2007 12:31:03]
The Very Strange Noises FAQ
A knock? Mmmmm......need some more description. Is it a deep knock,
like clonk...clonk etc, OR is more of a tap....tap? What side of the
engine? and is it up the top OR lower down on the motor? When did
this noise start? Slowly over time......after you did something with the
bike, like after a mad 3 day desert race :-) Has it ever run low on oil.......
some prior history may help the diagnosis.
●
IF its lower down and a heavy clonk noise.....then look for a sad
big end bearing.......these can make a very terminal sounding
noise at low revs with open throttle (loaded engine)
●
If it higher up in the middle of the motor with not so much of a
heavy clonk.....it could be piston slap (loose piston to bore
clearance)
●
If is more of a rattle then look at the cam chain tensioner setup.
IT MAY also be a balancer shaft problem too. I would start with
doing an oil pressure check with a master gauge......that is,
remove the pressure sensor and connect a separate mechanics
test pressure gauge. Run the bike on road and make sure that
pressures are in spec. Next........drain the oil and check for
metal pieces on the drain plug and also metallic sparkle in the
oil itself, wash the oil filter out in clean petrol and look for
residue from the filter. Remove the cam cover and check the
chain for slack, look down inside to see if you can see any wear/
broken cam chain guides etc.
Jack, F650GS, Australia.
Other things to try / consider:
●
For plastic type rattles, find a street were you can safely press parts of the fairing with your hand
to try and find what is rattling
●
Swap bikes with another F650 owner - see if they can identify the noise
●
Have you checked your helmet (ie Borrow someone elses helmet for a quick test ride - DON'T
ride without one!)?
●
Check everything is tightened to spec, including engine mounting bolts, bash plate, fairing etc...
And check a second time.
●
If you have just done some work on the bike, retrace your steps.
●
For noises up the front of the bike around the dash area, Noise 44 is a really good place to start!
●
Noises from 40 onwards tend to get a little long and can help in trouble shooting.
http://faq.f650.com/FAQS/StrangeNoises.htm (21 of 23) [18-02-2007 12:31:03]
The Very Strange Noises FAQ
●
After you have done some work on the bike, you are more likely to pay attention to strange
noises... some noises are normal, some are not!
What Should I Mention in the Forums?
If you can not find your noise or a similar noise in the list, and the other suggestions do not help identify
the noise... ask in the Forums. When you do, provide the following information:
1. What model / year bike do you have? (Most people forget to tell us this) Is it a Classic, GS,
Dakar, CS and what year was it made in? Also tell us if it has ABS - this could help the diagnosis.
2. What does it sound like? Does it sound metalic, or like plastic? Is it a deep knock like a clonk
clock or more of a tap tap? Is it a heavy clonk clonk or a lighter plink plink?
3. Where does it sound like it is coming from? Is it coming from the engine? Left or right side?
Front forks? Rear of the bike? If you can safely get off the bike to hear the sound, where does it
come from? Have you tried the mechanics stethoscope? Where abouts in the engine is it coming
from?
4. When did it start? So when did the noise start? Has it been gradual or did it start suddenly? Did
it start after a long trip? Have you done any maintenance lately? Have you heard it before?
5. Under what conditions does it occur? Tell us more about when you hear the noise:
a. Temperature? Does it happen only when the bike is cold, or when it is hot? Does the noise
change with the ambient / air temperature?
b. Engine Speed or Bike Speed? Does it only happen between certain engine speeds (eg
between 3500rpm and 4500rpm), or does it occur only at certain road speeds (eg below
30mph / 50kph).
c. In all gears, Neutral, clutch engaged? Does it only occur when in neutral? etc (Note: Just
because you can not hear it in 5th gear does not mean it is there when you are in 5th
gear)
d. Frequency? Does it happen when you turn the key on / off? Does it happen just after you
start the bike? Does it happen once a minute, once a second?
e. Load? Does it occur under heavy load, or is it just under a normal load?
f. Road Conditions? On road or off road? Uphill, downhill?
6. Anything else? Is there anything else you think might help identify the noise?
But please, please, please - DON'T FORGET to tell us how you fixed the problem. Because then you
help others.
Send some more Noises...
http://faq.f650.com/FAQS/StrangeNoises.htm (22 of 23) [18-02-2007 12:31:03]
The Very Strange Noises FAQ
You know the hardest thing about working on the Noises FAQ?
You spend the next 1000kms listening for every little tick, clonk and thunk!
http://faq.f650.com/FAQS/StrangeNoises.htm (23 of 23) [18-02-2007 12:31:03]