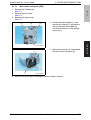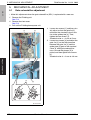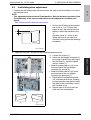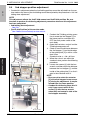
1
Option Printer
ZU-606
SERVICE MANUAL
Code Y111420-1
PUBLICATION ISSUED BY:
Olivetti S.p.A.
77, Via Jervis - 10015 Ivrea (TO)
Italy
Copyright © 2009, Olivetti
All rights reserved
Field Service Ver. 1.0 Jul. 2009
ZU-606
CONTENTS
ZU-606
OUTLINE
PRODUCT SPECIFICATIONS ................................................................................ 1
MAINTENANCE
2.
PERIODICAL MAINTENANCE PROCEDURE ....................................................... 5
2.1
Punch section ....................................................................................................... 5
2.1.1
Replacing the punch scraps conveyance motor (M7) ................................... 5
2.1.2
Replacing the punch clutch (CL1) ................................................................. 6
3.1
Items not allowed to be disassembled and adjusted ............................................ 8
3.2
Disassembly/reassembly parts list...................................................................... 10
3.3
Disassembly/reassembly procedure ................................................................... 11
3.3.1
Rear cover................................................................................................... 11
3.3.2
Upper cover................................................................................................. 12
3.3.3
Right cover .................................................................................................. 12
3.3.4
Front cover .................................................................................................. 13
3.3.5
Z folding unit................................................................................................ 14
3.3.6
Punch unit ................................................................................................... 17
3.3.7
Z folding/conveyance unit............................................................................ 18
3.3.8
Punch motor (M4) ....................................................................................... 20
3.3.9
Main motor (M6).......................................................................................... 21
3.3.10
Registration motor (M1) .............................................................................. 23
3.3.11
Punch shift motor (M5)................................................................................ 24
3.3.12
Main motor cooling fan (FM1) ..................................................................... 25
3.3.13
ZU control board (ZUCB) ............................................................................ 26
3.3.14
Paper size detect board (PSDTB) ............................................................... 26
ADJUSTMENT/SETTING
4.
HOW TO USE THE ADJUSTMENT SECTION ..................................................... 27
5.
MECHANICAL ADJUSTMENT ............................................................................. 28
5.1
Gate solenoid/Lw adjustment ............................................................................. 28
5.2
1st folding skew adjustment................................................................................ 29
5.3
2nd folding skew adjustment............................................................................... 31
5.4
2nd stopper position adjustment......................................................................... 32
i
MAINTENANCE
OTHER MAINTENANCE ITEM ............................................................................... 8
ADJUSTMENT / SETTING
3.
OUTLINE
1.
ADJUSTMENT / SETTING
MAINTENANCE
OUTLINE
ZU-606
Field Service Ver. 1.0 Jul. 2009
Blank Page
ii
Field Service Ver. 1.0 Jul. 2009
1. PRODUCT SPECIFICATIONS
OUTLINE
PRODUCT SPECIFICATIONS
ZU-606
1.
A. Type
Type
Z-folding multi punching device
B. Functions
Punching method Reciprocal punching method (punching each paper)
No. of holes
Metric area : 2 holes/4 holes (switched automatically)
Inch area : 2 holes/3 holes (switched automatically)
Hole diameter
Metric area : 6.5 mm± 0.5 mm
Inch area : 8.0 mm± 0.5 mm
OUTLINE
Punch
Hole position
Metric area : 11.0 mm± 5 mm
Inch area : 9.5 mm± 5 mm
Hole pitch Metric area :
80 mm± 0.5 mm
Inch area :
108 mm± 0.5 mm
Inch area
Center of the
paper
: 9.5 mm± 5 mm
Hole pitch 108 mm± 0.5 mm
Hole pitch 108 mm± 0.5 mm
Center of the
paper
Metric area : 11.0 mm± 5 mm
Hole pitch 21 mm± 0.5 mm
Hole pitch 70 mm± 0.5 mm
Center of the
paper
Hole pitch 21 mm± 0.5 mm
A07TT1C012AA
Folding method
Y111420-1
Buckle folding method with the roller pair
Service Manual
1
1. PRODUCT SPECIFICATIONS
Z-folding
Field Service Ver. 1.0 Jul. 2009
Folding length
ZU-606
a
L
OUTLINE
A07TT1C010AA
Paper size
L (mm)
A3
209 or less
B4
181 or less
11 x 17
215 or less
8K *1
194 or less
a (mm)
4±2
*1: Only for the Taiwan market
Folding precision
2 mm or less
2 mm or less
1st folding
2nd folding
A07TT1C011AA
Folding
Folding length
L
A07TT1C003AA
Paper size
L (mm)
8- /2 x 14
263 or less
1
Folding precision
2 mm or less
A07TT1C004AA
2
Service Manual
Y111420-1
1. PRODUCT SPECIFICATIONS
The maximum number of sheets for the FS main tray at the Zfolding operation
• Z-folding continuous: Max. 30 sheets
• Z-folding/stapling: See the table below
No. of sheets per staple
No. of fold sheets
No. of unfold
sheets
No. of set on
the main tray
1 to 40 sheets
20 set
41 to 90 sheets
10 set
2 sheets
1 to 80 sheets
10 set
3 sheets
1 to 70 sheets
4 set
4 sheets
1 to 60 sheets
3 set
5 sheets
1 to 50 sheets
2 set
1 sheet
6 sheets or greater
OUTLINE
Maximum tray capacity (80 g/m2)
Not guaranteed
C. Type of paper
No punch mode
Same as the main body.
Punch mode
Paper size
• Combination with the folding/saddle stitching mode is not available.
Metric area 2holes:
A3, B4, A4, A4S, B5, B5S, A5, A5S,
8K *1, 16K *1, 16KS *1,
8 x 13, 8-1/2 x 13, 8-1/4 x 13, 8-1/8 x 13-1/4
4holes:
A3, B4, A4, B5, 8K *1, 16K *1
*1: Only for the Taiwan market
Inch area 2holes:
11 x 17, 8-1/2 x 14, 8-1/2 x 11, 8-1/2 x 11S,
5-1/2 x 8-1/2, 5-1/2 x 8-1/2S, 7-1/4 x 10-1/2 , 7-1/4 x 10-1/2S
3holes:
11 x 17, 8-1/2 x 11
Z-folding mode
Folding mode
Y111420-1
Type of paper
64 to 90 g/m2 of the high-quality paper and the plain paper
• Special paper is not guaranteed. The punching of label
paper, tab paper, OHP paper, blueprint master and binding-holed paper are not allowed.
Paper size
A3, B4, 11 x 17, 8-1/2 x 14, 8K
• For B4 paper (including the mix of the paper), the combination with the stapling mode is not available.
Type of paper
64 to 90 g/m2 of the high-quality paper and the plain paper
• Special paper is not supported. Label paper, tab paper,
transparency film, paper, holed paper, and low stiffness
paper are not supported in Z-folding mode.
Paper size
8-1/2 x 14
Type of paper
64 to 90 g/m2 of the high-quality paper and the plain paper
• Special paper is not supported. Label paper, tab paper,
transparency film, paper, holed paper, and low stiffness
paper are not supported in folding mode.
Service Manual
ZU-606
Field Service Ver. 1.0 Jul. 2009
3
1. PRODUCT SPECIFICATIONS
Field Service Ver. 1.0 Jul. 2009
Paper curling
5 sheets of paper immediately after the printing
ZU-606
a
A07TT1C006AA
a : Excluding the OHP paper : Amount of curl: 15 mm or less
OHP paper
: Amount of curl: 10 mm or less
OUTLINE
D. Maintenance
Maintenance
Same as the main body.
Machine service life
Same as the main body.
E. Machine specifications
Power requirements
100 to 240 VAC (automatic switching)
DC5 V (supplied from the main body)
Max. power
consumption
120 W or less
Dimensions
169 mm (W) x 660 mm (D) x 1027.5 mm (H)
6.65 inch (W) x 25.98 inch (D) x 40.45 inch (H)
Weight
45 kg (99.21 lb)
F. Operating environment
Temperature
10 to 30 °C
Humidity
15 to 85 % RH (with no condensation)
NOTE
• These specifications are subject to change without notice.
4
Service Manual
Y111420-1
Field Service Ver. 1.0 Jul. 2009
2. PERIODICAL MAINTENANCE PROCEDURE
MAINTENANCE
PERIODICAL MAINTENANCE PROCEDURE
2.1
ZU-606
2.
Punch section
2.1.1
Replacing the punch scraps conveyance motor (M7)
A. Periodical replaced parts/cycle
• Punch scraps conveyance motor: Every 1,000,000 counts
B. Procedure
1. Remove the Z folding unit.
See P.14
MAINTENANCE
2. Disconnect the connector [1] and
remove two screws [2], and remove
the punch scraps conveyance motor
assy [3].
[3]
[2]
[1]
A07TF2C511DA
3. Remove two screws [1], and remove
the punch scraps conveyance motor
[2].
[2]
[1]
A07TF2C011DA
4. Reinstall the above parts following the removal steps in reverse.
Y111420-1
Service Manual
5
2. PERIODICAL MAINTENANCE PROCEDURE
2.1.2
Field Service Ver. 1.0 Jul. 2009
Replacing the punch clutch (CL1)
ZU-606
A. Periodical replaced parts/cycle
• Punch clutch: Every 1,000,000 counts
B. Procedure
1. Remove the Z folding unit.
See P.14
2. Remove the punch unit.
See P.17
3. Cut three wiring harness bands [1].
MAINTENANCE
[1]
A07TF2C023DA
NOTE
• When bind the wiring harness band
[1], face them to the arrow-marked
direction [2] to avoid the contact
with the conveyance section of the
main body.
[1]
[2]
[2]
[2]
[1]
A07TF2C024DA
[3]
[4]
4. Remove two screws [1], and remove
the punch motor assy [2].
NOTE
• When reinstalling the punch motor
assy [2], press the punch motor
gear [3] to the gear [4]. Be sure to
check that the gears rotate
smoothly and there is appropriate
backlash.
[1]
[1]
[2]
A07TF2C012DA
6
Service Manual
Y111420-1
2. PERIODICAL MAINTENANCE PROCEDURE
[4]
[3]
[2]
5. Remove the C-clip [1], and remove
the punch clutch [2].
NOTE
• When reinstalling punch clutch [2],
be sure to check the stopper [3] is
engaged with a projection [4] of
metal plate.
ZU-606
Field Service Ver. 1.0 Jul. 2009
[1]
A07TF2C512DA
MAINTENANCE
6. Reinstall the above parts following the removal steps in reverse.
Y111420-1
Service Manual
7
3. OTHER MAINTENANCE ITEM
3.
ZU-606
3.1
Field Service Ver. 1.0 Jul. 2009
OTHER MAINTENANCE ITEM
Items not allowed to be disassembled and adjusted
A. Paint-locked screws
NOTE
• To prevent loose screws, a screw lock in blue or green series color is applied to
the screws.
• The screw lock is applied to the screws that may get loose due to the vibrations
and loads created by the use of machine or due to the vibrations created during
transportation.
• If the screw lock coated screws are loosened or removed, be sure to apply a screw
lock after the screws are tightened.
MAINTENANCE
B. Red-painted screws
NOTE
• The screws which are difficult to be adjusted in the field are painted in red in order
to prevent them from being removed by mistake.
• Do not remove or loosen any of the red-painted screws in the field. It should also
be noted that, when two or more screws are used for a single part, only one representative screw may be marked with the red paint.
C. Variable resistors on board
NOTE
• Do not turn the variable resistors on boards for which no adjusting instructions
are given in Adjustment/Setting.
D. Removal of PWBs
CAUTION
• When removing a circuit board or other electrical component, refer to “Handling of
PWBs” and follow the corresponding removal procedures.
• The removal procedures given in the following omit the removal of connectors and
screws securing the circuit board support or circuit board.
• Where it is absolutely necessary to touch the ICs and other electrical components
on the board, be sure to ground your body.
8
Service Manual
Y111420-1
3. OTHER MAINTENANCE ITEM
E. Parts not allowed to be removed
(1) Punch section
• The precision of the punch edges is ensured in the punch unit. The normal punch operation may be affected if it is disassembled. Never loosen or remove these screws and
retaining rings.
ZU-606
Field Service Ver. 1.0 Jul. 2009
MAINTENANCE
[1]
A07TF2C510DA
[1]
Screws not allowed to be removed
(2) Z-folding section
• The screws position the clearance of the conveyance guide plate. The precision of the Zfolding may be affected if it is disassembled. Never loosen or remove these screws.
[2]
[1]
[1]
A07TF2C513DA
[1]
Screws not allowed to be removed
Y111420-1
[2]
Conveyance guide plate
Service Manual
9
3. OTHER MAINTENANCE ITEM
ZU-606
3.2
Field Service Ver. 1.0 Jul. 2009
Disassembly/reassembly parts list
Section
Exterior parts
Units
MAINTENANCE
Electrical parts
10
Part name
Ref. page
Rear cover
P.11
Upper cover
P.12
Right cover
P.12
Front cover
P.13
Z folding unit
P.14
Punch unit
P.17
Z folding/conveyance unit
P.18
Punch motor (M4)
P.20
Main motor (M6)
P.21
Registration motor (M1)
P.23
Punch shift motor (M5)
P.24
Main motor cooling fan (FM1)
P.25
ZU control board (ZUCB)
P.26
Paper size detect board (PSDTB)
P.26
Service Manual
Y111420-1
Field Service Ver. 1.0 Jul. 2009
Disassembly/reassembly procedure
3.3.1
Rear cover
1. Remove the screw [1] and the clamp
[2], and remove the power cord [3].
[2]
ZU-606
3.3
3. OTHER MAINTENANCE ITEM
[3]
[1]
2. Loosen the screw [1], and remove
two screws [2], and remove the rear
cover [3].
[2]
[3]
[1]
A07TF2C509DA
3. Reinstall the above parts following the removal steps in reverse.
Y111420-1
Service Manual
11
MAINTENANCE
A109F2C500DA
3. OTHER MAINTENANCE ITEM
ZU-606
3.3.2
Field Service Ver. 1.0 Jul. 2009
Upper cover
1. Remove the Z folding unit.
See P.14
2. Remove four screws [1], and remove
the upper cover [2].
[1]
MAINTENANCE
[2]
[1]
A07TF2C001DA
3. Reinstall the above parts following the removal steps in reverse.
3.3.3
Right cover
1. Remove the Z folding unit.
See P.14
2. Remove three screws [1], and
remove the right cover [2].
[2]
[1]
A07TF2C002DA
3. Reinstall the above parts following the removal steps in reverse.
12
Service Manual
Y111420-1
Field Service Ver. 1.0 Jul. 2009
3.3.4
3. OTHER MAINTENANCE ITEM
Front cover
ZU-606
1. Remove the Z folding unit.
See P.14
2. Remove three screws [1], and
remove the front cover [2].
[1]
[2]
A07TF2C003DA
MAINTENANCE
3. Reinstall the above parts following the removal steps in reverse.
Y111420-1
Service Manual
13
3. OTHER MAINTENANCE ITEM
3.3.5
Field Service Ver. 1.0 Jul. 2009
Z folding unit
ZU-606
A. Removal from the finisher
1. Open the front door of finisher [1].
2. Remove two screws [2] and slide the
finisher as shown in the illustration.
[1]
A109F2C501DA
MAINTENANCE
NOTE
• To mount the finisher, align the
hook portions of the mounting
bracket [1] and [2] with the upper
and lower holes [3] in the finisher.
Then, push the finisher toward the
rear.
[3]
[1]
[2]
A07TF2C501DA
3. Disconnect three connectors [1] and
remove the finisher.
[1]
[1]
A07TF2C502DA
4. Reinstall the above parts following the removal steps in reverse.
14
Service Manual
Y111420-1
Field Service Ver. 1.0 Jul. 2009
3. OTHER MAINTENANCE ITEM
ZU-606
B. Removal from the main body
1. Remove the finisher.
See P.14
2. Remove the punch waste box [1].
[1]
A07TF2C503DA
[1]
MAINTENANCE
3. Remove three screws [1] and two
washers [2].
[2]
[2]
[1]
A07TF2C504DA
[1]
4. Disconnect three connectors [1].
NOTE
• When reconnecting the connectors,
make sure that the harness of the Z
folding unit is placed below the
cable [2] of the horizontal transport
unit.
[1]
[1]
[2]
Y111420-1
[2]
A07TF2C505DA
Service Manual
15
3. OTHER MAINTENANCE ITEM
Field Service Ver. 1.0 Jul. 2009
5. Remove the Z folding unit [1].
ZU-606
CAUTION
• Make available collective manpower
of an appropriate size for transporting the machine.
[1]
A07TF2C506DA
NOTE
• When reinstalling the Z folding unit,
use the upper/lower brackets [1] as
a guide for positioning the Z folding
unit.
MAINTENANCE
[1]
[1]
A07TF2C507DA
6. Reinstall the above parts following the removal steps in reverse.
16
Service Manual
Y111420-1
Field Service Ver. 1.0 Jul. 2009
Punch unit
ZU-606
1. Remove the Z folding unit.
See P.14
2. Remove the rear cover.
See P.11
3. Remove the right cover.
See P.12
4. Pull out the Z folding/conveyance
unit [1].
[1]
A07TF2C004DA
[3]
5. Cut the wiring harness band [1], and
disconnect two connectors [2].
NOTE
• When bind the wiring harness band
[1], be sure to bind it so that the wiring harness [3] passes the wiring
harness band [1] from left to right
from the view of the rear.
• Be sure to bind the wiring harness
band [1] with sufficient length of the
wiring harness [3] when the punch
unit move to forward.
[1]
[2]
A07TF2C005DA
6. Remove four screws [1], and remove
the punch unit [2].
[2]
[1]
A07TF2C006DA
7. Reinstall the above parts following the removal steps in reverse.
Y111420-1
Service Manual
17
MAINTENANCE
3.3.6
3. OTHER MAINTENANCE ITEM
3. OTHER MAINTENANCE ITEM
ZU-606
3.3.7
Field Service Ver. 1.0 Jul. 2009
Z folding/conveyance unit
1. Remove the Z folding unit.
See P.14
2. Remove the upper cover.
See P.12
3. Pull out the Z folding/conveyance
unit [1].
[1]
MAINTENANCE
A07TF2C007DA
4. Disconnect three connectors [1]and
remove two screws [2], and remove
the arm [3].
[2]
[3]
[1]
A07TF2C008DA
5. Reinstall the Z folding/conveyance unit back again.
18
Service Manual
Y111420-1
3. OTHER MAINTENANCE ITEM
6. Remove four screws [1], and remove
Z-folding/conveyance unit [3] to the
front [4] by holding the rails [2] at the
both sides.
[2]
ZU-606
Field Service Ver. 1.0 Jul. 2009
[2]
[1]
[4]
[3]
A07TF2C009DA
NOTE
• When placing the Z-folding/conveyance unit, place it on the flat surface with its top or left side down.
• When reinstalling the Z-folding/conveyance unit, be sure to place the
rails on the rail holders [1] at four
positions.
[1]
[1]
A07TF2C010DA
7. Reinstall the above parts following the removal steps in reverse.
Y111420-1
Service Manual
19
MAINTENANCE
[1]
3. OTHER MAINTENANCE ITEM
ZU-606
3.3.8
Field Service Ver. 1.0 Jul. 2009
Punch motor (M4)
1. Remove the Z folding unit.
See P.14
2. Remove the punch unit.
See P.17
[3]
[4]
3. Remove two screws [1], and remove
the punch motor assy [2].
NOTE
• When reinstalling the punch motor
assy [2], press the punch motor
gear [3] to the gear [4]. Be sure to
check that the gears rotate
smoothly and there is appropriate
backlash.
[1]
[1]
[2]
MAINTENANCE
A07TF2C012DA
[3]
4. Remove two screws [1] and disconnect the connector [2], and remove
the punch motor [3].
[2]
[1]
A07TF2C013DA
5. Reinstall the above parts following the removal steps in reverse.
20
Service Manual
Y111420-1
Field Service Ver. 1.0 Jul. 2009
3.3.9
3. OTHER MAINTENANCE ITEM
Main motor (M6)
ZU-606
1. Remove the Z folding unit.
See P.14
2. Remove the upper cover.
See P.12
3. Remove four screws [1], and remove
the conveyance upper cover [2].
[1]
MAINTENANCE
[2]
[1]
A07TF2C014DA
4. Remove the Z folding/conveyance unit.
See P.18
[2]
5. Remove three screws [1], and disconnect the connector [2], and
remove the harness from three wire
saddles [3].
[1]
[1]
[3]
[1] [3]
A07TF2C015DA
6. Remove the screw [1], and remove
the conveyance encoder sensor
(PS10) [2].
[2]
[1]
A07TF2C016DA
Y111420-1
Service Manual
21
3. OTHER MAINTENANCE ITEM
7. Remove the screw [1], the slit circular disc [2] and the belt [3], and
remove the main motor assy [4]
[1]
ZU-606
[4]
Field Service Ver. 1.0 Jul. 2009
[3]
[2]
A07TF2C017DA
[2]
8. Remove four screws [1], and remove
the main motor [2].
MAINTENANCE
[1]
[1]
A07TF2C018DA
9. Reinstall the above parts following the removal steps in reverse.
22
Service Manual
Y111420-1
Field Service Ver. 1.0 Jul. 2009
Registration motor (M1)
1. Remove the Z folding unit.
See P.14
[1]
2. Disconnect the connector [1], and
remove three screws [2], and remove
the registration motor assy [3].
[2]
[2]
ZU-606
3.3.10
3. OTHER MAINTENANCE ITEM
[3]
[3]
[1]
3. Remove the screw [1].
4. Remove four screws [2], and remove
the registration motor [3].
[2]
[2]
A07TF2C020DA
5. Reinstall the above parts following the removal steps in reverse.
Y111420-1
Service Manual
23
MAINTENANCE
A07TF2C019DA
3. OTHER MAINTENANCE ITEM
ZU-606
3.3.11
Field Service Ver. 1.0 Jul. 2009
Punch shift motor (M5)
1. Remove the Z folding unit.
See P.14
2. Remove the rear cover.
See P.11
3. Disconnect two connectors [1] and
remove three screws [2], and remove
the punch shift motor assy [3].
[1]
[2]
[3]
MAINTENANCE
A07TF2C021DA
4. Disconnect the connector [1] and
remove two screws [2], and remove
the punch shift motor [3].
[2]
[1]
[3]
A07TF2C022DA
NOTE
• When installing the punch shift
motor assy, adjust its position so
that there is a clearance of “a”, as
specified below, at the front and
rear sides and make sure that the
motor assy is horizontal.
Adjustment value: “a” = 2 mm
a
a
A07TF2C514DA
5. Reinstall the above parts following the removal steps in reverse.
24
Service Manual
Y111420-1
Field Service Ver. 1.0 Jul. 2009
Main motor cooling fan (FM1)
[2]
[4]
[1]
ZU-606
1. Remove the Z folding unit.
See P.14
2. Remove the rear cover.
See P.11
3. Remove the upper cover.
See P.12
[2]
[3]
4. Disconnect the connector [1], and
remove four screws [2], and remove
the harness from wire saddle [3],
and remove the main motor cooling
fan assy [4].
A07TF2C025DA
5. Remove two screws [1], and remove
the main motor cooling fan [2].
[2]
[1]
A07TF2C026DA
6. Reinstall the above parts following the removal steps in reverse.
Y111420-1
Service Manual
25
MAINTENANCE
3.3.12
3. OTHER MAINTENANCE ITEM
3. OTHER MAINTENANCE ITEM
ZU-606
3.3.13
Field Service Ver. 1.0 Jul. 2009
ZU control board (ZUCB)
1. Remove the Z folding unit.
See P.14
2. Remove the punch unit.
See P.17
3. Disconnect all thirteen connectors
from the ZU control board.
4. Remove seven board supports [1],
and remove the ZU control board [2].
[1]
[2]
MAINTENANCE
[1]
A07TF2C516DA
5. Reinstall the above parts following the removal steps in reverse.
3.3.14
Paper size detect board (PSDTB)
1. Remove the Z folding unit.
See P.14
2. Remove the punch unit.
See P.17
3. Remove two screws [1], and disconnect the connector [2], and remove
the paper size detect board [3].
[3]
[2]
[1]
A07TF2C515DA
4. Reinstall the above parts following the removal steps in reverse.
26
Service Manual
Y111420-1
Field Service Ver. 1.0 Jul. 2009
4. HOW TO USE THE ADJUSTMENT SECTION
4.
HOW TO USE THE ADJUSTMENT SECTION
• “Adjustment/Setting” contains detailed information on the adjustment items and procedures for this machine.
• Throughout this “Adjustment/Setting,” the default settings are indicated by “ ”.
ZU-606
ADJUSTMENT/SETTING
Advance checks
Before attempting to solve the customer problem, the following advance checks must be
made. Check to see if:
•
•
•
•
•
•
CAUTION
To unplug the power cord of the machine before starting the service job procedures.
If it is unavoidably necessary to service the machine with its power turned ON, use
utmost care not to be caught in the scanner cables or gears of the exposure unit.
Special care should be used when handling the fusing unit which can be
extremely hot.
The developing unit has a strong magnetic field. Keep watches and measuring
instruments away from it.
Take care not to damage the PC drum with a tool or similar device.
Do not touch IC pins with bare hands.
Y111420-1
Service Manual
27
ADJUSTMENT / SETTING
• The power supply voltage meets the specifications.
• The power supply is properly grounded.
• The machine shares the power supply with any other machine that draws large current
intermittently (e.g., elevator and air conditioner that generate electric noise).
• The installation site is environmentally appropriate: high temperature, high humidity,
direct sunlight, ventilation, etc.; levelness of the installation site.
• The original has a problem that may cause a defective image.
• The density is properly selected.
• The original glass, slit glass, or related part is dirty.
• Correct paper is being used for printing.
• The units, parts, and supplies used for printing (developer, PC drum, etc.) are properly
replenished and replaced when they reach the end of their useful service life.
• Toner is not running out.
5. MECHANICAL ADJUSTMENT
ZU-606
5.
5.1
Field Service Ver. 1.0 Jul. 2009
MECHANICAL ADJUSTMENT
Gate solenoid/Lw adjustment
• Make this adjustment when the gate solenoid/Lw (SD1) is replaced with a new one.
1. Remove the Z folding unit.
See P.14
2. Remove the front cover.
See P.13
3. Pull out the Z folding/conveyance unit.
ADJUSTMENT / SETTING
[1]
4. Loosen two screws [1] and then visually adjust so that the gate/Lw [2]
maintains the standard value a relative to the guide plate [3]. Then,
tighten the two screws [1].
Standard value: a = 3 mm to 5 mm
5. Loosen two screws [4] and adjust the
gate /Lw [2] so that the clearance
between the gate /Lw [2] and the
guide plate [3] gets to the standard
value “b” while gate solenoid/Lw
turns ON and the plunger [5] is
pulled, and then tighten two screws
[4].
Standard value: b = 2 mm to 4.6 mm
[4]
[5]
[1]
[2]
b
[3]
a
A07TF3C507DA
28
Service Manual
Y111420-1
Field Service Ver. 1.0 Jul. 2009
1st folding skew adjustment
• Conduct the 1st folding skew adjustment when the skew of the 1st folding is not within
the standard value.
NOTE
• This adjustment affects the 1st Z-fold position. Be sure therefore to perform [1st Zfold Position] of the service mode whenever this adjustment has been completed.
See P.605 of the main body service manual.
ZU-606
5.2
5. MECHANICAL ADJUSTMENT
1. Remove the upper cover.
See P.12
2. Perform the Z-folding printing operation on A3 or 11 x 17 paper and
check to see if the skew of the 1st
folding is within the standard value
“a”.
Standard value: a = 2 mm or less
When the value is not within the
standard value, perform the following
procedure.
a
A07TF3C505DA
4. Remove four screws [1], and remove
the conveyance upper cover [2].
[1]
[2]
[1]
A07TF2C014DA
Y111420-1
Service Manual
29
ADJUSTMENT / SETTING
3. Open the front door, and pull out the Z folding/conveyance unit.
5. MECHANICAL ADJUSTMENT
[3]
Field Service Ver. 1.0 Jul. 2009
5. Loosen four screws [1].
6. Adjust the 1st stopper assembly [2]
by moving the front side of the
assembly to right and left by referring
to the markings [3], and then tighten
the four screws [1].
• When the skew pattern is [4], move
the front side of the 1st stopper
assembly [2] to the left [5].
• When the skew pattern is [6], move
the front side of the 1st stopper
assembly [2] to the right [7].
7. Replace the Z folding/conveyance
unit, and then perform the Z-folding
printing operation and check to see if
the skew of the 1st folding is within
the standard value.
8. Repeat steps 5 to 7 until the standard value can be obtained.
ZU-606
[1]
[5]
[2]
[7]
[4]
[6]
ADJUSTMENT / SETTING
A07TF3C508DA
30
Service Manual
Y111420-1
Field Service Ver. 1.0 Jul. 2009
2nd folding skew adjustment
• Conduct the 2nd folding skew adjustment when the skew of the 2nd folding is not within
the standard value.
NOTE
• This adjustment affects the 2nd Z-fold position. Be sure therefore to perform [2nd
Z-fold Position] of the service mode whenever this adjustment has been completed.
See P.605 of the main body service manual.
ZU-606
5.3
5. MECHANICAL ADJUSTMENT
1. Perform the Z-folding printing operation on A3 or 11 x 17 paper and
check to see if the skew of the 2nd
folding is within the standard value
“a”.
Standard value: a = 2 mm or less
When the value is not within the
standard value, perform the following
procedure.
a
A07TF3C506DA
[1]
[2]
3. Loosen four screws [1].
4. Adjust the 2nd stopper assembly [3]
by moving it vertically by referring to
the markings [2], and then tighten
the four screws [1].
• When the skew pattern is [4], move
the back side of the 2nd stopper
assembly [3] upward [5].
• When the skew pattern is [6], move
the back side of the 2nd stopper
assembly [3] downward [7].
5. Replace the Z-folding/conveyance
unit, and then perform the Z-folding
printing operation and check to see if
the skew of the 2nd folding is within
the standard value.
6. Repeat steps 4 to 6 until the standard value can be obtained.
[3]
[5]
[7]
[4]
[6]
A07TF3C509DA
Y111420-1
Service Manual
31
ADJUSTMENT / SETTING
2. Open the front door, and pull out the Z folding/conveyance unit.
5. MECHANICAL ADJUSTMENT
ZU-606
5.4
Field Service Ver. 1.0 Jul. 2009
2nd stopper position adjustment
• Conduct this adjustment when the 2nd folding position cannot be adjusted from the service mode or the skew of the 2nd folding cannot be adjusted by the procedure in “6.3 2nd
folding skew adjustment.”
NOTE
This adjustment affects the 2nd Z-fold amount and 2nd Z-fold position. Be sure
therefore to perform the following adjustment procedure whenever this adjustment
has been completed.
• 2nd folding skew adjustment
See P.31
• [2nd Z-fold Position] of the service mode
See P.605 of the main body service manual.
[3]
[1]
ADJUSTMENT / SETTING
a
[2]
[4]
1. Conduct the Z-folding printing operation to move the 2nd stopper [1] to
the home position, and then turn
OFF the main power switch of the
main body.
2. Open the front door, and pull out the
Z folding/conveyance unit.
3. Check to see if the distance between
the 2nd stopper [1] and inside edge
of the guide plate [2] is within a standard value.
Standard value: a = 20 ± 0.5 mm
4. When the value is not within the
standard value, perform the following
procedure.
5. Loosen two screws [3] with the hex
wrench, and then adjust the distance
between the 2nd stopper [1] and the
inside of the guide plate [2] so that it
gets to the standard value a.
NOTE
• Be sure not to rotate the actuator
[5] of the 2nd stopper home sensor
[4] during the adjustment. It may be
moved from the home position.
• Conduct the following steps 6 to 14
only if you cannot reach to the
screws [3] with the hex wrench
when they are located in side of the
2nd stopper assembly.
[5]
A07TF3C510DA
32
Service Manual
Y111420-1
[3]
[6]
[6]
[10] [8]
[12]
[1]
[4]
[3]
[10]
[2]
[11]
Y111420-1
[9]
[12]
6. Rotate the shaft [2] so that you can
reach to two screws [1] with the hex
wrench.
7. Loosen two screws [1].
8. Rotate the shaft [2] so that the actuator [3] is roughly positioned to the
home position [5] of the 2nd stopper
home sensor [4].
NOTE
• Never remove the screw [6] from
the actuator [3].
• At the appropriate position, the
anti-rotation pin [7] points upward
when the actuator [3] faces to the
left.
9. Rotate the pulley [8] to move the 2nd
stopper [9] to the position within the
standard value.
10. Loosen four screws [10].
11. Lift up the shaft [12] upward enough
to remove the belt [11] from the pulley [8], and then rotate the pulley [8]
without moving the shaft [2] and the
2nd stopper [9] so that the screw [1]
faces outside.
12. Tighten two screws [1].
13. Tighten four screws [10].
NOTE
• Before tightening the screws [10],
be sure to check the tension is
exerted on two belts [11].
14. Repeat the steps 3 to 5 to adjust the
2nd stopper to the position within the
standard value.
A07TF3C511DA
Service Manual
33
ZU-606
[7]
[5]
[4]
5. MECHANICAL ADJUSTMENT
ADJUSTMENT / SETTING
Field Service Ver. 1.0 Jul. 2009
Field Service Ver. 1.0 Jul. 2009
ADJUSTMENT / SETTING
ZU-606
5. MECHANICAL ADJUSTMENT
Blank Page
34
Service Manual
Y111420-1
UPDATING STATUS
DATE
10/2009
UPDATED PAGES
1ST EDITION
PAGES
39
CODE
Y111420-1