1
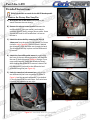
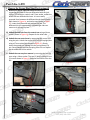
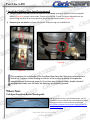
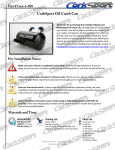
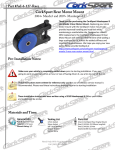
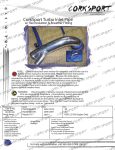
Part # Ate-3-070
CorkSport Mazdaspeed 6 Rear Sway Bar
2006-2007 Mazdaspeed 6
Pre-Installation Notes:
The CorkSport Rear Sway Bar is a great addition to
improving the handling performance to the Mazdaspeed
6. It will minimize traction robbing body lean that rolls the
outside tires off the pavement by attaching both sides of
the rear suspension together, increasing spring rate and
fine tune the handling of your speed 6. It is 70% stiffer
than the stock bar for dramatically improved cornering
potential and a distinct track and autocross advantage
over stock. We hope you enjoy the improved handling of
your Mazdaspeed 6. Please let us know your feedback by
submitting a review at:
http://www.corksport.com/corksport-mazdaspeed-6-rearswaybar.html
Make sure your vehicle is completely cooled down prior to starting installation. You will have
to remove part of your exhaust to give better access during the installation.
These instructions were written for reference only and the use of a factory service manual is
recommended. Please read these instructions thoroughly prior to starting installation
How our instructions work: To best cover all of our customers experience levels, we have
included an overview checklist for the more technically advanced users along with step-by-step
instructions for customers that require additional detail.
These installation instructions are for use with a 2006-2007 MS6. The torque values for this
installation range from 30-85ft-lbs.
Materials and Time:
General Info.
Part #: Ate-3-070
Time Est: 3-4 Hours
Wrench Rating: 4/5
Tooling List
3/8” Drive Ratchet
24” Extension
3/8” Swivel
14mm Socket
17mm Socket
17mm Open End Wrench
Screwdriver
Mallet
Jack
Jack Stands (preferably a lift)
Grease
Torque Wrench
Need Help With Your Installation?
Call (360) 260-CORK
Parts List
CorkSport MS6 Rear Sway Bar
Energy Suspension Sway Bar Bushing
Kit
Part # Ate-3-070
Checklist
This is an overview of each step in the build. You can use this as a reference and a checklist as you button up the work on your car
1. Remove the Factory Rear Sway Bar
1a) Jack up rear of vehicle and place on jack stands. Remove the rear wheels.
1b) Remove the exhaust center section between the mufflers (2 nuts per muffler) and catalytic
converter (two bolts) using a 14mm socket.
1c) Unbolt driveshaft by loosening four (4) bolts from the nut side with a 14mm socket.
Push out bolts. (See Figure 1a)
1d) Unbolt the front differential mount by supporting the front of the rear differential with a
jack. Remove the two (2) bolts using a 17mm open ended wrench (bolts shown in Figure
1b). Carefully lower the front of the differential and the driveshaft.
1e) Undo the electrical connections running to rear differential (shown in Figure 1d) and
detach them from the sub frame.
1f) Unbolt the driver side rear differential mount by supporting the rear of the differential
with a jack. Using a 24” long extension, swivel, and 17mm socket, unbolt the driver’s side
rear differential mount (bolt shown in Figure 1e and tool placement shown in Figure 1f).
Lower the rear of the differential carefully.
1g) Unbolt the end link from the control arm using a 14mm socket. (See Figure 1g). Repeat for
the other side.
1h) Unbolt the control arm by supporting it with a jack and unbolting it from the upright/hub
using a 17mm socket (bolt shown in Figure 1h). Lower the control arm slowly. Remove the
spring from the car. Repeat for other side.
1i) Unbolt the sway bar brackets using a 14mm socket and remove them. (See Figure 1i)
1j) Remove the rear sway bar by pulling the differential down as far as possible and slide the rear
sway bar towards the front of the car over the rear differential. The casting (shown in Figure 1j)
may need to be filed down.
Need Help With Your Installation?
Call (360) 260-CORK
Part # Ate-3-070
Checklist
This is an overview of each step in the build. You can use this as a reference and a checklist as you button up the work on your car
2. Install the CorkSport Rear Sway Bar
2a) Swap the end links from the stock bar to the CorkSport Rear Sway Bar using a 14mm socket.
Torque the end links to 30-45ft-lbs. Grease the supplied bushings and install onto bar.
2b) Install the CorkSport Rear Sway Bar by sliding it over the differential towards the rear of the car.
Position rear sway bar in approximate position and insert end links into control arms but do not
attach yet.
2c) Reinstall springs and control arms. Jack up control arms until lined up with the upright.
Reattach the control arm to the upright using a 17mm socket. Torque to 55-75ft-lbs.
2d) Reattach the rear differential mount by jacking up the back of differential and reinstalling
the bolt using 24” extension, a swivel, and a 17mm socket. Torque to 32-45ft-lbs.
2e) Reattach the front differential mount by jacking up the front of the rear differential while
lining up the driveshaft. Install the bolts using a 17mm open ended wrench. Torque to 55-78ftlbs.
2f) Reattach driveshaft by inserting bolts from the back and tightening down nuts with 14mm
socket. Torque to 35-43ft-lbs.
2g) Reattach the electrical connections to the sub frame and reconnect connections.
2h) Position the end links and reattach to the control arms. Torque to 30-45ft-lbs.
2i) Mount the sway bar to the chassis with a 14mm socket using the supplied brackets and washers
and reusing the stock nuts (shown in Figure 2a). Torque to 30-45ft-lbs. To clear the drivers side
axle boot, the grease fitting may have to be unscrewed from the mount (see Figure 2b).
2j) Remount your wheels and lower the vehicle. Torque the lug nuts to 80-85ft-lbs.
This completes the installation of the CorkSport Rear Sway Bar. Start your car and go for a
brisk drive. Try to put some loading on the car in the corners to ensure all suspension
components are functioning properly. If you hear any noises or creaks, double check all
hardware and make sure the sway bar bushings are properly greased.
Need Help With Your Installation?
Call (360) 260-CORK
Part # Ate-3-070
Detailed Instructions
These instructions are made for the 06-07 Mazdaspeed 6.
1. Remove the Factory Rear Sway Bar
A) Jack up the rear of the vehicle and place on jack
stands. Remove the rear wheels.
B) Remove the exhaust center section between the
mufflers (two (2) nuts per muffler) and catalytic
converter (two (2) bolts), using a 14mm socket. Some
pictures will show it still installed but it is best to
remove it.
Figure 1a
C) Unbolt the drive shaft by removing the four (4)
14mm nuts from the end of the driveshaft (3 of them
circled in red in Figure 1a, the fourth bolt is behind
the driveshaft). Push the bolts out through the back.
The driveshaft will stay in place until the differential
is lowered.
D) Unbolt the front differential mount by supporting
the front of the rear differential with a jack. Remove
the two (2) bolts (shown in Figure 1b) using a 17mm
open ended wrench. Lower the differential slowly
while holding the driveshaft to ensure it doesn’t fall
out. Remove the jack and let the differential and
driveshaft hang free (see Figure 1c).
Figure 1b
E) Undo the two electrical connections going to the
rear differential (the front connection is shown in
Figure 1d and the second connection is just behind
it). Unclip them from the sub frame. Each wire loom
is held to the subframe by two clips.
Figure 1c
Figure 1d Need Help With Your Installation?
Call (360) 260-CORK
1 of 4
Part # Ate-3-070
1. Remove the Factory Rear Sway Bar (continued)
F) Remove the driver side rear differential mount by
supporting the back of the rear differential with the jack.
Using a 24” extension, swivel, and 17mm socket, unbolt the
driver side rear differential mount. It is most easily
accessed from between the differential and the sub frame
(Bolt shown in Figure 1e, and tool access shown in Figure
1f). Lower the differential and remove the jack. The
differential is still supported by the passenger side rear
mount so it will stay in place.
G) Unbolt the end links from the control arm using a 14mm
socket (shown in Figure 1g). Repeat for the other side.
Figure 1e
H) Unbolt the rear control arm by supporting the control arm
using the jack. Unbolt the control arm from the upright/hub
using a 17mm socket (bolt shown in Figure 1h). Slowly
lower the control arm making sure the spring doesn’t fly
out. Once lowered remove the spring from the car. Repeat
for the other side of the vehicle.
I) Unbolt the rear sway bar mounts by removing the four (4)
nuts using a 14mm socket. The two (2) bolts holding on one
(1) mount shown in Figure 1i. Remove the mounts from the
bar.
Figure 1f
Figure 1h
Figure 1g
Figure 1i
Need Help With Your Installation?
Call (360) 260-CORK
2 of 4
Part # Ate-3-070
1. Remove the Factory Rear Sway Bar (continued)
J)
Remove the sway bar by sliding it towards the front
of the vehicle over the rear differential. This can be
difficult and the casting on the differential (shown in
Figure 1j) may have to be filed down to gain extra
clearance. It also makes it slightly easier if you can get
the arms of the sway bar underneath the control
arms.
2. Install the CorkSport Rear Sway Bar
Figure 1j
A) Swap the end links from the stock bar onto the CorkSport Rear Sway Bar using a 14mm socket. Torque
to 30-45ft-lbs. Grease the supplied bushing and install onto the bar in approximately the same location
as where the stock bushings are on the stock bar.
B) Slide the CorkSport Rear Sway Bar over the differential towards the rear of the vehicle. Position the bar
into place and insert the end links into the slots in the control arms but do not mount yet.
C) Reinstall the rear springs and control arms by jacking up the control arm until it is lined up with the
upright/hub. Make sure that the springs are fully seated against the rubber stops in the control arm.
Reattach the control arm using a 17mm socket. You may have to use a mallet to tap the upright/hub in
place. It also works to use a screw driver inserted into the hole to help line the holes up. Be careful to
not get the screwdriver stuck though. Torque the bolt to 55-75ft-lbs.
D) Reattach the driver side rear differential mount by jacking up the back of differential and reinstalling
the bolt using 24” extension, a swivel, and a 17mm socket. Torque the bolt to 32-45ft-lbs. It may be
necessary to slide the differential towards the back of the car to get it to line up correctly with the
mount. This step may be easier with two people, but can be done with one. To get the bolt started you
can hand thread it in by reaching from behind the subframe, however it is a tight area.
E) Reattach the front differential mount by jacking up the front of the rear differential while also lining up
driveshaft. Reinstall the two (2) bolts using 17mm open ended wrench. Torque the bolts to 55-78ft-lbs.
It is necessary to line up the driveshaft while jacking the differential up in place, otherwise the
driveshaft will not slide back into position if the differential is already mounted in place.
F) Reattach the driveshaft by inserting the bolts from the back. The heads of the bolts rest against the
differential output to resist spinning. Tighten down nuts with 14mm socket and torque to 35-43ft-lbs.
G) Reattach the electrical connections to the sub frame and reconnect connections.
H) Position the end links and reattach to the control arms using a 14mm socket. A small screw driver can
come in handy to help realign the holes. Torque to 30-45ft-lbs.
Need Help With Your Installation?
Call (360) 260-CORK
3 of 4
Part # Ate-3-070
2. Install the CorkSport Rear Sway Bar (continued)
H) Using the supplied brackets mount the sway bar to the chassis reusing the stock nuts and the supplied
washers (Figure 2a) using a 14mm socket. Torque to 30-45ft-lbs. To clear the drivers side axle boot, the
grease fitting may have to be unscrewed from the driver side mount (shown in Figure 2b).
I) Remount your rear wheels and lower the vehicle. Torque the lug nuts to 80-85ft-lbs.
Figure 2b
Figure 2a
This completes the installation of the CorkSport Rear Sway Bar. Start your car and go for a
brisk drive. Try to put some loading on the car in the corners to ensure all suspension
components are functioning properly. If you hear any noises or creaks, double check all
hardware and make sure the sway bar bushings are properly greased.
What’s Next:
CorkSport Front Strut Bar for Mazdaspeed 6
Adding a front strut bar to your Mazdaspeed 6, you will
increase the chassis stiffness and create additional traction
allowing you to more easily accelerate out of a turn
http://www.corksport.com/corksport-front-strut-bar-formazdaspeed-6.html
Need Help With Your Installation?
Call (360) 260-CORK
4 of 4