1
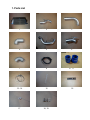
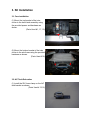
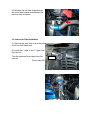
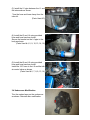
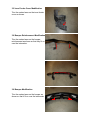
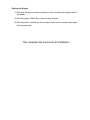
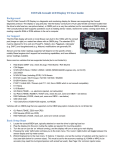
GReddy Intercooler Kit
96-98 Nissan 240SX (KA24DE) Front mount Type 24
96-98 Nissan 240SX (KA24DE) Front mount Type 24
Installation Manual
Please read the entire manual before installing this
kit.
Application:
Make
Nissan
Model
240SX
Chassis
S14
Year
96 - 98
•
This GReddy Intercooler Kit is designed only for the vehicles specified
above, with GReddy Turbo Kit (part # 11520633) installed.
•
Premium grade gasoline (91 octane or higher) is required with this Kit.
•
Make sure that the vehicle is not equipped with any ECU upgrade chips.
•
Use of GReddy Racing Spark Plugs ISO #7 or NGK plugs (colder than
factory) is recommended with this kit.
Important
1. This installation should only be performed by a trained specialist who is very
familiar with the automobile’s mechanical, and electrical system.
2. If installed by an untrained person, it may cause damage to the kit as well as
the vehicle.
3. GReddy Performance Products Inc. is not responsible for any damage to
the vehicle’s electrical system caused by improper installation.
4. Call your GReddy Authorized dealer or GReddy Performance Products if
there are any problems or questions regarding this product.
1. PARTS LIST
1. Intercooler
2. Intake Pipe
3.
"
4.
"
5.
"
6.
"
7.
"
Type 24
I-1 (50∅ Aluminum )
I-2 (60∅ Aluminum)
I-3 (Aluminum Elbow No. 3 90° 5R 60∅)
I-4 (60∅ Aluminum)
I-5 (70∅ Aluminum)
I-6 (Aluminum Elbow No. 9 90° 35R 70∅)
1
1
1
1
1
1
1
8. Rubber Hose
9. Silicone Hose
10.
"
11.
"
12. Hose Band
13.
"
14.
"
16∅ 320mm
60∅ - 70∅ Reducer
60∅ Straight
70∅ Straight
50∅ Tridon #32
60∅ Tridon #36
70∅ Tridon #44
1
2
1
1
1
4
6
15. Zip Ties
150mm
16. A/C Tank Relocation Bracket
17. Aluminum Spacer 18∅ - 9∅ - 8mm
5
1
1
18. M6 X 15mm
19. M8 X 30mm
Stainless P=1.00
Stainless P=1.25
B S/W F/w
B S/W F/w
-
3
1
1. Parts List
1
2
3
4
5
6
7
8
9 - 11
12 - 14
15
16
17
18, 19
2. Stock Parts Removal
Please refer to the factory service manual for the proper
stock parts removal.
2-1 Disconnect the negative terminal of the battery.
2-2 Remove the under engine cover.
2-3 Remove the front bumper.
2-4 Remove the bumper reinforcement.
2-5 Remove the Airflow meter, Airinx filter and the suction pipe S-1 from the
turbo kit.
2-6 Remove the charge pipe C-2, and C-3 from the turbo kit.
3. Kit Installation
3-1 Core installation
(1) Mount the top bracket of the inter
cooler to the hood latch assembly using
the provided spacer and hardware as
shown.
(Parts Used # 1, 17, 19)
(2) Mount the bottom bracket of the inter
cooler to the sub-frame using the provided
hardware as shown.
(Parts Used # 18)
3-2 A/C Tank Relocation
(1) Install the 50∅ hose clamp on the A/C
tank bracket as shown.
(Parts Used # 12,16)
(2) Relocate the A/C tank forward using
the new clamp bracket assembled in the
previous step as shown.
3-3 Intercooler Pipe Installation
(1) Remove the plate that covers the hole
at the front left fender well.
(2) Install the I-1 pipe to the C-1 pipe from
the turbo kit.
*Use the hose and hose clamp from the
turbo kit.
(Parts Used # 2)
Factory bolt
(3) Install the I-2 pipe between the I-1 and
the intercooler as shown.
*Use the hose and hose clamp from the
turbo kit.
(Parts Used # 3)
(4) Install theI-3 and I-4 using provided
hose and hose band as shown.
Secure the bracket on the I-4 pipe to the
body as shown.
(Parts Used # 4, 5, 9, 10, 13, 14, 18)
(5) Install theI-5 and I-6 using provided
hose and hose band as shown.
Install the 16∅ hose to the I-6 and the idle
air control valve as shown.
(Parts Used # 6, 7, 8, 9, 13, 14)
3-4 Undercover Modification
Trim the marked area on the undercover
as shown. Reinstall after modification.
3-5 Inner Fender Cover Modification
Trim the marked area on the inner fender
cover as shown.
3-6 Bumper Reinforcement Modification
Trim the marked area on the bumper
reinforcement as shown so that they fit on
over the intercooler.
3-6 Bumper Modification
Trim the marked area on the bumper as
shown so that it fit on over the intercooler.
Starting the Engine
(1) Check all the pipe and hose connections, then reconnect the negative side of
the battery.
(2) Start the engine. While idling, check for any air leeks.
(3) After inspection, reinstall the front bumper, under cover and other stock parts
that was removed.
This completes the Intercooler Kit installation.