1
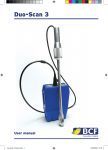
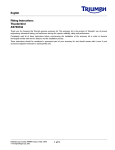
British Customs 101 Rear Fender Removal Instructions Include: 1. Fender Removal On The Following Motorcycles: Triumph Modern Classics Tools Required: 5MM Allen Wrench T30 Torx Bit WARNING: Laws concerning this product vary from state/province to state/province. Your state/province may prohibit its use on public roads or restrict its use to novelty, show use, off-road areas, or race facility areas only. In some states/provinces off-road uses are also prohibited. The manufacturer and retailer assume no responsibility for any use or application of this product in violation of any applicable law. Before installing this product, please check your state/province and local/municipal laws and regulations. WARNING: It is recommended that this kit be installed by a certified Triumph technician, following the Triumph service manual to aid in proper fitting. Verify all torque specs in Triumph service manual. Other Items We Think You May Like Master Cylinder Cover Low Profile Front Sprocket Cover Clutch Arm Finisher 1 Chain Guard British Customs 101 Rear Fender Removal Step 1: Remove the seat by unscrewing the two 5MM screws at the tail section of the seat, then disconnect the battery, positive (+) side first. Step 2: Disconnect the small rectangular taillight connector plug by pushing down on the latch while pulling the two fittings apart. Step 3: Remove the forward two fender T30 Torx screws that hold down the electrical components bracket Step 4: Support the back of the fender as you remove the final two T30 Torx screws from the tailend of the subframe and set aside. 2 British Customs 101 Rear Fender Removal End: CONGRATULATIONS! You have successfully completed the removal of the rear fender! 3