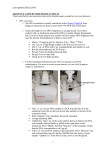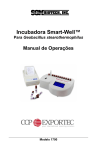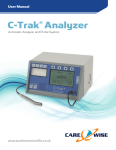
1
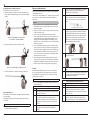
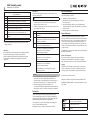
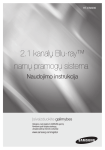
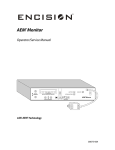
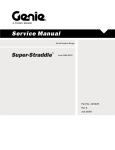
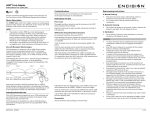
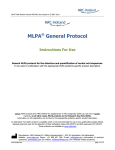
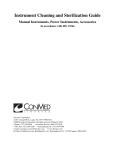
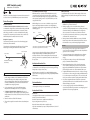
AEM® Handle Assembly
EN
Instructions For Use/Care
ENCISION recommends placing this document in the Instructions for
Use/Care Section of your AEM Monitor Operator/Service Manual.
Device Description
Modular Instruments
The ES8000, ES8000L, ES8200 and ES8200L Handle Assemblies
are instruments designed for use with reusable and disposable AEM
Inserts. Most inserts fit standard 5.5mm trocar cannulas. (Inserts
with a larger or smaller cross-section are identified in the catalog
description.) The instruments are “true 5mm” and are sized for use
with the Disposable Sheath (ES0150A or ES0150-45).
Use with Monopolar Electrosurgery
AEM instruments, in conjunction with an AEM Monitor properly
connected to the electrosurgical generator (ESU), continuously
monitor and dynamically manage “stray energy” (insulation failure
and capacitive coupling) in zones 2 & 3, which are likely out of the
surgeon’s field of view.
AEM System Setup
See laminated Setup Sheet (00701) when using the ES9005 series
AEM Cord Adapter and (02678) when using the ES9015 Universal
Adapter.
AEM shielding does not cover zone 1, which the surgeon should
keep in view during instrument activation. As in all applications,
“misapplied” electrosurgical energy remains the responsibility of the
attending surgeon.
• Laparoscopic surgery may result in gas embolism due to
insufflation of gas into the abdomen.
• Pulling or tugging cords can result in breaking of internal
conductors, causing intermittent alarms or sparking and burning
of insulation during use. The AEM Monitor is not designed to
detect or prevent an arc in the event of a broken active wire.
• Keep electrical connections dry while in use to prevent potential
conduction of HF current to the user.
• Damaged external insulation AND incorrect setup of the AEM
Monitor may result in a risk of unintended patient burn, shock or
fire hazard. Do not use product having damaged insulation.
Zone 1
Zone 2
Zone 3
Principle of Operation
The front and rear handles open and close the working tip (jaw/
blade insert) of the instrument.
The working tip of the instrument should always be closed when
introducing or removing the instrument from the cannula.
Scissors Insert
Cord Connection
Rotation Knob
Shielded Barrel Assembly
(Insert Inside)
(Note: Zone 1 equals approximately 1.6cm Tip to Shield)
(Note: Zone 3 equals area of Trocar Cannula)
Laparoscopic procedures should be performed only by surgeons
having adequate training and familiarity with laparoscopic
techniques and who are also knowledgeable about anatomy and
pathology as well as the complications, hazards, risks and benefits of
the procedure.
Indications/Intended Use
Handle
Trigger
NOTE
• This product is rated to 9000 Vp-p. Limit electrosurgical generator
power setting to 80 Watts or lower (60 Watts for the Conmed
Aspen Excalibur spray mode). Higher settings may result in
spurious insulation failure alarms and/or insulation breakdown.
See Encision AEM Monitor Operator/Service Manual for list of
compatible electrosurgical generators.
• See also Instructions for Use/Care for AEM Instruments,
Disposable Sheath and Disposable Scissors as applicable.
• The ES8000, ES8000L, ES8200, ES8200L handles are not
compatible with 35cm or 45cm lengths of the following model
number inserts: ES0502, ES0517, ES0518, ES0519, ES0520, ES0529,
and ES0545.
• Discard on evidence of End of Life Indicators.
• This product is supplied non-sterile and must be sterilized prior
to use.
These AEM instruments incorporate the use of AEM technology and
are intended for use in delivering monopolar electrosurgical energy
during laparoscopic procedures only.
AEM instruments are intended for use with the AEM Monitoring
System and electrosurgical generators having compatibility with the
AEM Monitor.
Scissors Inserts are intended for use on soft tissue only.
Contraindications
These instruments are not intended for use when laparoscopic
electrosurgical techniques are contraindicated.
Instructions For Use
Warning
CAUTION
• Good operating room practice suggests that connections of
accessories to electrosurgical generators be made only while the
generator is Off or on Standby.
• Use these instruments only in conditions that assure adequate
visualization to minimize risk of misapplied electrosurgical
energy.
• Keep ESU power setting as low as possible for the intended
purpose to minimize unintended burns.
• Damaged internal insulation of the cord and/or instrument,
or loss of shield continuity, may cause ESU return pad alarms
triggered by the AEM Monitor’s Fault Indicators. For maximum
patient safety, discontinue use of the instrument if this occurs.
• A singular AEM instrument must be the sole conductor of energy
to tissue. Do not conduct energy by touching an AEM instrument
to a second instrument contacting tissue. The second device will
not be protected from capacitive coupling and insulation failure.
• Keep electrosurgical instruments away from the patient and
operative field when not in use. Accidental activation can result in
unintended injury to the patient.
• See electrosurgical generator manual and AEM Monitor
Operator/Service Manual for precautions concerning the general
application of electrosurgical equipment.
Prior to Use
Thoroughly read these instructions and the instructions in the AEM
Monitor Operator/Service Manual.
Reusable components are supplied non-sterile. Refer to
Reprocessing Instructions prior to use.
Disposable inserts and sheaths are supplied sterile.
Inspect the instrument for proper assembly and function. See End of
Life Indicators.
00209-018 2011/08
1 of 4
EN
Assembly Instructions (Handle and Insert)
Assemble the two (2) basic components.
1. Hold the instrument upside down as shown. Slide the insert (A)
into the handle shaft until the trigger catches and rotates slightly
upward.
A
Reprocessing Instructions
4
Immerse all components in MANU-KLENZ® or equivalent
detergent solution (prepared per manufacturer’s
instructions) and clean all surfaces.
5
Using a hand held soft bristle brush, use a back and forth
motion and brush all surfaces with particular attention
paid to Cord Connector, crevices, grooves, fittings, and
joints.
6
Hold the instrument as shown below with trigger ends
touching. Using a long-handled soft bristle brush with a
gauge slightly larger than the lumen of the instrument
(recommended size 8Fr/2.7mm), brush the inner lumen
of the rear part of the handle using complete strokes
while immersed. Push the brush all the way through the
lumen and pull it through several times.
7
If necessary, repeat the process on the other end of the
lumen as shown below.
8
Flush lumen at end using appropriate sized syringe
tubing.
9
Remove the device from the detergent solution and rinse
thoroughly under running distilled or demineralized
water (minimum of 3 minutes).
After use, the instrument must be disassembled, cleaned, lubricated
and sterilized before reuse.
This product has been validated for 10-6 sterility assurance level when
reprocessed in accordance with these cleaning and sterilization
instructions.
Caution
DO NOT FORCE TRIGGER UP - IT WILL ROTATE
AUTOMATICALLY AS INSERT ENGAGES.
2. Rotate the insert tip clockwise to screw in the insert.
DO NOT USE OPEN BLADES TO TIGHTEN SCISSORS
3. Turn the rotation knob to adjust the positioning of the insert.
• Treat a used instrument as a potential biohazard until cleaning
and sterilization has been completed. Microscopic residues may
remain after cleaning.
• Stainless Steel is rust-resistant, not rust-proof. Instruments should
be kept dry when not in use.
• Do not use bleach (sodium hypochlorite) based products
during cleaning. Bleach is extremely corrosive to metals and can
negatively affect the electrosurgical instruments. Refer to your
cleaning products Material Safety Data Sheet (MSDS) to ensure
that they are not corrosive or harmful to various metals (including
stainless steel, gold, etc).
• Use of some detergent solutions may leave a surfactant residue
on the gold connector surface, depending on the strength of the
solution and how thoroughly the residues are rinsed off. This may
result in intermittent cord alarms. The residue may be removed
by use of an alcohol-soaked swab, rotated completely around the
external gold connector surfaces.
• Certain cleaning chemicals may negatively affect metals, such
as the gold connectors. Refer to your cleaning products Material
Safety Data Sheet (MSDS) to ensure that they are not corrosive or
harmful to various metals (including stainless steel, gold, etc).
Cleaning
Automated washer/disinfector systems are not recommended as
the sole cleaning method for surgical instruments. An automated
washer/disinfector system may be used as a follow-up to manual
cleaning, but is not required.
NOTE
• The use of fully distilled or demineralized water is preferred for
cleaning and rinsing.
Manual Cleaning
Step
Disassembly/Disposal
Disassemble in reverse order from assembly. No further disassembly
is recommended.
When using a disposable sheath, remove and discard the
sheath prior to cleaning.
2
Immerse all components in KLENZYME® or equivalent
blood dissolving enzymatic solution (prepared per
manufacturer’s instructions) for at least 5 minutes and
gently agitate. (Soak longer if proteinaceous material is
present.)
3
Remove the device from the enzyme solution and rinse
thoroughly under running tap water (minimum of 3
minutes).
If using Disposable Sheath, see also Disposable Sheath Instructions
For Use/Care.
NOTE
• Used instruments are considered medical waste. Dispose of in
accordance with local regulations.
00209-018 2011/08
Description
1
Combination Manual/Automated Cleaning
Step
1
2
3
Description
Follow Manual Cleaning steps 1 – 9.
Use of a sonicator or ultrasonic cleaner at 35-45 kHz
can support manual cleaning of devices. Cycle time
5 minutes maximum. Do not exceed water temperatures
above 50°C (122°F).
Place instruments in a suitable washer/disinfector basket
and process through a standard instrument washer/
disinfector cleaning cycle. See Table listing typical cycles.
2 of 4
AEM® Handle Assembly
Instructions For Use/Care
EN
Typical Automated Washer/Disinfector Cycle for
Surgical Instruments
Step
1
2
3
4
5
6
7
Description
Prewash with cold tap water for 1-10 minutes.
Enzyme spray with hot tap water for 1-15 minutes.
Rinse with hot or cold water for at least 20 seconds.
Detergent wash with hot tap water for 1-20 minutes.
Hot water rinse for at least 20 seconds.
Thermal rinse (80oC to 98oC / 176°F to 208°F) for 1-5
minutes. Lubricant may be added during this cycle.
Hot air dry (use low temperature setting) for 0-10
minutes.
NOTE
• The washer/disinfector manufacturer’s instructions should be
strictly adhered to.
Lubrication
After cleaning all the components, but before sterilization, lubricate
the shaft and all moving parts of the jaw insert with watersoluble medical instrument lubrication. After lubrication, prepare
the instrument for sterilization by wrapping in sterile wrap, as
appropriate.
NOTE
• Failure to lubricate may result in increased wear or binding.
Sterilization
Monitoring sterility using Geobacillus stearothermophilus spore
strips is recommended.
NOTE
• Do not exceed temperatures of 135°C / 275°F. Performance to
specification has not been verified above this temperature.
Damage to the product may occur.
• Validation of sterilization cycles other than steam autoclave is the
responsibility of the end user.
Step
1
2
3
Description
End of Life Indicators
Visually inspect and electrically test prior to use. Discontinue use if
any of the following are evident:
• Intermittent electrical performance
• Bent electrode shaft or tip affecting function of sheath or
insertion into trocar
• Any insulation damage which exposes metal (AEM Shield)
along the length of the instrument’s shaft and/or any insulation
damage in Zone 1
• Binding or impaired mechanical functions
Allow the instrument to dry thoroughly prior to
Sterilization.
See Caution above regarding removal of detergent
solution from the connector surface using an alcohol
swab prior to Sterilization.
Steam Sterilization – assembled or disassembled:
(use one of the methods listed below)
Prevac (2 layers of Sterile Wrap or Unwrapped)
Express Warranty
Temperature: 132°C / 270°F minimum
Duration: 4 minutes minimum
Gravity Steam (2 layers of Sterile Wrap)
See AEM Monitor Operator/Service Manual for details of Limitations,
Disclaimer, and Exclusions.
Temperature: 132°C / 270°F minimum
Duration: 15 minutes minimum.
Gravity Steam (FLASH/Unwrapped)*
Temperature: 132°C / 270°F minimum
Duration: 10 minutes minimum
* Flash Sterilization is not recommended, except in
emergency situations.
CAUTION
• Cold Soak Sterilization is not recommended. Testing results
indicate that cold soak sterilization (Glutaraldehyde) is not
adequate for this product. Manufacturer’s recommended cycle
times DO NOT always provide a 10-6 sterility assurance level.
• Gas Plasma (Hydrogen Peroxide) Sterilization is not
recommended for ENCISION Instruments. Instruments with long,
narrow lumens may pose a challenge for this type of sterilization.
ENCISION hereby warrants to Buyer that products purchased
hereunder shall be free from defects in materials and workmanship
under normal use and service, as specified in these Instructions for
Use/Care, for the period of six months from date of purchase, or
upon reaching an end of life indicator, whichever occurs first. Any
evidence of unauthorized modification or repair of this device will
void the warranty.
Return of Used Product
If for any reason this product must be returned to ENCISION,
a returned goods authorization is required prior to shipping.
Appropriate return instructions may be obtained from ENCISION.
Product
ENCISION reserves the right to amend, modify or to change any
product, to introduce new products, to withdraw products and
otherwise vary product specifications at any time without notice.
US Patent Nos.: 5,769,841; 6,494,877
ENCISION® and AEM® are registered trademarks of ENCISION Inc.
KLENZYME® and MANU-KLENZ® are registered trademarks of Steris
Corporation.
Product Life
The life of this surgical instrument is largely dependent on the
care and handling at the point of use / cleaning / sterilization. For
optimal instrument life, protect it from contact / impact with other
instruments during decontamination and sterilization.
The number of uses may be reduced by improper handling, and
“prevac” or “flash” sterilization methods.
Electrification of scissors inserts may reduce their useful life.
00209-018 2011/08
Federal (USA) law restricts this device to sale
by or on the order of a physician.
Consult Instructions for Use
Latex Free
3 of 4
EN
Made in USA
Manufactured by
ENCISION Inc.
6797 Winchester Circle
Boulder, CO 80301 USA
Ph: 303-444-2600
Fax: 303-444-2693
Printed in USA
© Copyright 2011 Encision Inc.
00209-018 2011/08
4 of 4