1
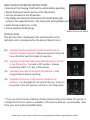
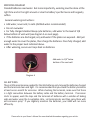
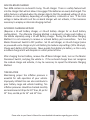
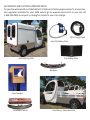
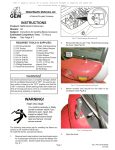
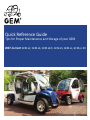
R
Quick Reference Guide
Tips for Proper Maintenance and Storage of your GEM
2007-Current GEM e2, GEM e4, GEM e6®, GEM eS, GEM eL, GEM eL XD
Basic vehicle operation instructions:
• Disconnect the Charging Cord from the vehicle before operating
• Master Disconnect Switch must be in the ON position
• Turn key clockwise to the ON position
• The display will indicate an illuminated red colored Brake Light
symbol in the upper left corner, fully release the Parking Brake Lever
• Select driving mode (R, DL, or DH)
• Press Accelerator Pedal and go
Service Codes
(The Service Code is displayed in the same location as the
mph/kph and is accompanied by the Service Wrench icon.)
Master Disconnect Switch
[06] Indicates that the Accelerator Pedal is pressed and no
direction has been selected. Release Accelerator Pedal and
insure Direction Switch is locked into position.
[11] Indicates Accelerator Pedal is pressed before key is turned
to the ON position. Turn key to OFF position. Release
Accelerator Pedal. Turn key to ON position.
[15] Indicates a low state of charge for the batteries. Fully
charge batteries before operating.
[16] Indicates that there is a high state of charge for the
batteries. Turn headlights on for several minutes, then turn
key switch to the OFF position and then to the ON position.
* If you see other Service Indication Codes please contact your dealer for service. A
complete list of error codes is available in the Service Manual, a purchasable item
from your local authorized GEM dealer.
Please refer to your Owner’s Manual for more detailed information regarding your vehicle.
HOW TO DETERMINE IF CHARGE IS AT 100%
After charging is 100% complete, the Charger Connected icon will be the only thing
lit and the bar graph will not be illuminated. A green light on the charger itself will
also illuminate when the car is 100% charged. To know if the charging process is
complete, all ten bars on the State of Charge Indicator should be illuminated when
the car is turned on. If neither the Charger Connected icon nor the State of Charge
Indicators are illuminated, the charger may not be charging. If this occurs, make sure
the Main Disconnect Switch is in the ON position. More information on the charger
and charging of the batteries is discussed on pages 76-81 of the Owner’s Manual.
Plugged In Charging
Charge Complete
PERCENT OF CHARGE DISPLAY
The new charging display on the 2010 GEM car model years, makes it easy for the
GEM user to tell how much battery life is available. When the vehicle is plugged in
and charging, the percent of charge is displayed.
30% Charged
74% Charged
99% Charged
Please refer to your Owner’s Manual for more detailed information regarding your vehicle.
BATTERY CHARGING
on the bed of the GEM eS, GEM eL, GEM eL XD, and the GEM e6 models, or under
the maintenance plate on the rear spat of the GEM e2, GEM e4, and GEM e6 models,
bench seat, with the remaining three located under the access panel located on the
pedestal, with access through the panel located on the front of that pedestal. More
under the access panel on either the rear bed or rear spat. The charging system is
life and performance out of your GEM. Because of high power draw at low states of
Recharge vehicle after each use.
Your GEM is equipped with a battery charger that includes a feature that will monitor
the state of charge of the batteries, and will initiate a charge cycle whenever the
batteries fall to a pre-determined charge level. To enable this feature, leave the
Master Disconnect Switch in the ON position (see figure A on previous page) and keep
your car plugged into a standard household 15-amp 110/120-volt A/C outlet. Charger
also works on a 20-amp 220/240-volt A/C outlet.
NOTE: The batteries used in your gem will perform better when kept
fully charged. Therefore, whenever possible, recharge the batteries—no
matter what state of charge is indicated.
1. The Master Disconnect Switch must be in the ON position for the charger to operate
and charge the batteries. The Master Disconnect Switch is located in the Fuse Access
Panel of the white lower dash.
2. The Battery Charger Receptacle
is located on the hood. It accepts a
standard, 3-wire, grounded extension
cord. The extension cord should not
exceed the following: 12-gauge wire 50
feet in length or 14-gauge wire 25 feet
in length.
3. Insert the proper extension cord into
the Battery Charger Receptacle.
4. Plug the extension cord into a 110volt A/C, 15-amp breaker outlet. A
Ground Fault Interrupt protected circuit
(GFI) is recommended. To ensure
proper charging, no other cars, appliances, door openers, etc. can be
plugged into the same circuit. Do not use a gfci cord with a gfci outlet.
5. A full recharge cycle can take from 8 to 14 hours (if the state of charge indicator is
indicating only one red bar), depending on battery option-12 volt or 8 volt.
Please refer to your Owner’s Manual for more detailed information regarding your vehicle.
Battery Tips & STORAGE RECOMMENDATIONS
1. Battery posts must be clean and tight.
2. If corroded, clean posts with a solution of one cup baking soda and one gallon water.
3. When storing or not using your GEM for an extended period of time (two weeks or
longer) it is recommended that you first check the water level of the batteries, unless
equipped with maintenance free gel batteries, and leave the vehicle plugged in with
the Master Disconnect Switch in the ON position. The charger will restart every 7 days
for liquid batteries and every 14 days for gel batteries, for up to 24 times as long as the
charger does not red fault code.
4. The Master Disconnect switch must be in the ON position for the charger to operate
and charge the batteries.
5. If the batteries appear to be frozen, do not charge them. Contact your local authorized
GEM dealer or Global Electric Motorcars Customer Service at 1.866.764.0616
for service.
flooded batteries
1. The water level in these batteries needs to be maintained at no higher than the
bottom neck opening (1/2 inch above the plates) and should be checked at least
monthly.
2. If the water level is below the plates, add just enough distilled water to cover the
plates, then charge and re-check the water levels.
3. If the water level is below the neck opening, but above the top of the plates, first
charge the vehicle, then re-check the levels and add distilled water to just below the
neck opening. Overfilling can cause the batteries to boil and spill acid.
4. Check all battery connections monthly to ensure that they are tight and free of
corrosion. If corrosion starts to appear, wash the tops and terminals of batteries with a
solution of one cup baking soda and one gallon water. Let terminals dry and then spray
them with anti-corrosion spray.
Please refer to your Owner’s Manual for more detailed information regarding your vehicle.
WATERING DIAGRAM
Flooded batteries need water. But more importantly, watering must be done at the
right time and in the right amount or else the battery’s performance and longevity
suffers.
General watering instructions:
• Add water, never acid, to cells (distilled water recommended)
• Do not overwater
• For fully charged standard deep cycle batteries, add water to the level of 1/8
below bottom of vent wall (see diagram A on next page).
• If the batteries are discharged, only add water if the plates are exposed. Add just
enough water to cover the plates, then charge the batteries. Once fully charged, add
water to the proper level indicated above.
• After watering, secure vent caps back on batteries.
Add water to 1/8” below
bottom of the vent well.
Diagram A
GEL Batteries
There is little maintenance needed for the GEL batteries only to keep the batteries charged
and the terminals clean and tight. It is recommended that you check the battery terminals
at least once a month for corrosion. While checking the terminals, make sure that there
is a tight connection between the battery cable and the battery terminal. If corrosion
starts to appear, wash the tops and the terminals of batteries with a solution of baking
soda and water using the 1 cup/gallon ratio. Let terminals dry and then spray them with
anti-corrosion spray. If you regularly maintain the batteries, your GEM will run more
efficiently.
Please refer to your Owner’s Manual for more detailed information regarding your vehicle.
GEM ON-BOARD CHARGER
Your GEM contains an on-board 12-amp, 72-volt charger. There is a safety feature built
into the charger that will not allow it to engage if the batteries are overly discharged. This
safety feature is activated when the charger detects that the combined voltage of all six
batteries or nine batteries, depending on configuration, is 68-volts or less. If the total
voltage is below 68-volts and the on-board charger will not activate, it then becomes
necessary to employ an alternate charging method.
ALTERNATE CHARGING METHOD
(Requires a 12-volt battery charger, or 24-volt battery charger for an 8-volt battery
configuration). The Alternate Charging Method is designed to charge each battery in
the vehicle separately using a 12-volt battery charger. During the Alternative Charging
Method it is not necessary to remove or unhook battery post connections. Turn the
Master Disconnect Switch to OFF position. Set 12-volt charger, or 24-volt charger (same
as you would use to charge any 12-volt battery) to medium amp settings (10 to 30 amps).
Charge each battery 10-20 minutes. Move quickly from battery to battery, as this is only
a residual charge and it will dissipate in a short period of time.
After charging the last battery, remove the off-board charger leads, turn on the Master
Disconnect Switch, and plug the vehicle in. If the on-board charger does not recognize
the residual charge and activate, it may be necessary to repeat the Alternate Charging
Method.
TIRE INFLATION
Maintaining proper tire inflation pressure is
essential for safe operation of your vehicle.
Improperly inflated tires can also contribute to
poor battery range and vehicle handling. Tire
inflation pressures should be checked monthly
and maintained at 30 psi for 10” tires, 32 psi for
12” tires, and 36 psi for 13” and 14” tires.
Please refer to your Owner’s Manual for more detailed information regarding your vehicle.
Cleaning Instructions
Windshield or Sunroof
We recommend using GEM Windshield Cleaner and Protectant to clean
the windshield, sunroof and side windows. Normal dust and dirt can also
be removed using a liquid household glass cleaner. Do not use abrasive
cleaners on the windshield and sunroof, as they will cause scratches.
NOTE: Be very careful when cleaning the acrylic windows as they can
be scratched or damaged. Do not use a cleaner with an abrasive, a
combination cleaner and wax or any solvent that contains ethyl or methyl
alcohol. Also, do not use products containing ammonia, soaps or abrasives. Never use
gasoline or cleaning solvent. These products can scratch and/or destroy the surface of the
windows. To remove oil, grease or road tar, use isopropyl alcohol, then wash the windows
with water. Dry gently with a soft cloth or chamois.
Seats and Interior
We recommend using GEM Foaming All-Surface Cleaner
to clean your seats and interior surfaces. You can use
warm water and rub with a clean, damp cloth to remove
dirt. Substances such as tar and asphalt will stain if not
removed quickly. Use a clean cloth and solvent-type vinyl
cleaner. Then wash the area thoroughly with a damp
cloth and mild liquid detergent. Finish by rinsing with
cool water.
Note: Do not spray the interior of the vehicle with water. Water contact to the windshield,
dash panel or instrument panel could damage the electrical system.
Exterior
The best way to preserve your vehicle’s finish is to wash the vehicle
regularly. Use mild liquid detergents only (no strong soaps or chemical
detergents) and rinse promptly. Dry the finish with a soft, clean chamois
or towel to avoid surface scratches and water spotting. To remove
haze, bring back the original shine and protect the exterior surfaces of
your vehicle, we recommend using GEM Fiberglass, Plastic and Rubber
Restorer.
NOTE: To avoid spotting, do not wash the vehicle in direct sunlight.
Please refer to your Owner’s Manual for more detailed information regarding your vehicle.
ACCESSORIES AND FACTORY APPROVED PARTS
To view the wide selection of Global Electric Motorcars factory approved parts, accessories,
and upgrades available for your GEM vehicle go to www.nevservice.biz or you can call
1.866.764.0616 to request a catalog be mailed to you at no charge.
GFCI Charge Cord
Easy Fill Battery Filler
MAX BOX by GEM
Sun-Sliding Visor
Bumpers
Fast Chargers
Panoramic Mirror
Hard Doors, Stake-Back Kits
GEM Notes:
For more information contact GEM Service at 866.764.0616
© 2011 Polaris Industries Inc.
1301 39th St NW Suite #2 ■ Fargo, ND 58102
www.gemcar.com
www.nevservice.biz
866.764.0616
Global Electric Motorcars® by