1
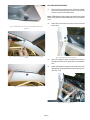
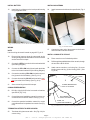
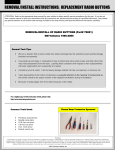
(Rev 1- page 4, bullet 20 is wrong. Positive changed to negative and added J8)
and corrected diode on page 5
INSTRUCTIONS
Product: GEM Electric Motorcars
Models: All
Subject: Instructions for installing Stereo Accessory
Estimated Completion Time: .75 Hours
Parts:
See Page # 7
REQUIRED TOOLS & SUPPLIES:
(1) 3/8” Drive Ratchet
(1) 3/8” Socket
(1) Small felt tip Marker
(1) Drill
(1) Center Punch
(1) Ø 1/4” Drill Bit
(1) Ø 3/8” Drill Bit
(6”) Masking Tape
(1) Phillips Screwdriver
(1) Small Flat Screwdriver
Fig. # 1 Switch master disconnect off
2.
(1) Med. Flat Screwdriver
(1 Pair) Safety Glasses
(1) Wire Cutter
(1) Needle Nose Pliers
(1) Wire Stripper
(1) Wire terminal Crimper
(1) Tape Measure
(1) 6 Ft. of 18 Ga. Mechanics Wire
(7) Butt Connectors
(6) Tie Straps
Remove the Qty. two (2) 1” Dia. Hood Knobs securing
the hood. (See Fig # 2).
WARNING!
To prevent personal injury or property damage: Switch
the 72-volt Master Disconnect to “OFF”, be sure the ignition switch is always in the “OFF” position and that the
“KEY” is removed. Set the parking brake, then make sure
that all moving parts have come to a complete stop before servicing, adjusting, or repairing.
Fig. # 2 Loosen and remove hood knobs
3.
Newer models only require for the latch to be
unclasped. (See Fig # 3).
WARNING!
HIGH VOLTAGE
You could be seriously or fatally
injured by electric shock if you
attempt to open, repair, test,
inspect or adjust. Only
qualified technicians should
open and service. Consult
service manual.
The following instructions are for installing the Stereo accessory to all models of GEM cars.
To install the stereo, proceed as follows.
Fig. # 3 unclasp latch
4.
1.
Remove bench seat cushion (rear bench seat cusion
for 4 passenger vehicles) to access the Master Disconnect switch. Switch master disconnect off. (See
Fig. # 1.
Page 1
Open the hood.
Inst. P/N 1010-00030
-011002
REMOVING THE DASH
5.
10.
Loosen the Qty. two (2) dash mount bolts securing
the upper dash located on the front of the lower windshield support.
Mark the hole locations for the wiring harness to be
routed at the driver side of vehicle on the roof rail and
stereo console. (See Fig. # 8, 9, 10 & 11)
Fig. # 6 Remove lower dash mount bolts
Fig. # 4 Loosen dash mount bolts
6.
Remove upper dash. (See Fig. # 5)
Fig. # 7 Remove grab handles
Fig. # 5 Remove upper dash
7.
Remove Qty. three (3) lower dash mounting bolts.
(See Fig. # 6)
REMOVING THE GRAB HANDLES
8.
Remove grab handles from each side of vehicle. First
remove the plastic caps with a small flat tip screwdriver. Then remove the screws securing the grab
handles. (See Fig. # 7)
LOCATING THE STEREO CONSOLE
9.
Locate the stereo console on the inside roof of vehicle.
Fig. # 8 Mark hole locations for wiring harness
Page 2
ROUTING WIRING HARNESS
11.
Remove stereo console from roof. Drill holes to Ø3/8”
previously marked through one side of roof rail and
console. Deburr holes after drilling.
Note: GEM suggests using rubber grommets for the drilled
holes in roof rail and console available at your local hardware
store.
12.
Drill a Ø3/8” hole at the lower inner corner of roof rail
below dash.
Fig. # 9 Drill Ø3/8” hole in stereo console and install rubber
grommet
Fig. # 10 Mark and drill Ø3/8” hole in roof rail 1/2” down from
ceiling
Fig. # 12 Drill lower hole in roof rail
13.
Use a 6Ft. length of 18 Ga. mechanics wire to form a
fish tape and insert in the top hole an out the bottom
hole.
14.
Attach wiring harness (opposite of diode end) to fish
tape and pull up through bottom hole and out top hole.
(See Fig. # 13)
Fig. # 11 and 3-1/4” from front window brace
Fig. # 13 Route wiring harness
Page 3
INSTALL BATTERY
INSTALLING ANTENNA
15.
26.
Install the 12 volt battery to the brake pedal housing
using supplied bracket.
Install antenna at the dimensions specified in (Fig. #
17)
Fig. # 14 Install battery to car chassis above brake pedal housing
Fig. # 17 Install antenna
WIRING
27.
NOTE:
Use the wiring schematic located on page # 5 Fig. # 15.
Connect the male end of the antenna to the female
end of the radio antenna connector.
INSTALL CONSOLE TO VEHICLE
16.
Route wiring harness along the same path as the
existing wiring harness that leads to the circuit board
and secure with tie straps.
17.
Connect the RED wire to the circuit board marked J9.
(See Wiring Diagram)
18.
Connect the YELLOW end of the wire with the diode
to the circuit board marked J7. (See Wiring Diagram)
19.
Connect the remaining YELLOW wire lead to the positive (+) terminal of the battery. (See Fig. # 14)
20.
Connect the remaining BLACK wire lead to the positive (-) terminal of the battery. (See Fig. # 14)
28.
Place console on roof in desired position.
29.
Drill through the predrilled holes of the console, through
the roof with a Ø.25 drill bit.
30.
Attach stereo console to roof using Qty. (6) screw
binding posts and Qty. (6) Nut binding posts. (See
Fig. # 18).
VEHICLE
ROOF
(Rev 1-to the negative and J8 post)
21.
Secure remaining wires with tie straps.
SCREW, BINDING POST
#8-32 X .375 WHITE
CONSOLE PREPARATION
22.
Drill Qty. eight (8) Ø.25 holes in console at locations
specified in (Fig. # 16).
23.
Consult the stereo installation manual for correct cutout dimensions for stereo chassis. See (Fig. # 16).
24.
Consult the speaker installation manual for correct
cutout dimensions for speakers into console. See (Fig.
# 16).
NUT, BINDING
POST # 8-32 GRAY
PANEL, AE
(AUDIO ELECTRONICS)
Fig. # 18 Attach Stereo console to roof using hardware
TERMINATING STEREO TO WIRE HARNESS
25.
Terminate wiring harness to radio. See (Fig. # 16) for
correct wiring.
Page 4
(Rev 1 - see 20. Changed positive to negative and added J8)
(Rev 1- corrected diode polarization)
RE-ASSEMBLY
31.
Re-install grab handles to roof rail.
32.
Install lower and upper dash in the reverse dis-assembly procedure.
33.
Install safety decal to location shown in (Fig. # 19).
Use P/N 0350-00549 for 2 passenger vehicles.
Use P/N 0350-00548 for 4 passenger vehicles.
34.
Close hood.
35.
Turn master disconnect switch to the “ON” position.
NOTE: The stereo may stay on up to 40 seconds after the
ignition is turned to the “OFF” position.
Fig. # 19 Stereo installation finished
CONSOLE CUTOUT DIMENSIONS
"A"
"B"
CONSULT OPERATORS
MANUAL THAT CAME WITH
YOUR SPEAKERS FOR
HOLE SIZE
FOR DIMENSION "A" AND "B" CONSULT YOUR STEREO
INSTALLATION MANUAL FOR CORRECT DIMENSIONS
FOR HOLE CUTOUT
Ø0.25 (6 PLACES)
Fig. # 16
Page 6
PARTS
IN
S
S
E
C
O
R
P
Toll Free: 866.764.0616
Fax: 701.232.0600
e-mail: [email protected]
Web Site: www.gemcar.com
Page 7