1
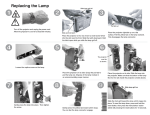
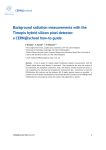
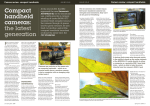
Battistinis
Custom
Cycles
1109 Langton drive
San Ramon, CA 94582
925.270.4211 Tech line
www.battistinisusa.com
Quantity
1
1
1
1
1
2
BILL OF MATERIALS
Part
Brake lever, chrome or black anodized
Cotter pin
Brake lever peg chrome or black anodized
Hat spacer
5
/16 -24 x 1 3/4” flat head cap screw, chrome
5
/16 “ shim washer
WARNING: Your safety depends on the correct installation of this kit. Use
appropriate service manual procedures. If the procedures are not within your
capability or you do not have the correct tools, have a trained mechanic/
technician install this part for you. Improper installation of this part could result
in injury or death.
STEP 1 - FOR PRE-2008 MODELS: Following the
specifications listed in the appropriate service manual for
your year and model of motorcycle, remove the right-side
floorboard and existing brake lever. Clean the pivot shaft
and remove o-ring as shown in the inset photo (arrow).
NOTE: the brake lever peg is included in this kit but is not
installed to the brake lever. This is done to allow ample
clearance between the lever and highway bars during
installation of the lever.
STEP 2 - FOR PRE-2008 MODELS: Now install your
new Battistinis brake lever using a drop of Loctite Blue 242 on
the threads of the new nut supplied with this kit (inset) while
following the specifications listed in the appropriate service
manual for your year and model of motorcycle. NOTE: it is
imperative that the nut bottoms out on the pivot shaft leaving
the lever free to float left to right. Check to ensure the lever
has end float and also that it has adequate clearance from
the heat shield on the front exhaust pipe. Modify the heat
shield as necessary. Now install the brake lever peg using a
drop of Loctite 242 Blue on the threads of the mounting bolt.
1
Chrome billet
&
Black anodized
Brake levers
for FLT models
BASIC TOOLS
MEDIUM:
30 minutes
to install
(approx.)
MAINTENANCE: To keep your new brake
lever looking its best, apply a high-quality
chrome polish to it every time you detail your
motorcycle.
Battistinis
Custom
Cycles
Chrome billet &
Black anodized
Brake levers
for FLT models
STEP 1 - FOR 2008-UP MODELS: Following the
specifications listed in the appropriate service manual
for your year and model of motorcycle, remove the rightside floorboard and existing brake lever. Next, remove
the two 5/16” mounting screws (arrows) from the master
cylinder. This will allow you to acheive proper alignment
of the new brake laver with the master cylinder pushrod.
NOTE: the brake lever peg is included in this kit but is not
installed to the brake lever. This is done to allow ample
clearance between the lever and highway bars during
installation of the lever.
STEP 2 - FOR 2008-UP MODELS: Should the alignment
between the master cylinder pushrod need adjustment,
use the 5/16” shim washers included with this kit. They are
placed over the mounting screws (arrows) in between the
master cylinder and the bracket. This will provide adjustment
to allow for proper alignment of the brake arm with the
master cylinder pushrod. This may not be necessary on
every motorcycle.
STEP 3 - FOR 2008-UP MODELS: Now install your new
Battistinis brake lever using a drop of Loctite Blue 242 on
the threads of the new nut supplied with this kit (inset) while
following the specifications listed in the appropriate service
manual for your year and model of motorcycle. NOTE: it is
imperative that the nut bottoms out on the pivot shaft leaving
the lever free to float left to right. Check to ensure the lever
has end float and also that it has adequate clearance from
the heat shield on the front exhaust pipe. Modify the heat
shield as necessary. Now install the brake lever peg using a
drop of Loctite 242 Blue on the threads of the mounting bolt.
2