1
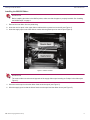
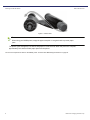
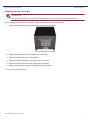
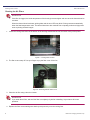
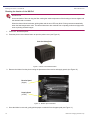
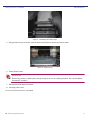
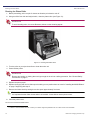
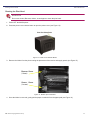
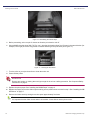
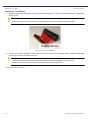
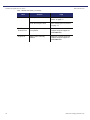
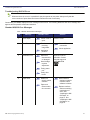
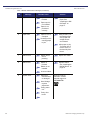
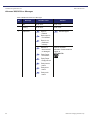
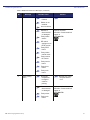
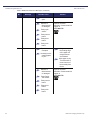
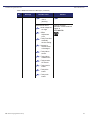
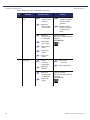
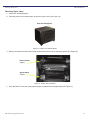
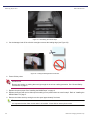
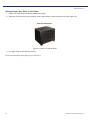
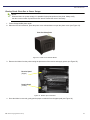
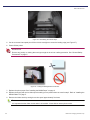
M4/Q4 Printer Basics
BEFORE YOU BEGIN
I MPORTANT S AFETY I NSTRUCTIONS
Safety is paramount. These safety instructions are to protect you, your customer and your investment in the DNP Photo
Imaging America Corp. product line and for the overall public. The following bullet points apply to the safety instructions in
this manual:
Read all of these instructions before setting up, installing, and operating your system.
Follow all warnings, safety precautions, and notices for all procedures in this manual.
When in doubt, stop what you are doing and reassess the safety of the situation or procedure. Never continue with a
step or procedure when there is the slightest doubt regarding safety.
Save these instructions for future reference.
GENERAL SAFETY PRECAUTIONS
Never install or setup the system near water.
Never place the system on an unstable platform.
Never place the system near a heat source such as a heater or furnace.
Never perform any of these steps while wearing jewelry (rings, loose necklaces, bracelets, etc.), neckties or long
sleeve shirts. These items are conductors of electricity or may get caught in the unit and cause injury.
Never insert any foreign object into the system unit without powering the system OFF first.
Never block ventilation ports; allow plenty of room around the system for ventilation.
Never use water or liquid to extinguish a fire on the system unit.
Always protect the power cord from accidental kinks, cuts, and foot traffic.
Always operate this system from the correct type of grounded power source.
Always clean and maintain the system in the prescribed manner as instructed in this manual.
Always use this equipment in the specified manner as recommended by the manufacturer.
Failure to observe safety precautions voids your warranty and may cause damage to the unit and could result in personal
injury or death. Contact technical support at 1-888-749-3587 if:
The system is damaged due to fire or flood; or is otherwise unsafe to operate.
Any part of the system is dropped, cracked, or is not operating properly after performing cleaning and maintenance.
You have any questions not answered in this manual.
DNP Photo Imaging America Corp.
iii
General Safety Precautions
iv
Basic Maintenance
DNP Photo Imaging America Corp.
M-Series & Q-Series Printers
Basic Maintenance
M-SERIES & Q-SERIES PRINTERS
Distinguishing Your M-Series and Q-Series Printer Model
The M-Series printers are versatile photo printers for use in photo labs by professional photographers, or in other
commercial situations which demand high speed and exceptional quality. Other information on the M-Series printers can be
found in the printer's field service manual or your system’s documentation suite.
Figure 3. The M-Series and Q-Series Printer Lines
A t te n t i o n
Prior to moving the printer, the ink ribbon and paper cassette should be removed from the printer. Always have
assistance when lifting/moving the printer.
When reinstalling, check that the ribbon and the paper are properly positioned before resuming printing. If either
is positioned incorrectly, paper jams, print position errors, or other unexpected problems can occur.
A t te n t i o n
Do not open the printer cover when the printer is printing. Doing so can cause damage to the thermal head.
The M4 and Q4 printers are very similar. The instructions written for one work for the other. Both the M4 and Q4 printers
have multiple paper sizes available. The most common paper size for both printers is 4x6.
The M8C and Q8 printers are interchangeable. Instructions written for one work for the other, and so forth.
20
DNP Photo Imaging America Corp.
M4/Q4 Printers
Basic Maintenance
M4/Q4 PRINTERS
Use the following procedures with your M4/Q4 printer.
Installing the M4/Q4 Paper
No t e
It is a good idea to check daily that there is enough paper in the printer to meet anticipated
demand.
Avoid touching the surface of the M4/Q4 paper. Excessive fingerprints or smudges can lead to
poor print quality.
1. Remove the ribbon spools from the printer.
2. Remove the paper spool from the paper compartment.
3. Pull the spool apart. Properly discard of the used paper roll.
Figure 1. Paper Spool
4. Place the new paper roll on one end of the paper spool.
No t e
Hold the edges of the new paper roll to avoid getting fingerprints and smudges on the paper.
5. Attach the other end of the paper spool.
6. Turn the paper spool so that the leading edge of the paper goes over the top of the spool.
Hello
2
DNP Photo Imaging America Corp.
Hello
Basic Maintenance
Figure 2. Positioning the Leading Edge of the Paper
7. Remove the sticker from the paper roll. Carefully place the spool in the paper cradle (see Figure 3).
8. Feed the paper over the beam and under the alignment guide. Align the paper as indicated by the guide markings on
the printer (see Figure 3).
Figure 3. Threading the Paper in the M4/Q4
9. Slide the paper over the rubber roller and behind the guide plate (see Figure 3).
No t e
When using your M4/Q4 printer, empty the paper scrap bin on a regular basis to prevent paper
jams.
10. Continue feeding the paper until the printer beeps. This indicates that the paper is in the correct position.
You have now replaced the paper in the M4/Q4 printer. Continue with “Installing the M4/Q4 Ribbon” on page 5.
DNP Photo Imaging America Corp.
3
Installing the M4/Q4 Ribbon
Basic Maintenance
Installing the M4/Q4 Ribbon
A t te n t i o n
Before installing the ribbon in the M4/Q4 printer, make sure that the paper is properly installed. See “Installing
the M4/Q4 Paper” on page 2.
1. Remove the new ribbon from the plastic bag.
2. Insert the receive spool in the upper ribbon cradles with the geared end on the left (see Figure 4).
3. Insert the supply spool in the lower ribbon cradles with the geared spool on the left (see Figure 4).
Figure 4. Ribbon Cradles
A t te n t i o n
The receive ribbon must be wound opposite of the supply ribbon spool creating an S shape in the ribbon (see
Figure 5).
4. Wind the receive spool so that the ribbon feeds under the spool (see Figure 5).
5. Wind the supply spool so that the ribbon feeds over the spool and the ribbon is taut (see Figure 5).
DNP Photo Imaging America Corp.
5
Installing the M4/Q4 Ribbon
Basic Maintenance
Figure 5. Ribbon Path
No t e
When using your M4/Q4 printer, empty the paper scrap bin on a regular basis to prevent paper
jams.
The printer cycles through the new ribbon and paper for a few seconds. When this process is complete,
approximately four sheets of blank paper eject from the printer.
You have now replaced the ribbon in the M4/Q4 printer. Continue with “Maintaining the Printers” on page 25.
6
DNP Photo Imaging America Corp.
Emptying the Paper Scrap Bin
Basic Maintenance
Emptying the Paper Scrap Bin
A t te n t i o n
Do not insert your fingers into the print exit area when the printer is in use. Doing so can cause injury.
Before replacing the printer media, remove the paper trimmings from the printer’s scrap bin.
1. Locate the hand-hold area at the bottom-center of the bin (see Figure 6)
Figure 6. M4/Q4 Printer Scrap Bin
2. Gently pull the bin away from the bottom of the printer base.
3. Slide the bin down and remove it from printer.
4. Empty any paper trimmings in the bin into a proper receptacle.
5. Insert the top-end of the bin into the upper base of the printer.
6. Gently guide the bottom end of the scrap bin into the printer base.
You have now emptied the scrap bin.
DNP Photo Imaging America Corp.
7
Cleaning the Air Filters
Basic Maintenance
Cleaning the Air Filters
A t te n t i o n
If the filter is clogged, the inside temperature of the housing becomes higher and can cause the thermal head to
overheat.
When the thermal head overheats, printing halts and the error LED may blink. Printing resumes automatically
when the head temperature cools. The thermal head can also overheat due to inputting continuous high-power
such as printing all black images.
1. Locate the cooling fans bolted to the bottom of the housing towards the back of the interior cavity of the printer.
Figure 7. Cooling Fans Location
2. The filter covers snap off. Use your fingers to pry the filter cover off the fan.
Figure 8. Removing the Fan Filter Cover
3. Clean the air filter using a brush or cleaner.
A t te n t i o n
If you wash the air filter, wait until the filter is completely dry before reinstalling. Any moisture will cause
problems.
4. Replace the filter covers making sure that they snap securely on to the cooling fans.
8
DNP Photo Imaging America Corp.
Cleaning the Air Filters
Basic Maintenance
5. Power ON the printer.
A t te n t i o n
Remove any jewelry or clothing that could get caught in the unit as a safety precaution.
6. Reinstall the printer paper. See “Installing the M-Series Paper and Ribbon” on page 8.
7. Replace the ribbon. See “Installing the M-Series Paper and Ribbon” on page 8.
8. Close the printer cover.
You have now cleaned the air filters.
DNP Photo Imaging America Corp.
9
Cleaning the Interior of the M4/Q4
Basic Maintenance
Cleaning the Interior of the M4/Q4
A t te n t i o n
An accumulation of dust can clog the filter causing the inside temperature of the housing to become higher and
the thermal head to overheat.
When the thermal head overheats, printing halts and the error LED may blink. Printing resumes automatically
when the head temperature cools. The thermal head can also overheat due to inputting continuous high-power
such as printing all black images.
1. Power OFF the M4/Q4 printer.
2. Press the printer cover release button to open the printer cover (see Figure 9).
Figure 9. Printer Cover Release Button
3. Remove the ribbon from the printer noting the placement of the receive and supply spools (see Figure 10).
Receive Spool
(Upper)
Supply Spool
(Lower)
Figure 10. Ribbon Spool Placement
4. Once the ribbon is removed, gently pull the paper to unwind it from the paper path (see Figure 11).
10
DNP Photo Imaging America Corp.
Cleaning the Interior of the M4/Q4
Basic Maintenance
Figure 11. Unthreading the Printer Paper
5. Using a small vacuum or blower, clean the inside of the printer to remove any dust or debris.
Figure 12. Printer Interior
6. Power ON the printer.
A t te n t i o n
Remove any jewelry or clothing that could get caught in the unit as a safety precaution. See “General Safety
Precautions” on page iii.
7. Reinstall the printer paper and ribbon.
8. Close the printer cover.
You have now cleaned the interior of the M4/Q4.
DNP Photo Imaging America Corp.
11
Cleaning the Platen Roller
Basic Maintenance
Cleaning the Platen Roller
1. Before proceeding, wait a couple of minutes to allow the print head to cool off.
2. Using a soft lint-free cloth and ethyl alcohol1, clean the platen roller (see Figure 13).
A t te n t i o n
To avoid invading resin, do not use Benzene, thinner or other cleaning agents.
Figure 13. Cleaning the Platen Roller
3. Turn the roller as you wipe the surface to clean the entire unit.
4. Power ON the printer.
A t te n t i o n
Remove any jewelry or clothing that could get caught in the unit as a safety precaution. See “General Safety
Precautions” on page iii.
5. Replace the printer paper.
6. Replace the supply and receive ribbon spools making sure to position them as noted in “Installing the M4/Q4 Ribbon”
on page 5 beginning with step 2.
7. Remove the ribbon slack by turning the receive spool approximately five times.
No t e
It is important that the ribbon be taut when it is installed. A loose ribbon causes printer errors.
8. Close the printer cover.
You have now cleaned the Platen Roller.
1. Available in the Field Maintenance Kit. Contact your customer support representative at 1-877-388-1776 for more information.
12
DNP Photo Imaging America Corp.
Cleaning the Print Head
Basic Maintenance
Cleaning the Print Head
A t te n t i o n
Do not use alcohol, Benzene, thinner, or sand paper to clean the print head.
1. Power OFF the M4/Q4 printer.
2. Press the printer cover release button to open the printer cover (see Figure 14).
Figure 14. Printer Cover Release Button
3. Remove the ribbon from the printer noting the placement of the receive and supply spools (see Figure 15).
RECEIVE SPOOL
(UPPER)
SUPPLY SPOOL
(LOWER)
Figure 15. Ribbon Spool Placement
4. Once the ribbon is removed, gently pull the paper to unwind it from the paper path (see Figure 16).
DNP Photo Imaging America Corp.
13
Cleaning the Print Head
Basic Maintenance
Figure 16. Unthreading the Printer Paper
5. Before proceeding, wait a couple of minutes to allow the print head to cool off.
6. Using a #8000 cleaning sheet (3M, Fuji Film, etc.), wipe the print head surface five (5) times in the same direction (for
example, left to right) to remove any powder or residue adhering to the print head. (see Figure 17).
Figure 17. Cleaning the Print Head
7. Turn the roller as you wipe the surface to clean the entire unit.
8. Power ON the printer.
A t te n t i o n
Remove any jewelry or clothing that could get caught in the unit as a safety precaution. See “Important Safety
Instructions” on page iii.
9. Replace the printer paper. See “Installing the M4/Q4 Paper” on page 2.
10. Replace the supply and receive ribbon spools making sure to position them as noted in step 3. See “Installing the M4/
Q4 Ribbon” on page 5.
11. Remove the ribbon slack by turning the receive spool approximately five times.
No t e
It is important that the ribbon be taut when it is installed. A loose ribbon causes printer errors.
14
DNP Photo Imaging America Corp.
Cleaning the Print Head
Basic Maintenance
12. Close the printer cover.
You have now cleaned the print head.
DNP Photo Imaging America Corp.
15
Repairing a Torn Ribbon
Basic Maintenance
Repairing a Torn Ribbon
1. Attach the supply side of the ribbon to the receive side using clear tape. There is no need to be specific in aligning the
ribbon pieces.
No t e
Depending on your printer, the ribbon may look different from the one shown in the picture below.
Figure 18. Fixing a Torn Ribbon
2. Turn the receive spool towards the back of the printer several times until the repaired portion disappears completely
and the supply side of the ribbon is smooth.
No t e
The ribbon can be repaired without removing the ribbon spools from the printer. If more space is
needed, then remove the ribbon spools and replace them after repairing them.
You have now fixed a torn ribbon.
16
DNP Photo Imaging America Corp.
Troubleshooting M4/Q4 Print Quality
Basic Maintenance
Troubleshooting M4/Q4 Print Quality
Occasionally, the M4/Q4 printer will require manual adjustments to ensure high-quality prints. The following table lists
various print issues and how to resolve them.
Table 1: M4/Q4 Print Quality
Issue
Graze
Wrinkle
Stripe
Registration
Error
DNP Photo Imaging America Corp.
Solution
Page
Adjust offset.
Requires a trained technician.
Contact technical support at
1-877-388-1776.
Clean thermal print head.
See “Cleaning the Print Head”
on page 13.
Adjust head voltage.
Requires a trained technician.
Contact technical support at
1-877-388-1776.
Adjust offset.
Requires a trained technician.
Contact technical support at
1-877-388-1776.
Adjust ribbon feed out gear
assembly.
Requires a trained technician.
Contact technical support at
1-877-388-1776.
Adjust ribbon rewinding gear
assembly.
Requires a trained technician.
Contact technical support at
1-877-388-1776.
Adjust ribbon feed out gear
assembly.
Requires a trained technician.
Contact technical support at
1-877-388-1776.
Adjust head pressure.
Requires a trained technician.
Contact technical support at
1-877-388-1776.
Adjust ribbon rewinding gear
assembly.
Requires a trained technician.
Contact technical support at
1-877-388-1776.
Adjust head pressure.
Requires a trained technician.
Contact technical support at
1-877-388-1776.
Clean platen roller.
See “Cleaning the Platen
Roller” on page 12.
Clean thermal print head.
See “Cleaning the Print Head”
on page 13.
17
Troubleshooting M4/Q4 Print Quality
Basic Maintenance
Table 1: M4/Q4 Print Quality (Continued)
Issue
Feed Deviation
18
Solution
Page
Clean platen roller.
See “Cleaning the Platen
Roller” on page 12.
Clean thermal print head.
See “Cleaning the Print Head”
on page 13.
Cut Start
Position Error
Cut-off paper width. Adjust
Print position.
Requires a trained technician.
Contact technical support at
1-877-388-1776.
Angled Cut
Adjust Cutter assembly
position.
Requires a trained technician.
Contact technical support at
1-877-388-1776.
DNP Photo Imaging America Corp.
Troubleshooting M4/Q4 Errors
Basic Maintenance
Troubleshooting M4/Q4 Errors
No t e
Whenever there is a error, it is possible for the print spooler to lose prints. Always verify that the
correct number of prints have been issued. Resend the order if necessary.
Occasionally, the M4/Q4 displays an error message on the screen. The following tables list each error message as it
appears and the possible causes and solutions.
Standard M4/Q4 Error Messages
Table 7: M4/Q4 Standard Error Messages
No.
Message
Possible Cause
1
Cover Open
Printer cover is
open.
2
Data Error
Trouble
receiving
image data.
Solution
Close the cover.
Check USB
connection.
Check application.
Application
problem.
3
Hardware Error
Harness is
disconnected
or damaged.
Head Voltage
requires
adjustment.
Requires a trained
technician. Contact
technical support at
1-877-388-1776.
Faulty power
unit.
Faulty drive
board.
4
Paper Error
Media size
doesn’t match
software.
Paper and
ribbon media
do not match.
DNP Photo Imaging America Corp.
Reset software
settings or replace
media to match
software in Admin.
Replace media to
achieve matching
combination of
sizes. See
“Installing the M4/
Q4 Paper” on
page 21. See
“Installing the M4/
Q4 Ribbon” on
page 23.
37
Troubleshooting M4/Q4 Errors
Basic Maintenance
Table 7: M4/Q4 Standard Error Messages (Continued)
No.
5
Message
Paper End Error
Possible Cause
Paper is
finished.
Paper spool is
not installed.
Solution
Replace or reinstall
paper. See
“Installing the M4/
Q4 Paper” on
page 21.
Paper is not
positioned
correctly.
6
Paper Jam
Paper is torn or
crumpled.
Humidity level is
causing paper
to jam.
Using scissors, cut
the leading edge
of the paper roll
straight across
and reinstall.
Allow paper to dry.
Turn down AC to
remove some of
the humidity from
the air.
7
Ribbon Error
Ribbon break
due to
jamming.
Repair torn ribbon.
8
Ribbon End
Ribbon is
finished.
Replace ribbon.
See “Installing the
M4/Q4 Ribbon” on
page 23.
Ribbon is not
installed.
Incorrect ribbon.
9
System Error
Harness is
disconnected
or damaged.
Head Voltage
requires
adjustment.
Requires a trained
technician. Contact
technical support at
1-877-388-1776.
Faulty power
unit.
Faulty drive
board.
38
DNP Photo Imaging America Corp.
Troubleshooting M4/Q4 Errors
Basic Maintenance
No t e
Whenever there is a error, it is possible for the print spooler to lose prints. Always verify that the
correct number of prints have been issued. Resend the order if necessary.
DNP Photo Imaging America Corp.
39
Troubleshooting M4/Q4 Errors
Basic Maintenance
Advanced M4/Q4 Error Messages
Table 8: M4/Q4 Advanced Error Messages
No.
1
Message
Possible Cause
Solution
Idle
Not an error.
Not an error.
Printing
Not an error.
Not an error.
Paper End
Paper is
finished.
Reinstall paper.
Paper spool is
not installed.
Paper is not
positioned
correctly.
Harness is
disconnected
or damaged.
Faulty Paper
End sensor.
Faulty Paper
Empty sensor.
Requires a trained
technician. Contact technical
support at
1-877-388-1776.
Faulty interim
board.
Faulty drive
board.
Faulty main
board.
40
DNP Photo Imaging America Corp.
Troubleshooting M4/Q4 Errors
Basic Maintenance
Table 8: M4/Q4 Advanced Error Messages (Continued)
No.
2
Message
Ribbon End
Possible Cause
Ribbon is
finished.
Solution
Replace ribbon.
Ribbon is not
installed.
Incorrect ribbon.
Harness is
disconnected
or damaged.
Faulty ribbon
sensor.
DIP switch
setting error on
RFID module.
Requires a trained
technician. Contact technical
support at
1-877-388-1776.
Faulty RFID
board.
Faulty ribbon
rewind motor.
Faulty tension
HP sensor.
Faulty interim
board.
Faulty drive
board.
Faulty main
board.
3
Head Cooling
Down
Print head
temperature
too high to
continue
printing.
Harness is
disconnected
or damaged.
Faulty mistor
Faulty main
board.
DNP Photo Imaging America Corp.
Warning Only. Allow
the print head to
cool.
Requires a trained
technician. Contact technical
support at
1-877-388-1776.
41
Troubleshooting M4/Q4 Errors
Basic Maintenance
Table 8: M4/Q4 Advanced Error Messages (Continued)
No.
4
Message
Cover Open
Possible Cause
Solution
Printer cover is
open.
Close the cover.
Harness is
disconnected
or damaged.
Requires a trained
technician. Contact technical
support at
1-877-388-1776.
Faulty open
sensor.
Faulty interim
board.
Faulty drive
board.
Faulty main
board.
5
Paper Jam
Paper is torn or
crumpled.
Humidity level is
causing paper
to jam.
Using scissors, cut
the leading edge
of the paper roll
straight across
and reinstall.
Allow paper to dry.
Turn down AC to
remove some of
the humidity from
the air.
Harness is
disconnected
or damaged.
Faulty Paper
Jam sensor.
Faulty interim
board.
Requires a trained
technician. Contact technical
support at
1-877-388-1776.
Faulty drive
board.
Faulty main
board.
42
DNP Photo Imaging America Corp.
Troubleshooting M4/Q4 Errors
Basic Maintenance
Table 8: M4/Q4 Advanced Error Messages (Continued)
No.
6
Message
Ribbon Error
Possible Cause
Ribbon break
due to
jamming.
Ribbon break due to:
Head voltage set
too high.
Offset
Adjustment
error.
Solution
Repair torn ribbon.
Requires a trained
technician. Contact technical
support at
1-877-388-1776.
Faulty Feed Out
assembly
tension setting.
Harness is
disconnected
or damaged.
Faulty ribbon
sensor.
Faulty ribbon
rewind motor.
Faulty tension
HP sensor.
Faulty interim
board.
Faulty drive
board.
Faulty main
board.
DNP Photo Imaging America Corp.
43
Troubleshooting M4/Q4 Errors
Basic Maintenance
Table 8: M4/Q4 Advanced Error Messages (Continued)
No.
7
Message
Paper Definition
Error
Possible Cause
Media size
doesn’t match
software.
Paper and
ribbon media
do not match.
Harness is
disconnected
or damaged.
Faulty paper
size sensor.
Faulty interim
board.
Solution
Reset software
settings or replace
media to match
software.
Replace media to
achieve matching
combination of
sizes.
Requires a trained
technician. Contact technical
support at
1-877-388-1776.
Faulty drive
board.
Faulty main
board.
8
Data Error
Trouble
receiving
image data.
Check USB
connection.
Check application.
Application
problem.
Harness is
disconnected
or damaged.
Faulty main
board.
44
Requires a trained
technician. Contact technical
support at
1-877-388-1776.
DNP Photo Imaging America Corp.
Troubleshooting M4/Q4 Errors
Basic Maintenance
Table 8: M4/Q4 Advanced Error Messages (Continued)
No.
9
Message
Head Voltage
Error
Possible Cause
Harness is
disconnected
or damaged.
Head Voltage
requires
adjustment.
Solution
Requires a trained
technician. Contact technical
support at
1-877-388-1776.
Faulty power
unit.
Faulty drive
board.
Faulty main
board.
10
Head Position
Error
Head up/down
movement
error.
Harness is
disconnected
or damaged.
Head Voltage
requires
adjustment.
Power OFF and
then restart the
printer.
Requires a trained
technician. Contact technical
support at
1-877-388-1776.
Faulty power
unit.
Faulty drive
board.
Faulty main
board.
DNP Photo Imaging America Corp.
45
Troubleshooting M4/Q4 Errors
Basic Maintenance
Table 8: M4/Q4 Advanced Error Messages (Continued)
No.
11
Message
Power Supply
Fan Stopped
Possible Cause
Fan is blocked.
Fan not working.
Solution
Power OFF printer
and remove
obstacle.
Power OFF and
then restart the
printer.
Harness is
disconnected
or damaged.
Faulty fan.
Faulty interim
board.
Requires a trained
technician. Contact technical
support at
1-877-388-1776.
Faulty drive
board.
Faulty main
board.
12
Cutter Error
Paper caught.
Power OFF printer.
Power ON printer
to release the
cutter. Remove
paper.
Harness is
disconnected
or damaged.
Requires a trained
technician. Contact technical
support at
1-877-388-1776.
Faulty cutter
position
sensor.
Faulty cutter
motor.
Faulty interim
board.
Faulty drive
board.
Faulty main
board.
46
DNP Photo Imaging America Corp.
Troubleshooting M4/Q4 Errors
Basic Maintenance
Table 8: M4/Q4 Advanced Error Messages (Continued)
No.
13
Message
Pinch Roller
Position Error
Possible Cause
Paper jam
detected near
the delivery
roller.
Harness is
disconnected
or damaged.
Faulty cutter
position
sensor.
Solution
Remove the paper
jam.
Requires a trained
technician. Contact technical
support at
1-877-388-1776.
Faulty cutter
motor.
Faulty interim
board.
Faulty drive
board.
Faulty main
board.
14
Ribbon Tension
Error
Ribbon tension
mechanism
failure.
Harness is
disconnected
or damaged.
Faulty tension
HP sensor.
Faulty tension
motor.
Remove the paper
jam.
Requires a trained
technician. Contact technical
support at
1-877-388-1776.
Faulty interim
board.
Faulty drive
board.
Faulty main
board.
DNP Photo Imaging America Corp.
47
Troubleshooting M4/Q4 Errors
Basic Maintenance
Table 8: M4/Q4 Advanced Error Messages (Continued)
No.
15
Message
Illegal Head
Temperature
Possible Cause
Printer head
overheated.
Solution
Power OFF. Allow
printer to cool for a
few minutes.
Restart the printer.
Check that the
cooling fan airflow
is not blocked.
Harness is
disconnected
or damaged.
Faulty mistor.
Faulty main
board.
16
Illegal Media
Temperature
Temperature of
media is too
high.
Requires a trained
technician. Contact technical
support at
1-877-388-1776.
Power OFF. Allow
printer to cool for a
few minutes.
Restart the printer.
Check that the
cooling fan airflow
is not blocked.
Harness is
disconnected
or damaged.
Faulty mistor.
Faulty interim
board.
Requires a trained
technician. Contact technical
support at
1-877-388-1776.
Faulty drive
board.
Faulty main
board.
48
DNP Photo Imaging America Corp.
Removing Paper Jams
Basic Maintenance
Removing Paper Jams
1. Power OFF the M4/Q4 printer.
2. Press the printer cover release button to open the printer cover (see Figure 19).
Figure 19. Printer Cover Release Button
3. Remove the ribbon from the printer noting the placement of the receive and supply spools (see Figure 20).
Receive Spool
(Upper)
Supply Spool
(Lower)
Figure 20. Ribbon Spool Placement
4. Once the ribbon is removed, gently pull the paper to unwind it from the paper path (see Figure 21).
DNP Photo Imaging America Corp.
19
Removing Paper Jams
Basic Maintenance
Figure 21. Unthreading the Printer Paper
5. Cut the damaged end off the roll with a straight cut across the leading edge (see Figure 22).
Figure 22. Cutting the Damaged End off the Roll
6. Power ON the printer.
A t te n t i o n
Remove any jewelry or clothing that could get caught in the unit as a safety precaution. See “General Safety
Precautions” on page iii.
7. Replace the printer paper. See “Installing the M4/Q4 Paper” on page 2.
8. Replace the supply and receive ribbon spools making sure to position them as noted in step 3. Refer to “Installing the
M4/Q4 Ribbon” on page 5.
9. Remove the ribbon slack by turning the receive spool approximately five times.
No t e
It is important that the ribbon be taut when it is installed. A loose ribbon causes printer errors.
20
DNP Photo Imaging America Corp.
Removing Paper Jams
Basic Maintenance
10. Close the printer cover.
11. Power ON the printer
You have now cleared a paper jam.
DNP Photo Imaging America Corp.
21
Basic Maintenance
Clearing Scrap Paper Stuck in the Printer
1. Power OFF and then power ON the M4/Q4 printer again.
2. When the LED is lit solid, press the printer cover release button to open the printer cover (see Figure 23).
Figure 23. Printer Cover Release Button
3. The paper scrap is automatically ejected.
You have now dislodged a stuck paper scrap (or “french fry”).
22
DNP Photo Imaging America Corp.
Basic Maintenance
Clearing Stuck Prints Due to Power Outage
No t e
Whenever there is a power outage, it is possible for the print spooler to lose prints. Always verify
that the correct number of prints have been issued. Resend the order if necessary.
1. Power ON the M4/Q4 printer again.
2. When the LED is lit solid blue, press the printer cover release button to open the printer cover (see Figure 24).
Figure 24. Printer Cover Release Button
3. Remove the ribbon from the printer noting the placement of the receive and supply spools (see Figure 25).
Receive Spool
(Upper)
Supply Spool
(Lower)
Figure 25. Ribbon Spool Placement
4. Once the ribbon is removed, gently pull the paper to unwind it from the paper path (see Figure 26).
DNP Photo Imaging America Corp.
23
Basic Maintenance
Figure 26. Unthreading the Printer Paper
5. Cut the recovered interrupted print off the roll with a straight cut across the leading edge (see Figure 27).
6. Power ON the printer.
A t te n t i o n
Remove any jewelry or clothing that could get caught in the unit as a safety precaution. See “General Safety
Precautions” on page iii.
Figure 27. Cutting the Damaged End off the Roll
7. Replace the printer paper. See “Installing the M4/Q4 Paper” on page 2.
8. Replace the supply and receive ribbon spools making sure to position them as noted in step 3. Refer to “Installing the
M4/Q4 Ribbon” on page 5.
9. Remove the ribbon slack by turning the receive spool approximately five times.
No t e
It is important that the ribbon be taut when it is installed. A loose ribbon causes printer errors.
24
DNP Photo Imaging America Corp.
Basic Maintenance
10. Close the printer cover.
You have now cleared a print stuck due to a power outage.
DNP Photo Imaging America Corp.
25
PN: 35-3020-M4Q4
Rev: 0208
PO BOX 767
SAN MARCOS, TX 78667
WWW.DNPPHOTO.COM