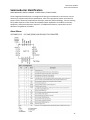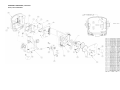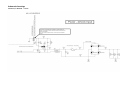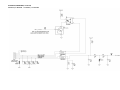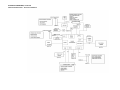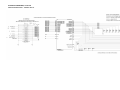
1
Pelco Service Operations
Sarix IX Service Manual Sarix IX Series
MODELS: IXS0, IX10, IX30, IXE20 | Odyssey
SERVICE MANUAL TECHNICAL RESOURCE GUIDE PRELIMINARY DRAFT COPY
SDXX-XXXX-XXXX SDXX‐XXXX‐XXXX Last Update: June 29th, 2011 Revision (A) 1 Pelco Service Operations
Sarix IX Service Manual FRONT VIEW REAR VIEW 2 Pelco Service Operations
Sarix IX Service Manual SARIX IX SERIES SERVICE MANUAL Pelco Service Operations United States Tel: 1‐800‐289‐9100 Fax: 1‐800‐289‐9707 International Tel: +1‐559‐292‐1981 Fax: +1‐559‐348‐1120 [email protected] Information shown in this guide is for reference purposes only and is not necessarily an exact representation of material or hardware contained within various Pelco technologies or products. Part numbers, descriptions, illustrations and so forth are subject to change without notice or obligation. This document and the data disclosed herein or herewith is the property of Pelco and is not to be reproduced, used or disclosed in whole or in part without the permission of Pelco. All patent, proprietary, design, use, sale, manufacturing and reproduction rights thereto are reserved by Pelco. 3 Pelco Service Operations
Sarix IX Service Manual SARIX IX SERIES SERVICE MANUAL Table of Contents Introduction ............................................................................................................. Specifications ........................................................................................................... Firmware Releases ................................................................................................... 1 2 Firmware Update Procedure ................................................................................... 7 Test & Calibration Procedures ................................................................................. 8 6 Troubleshooting Guidelines ..................................................................................... 20 Test & Configuration Scripts .................................................................................... 26 SKUing & DeSKUing .................................................................................................. 27 Replacement Parts Listing ....................................................................................... 28 Semiconductor Identification .................................................................................. 32 Drawings Exploded View Assemblies ................................................................................... 34 Schematics ........................................................................................................... 38 Printed Circuit Boards .......................................................................................... 67 4 Pelco Service Operations
Sarix IX Service Manual Introduction This service guide contains proprietary information for use by qualified service personnel to service and repair Pelco equipment. The procedures described in this guide require advanced technical equipment and specialist test equipment. Documentation This guide contains product specifications, diagrams, schematics, mechanical drawings, and printed circuit board (PCB) drawings. This information should be used in combination with a test and troubleshooting guide, if applicable. Equivalent Parts Only use replacement parts recommended by Pelco. Factory Repair Should it become necessary to return a product to Pelco for repair, call +1‐559‐292‐1981 or +1‐800‐289‐9100, or email [email protected]. Important Safety Instructions CAUTION: These servicing instructions are for use by qualified service personnel only. To reduce the risk of electrical shock, do no perform any servicing other than that contained in the operating instructions unless you are qualified to do so. The product and/or manual may bear the following marks: This symbol indicates that dangerous voltage constituting a risk of electric shock is present with this unit. This symbol indicates that there are important operating and maintenance instructions in the literature accompanying this unit. WARNING: HAZARDOUS MOVING PARTS, KEEP FINGERS AND OTHER BODY PARTS AWAY. WARNING: HIGH TOUCH CURRENT. EARTH CONNECTION ESSENTIAL BEFORE CONNECTING SUPPLY. 1 Pelco Service Operations
Sarix IX Service Manual Product Specifications IXS0 0.5 MEGAPIXEL STANDARD‐DEF DIGITAL CAMERA GENERAL
Imaging Device
16:9 Aspect Ratio
4:3 Aspect Ratio
5:4 Aspect
Ratio Imager Type
Imager Readout
Maximum Resolution
Signal-to-Noise Ratio
Auto Iris Lens Type
Electronic Shutter Range
Wide Dynamic Range
White Balance Range
Sensitivity
Color (33 ms)
Color SENS (500 ms)
Mono (33 ms)
Mono SENS (500 ms)
Weight (without lens)
Shipping Weight
VIDEO
Video Encoding
1/3-inch (effective)
1/4-inch (effective)
1/4-inch (effective)
CMOS
Progressive scan
800 x 600
50 dB
DC drive
1 ~ 1/100,000 sec
60 dB
2,000° to 10,000°K
f/1.2; 2,850°K; SNR> 24dB
0.50 lux
0.12 lux
0.25 lux
0.03 lux
1.11 lb (0.50 kg)
2.00 lb (0.90 kg)
Video Streams
Frame Rate
Supported Protocols
Users
Unicast
ELECTRICAL
Port
Cabling Type
Power Input
Power Consumption
Current Consumption
PoE
24 VAC
Local Storage
Alarm Input
Alarm Output
Service Port
RJ-45 connector for 100Base-TX
Auto MDI/MDI-X
Cat5 or better for 100Base-TX
22 to 34 VAC; 24 VAC nominal or
PoE (IEEE 802.3af class 3)
<6 W
<200 mA maximum
<295 mA nominal;
<390 mA maximum
Mini SD
10 VDC maximum,
5 mA maximum
0 to 15 VDC maximum
75 mA maximum
External 3-connector, 2.5 mm
provides NTSC/PAL video output
MECHANICAL Lens Mount
Camera Mount
CS mount, adjustable
0.25-inch (0.64 cm) UNC-20
screw, top and bottom of camera
housing
ENVIRONMENTAL Operational Temperature
Storage Temperature
Storage Humidity
14° to 122°F (–10° to 50°C)
14° to 158°F (–10° to 70°C)
20% to 90%, noncondensing
H.264 base profile, MPEG-4
and MJPEG
Up to 2 simultaneous streams;
the second stream is variable
based on the setup of the primary
stream
Up to 30, 25, 24, 15, 12.5, 12, 10,
8, 7. 5, 6, 5, 4, 3, 2.5, 2, 1
(dependent upon coding,
resolution, and stream
configuration)
TCP/IP, UDP/IP (Unicast,
Multicast IGMP), UPnP,
DNS, DHCP, RTP, RTSP, NTP,
IPv4, SNMP v2c/v3, QoS, HTTP,
HTTPS, LDAP (client), SSH, SSL,
SMTP, FTP, mDNS (Bonjour®),
and 802.1x (EAP)
Multicast
Security Access
Software Interface
Pelco System Integration
Open IP Integration
Up to 20 simultaneous users
depending on resolution settings
(2 guaranteed streams)
Unlimited users H.264 OR
MPEG-4
Password protected
Web browser view and setup, up
to 16 cameras
Endura 1.5 (or later), MPEG-4 or
Endura 2.0 (or later), H.264
Digital Sentry 4.2 (or later)
DX8100 Series 2.0 (or later)
DVR5100 Series 1.5.4 (or later)
Pelco IP camera API
Minimum System Requirements
Processor
Intel® Pentium® 4
Microprocessor, 1.6 GHz
Memory
512 MB RAM
Network Interface Card
100 megabits (or greater)
Monitor
Minimum of 1024 x 768
resolution, 16- or 32-bit
pixel color resolution
Web Browser*
Internet Explorer® 7.0 (or later) or
Mozilla® Firefox® 3.5 (or later);
Internet Explorer® 8.0 (or later) is
recommended for configuring
analytics
Pelco’s Media Player or
Media Player†
QuickTime® 7.6.5 for
Windows XP, Windows Vista, or
QuickTime 7.6.4 for Mac OS X
10.4
*Internet Explorer is not
supported by Mac OS X 10.4.
† This product is not compatible
with QuickTime version 7.6.4 for
Windows XP or Windows Vista. If
you have this version installed on
your PC, you will need to upgrade
to QuickTime version 7.6.5.
2 Pelco Service Operations
Sarix IX Service Manual SPECIFICATIONS, continued IX10 1.3 MEGAPIXEL HIGH‐DEF DIGITAL CAMERA GENERAL
Imaging Device
Imager Type
Imager Readout
Maximum Resolution
Signal-to-Noise Ratio
Auto Iris Lens Type
Electronic Shutter Range
Wide Dynamic Range
White Balance Range
Sensitivity
Color (33 ms)
Color SENS (500 ms)
Mono (33 ms)
Mono SENS (500 ms)
Weight (without lens)
Shipping Weight
ELECTRICAL
Port
Cabling Type
Power Input
Power Consumption
Current Consumption
PoE
24 VAC
Local Storage
Alarm Input
Alarm Output
Service Port
1/3-inch (effective)
CMOS
Progressive scan
1280 x 1024
50 dB
DC drive
1 ~ 1/100,000 sec
60 dB
2,000° to 10,000°K
f/1.2; 2,850°K; SNR>24 dB
0.50 lux
0.12 lux
0.25 lux
0.03 lux
1.11 lb (0.50 kg)
2.00 lb (0.90 kg)
RJ-45 connector for 100Base-TX
Auto MDI/MDI-X
Cat5 or better for 100Base-TX
22 to 34 VAC; 24 VAC nominal or
PoE (IEEE 802.3af class 3)
<6 W
<200 mA maximum
<295 mA nominal;
<390 mA maximum
Mini SD
10 VDC maximum,
5 mA maximum
0 to 15 VDC maximum
75 mA maximum
External 3-connector, 2.5 mm
provides NTSC/PAL video output
MECHANICAL Lens Mount
Camera Mount
CS mount, adjustable
0.25-inch (0.64 cm) UNC-20
screw, top and bottom of camera
housing
ENVIRONMENTAL Operational Temperature
Storage Temperature
Storage Humidity
14° to 122°F (–10° to 50°C)
14° to 158°F (–10° to 70°C)
20% to 90%, noncondensing
VIDEO
Video Encoding
Video Streams
Frame Rate
Supported Protocols
H.264 base profile, MPEG-4
and MJPEG
Up to 2 simultaneous streams;
the second stream is variable
based on the setup of the primary
stream
Up to 30, 25, 24, 15, 12.5, 12, 10,
8, 7. 5, 6, 5, 4, 3, 2.5, 2, 1
(dependent upon coding,
resolution, and stream
configuration)
TCP/IP, UDP/IP (Unicast,
Multicast IGMP), UPnP,
DNS, DHCP, RTP, RTSP, NTP,
IPv4, SNMP v2c/v3, QoS, HTTP,
HTTPS, LDAP (client), SSH, SSL,
SMTP, FTP, mDNS (Bonjour®),
and 802.1x (EAP)
Users
Unicast
Multicast
Security Access
Software Interface
Pelco System Integration
Open IP Integration
Up to 20 simultaneous users
depending on resolution settings
(2 guaranteed streams)
Unlimited users H.264
Password protected
Web browser view and setup, up
to 16 cameras
Endura 2.0 (or later),
Digital Sentry 4.2 (or later)
Pelco IP camera API
Minimum System Requirements
Processor
Intel® Pentium® 4
Microprocessor, 1.6 GHz
Memory
512 MB RAM
Network Interface Card
100 megabits (or greater)
Monitor
Minimum of 1024 x 768
resolution, 16- or 32-bit
pixel color resolution
Web Browser*
Internet Explorer® 7.0 (or later) or
Mozilla® Firefox® 3.5 (or later);
Internet Explorer® 8.0 (or later) is
recommended for configuring
analytics
Pelco’s Media Player or
Media Player†
QuickTime® 7.6.5 for
Windows XP, Windows Vista, or
QuickTime 7.6.4 for Mac OS X
10.4
*Internet Explorer is not
supported by Mac OS X 10.4.
† This product is not compatible
with QuickTime version 7.6.4 for
Windows XP or Windows Vista. If
you have this version installed on
your PC, you will need to upgrade
to QuickTime version 7.6.5.
3 Pelco Service Operations
Sarix IX Service Manual SPECIFICATIONS, continued IX30 3.1 MEGAPIXEL HIGH‐DEF DIGITAL CAMERA GENERAL
Imaging Device
Imager Type
Imager Readout
Maximum Resolution
Signal-to-Noise Ratio
Auto Iris Lens Type
Electronic Shutter Range
Wide Dynamic Range
White Balance Range
Sensitivity
Color (33 ms)
Color SENS (500 ms)
Mono (33 ms)
Mono SENS (500 ms)
Weight (without lens)
Shipping Weight
ELECTRICAL
Port
Cabling Type
Power Input
Power Consumption
Current Consumption
PoE
24 VAC
Local Storage
Alarm Input
Alarm Output
Service Port
1/3-inch (effective)
CMOS
Progressive scan
2048 x 1536
50 dB
DC drive
1 ~ 1/100,000 sec
60 dB
2,000° to 10,000°K
f/1.2; 2,850°K; SNR>24dB
0.50 lux
0.12 lux
0.25 lux
0.03 lux
1.11 lb (0.50 kg)
2.00 lb (0.90 kg)
RJ-45 connector for 100Base-TX
Auto MDI/MDI-X
Cat5 or better for 100Base-TX
22 to 34 VAC; 24 VAC nominal or
PoE (IEEE 802.3af class 3)
<6 W
<200 mA maximum
<295 mA nominal;
<390 mA maximum
Mini SD
10 VDC maximum,
5 mA maximum
0 to 15 VDC maximum
75 mA maximum
External 3-connector, 2.5 mm
provides NTSC/PAL video output
MECHANICAL Lens Mount
Camera Mount
CS mount, adjustable
0.25-inch (0.64 cm) UNC-20
screw, top and bottom of camera
housing
ENVIRONMENTAL Operational Temperature
Storage Temperature
Storage Humidity
14° to 122°F (–10° to 50°C)
14° to 158°F (–10° to 70°C)
20% to 90%, noncondensing
VIDEO
Video Encoding
Video Streams
Frame Rate
Supported Protocols
H.264 base profile, MPEG-4
and MJPEG
Up to 2 simultaneous streams;
the second stream is variable
based on the setup of the primary
stream
Up to 30, 25, 24, 15, 12.5, 12, 10,
8, 7. 5, 6, 5, 4, 3, 2.5, 2, 1
(dependent upon coding,
resolution, and stream
configuration)
TCP/IP, UDP/IP (Unicast,
Multicast IGMP), UPnP,
DNS, DHCP, RTP, RTSP, NTP,
IPv4, SNMP v2c/v3, QoS, HTTP,
HTTPS, LDAP (client), SSH, SSL,
SMTP, FTP, mDNS (Bonjour®),
and 802.1x (EAP)
Users
Unicast
Multicast
Security Access
Software Interface
Pelco System Integration
Open IP Integration
Up to 20 simultaneous users
depending on resolution settings
(2 guaranteed streams)
Unlimited users H.264
Password protected
Web browser view and setup, up
to 16 cameras
Endura 2.0 (or later),
Digital Sentry 4.2 (or later)
Pelco IP camera API
Minimum System Requirements
Processor
Intel® Pentium® 4
Microprocessor, 1.6 GHz
Memory
512 MB RAM
Network Interface Card
100 megabits (or greater)
Monitor
Minimum of 1024 x 768
resolution, 16- or 32-bit
pixel color resolution
Web Browser*
Internet Explorer® 7.0 (or later) or
Mozilla® Firefox® 3.5 (or later);
Internet Explorer® 8.0 (or later) is
recommended for configuring
analytics
Pelco’s Media Player or
Media Player†
QuickTime® 7.6.5 for
Windows XP, Windows Vista, or
QuickTime 7.6.4 for Mac OS X
10.4
*Internet Explorer is not
supported by Mac OS X 10.4.
† This product is not compatible
with QuickTime version 7.6.4 for
Windows XP or Windows Vista. If
you have this version installed on
your PC, you will need to upgrade
to QuickTime version 7.6.5.
4 Pelco Service Operations
Sarix IX Service Manual SPECIFICATIONS, continued IXE20 2.1 MEGAPIXEL EXTENDED PLATFORM HIGH‐DEF DIGITAL CAMERA GENERAL
Imaging Device
Imager Type
Imager Readout
Maximum Resolution
Signal-to-Noise Ratio
Auto Iris Lens Type
Electronic Shutter Range
Wide Dynamic Range
White Balance Range
Sensitivity
Color (33 ms)
Color SENS (500 ms)
Mono (33 ms)
Mono SENS (500 ms)
Weight (without lens)
Shipping Weight
ELECTRICAL
Port
Cabling Type
Power Input
Power Consumption
Current Consumption
PoE
24 VAC
Local Storage
Alarm Input
Alarm Output
Service Port
1/3-inch (effective)
CMOS
Progressive scan
1920 x 1080
50 dB
DC drive
1 ~ 1/100,000 sec
60 dB
2,000° to 10,000°K
f/1.2; 2,850°K; SNR
0.50 lux
0.12 lux
0.25 lux
0.03 lux
1.14 lb (0.51 kg)
2.00 lb (0.90 kg)
RJ-45 connector for 100Base-TX
Auto MDI/MDI-X
Cat5 or better for 100Base-TX
22 to 34 VAC; 24 VAC nominal or
PoE (IEEE 802.3af class 3)
<7 W
<200 mA maximum
<295 mA nominal;
<390 mA maximum
Mini SD
10 VDC maximum,
5 mA maximum
0 to 15 VDC maximum
75 mA maximum
External 3-connector, 2.5 mm
provides NTSC/PAL video output
MECHANICAL Lens Mount
Camera Mount
CS mount, adjustable
0.25-inch (0.64 cm) UNC-20
screw, top and bottom of camera
housing
ENVIRONMENTAL Operational Temperature
Storage Temperature
Storage Humidity
14° to 122°F (–10° to 50°C)
14° to 158°F (–10° to 70°C)
20% to 90%, noncondensing
Additional Resolutions
VIDEO
Video Encoding
Video Streams
Frame Rate
Supported Protocols
640 x 512, 640 x 352, 480 x 368,
480 x 272, 320 x 256, and 320 x
176
H.264 high, main, or base profile
and MJPEG
Up to 2 simultaneous streams;
the second stream is variable
based on the setup of the primary
stream
Up to 30, 25, 24, 15, 12.5, 12, 10,
8, 7. 5, 6, 5, 4, 3, 2.5, 2, 1
(dependent upon coding,
resolution, and stream
configuration)
TCP/IP, UDP/IP (Unicast,
Multicast IGMP), UPnP,
DNS, DHCP, RTP, RTSP, NTP,
IPv4, SNMP v2c/v3, QoS, HTTP,
HTTPS, LDAP (client), SSH, SSL,
SMTP, FTP, mDNS (Bonjour®),
and 802.1x (EAP)
Users
Unicast
Multicast
Security Access
Software Interface
Pelco System Integration
Open IP Integration
Up to 20 simultaneous users
depending on resolution settings
(2 guaranteed streams)
Unlimited users H.264
Password protected
Web browser view and setup, up
to 16 cameras
Endura 2.0 (or later) Digital
Sentry 4.2 (or later)
Pelco IP camera API
Minimum System Requirements
Processor
Intel® Core®2 Duo
microprocessor, 2.6 GHz
Operating System Microsoft®
Windows® XP, Windows Vista®,
or Mac® OS X 10.4 (or later),
Memory
2 GB RAM
Network Interface Card
100 megabits (or greater)
Monitor
Minimum of 1024 x 768
resolution, 16- or 32-bit
pixel color resolution
Web Browser*
Internet Explorer® 7.0 (or later) or
Mozilla® Firefox® 3.5 (or later);
Internet Explorer® 8.0 (or later) is
recommended for configuring
analytics
Pelco’s Media Player or
Media Player†
QuickTime® 7.6.5 for
Windows XP, Windows Vista, or
QuickTime 7.6.4 for Mac OS X
10.4
*Internet Explorer is not
supported by Mac OS X 10.4.
† This product is not compatible
with QuickTime version 7.6.4 for
Windows XP or Windows Vista. If
you have this version installed on
your PC, you will need to upgrade
to QuickTime version 7.6.5.
5 Pelco Service Operations
Sarix IX Service Manual Firmware Releases Reference Pelco.com for release notes pertaining to current models in production. Historically referenced versions are listed below. Specific release notes for the following versions are available upon request ([email protected]). IXE VERSION Version 1.4 SA43‐0002‐0004 IXE‐BASE FIRMWARE 1.4.9.9081 Version 1.5 SA43‐0002‐0005 IXE‐BASE FIRMWARE 1.5.9.9081 Version 1.6 SA43‐0002‐0006 IXE‐BASE FIRMWARE 1.6.13.9081 Version 1.7 SA43‐0002‐0007 IXE‐BASE FIRMWARE 1.7.8.9081
IX VERSION Sarix Version 1.4 SA43‐0001‐0004 IXE‐BASE FIRMWARE 1.4.9.9080 Sarix Version 1.5 SA43‐0001‐0005 IXE‐BASE FIRMWARE 1.5.9.9080 Sarix Version 1.6 SA43‐0001‐0006 IXE‐BASE FIRMWARE 1.6.13.9080 (Related to ID/IDE, IMS0, IM10 and TXB‐N models.) Sarix Version 1.7 SA43‐0001‐0007 IXE‐BASE FIRMWARE 1.7.8.9080 (Related to IE/IEE, IMS0C10 and TXB‐N models.) 6 Pelco Service Operations
Sarix IX Service Manual Firmware Update Procedure Device Utility Software To accomplish a firmware update or change, refer to the appropriate version of device utility software available at Pelco.com. Device Utility software operation manual (ref. C2984M) supports firmware updates with step‐by‐step instructions on how to perform upgrades or downgrades as required. 7 Pelco Service Operations
Sarix IX Service Manual Service Test & Calibration Procedure SARIX IX / IXE SERVICE PROCEDURE CHECKLIST Sarix IX / IXE Service Procedure The following series of tests are established to sequentially assess the integrity of hardware returned for service. Before and after restorative service work takes place, this service test procedure is applied to properly isolation faults associated with unit under test, or returned for service. Upon successful completion of this procedure whereby all tests pass, the product is acceptable for return to service. This procedure and its tests may vary slightly from model to model. Some models may call for different tests or tests applied in a different order. Contact Pelco Service Operations for additional details. No. Type Test Description Pass Fail 1 VISUAL 2 VISUAL UNIT TEST PREPARATION PHYSICAL INTEGRITY CHECK 3 4 VISUAL OPTICS SENSOR INSPECTION VISUAL LENS INSPECTION 5 DYNAMIC POWER USING 24VAC 6 DYNAMIC POWER OVER ETHERNET (POE) 7 DYNAMIC LED FUNCTIONALITY 8 DYNAMIC NETWORK LINK & ACTIVITY 9 DYNAMIC CURRENT DRAW & LINE TEST 10 DYNAMIC AUTO IRIS CHECK 11 DYNAMIC LENS IRIS CONTROL 12 DYNAMIC SERVICE VIDEO UTILITY 13 DYNAMIC TILT TIP ALIGNMENT 14 DYNAMIC AUTO FOCUS CHECK 15 DYNAMIC FOCAL RANGE CHECK 16 DYNAMIC ALM/RLY/SD FUNCTIONS 17 DYNAMIC USB / ACC PORT FUNCTION 18 DYNAMIC UNIT RESET 19 DYNAMIC CONTROL OVER ETHERNET 20 DYNAMIC VIDEO OVER ETHERNET 21 DYNAMIC DHCP IP CHECK 22 DYNAMIC ENDURA OPERABILITY 23 DYNAMIC ANALYTIC FUNCTIONS 24 VISUAL FINAL CHECK 8 Pelco Service Operations
Sarix IX Service Manual SERVICE TEST & CALIBRATION, continued Sarix IX / IXE SERVICE TESTS
UNIT TEST PREPARATION DESCRIPTION: Unit examination and orientation toward static and dynamic tests. TEST REQUIREMENTS: 1. Sarix Camera 2. #6 Philips Driver 3. Clean & dust free workstation TEST SET UP: 1. Specialist must wear hand gloves and breathing mask before inspection. 2. Workstation must be reasonably free of dust, or other forms of contaminates. 3. ESD static safe workstation and work surface. 4. Specialist wearing wrist strap attached to grounded workstation mat. 5. ESD rated material handling equipment (carton, bag, tote). TEST STEPS: 1. Verify no external chassis, interface or fabrication hardware damage exists. 2. Remove bottom cover of chassis assembly with #6 Philips driver. 3. Extend front optics assembly cover door to ensure fit and function. 4. Apply 24VAC connection to terminal block. 5. Apply CAT 5/6 Ethernet plug to RJ45 receptacle with pre‐established computer network connection. 6. Apply lens with control port attached. 7. Ensure PCB assemblies and ribbon cables appear correctly positioned and seated. 8. Ensure no physical damage or foreign objects are found within the unit. PHYSICAL INTEGRITY CHECK DESCRIPTION: This test will verify that the cosmetics and silkscreen are not damaged. TEST REQUIREMENTS: Sarix Camera TEST SET UP: Unit under test TEST STEPS: 1. Remove bottom cover from camera assembly. 2. Visually examine PCBA assemblies to ensure proper fit and error free assembly. 3. Ensure flex conductors are fully seated and undamaged. 4. Endure fasteners, connectors, switches and ports are in their correct position and fit. 5. Ensure no foreign objects are present within camera chassis. 6. Ensure unit is serialized with outside barcode decal on external chassis. 7. By physical observation, ensure there are no cracked, broken, missing, or displaced components on PCB Assemblies. 8. Examine chassis for scratches, dents or other defects. 9. Check all silk‐screens to ensure legibility. 9 Pelco Service Operations
Sarix IX Service Manual SERVICE TEST & CALIBRATION, continued Sarix IX / IXE SERVICE TESTS
USB/ACC PORT FUNCTIONALITY TEST DESCRIPTION: This test will verify the USB/ACC port is operational. TEST REQUIREMENTS: 1. USB Flash Drive (Must have LED Read/Write indicator ) 2. USB Female A to Male A Adaptor 3. EXTERNAL 24VAC POWER SUPPLY (SUPPLY MINIMUM OF 300ma), OR SINGLE PORT POWER‐OVER‐ETHERNET (POE) INJECTOR TEST SET UP: Establish supply voltage at terminal block. TEST STEPS: 1. Plug in a USB Memory device (thumb drive) to USB/ACC port on the rear of the camera. 2. Visually ensure that the LED flashes on the USB memory device. 3. Use a USB that has some sort of connectivity light on it. LED FUNCTIONALITY TEST
DESCRIPTION: This test shall verify unit LEDs are functioning correctly. TEST REQUIREMENTS: 1. PC computer web browser and network interface card. 2. Network Connection 3. External 24VAC power supply (300ma minimum), or single port POE injector 4. CAT5 (or better) Network Cable 5. USB Flash Drive 6. USB Female‐to‐Female Adapter 7. Camera Mounted Megapixel Lens 8. Pelco Device Utility Software TEST SET UP: Establish supply voltage at terminal block, or RJ45 receptacle. Connect network port to RJ45 receptacle. Ensure camera is online and available. TEST STEPS: 1. Ensure ACT LED is flashing Green on RJ45 receptacle. 2. Ensure that front pilot LED is illuminated green (steady and not flashing). 3. Ensure Link LED is illuminated amber (steady and not flashing). 4. With bottom cover removed from camera, ensure that CR1 LED located on processor PCBA is illuminated green (steady and not flashing). 10 Pelco Service Operations
Sarix IX Service Manual SERVICE TEST & CALIBRATION, continued Sarix IX / IXE SERVICE TESTS TILT TIP ALIGNMENT DESCRIPTION: This test will verify the Sensor is aligned correctly within the optics assembly. TEST REQUIREMENTS: ‐ Tilt Tip Fixture Assembly ‐ PMCL524F High Definition LCD Monitor TEST SET UP: Ensure Tilt Tip Fixture and Monitor are powered on. TEST STEPS: 1. Place the CME Adaptor on the camera under test. 2. Place the unit onto the Tilt Tip Stage and lock in place. 3. Rotate unit 90 degrees, observe the monitor to ensure the Reflection from Sensor is located within the Calibration limit. 4. Rotate unit 90 degrees, observe the monitor to ensure the Reflection from the Sensor is located within the Calibration limit. 5. Rotate unit 90 degrees, observe the monitor to ensure the Reflection from the Sensor is within the Calibration limit. 6. Rotate unit 90 degrees, observe the monitor to ensure the Reflection from the Sensor is located within the Calibration limit. I2C FUNCTIONALITY TEST
DESCRIPTION: This is a test to verify I2C signal integrity. TEST REQUIREMENTS: 1. PMCL524F 24" High Definition Monitor 2. IX‐SC Sarix Service Cable to BNC, 4ft 3. External 24VAC Power Supply (300ma max), or single port POE injector 4. CAT5 (or better) network cable TEST SET UP: Establish supply voltage at terminal block. Connect network port to RJ45 receptacle. Ensure monitor connection is available and online. TEST STEPS: 1. Connect Service Video cable into the Service Video port on the front of the unit under test (Stereo End). 2. Connect Service video cable to PMCL524F monitor (BNC End). 3. Apply power to unit under test (24vac OR POE). 4. Video should be present on monitor. 11 Pelco Service Operations
Sarix IX Service Manual SERVICE TEST & CALIBRATION, continued Sarix IX / IXE SERVICE TESTS NETWORK LINK & ACTIVITY DESCRIPTION: This test shall verify simple unit network functionality. TEST REQUIREMENTS: 1. PC Computer web browser and network interface card 2. Network Connection 3. External 24VAC Power Supply (300ma max), or single port POE injector 4. CAT5 (or better) network cable 5. Camera Mounted Megapixel Lens 6. Pelco Device Utility Software TEST SET UP: Establish supply voltage at terminal block, or RJ45 receptacle. Connect network port to RJ45 receptacle. Ensure camera is online and available. TEST STEPS: 1. Connect Ethernet cable from PC through network switch directly to the RJ45 connector. 2. Apply 24vac ( or POE ) to power the camera. This begins the Boot process. Wait for the Boot process to complete before beginning the test procedure. 3. Connect the Service Video cable to the camera service video port. 4. Look up IP address of camera using the Device Utility Software. 5. Bring up a DOS command prompt and type 'ping <ip‐address>' 6. Verify camera network located with packets sent and received without loss and minimum latency. AUTO IRIS TEST
DESCRIPTION: This test will verify Auto Iris functionality. TEST REQUIREMENTS: 1. PMCL524F 24" High Definition Monitor 2. PC Computer web browser and network interface card ‐ MEGAPIXEL LENS 3. Pelco Device Utility 4. Network Connection 5. External 24VAC Power Supply (300ma max), or single port POE injector 6. POE20Y560G Single Port POE Injector TEST STEPS: 1. Unplug and remove the Lens from the unit under test. 2. Power up unit. This begins the Boot process. Wait for the Boot process to complete before beginning the test procedure. 3. Plug in the Auto Iris connector. 4. When the connector is plugged in, Service tech should see Iris diaphragm Open. 5. Unplug the Auto Iris connector, service tech should see Iris diaphragm Closed. 6. Reconnect Auto Iris connector. 7. Unit should produce an image on test monitor. 12 Pelco Service Operations
Sarix IX Service Manual SERVICE TEST & CALIBRATION, continued Sarix IX / IXE SERVICE TESTS
POWER OVER ETHERNET TEST DESCRIPTION: This test will verify functionality of Power over Ethernet (POE) on camera under evaluation. TEST REQUIREMENTS: 1. PMCL524F 24" High Definition Monitor 2. Pelco Device Utility 3. Network Connection 4. External 24VAC Power Supply (300ma max), or single port POE injector 5. POE20Y560G Single Port POE Injector TEST STEPS: 1. Plug CAT5 cable from Endura Service System to the Input port on the POE injector. 2. Plug CAT5 cable into the Output port on POE injector. 3. Plug CAT5 cable from Output port of POE inject into the RJ45 port on rear camera. 4. Open the Pelco Device Utility for Sarix. 5. Power up POE injector. This begins the Boot process. Wait for the Boot process to complete before beginning the test procedure. 6. Within the Device utility, open view panel for camera under evaluation. 7. Observe video now seen on the unit under test in the device utility. An image on the monitor confirms the unit is functioning using POE. 24VAC POWER SUPPLY TEST
DESCRIPTION: This test will verify functionality using 24vac external supply. TEST REQUIREMENTS: 1. PMCL524F 24" High Definition Monitor 2. Pelco Device Utility 3. Network Connection 4. External 24VAC Power Supply (300ma max), or single port POE injector 5. 6‐Pin Terminal Block Plug, 3.5mm pitch (24vac, relay/alarm connector) TEST STEPS: 1. Connect 24vac external supply to terminal block ports marked 24V~ on rear of camera. 2. Plug CAT5/6 cable into RJ45 port on rear of camera. 3. Plug opposite end of CAT5/6 cable into Switch connected to network computer hosting the Pelco device utility. 4. Apply 24vac to power the camera. This begins the Boot process. Wait for the Boot process to complete before beginning going to the next step. 5. Within the Device utility, open view panel for camera under evaluation. 6. Observe video now seen on the unit under test in the device utility. An image on the monitor confirms the unit is functioning using POE. 7. A image on the monitor confirms the unit is functioning using 24vac. 13 Pelco Service Operations
Sarix IX Service Manual SERVICE TEST & CALIBRATION, continued Sarix IX / IXE SERVICE TESTS LENS INSPECTION DESCRIPTION: Unit lens evaluation. TEST REQUIREMENTS: 1. Sarix Camera 2. Clean & dust free workstation TEST SET UP: 1. Specialist must wear hand gloves and breathing mask before inspection. 2. Workstation must be reasonably free of dust, or other forms of contaminates. 3. ESD static safe workstation and work surface. 4. Specialist wearing wrist strap attached to grounded workstation mat. 5. ESD rated material handling equipment (carton, bag, tote). TEST STEPS: 1. Remove lens from camera as applicable. Insert protective dust cap onto Sarix Optics assembly. 2. Examine glass elements from both ends of lens. Inspect to ensure lens unit integrity. a.) Particle contamination (dust, hair, materials specks) b.) Cracks or Fractures c.) Smudges or Moisture d.) Deformities or Discoloration 3. Ensure cable assembly is intact with firmly attached motor plug. 4. Ensure set screw enables lens movement and locking. 5. Examine lens to ensure no physical defect exists (thread mounts, body, cavity, de‐lamination) FOCAL LENGTH ADJUSTMENT DESCRIPTION: This test will verify the lens and lens range functionality TEST REQUIREMENTS: 1. PMCL524F 24" High Definition Monitor 2. Pelco Device Utility 3. Network Connection 4. External 24VAC Power Supply (300ma max), or single port POE injector 5. POE20Y560G Single Port POE Injector 6. PC Computer web browser and network interface card ‐ MEGAPIXEL LENS 7. Sarix Megapixel Lens TEST SETUP: Establish supply voltage at terminal block. Connect network port to RJ45 receptacle. Ensure monitor connection is available and online. TEST STEPS: 1. Apply 24vac to power the camera. This begins the Boot process. Wait for the Boot process to complete before beginning the test procedure. 2. Open Pelco device utility, to locate the IP address of unit under test. 3. Place the IP address in the web browser. 4. Unit should display a image on the monitor. 5. Point camera at a still image object or color chart. 6. Manually set the focal length to the widest/maximum view out. 7. Press the (F) button on the side of the camera until it clicks. 8. Image should have sharp edges and a clear image. 9. Manually set the focal length to the minimum distance. 10. Press the (F) button on the side of the camera until it clicks. 11. Image should have sharp edges and a clear image. 14 Pelco Service Operations
Sarix IX Service Manual SERVICE TEST & CALIBRATION, continued Sarix IX / IXE SERVICE TESTS
MINI SD SNAPSHOT, ALARM/RELAY FUNCTION
DESCRIPTION: This test will verify operation of Mini SD snapshot recording to include alarm and relay functionality. TEST REQUIREMENTS: 1. PMCL524F 24" High Definition Monitor 2. Pelco Device Utility 3. Network Connection 4. External 24VAC Power Supply (300ma max), or single port POE injector 5. POE20Y560G Single Port POE Injector 6. CAT5 or Better Network Cable 7. Six‐position Terminal Block Connector with jumper / switch and 1k‐ohm axial resistor TEST STEPS: 1. Establish physical network connectivity between computer and camera using a CAT5 RJ45 plug and the RJ45 receptacle on the camera under test. 2. If POE is not powering camera via the RJ45 port, apply separate 24vac to power the camera (300ma minimum). 3. Locate the camera IP address and type it into the URL address field of a Web Browser opened on the computer connected to the camera. 4. Log into the camera, username and password is admin/admin. 5. Connect LED with serial 1k resistor and 12VDC power supply between RELAY R1 and ground ports of alarm/relay/24v terminal block plug. 6. Attach single‐pole single‐throw (SPST) switch in series between ALARM A1 and ground ports of alarm/relay/24v terminal block plug. 7. Apply 24VAC power or POE to camera and observe camera boot process. Wait for camera start‐up process to complete before proceeding. Internal LEDs should stop blinking to indicate camera start‐up completion. 8. Within the browser based software utility, navigate to 'Settings' from the main menu and under settings proceed to 'Events'. 9. Under Events, select 'Sources' and name the source as 'Trigger_Switch'. 10. Under the Type field, name the event 'Alarm', under Alarm: 1 11. Set the Dwell time to 1 second. 12. Set the Polarity to ( Normal ). MINI SD SNAPSHOT, ALARM/RELAY FUNCTION,
Continued 13. Set Supervised to ( True ). 14. Set Handlers to 'Alarm 1' and 'Relay 1'. 15. From menu, select 'Events' and click 'Handlers' option. 16. Under 'Name' field, type handler name as 'Alarm 1'. 17. Set the Handler Type to 'Write JPEG to SD card'. 18. Set the Size limit to 2 Megs. Filter for all days of the week by checking each field box as true. Set start time as '0100' and End time as '2300' hrs. 19. Set the Source to 'Trigger_Switch'. 20. Click Submit button. *** JPG SNAPSHOT EVENT *** 21. Insert Mini‐SD disk into rear camera. 22. Toggle SPST switch connected to alarm/relay/24vac terminal block connector. 23. Remove Mini‐SD disk from rear of camera and read image capture / snapshot JPG from media view on computer. *** RELAY OPEN/CLOSURE EVENT *** 24. Click New Handler to add 'Relay 1' as a Handler. 25. Set the Type to 'Open/Close Relay'. 26. Set the On‐Time to 1 second, and the Off‐Time to 1 second. 27. Set the Pulse count to 5, and filter for all days of the week by checking each field box as true. Set start time as '0100' and End time as '2300' hrs. 28. Set the Source to 'Trigger_Swtich'. 29. Press Submit. 30. Toggle SPST switch connected to alarm/relay/24vac terminal block connector. 31. Observe that the connected LED to relay port on terminal block receptacle cycles on and off for about 5 seconds. A total of 5‐pulses, 1‐second on and 1‐second off should appear., de‐
lamination) 15 Pelco Service Operations
Sarix IX Service Manual SERVICE TEST & CALIBRATION, continued Sarix IX / IXE SERVICE TESTS
AUTO FOCUS TEST DESCRIPTION: This test will verify operation of auto focus. TEST REQUIREMENTS: 1. PMCL524F 24" High Definition Monitor 2. Pelco Device Utility 3. Network Connection 4. External 24VAC Power Supply (300ma max), or single port POE injector 5. POE20Y560G Single Port POE Injector 6. PC Computer web browser and network interface card TEST STEPS: 1. Plug in CAT5 cable into RJ45 connector on rear of camera. 2. Apply 24vac ( or POE ) to power the camera. This begins the Boot process. Wait for the Boot process to complete before beginning the test procedure. 3. On the networked PC, run the Pelco Device Utility. 4. Locate the IP address, and type it into the Web Browser. 5. Set the Camera at a Max distance of 4 feet from the color chart. 6. Set the Focus Far to the Max distance. 7. Set the Tele‐focal to the Max distance. 8. With the camera facing the color chart press and hold the (F) button on the side of the camera until it clicks. 9. Once the camera has completed the focus process. You should see a clear image on the monitor with clear and sharp edges. 10. Set steps 7 & 8 at the Min distance. 11. Press and hold the (F) button until the camera starts to click. 12. Once the camera has completed the focus process. You should have a clear and sharp image on the monitor. RESET FUNCTIONALITY
DESCRIPTION: This test will verify the functionality if the Reset circuit. TEST REQUIREMENTS: 1. PMCL524F 24" High Definition Monitor 2. External 24VAC Power Supply (300ma max), or single port POE injector 3. PC Computer web browser and network interface card 5. CAT5 (or better) Network Cable SET UP: Establish supply voltage at terminal block. Connect network port to RJ45 receptacle. Ensure monitor connection is available and online with the camera under test. TEST STEPS: 1. Power up unit. This begins the Boot process. Wait for the Boot process to complete before beginning the next step. 2. Once the unit has completed the BOOT process and a image is present on the monitor, copy and paste the IP address from the Pelco Device Utility into the browser. 3. Confirm you have a video image on the test monitor. 4. Insert reset tool into reset opening on rear of camera. 5. Press and release the reset button on the rear of the camera marked as RESET. 6. Camera will begin the reset process. 7. Once reset process is complete, click the LIVE tab in the software utility to view video and sure proper operation has returned. 8. Reset test complete. 16 Pelco Service Operations
Sarix IX Service Manual SERVICE TEST & CALIBRATION, continued LENS CONTROL VOLTAGE TEST DESCRIPTION: This test shall verify that the Sarix camera under test provides adequate voltage for proper lens control. TEST REQUIREMENTS: 1. PMCL524F 24" High Definition Monitor 2. External 24VAC Power Supply (300ma max), or single port POE injector 3. PC Computer web browser and network interface card 4. CAT5 (or better) Network Cable 5. Digital Multimeter (DMM) with AC Current measurement capability 6. 10A Variac SET UP: Establish 24VAC supply voltage at camera input terminal block. Connect network port to the RJ45 receptacle. Ensure monitor connection Is available and online with the camera under test. TEST STEPS: 1. With a variac supply, apply 24VAc power to unit under test. This begins the boot process. Wait for the boot process to complete before beginning the next step. 2. Once the unit has completed the boot process, confirm video is present on the test monitor. 3. With the camera at idle for about 10 seconds, measure DC voltage at pin 1 of lens the four‐pin lens control port on the left side of the camera. Ensure voltage reads XX volts +/‐ 10%. 4. With the variac, scale down/back the input AC voltage to the camera to 21VAC. Ensure lens control voltage does not change and that there are no observable adverse affects with the camera (offline, video drop out, high‐temp, no iris movement, etc). Cycle power off and on again to return low‐line input voltage to the camera. Verify general lens focal length range operation with the Pelco device utility. 5. With the variac, scale up/forward the input AC voltage to the camera to 27VAC. Ensure lens control voltage does not change and that there are no observable adverse affects with the camera (offline, video drop out, high‐temp, no iris movement, etc). Cycle power off and on again to return high‐line input voltage to the camera. Verify general lens focal length range operation with the Pelco device utility. CURRENT DRAW, LOW‐LINE, HIGH‐LINE TEST
DESCRIPTION: This test shall verify that the Sarix camera under test does not draw excessive current while operating under best case and worse case conditions. TEST REQUIREMENTS: 1. PMCL524F 24" High Definition Monitor 2. External 24VAC Power Supply (300ma max), or single port POE injector 3. PC Computer web browser and network interface card 4. CAT5 (or better) Network Cable 5. Digital Multimeter (DMM) with AC Current measurement capability; 10A Variac SET UP: Establish 24VAC supply voltage at terminal block with DMM positive and negative probe leads in series with high (+) side of connection at the 6‐pin terminal block plug. Connect network port to the RJ45 receptacle. Ensure monitor connection is available and online with the camera under test. TEST STEPS: 1. Set the DMM to measure AC current at the given supply frequency (50/60Hz). With a variac supply, apply 24VAc power to unit under test. This begins the boot process. Wait for the boot process to complete before beginning the next step. 2. Once the unit has completed the boot process, confirm video is present on the test monitor. 3. With the camera at idle for about 10 seconds, observe current draw does not exceed 300ma. 4. With the variac, scale down/back the input AC voltage to the camera to 21VAC. Ensure camera current draw does not exceed 300ma and that there are no observable adverse affects with the camera (offline, video dropout, high‐temp, no iris movement, etc). Cycle power off and on again to return low‐line input voltage to the camera. Verify general camera functionality with the Pelco device utility and remain at low‐line idle for 30 seconds to ensure stability. 5. With the variac, scale up/forward the input AC voltage to the camera to 27VAC. Ensure camera current draw does not exceed 300ma and that there are no observable adverse affects with the camera (offline, video dropout, high‐temp, no iris movement, etc). Cycle power off and on again to return high‐line input voltage to the camera. Verify general camera functionality with the Pelco device utility and remain at high‐line idle for 30 seconds to ensure stability. 17 Pelco Service Operations
Sarix IX Service Manual SERVICE TEST & CALIBRATION, continued Sarix IX / IXE SERVICE TESTS
CONTROL OVER ETHERNET DESCRIPTION: This test will verify the Sarix Camera under testis controlled using a Ethernet connection. TEST REQUIREMENTS: 1. PMCL524F 24" High Definition Monitor 2. External 24VAC Power Supply (300ma max), or single port POE injector 3. PC Computer web browser and network interface card 4. CAT5 (or better) Network Cable 5. Pelco Device Utility 6. Megapixel Lens TEST STEPS: 1. Establish physical network connectivity between computer and camera using a CAT5 RJ45 plug and the RJ45 receptacle on the camera under test. 2. If POE is not powering camera via the RJ45 port, apply separate 24vac to power the camera (300ma minimum). 3. Locate the camera IP address and type it into the URL address field of a Web Browser opened on the computer connected to the camera. 4. Log into the camera, username and password is admin/admin. 5. Apply 24VAC power or POE to camera and observe camera boot process. Wait for camera start‐up process to complete before proceeding. Internal LEDs should stop blinking to indicate camera start‐up completion. 6. Within the browser based software utility, navigate to 'Settings' from the main menu and under settings proceed to 'Imaging'. 7. Under Imaging, select the Focus tab. Under Focus Mode check the Manual radio button. 8. Slide the Day Manual Focus Position to 60.00. The image should be burly. 9. Change the Mode back to Auto, the image should now be focused. 10. Click the Full Range Auto Focus tab, motors will Zoom all the way out ,and all the way in. Image should be in focus once the motors have stopped moving. 11. Click the Quick Auto Focus tab, image should be in focus once the motors have stopped. ENDURA OPERABILITY
DESCRIPTION: This test will verify the unit under test is functional using Endura. TEST REQUIREMENTS: 1. Endura Service Test System 2. External 24VAC Power Supply (300ma max), or single port POE injector 3. CAT5 (or better) Network Cable TEST STEPS: 1. Establish physical network connectivity between Endura Service System and camera using a CAT5 RJ45 plug and the RJ45 receptacle on the camera under test. 2. If POE is not powering camera via the RJ45 port, apply separate 24vac to power the camera (300ma minimum). 3. Apply 24VAC power or POE to camera and observe camera boot process. Wait for camera start‐up process to complete before proceeding. Internal LEDs should stop blinking to indicate camera start‐up completion. 4. Open Endura Utilities, click the Search tab, unit under test should be present under System Attributes. Click SM search, unit should be seen in the Online column. 5. Highlight the unit under test, the IP, MAC Address, and Firmware can be seen for reference purposes. 6. Minimize Endura Utilities. 7. To view the camera under test open Endura Workstation on the desk top. 8. Locate camera under test, should be located under Unknown Location. 9. Double click Unknown location, unit under test should be present. 10. Double click unit under test and confirm image is present on monitor. 18 Pelco Service Operations
Sarix IX Service Manual SERVICE TEST & CALIBRATION, continued Sarix IX / IXE SERVICE TESTS
FINAL CHECK DESCRIPTION: This test will verify the unit is ready for pack‐off. TEST REQUIREMENTS: 1. PMCL524F 24" High Definition Monitor 2. External 24VAC Power Supply (300ma max), or single port POE injector 3. PC Computer web browser and network interface card 4. Network Connection 5. CAT5 (or better) Network Cable 6. Pelco Device Utility 7. Megapixel Lens SET UP: 1. Establish physical network connectivity between computer and camera using a CAT5 RJ45 plug and the RJ45 receptacle on the camera under test. 2. If POE is not powering camera via the RJ45 port, apply separate 24vac to power the camera (300ma minimum). 3. Locate the camera IP address and type it into the URL address field of a Web Browser opened on the computer connected to the camera. 4. Log into the camera, username and password is admin/admin. 5. Apply 24VAC power or POE to camera and observe camera boot process. Wait for camera start‐up process to complete before proceeding. Internal LEDs should stop blinking to indicate camera start‐up completion. 6. Confirm video is present on the monitor ( If Applicable ) TEST STEPS: 1. Within the browser based software utility, navigate to 'Settings' from the main menu and under settings proceed to 'NETWORK'. 2. Under System Settings, confirm the Model Number, Serial Number, Hardware Address/MAC Address match the Product label located on the base cover. 3. Verify all painted surfaces are clean and free of scratches, and dents. 4. Verify all silk‐screens are legible on both the Top and Bottom covers. 5. Verify silkscreen on Cosmetic channel cover is legible. 6. Verify UI cover slides up and down smoothly and locks in place. 7. Verify there is No lose hardware inside the unit before installing the Base cover. 8. Transfer required Genealogy information to Genealogy PDF form. 19 Pelco Service Operations
Sarix IX Service Manual General Troubleshooting Guidelines The purpose of this section is to provide a consistent and standard method of bringing service and repair to a variety of Pelco technologies. By applying this approach toward service and repair of Pelco equipment, the time it takes to complete repairs is shortened, the cost of service to customers and Pelco through warranty claims is reduced and repair services rendered are assured as accurate without the likelihood of repeat failure incidents. Pelco Service Center personnel that will be inspecting, testing, diagnosing, calibrating and servicing Pelco equipment shall follow this procedure. This procedure serves as a uniform and top down approach toward warranty and post‐warranty repairs but does not apply specifically toward hardware, firmware, or software performance or quality updates, nor does this procedure apply to calibration methods prescribed in other support documentation. Within the procedure below, the step sequence of visual inspection, static inspection, and dynamic inspection are followed in this order. Procedures VISUAL INSPECTION 1. Pre‐service and repair assessment must include a unit level overview to determine what external factors might explain or contribute to a cause of unit failure. Moreover, for purposes of clarity, a unit failure is that which constitutes an observable defect or fault in unit function, performance, reliability, safety or regulatory compliance (e.g. CE, FCC, cUL, NOM, TUV, as applicable). 2. Before a unit chassis is opened for internal examination and diagnosis, a Service Engineer must determine what damage or conditions could exist to explain a defect that a customer may have described. More specifically, hardware or fabricated components such as enclosures, latches, lenses, interface connectors and so forth could give immediate observable evidence as to a cause of failure or defect. 3. To determine the warranty period status of a unit in service, a Service Engineer must obtain both the build date of the unit manufactured and in some cases customer purchase date of the unit itself. The unit manufacture date is often indicated by Julian date code within the unit’s serial number. If a serial number does not follow a Julian date code format to indicate manufacture date, the customer’s purchase date must be provided by either sales receipt or invoice. The duration and terms of Pelco warranties are as published in Pelco publications or at its website. 4. Once the warranty or post‐warranty period status is validated, charges and estimates are applicable for services rendered to Pelco or the customer, respectively. As the warranty status of the unit in service is somewhat determined by the condition and use of the application, a warranty assessment cannot be provided until a unit is examined as to the cause of failure. A Service Engineer must rule out any possibility of misuse, neglect, or intentional damage brought to the unit. Once it’s determined that the cause of failure is from an irregularity in production workmanship or a short‐term design defect, then the unit’s coverage is honored by Pelco for the warranty duration and terms specified. 5. As a Service Engineer begins work on the unit in service, he works from the outside and goes inward to determine cause(s) of failure to bring about a total correction. Complimentary to that 20 Pelco Service Operations
Sarix IX Service Manual TROUBLESHOOTING GUIDELINES, continued approach, getting a customer description of the failure or defect is necessary and important to implement an effective repair. What’s more, it is necessary to obtain a customer failure description to replicate the problem description and to generalize what steps to take to repair the unit in service. Since customers want unit repairs to be done correctly in the shortest time and at the lowest expense possible, it is also necessary to fully assess the functional status and fitness of a unit in service. This means that a customer description that might lead to a remedy is not enough to bring about an effective repair. A Service Engineer must get a brief full unit assessment to repair a unit, or to inform a customer what’s involved in repair work. 6. After the external condition of a unit in service is examined, and a possible faulty operational status is confirmed by test, a Service Engineer then opens the chassis or enclosure of the unit and continues a visual examination. No power or signal is applied to the unit in service at this time. A survey of the following must be completed as a unit is opened and before a Service Engineer. a. Unit is properly assembled as per Pelco Service Manuals, Exploded View Diagrams, or Mechanical Assembly Drawings. b. Connectors are terminated and well seated. c. Wiring cables and harnesses are properly wrapped and well stowed. d. Ensure there are no loose or foreign objects within the unit. e. Ensure there is no evidence of contamination, oxidation or corrosion. f. Main and peripheral assemblies, as well as their components are anchored and well secured. g. Check for printed circuit board (PCB) or component hot spots to indicate overheating. h. Look for burned out components as indicated by heat stress or surrounding carbon deposits. i. Check for discolored, deformed, cracked, broken or damaged components or assemblies. j. Ensure that all components in place are of their proper size and fit. Look for improperly stuffed components by polarity, value, lead insertion, or prep. k. Look for any evidence of prior repair attempts. l. From the physical evidence of damage by visual observation, list‐out and replace components that become necessary for repairs. If under post‐warranty conditions customer approval is necessary, be prepared to estimate the costs of repairs and reverse service through retained damaged parts if necessary. Removed post‐warranty parts are returned to the customer unless otherwise specified. STATIC INSPECTION 1. Once a visual inspection is completed for the unit in service, the next step is to generally
measure the collection of active and passive components surrounding the observable damage 21 Pelco Service Operations
Sarix IX Service Manual TROUBLESHOOTING GUIDELINES, continued 2. by visual inspection, or around the circuitry and hardware involved with the customer’s fault description. With a unit schematic available to cross‐reference what SMT or through‐hole component values and measurements should be, follow these points of inspection. No power or signal is applied to the unit in service at this time. This is a fast sweep approach toward passive and active component measurements using a Digital Multimeter or other more applicable hand tools. a. Measure in‐circuit resistance values. Check for open circuit readings across carbon‐
composition resistors. Check for changes in value among metal oxide or “flameproof” resistors. Take into account changes in networked resistance values and lift component leads for measurement only if necessary. b. Measure for in‐circuit inductor continuity. Watch for open ferrite beads, broken coil leads or open transformer windings (both primary and secondary). c. Measure for out‐of‐circuit capacitance values only for those capacitors that are suspect as having a defect due to proximity of surrounding component damage. Do not sweep measure capacitors through individual out‐of‐circuit measurements. d. Measure for in‐circuit PN junctions of diodes, transistors, LEDs, and other simple junction based semiconductors. Verify proper forward and reverse voltage drops across junctions as per the device type under test. Watch for parallel shorts or low resistance values that could affect direct voltage drop measurements. This is again is a survey of components in a sweeping fashion with respect to their circuit position as indicated by corresponding Pelco schematics or service manuals. e. Briefly check for mechanical integrity of motors, drives and belts if applicable. f. Verify and correct for proper mounting and placement of fans, gaskets, seals, and inserts. g. Verify solvents, lubricants, adhesives and thermal compounds are in place as applicable. DYNAMIC INSPECTION 1. While both visual inspection and static measurements often yield immediate results as to how repairs are completed, sometimes these two approaches in sequence do not go far enough to correct a functional problem that lead to a more complete repair. So after both visual and static inspection points are followed, it is now necessary to apply power and signal to a unit under test. 2. Pelco products are either powered by an AC supply or a DC supply. So this brief outline covers both approaches toward power‐up or a power cycle event. a. AC: While there are fuses and circuit breakers often in place to protect a unit in service from further damage upon failure, sometimes the current draw from that failure could dwell at an excessive level to cause immediate or long‐term damage. Even while a fuse 22 Pelco Service Operations
Sarix IX Service Manual TROUBLESHOOTING GUIDELINES, continued replacement or circuit breaker reset establishes ac connectivity, there still could exist an excessive ac current draw condition that leads to further damage or repeat failure. It’s for these reasons that AC supplied Pelco equipment should be powered via a ramped up ac voltage through a variable transformer (Variac) of the correct voltage and operating frequency (0‐230VAC; 50Hz / 60Hz). While this voltage ramp‐up slowly and gradually occurs at the hand control of a Service Engineer, ac current draw is monitored through a meter to determine if a fault remains. When an excessive ac current draw condition is alleviated, it is then that a low voltage drop out level is monitored for the unit under test as well. When AC is fully applied to a unit under test and that unit is stable at it’s 100V, 120V or 230V supply, a series of additional measurements can begin to take place. b. DC: At times there may be a need for a high current (0‐10A) dc supply to ramp up voltage to a unit under test. As the input DC voltage is increased by the hand control of a Service Engineer, the power supply dc current is monitored to ensure there is no excessive current draw to be concerned about. Sometimes it’s sufficient to directly apply an external inline dc power supply (wall‐wart) to a unit under test. However, there are risks with this practice and it should be avoided. It’s better to have all the proper fittings for Pelco equipment where dc voltages are applied to units while at a service workstation. 3. Once a unit’s power supply is up and stable, a Service Engineer probes for dc voltage carry‐
through at key points throughout a design. More specifically, from the power supply source through added filtering, regulation and attenuation, assembly voltage levels, rail voltages, and bus voltages are measured and verified for presence. The first order of test involves the need to verify that 48Vdc, 24Vdc, 12Vdc, 5Vdc and 3.3Vdc voltage references are in place and accounted for. These voltages are present with respect to chassis or safety ground, or some other specified reference level. Whenever it’s determined that a reference or supply voltage is missing or off in level, it then becomes necessary to isolate the components a section at a time to determine the origin of the fault. This occurs by working backwards from the point of measurement error to the nodes that shares that supply point. Where safe and reliable, each node branch is then either further isolated to determine what new active voltage measurements to take and to partition what components might be involved in a repair. Occasionally, what leads to unit failures is a missing voltage supply point because of a power supply failure, or faulty component(s) loading on that power supply. The task then is to identify the faulty component(s) that load or draw the power supply down. In the proximity of this supplied branch there are components such as integrated circuits, or active and passive electronics that are probed and replaced that serve as the point at which a repair is achieved. The progressive approach here is to isolate the apparent supply or circuit‐loading fault to a local group of parts subject to fast and easy replacement. 4. After it’s verified that supply voltages are present or returned at proper levels, a Service Engineer can then begin to probe for faulty signal throughput or handshaking. Signal types to probe and measure can either be digital or analog. And each type requires separate attention as outlined here. a. Audio / Video (Line) Signals: 23 Pelco Service Operations
Sarix IX Service Manual TROUBLESHOOTING GUIDELINES, continued From the external input of a signal, whether it’s a camera lens, or an input terminal, the place to begin pick up of signal transfer occurs right at the termination point after the unit’s system interface. Analog cameras, or line level equipment that propagate signals through circuitry to some predefined output must cascade in stages within a design. A Service Engineer examines the signal position and strength as it passes from one component and/or section to the next until there is a loss or adverse change of signal transfer. From that point the intercepting component or local group of components that affect the measurement are then further examined and qualified for replacement. b. Control / Data Signals: Within an assembly that is supported by a component architecture involving hardware such as microcontrollers, memory devices, processors and A/D and D/A converters, it becomes important to monitor signals with respect to their relationships with one another. Clock signals derived by timers or crystals must be probed to verify their presence. Thereafter, signal conditioning or wave shaping devices such as inverters or down‐counter devices must then be probe points to ensure that microcontrollers, microprocessors, DSPs, or other clock dependent peripheral devices are driven appropriately. In conjunction with properly applied dc supply voltages to this digital hardware, clock signals must be rendered intact. Analog signals that are converted to a digital representation must be measured with proper equipment to ensure that signal storage and manipulation by instruction or software command takes place. It is often enough to probe and measure a signal in its digital domain with a multi‐channel DSO or analyzer to verify it is in place and that changes are happening based upon some stimulus. Serial or network communication transceivers, whether via external UTP or Fiber should be probed or monitored with appropriate equipment to verify signal presence. Working backwards from a transceiver, a Service Engineer can pick up how a network or digital signal should transfer throughout an assembly to verify proper operation. Where by locale a signal interruption becomes observable, there are components in that proximity that either qualifies for further testing or replacement. Sizeable multilayer motherboards largely populated with digital surface mount devices are sometimes embedded within their host PCB. Moreover, it is sometimes necessary to consider the economic value of an assembly in service against its full replacement value. Sometimes PCB assemblies are not serviceable by design and it then comes necessary to fully replace what components cannot be measured or accessed. Nonvolatile memory devices such as EEProms, MPUs, Flash, FPGAs, GALs, or ASICs are difficult to probe or measure to determine their integrity. It is and should be enough to ensure that these devices are updated or programmed as necessary before testing and service begins. When in doubt, these devices should be reprogrammed to the current level of firmware or code they carry. 24 Pelco Service Operations
Sarix IX Service Manual TROUBLESHOOTING GUIDELINES, continued FINAL TEST AND WRAP UP 1. As electronic components are collected after repairs are completed, those parts should be rendered available to the customer if there is desire for their return. At the customer’s discretion, defective electronic components saved may be properly disposed or recycled by the Pelco Authorized Service Center. 2. Final Test: As necessary to ensure accurate, timely and complete repair work is accomplished, it is important to run a final test. This test must first demonstrate that the original fault description was remedied and that the unit is fit for use through the remainder of its useful life. After corrective testing is done, the Service Engineer must also apply a general test procedure to verify proper operation. This procedure must include a series of steps that demonstrate a unit’s adherence to product specifications for current production models and reliability stress tests such as mechanical and thermal shock to reveal intermittencies or uncovered defects. It is sometimes important to apply unique and limited stress testing to a customer described unit fault; specifically for the purpose of finding if the introduced repair is robust and fully effective. 3. Clean up: After repairs and reassembly, every unit serviced must be wiped down and cleaned with a nonconductive and nonabrasive cleanser such as a diluted Simple Green solution. 4. Wrap Up: Cables must be tie‐wrapped and outside fasteners and connectors must be secured to avoid scratches, damage, or undue loss of parts. Units after service should be wrapped or protected with a nonconductive cover. All materials returned to the service center with the unit in service must be returned to the customer at the time service is completed (e.g. manuals, cables, connectors, etc.) 25 Pelco Service Operations
Sarix IX Service Manual Test & Configuration Scripts As with the application of firmware updates or changes within Device Utility software, Scripting is supported to test and configure various camera functions. Script templates are given within Device Utility 2.0 to select and apply to cameras under test. Refer to Device Utility software users manual and instructions pertaining to the use of scripting with Sarix cameras. The following Script templates are given within Device Utility to support test & configuration: • setFriendlyName • disableMulticast • setFTPHandler • disableUserLeds • setHoldDetectTimes • enableAutoFocus • setHostName • enableAutoManualDayNightSetting • setLdapConfiguration • enableManualFocusPosition • setMTU • enableMulticast • setNtp • enableSSH • setSDCardHandler • enableUserLeds • setSmtp • getFriendlyName • setTimeZone • getHostname • setVideoOverlay • setAuthenticationMode • testFailVersion • setDayNightTransitionLevels • updateLocalUser • setDNS • setEmailHandler Actual editable script text syntax for each template is available from Device Utility. Supported device scripting availability is as indicated in the following table. 26 Pelco Service Operations
Sarix IX Service Manual SKUing & DeSKUing Background Various Sarix IX camera models are produced from a base platform hardware build. Each single unit manufactured is configured by software to unlock functions held within firmware unique to different IX models. To configure each single model for delivery, a Sarix camera is programmed as a stock keeping unit (SKU). Each model has its own unit level serial number and MAC address based upon a model identity given. Every model identity assigned takes is registered within Pelco systems for transaction and support purposes. SKUing, serialization and MAC address assignment takes place during the manufacturing process at Pelco. All Sarix IX hardware is the same from version to version except for IXE models which have a separate detachable coprocessor assembly. The Sarix coprocessor assembly supports analytic functions among more advanced Sarix IX camera models. Matched Pair Requirement The model identity code programmed within each Sarix IX/IXE camera resides within the SECPROM device on a Sarix processor assembly. That device on the processor assembly is code matched to the specific sensor and optics hardware on each Sarix IX/IXE camera. Among all models of the same identity, each camera is unique and therefore requires processor level service to accompany an optics assembly replacement. That is, whenever a processor replacement is required during the course of service, an optics assembly must accompany that change. Moreover, whenever an optics assembly replacement is required during the course of service, a processor assembly must accompany that change. This replacement requirement is necessary as a matched pair. Reference service part numbers in this service manual, or contact Pelco Service Operations for updated part number information to obtain availability and delivery details. Component level service that does not involve the sensor or programmed devices does not have this matched pair assembly replacement requirement. NOTE: Processor and optic assemblies must never get separated within inventory or elsewhere to accomplish successful service. If mismatched assemblies are replaced within a defective camera, color calibration and another functional anomalies may appear. For details on how to SKU and deSKU matched pair assemblies, or Sarix IX/IXE cameras, contact Pelco service operations for authorization, details or instructions.
27 Pelco Service Operations
Sarix IX Service Manual Replacement Parts Listing SARIX MEGAPIXEL DIGITAL CAMERA ‐ ASSY, SERVICE PARTS UNIT LEVEL SERVICE ITEMS PART NUMBER ZSPIX‐0001 ZSPIX‐0002 ZSPIX‐0003 ZSPIX‐0004 ZSPIX‐0005 ZSPIXE‐0001 ZSPIX‐0006 ZSPIX‐IXE‐0001 ZSPIX‐IXE‐0002 CN02‐0216‐1106 ZSPIX‐0010 ZSPIX‐0011 ZSPIX‐0012 ZSPIX‐0013 ZSPIX‐0014 ZSPIX‐0015 ZSPIX‐0016 ZSPIX10C ZSPIX10DN ZSPIX30C ZSPIX30DN ZSPIXE10C ZSPIXE10DN ZSPIXE20C ZSPIXE20C‐OCP ZSPIXE20C‐OS ZSPIXE20C‐OSP ZSPIXE20C‐PM ZSPIXE20C‐PO ZSPIXE20DN ZSPIXE20DN‐OCP ZSPIXE20DN‐OS ZSPIXE20DN‐OSP ZSPIXE20DN‐PM ZSPIXE20DN‐PO ZSPIXS0C ZSPIXS0DN DESCRIPTION UI COVER DOOR ASSY, COSMETIC CHANNEL COVER REAR UPPER ENCLOSURE, MACHINED AND PAINTED REAR LOWER ENCLOSURE, MACHINED AND PAINTED, WITH INSERT POWER IO PCBA CO‐PROCESSOR PCBA TRANSLATOR PCBA OE ‐ PRODUCT BOX SARIX OE ‐ LOWER FOAM PACKAGING MATERIAL G‐CONN 6 PIN,3.5MM PITCH G‐SCREW, #4‐40X5/8", PAN HD, TORX PLUS, ZINC PLATED (10IP) CONN,THT,RJ45 G‐SWITCH,SMT,RA,TACT,SPST,50MA@12V G‐SCREW, #4‐40X3/8", PAN HD, TORX PLUS, ZINC PLATED (10IP) G‐SCREW, 4‐40X.187, PAN HD, TORX PLUS, ZINC PLATED (10IP) COSMETIC HOLE PLUG, FRONT COSMETIC HOLE PLUG, REAR OE ‐ SARIX PROCESSOR/OPTICS SKU ( IX10C ) OE ‐ SARIX PROCESSOR/OPTICS SKU ( IX10DN ) OE ‐ SARIX PROCESSOR/OPTICS SKU ( IX30C ) OE ‐ SARIX PROCESSOR/OPTICS SKU ( IX30DN ) OE ‐ SARIX PROCESSOR/OPTICS SKU ( IXE10C ) OE ‐ SARIX PROCESSOR/OPTICS SKU ( IXE10DN ) OE ‐ SARIX PROCESSOR/OPTICS SKU ( IXE20C ) OE ‐ SARIX PROCESSOR/OPTICS SKU ( IXE20C‐OCP ) OE ‐ SARIX PROCESSOR/OPTICS SKU ( IXE20C‐OS ) OE ‐ SARIX PROCESSOR/OPTICS SKU ( IXE20C‐OSP ) OE ‐ SARIX PROCESSOR/OPTICS SKU ( IXE20C‐PM ) OE ‐ SARIX PROCESSOR/OPTICS SKU ( IXE20C‐PO ) OE ‐ SARIX PROCESSOR/OPTICS SKU ( IXE20DN ) OE ‐ SARIX PROCESSOR/OPTICS SKU ( IXE20DN‐OCP ) OE ‐ SARIX PROCESSOR/OPTICS SKU ( IXE20DN‐OS ) OE ‐ SARIX PROCESSOR/OPTICS SKU ( IXE20DN‐OSP ) OE ‐ SARIX PROCESSOR/OPTICS SKU ( IXE20DN‐PM ) OE ‐ SARIX PROCESSOR/OPTICS SKU ( IXE20DN‐PO ) OE ‐ SARIX PROCESSOR/OPTICS SKU ( IXS0C ) OE ‐ SARIX PROCESSOR/OPTICS SKU ( IXS0DN ) 28 Pelco Service Operations
Sarix IX Service Manual REPLACEMENT PARTS, continued SARIX MEGAPIXEL DIGITAL CAMERA ‐ POWER SUPPLY, SERVICE PARTS ZSPIX‐0005 POWER I/O PCBA PART NUMBER DESCRIPTION MFR PART NUMBER MFR DESCRIPTION REF. DESIG. CN02‐1316‐1106 G‐HDR RA FEM THT 138C 1X6 02472‐0107‐00 (DIP) PHOENIX: 1844252 P3 CN21‐4382‐0930 G‐CON,SMT,PLUG,11MMSTK,0.635MM,30X2 02469‐0029‐00 MOLEX: 53627‐0674 P4 CN22‐2101‐3101 CONN,THT,RJ45,RA,1X1,8P,INV,SHLD,2LED GRN/YEL 02474‐0155‐00 (DIP) MOLEX: 48146‐0011 J4 02204‐0823‐01 CAL‐CHIP: GMC21X7R823K100NT‐LF C45 C7‐C9,C18,C21 CP51‐0211‐0823 G‐CAP,CER,SMT,0805,X7R,100V,82NF CP51‐0216‐7106G G‐CAP CER SMT 0805 X5R 16V 10% 10UF 02204‐0106‐24 JOHANSON DIELEC: 160R15X106KV4E CP51‐0225‐2105 G‐CAP CER SMT 0805 X7R 25V 20% 1UF 02204‐0105‐02 TDK: C2012X7R1E105M C43 CP51‐0225‐2334 G‐CAP CER SMT 0805 X7R 25V 0.33UF 02204‐0334‐01 MURATA: GRM21BR71E334KA01L C30 CP51‐0251‐1152G G‐CAP CER SMT 0805 50V 5% 1500PF 02204‐0152‐00 CAL‐CHIP: GMC21CG152J50NTLF CP51‐0312‐2104G G‐CAP CER SMT 1206 X7R 100V 20% 0.1UF 02205‐0104‐00 CAL‐CHIP: GMC31X7R104M100NTLF C11,C13‐
C14,C27,C29,C56‐
C57 CP51‐0360‐7226G G‐CAP CER SMT 1206 X5R 6.3V 10% 22UF 02205‐0226‐05 CAL‐CHIP: GMC31X5R226K6R3NTLF C1,C3,C6,C119 CP51‐0524‐2472 G‐CAP CER SMT 1812 X7R 2121VDC 4700PF 02207‐0472‐00 TECATE: CMC‐
2K0/472KX1812TAPF C15,C25,C49‐
C50,C130 CP51‐2211‐2105 G‐CAP,CER,SMT,0402,X7R,10V,10%,1UF 02202‐0105‐03 CALCHIP: GMC04X7R105K10NTLF CP51‐2225‐2104 G‐CAP CER SMT 0402 X7R 25V 10% 0.1UF 02202‐0104‐11 CAL‐CHIP: GMC04X7R104K25NT‐LF C10,C46 C22,C36‐
C37,C44,C118,C120‐
C121,C124,C133‐
C135,C138 CP51‐2225‐2104 G‐CAP CER SMT 0402 X7R 25V 10% 0.1UF 02202‐0104‐11 CAL‐CHIP: GMC04X7R104K25NT‐LF 02202‐0472‐05 CAL‐CHIP: GMX04X7R72J25NTLF C48 02202‐0100‐01 PANASONIC: ECJ‐
0EC1H100D ; CALCHIP: GMC04CG100D50NTLF C55 02202‐0180‐00 CAL‐CHIP: GMC04CG180J50NT‐LF C47 CP51‐2225‐2472A CP51‐2251‐1100G CP51‐2251‐1180 G‐CAP CER SMT 0402 X7R 25V 5% 4700PF G‐CAP CER SMT 0402 NPO 50V 10PF G‐CAP CER SMT 0402 NPO 50V 5% 18PF CP51‐2251‐1270 G‐CAP CER SMT 0402 NPO 50V 27PF 02202‐0270‐00 VISHAY: VJ0402A270JXACW1BC CP51‐2251‐2102G G‐CAP CER SMT 0402 X7R 50V 10% 1000PF 02202‐0102‐01 MURATA: GRM155R71H102KA01D CP51‐2612‐2102 CP51‐2625‐2104G G‐CAP CER SMT 0603 X7R 100V 1000PF G‐CAP CER SMT 0603 X7R 25V 0.1UF 02203‐0102‐02 02203‐0104‐05 AVX: 06031C102KAT2A AVX: 06033C104JAT2A CP51‐2651‐2103G G‐CAP CER SMT 0603 X7R 50V 10% 0.01UF 02203‐0103‐01 CALCHIP: GMC10X7R103K50NTLF C19‐C20 C4‐C5,C136 C2,C42 C16‐C17,C23‐
C24,C51‐C54,C131‐
C132 CP51‐2660‐7225 G‐CAP CER SMT 0603 6.3V 10% 2.2UF 02203‐0225‐02 MURATA: GRM185R60J225KE26D CP51‐3112‐2475 G‐CAP CER SMT 2220 X7R 4.7UF 100V 02207‐0475‐00 TDK: C5750X7R2A475M C28 CP51‐3116‐2476 G‐CAP CER SMT 2220 X7R 16V 20% 47UF 02207‐0476‐00 TDK: C5750X7R1C476M C33‐C34 CP54‐1812‐0106 G‐CAP,SMT,6.3X8,ELEC,100V,20%,10UF 02251‐0106‐05 NIC: NACEW100M100V6.3XTR13F 29 Pelco Service Operations
Sarix IX Service Manual REPLACEMENT PARTS, continued SARIX MEGAPIXEL DIGITAL CAMERA ‐ POWER SUPPLY, SERVICE PARTS ZSPIX‐0005 POWER I/O PCBA PART NUMBER DESCRIPTION MFR PART NUMBER MFR DESCRIPTION REF. DESIG. CP55‐0911‐0157 G‐CAP,SMT,TANT,3528,10V,20%,150UF 02213‐0157‐01 AVX: TLJB157M010R0500 C31‐C32 CP59‐2551‐0227G G‐CAP,SMT,10X10.2,50V,220UF 02251‐0227‐05 ILLINOIS CAP: 227AXZ050M C40‐C41,C137 DO50‐0500‐0914G G‐DIODE,SWITCHING,SMT,SOT‐23,MMBD914LT1 02001‐0044‐00 DIODE INC: MMBD914‐7‐F D9 DO51‐0900‐1100G G‐DIODE,SMT,SMB,1A,MBRS1100T3,SCH BARR RECT 02003‐0082‐00 ON SEMI: MBRS1100T3G D1,D3‐D5,D11 DO51‐3000‐7000 G‐DIODE,SMT,SMA,RECTIFIER,1A,200V 02004‐0016‐01 VISHAY: ES1D D6 DO53‐0500‐5234 G‐DIODE,ZENER,SMT,SOT23,6.3V 02002‐0054‐00 DIODES INC: MMBZ5234B D10 DO53‐0712‐5218 G‐DIODE,ZENER,SMT,SOD‐123,18V 02002‐0053‐00 DIODES INC: BZT52C18 D7‐D8 DO59‐1905‐0040 G‐TVS,SMT,DO‐214AA,40V,SMBJ40A,BI‐
DIRECTIONAL 02009‐0024‐00 VISHAY: SMBJ40A‐CAE3 D15 DO59‐2500‐0001G G‐TVS,SMT,SOD323,5V,350W,BI‐DIRECT. 02009‐0023‐00 PROTEK: PSD05C‐LF D2,D12 Y4 FD01‐2321‐2505 G‐XTAL,QUARTZ,SMT,ABM8,25.000MHZ 02042‐0133‐00 ABRACON: ABM8‐
25.000MHZ‐16B‐1‐U‐T FS01‐1102‐2501 G‐FUSE,SMT,6125,SLO‐BLO,2.5A,125V 02401‐0039‐00 COOPER BUSSMANN: TR1/6125TD2.5‐R IC11‐0908‐2712 G‐IC,SMT,SOIC8,ISO ERR AMP,FOD2712 02051‐0084‐00 FAIRCHILD: FOD2712AR2 U6 IC28‐4016‐1602 G‐IC,SMT,SOP16,ETHERNET CONTROLLER 02068‐0035‐00 AKROS SILICON: AS1602 U3 IC32‐3605‐0014 G‐IC,SMT,SOT353,SCHMITT‐TRIG INVTR TI: 74LVC1G14GW‐G IC47‐4820‐1113 G‐IC,SMT,QFN20,13W PD W/ DC‐DC CONVERTER 02059‐0133‐00 AKROS SILICON: AS1113 U5 IC69‐2705‐0017 G‐IC,SMT,SOT23‐5,SNGL SCHM‐TRIG BUF 02071‐0079‐00 TI: SN74AUC1G17DBVR IC79‐4840‐5023 G‐IC,SMT,QFN,7V,2A,PWR‐MGMT 02059‐0130‐00 TI: TPS65023RSBR U1 IC86‐2706‐0145 G‐IC,SMT,SOT23‐6,BUS TRANSCEIVER 02071‐0074‐00 TI: SN74AVC1T45DBVR U8 IC86‐6432‐5241 G‐IC,SMT,MLP5_32,10/100 ETH MINI PHY TRANSCVR 02072‐0011‐00 BROADCOM: BCM5241A1IMLG U7 RL04‐0610‐_660 G‐RELAY,SMT,SOP4,60V,600mA,OPTO 02391‐0000‐00 CLARE: CPC1018N‐TR K1 RS50‐0119‐1000G G‐RES SMT 0805 1/10W 1% 100 OHM 02114‐1000‐00 CAL‐CHIP: RM10F1000CTLF R21 RS50‐0122‐068XG G‐RES SMT 0805 1/8W 5% 6.8 OHM 02154‐068Z‐00 CAL‐CHIP: RM10J6R8CTLF RS50‐0414‐250Z G‐RES SMT 2010 1/2W 1% 0.25 OHM 02116‐250X‐00 VISHAY: WSL2010R2500FEA R31 RS50‐1811‐0000G G‐RES SMT 0402 1/16W 1% 0 OHM 02112‐0000‐00 CALCHIP: RM04F0000CTLF RS50‐1811‐0000G G‐RES SMT 0402 1/16W 1% 0 OHM 02112‐0000‐00 CALCHIP: RM04F0000CTLF R1,R5‐R6,R13,R33,R36 RS50‐1811‐1000G G‐RES SMT 0402 1/16W 1% 100 OHM 02112‐1000‐01 CAL‐CHIP: RM04F1000CTLF R44,R69 RS50‐1811‐1001G G‐RES SMT 0402 1/16W 1% 1.00K 02112‐1001‐01 CAL‐CHIP: RM04F1001CTLF RS50‐1811‐1001G G‐RES SMT 0402 1/16W 1% 1.00K 02112‐1001‐01 CAL‐CHIP: RM04F1001CTLF R18‐R20,R63 RS50‐1811‐1002G G‐RES SMT 0402 1/16W 1% 10.0K 02112‐1002‐01 CALCHIP: RM04F1002CTLF R2‐R4,R7‐R8,R11‐
R12,R14,R24,R29,R40,R70
RS50‐1811‐1002G G‐RES SMT 0402 1/16W 1% 10.0K 02112‐1002‐01 CALCHIP: RM04F1002CTLF RS50‐1811‐1002G G‐RES SMT 0402 1/16W 1% 10.0K 02112‐1002‐01 CALCHIP: RM04F1002CTLF RS50‐1811‐1003G G‐RES SMT 0402 1/16W 1% 100K 02112‐1003‐01 CALCHIP: RM04F1003CTLF R41,R55‐R57,R66‐R68 RS50‐1811‐100XG G‐RES SMT 0402 1/16W 1% 10.0 OHM 02112‐100Z‐00 CAL‐CHIP: RM0410R0CTLF R15,R52 RS50‐1811‐1072 G‐RES SMT 0402 1/16W 1% 10.7K 02112‐1072‐00 CAL‐CHIP: RM04F1072CTLF R27 RS50‐1811‐1211 G‐RES SMT 0402 1/16W 1% 1.21K 02112‐1211‐00 PANASONIC: ERJ‐2RKF1211X R32 RS50‐1811‐1241 G‐RES SMT 0402 1/16W 1% 1.24K 02112‐1241‐00 PANASONIC: ERJ‐2RKF1241X R59 RS50‐1811‐1372 G‐RES SMT 0402 1/16W 1% 13.7K 02112‐1372‐00 CAL‐CHIP: RM04F1372CT R46 RS50‐1811‐2001G G‐RES SMT 0402 1/16W 1% 2.00K 02112‐2001‐01 CALCHIP: RM04F2001CTLF 30 Pelco Service Operations
Sarix IX Service Manual REPLACEMENT PARTS, continued SARIX MEGAPIXEL DIGITAL CAMERA ‐ POWER SUPPLY, SERVICE PARTS ZSPIX‐0005 POWER I/O PCBA PART NUMBER RS50‐1811‐2200G DESCRIPTION G‐RES SMT 0402 1/16W 1% 220 OHM MFR PART NUMBER MFR DESCRIPTION 02112‐2200‐00 VISHAY: CRCW0402220RFKED REF. DESIG. RS50‐1811‐2201 G‐RES SMT 0402 1/16W 1% 2.20K 02112‐2201‐01 CAL‐CHIP: RM04F2201CT‐LF R17,R22‐R23,R73 R10,R16,R47‐
R51,R106 RS50‐1811‐2551 G‐RES,SMT,0402,1/16W,1%,2.55K 02112‐2551‐00 CAL‐CHIP: RM04F2551CT‐LF R34 RS50‐1811‐2672 G‐RES SMT 0402 1/16W 1% 26.7K 02112‐2672‐00 CAL‐CHIP: RM04F2672CT R42 RS50‐1811‐330XG G‐RES SMT 0402 1/16W 1% 33.0 OHM 02112‐330Z‐00 ROHM: MCR01MZSF33R2 R701‐R702 RS50‐1811‐3482 G‐RES SMT 0402 1/16W 1% 34.8K 02112‐3482‐00 CAL‐CHIP: RM04F3482CT‐LF RS50‐1811‐4322G G‐RES SMT 0402 1/16W 1% 43.2K 02112‐4322‐00 CAL‐CHIP: RM04F4322CTLF R35 RS50‐1811‐4991 G‐RES SMT 0402 1/16W 1% 4.99K 02112‐4991‐00 CAL‐CHIP: RM04F4991CTLF R43 R58,R60‐R62 RS50‐1811‐499XG G‐RES SMT 0402 1/16W 1% 49.9 OHM 02112‐499Z‐00 VISHAY: CRCW040249R9FKEAE3 RS50‐1811‐750XG G‐RES SMT 0402 1/16W 1% 75.0 OHM 02112‐750Z‐00 CAL‐CHIP: RM04F75R0CTLF R25‐R26,R64‐R65 RS50‐1811‐9092 G‐RES SMT 0402 1/16W 1% 90.9K 02112‐9092‐01 CAL‐CHIP: RM04F9092CTLF R39,R53 TP00‐0102‐2001 G‐TEST POINT,PCMNT,THT,LOOPED SILVER KEYSTONE: 5021 TR01‐6301‐0114 G‐TRANS,SMT,SOT323,NPN,W/RES,0.1A,50V 02014‐0097‐00 PHILLIPS: PDTC114TU Q1 TR03‐5101‐0335G G‐TRANS,SMT,SOT23,NDS335N,FET,20V,N‐CH 02013‐0117‐00 FAIRCHILD: NDS335N_NL TR04‐5701‐2582 G‐TRANS SMT SO‐8 N‐CH MOSFET FDS2582 FAIRCHILD: FDS2582 Q3 Q2 TR04‐5701‐7807 G‐TRANS,SMT,SO‐8,MOSFET,N‐CH 02013‐0116‐00 INTERNATIONAL RECTIFIER: IRF7807ZTRPBF XF02‐0102‐0008 G‐XFMR,SMT,PWR,FLYBACK,SYNC,5V 02341‐0067‐00 COILCRAFT: GA3305AL T2 G‐IND,PWR,SMT,4.5MMX4MM,10UH,1.15A 02349‐0044‐00 02346‐0217‐00 PULSE: H2019NL ABRACON: ASPI‐0403‐100 T1 L11 XF52‐0600‐2205 G‐IND,PWR,SMT,5MMX5MM,2.2UH,2.04A 02346‐0216‐00 ABRACON: ASPI‐0428S‐2R2‐
M‐T L1‐L3 XF55‐0100‐0502 G‐FERR BEAD,SMT,603,22@100M,500MA 02313‐0031‐00 NYRATAL BKN18BB220SB1D LF1‐LF4 XF55‐0100‐0722 G‐FERRITE,SMT,0603,0.7A,220@100M 02313‐0034‐00 STEWARD: LI0603G221R‐10 L4‐L8,L10,L15,L17 XF55‐0130‐5011 G‐FERRITE,SMT,FER_3312,110@100MHZ 02343‐0025‐00 STEWARD: CM3312R111R‐10 L9,L13‐L14 XF02‐0402‐0001G XF51‐0500‐1006 G‐XFMR,SMT,XFRM_‐050_16P,10/100BASE‐T SINGLE PORT 31 Pelco Service Operations
Sarix IX Service Manual Semiconductor Identification SARIX MEGAPIXEL DIGITAL CAMERA ‐ POWER SUPPLY, SERVICE PARTS These integrated circuit devices are recognized as having an involvement in service over time. As necessary to support these device replacements, refer to the appropriate Intersil tech notes for proper reflow, removal and replacement technique, materials and methodology. Service involving this product requires surface mount device (SMD) rework capabilities to include the necessary equipment, chemicals and process materials. For additional assistance, contact Pelco service operations for guidance as needed. Akros Silicon IC47‐4820‐1113 G‐IC,SMT,QFN20,13W PD W/DC‐DC CONVERTER 32 Pelco Service Operations
Sarix IX Service Manual SEMICONDUCTOR IDENTIFICATION, continued Vishay MOSFET TR04‐5701‐7807 TRANS, SMT, SO‐8, MOSFET, N‐CHANNEL 33 Pelco Service Operations
Sarix IX Service Manual Assembly Drawings ASSY, BOX CAMERA 34 Pelco Service Operations
Sarix IX Service Manual ASSEMBLY DRAWINGS, continued ASSY, BOX CAMERA 35 Pelco Service Operations
Sarix IX Service Manual ASSEMBLY DRAWINGS, continued ASSY, BOX CAMERA 36 Pelco Service Operations
Sarix IX Service Manual ASSEMBLY DRAWINGS, continued ASSY, BOX CAMERA 37 Pelco Service Operations
Sarix IX Service Manual Schematic Drawings POWER I/O BOARD ‐ 24VAC 38 Pelco Service Operations
Sarix IX Service Manual SCHEMATIC DRAWINGS, continued POWER I/O BOARD ‐ ETHERNET 39 Pelco Service Operations
Sarix IX Service Manual SCHEMATIC DRAWINGS, continued POWER I/O BOARD ‐ POE AND REGULATION 40 Pelco Service Operations
Sarix IX Service Manual SCHEMATIC DRAWINGS, continued POWER I/O BOARD ‐ SECONDARY REGULATION 41 Pelco Service Operations
Sarix IX Service Manual SCHEMATIC DRAWINGS, continued POWER I/O BOARD ‐ ALARMS / FILTERING 42 Pelco Service Operations
Sarix IX Service Manual SCHEMATIC DRAWINGS, continued POWER I/O BOARD ‐ ETHERNET PHY 43 Pelco Service Operations
Sarix IX Service Manual SCHEMATIC DRAWINGS, continued POWER I/O BOARD ‐ PROCESSOR INTERFACE 44 Pelco Service Operations
Sarix IX Service Manual SCHEMATIC DRAWINGS, continued PROCESSOR BOARD ‐ BLOCK DIAGRAM 45 Pelco Service Operations
Sarix IX Service Manual SCHEMATIC DRAWINGS, continued PROCESSOR BOARD ‐ IMAGE INPUT 46 Pelco Service Operations
Sarix IX Service Manual SCHEMATIC DRAWINGS, continued PROCESSOR BOARD ‐ DDR2 DRAM 47 Pelco Service Operations
Sarix IX Service Manual SCHEMATIC DRAWINGS, continued PROCESSOR BOARD ‐ FLASH MEMORY 48 Pelco Service Operations
Sarix IX Service Manual SCHEMATIC DRAWINGS, continued PROCESSOR BOARD ‐ PERIPHERAL ASSEMBLY INTERFACES 49 Pelco Service Operations
Sarix IX Service Manual SCHEMATIC DRAWINGS, continued PROCESSOR BOARD ‐ USB HOST 50 Pelco Service Operations
Sarix IX Service Manual SCHEMATIC DRAWINGS, continued PROCESSOR BOARD ‐ CLOCKS & RESET 51 Pelco Service Operations
Sarix IX Service Manual SCHEMATIC DRAWINGS, continued PROCESSOR BOARD ‐ MINI‐SD, SET UP VID 52 Pelco Service Operations
Sarix IX Service Manual SCHEMATIC DRAWINGS, continued PROCESSOR BOARD ‐ DAVINCI POWER 53 Pelco Service Operations
Sarix IX Service Manual SCHEMATIC DRAWINGS, continued PROCESSOR BOARD ‐ ETHERNET, GPIO, I2C, SPI 54 Pelco Service Operations
Sarix IX Service Manual SCHEMATIC DRAWINGS, continued MECH UI ‐ USER INTERFACE | FLEX 55 Pelco Service Operations
Sarix IX Service Manual SCHEMATIC DRAWINGS, continued MECH UI ‐ AUTO BACKFOCUS, IRIS, FLEX FINGERS 56 Pelco Service Operations
Sarix IX Service Manual SCHEMATIC DRAWINGS, continued MECH UI ‐ LEDS & BUTTONS 57 Pelco Service Operations
Sarix IX Service Manual SCHEMATIC DRAWINGS, continued MECH UI ‐ USB, SERVICE JACK 58 Pelco Service Operations
Sarix IX Service Manual SCHEMATIC DRAWINGS, continued TRANSLATOR BOARD ‐ SENSOR BOARD INTERFACE 59 Pelco Service Operations
Sarix IX Service Manual SCHEMATIC DRAWINGS, continued TRANSLATOR BOARD ‐ SUPPLY CONDITIONING 60 Pelco Service Operations
Sarix IX Service Manual SCHEMATIC DRAWINGS, continued TRANSLATOR BOARD ‐ SUPPLY CONDITIONING 61 Pelco Service Operations
Sarix IX Service Manual SCHEMATIC DRAWINGS, continued TRANSLATOR BOARD ‐ BUFFERS 62 Pelco Service Operations
Sarix IX Service Manual SCHEMATIC DRAWINGS, continued TRANSLATOR BOARD ‐ INPUT, OUTPUT CONNECTIONS 63 Pelco Service Operations
Sarix IX Service Manual SCHEMATIC DRAWINGS, continued SENSOR BOARD ‐ SENSOR 64 Pelco Service Operations
Sarix IX Service Manual SCHEMATIC DRAWINGS, continued SENSOR BOARD ‐ CLOCK, POWER, TEMPERATURE 65 Pelco Service Operations
Sarix IX Service Manual SCHEMATIC DRAWINGS, continued SENSOR BOARD ‐ TRANSLATOR BOARD INTERFACE 66 Pelco Service Operations
Sarix IX Service Manual Printed Circuit Board Assembly (PCBA) Drawings POWER I/O BOARD ‐ TOP | BOTTOM 67 Pelco Service Operations
Sarix IX Service Manual PCBA DRAWINGS, continued PROCESSOR BOARD ‐ TOP | BOTTOM 68 Pelco Service Operations
Sarix IX Service Manual 69 Pelco Service Operations 3500 Pelco Way Clovis CA 93612 UNITED STATES Tel: +1‐800‐289‐9100 or +1‐559‐292‐1981 Fax: +1‐800‐289‐9707 or +1‐559‐348‐1120 Pelco, the Pelco logo, and specific Pelco model series names are registered trademarks of Pelco [email protected]